
Previous Chapter ... ... Next Chapter
The planche requires an unfathomable amount of straight-arm pushing strength. It seems everyone doing bodyweight training is striving for this skill, yet those who can perform this skill well are few and far between.
Many internet videos now feature this skill and suggest methods on the training towards it. However, in most every case, we see an extremely arched spine and slightly bent arms. These form errors do more than make it look less appealing: they actually make the skill much easier to perform strength-wise and sacrifice over all strength gains. Consequentially, we will hear of people obtaining a "planche" within six months to a year.
If an authentic planche is one of our primary goals, we want to avoid these form errors as much as possible, because we are only cheating ourselves of proper strength development. While the road may be Tonger, we will be rewarded with a cleaner looking body position and much more strength. Indeed the. additional strength will have great transference to the other bodyweight strength skills we are striving towards.
Turning hands to the side for this skill is suggested as it will best translate towards other progressions, such as anything on the parallel bars. The hands forward position does make the skill a bit easier because of the leverage the wrists can provide by moving the base of support forward. This, however, requires tremendous wrist conditioning to avoid wrist pain. And again, while making the skill easier allows you to obtain the full skill sooner, the real pursuit is strength.
Working towards the planche will get frustrating simply because it takes so long to make progress. Remember, we do not know the strength and condition of others who say they were able to achieve these positions in a short amount of time. They could have 5-10+ years of other strength training behind them which speeds up progress. The key to training planche is consistency, even in the supplemental work; do not expect to excel if you keep changing your routine setup.
Shoulders should be tight and active, and the scapulae should be protracted as far as possible. This is done by pressing deep into the ground with your hands, arms, and shoulders as one unit, resisting all of the downward force on your body. This active position is essential to keep the shoulder safe from
impingement, to allow better leverage, and to align body positions correctly. This same position is used in many other movements and holds, such as
Never lose sight of active shoulders no matter how far you progress in the planche.

The frog stand is less of a strength skill and more of a balance skill. That is not to say it does not require any strength, but most of the focus is on getting a feel for the position.
Grip the ground or parallettes firmly and, with bent arms, lean forward. Slowly put one knee at a time on the shelf created by the slightly bent elbows. Onee you can balance like that, lean forward until shoulders and hips are level.
As with all the planche skills from here on out, we should prepare our bodies to feel the "I am going to face plant!" sensation. This is totally normal and a big part of moving up from progression to progression. We should fight this sensation as much as possible with our shoulders. Aside from the Frog Stand, we do not by bend the elbows because (1) we do not want to build the bad habit of bending the elbows when we feel off balance, and (2) we want to build the core of all pressing ability: straight-arm pressing strength through the shoulders.
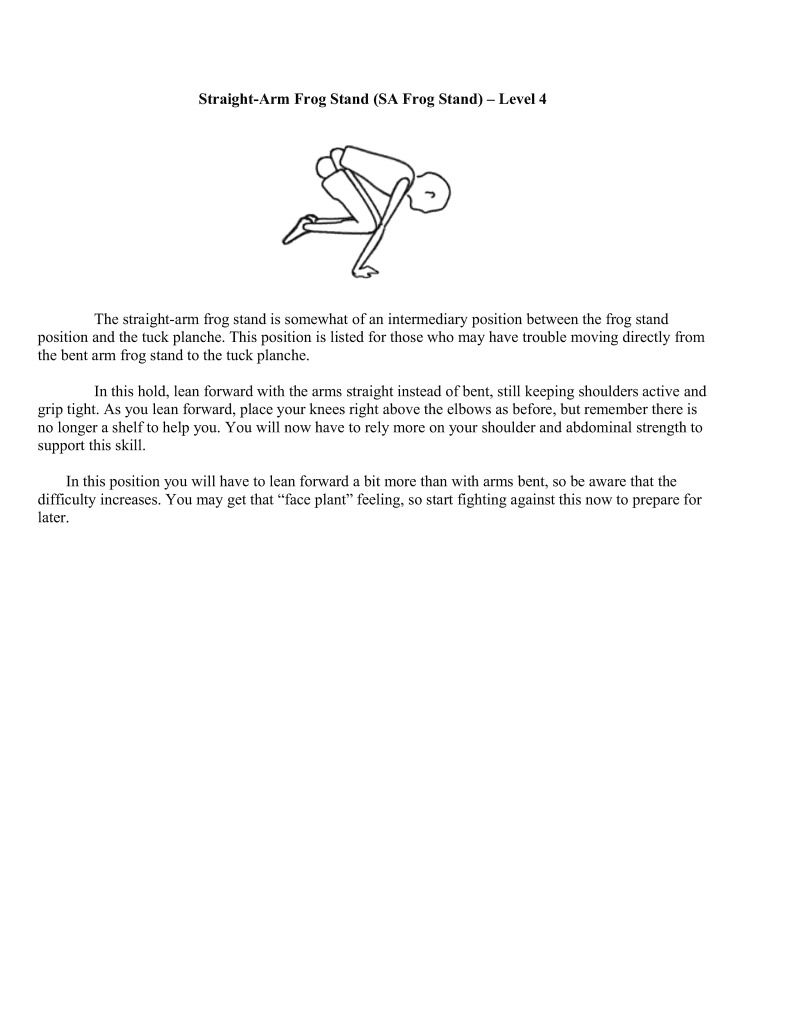
The straight-arm frog stand is somewhat of an intermediary position between the frog stand position and the tuck planche. This position is listed for those who may have trouble moving directly from the bent arm frog stand to the tuck planche.
In this hold, lean forward with the arms straight instead of bent, still keeping shoulders active and grip tight. As you lean forward, place your knees right above the elbows as before, but remember thert 1o longer a shelf to help you. You will now have to rely more on your shoulder and abdominal strength to support this skill
In this position you will have to lean forward a bit more than with arms bent, so be aware that the difficulty increases. You may get that "face plant" feeling, so start fighting against this now to prepare for later.
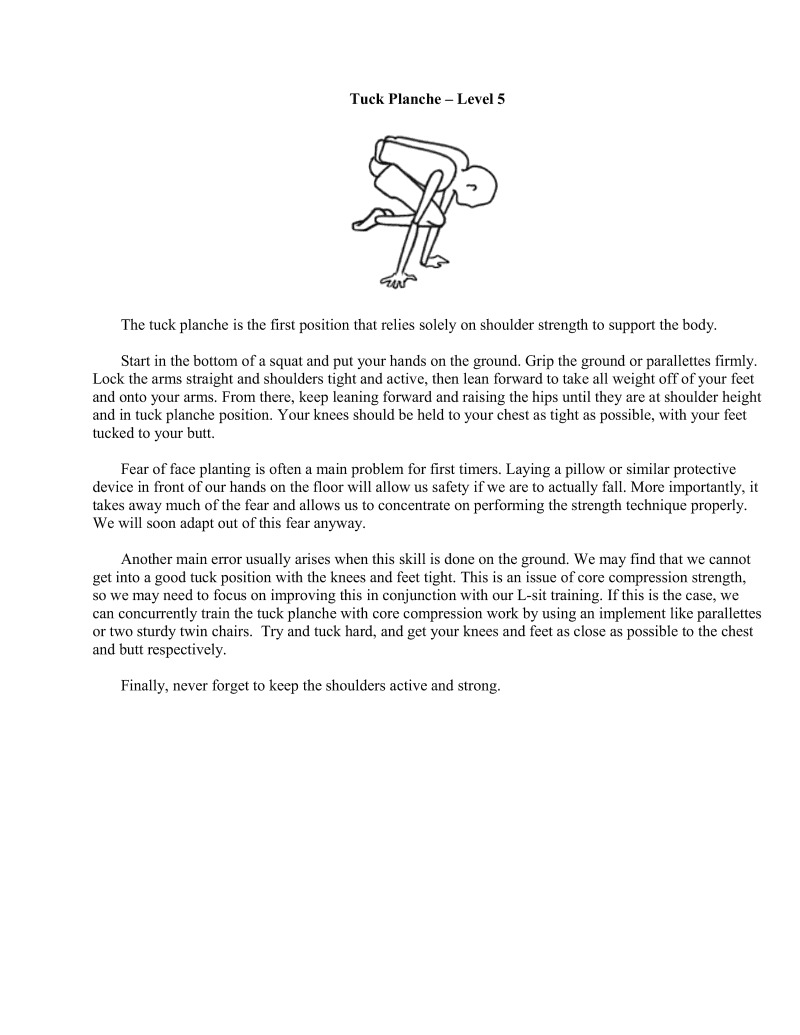
The tuck planche is the first position that relies solely on shoulder strength to support the body.
Start in the bottom of squat and put your hands on the ground. Grip the ground or parallettes firmly. Lock the arms straight and shoulders tight and active, then lean forward to take all weight off of your feet and onto your arms. From there, keep leaning forward and raising the hips until they are at shoulder height and in tuck planche position. Your knees should be held to your chest is tight as possible, with your feet tucked to your butt.
Fear of face planting is often a main problem for first timers. Laying a pillow or similar protective device in front of our hands on the floor will allow us safety if we are to actually fall. More importantly, it takes away much of the fear and allows us to concentrate on performing the strength technique properly. We will soon adapt out of this fear anyway.
Another main error usually arises when this skill is done on the ground. We may find that we cannot getinto a good tuck position with the knces and feet tight. This is an g of core compression strength, so we may need to focus on improving this in conjunction with our L-sit training. If this is the case, we
can concurrently train the tuck planche with core compression work by using an implement like parallettes or two sturdy twin chairs. Try and tuck hard, and get your knees and feet as close as possible to the chest and butt respectively.
Finally, never forget to keep the shoulders active and strong.
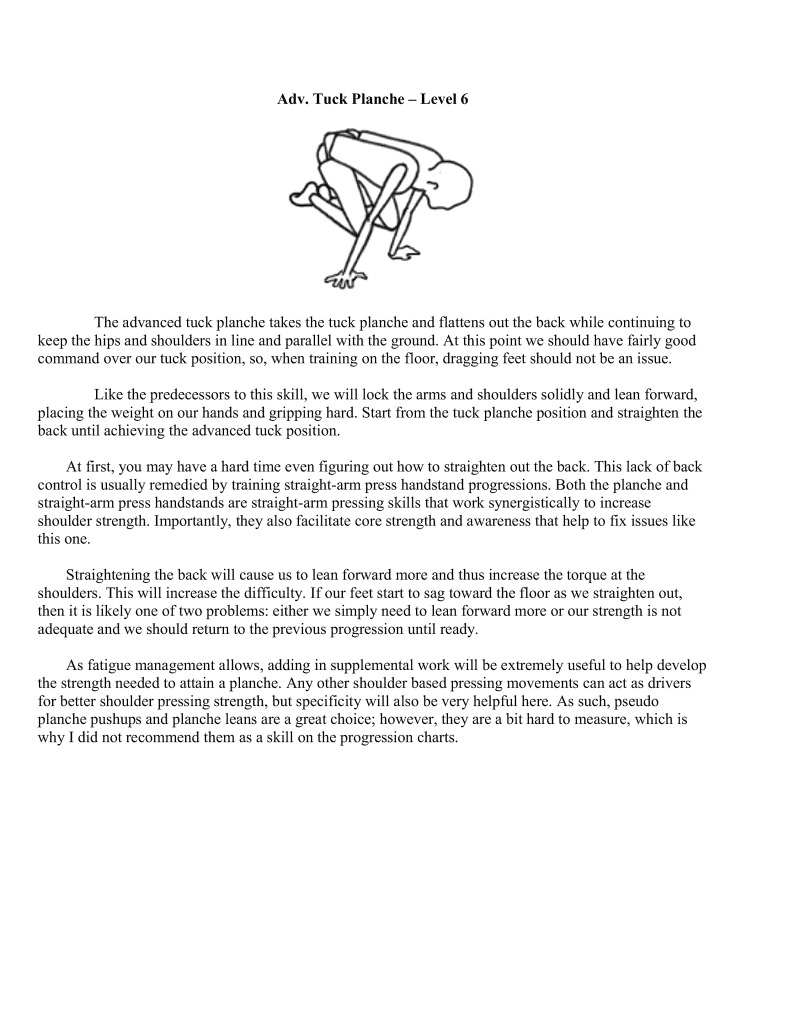
The advanced tuck planche takes the tuck planche and flatiens out the back while continuing to keep the hips and shoulders in line and parallel with the ground. At this point we should have fairly good command over our tuck position, so, when training on the floor, dragging feet should not be an issue.
Like the predecessors to this skill, we will lock the arms and shoulders solidly and lean forward, placing the weight on our hands and gripping hard. Start from the tuck planche position and straighten the back until achieving the advanced tuck position.
Atfirst, you may have a hard time even figuring out how to straighten out the back. This lack of back control is usually remedicd by training straight-arm press handstand progressions. Both the planche and straight-arm press handstands are straight-arm pressing skills that work synergistically to increase shoulder strength. Importantly, they also facilitate core strength and awareness that help to fix issues like this one.
Straightening the back will cause us to lean forward more and thus increase the torque at the shoulders. This will increase the difficulty. If our feet start to sag toward the floor as we straighten out, then it is likely one of two problems: either we simply need to lean forward more or our strength is not adequate and we should return to the previous progression until ready.
As fatigue management allows, adding in supplemental work will be extremely useful to help develop the strength needed to attain a planche. Any other shoulder based pressing movements can act as drivers for better shoulder pressing strength, but specificity will also be very helpful here. As such, pseudo planche pushups and planche leans are a great choice; however, they are a bit hard to measure, whi why I did not recommend them as a skill on the progression charts.
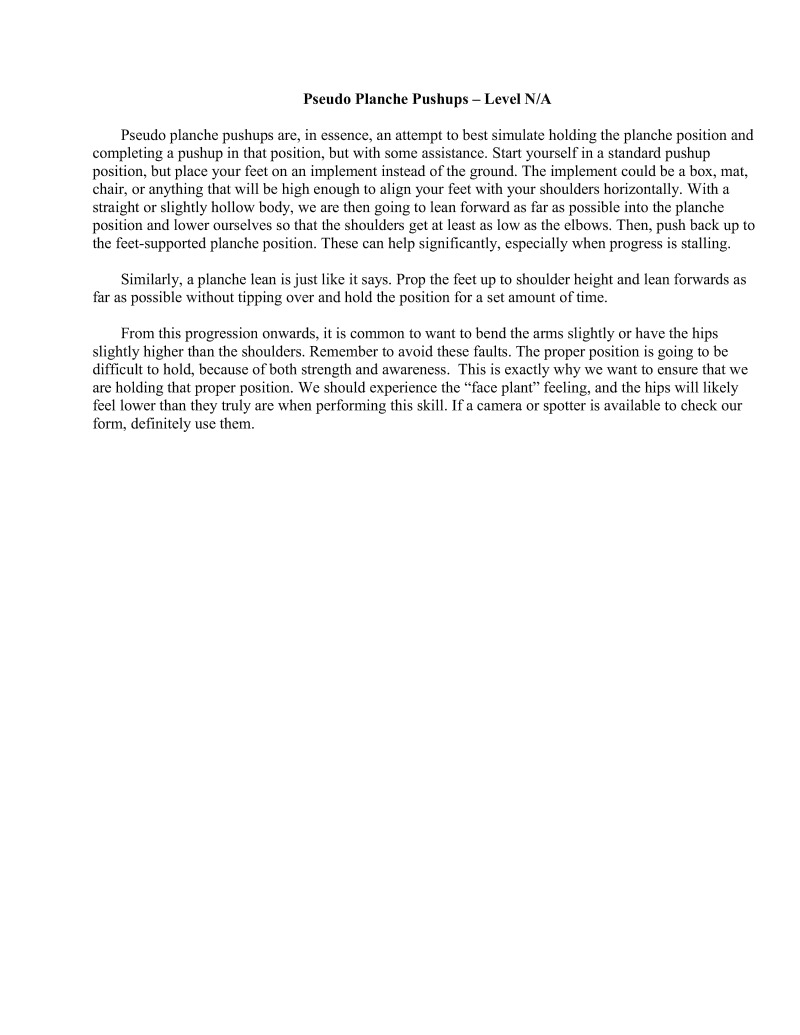
Pseudo planche pushups are, in essence, an attempt to best simulate holding the planche position and completing a pushup in that position, but with some assistance. Start yourself in a standard pushup position, but place your feet on an implement instead of the ground. The implement could be a box, mat, chair, or anything that will be high enough to align your feet with your shoulders horizontally. With a straight or slightly hollow body, we arc then going to lean forward as far as possible into the planche position and lower ourselves so that the shoulders get at least as low as the elbows. Then, push back up to the feet-supported planche position. These can help significantly, especially when progress is stalling
Similarly, a planche lean is just like it says. Prop the feet up to shoulder height and lean forwards as far as possible without tipping over and hold the position for a set amount of time.
From this progression onwards, it is common to want to bend the arms slightly or have the hips slightly higher than the shoulders. Remember to avoid these faults. The proper position is going to be difficult to hold, because of both strength and awareness. This is exactly why we want to ensure that we are holding that proper position. We should experience the "face plant" feeling, and the hips will likely feel lower than they truly are when performing this skill. If a camera or spoter is available to check our form, definitely use them.
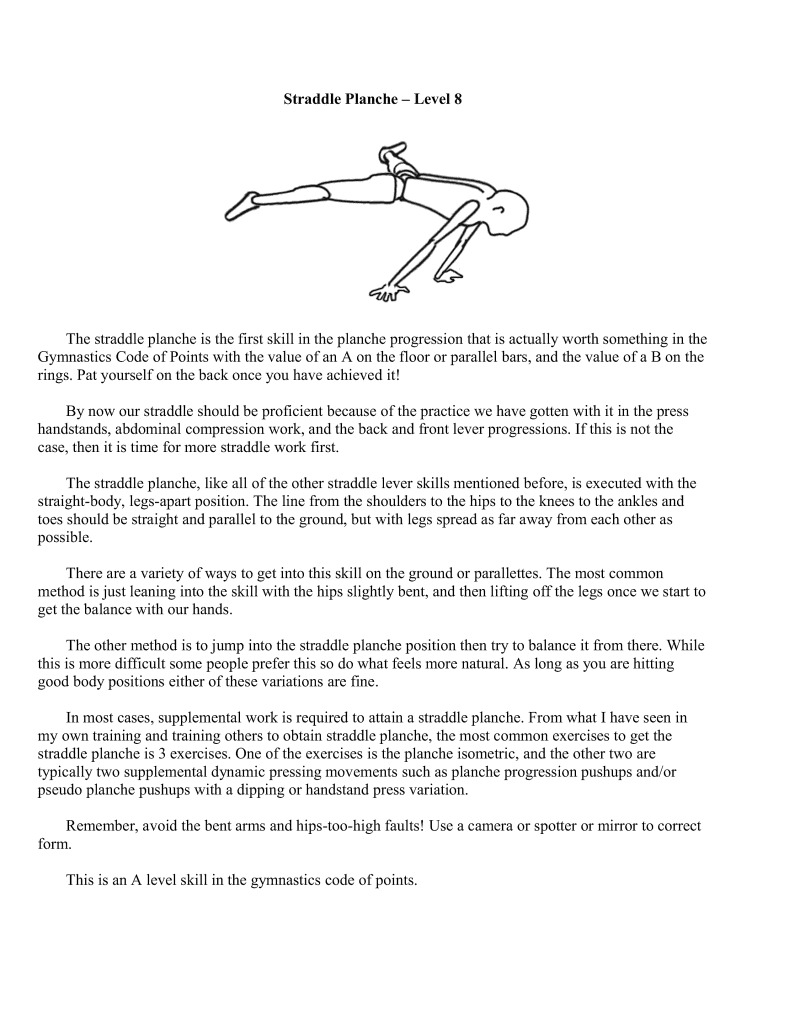
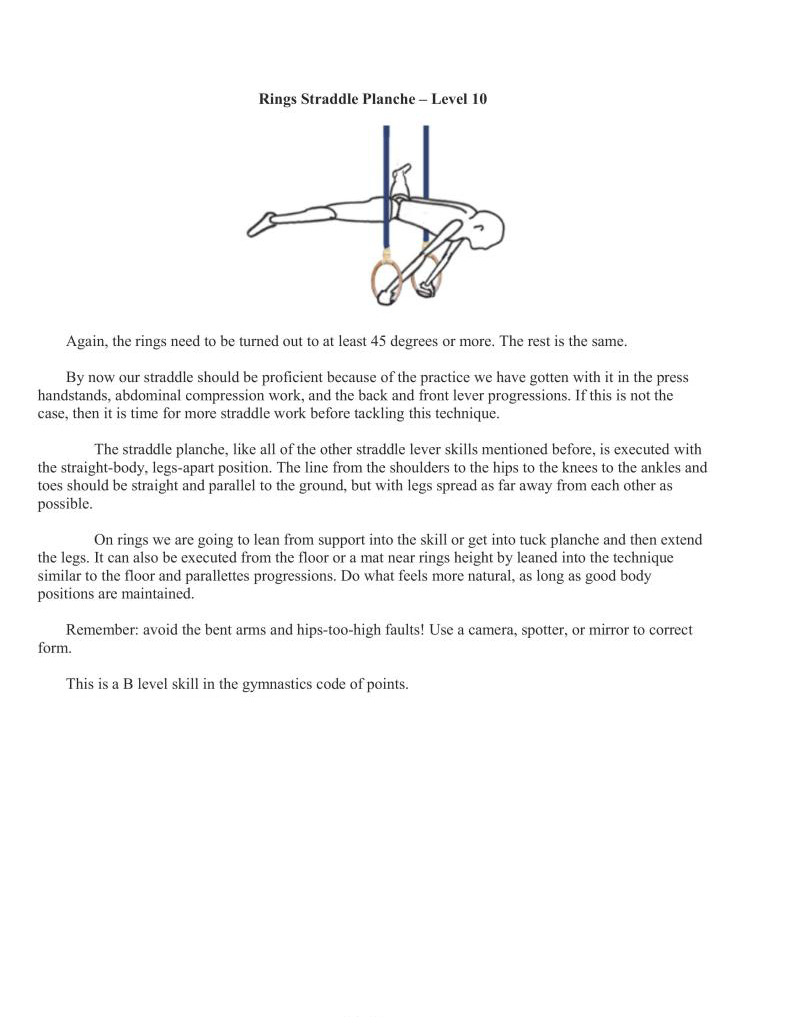
The straddle planche is the first skill in the planche progression that is actually worth something in the Gymnastics Code of Points with the value of an A on the floor or parallel bars, and the value of a B on the rings. Pat yourself on the back once you have achieved it!
By now our straddle should be proficient because of the practice we have gotten with it in the press handstands, abdominal compression work, and the back and front lever progressions. If this is not the case, then itis
The straddle planche, like all of the other straddle lever skills mentioned before, is executed with the straight-body, legs-apart position. The line from the shoulders to the hips to the knees to the ankles and toes should be straight and parallel to the ground, but with legs spread as far away from each other as possible.
There are a variety of ways to get into this skill on the ground or parallettes. The most common method is just leaning into the skill with the hips slightly bent, and then lifting off the legs once we start to gt the balance with our hands.
The other method is to jump into the straddle planche position then try to balance it from there. While this is more difficult some people prefer this so do what feels more natural. As long as you are hitting good body positions either of these variations are fine.
In most cases, supplemental work is required to attain a straddle planche. From what I have seen in my own training and training others to obtain straddle planche, the most common exercises to get the straddle planche is 3 exercises. One of the exercises is the planche isometric, and the other two are typically two supplemental dynamic pressing movements such as planche progression pushups and/or pseudo planche pushups with a dipping or handstand press variation
Remember, avoid the bent arms and hips-too-high faults! Use a camera or spotter or mirror to correct form.
This is an A level skill in the gymnastics code of points.
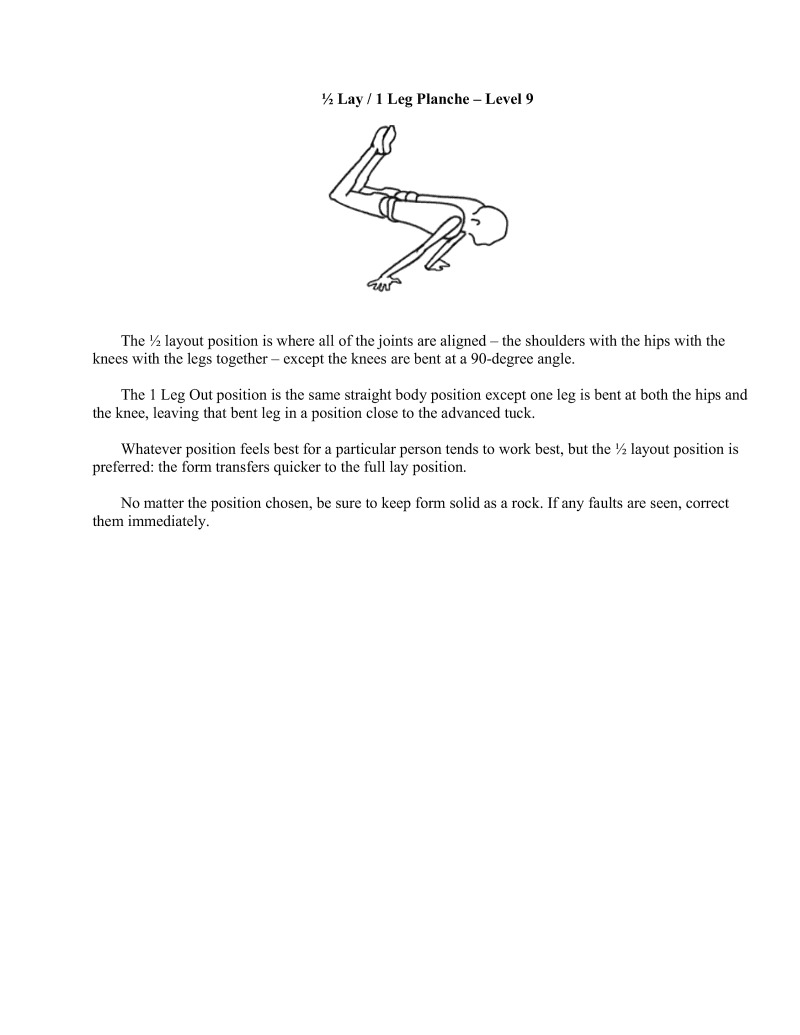
The % layout position is where all of the joints are aligned — the shoulders with the hips with the knees with the legs together — except the knees are bent at a 90-degree angle.
The 1 Leg Out position is the same straight body position except one leg is bent at both the hips and the knee, leaving that bent leg in a position close to the advanced tuck
Whatever position feels best for a particular person tends to work best, but the % layout position is preferred: the form transfers quicker to the full lay position.
No mater the position chosen, be sure to keep form solid as a rock. If any faults are seen, correct mediately.
thes
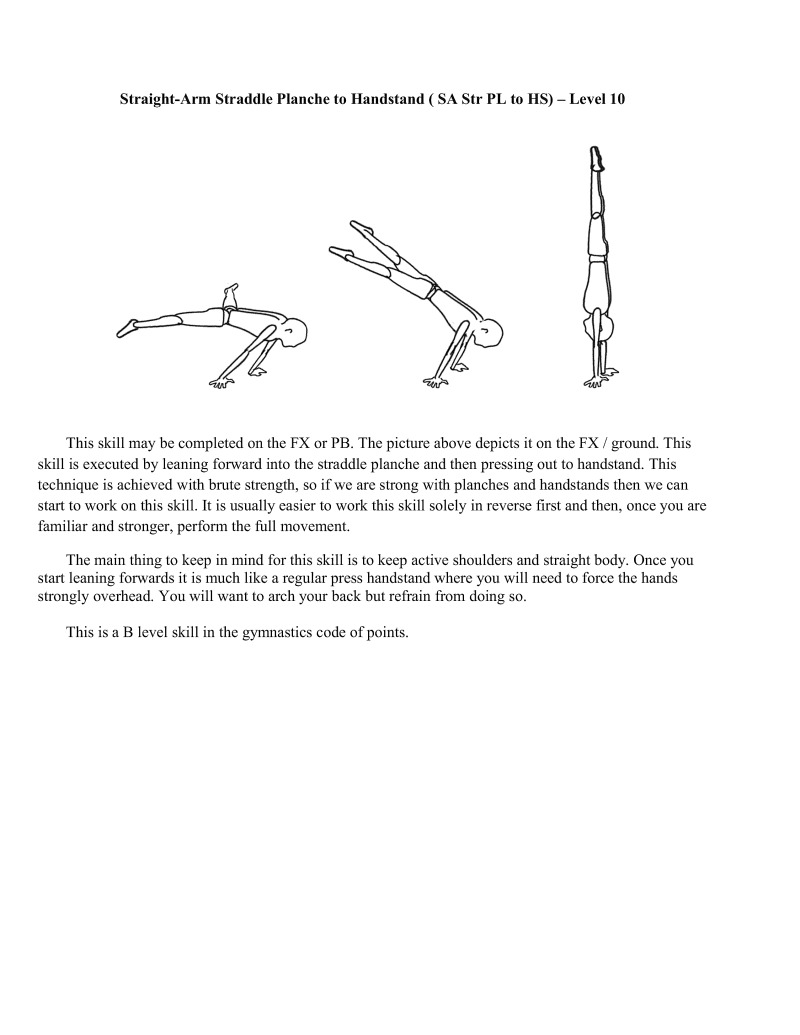
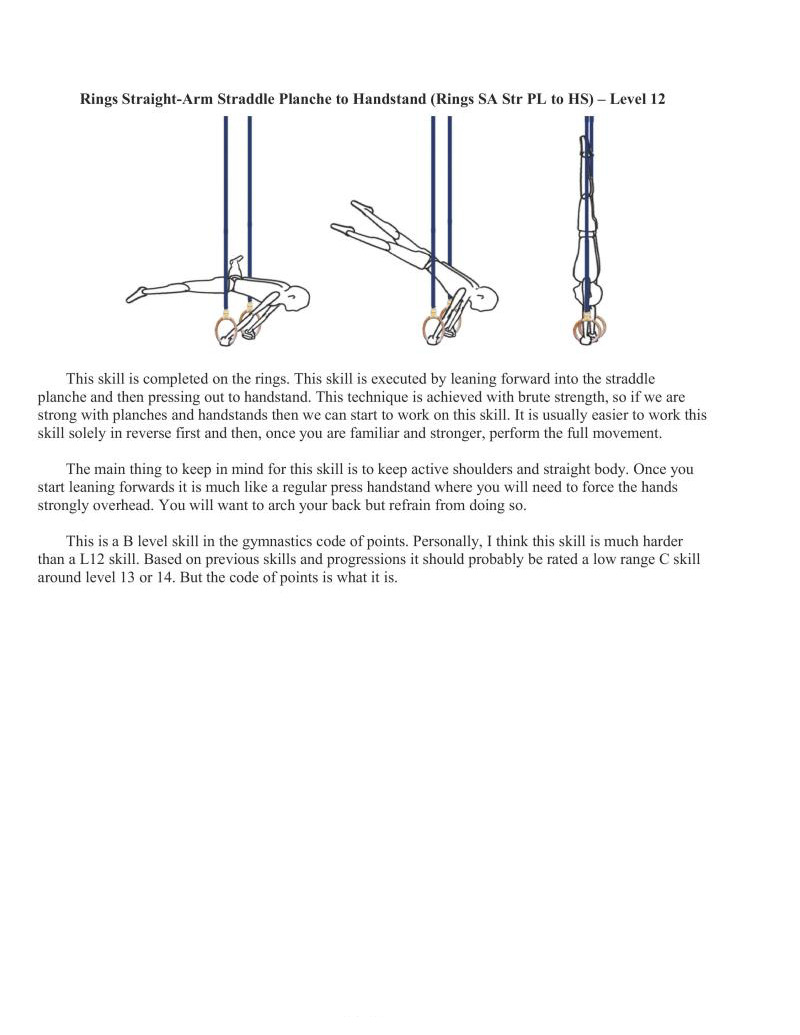
This skill may be completed on the FX or PB. The picture above depicts it on the FX / ground. This skill is executed by leaning forward into the straddle planche and then pressing out to handstand. This technique is achieved with brute strength, so if we are strong with planches and handstands then we can start to work on this skill. It is usually easier to work this skill solely in reverse first and then, once you are familiar and stronger, perform the full movement.
The main thing to keep in mind for this skill is to keep active shoulders and straight body. Once you start leaning forwards it is much like a regular press handstand where you will need to force the hands strongly overhead. You will want to arch your back but refrain from doing so.
This is a B level skil
in the gymnastics code of points.
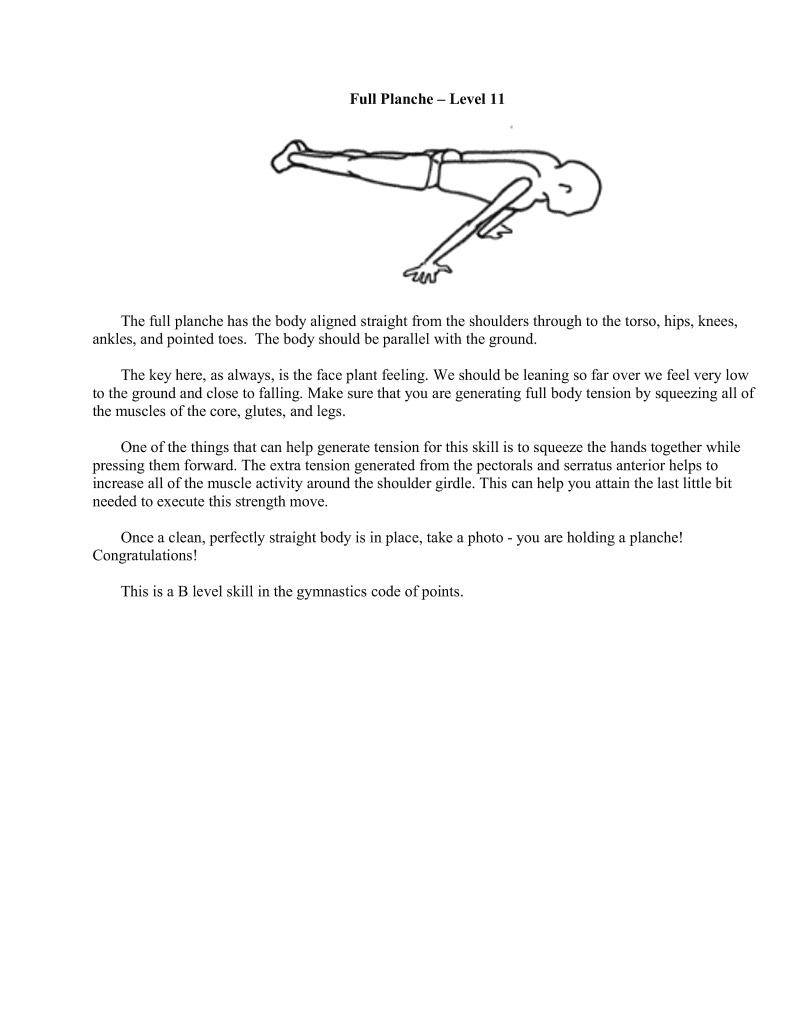
The full planche has the body aligned straight from the shoulders through to the torso, hips, knees, ankles, and pointed toes. The body should be parallel with the ground.
The key here, as always, is the face plant feeling. We should be leaning so far over we feel very low o the ground and close to falling. Make sure that you are generating full body tension by squeczing all of the muscles of the core, glutes, and legs.
One of the things that can help generate tension for this skill i to squeeze the hands together while pressing them forward. The extra tension generated from the pectorals and serratus anerior helps to increase all of the muscle activity around the shoulder girdle. This can help you attain the last little bit needed to execute this strength move.
Once a clean, perfectly straight body is in place, take a photo - you are hol Congratulations!
2 a planche!
This is a B level skill in the gymnastics code of points.
This skill is completed on the rings. This skill is executed by leaning forward into the straddle planche and then pressing out to handstand. This technique is achieved with brute strength, so if we are strong with planches and handstands then we can start to work on this skill. It is usually easier to work this skill solely in reverse first and then, once you are familiar and stronger, perform the full movement
The main thing to keep in mind for this skill is to keep active shoulders and straight body. Once you start leaning forwards it is much like a regular press handstand where you will need to force the hands strongly overhead. You will want to arch your back but refrain from doing so.
This is a B level skill in the gymnastics code of points. Personally, I think this skill is much harder than a L12 skill. Based on previous skills and progressions it should probably be rated a low range C skill around level 13 or 14. But the code of points is what
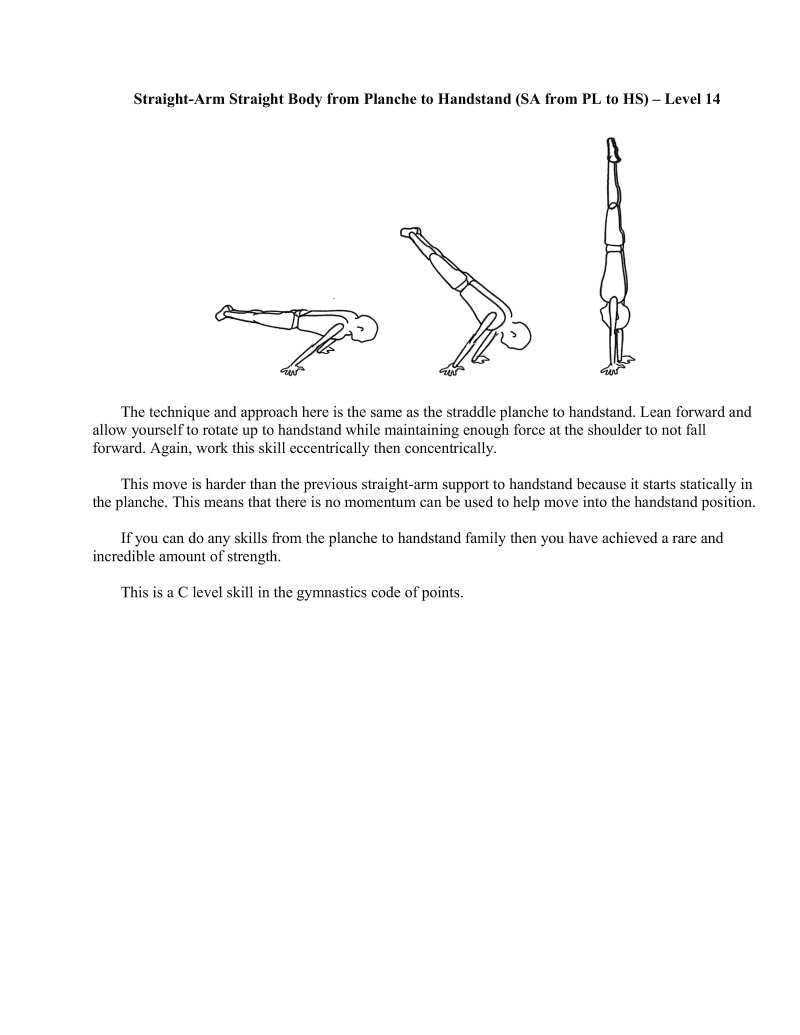
The technique and approach here i the same as the straddle planche to handstand. Lean forward and allow yourself to rotate up to handstand while maintaining enough force at the shoulder to not fall forward. Again, work this skill eccentrically then concentrically.
This move is harder than the previous straight-arm support to handstand because i starts statically in the planche. This means that there is no momentum can be used to help move into the handstand position.
If you can do any skills from the planche to handstand family then you have achieved a rare and incredible amount of strength.
This is a C level skill in the gymnastics code of points.
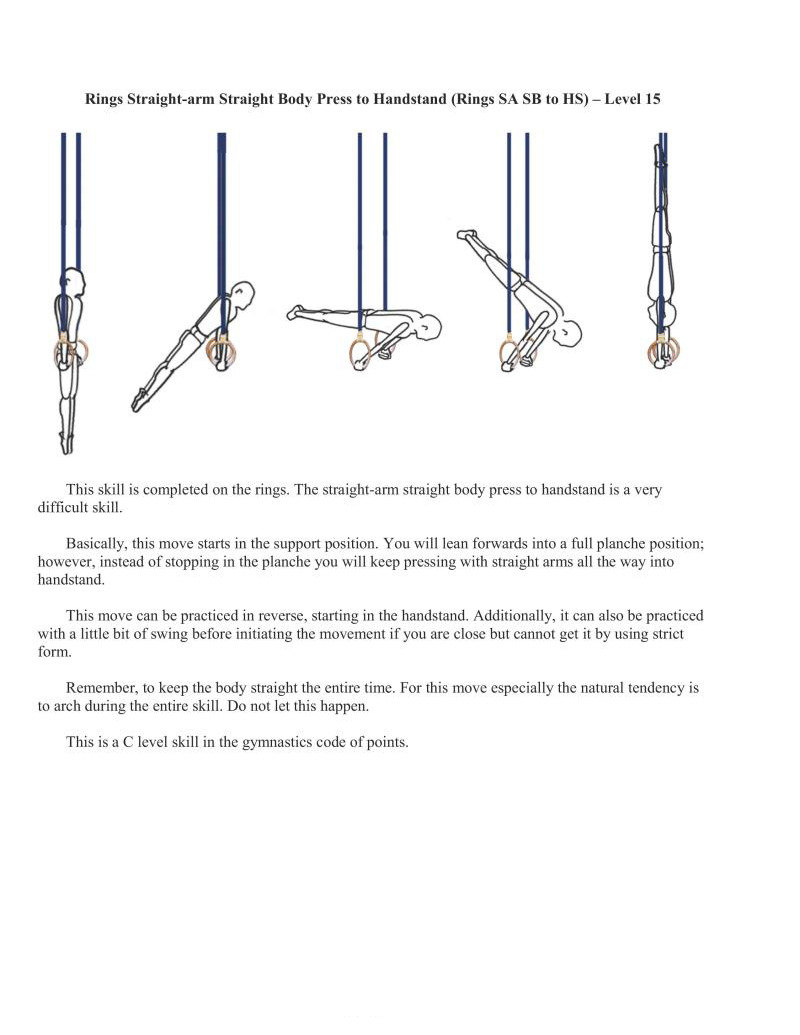
This skill is completed on the rings. The straight-arm straight body press to handstand is a very difficult skill.
Basically, this move starts in the support position. You will lean forwards into a full planche position: however, instead of stopping in the planche you will keep pressing with straight arms all the way into handstand.
This move can be practiced in reverse, starting in the handstand. Additionally, it can also be practiced with a little bit of swing before initiating the movement if you are close but cannot get it by using strict form.
Remember, to keep the body straight the entire time. For this move especially the natural tendency is to arch during the entire skill. Do not let this happen.
This is a C level skill in the gymnastics code of points.
16
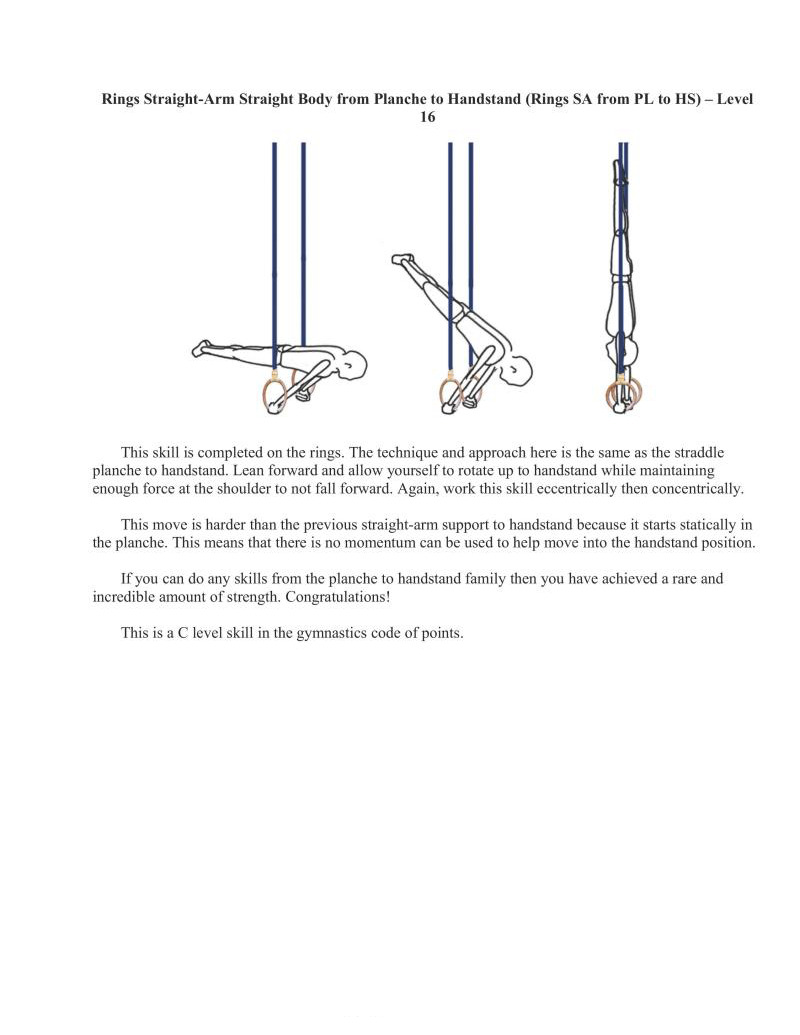
This skill is completed on the rings. The technique and approach here is the same as the straddle planche to handstand. Lean forward and allow yourself to rotate up to handstand while maintaining enough force at the shoulder to not fall forward. Again, work this skill eccentrically then concentrically.
This move is harder than the previous straight-arm support to handstand because it starts statically in the planche. This means that there is no momentum can be used to help move into the handstand position.
1f you can do any skills from the planche to handstand family then you have achieved a rare and incredible amount of strength. Congratulations!
This is a C level skill in the gymnastics code of points.
The rings planche positions are the same as the floor and parallettes variations. The only real difference is orienting the hands to have control and stability over the rings. OF course, that is the hard part. That is why all of the planche rated skills in the gymnastics code of points are one letter grade more difficult on the rings as opposed to the floor and parallel bars.
Strength gains from performing these holds on rings are phenomenal and carry over extensively to their floor and parallettes counterparts
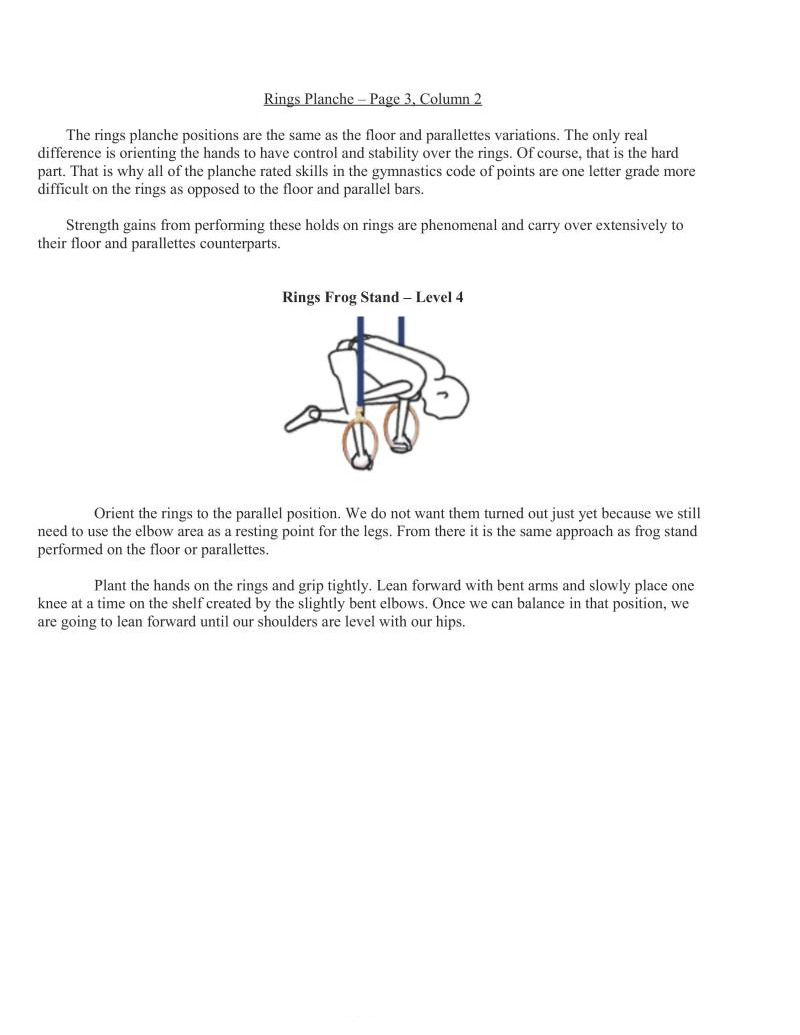
Orient the rings to the parallel position. We do not want them turned out just yet because we still need to use the elbow area as a resting point for the legs. From there it is the same approach as frog stand performed on the floor or parallettes.
Plant the hands on the rings and grip tightly. Lean forward with bent arms and slowly place one knee at a time on the shelf created by the slightly bent elbows. Once we can balance in that position, we are going to lean forward until our shoulders are level with our hips.
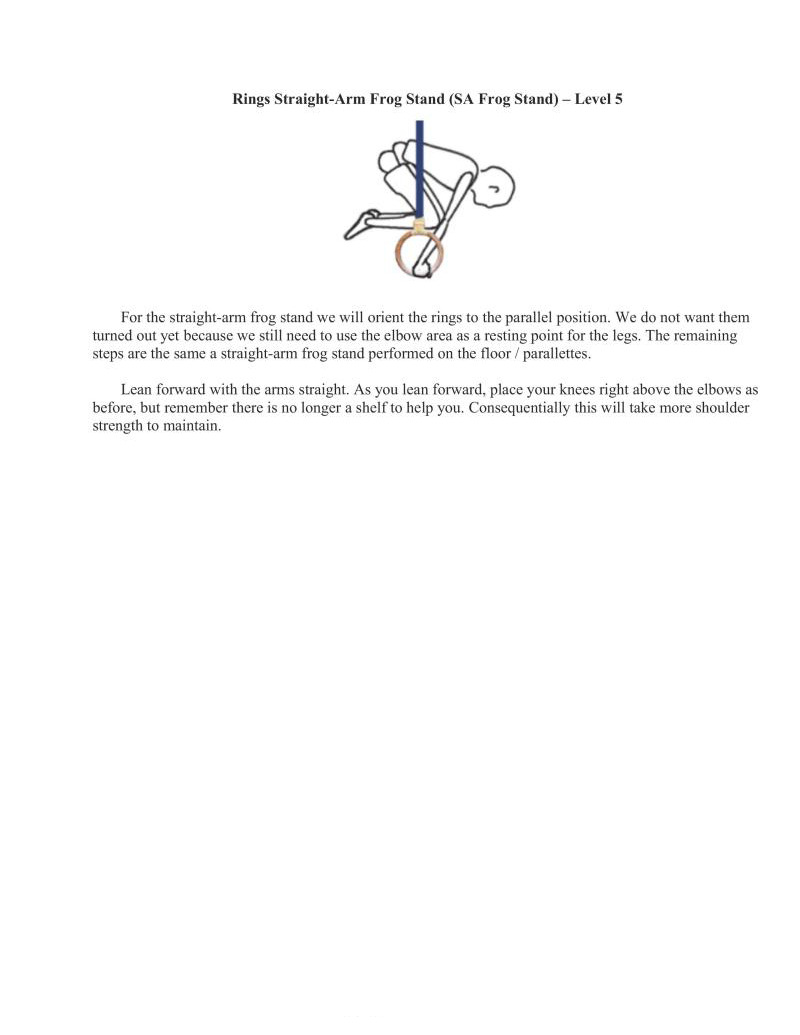
For the straight-arm frog stand we will orient the rings to the parallel position. We do not want them turned out yet because we still need to use the elbow area as a resting point for the legs. The remaining steps are the same a straight-arm frog stand performed on the floor / parallettes.
Lean forward with the arms straight. As you lean forward, place your knees right above the elbows as before, but remember there is no longer a shelf to help you. Consequentially this will take more shoulder strength to maintain.
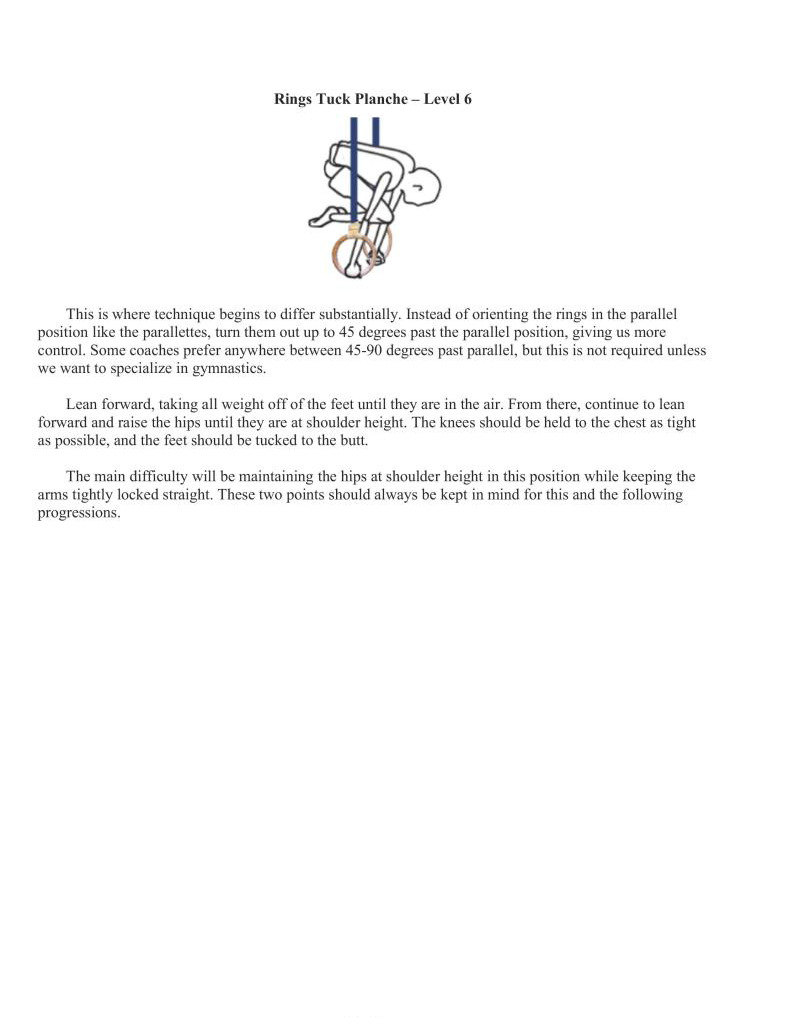
where technique begins to differ substantially. Instead of orienting the rings in the parallel position like the parallettes, turn them out up to 43 degrees past the parallel position, giving us more control. Some coaches prefer anywhere between 45-90 degrees past parallel, but this is not required unless in gymnastics.
Lean forward, taking all weight off of the feet until they are in the air. From there, continue to lean forward and raise the hips until they are at shoulder height. The knees should be held to the chest as tight as possible, and the feet should be tucked to the butt.
The main difficulty will be mai his position while keeping the arms tightly locked straight. These two points should always be kept in mind for this and the following progressions
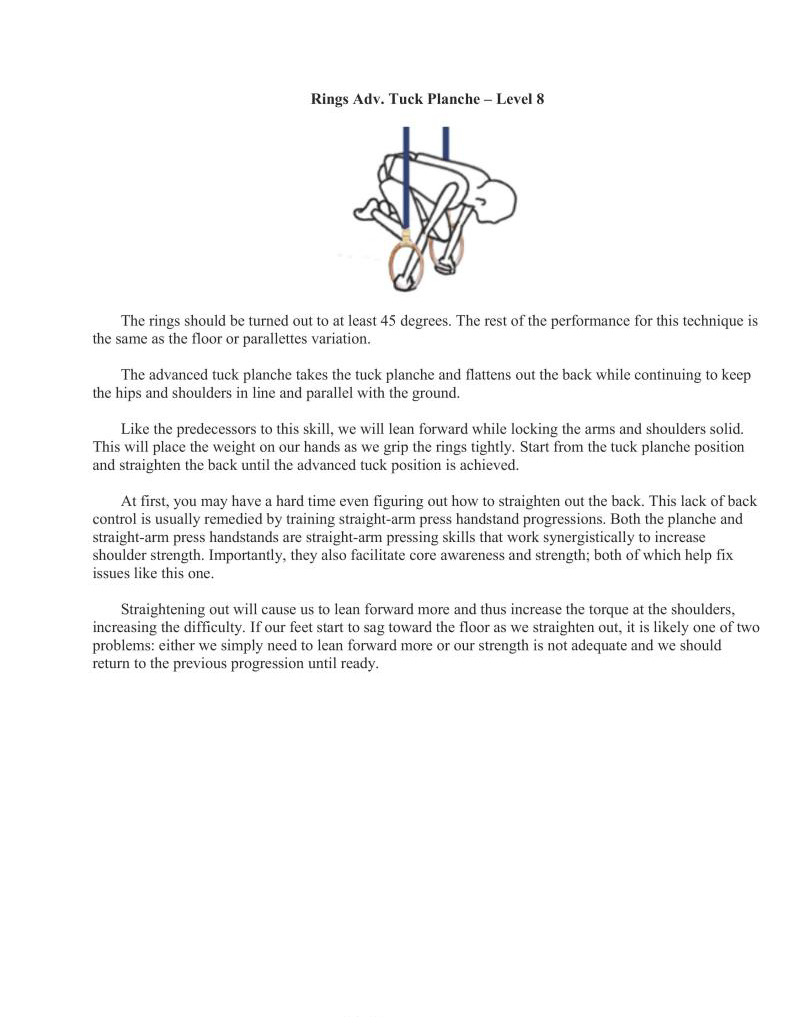
The rings should be turned out to at least 45 degrees. The rest of the performance for this technique is the same as the floor or parallettes variation.
The advanced tuck planche takes the tuck planche and flattens out the back while continuing to keep the hips and shoulders in line and parallel with the ground.
Like the predecessors to this skill, we will lean forward while locking the arms and shoulders solid. This will place the weight on our hands as we grip the rings tightly. Start from the tuck planche position and straighten the back until the advanced tuck position is achieved.
At first, you may have a hard time even figuring out how to straighten out the back. This lack of back control is usually remedied by training straight-arm press handstand progressions. Both the planche and straight-arm press handstands are straight-arm pressing skills that work synergistically to increase
oulder strength. Importantly, they also facilitate core awareness and strength; both of which help fix issues like this one.
Straightening out will cause us to lean forward more and thus increase the torque at the shoulders, increasing the difficulty. If our feet start to sag toward the floor as we straighten out, it is likely one of two. problems: either we simply need to lean forward more or our strength is not adequate and we should return to the previous progression until ready.
Again, the rings need to be turned out to at least 43 degrees or more. The rest i the same
By now our straddle should be proficient because of the practice we have gotten with it in the press handstands, abdominal compression work, and the back and front lever progressions. If this is not the case, then it is time for more straddle work before tackling this technique.
The straddle planche, like all of the other straddle lever skills mentioned before, is executed with the straight-body, legs-apart position. The line from the shoulders to the hips to the knees to the ankles and toes should be straight and parallel to the ground, but with legs spread as far away from each other as possible.
On rings we are going to lean from support into the skill or get into tuck planche and then extend the legs. It can also be executed from the floor or a mat near rings height by leaned into the technique similar to the floor and parallettes progressions. Do what feels more natural, as long as good body positions are maintained.
Remember: avoid the bent arms and hips-too-high faults! Use a camera, spotter, or mirror to correct form.
This is a B level skill in the gymnastics code of points.
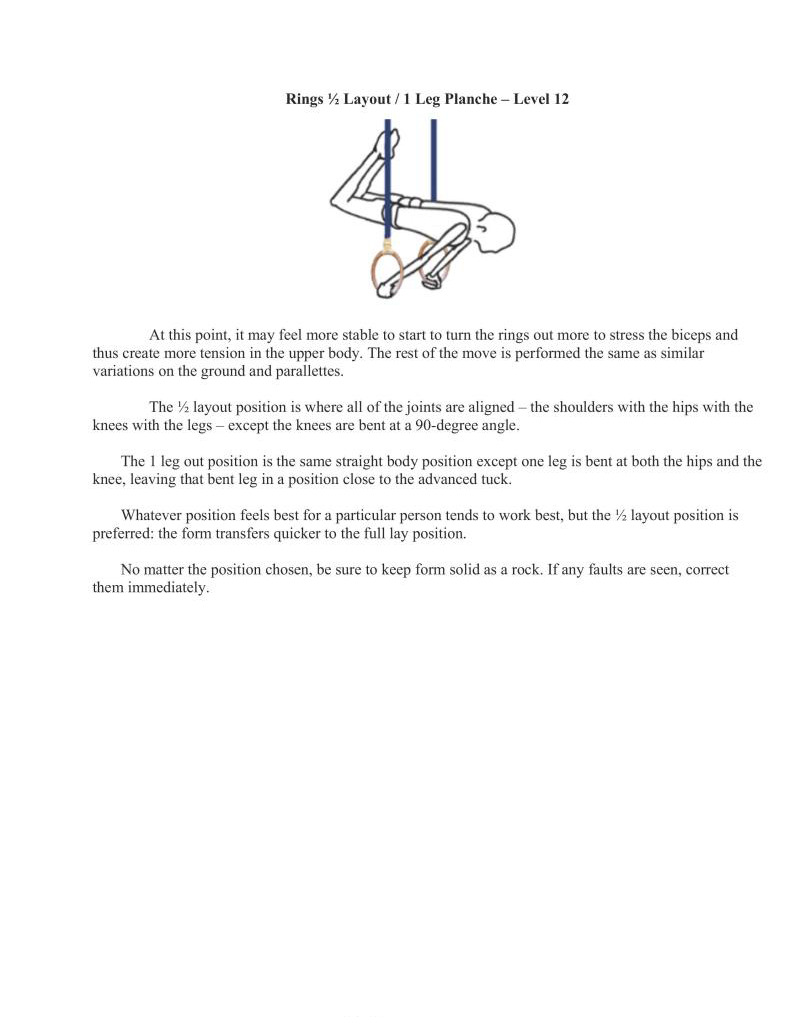
At this point, it may feel more stable to start to turn the rings out more to stress the biceps and ate more tension in the upper body. The rest of the move is performed the same as similar variations on the ground and parallettes.
The % layout position is where all of the joints are aligned the shoulders with the hips with the knees with the legs — except the knees are bent at a 90-degree angle
The 1 leg out position is the same straight body position except one leg is bent at both the hips and the knee, leaving that bent leg in a position close to the advanced tuck.
Whatever position feels best for a particular person tends to work best, but the % layout position is preferred: the form transfers quicker to the full lay position.
No matter the position chosen, be sure to keep form solid as a rock. If any faults are seen, correct them immediately.

On the gymnastics A-G scale (G being the hardest), the full planche on the rings is a C rated skill, though this is actually a point where one has become extremely strong. To put it in perspective, a planche on parallel bars and an iron cross are both only B rated skills.
If we are at this point then we probably do not need any advice from this guide. The similar feelings of wanting to tip over will still be there. It is also likely on rings that we probably will not have the problem of the hips being too high, but we can never be too careful. We should get a spotter or a camera to check our positions when in doubt.
This is a C level skill in the gymnastics code of points.
The planche pushup progressions are an excellent supplement to build the strength for the planche isometrics. They are awesome in their own right for building overall strength even without the isometrics.
We need to be able to control the body moving into and out of the planche position as well as pause at the top in the isometric hold. As such, generally the pushup variations will lag about one progression behind the isometrics.
Three common faults with planche pushups (all variations) are delineated below:
It is common to not be aware of your body when starting this movement, and it is easy to forget where you are in space. Dropping or elevating the hips brings the center of mass closer to the arms. This will decrease the leverage against the shoulders and make the movement much easier to perform. The body senses this advantage and may tend to do this to compensate for weakness. Be sure to avoid this tendency. I either like having a spotter tell me that I am too high or low, or use a camera between sets to track my body positions and correct them next time.
The hardest part of the movement is locking the elbows at the top and then pausing in the planche isometric. It was mentioned earlier that bending the arms, even slightly, makes the isometric significantly easier. By extension, locking the arms straight is the most difficult position. It is common to see videos of planche progression pushups that have people not locking out their arms to complete the movement, This flavw is fatal to our strength training in the long run because not only are we not reinforcing the practice of the planche isomeric, but we are also missing out on the hard camed transitional strength of moving from bent arm to straight-arm strength.
The last fault has to do with the shoulders. When newer trainees start to support themselves onto their hands it is easiest for them just to be lazy with their scapulas. For instance, when you see a new trainee trying out the planche they usually engage their shoulders as they lean forward, but they allow their scapulas 10 relax and stick out from the back. You should not let this occur. Focus on pushing your hands as far away from your body at all times. This keep the scapulas pinned against the rib cage in back. This increases their congruency with the rib cage and therefore provides a more stable shoulder girdle overall. This will help both increase force output from the shoulder and make the skill more stable. If you are. having issues with being able to keep the scapulas against the ribs, you may need to add in some scapular pushups into your routine to work on the serratus anterior which is the muscle responsible for this action.
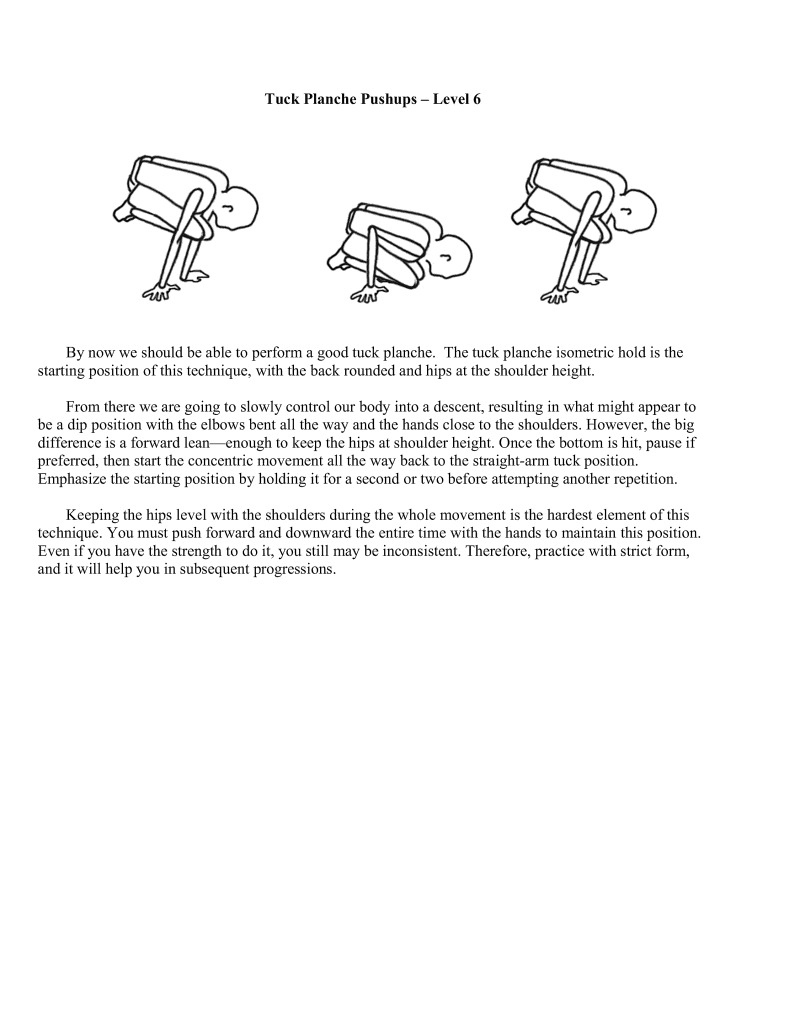
By now we should be able to perform a good tuck planche. The tuck planche isometric hold is the starting position of this technique, with the back rounded and hips at the shoulder height.
From there we are going to slowly control our body into a descent, resulting in what might appear to be adip position with the elbows bent all the way and the hands close to the shoulders. However, the big difference is a forward lean—enough to keep the hips at shoulder height. Once the bottom is hit, pause if preferred, then start the concentric movement all the way back to the straight-arm tuck position. Emphasize the starting position by holding it for a second or two before attempting another repetition.
Keeping the hips level with the shoulders during the whole movement is the hardest clement of this technique. You must push forward and downward the entire time with the hands to maintain this position. Even if you have the strength to do it, you still may be inconsistent. Therefore, practice with strict form, and it will help you in subsequent progressions.
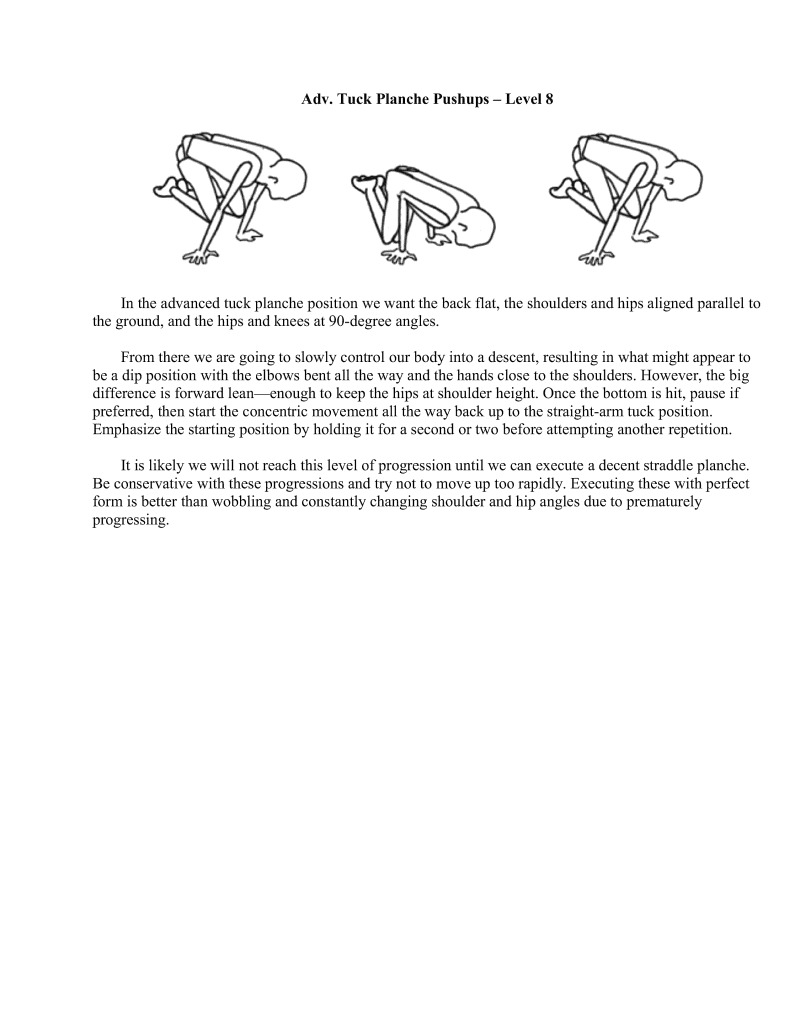
In the advanced tuck planche position we want the back flat, the shoulders and hips aligned parallel to the ground, and the hips and knees at 90-degree angles.
From there we are going to slowly control our body into a descent, resulting in what might appear to be a dip position with the elbows bent all the way and the hands close to the shoulders. However, the big difference is forward lean—enough to keep the hips at shoulder height. Once the bottom is hit, pause if
preferred, then start the concentric movement all the way back up to the straight-arm tuck positi Emphasize the starting position by holding it for a second or two before attempting another reps
It is likely we will not reach this level of progression until we can execute a decent straddle planche. Be conservative with these progressions and try not to move p too rapidly. Executing these with perfect form is better than wobbling and constantly changing shoulder and hip angles due to prematurely progressing.
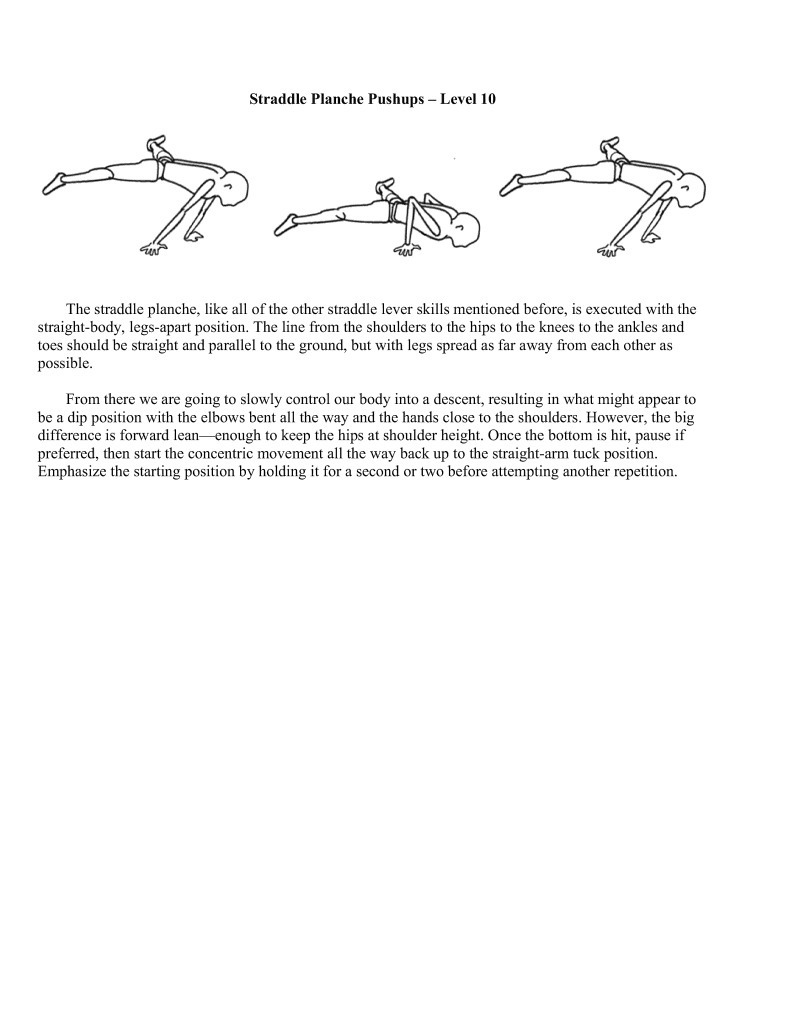
The straddle planche, like all of the other straddle lever skills mentioned before, is executed with the straight-body, legs-apart position. The line from the shoulders to the hips to the knees to the ankles and toes should be straight and parallel to the ground, but with legs spread as far away from each other as possible.
From there we are going to slowly control our body into a descent, resulting in what might appear to be a dip position with the elbows bent all the way and the hands close to the shoulders. However, the big difference is forward lean—enough to keep the hips at shoulder height. Once the bottom is hit, pause if preferred, then start the concentric movement all the way back up to the straight-arm tuck position. Emphasize the starting position by holding it for a second or two before attempting another repetition.
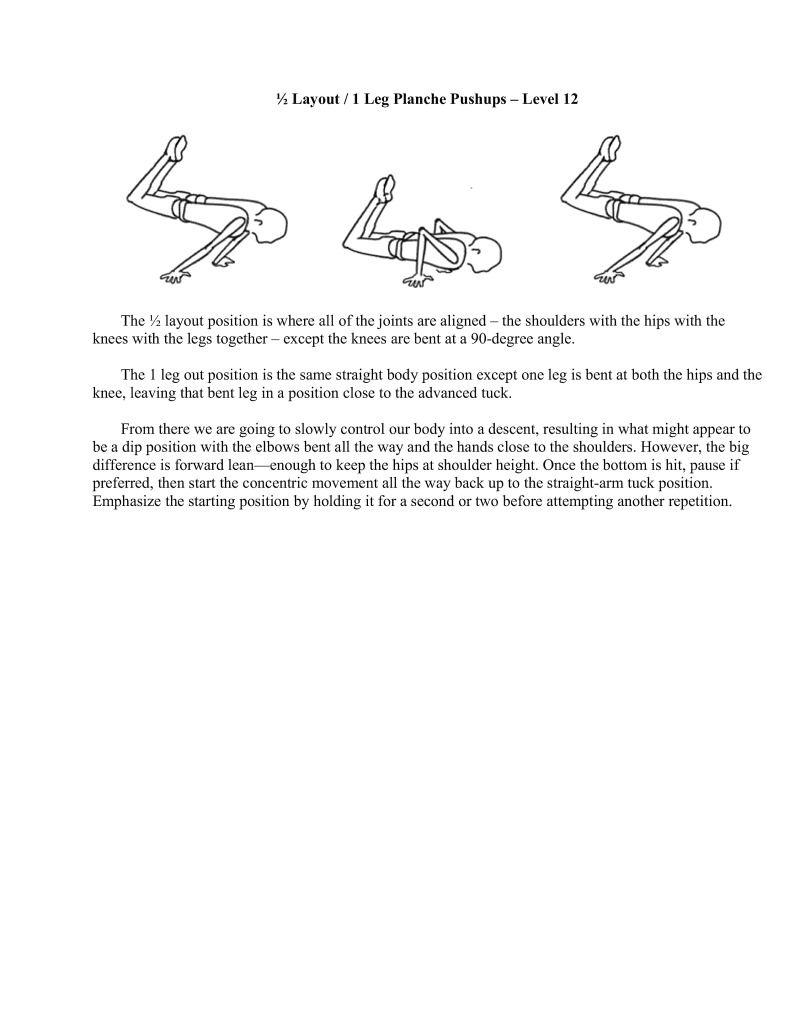
The % layout position is where all of the joints are aligned — the shoulders with the hips with the knees with the legs together — except the knees are bent at a 90-degree angle.
The 1 leg out position is the same straight body position except one leg is bent at both the hips and the knee, leaving that bent leg in a position close to the advanced tuck.
From there we are going to slowly control our body into a descent, resulting in what might appear to be a dip position with the elbows bent all the way and the hands close to the shoulders. However, the big difference is forward lean—enough to keep the hips at shoulder height. Once the bottom is i, pause if preferred, then start the concentric movement all the way back up to the straight-arm tuck position. Emphasize the starting position by holding it for a second or two before attempting another repetition.
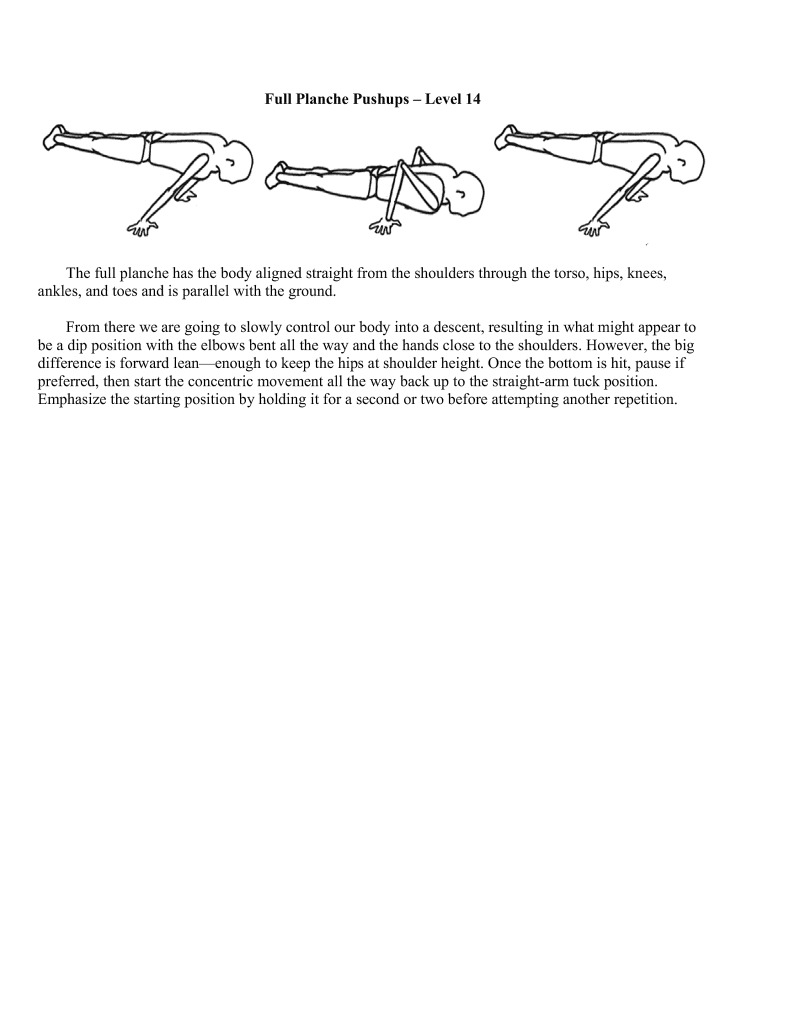
The full planche has the body aligned straight from the shoulders through the torso, hips, knees, ankles, and toes and is parallel with the ground.
From there we are going to slowly control our body into a descent, resulting in what might appear to be adip position with the elbows bent all the way and the hands close to the shoulders. However, the big difference is forward lean—enough to keep the hips at shoulder height. Once the bottom is hit, pause if preferred, then start the concentric movement all the way back up to the straight-arm tuck position. Emphasize the starting position by holding it for a second or two before attempting another repetition.
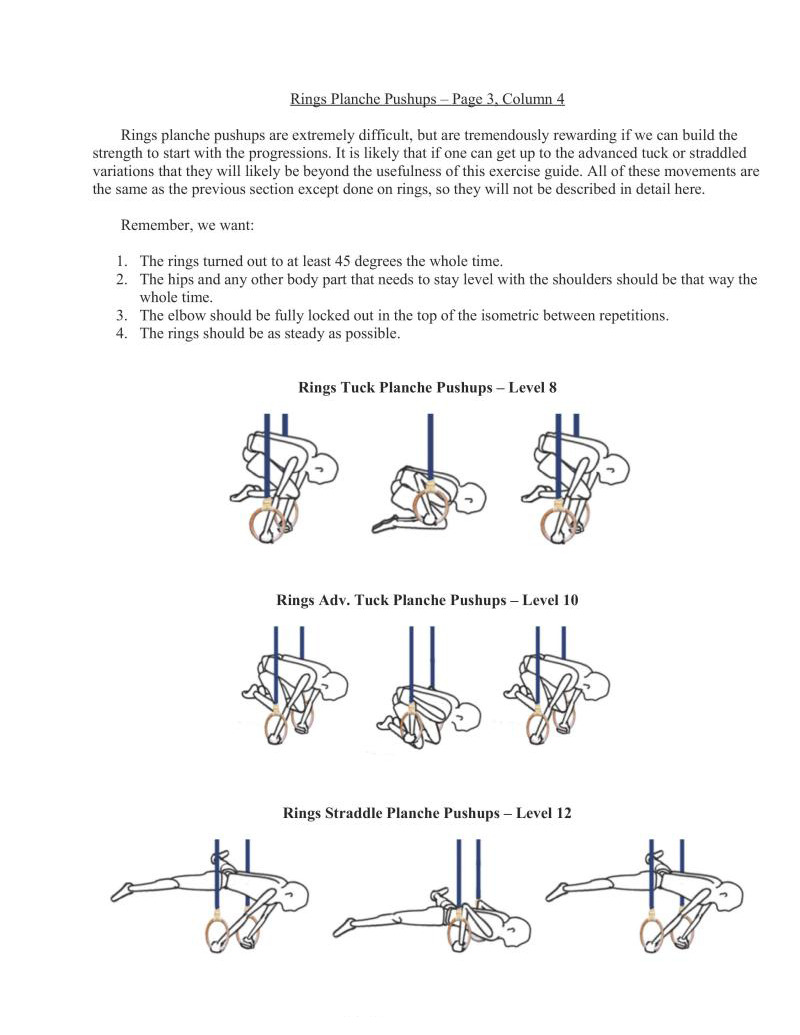
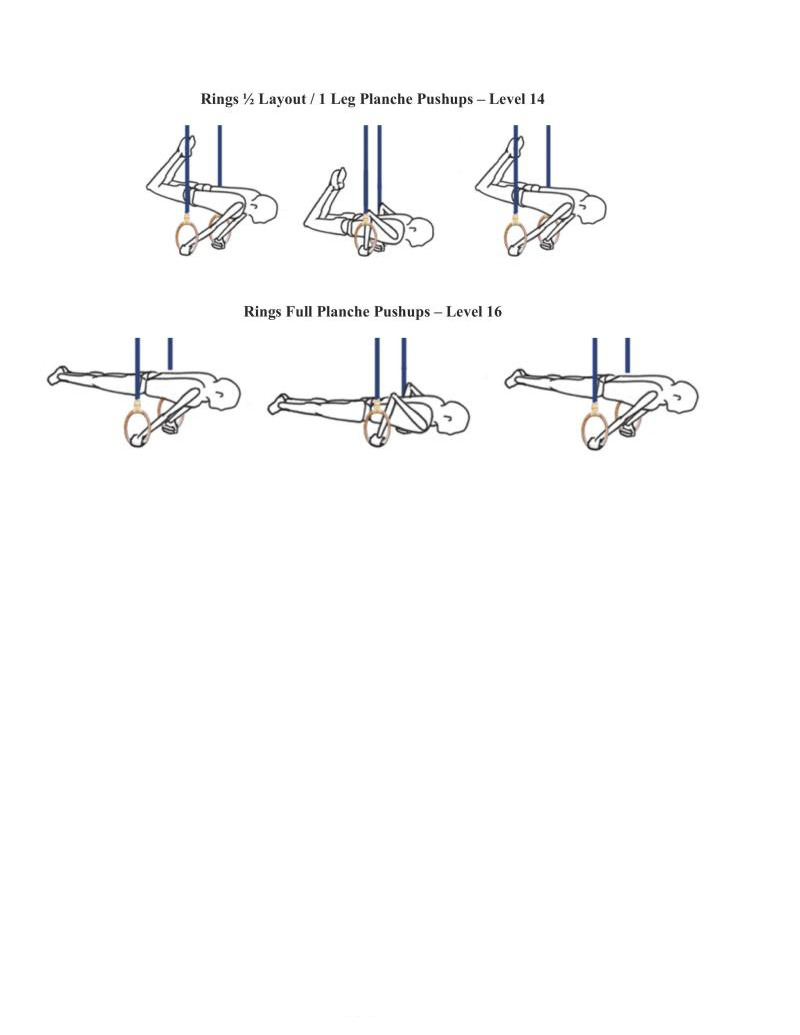
Rings planche pushups are extremely difficult, but are tremendously rewarding if we can build the strength to start with the progressions. It is likely that if one can get up to the advanced tuck or straddled variations that they will likely be beyond the usefulness of this exercise guide. All of these movements are the same as the previous section except done on rings, so they will not be described in detail here.
Remember, we want:
*Rings Tuck Planche Pushups — Level 8 *Rings Adv. Tuck Planche Pushups — Level 10 *Rings Straddle Planche Pushups — Level 12
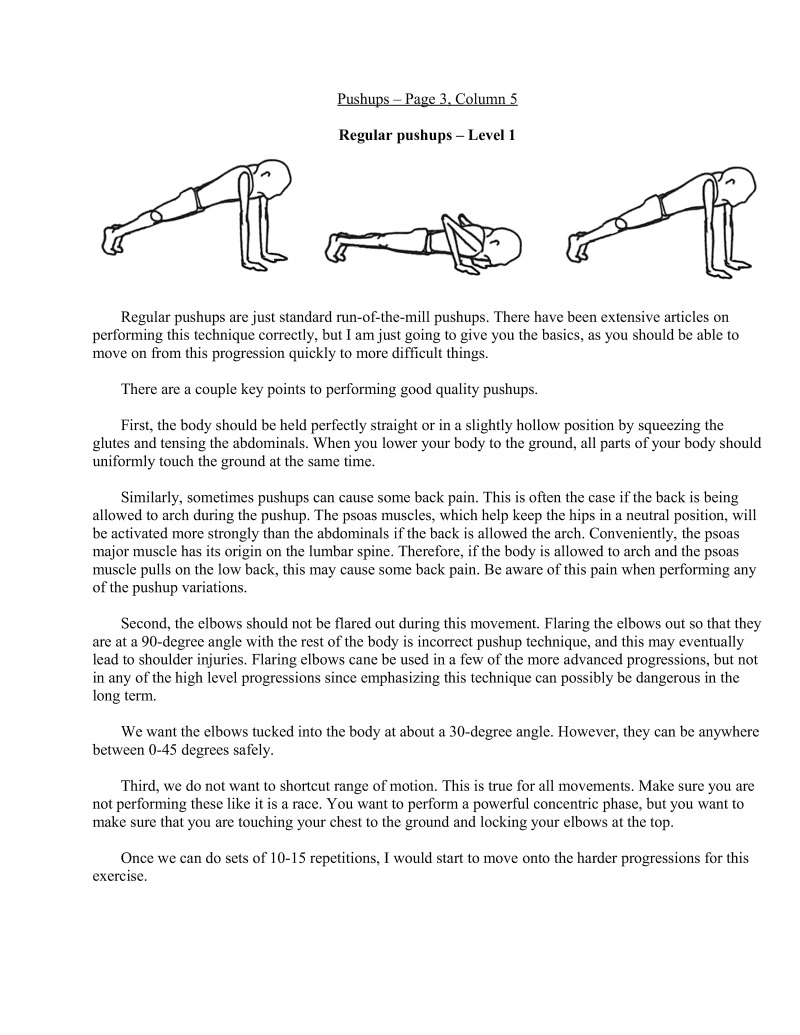
Regular pushups are just standard run-of-the-mill pushups. There have been extensive articles on performing this technique correctly, but I am just going to give you the basics, as you should be able to move on from this progression quickly to more difficult things.
There are a couple key points to performing good quality pushups.
First, the body should be held perfectly straight or in a slightly hollow position by squeezing the glutes and tensing the abdominals. When you lower your body to the ground, all parts of your body should uniformly touch the ground at the same time.
Similarly, sometimes pushups can cause some back pain. This is often the case if the back is being allowed to arch during the pushup. The psoas muscles, which help keep the hips in a neutral position, will be activated more strongly than the abdominals if the back is allowed the arch. Conveniently, the psoas major muscle has its origin on the lumbar spine. Therefore, if the body is allowed to arch and the psoas muscle pulls on the low back, this may cause some back pain. Be aware of this pain when performing any of the pushup variations.
Second, the elbows should not be flared out during this movement. Flaring the elbows out so that they are at a 90-degree angle with the rest of the body is incorrect pushup technique, and this may eventually lead to shoulder injuries. Flaring elbows cane be used in a few of the more advanced progressions, but not in any of the high level progressions since emphasizing this technique can possibly be dangerous in the long term.
We want the elbows tucked into the body at about a 30-degree angle. However, they can be anywhere between 0-45 degrees safely.
Third, we do not want to shortcut range of motion. This is true for all movements. Make sure you are not performing these like it is a race. You want to perform a powerful concentric phase, but you want to make sure that you are touching your chest to the ground and locking your elbows at the top.
Once we can do sets of 10-15 repetitions, I would start to move onto the harder progressions for this exercise.

Diamond pushups take regular pushups a step further. What we want to do is bring the hands closer together to make the pushup harder. Eventually the index fingers and thumbs will meet in the middle to form a diamond shape. This is the position we want to hit in the end.
This technique puts a lot more stress on the triceps and chest due to increasing the torque at the elbows and shoulders. Therefore, be wary of your joints if they start to ache especially in between sessions of exercises. This may signal some overuse, especially if you are a person who is relatively new to exercise attempting to lean these skills
If this is the case, take a break from the offending exercises for a couple of days, if not more, and let your body recover fully before restarting. We do not want to have any nagging injuries, as the progressions get more difficult.
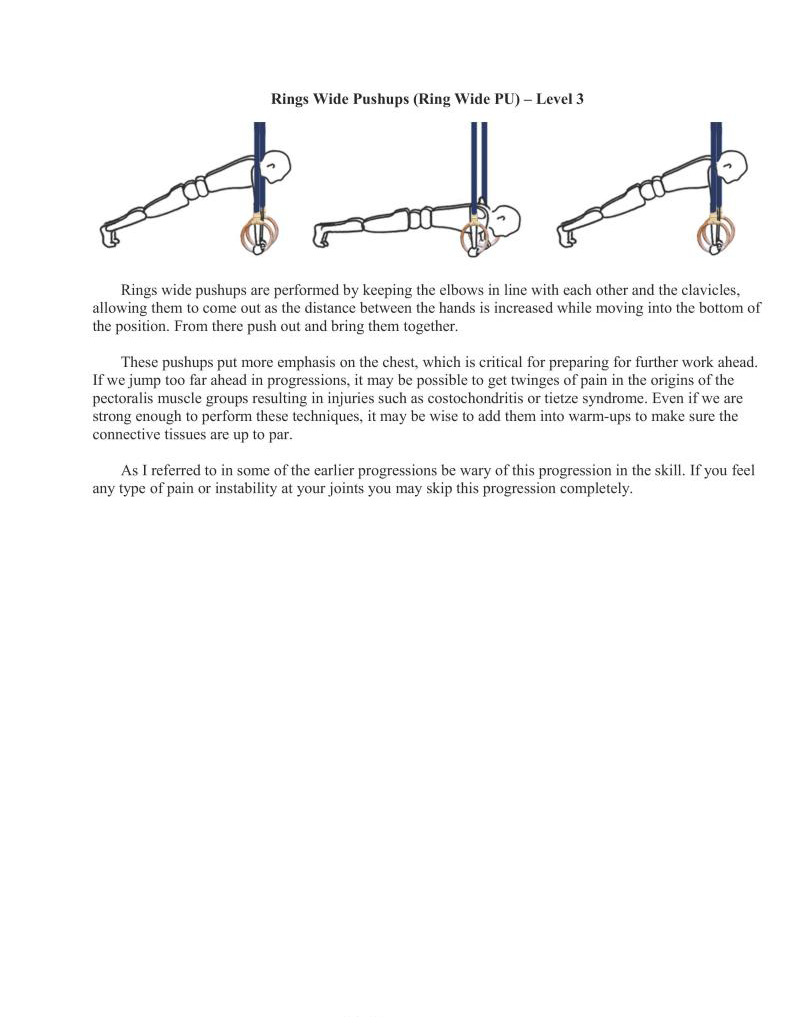
Rings wide pushups are performed by keeping the elbows in line with each other and the clavicles, allowing them to come out as the distance between the hands is increased while moving into the bottom of the position. From there push out and bring them together.
These pushups put more emphasis on the chest, which i critical for preparing for further work ahead. If we jump too far ahead in progressions, it may be possible to get twinges of pain in the origins of the pectoralis muscle groups resulting in injuries such as costochondritis or tietze syndrome. Even if we are strong enough to perform these techniques, it may be wise to add them into warm-ups to make sure the conncetive tissues are up to par.
As I referred to in some of the earlier progressions be wary of this progression in the skill, If you feel any type of pain or instability at your joints you may skip this progression completely.
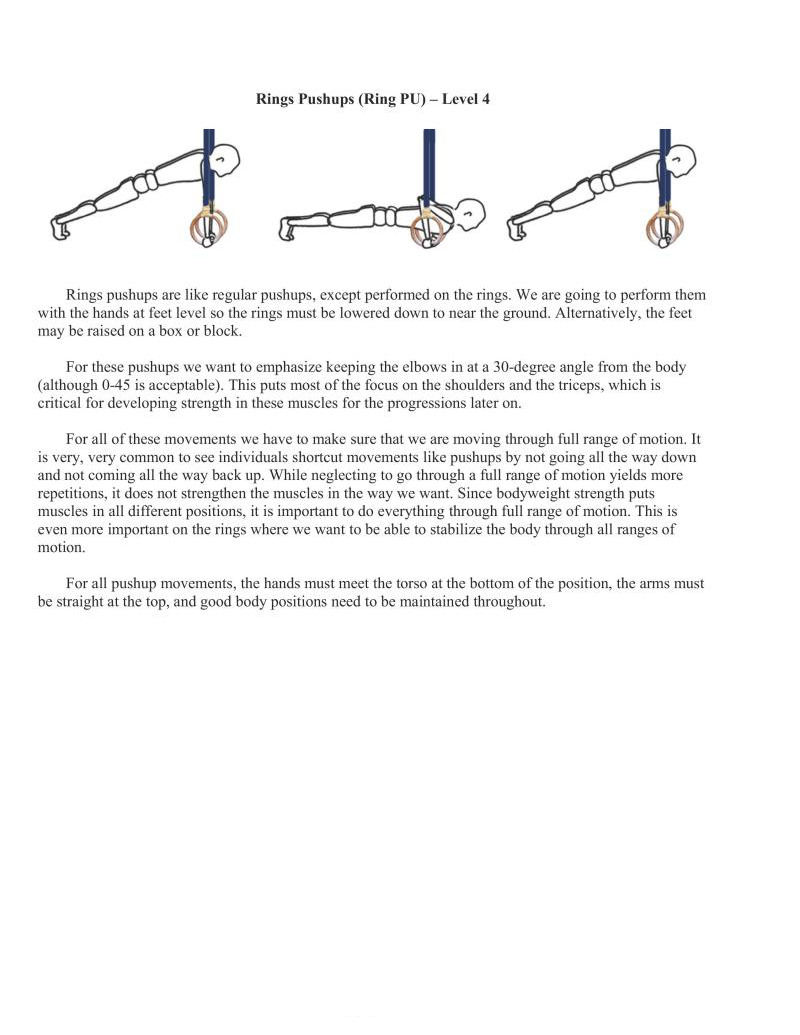
Rings pushups are like regular pushups, except performed on the rings. We are going to perform them with the hands at feet level so the rings must be lowered down to near the ground. Alternatively, the feet may be raised on a box or block
For these pushups we want to emphasize keeping the elbows in at a 30-degree angle from the body (although 0-45 is acceptable). This puts most of the focus on the shoulders and the triceps, which is critical for developing strength in these muscles for the progressions later on.
For all of these movements we have to make sure that we are moving through full range of motion. It
very, very common to see individuals shortcut movements like pushups by not going all the way down and not coming all the way back up. While neglecting to go through a full range of motion yields more repetitions, it does not strengthen the muscles in the way we want. Since bodyweight strength puts muscles in all different positions, it is important to do everything through full range of motion. This is even more important on the rings where we want to be able to stabilize the body through all ranges of motion.
For all pushup movements, the hands must meet the torso at the bottom of the position, the arms must be straight at the top, and good body positions need to be maintained throughout.
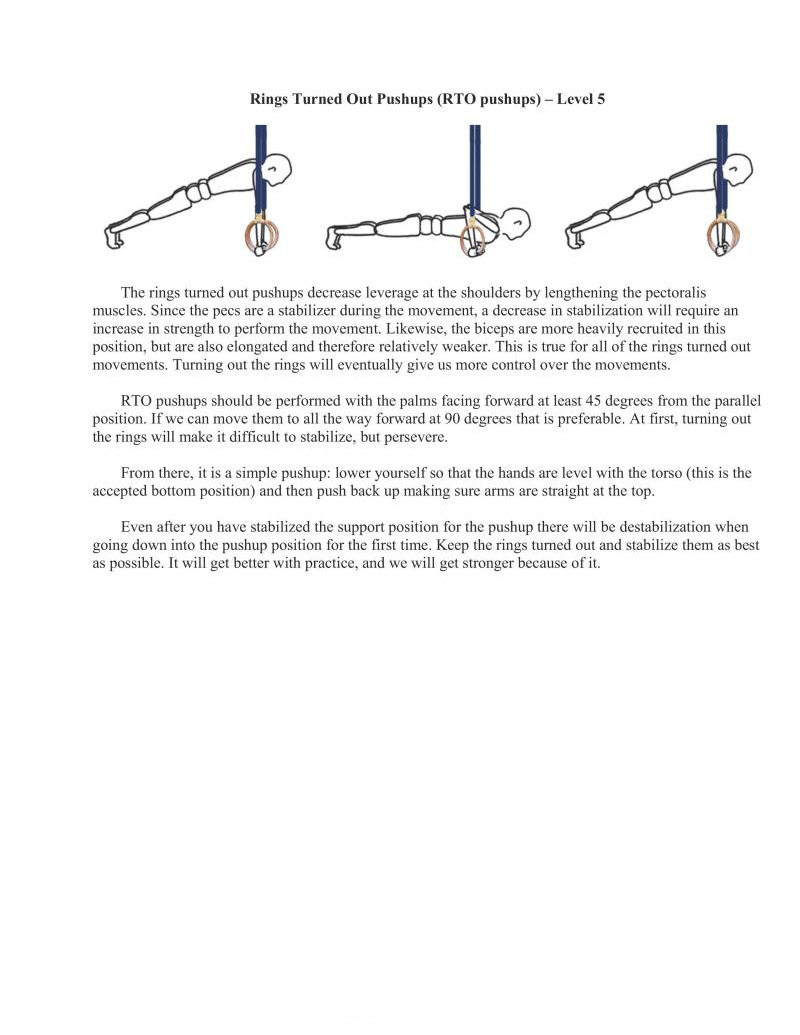
The rings turned out pushups decrease leverage at the shoulders by lengthening the pectoralis muscles. Since the pecs are a stabilizer during the movement, a decrease in stabilization will require an increase in strength to perform the movement. Likewise, the biceps are more heavily recruited in this position, but are also elongated and therefore relatively weaker. This is true for all of the rings turned out movements. Turning out the rings will eventually give us more control over the movements.
RTO pushups should be performed with the palms facing forward at least 45 degrees from the parallel position. If we can move them to all the way forward at 90 degrees that is preferable. At first, turning out the rings will make it difficult to stabilize, but persevere.
From there, it is a simple pushup: lower yourself so that the hands are level with the torso (this is the aceepted bottom position) and then push back up making sure arms are straight at the top.
Even after you have stabilized the support position for the pushup there will be destabilization when going down into the pushup position for the first time. Keep the rings turned out and stabilize them as best as possible. It will get better with practice, and we will get stronger because of t.
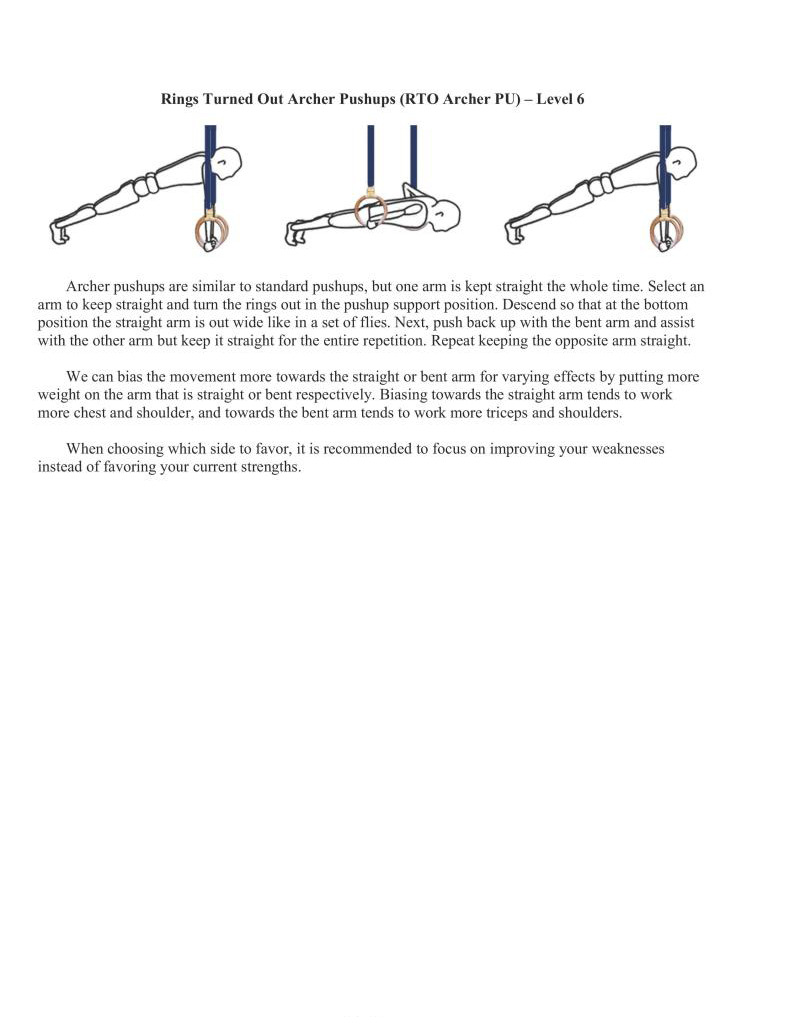
Archer pushups are similar to standard pushups, but one arm is kept straight the whole time. Select an arm to keep straight and tum the rings out in the pushup support position. Descend so that at the bottom position the straight arm is out wide like in a set of flies. Next, push back up with the bent arm and assist with the other arm but keep it straight for the entire repetition. Repeat keeping the opposite arm straight.
We can bias the movement more towards the straight or bent arm for varying effects by putting more weight on the arm that is straight or bent respectively. Biasing towards the straight arm tends to work more chest and shoulder, and towards the bent arm tends to work more triceps and shoulders.
When choosing which side to favor, it is recommended to focus on improving your weaknesses instead of favoring your current strengths.
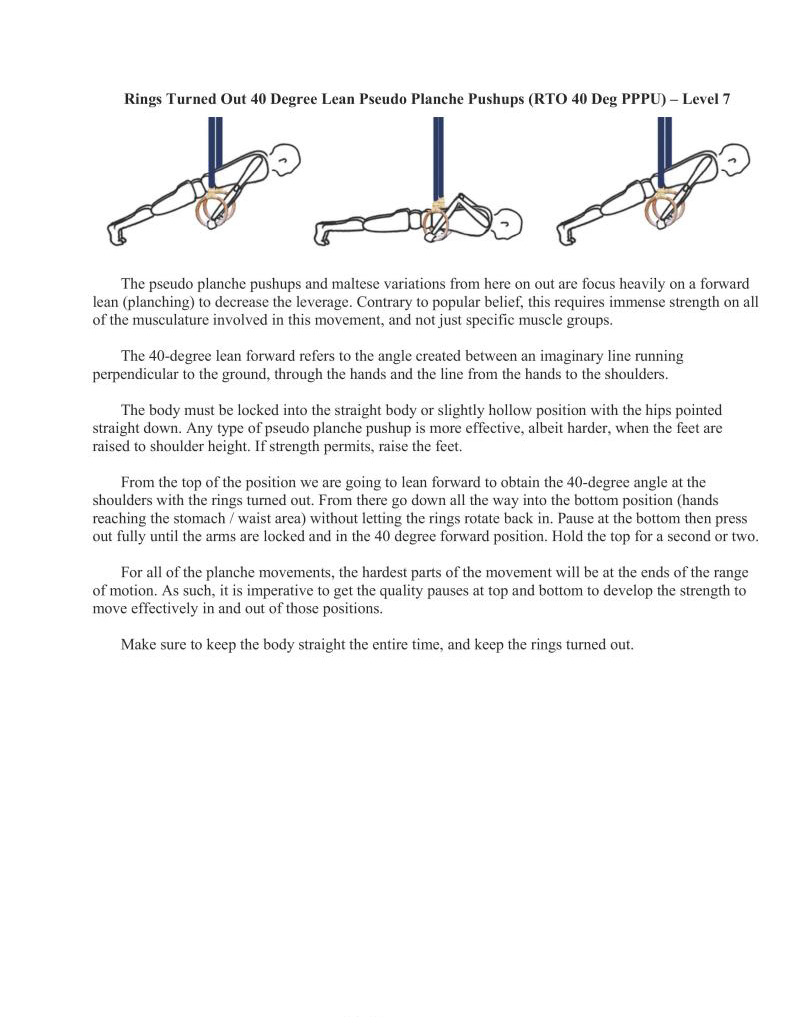
The pseudo planche pushups and maltese variations from here on out are focus heavily on a forward lean (planching) to decrease the leverage. Contrary to popular belief, this requires immense strength on all of the musculature involved in this movement, and not just specific muscle groups.
The 40-degree lean forward refrs to the angle created between an imaginary line running perpendicular to the ground, through the hands and the line from the hands to the shoulders.
The body must be locked into the straight body or slightly hollow position with the hips pointed straight down. Any type of pseudo planche pushup is more effective, albeit harder, when the feet are raised to shoulder height. If strength permits, raise the feet.
From the top of the position we are going to lean forward to obtain the 40-degree angle at the shoulders with the rings turned out. From there go down all the way into the bottom position (hands reaching the stomach / waist area) without letting the rings rotate back in. Pause at the bottom then press out fully until the arms are locked and in the 40 degree forward position. Hold the top for a second or two.
For all of the planche movements, the hardest parts of the movement will be at the ends of the range of motion. As such, it is imperative to get the quality pauses at top and bottom to develop the strength to move effectively in and out of those positions.
Make sure to keep the body straight the entire time, and keep the rings turned out
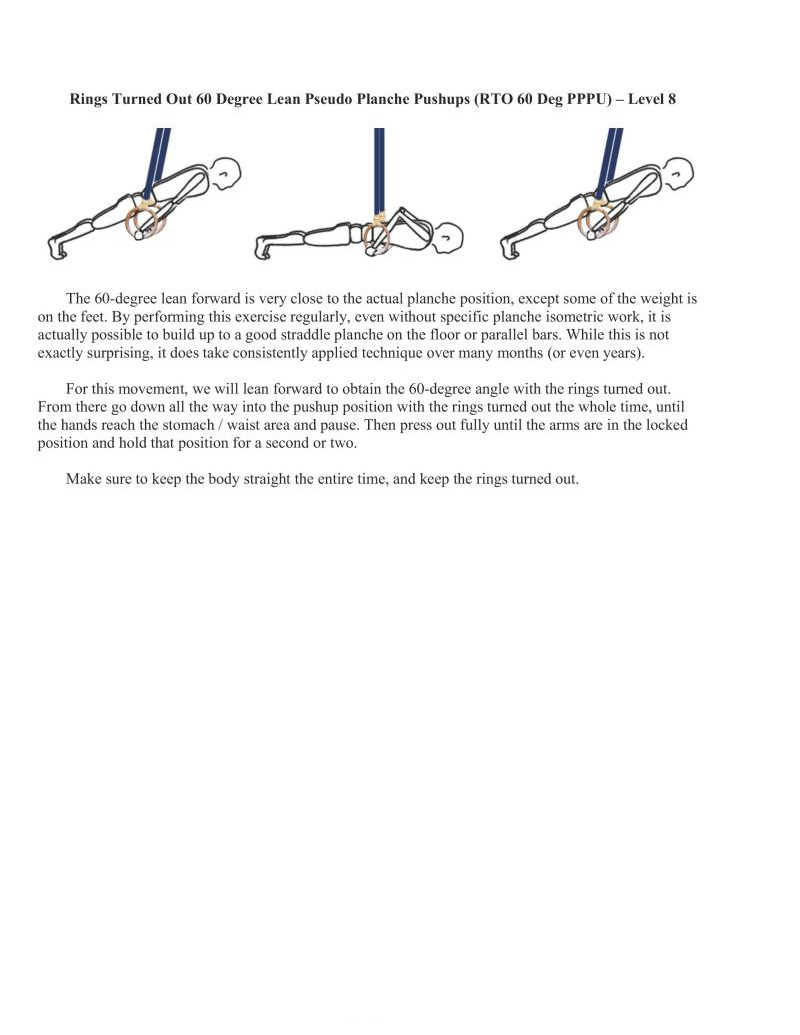
The 60-degree lean forward is very close to the actual planche position, except some of the weight is on the feet. By performing this exercise regularly, even without specific planche isometric work, it is actually possible to build up to a good straddle planche on the floor or parallel bars. While this is not exactly surprising, it does take consistently applicd technique over many months (or even years).
For this movement, we will lean forward to obtain the 60-degree angle with the rings turned out. From there go down all the way into the pushup position with the rings turned out the whole time, until the hands reach the stomach / waist area and pause. Then press out fully until the arms are in the locked position and hold that position for a second or two,
Make sure to keep the body straight the entire time, and keep the rings turned out.
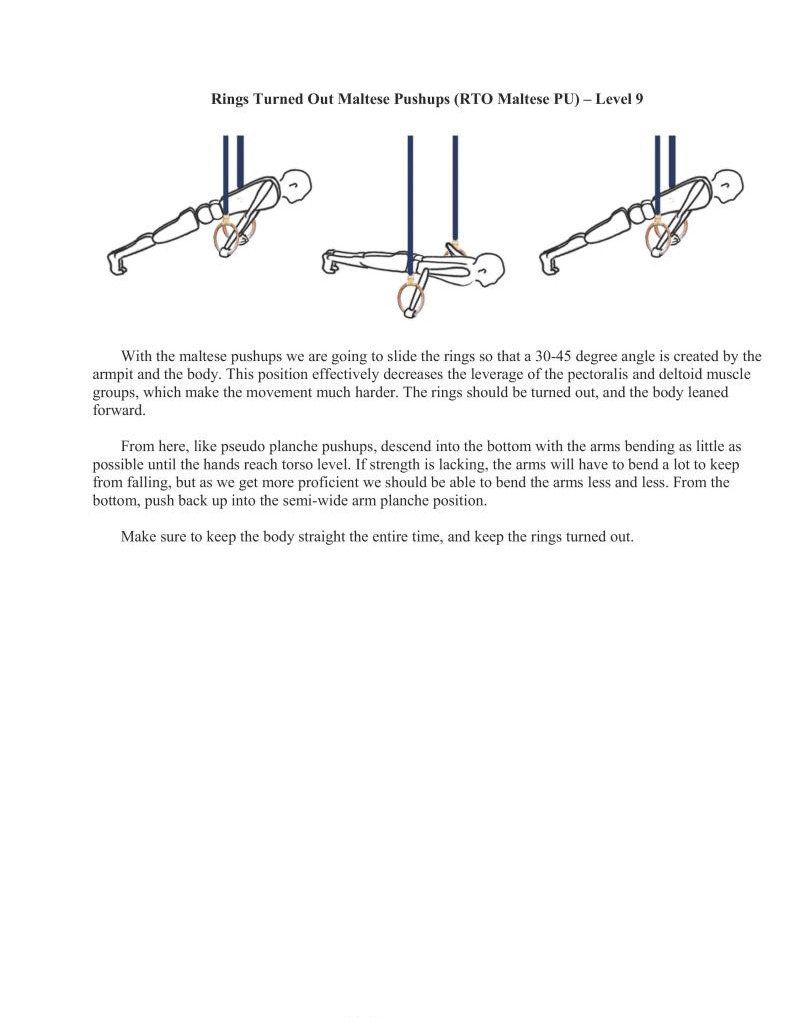
With the maltese pushups we are going to slide the rings so that a 30-45 degree angle is created by the armpit and the body. This position effectively decreases the leverage of the pectoralis and deltoid muscle groups, which make the movement much harder. The rings should be turned out, and the body leaned forward.
From here, like pseudo planche pushups, descend into the bottom with the arms bending as little as possible until the hands reach torso level. If strength is lacking, the arms will have to bend a lot to keep from falling, but as we get more proficient we should be able to bend the arms less and less. From the bottom, push back up into the semi-wide arm planche position.
Make sure to keep the body straight the entire time, and keep the rings turned out.
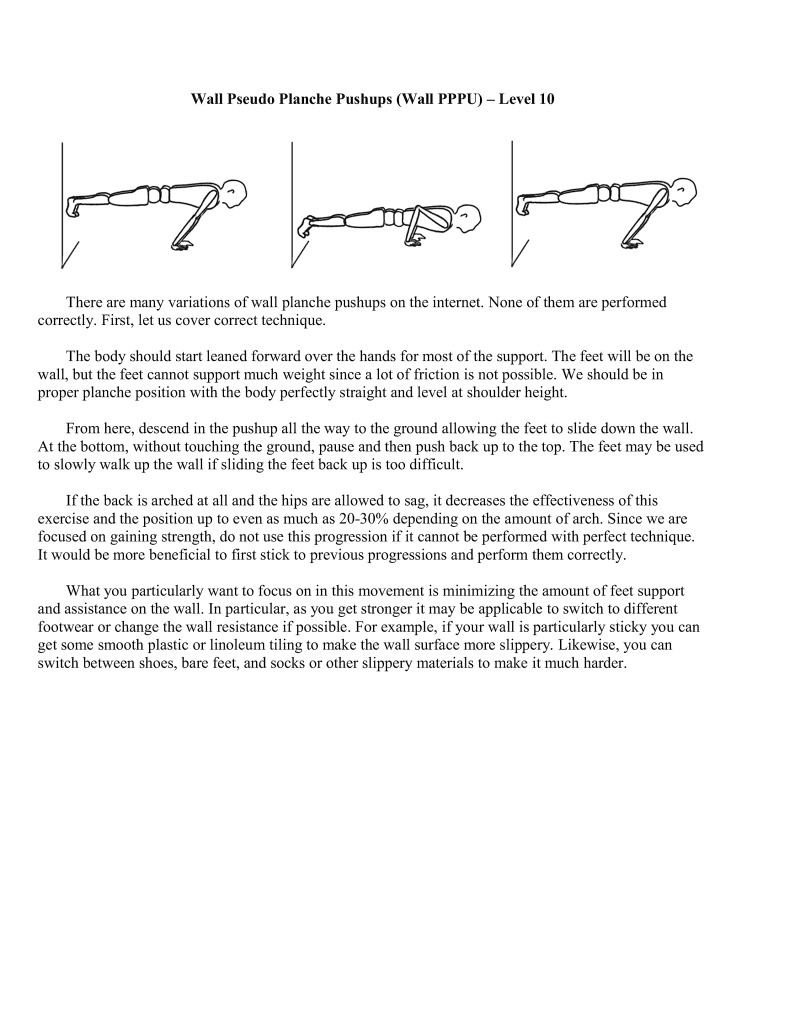
There are many variations of wall planche pushups on the internet. None of them are performed correctly. First, let us cover correct technique.
The body should start leaned forward over the hands for most of the support. The feet will be on the wall, but the feet cannot support much weight since a lot of friction is not possible. We should be in proper planche position with the body perfectly straight and level at shoulder height
From here, descend in the pushup all the way to the ground allowing the feet to slide down the wall. At the bottom, without touching the ground, pause and then push back up to the top. The feet may be used 1o slowly walk up the wall if sliding the feet back up is too difficult
If the back is arched at all and the hips are allowed to sag, it decreases the effectiveness of this exercise and the position up to even as much as 20-30% depending on the amount of arch. Since we are focused on gaining strength, do not use this progression if it cannot be performed with perfect technique. It would be more beneficial to first stick to previous progressions and perform them correctly.
What you particularly want to focus on in this movement is minimizing the amount of feet support and assistance on the wall. In particular, as you get stronger it may be applicable to switch to different footwear or change the wall resistance if possible. For example, if your wall is particularly sticky you can get some smooth plastic or linoleurn tiling to make the wall surface more slippery. Likewise, you can switch between shoes, bare feet, and socks or other slippery materials to make it much harder.
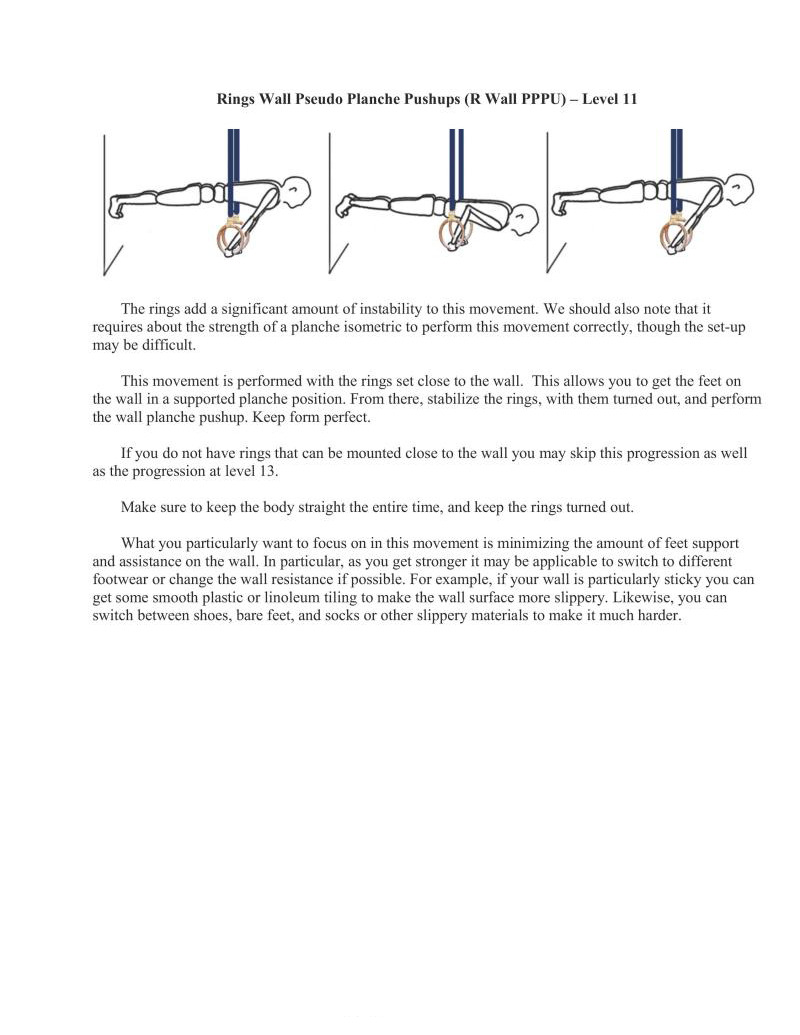
The rings add a significant amount of instability to this movement. We should also note that it requires about the strength of a planche isometric to perform this movement correctly, though the set-up may be difficult.
This movement is performed with the rings set close to the wall. This allows you to get the feet on the wall in a supported planche position. From there, stabilize the rings, with them turned out, and perform the wall planche pushup. Keep form perfect.
If you do not have rings that can be mounted close to the wall you may skip this progression as well as the progression at level 13.
Make sure to keep the body straight the entire time, and keep the rings turned out.
What you particularly want to focus on in this movement is minimizing the amount of feet support and assistance on the wall. In particular, as you get stronger it may be applicable to switch to different footwear or change the wall resistance if possible. For example, if your wall is particularly sticky you can get some smooth plastic or linoleu tiling to make the wall surface more slippery. Likewise, you can switch between shoes, bare feet, and socks or other slippery materials to make it much harder.
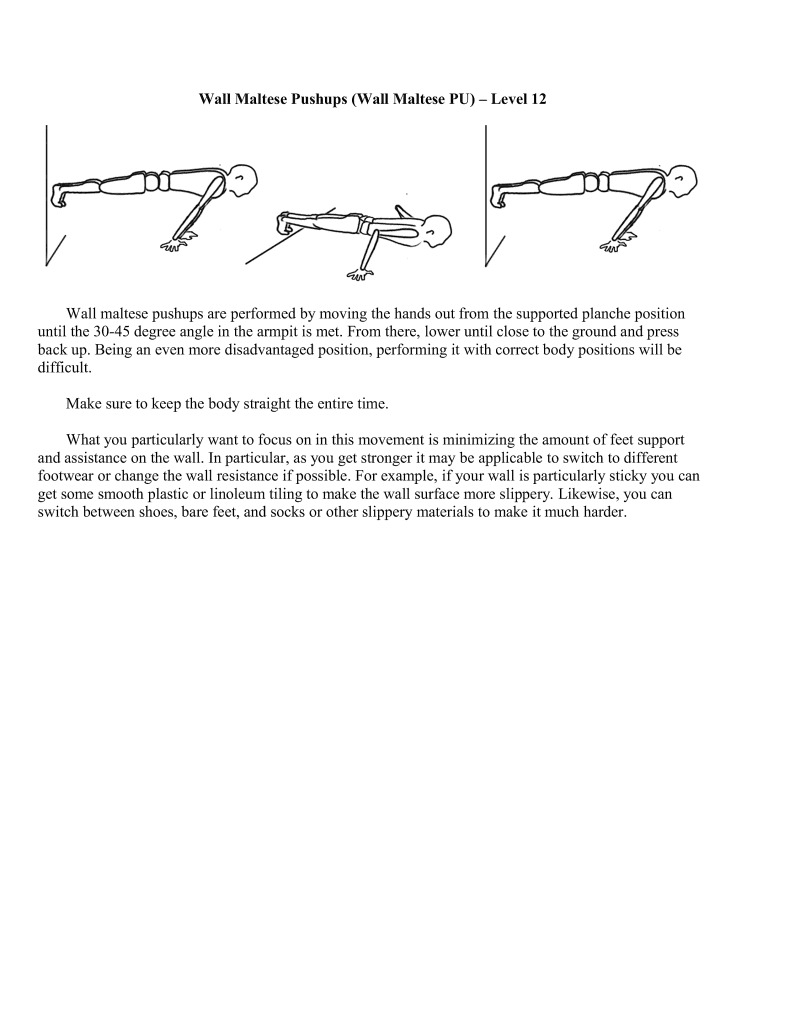
Wall maltese pushups are performed by moving the hands out from the supported planche position until the 30-43 degree angle in the armpit is met. From there, lower until close to the ground and press
back up. Being an even more disadvantaged position, performing it with correct body positions will be difficult.
Make sure to keep the body straight the entire time.
What you particularly want to focus on in this movement is minimizing the amount of feet support and assistance on the wall. In particular, as you get stronger it may be applicable to switch to different footwear or change the wall resistance if possible. For example, if your wall is particularly sticky you can get some smooth plastic or linoleurn tiling to make the wall surface more slippery. Likewise, you can switch between shoes, bare feet, and socks or other slippery materials to make it much harder
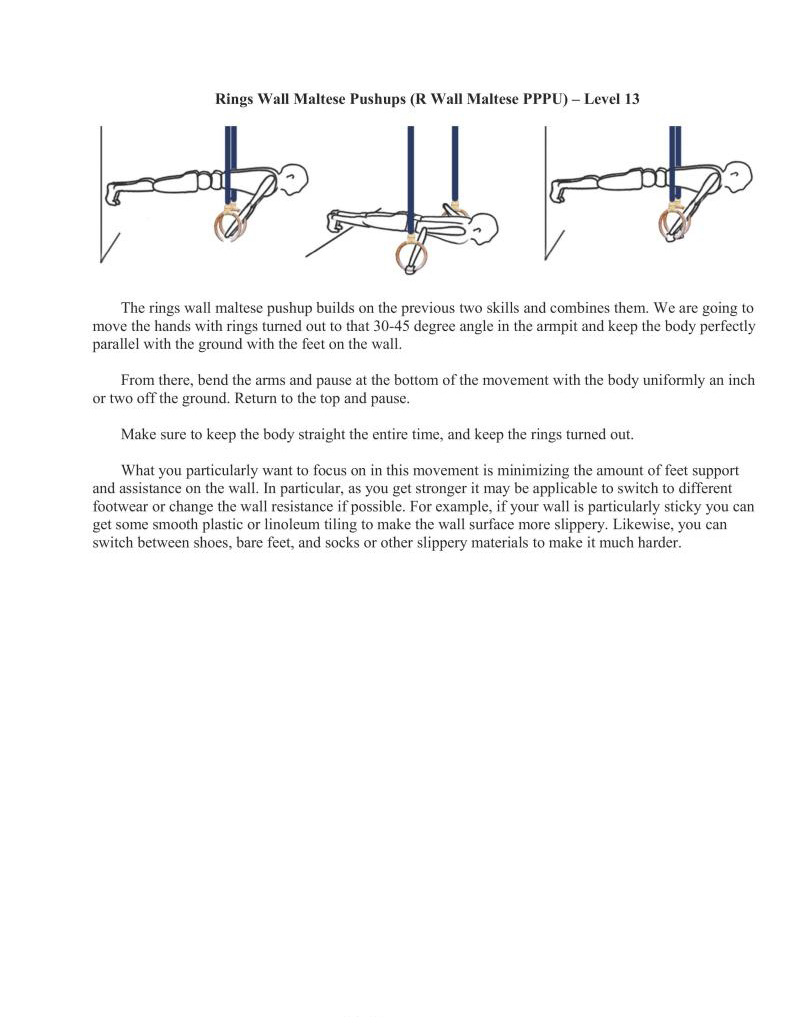
The rings wall maltese pushup builds on the previous two skills and combines them. We are going to move the hands with rings turned out to that 30-45 degree angle in the armpit and keep the body perfectly parallel with the ground with the feet on the wall
From there, bend the arms and pause at the bottom of the movement with the body uniformly an inch or two off the ground. Return to the top and pause.
Make sure to keep the body straight the entire time, and keep the rings turned out.
What you particularly want to focus on in this movement is minimizing the amount of feet support and assistance on the wall. In particular, as you get stronger it may be applicable to switch to different footwear or change the wall resistance if possible. For example, if your wall is particularly sticky you can get some smooth plastic or linoleu tiling to make the wall surface more slippery. Likewise, you can switch between shoes, bare feet, and socks or other slippery materials to make it much harder.
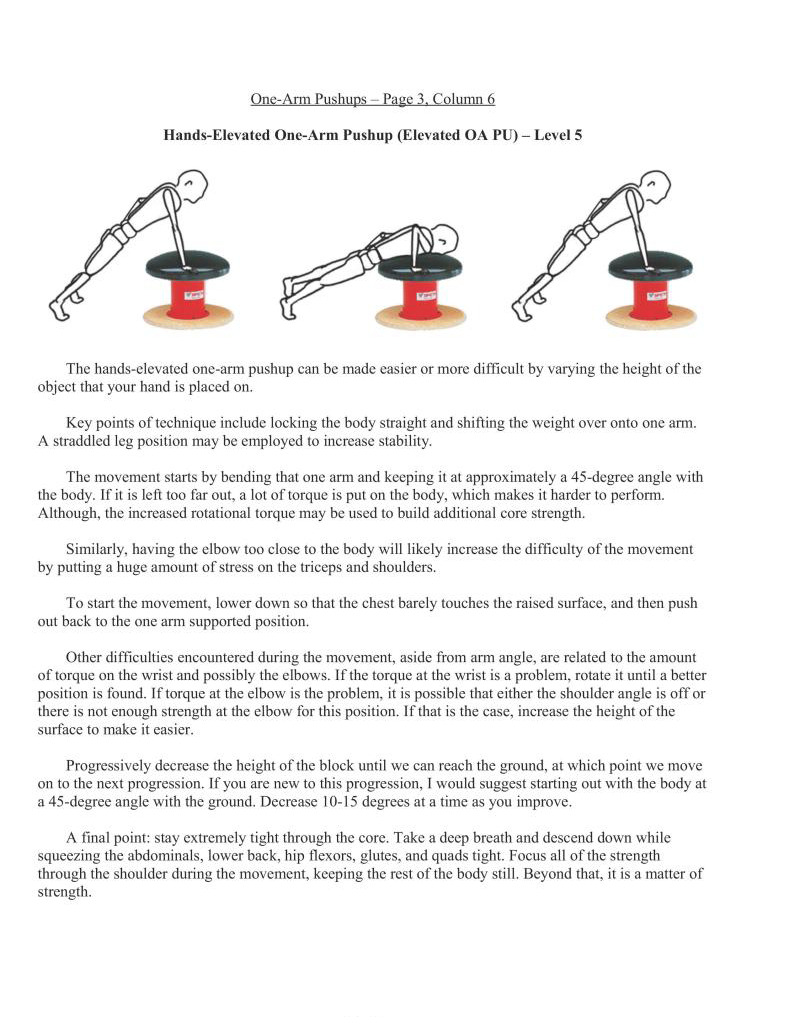
The hands-elevated one-arm pushup can be made easier or more difficult by varying the height of the object that your hand is placed on.
Key points of technique include locking the body straight and shifting the weight over onto one arm. A straddled leg position may be employed to increase stability.
The movement starts by bending that one arm and keeping it at approximately a 43-degree angle with the body. If it is left too far out, a lot of torque is put on the body, which makes it harder to perform. Although, the increased rotational torque may be used to build additional core strength.
Similarly, having the elbow too close to the body will likely increase the difficulty of the movement by putting a huge amount of stress on the triceps and shoulders.
To start the movement, lower down is that the chest barely touches the raised surface, and then push out back to the one arm supported position.
Other difficulties encountered during the movement, aside from arm angle, are related to the amount of torque on the wrist and possibly the elbows. If the torque at the wrist is a problem, rotate it until a better position is found. If torque at the elbow is the problem, it is possible that either the shoulder angle is off or there is not enough strength at the elbow for this position. If that is the case, increase the height of the surface to make it easier.
Progressively decrease the height of the block until we can reach the ground, at which point we move on to the next progression. If you are new to this progression, I would suggest starting out with the body at a45-degree angle with the ground. Decrease 10-15 degrees at a time as you improve.
A final point: stay extremely tight through the core. Take a deep breath and descend down while squeezing the abdominals, lower back, hip flexors, glutes, and quads tight. Focus all of the strength through the shoulder during the movement, keeping the rest of the body still. Beyond that, it is a matter of strength.
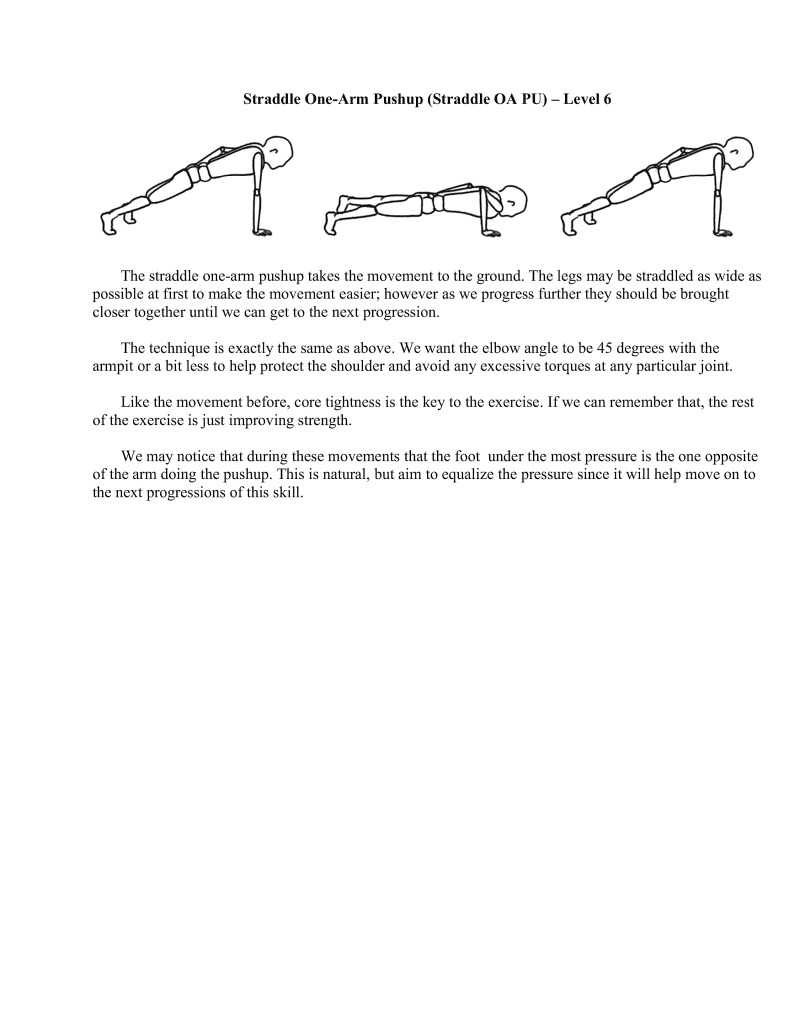
The straddle one-arm pushup takes the movement to the ground. The legs may be straddled as wide as possible at first to make the movement easier; however as we progress further they should be brought closer together until we can get to the next progression.
The technique is exactly the same as above. We want the elbow angle to be 45 degrees with the armpit or a bit less to help protect the shoulder and avoid any excessive torques at any particular joint.
Like the movement before, core tightness is the key to the exercise. If we can remember that, the rest
We may notice that during these movements that the foot under the most pressure is the one opposite of the arm doing the pushup. This is natural, but aim to equalize the pressure since it will help move on to the next progressions of this skill
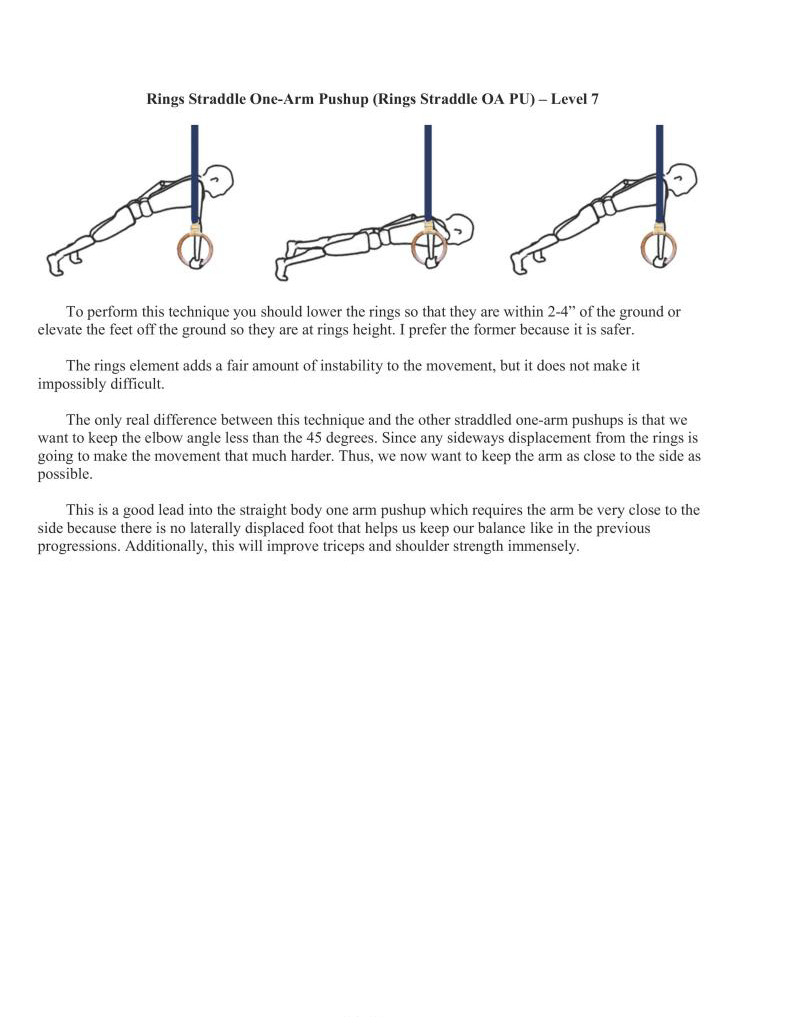
To perform this technique you should lower the rings so that they are within 2-4 of the ground or elevate the feet off the ground so they are at rings height. I prefer the former because it is safer.
The rings element adds a fair amount of instability to the movement, but it does not make it impossibly difficult.
The only real difference between this technique and the other straddled one-arm pushups is that we want to keep the elbow angle less than the 45 degrees. Since any sideways displacement from the rings is going to make the movement that much harder. Thus, we now want to keep the arm as close to the side as possible.
This is a good lead into the straight body one arm pushup which requires the arm be very close to the side because there is no laterally displaced foot that helps us keep our balance like in the previous progressions. Additionally, this will improve triceps and shoulder strength immensely.
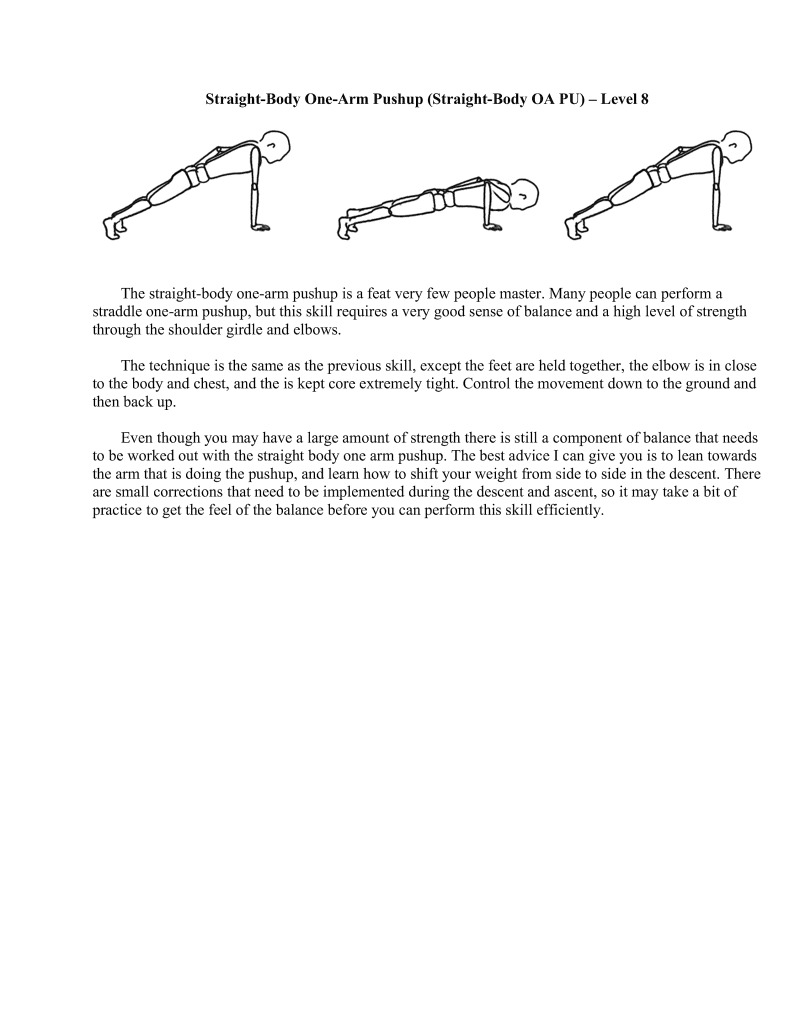
The straight-body one-arm pushup is a feat very few people master. Many people can perform a
straddle one-arm pushup, but this skill requires a very good sense of balance and a high level of strength through the shoulder girdle and elbows
The technique is the same as the previous skill, except the feet are held together, the elbow is in close o the body and chest, and the is kept core extremely tight. Control the movement down to the ground and then back up.
Even though you may have a large amount of strength there is still a component of balance that needs to be worked out with the straight body one arm pushup. The best advice I can give you is to lean towards the arm that is doing the pushup, and learn how to shift your weight from side to side in the descent. There are small corrections that need to be implemented during the descent and ascent, so it may take a bit of practice to get the feel of the balance before you can perform this skill efficiently.
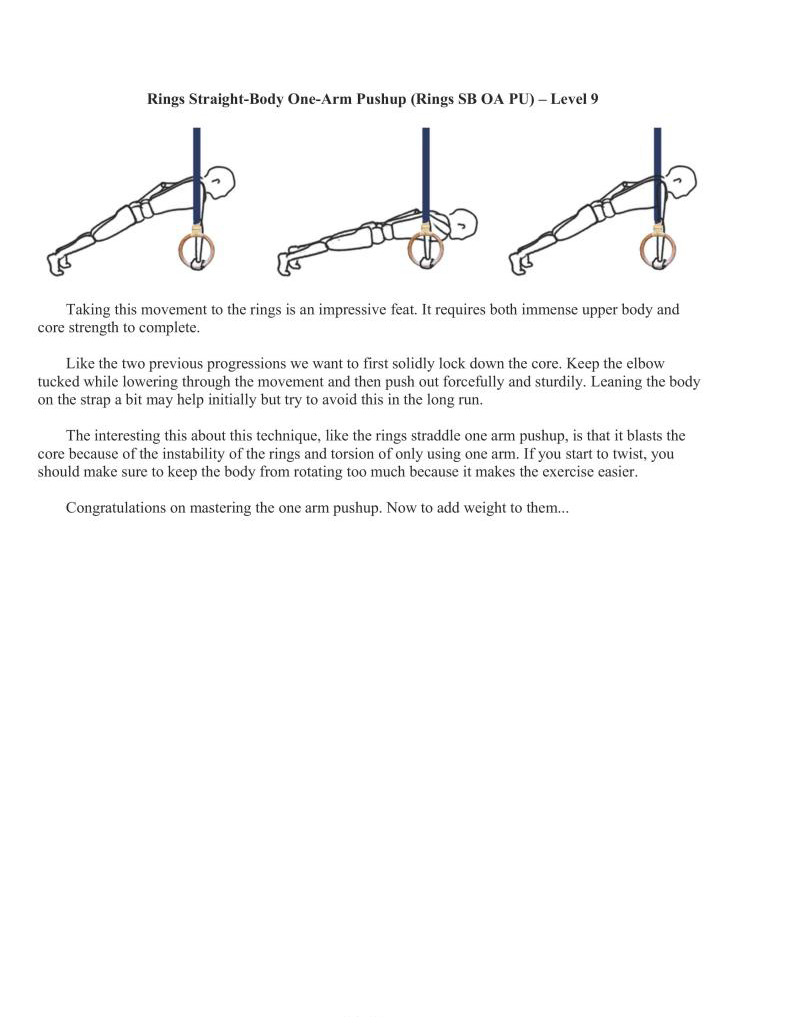
Taking this movement to the rings is an impressive feat. It requires both immense upper body and core strength to complete.
Like the two previous progressions we want to first solidly lock down the core. Keep the elbow tucked while lowering through the movement and then push out forcefully and sturdily. Leaning the body on the strap a bit may help initially but ry to avoid this in the long run.
The interesting this about this technique, like the rings straddle one arm pushup, is that it blasts the core because of the instability of the rings and torsion of only using one arm. If you start to twist, you should make sure to keep the body from rotating too much because it makes the exercise easier.
Congratulations on mastering the one arm pushup. Now to add weight to them...
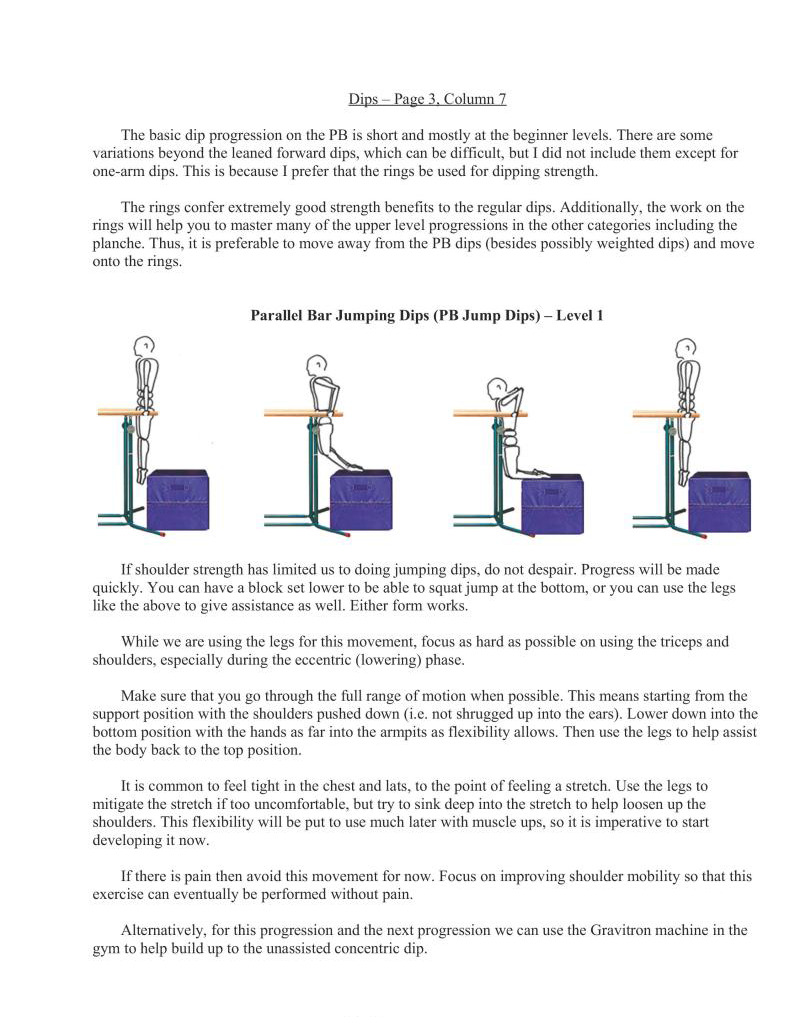
dip progression on the PB is short and mostly at the beginner levels. There are some variations beyond the leaned forward dips, which can be difficult, but did not include them except for one-arm dips. This is because I prefer that the rings be used for dipping strength.
The rings confer extremely good strength benefits to the regular dips. Additionally, the work on the rings will help you to master many of the upper level progressions in the other categories including the planche. Thus, it is preferable to move away from the PB dips (besides possibly weighted dips) and move onto the rings,
I shoulder strength has limited us to doing jumping dips. do not despair. Progress will be made quickly. You can have a block set lower to be able to squat jump at the boitom, or you can use the legs like the above to give assistance as well. Either form works.
While we are using the legs for this movement, focus as hard as possible on using the triceps and shoulders, especially during the eccentric (lowering) phase.
Make sure that you go through the full range of motion when possible. This means starting from the support position with the shoulders pushed down (i.¢. not shrugged up into the cars). Lower down into the bottom position with the hands as far into the armpits as flexibility allows. Then use the legs to help assist the body back to the top position.
It is common to feel tight in the chest and lats, to the point of feeling a streteh. Use the legs to mitigate the stretch if too uncomfortable, but try to sink deep into the stretch to help loosen up the shoulders. This flexibility will be put to use much later with muscle ups, so it is imperative to start developing it now.
If there is pain then avoid this movement for now. Focus on improving shoulder mobility so that this exercise can eventually be performed without pain.
Alternatively, for this progression and the next progression we can use the Gravitron machine in the gym to help build up to the unassisted concentric dip.
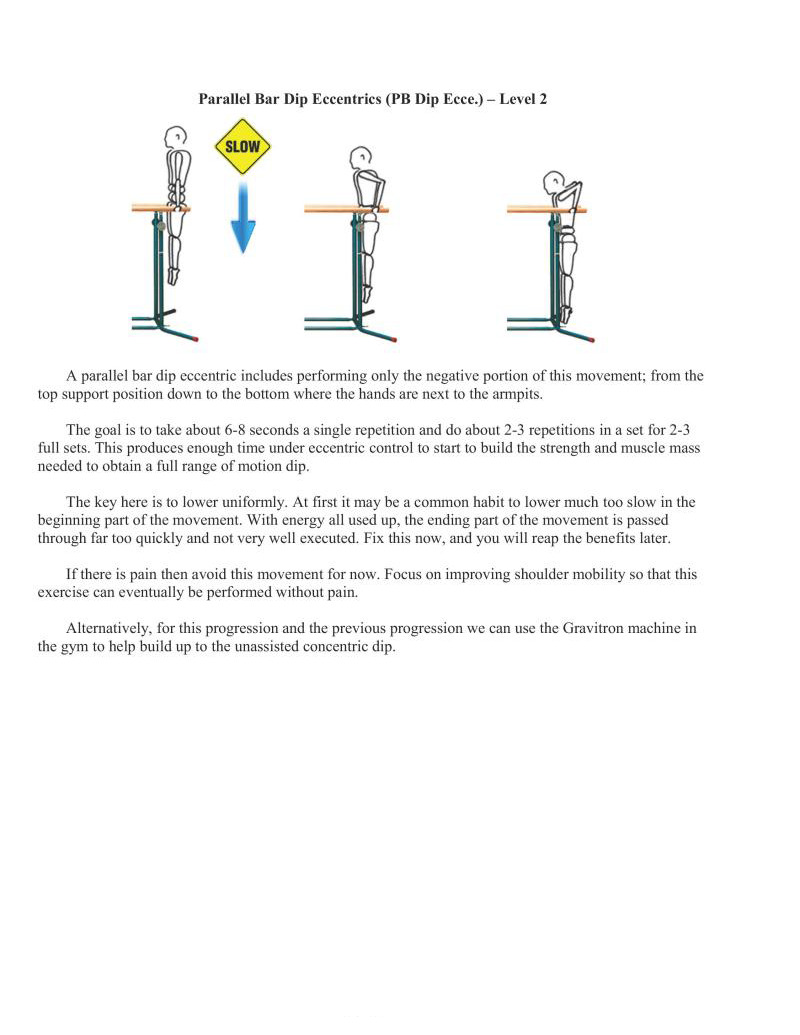
A parallel bar dip eccentric includes performing only the negative portion of this movement; from the top support position down to the bottom where the hands are next to the armpits.
The goal i to take about 6-8 seconds a single repetition and do about 2-3 repetitions in a set for 2-3 full sets. This produces enough time under eccentric control to start to build the strength and muscle mass needed to obtain a full range of motion dip.
The key here is to lower uniformly. At first it may be a common habit to lower much too slow in the beginning part of the movement. With energy all used up, the ending part of the movement is passed through far too quickly and not very well executed. Fix this now, and you will reap the benefits later.
If there is pain then avoid this movement for now. Focus on improving shoulder mobility so that this exercise can eventually be performed without pain.
Alternatively, for this progression and the previous progression we can use the Gravitron machine in the gym to help build up to the unassisted concentric dip.
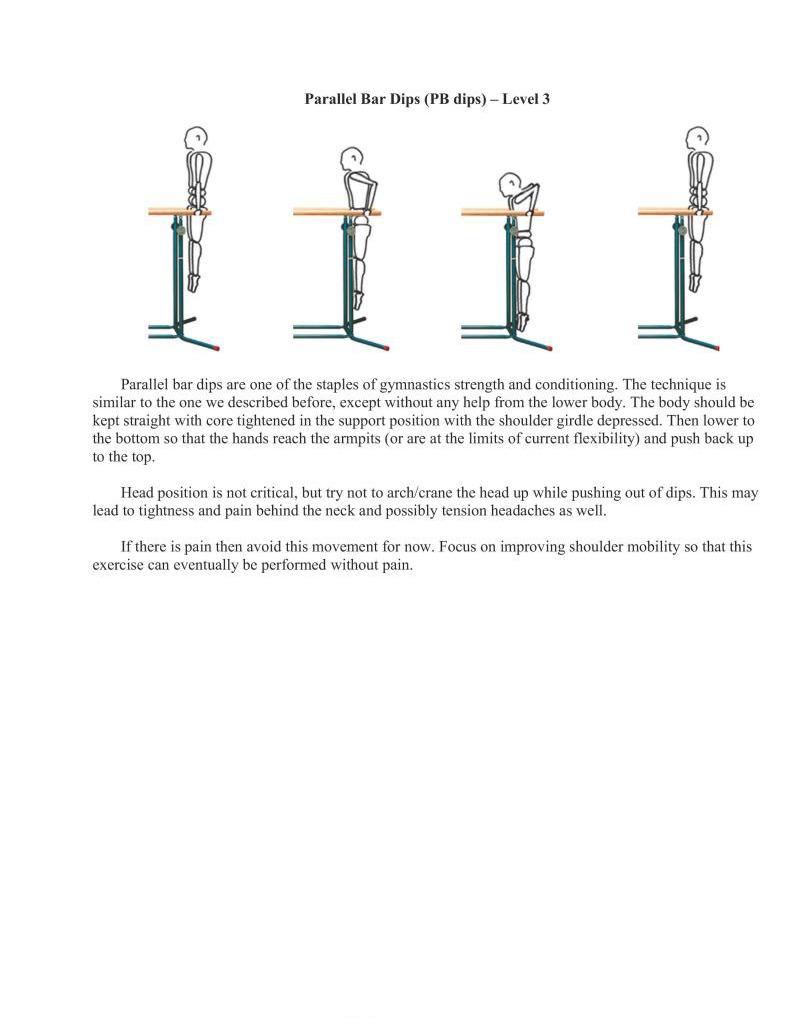
Parallel bar dips are one of the staples of gymnastics strength and conditioning. The technique is similar to the one we described before, except without any help from the lower body. The body should be kept straight with core tightened in the support position with the shoulder girdle depressed. Then lower to the bottom so that the hands reach the armpits (o are at the limits of current flexibility) and push back up 1o the top.
Head position is not critical, but try not to arch/crane the head up while pushing out of dips. This may lead to tightness and pain behind the neck and possibly tension headaches as well.
If there is pain then avoid this movement for now. Focus on improving shoulder mobility so that this exercise can eventually be performed without pain.
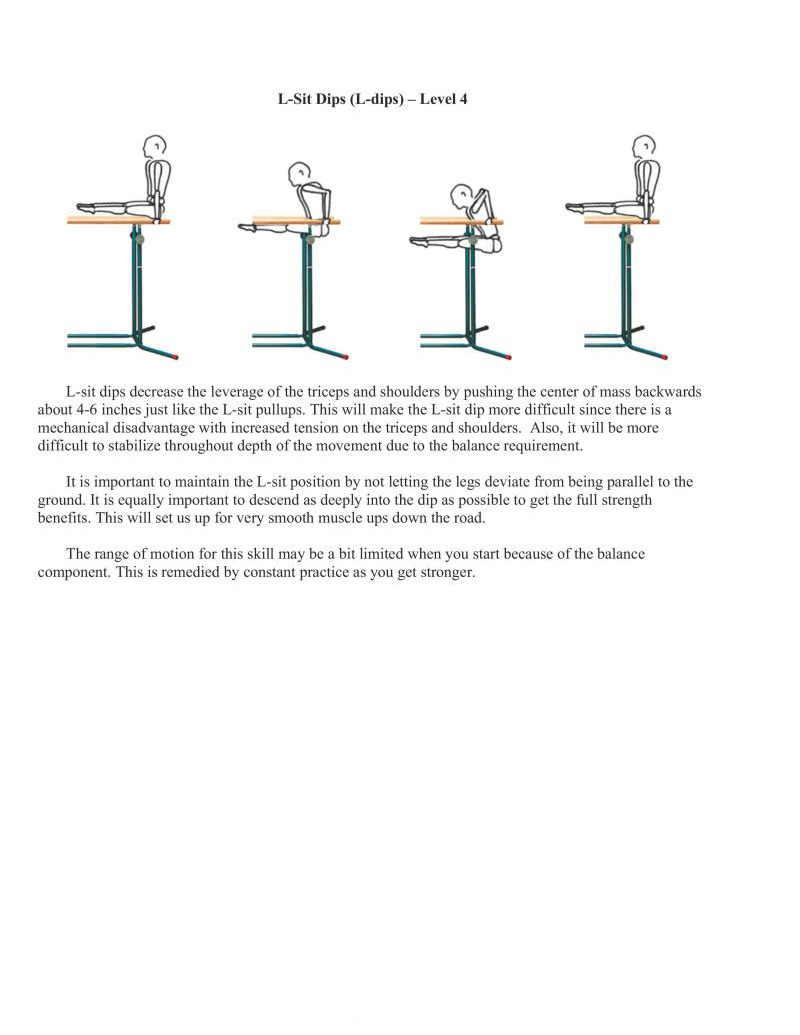
L-sit dips decrease the leverage of the triceps and shoulders by pushing the center of mass backwards about 4-6 inches just like the L-sit pullups. This will make the L-sit dip more difficult since there is a
mechanical disadvantage with increased tension on the triceps and shoulders. Also, it will be more difficult to stabilize throughout depth of the movement due to the balance requirement.
It is important to maintain the L-sit position by not letting the legs deviate from being parallel to the ground. It is equally important to descend as decply into the dip as possible to get the full strength benefits. This will set us up for very smooth muscle ups down the road.
The range of motion for this skill may be a bit limited when you start because of the balance component. This is remedied by constant practice as you get stronger.
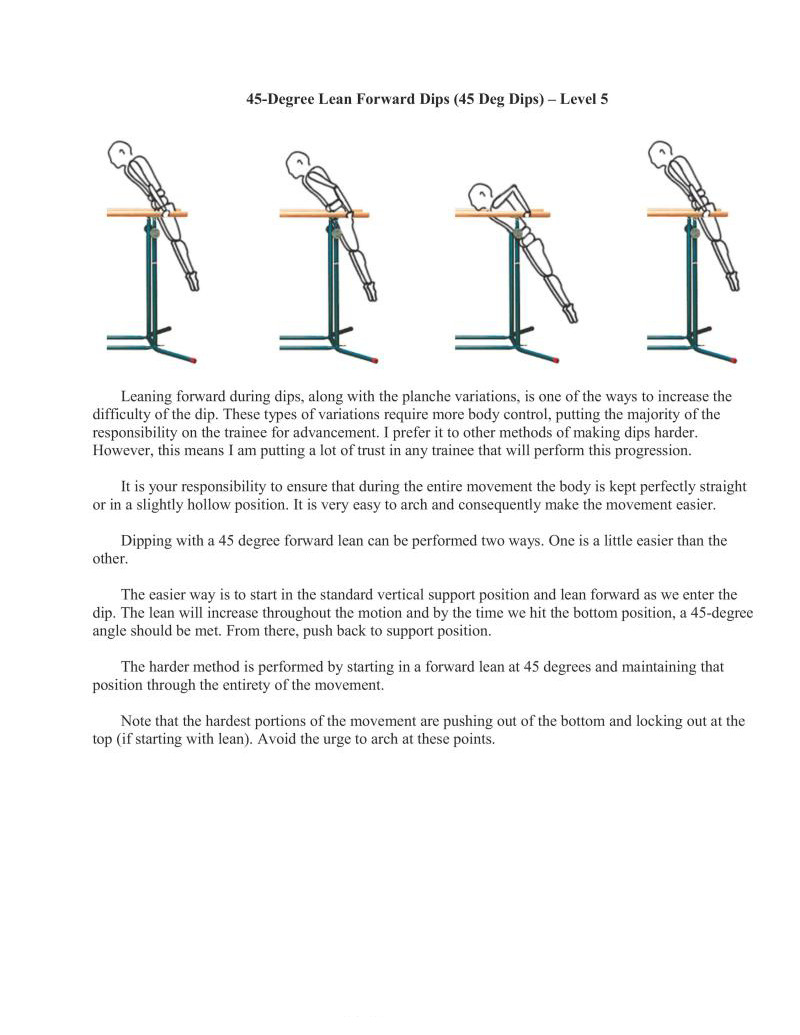
Leaning forward during dips, along with the planche variations, is one of the ways to increase the difficulty of the dip. These types of variations require more body control, putting the majority of the responsibility on the trainee for advancement. I prefer it to other methods of making dips harder. However, this means | am putting a lot of trust in any trainee that will perform this progression.
It is your responsibility to ensure that during the entire movement the body is kept perfectly straight orin a slightly hollow position. It is very easy to arch and consequently make the movement easier.
Dipping with a 45 degree forward lean can be performed two ways. One is a littl easier than the other.
The easier way is to start in the standard vertical support position and lean forward as we enter the dip. The lean will increase throughout the motion and by the time we hit the bottom position, a 45-degree angle should be met. From there, push back to support position.
The harder method is performed by starting in a forward lean at 45 degrees and maintaining that position through the entirety of the movement
Note that the hardest portions of the movement are pushing out of the bottom and locking out at the top (if starting with lean). Avoid the urge to arch at these points,

It is a novel exercise that very few people even know about or want to learn. I decided on including it because, like the one arm chinup or one arm pushup, using this progression can be good for assessing unilateral strength balance. It also requires good use of the core stabilizers. Plus, it is fun to see if you can perform this type of skill
There are two different variations of the one arm dip, and one way to make each more difficult. These progressions will likely be used solely on a wall because the wall can brace the legs to help provide balance. It is possible to do it on a single rail, but this will make the exercise significantly more difficult.
The first variation of the one arm dip is with the body facing the wall. Usually the hand will be placed with the fingers pointing forward. The hand will be placed more towards the middle of the body.
The second variation is to face parallel along the wall with the side of the body facing the wall. In this position, the hand is placed in line with the dircction the body is facing. There will be some lean over the arm to keep balance.
Descending and ascending is just like in the straight body one-arm pushup progressions. Keep the amm tucked in close to the body to n torque at the joints and rotational forces. The core must be squeezed tight along with the legs
This exercise can be made easier by just bending the torso down and up. This decreases any movement of the legs, which takes weight off of the pushing arm. Additionally, the legs can be used to push minimally because of a bit of fiction from the wall. Ultimately. you will want to eliminate any of these assistance measures and perform this technique by keeping a straight body and pressing through a single arm.
Do note that if you bend and/or twist your your torso, it can make the movement much easier such that it may fall under level 6 or 7 type of strength. This is one way to build up to the movement. It is also an alternative movement you can use to work on strength in the absence of a weighted vest, weight belt, parallettes, or other equipment. It is useful outside as well and can be performed on a bar with some balance effort.
Like the other progressions, these types of dips put the onus on us to perform them correctly. Dips on rings are critical to building a lot of the upper body strength. Stay hollow and resist arching at ail costs.
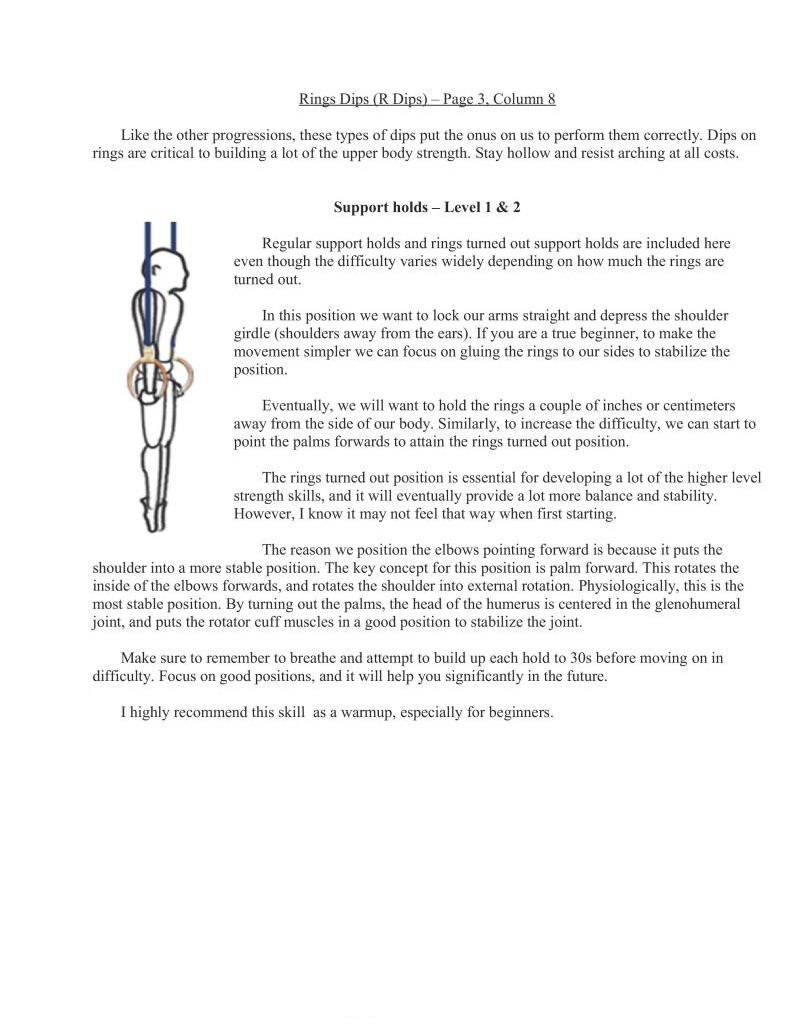
Regular support holds and rings turned out support holds are included here even though the difficulty varies widely depending on how much the rings are turned out.
In this position we want to lock our arms straight and depress the shoulder girdle (shoulders away from the ears). If you are a true beginner, to make the movement simpler we can focus on gluing the rings to our sides to stabilize the position.
Eventually, we will want to hold the rings a couple of inches or centimeters away from the side of our body. Similarly, to increase the difficulty, we can sart to point the palms forwards to attain the rings turned out position
The rings turned out position is essential for developing a lot of the higher level strength skills, and it will eventually provide a lot more balance and stability. However, I know it may not feel that way when first starting.
The reason we position the elbows pointing forward is because it puts the shoulder into a more stable position. The key concept for this position is palm forward. This rotates the inside of the elbows forwards, and rotates the shoulder into external rotation. Physiologically, this is the most stable position. By turning out the palms, the head of the humerus is centered in the glenohumeral joint, and puts the rotator cuff muscles in a good position to stabilize the joint.
Make sure to remember to breathe and attempt to build up each hold to 30s before moving on in difficulty. Focus on good positions, and it will help you significantly in the future.
I highly recommend this skill as a warmup, especially for beginners
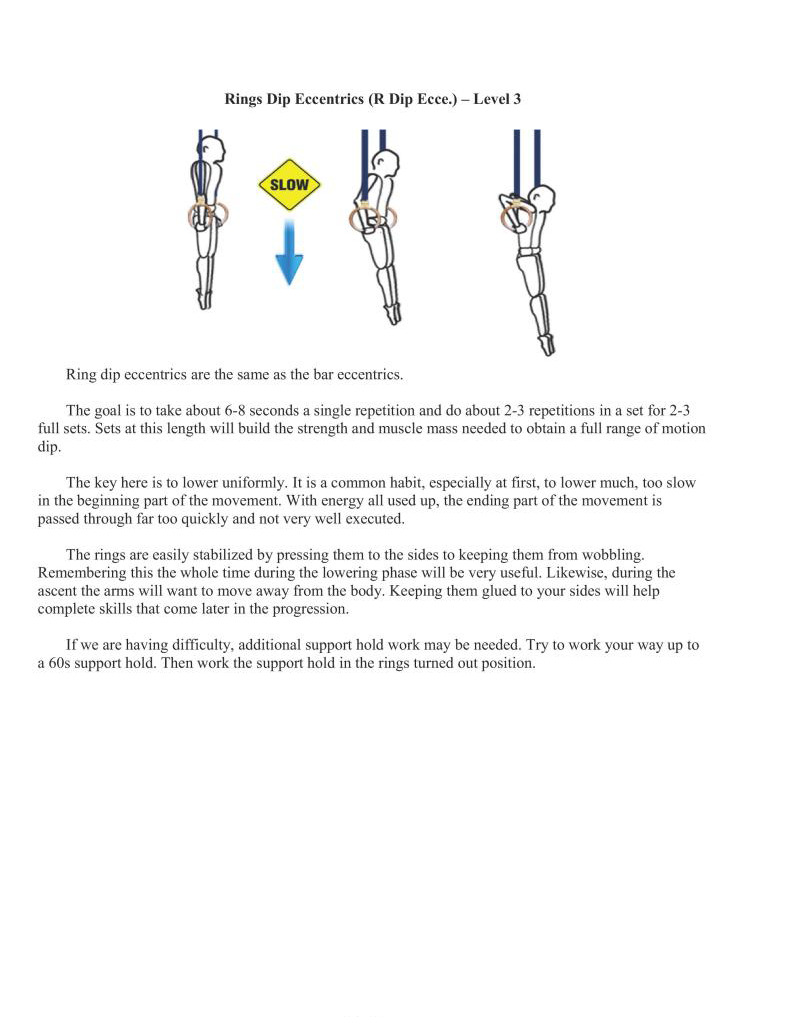
Ring dip eccentrics are the same as the bar eccentrics.
The goal is to take about 6-8 seconds a single repetition and do about 2-3 repetitions in a set for 2-3 full sets. Sets at this length will build the strength and muscle mass needed to obtain a full range of motion dip.
The key here is to lower uniformly. It is a common habit, especially at first, to lower much, too slow in the beginning part of the movement. With energy all used up, the ending part of the movement is passed through far too quickly and not very well executed.
The rings are easily stabilized by pressing them to the sides to keeping them from wobbling. Remembering this the whole time during the lowering phase will be very useful. Likewise, during the ascent the arms will want to move away from the body. Keeping them glued to your sides will help complete skills that come later in the progression.
If we are having difficulty, additional support hold work may be needed. Try to work your way up to a 60s support hold. Then work the support hold in the rings turned out position.
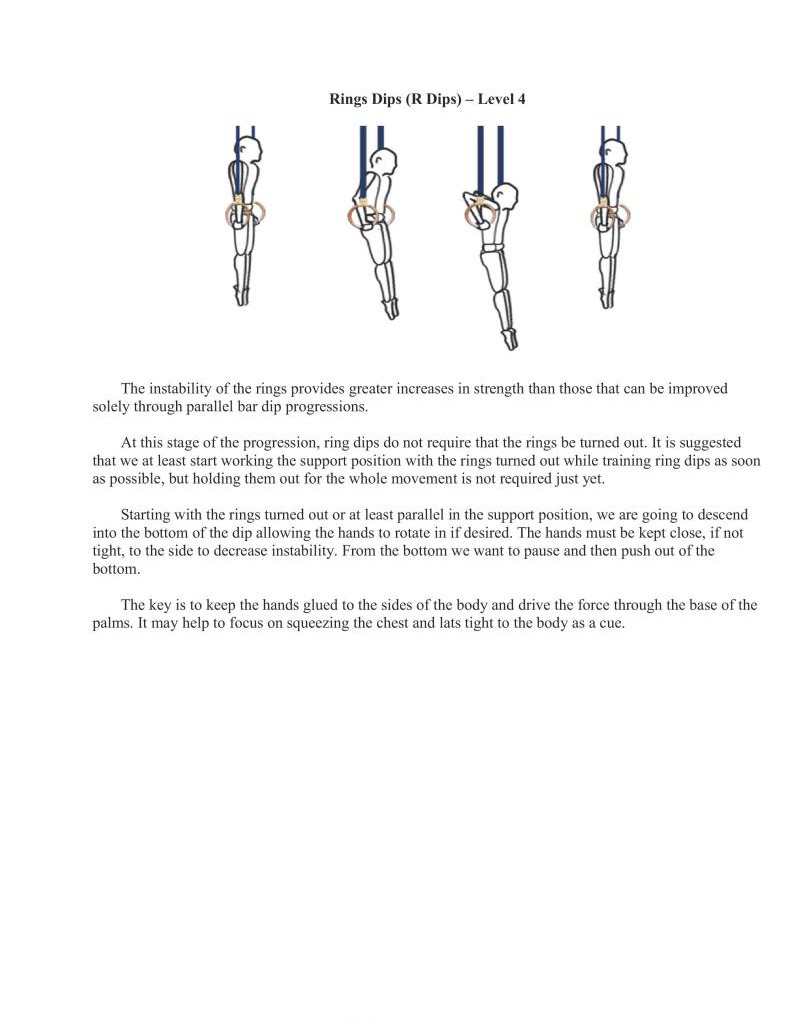
The instability of the rings provides greater increases in strength than those that can be improved solely through parallel bar dip progressions.
At this stage of the progression, ring dips do not require that the rings be turned out. It is suggested that we at least start working the support position with the rings turned out while training ring dips as soon as possible, but holding them out for the whole movement is not required just yet.
Starting with the rings turned out or at least parallel in the support position, we are going to descend into the bottom of the dip allowing the hands to rotate in if desired. The hands must be kept close, if not tight, to the side to decrease instability. From the bottom we want to pause and then push out of the bottom.
The key is to keep the hands glued to the sides of the body and drive the force through the base of the palms. It may help to focus on squeczing the chest and lats tight to the body as a cue.
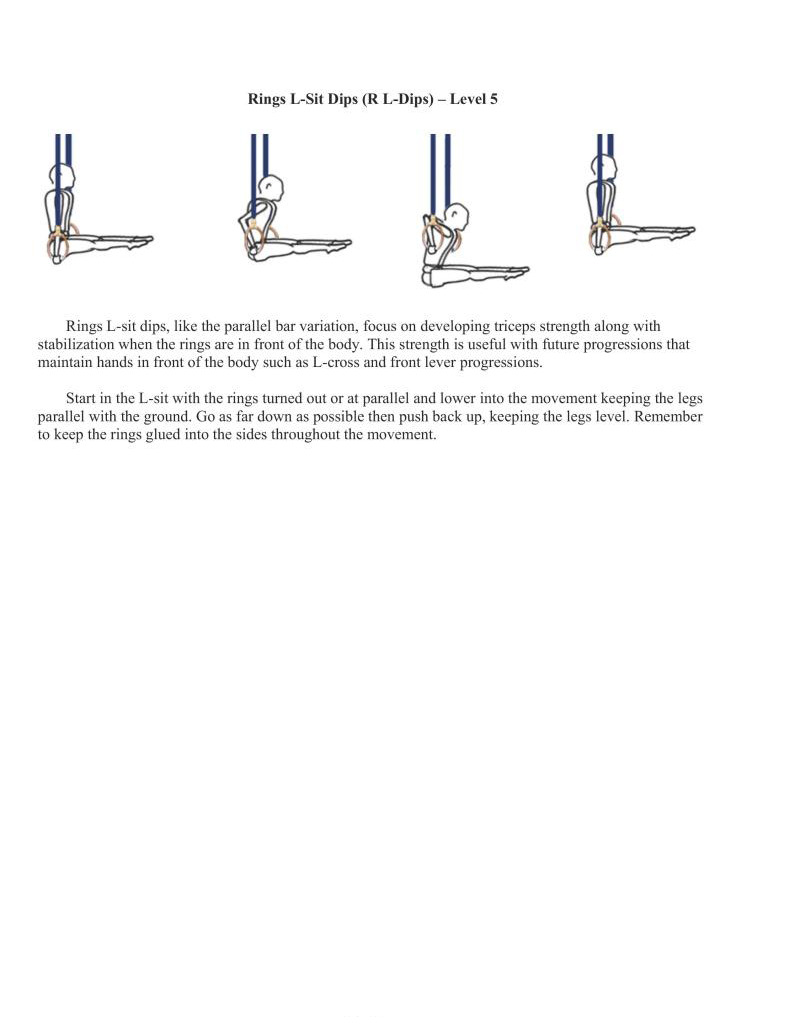
Rings L-sit dips, like the parallel bar variation, focus on developing triceps strength along with
stabilization when the rings are in front of the body. This strength is useful with future progressions that maintain hands in front of the body such as L-cross and front lever progressions.
Start in the L-sit with the rings turned out or at parallel and lower into the movement keeping the legs parallel with the ground. Go as far down as possible then push back up, keeping the legs level. Remember to keep the rings glued into the sides throughout the movement.
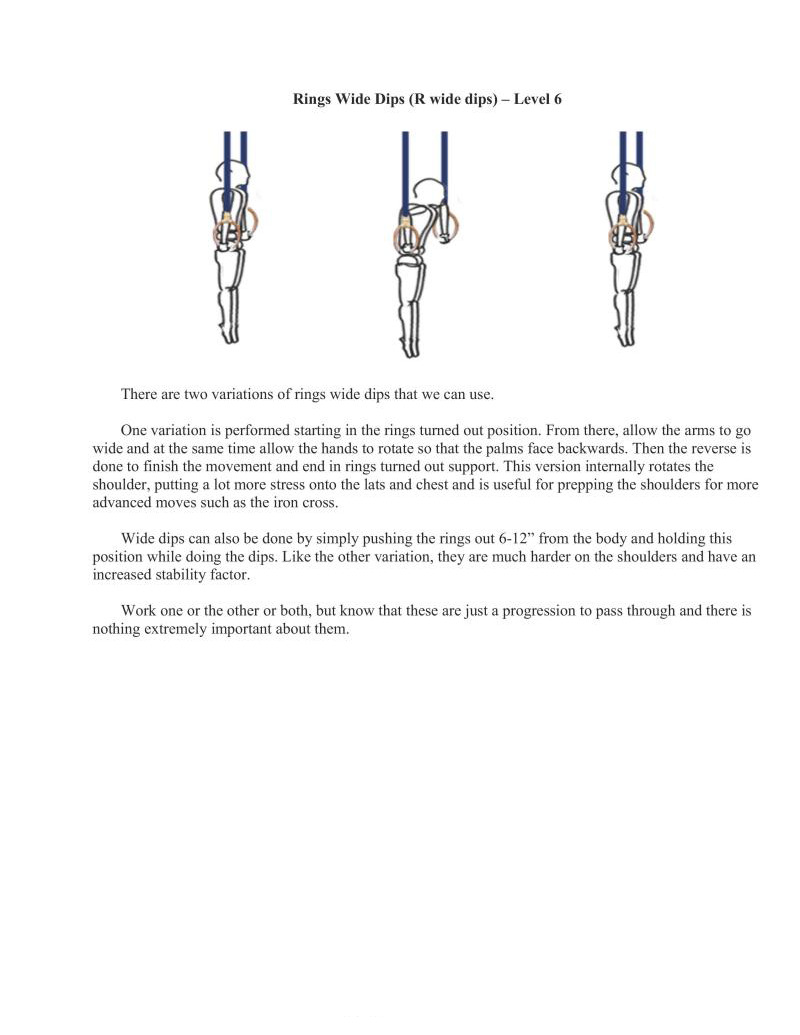
There are two variations of rings wide dips that we can use.
One variation is performed starting in the rings turned out position. From there, allow the arms to go wide and at the same time allow the hands to rotate so that the palms face backwards. Then the reverse is done to finish the movement and end in rings turned out support. This version internally rotates the shoulder, putting a lot more stress onto the lats and chest and is useful for prepping the shoulders for more advanced moves such as the iron cross.
Wide dips can also be done by simply pushing the rings out 6-12" from the body and holding this position while doing the dips. Like the other variation, they are much harder on the shoulders and have an increased stability factor.
Work one or the other or both, but know that these are just a progression to pass through and there is nothing extremely important about them.
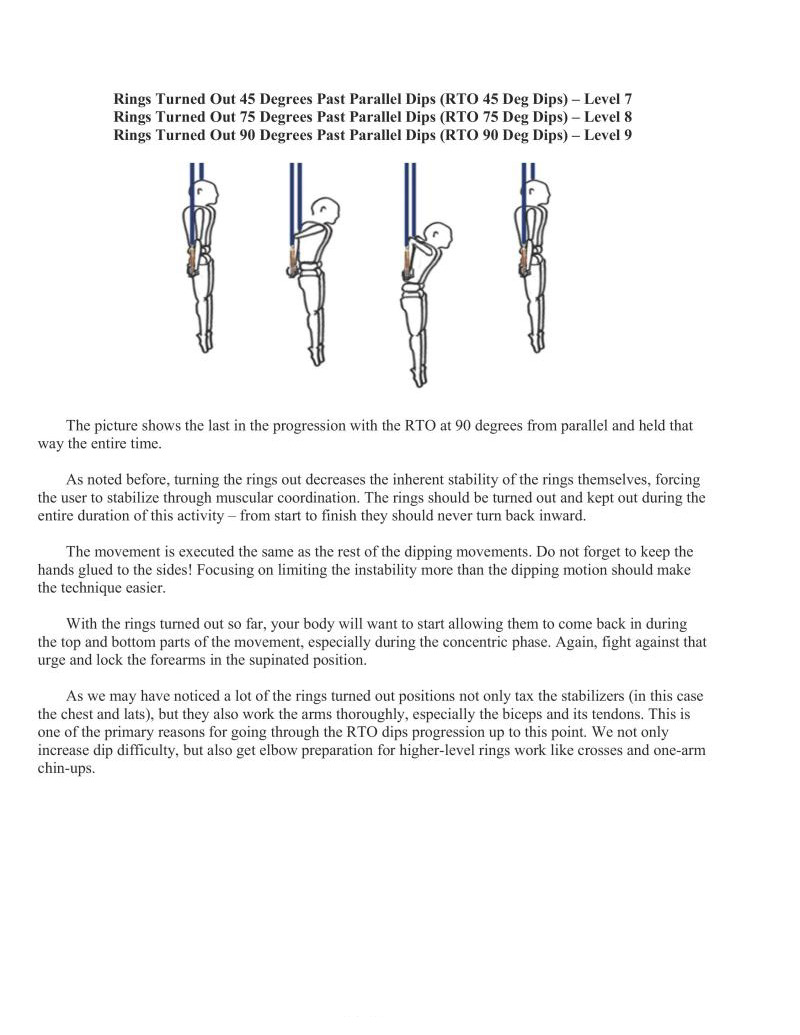
The picture shows the last in the progression with the RTO at 90 degrees from parallel and held that way the entire time.
As noted before, turning the rings out decreases the inherent stability of the rings themselves, forcing the user to stabilize through muscular coordination. The rings should be turned out and kept out during the entire duration of this activity — from start to finish they should never turn back inward.
The movement is executed the same as the rest of the dipping movements. Do not forget to keep the hands glued to the sides! Focusing on limiting the instability more than the dipping motion should make the technique casicr.
With the rings turned out so far, your body will want to start allowing them to come back in during the top and bottom parts of the movement, especially during the concentric phase. Again, fight against that urge and lock the forearms in the supinated position.
As we may have noticed a lot of the rings turned out positions not only tax the stabilizers (in this case the chest and lats), but they also work the arms thoroughly, especially the biceps and its tendons. This is one of the primary reasons for going through the RTO dips progression up to this point. We not only increase dip difficulty, but also get elbow preparation for higher-level rings work like crosses and one-arm chin-ups.
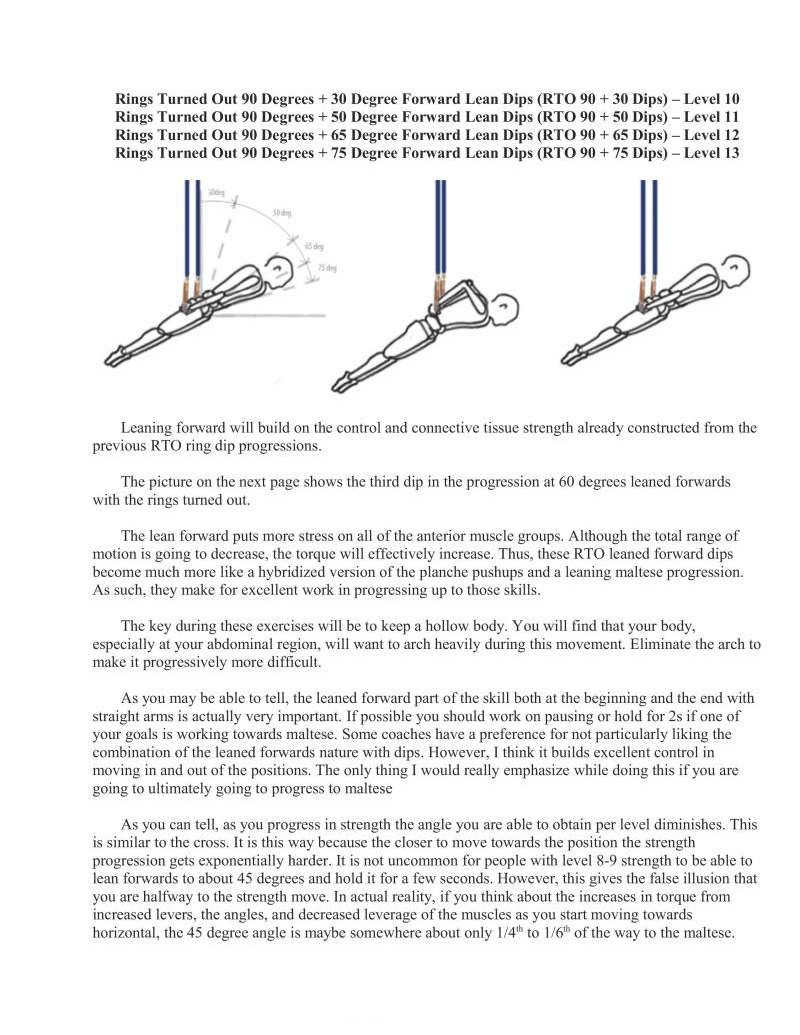
Leaning forward will build on the control and connective tissue strength already constructed from the previous RTO ring dip progressions.
The picture on the next page shows the third dip in the progression at 60 degrees leaned forwards with the rings turned out
The lean forward puts more stress on all of the anterior muscle groups. Although the total range of motion is going to decrease, the torque will effectively increase. Thus, these RTO leaned forward dips become much more like a hybridized version of the planche pushups and a leaning maltese progression. As such, they make for excellent work in progressing up to those skills.
The key during these exercises will be to keep a hollow body. You will find that your body, especially at your abdominal region, will want to arch heavily during this movement. Eliminate the arch to make it progressively more difficult.
As you may be able to tell, the leaned forward part of the skill both at the beginning and the end with straight arms is actually very important. If possible you should work on pausing or hold for 2s if one of your goals is working towards maltese. Some coaches have a preference for not particularly liking the combination of the leaned forwards nature with dips. However, I think it builds excellent control in moving in and out of the positions. The only thing I would really emphasize while doing this if you are going to ultimately going to progress to maltese
As you can tell, as you progress in strength the angle you are able to obtain per level diminishes. This is similar to the cross. It is this way because the closer to move towards the position the strength progression gets exponentially harder. It is not uncommon for people with level 8-9 strength to be able to lean forwards to about 45 degrees and hold it for a few seconds. However, this gives the false illusion that you are halfway to the strength move. In actual reality, if you think about the increases in torque from increased levers, the angles, and decreased leverage of the muscles as you start moving towards horizontal, the 45 degree angle is maybe somewhere about only 1/4" to 1/6" of the way to the maltese.

Since I am not covering the maltese specifically, I did want to finish out the start with approximate angles of lean as you get closer to the maltese. These are as below and filled out in the chart as well (though the maltése is in the column to the left since I did not have enough room).
Weighted dips are often called the squat of the upper body for the amount of musculature they use. I would agree with this assessment,
Weighed dips can be done on either parallel bars or rings. Obviously, rings weighted dips are a bit more difficult than those done on parallel bars at lower levels. However, once you start to move towards full 2x bodyweight dips, they actually start to get easier on the rings.
This is because the rings splay outwards normally, but when you add significant amounts of weight to your body, physics dictates that the rings tend to stay put. When the rings move outwards they also move upwards. Hence, gravity, your weight, and the additional weight counteract the outward force applied to the rings from your hands, which help to stabilize the rings more.
Regardless, the weighted dip progression is very easy to measure, which is why I have used them extensively in my training. Weighted dips have very good transference to planche skills, but they do not benefit handstand pushups as much. We should expect this because weighted dips work more in the extension range of motion of the shoulder, conferring some benefit to the flexion of the planche. However, itis unlikely to confer benefits to fully flexed shoulder positions such as handstands and handstand pushups
Weighted dips will typically outpace weighted pullups by a progression or two due to additional involved musculature. Additionally, the triceps are larger and stronger than the biceps.
You should be able to perform a 2x bodyweight dip at roughly level 9 ability. This is about consistent with all of the other skills developed around that level. For reference, straddle planche is at level 8, and the 1/2 layout and 1 leg out planche is a level 9 ability.
Previous Chapter ... ... Next Chapter