Previous Chapter ... ... Next Chapter
In gymnastics based strength training, the back lever is one of the first fundamental static strength- based positions.
Working towards a solid back lever will prepare the body for many of the higher level strength progressions like the iron cross. As such, this manual encourages a supinated grip to get the most out of back lever training which will significantly stress the biceps and elbows.
We can execute back levers either on a pullup bar or rings. There is a very little change in difficulty between the two so it is up to preference and equipment availability. However, when using the bar you have to remember to set your hands correctly from the start since they are fixed. This correct hand position will be in the chin up position (hands facing towards you). On the rings we can modify our grip as we need to during the movement.
Supinated grip lets us to improve the quality of strength in the connective tissues in our elbows and recruit more of the biceps, both of which will help with later progressions (and honestly, who does not want bigger guns?). Even if you do not have any pre-existing injury conditions you may at first experience discomfort in the elbows. This is normal. To counteract this, you should mentally cue yourself to strongly tense the biceps during the hold to help protect the joint.
When beginning with this skill there is some elbow soreness to be expected from the stress mentioned above. If this soreness persists and worsens and becomes a sharp, slightly burning pain (which flares during daily activity), some precautions are necessary. Likewise, if there are elbow injury concerns such as excessive hyperextension or previous injuries that may be aggravated, then you may need to do some extra prehabilitation work to help protet the joints.
In regards to prehabilitation and overuse injuries, the first thing I would recommend is to take a week off from the exercise. Very often this is enough time to allow the recovery processes to fix the issue and You may continue from there. Second, understand that your ego might need to be smacked around, and You may need to step down in the progression to lower the intensity. This is important if you have been not using the supinated grip or have been progressing much too fast such that the intensity is causing pain. Third, assistance work may be necessary to cater specifically to the biceps and connective tissue at the elbow. Biceps curls are an obvious solution. For connetive tissue soreness higher repetitions seem to be most advantageous specifically in the range of about 10-15 repetitions. Aim for 2-4 sets as supplementary work.
However, if your injury condition or concerns arc extreme enough and the benefits of supination in back lever do not align strongly with your goals, simply do not use the supinated grip.
On a fixed bar, grab the bar with a palms-facing-you rip. Slide your body up, in between your arms, and back down flipped around. On the rings, starting hand position does not matter while you get inverted. The palms will naturally face the body. Once you start to lower into the back lever position you want to supinate that grip and have those palms face the same direction as your feet.
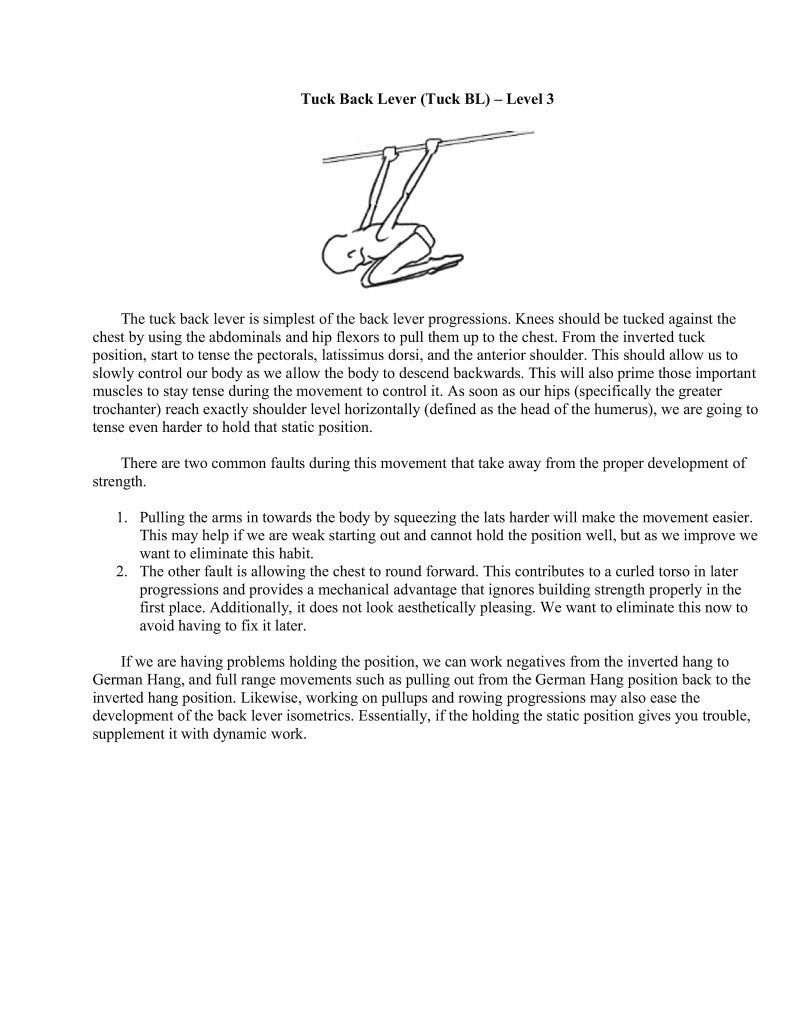
The tuck back lever is simplest of the back lever progressions. Knees should be tucked against the chest by using the abdominals and hip flexors to pull them up to the chest. From the inverted tuck position, start to tense the pectorals, latissimus dorsi, and the anterior shoulder. This should allow us to slowly control our body as we allow the body to descend backwards. This will also prime those important muscles to stay tense during the movement to control it. As soon as our hips (specifically the greater trochanter) reach exactly shoulder level horizontally (defined as the head of the humerus), we are going to tense even harder to hold that static position.
There are two common faults during this movement that take away from the proper development of strength
If we are having problems holding the position, we can work negatives from the inverted hang to German Hang, and full range movements such as pulling out from the German Hang position back to the inverted hang position. Likewise, working on pullups and rowing progressions may also case the development of the back lever isometrics. Essentially, if the holding the static position gives you trouble, supplement it with dynamic work.

The advanced tuck back lever is a continuation of the advanced tuck. This is performed by contracting the back muscles to straighten out the rounded torso. In the tuck, we just pulled the knees to the chest and let our backs round. In the advanced tuck, we are going to straighten out the core of our body so we can see a straight line from our shoulder (humeral head) through the body to the hips (greater trochanter).
Since we are straightening out the torso we increase the difficulty by pushing our center of mass slightly farther away from the shoulders, inereasing the torque at that joint.
If this progression gets easy to hold, open the hip angle by moving the knees farther away from the chest. We want to work up to hip and knee angles of 90 degrees each.
The technique to perform this skill is the same as the tuck back lever. Remember, we need to focus on keeping a supinated grip, a proud chest, and not squeezing our hands closer to each other.
The increased torque at the shoulder will also put more torque at the elbow. Thus, the increased stress may lead to soreness. Fixing the issue is the same as previously prescribed for the Tuck Back Lever.
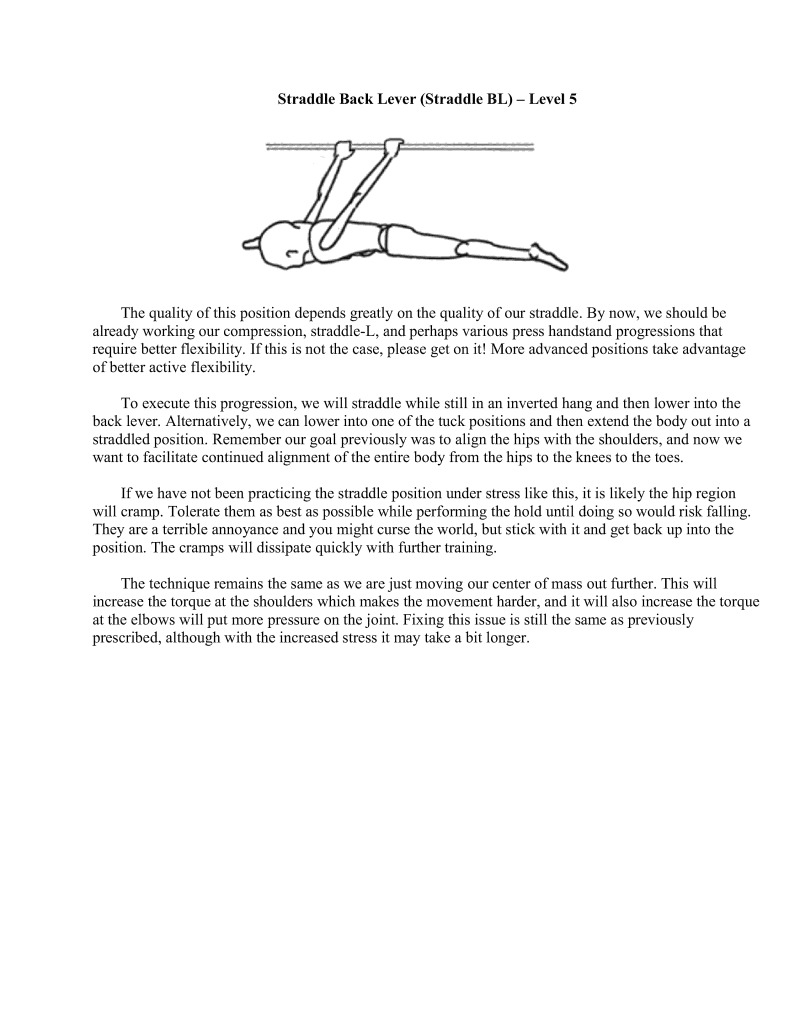
The quality of this position depends greatly on the quality of our straddle. By now, we should be already working our compression, straddle-L, and perhaps various press handstand progressions that require better flexibility. If this is not the case, please get on it! More advanced positions take advantage of better active flexibility.
To execute this progression, we will straddle while still in an inverted hang and then lower into the back lever. Alternatively, e can lower into one of the tuck positions and then extend the body out into a straddled position. Remember our goal previously was to align the hips with the shoulders, and now we want to facilitate continued alignment of the entire body from the hips to the knees to the toes.
If we have not been practicing the straddle position under stress like this, it is likely the hip region will cramp. Tolerate them as best as possible while performing the hold until doing so would risk falling. They are a terrible annoyance and you might curse the world, but stick with it and get back up into the position. The cramps will dissipate quickly with further training.
The technique remains the same as we are just moving our center of mass out further. This will increase the torque at the shoulders which makes the movement harder, and it will also increase the torque at the elbows will put more pressure on the joint. Fixing this issue is still the same as previously prescribed, although with the increased stress it may take a bit longer.
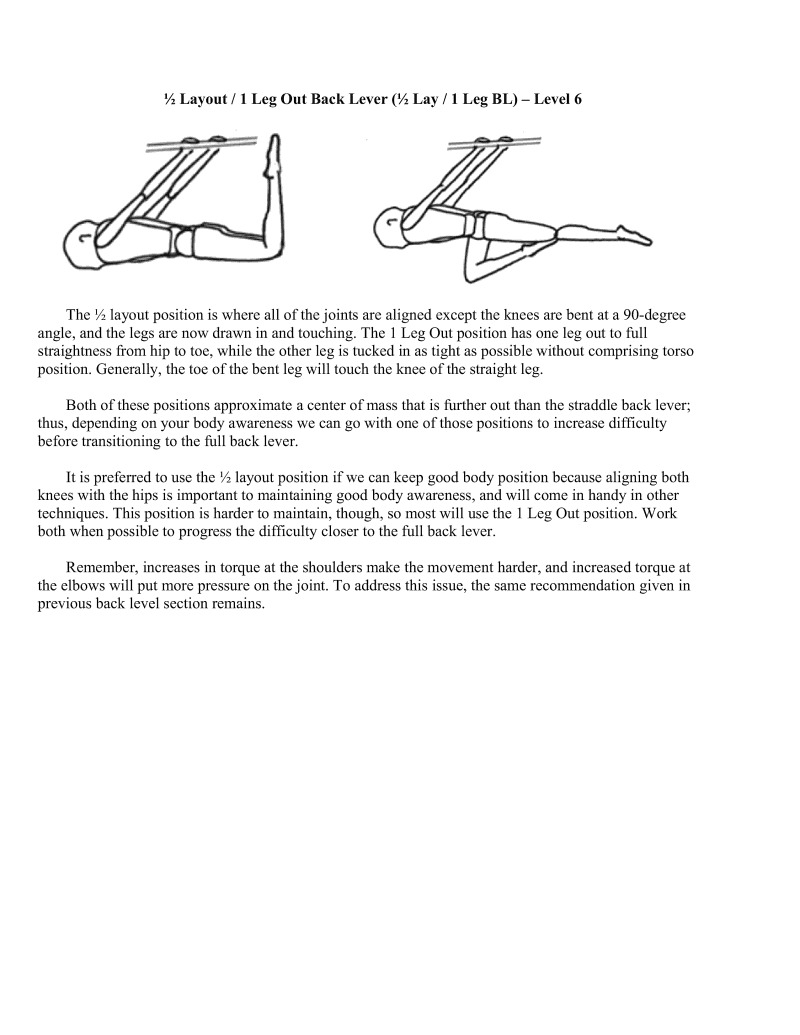
½ Layout/ 1 Leg Out Back Lever (½ Lay / 1 Leg BL) - Level 6
The ½ layout position is where all of the joints are aligned except the knees are bent at a 90-degree angle, and the legs are now drawn in and touching. The 1 Leg Out position has one leg out to full straightness from hip to toe, while the other leg is tucked in as tight as possible without comprising torso position. Generally, the toe of the bent leg will touch the knee of the straight leg.
Both of these positions approximate a center of mass that is further out than the straddle back lever; thus, depending on your body awareness we can go with one of those positions to increase difficulty before transitioning to the full back lever.
techniques. This position is harder to maintain, though, so most will use the 1 Leg Out position. Work both when possible to progress the difficulty closer to the full back lever.
Remember, increases in torque at the shoulders make the movement harder, and increased torque at the elbows will put more pressure on the joint. To address this issue, the same recommendation given in previous back level section remains.
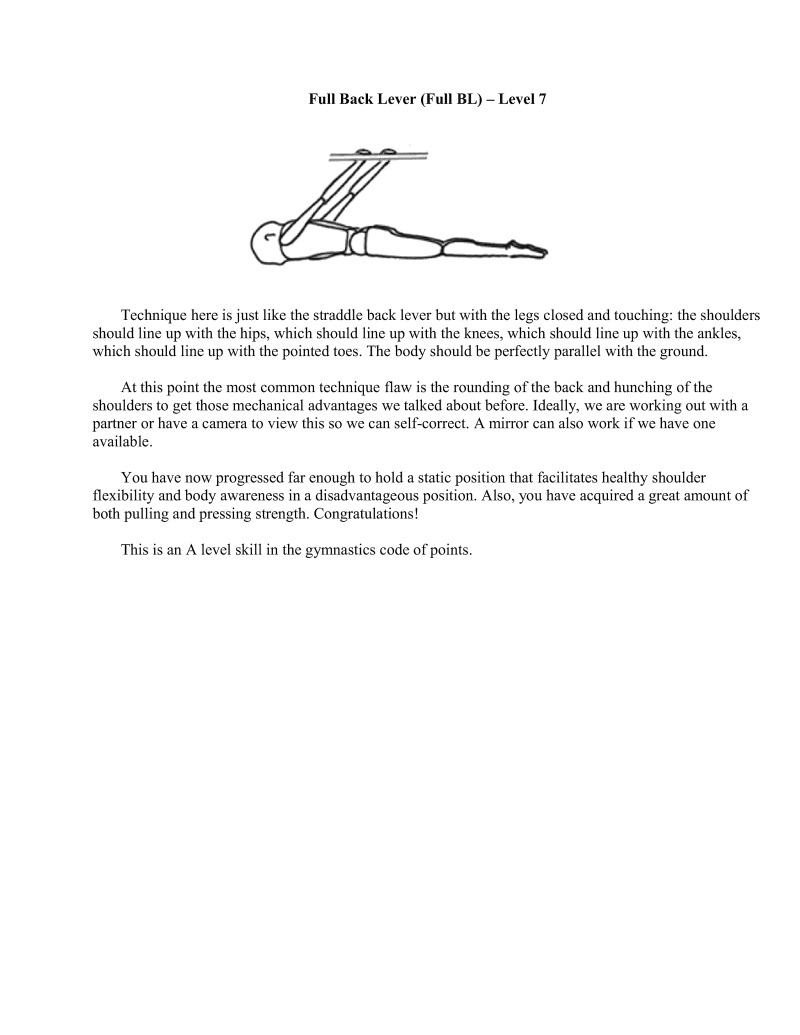
Technique here is just like the straddle back lever but with the legs closed and touching: the shoulders should line up with the hips, which should line up with the knees, which should line up with the ankles, which should line up with the pointed toes. The body should be perfectly parallel with the ground.
At this point the most common technique flaw is the rounding of the back and hunching of the shoulders to get those mechanical advantages we talked about before. Ideally, we are working out with a partner or have a camera to view this so we can self-correct. A mirror can also work if we have one available.
You have now progressed far enough to hold a static position that facilitates healthy shoulder flexibility and body awareness in a disadvantageous position. Also, you have acquired a great amount of both pulling and pressing strength. Congratulations!
This is an A level skill in the gymnastics code of points.
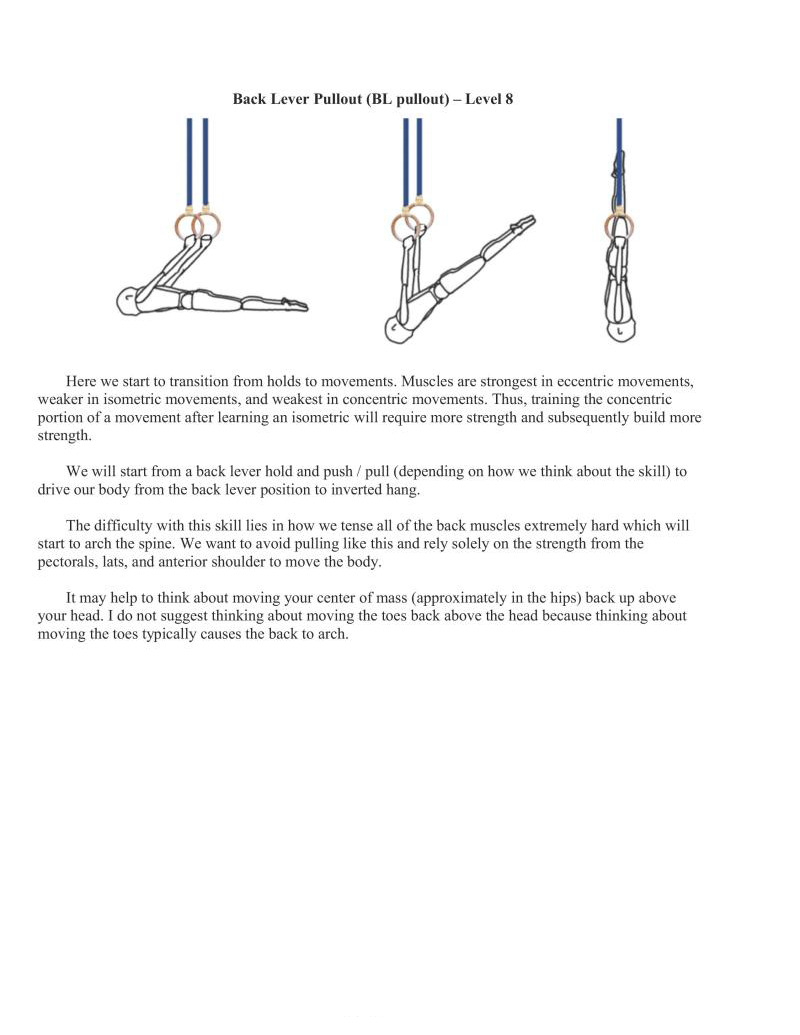
Here we start to transition from holds to movements. Muscles are strongest in eccentric movements, weaker in isometric movements, and weakest in concentric movements. Thus, training the concentric. portion of a movement after learning an isometric will require more strength and subsequently build more strength,
We will start from a back lever hold and push / pull (depending on how we think about the skill) to drive our body from the back lever position to inverted hang.
The difficulty with this skill lies in how we tense all of the back muscles extremely hard which will start to arch the spine. We want to avoid pulling like this and rely solely on the strength from the pectorals, lats, and anterior shoulder to move the body.
It may help to think about moving your center of mass (approximately in the hips) back up above your head. I do not suggest thinking about moving the toes back above the head because thinking about moving the toes typically causes the back to arch.
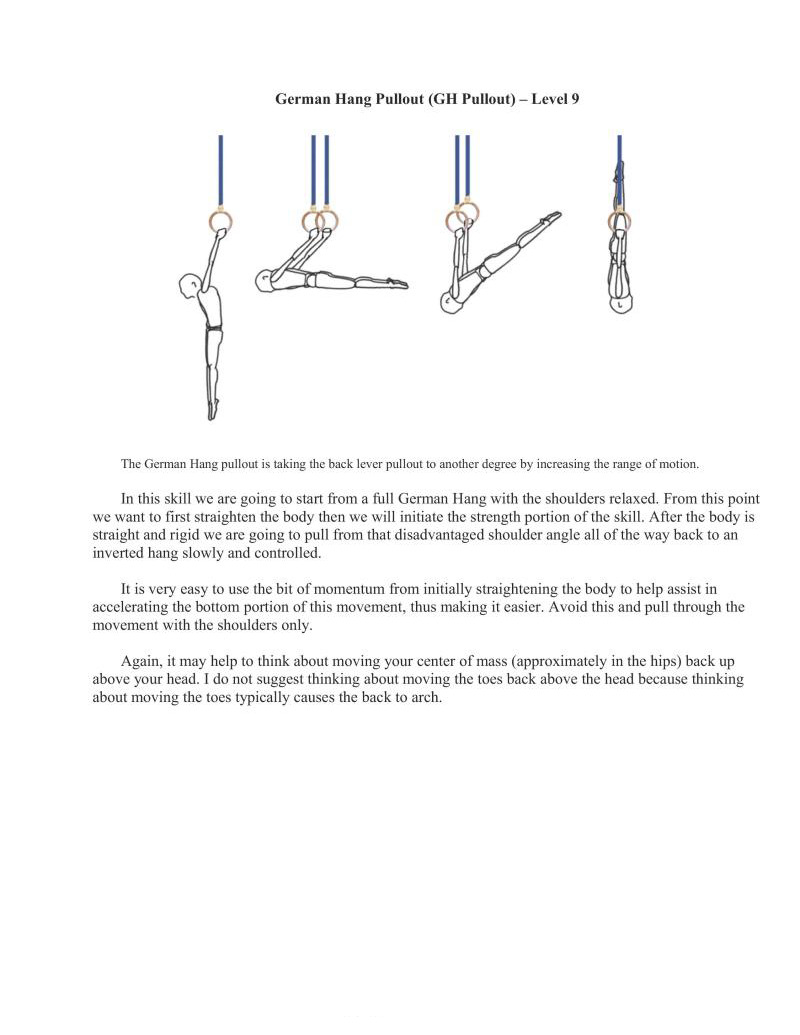
The German Hang pullout is taking the back lever pullout to another degree by increasing the range of motion.
In this skill we are going to start from a full German Hang with the shoulders relaxed. From this point we want to first straighten the body then we will initiate the strength portion of the skill. After the body is straight and rigid we are going to pull from that disadvantaged shoulder angle all of the way back to an inverted hang slowly and controlled.
It is very easy to use the bit of momentum from initially straightening the body to help assist in accelerating the bottom portion of this movement, thus making it easier. Avoid this and pull through the movement with the shoulders only.
Again, it may help to think about moving your center of mass (approximately in the hips) back up above your head. I do not suggest thinking about moving the toes back above the head because thinking about moving the toes typically causes the back to arch.
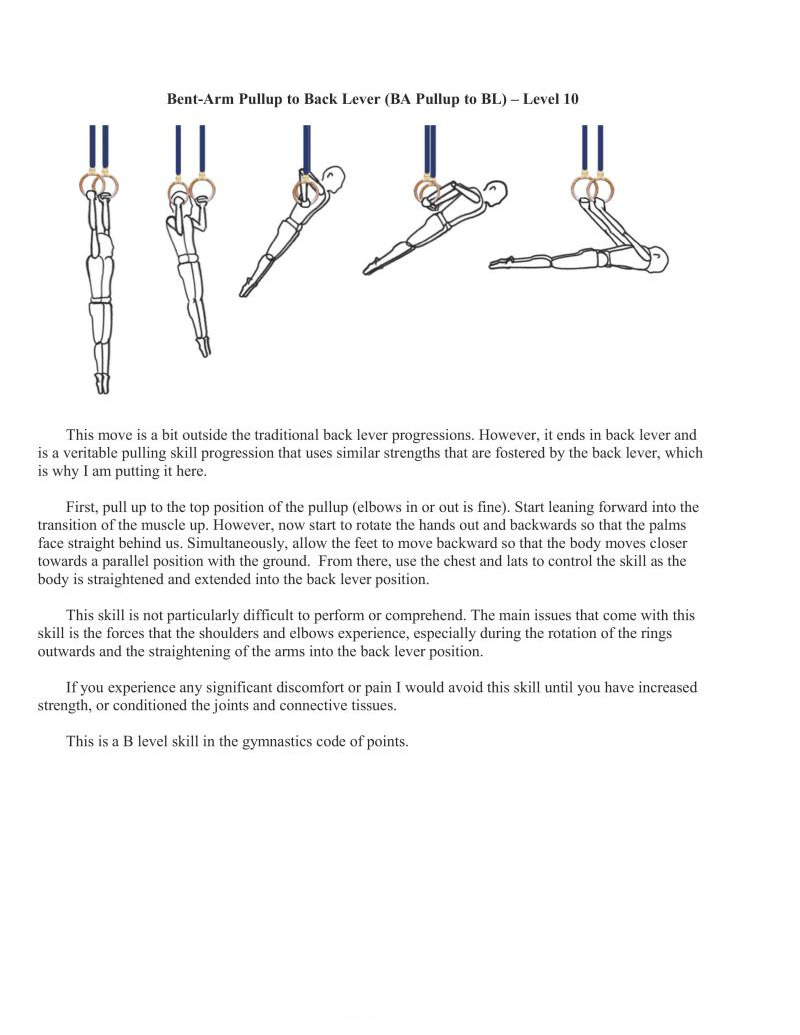
This move is a bit outside the traditional back lever progressions. However, it ends in back lever and is a veritable pulling skill progression that uses similar strengths that are fostered by the back lever, which is why Iam putting it here.
irst, pull up to the top position of the pullup (elbows in or out is fine). Start leaning forward into the transition of the muscle up. However, now start to rotate the hands out and backwards so that the palms face straight behind us. simultaneously, allow the feet to move backward so that the body moves closer towards a parallel position with the ground. From there, use the chest and lats to control the skill as the body is straightened and extended into the back lever position.
This skill is not particularly difficult to perform or comprehend. The main issues that come with this skill i the forces that the shoulders and elbows expericnce, especially during the rotation of the rings outwards and the straightening of the arms into the back lever postion.
If you experience any significant discomfort or pain I would avoid this skill until you have increased strength, or conditioned the joints and connective tissues.
This is a B level skill in the gymnastics code of points.

The handstand lower to back lever is an interesting skill. It is a dual pushing/pulling skill, so T hesitated to put it into this category, but it fits here with the back lever progressions.
The handstand lower to back lever starts in a rings handstand. As you start to lower, push the shoulders forwards. We will reach a semi-elbow lever position on the rings. From there we will lower with bent arms with the body parallel to the ground at rings height. Then we will slowly extend the arms straight until we hit the back lever position. Essentially, this skill lowers to elbow lever then straight through a bent arm maliese position (straight body level with the rings) down into the back lever.
Like the above skill, one thing that may cause problems is the "fall." If you are not strong enough to lower slowly under control then the body will jerk when you get into the back lever position. Thus, this movement can be tough on the shoulders and elbows. If this is the case it may be a good idea to back off and focus on more on strength work, and use the aforementioned assistance devices or spoter.
This is a B level skill in the gymnastics code of points.
The front lever is a secondary static skill. These progressions will likely be a bit more difficult as denoted on the strength progression charts. This is because the lats are lengthened slightly, and the pectoral muscles are in a shorter position than normal. As we know, muscles are strongest around the middle of their range of motion.
This progression should be trained after or concurrently with back lever and will help prosle a better foundation for which we will build on advanced rings strength skills. It looks pretty cool, too.
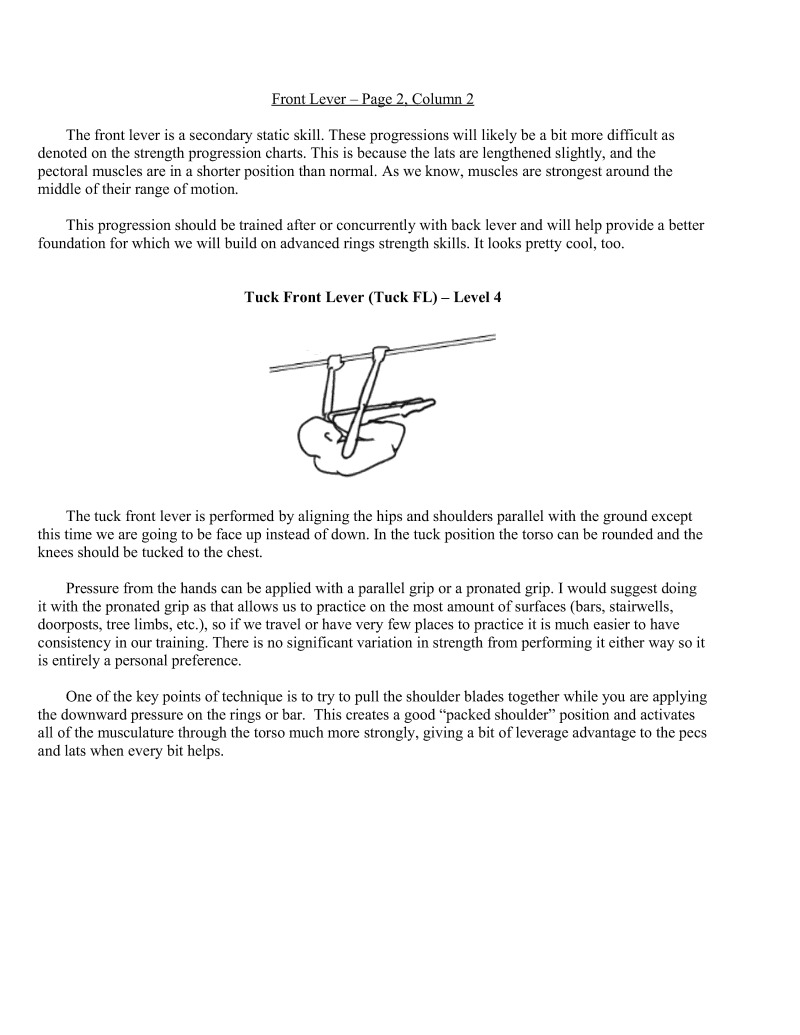
The tuck front lever is performed by aligning the hips and shoulders parallel with the ground except me we are going to be face up instead of down. In the tuck position the torso can be rounded and the knees should be tucked to the chest,
Pressure from the hands can be applied with a parallel grip or a pronated grip. I would suggest doing it with the pronated grip as that allows us to practice on the most amount of surfaces (bars, stairwells, doorposts, tree limbs, etc.), so if we travel or have very few places to practice it is much easier to have consistency in our training. There is no significant variation in strength from performing it either way so it is entirely a personal preference.
One of the key points of technique is to try to pull the shoulder blades together while you are applying the downward pressure on the rings or bar. This creates a good "packed shoulder" position and activates all of the musculature through the torso much more strongly. giving a bit of leverage advantage to the pecs and lats when every bit helps.
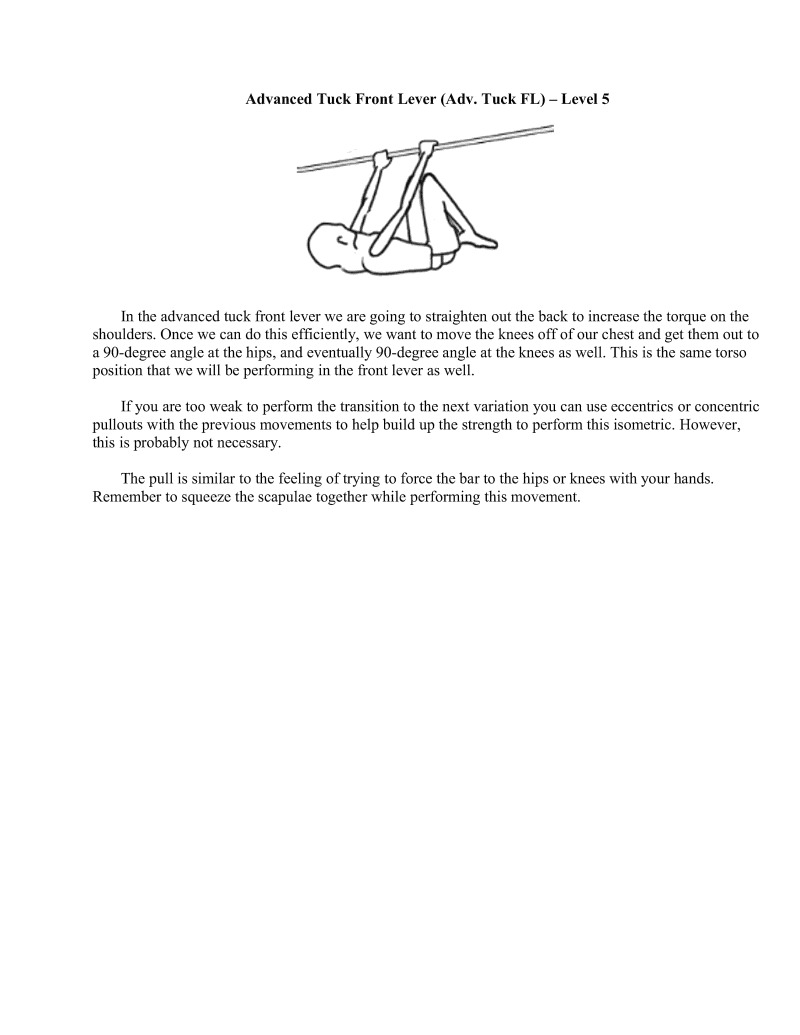
In the advanced tuck front lever we are going to straighten out the back to increase the torque on the shoulders. Once we can do this efficiently, we want to move the knees off of our chest and get them out to 90-degree angle at the hips, and eventually 90-degree angle at the knees as well. This i the same torso position that we will be performing in the front lever as well.
If you are too weak to perform the transition to the next variation you can use eccentrics or concentric. pullouts with the previous movements to help build up the strength to perform this isometric. However, this is probably not necessary.
The pull is similar to the feling of trying to force the bar to the hips or knees with your hands. Remember to squeeze the scapulae together while performing this movement.
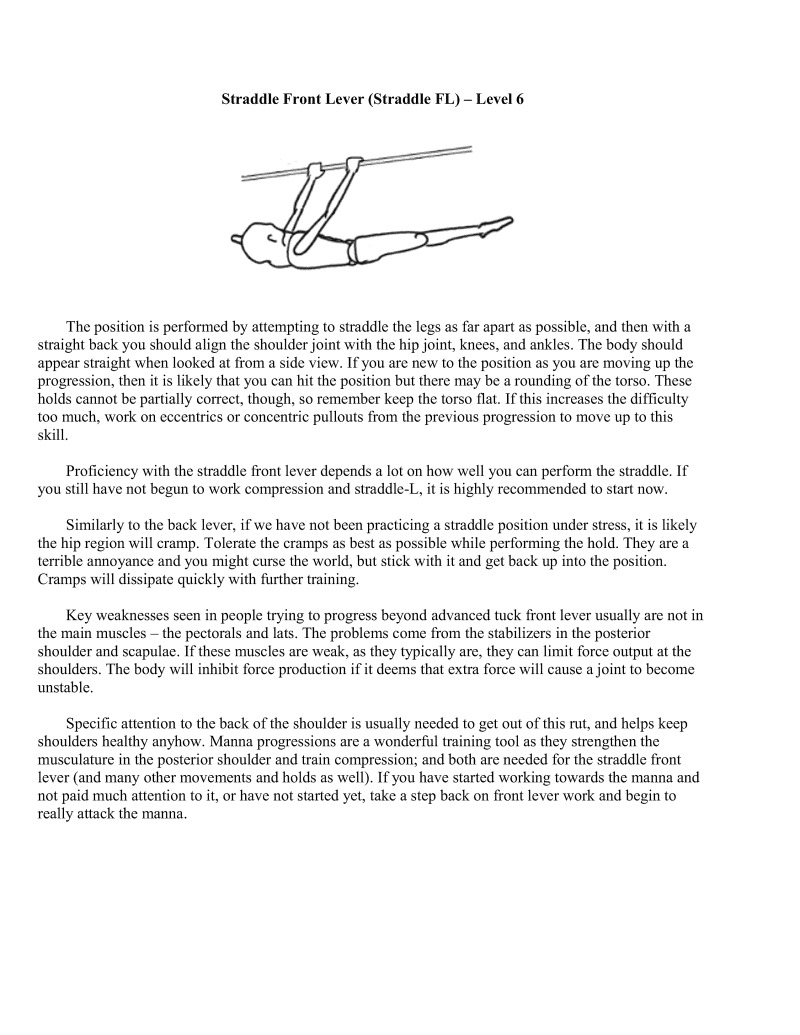
The position is performed by attempting to straddle the legs as far apart as possible, and then with a straight back you should align the shoulder joint with the hip joint, knees, and ankles. The body should appear straight when looked at from a side view. If you are new to the position as you are moving up the progression, then it is likely that you can hit the position but there may be a rounding of the torso. These holds cannot be partially correct, though, so remember keep the torso flat. If this increases the difficulty 100 much, work on eccentrics or concentric pullouts from the previous progression to move up to this skill
Proficiency with the straddle front lever depends a lot on how well you can perform the straddle. If you still have not begun to work compression and straddle-L. it is highly recommended to start now.
Similarly to the back lever, if we have not been practicing a straddle position under stress, it is likely the hip region will cramp. Tolerate the cramps as best as possible while performing the hold. They are a terrible annoyance and you might curse the world, but stick with it and get back up into the position. Cramps will dissipate quickly with further training.
Key weaknesses seen in people trying to progress beyond advanced tuck front lever usually are not in the main muscles — the pectorals and lats. The problems come from the stabilizers in the posterior shoulder and scapulae. If these muscles are weak, as they typically are, they can limit force output at the shoulders. The body wi t force production if it deems that extra force will cause a joint to become unstable.
Specific attention to the back of the shoulder is usually needed to get out of ths rut, and helps keep shoulders healthy anyhow. Manna progressions are a wonderful training tool as they strengthen the musculature in the posterior shoulder and train compression; and both are needed for the straddle front lever (and many other movements and holds as well). If you have started working towards the manna and not paid much attention to it, or have not started yet, take a step back on front lever work and begin to really attack the manna.
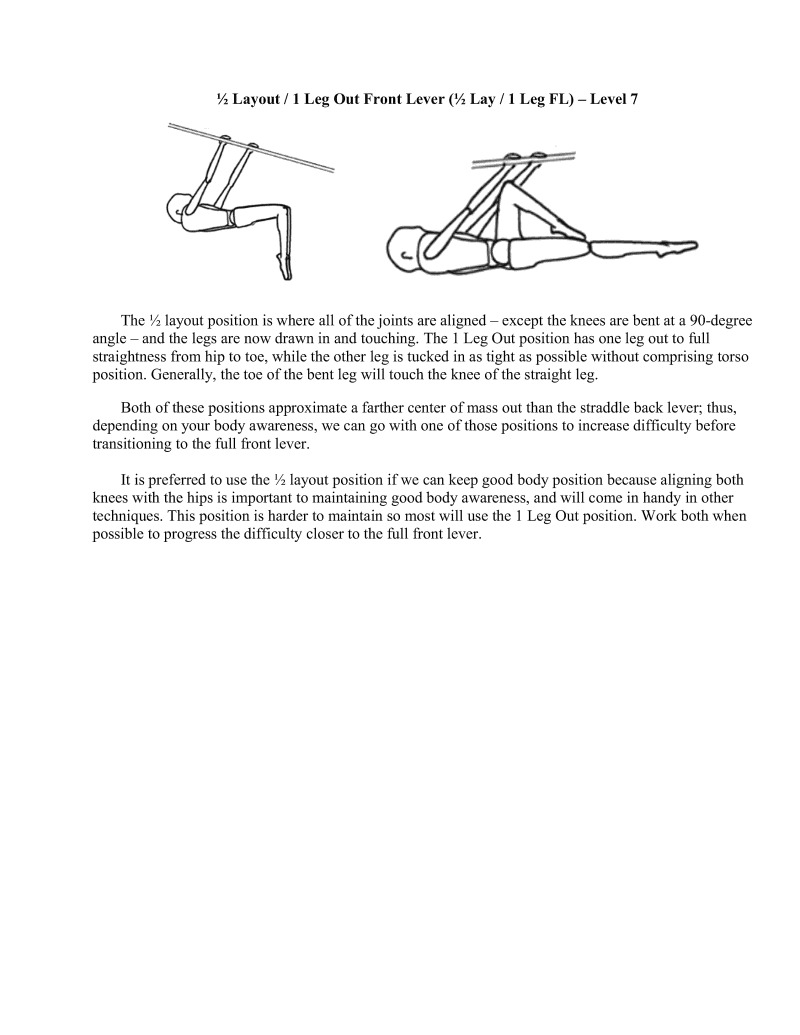
The ½ layout position is where all of the joints are aligned — except the knees are bent at a 90-degree angle —and the legs are now drawn in and touching. The 1 Leg Out position has one leg out to full straightness from hip to toe, while the other leg is tucked in as tight as possible without comprising torso position. Generally, the toe of the bent leg will touch the knee of the straigh leg.
Both of these positions approximate a farther center of mass out than the straddle back lever; thus, depending on your body awareness, we can go with one of those positions to increase difficulty before transitioning to the full front lever.
It is preferred to use the % layout position if we can keep good body position because aligning both knees with the hips is important to maintaining good body awareness, and will come in handy in other techniques. This position is harder to maintain so most will use the 1 Leg Out position. Work both when possible to progress the difficulty closer to the full front lever.
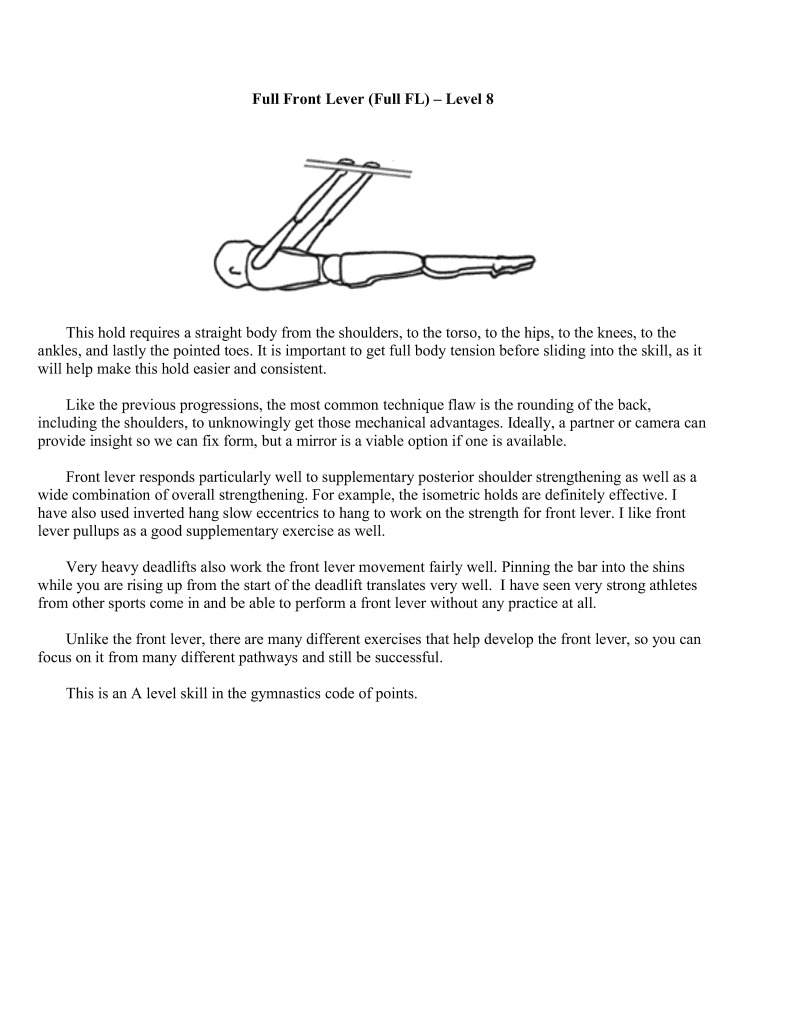
This hold requires a straight body from the shoulders, to the torso, to the hips, to the knees, to the ankles, and lastly the pointed toes. It is important to get full body tension before sliding into the skill, as it will help make this hold easier and consistent.
Like the previous progressions, the most common technique flaw is the rounding of the back, including the shoulders, to unknowingly get those mechanical advantages. Ideally, a partner or camera can provide insight so we can fix form, but a mirror is a viable option if one is available.
Front lever responds particularly well to supplementary posterior shoulder strengthening as well as a wide combination of overall strengthening. For example, the isometric holds are definitely effective. T have also used inverted hang slow eccentrics to hang to work on the strength for front lever. I like front lever pullups as a good supplementary exercise as well.
Very heavy deadlifts also work the front lever movement fairly well. Pinning the bar into the shins while you are rising up from the start of the deadlift translates very well. 1 have scen very strong athletes from other sports come in and be able to perform a front lever without any practice at all
Unlike the front lever, there are many different exercises that help develop the front lever, so you can focus on it from many different pathways and still be successful.
This is an A level skill in the gymnastics code of points.
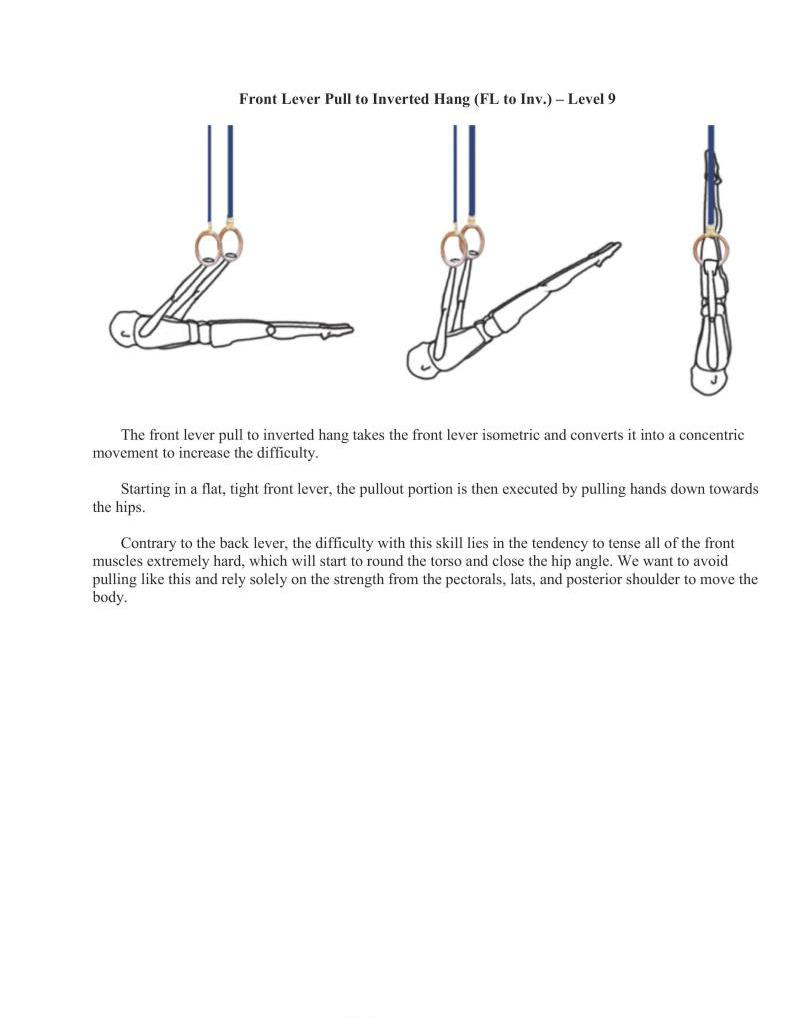
The front lever pull to inverted hang takes the front lever isometric and converts it into a concentric movement to increase the difficulty.
Starting in a flat, tight front lever, the pullout portion is then executed by pulling hands down towards the hips.
Contrary to the back lever, the difficulty with this skill lies in the tendency to tense all of the front muscles extremely hard, which will start to round the torso and close the hip angle. We want to avoid pulling like this and rely solely on the strength from the pectorals, lats, and posterior shoulder to move the body.

Starting from a hang and pulling out to an inverted hang increases the pull range of motion to increase the difficulty.
We will start relaxed in the straight body vertical position. First, engage the shoulders by pulling them into the active position (shoulder into the socket), and then initiate the pull. You should now be rigid as you pull the hands to the hips in a slow and controlled manner. This will be difficult because the shoulder muscles are lengthened towards near the end of their range of motion.
It is very tempting to use the bit of momentum from the initiation of movement to help assist in accelerating out of the bottom. Again, avoid this and initiate and pull the movement with the shoulder muscles only.
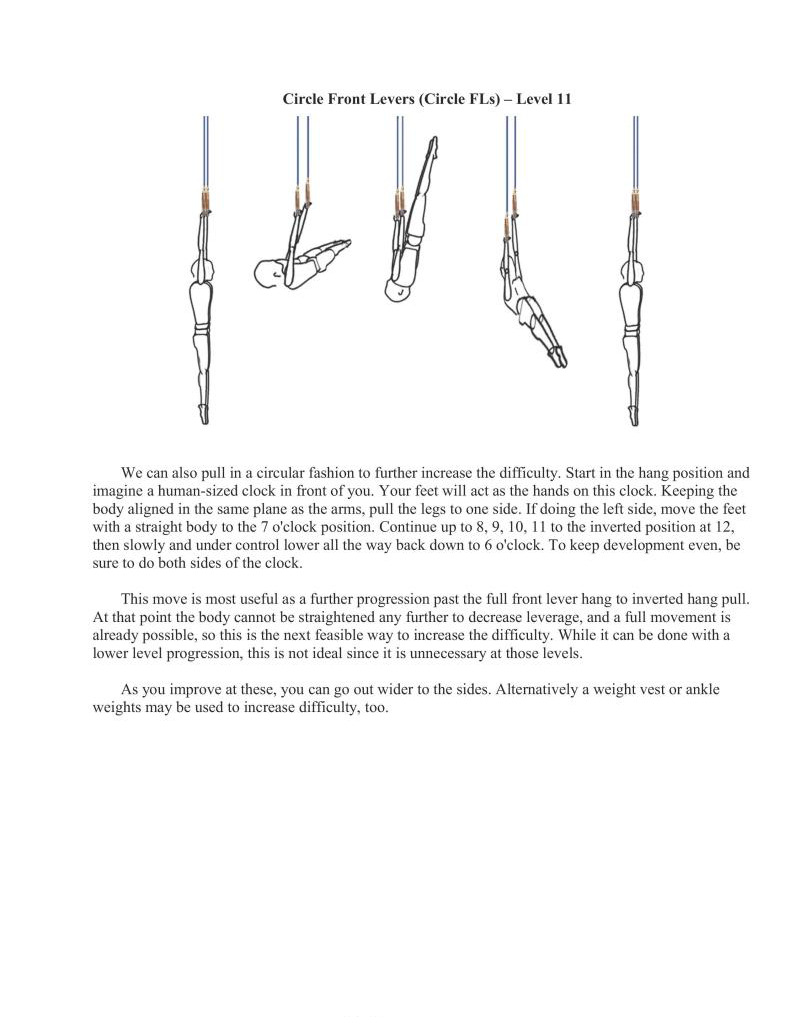
We can also pull in a circular fashion to further increase the difficulty. Start in the hang position and imagine a human-sized clock in front of you. Your feet will act as the hands on this clock. Keeping the body aligned in the same plane as the arms, pull the legs to one side. If doing the left side, move the feet with a straight body to the 7 o'clock position. Continue up to 8, 9, 10, 11 to the inverted position at 12,
then slowly and under control lower all the way back down to 6 o'clock. To keep development even, be sure to do both sides of the clock.
This move is most useful as a further progression past the full front lever hang to inverted hang pull. At that point the body cannot be straightened any further to decrease leverage, and a full movement is already possible, so this is the next feasible way to increase the difficulty. While it can be done with a lower level progression, this is not ideal since it is unnecessary at those levels.
As you improve at these, you can go out wider to the sides. Alternatively a weight vest or ankle weights may be used to increase difficulty, too.
Front lever pullups are an excellent horizontal pulling exercise and are highly recommended to keep the shoulders balanced; and you can get some impressed faces if done in public.
Front lever pullup progressions are one of my favorite horizontal pulling exercises. Done in combination with the Lsit/Vsit/manna progression and potentially adding in a horizontal rowing exercise, easily keep the shoulders well balanced.
For the rope elimb portions of the front lever pullup progression, they will be placed in the section after even though they are integrated into the middle of this progression. So if you are trying to find them they will be afterward the full front lever pullup progression.
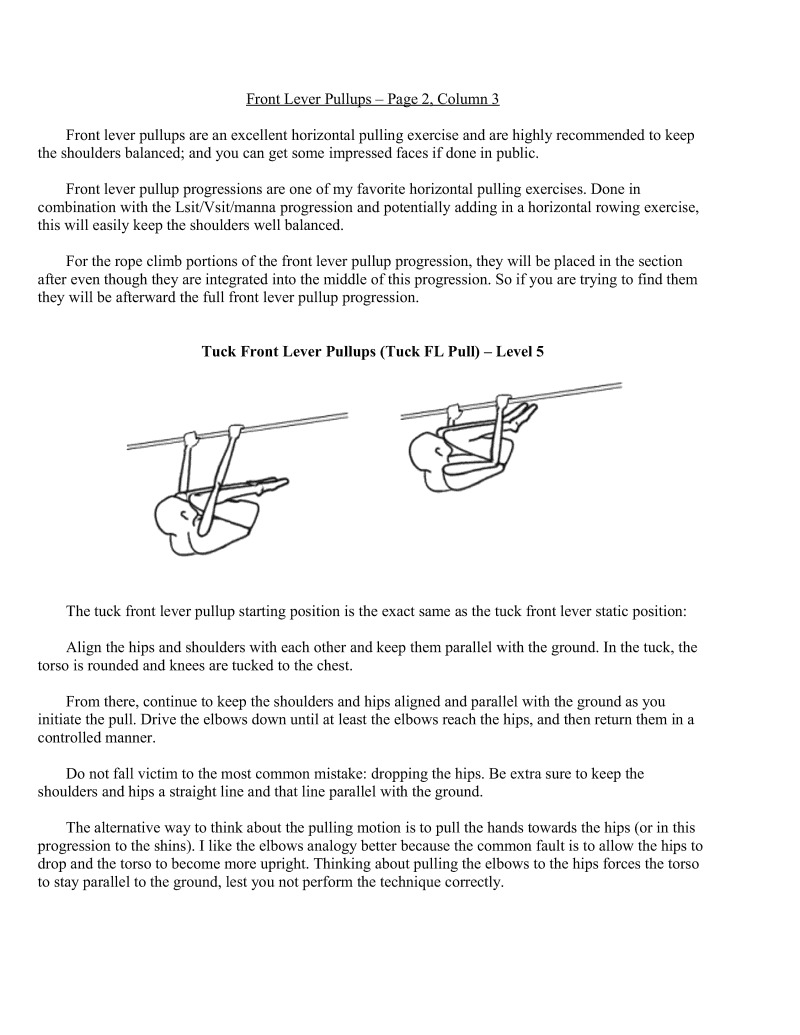
The tuck front lever pullup starting position is the exact same as the tuck front lever static position.
Align the hips and shoulders with each other and keep them parallel with the ground. In the tuck, the torso is rounded and knees are tucked to the chest.
From there, continue to keep the shoulders and hips aligned and parallel with the ground as you ate the pull. Drive the elbows down until at least the elbows reach the hips, and then return them in a controlled manner.
Do not fall victim to the most common mistake: dropping the hips. Be extra sure to keep the shoulders and hips a straight line and that line parallel with the ground.
The alternative way to think about the pulling motion is to pull the hands towards the hips (or in this progression to the shins). like the elbows analogy better because the common fault is to allow the hips to drop and the torso to become more upright. Thinking about pulling the elbows to the hips forces the torso 1o stay parallel to the ground, lest you not perform the technique correctly.
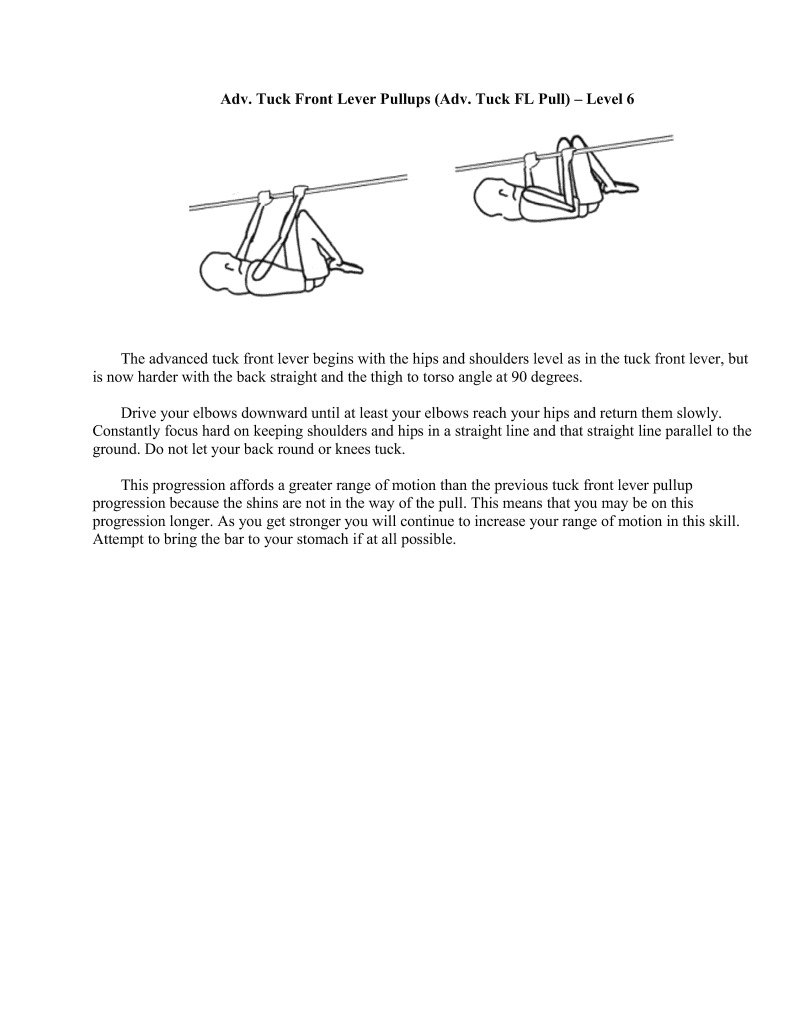
The advanced tuck front lever begins with the hips and shoulders level as in the tuck front lever, but is now harder with the back straight and the thigh to torso angle at 90 degrees.
Drive your elbows downward until at least your elbows reach your hips and return them slowly. Constantly focus hard on keeping shoulders and hips in a straight line and that straight line parallel to the ground. Do not let your back round or knees tuck.
This progression affords a greater range of motion than the previous tuck front lever pullup progression because the shins are not in the way of the pull. This means that you may be on this progression longer. As you get stronger you will continue to increase your range of motion in t Attempt to bring the bar to your stomach if at all possible.
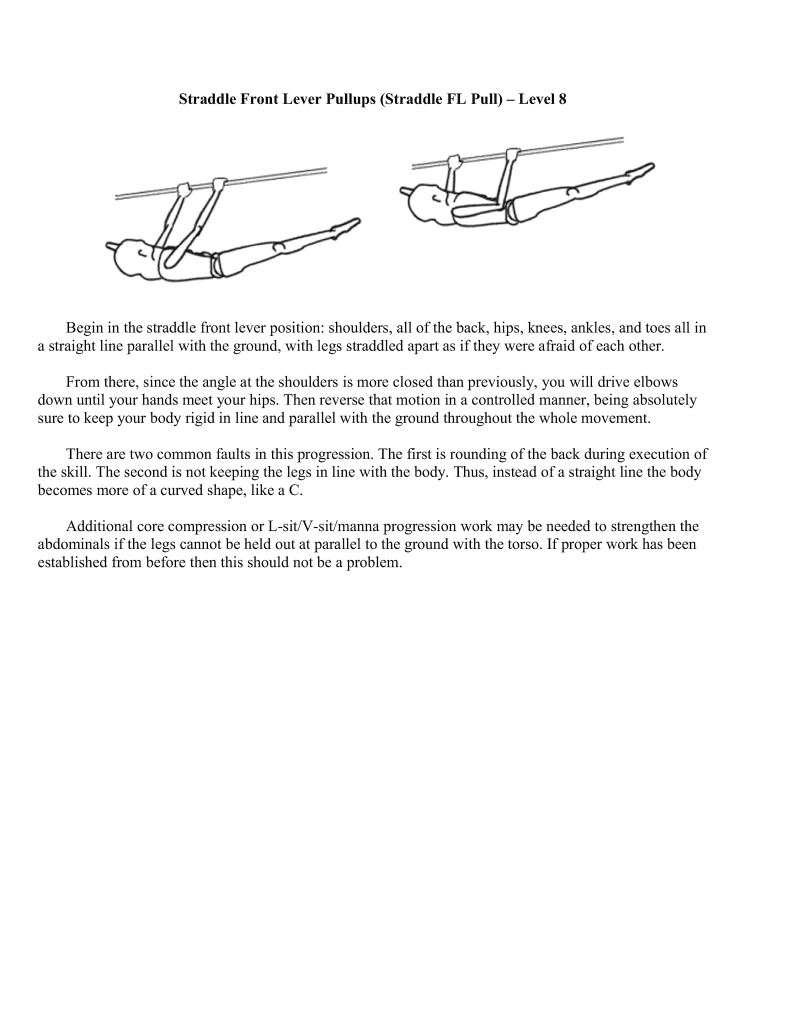
Begin in the straddle front lever position: shoulders, all of the back, hips, knees, ankles, and toes all in a straight line parallel with the ground, with legs straddled apart as if they were afraid of each other.
From there, since the angle at the shoulders is more closed than previously, you will drive elbows down until your hands meet your hips. Then reverse that motion in a controlled manner, being absolutely sure to keep your body rigid in line and parallel with the ground throughout the whole movement.
There are two common faults in this progression. The first is rounding of the back during execution of the skill. The second is not keeping the legs in line with the body. Thus, instead of a straight line the body becomes more of a curved shape, like a C.
Additional core compression or L-sit/V-sit/manna progression work may be needed to strengthen the abdominals if the legs cannot be held out at parallel to the ground with the torso. If proper work has been established from before then this should not be a problem.
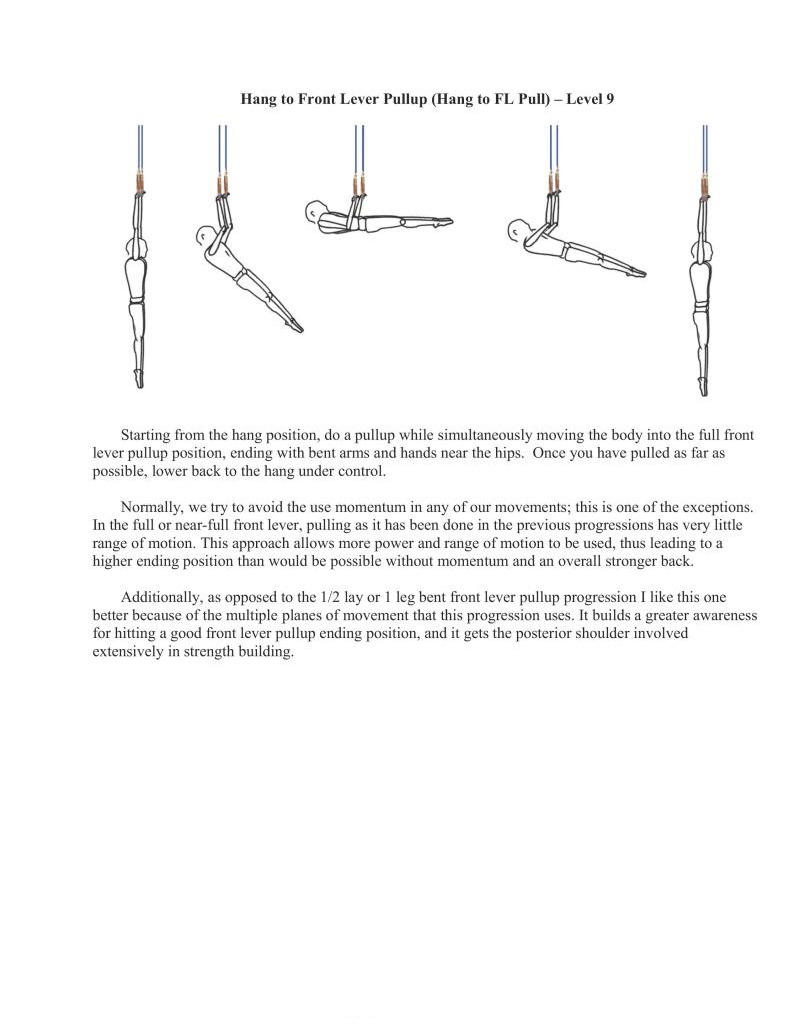
Starting from the hang position, do a pullup while simultaneously moving the body into the full front lever pullup position, ending with bent arms and hands near the hips. Once you have pulled as far as possible, lower back to the hang under control.
Normally, we try to avoid the use momentum in any of our movements; this is one of the exceptions. In the full or near-full front lever, pulling as it has been done in the previous progressions has very little range of motion. This approach allows more power and range of motion to be used, thus leading to a higher ending position than would be possible without momentum and an overall stronger back.
Additionally, as opposed to the 1/2 lay or 1 leg bent front lever pullup progression I like this one better because of the multiple planes of movement that this progression uses. It builds a greater awaren for hitting a good front lever pullup ending position, and it gets the posterior shoulder involved extensively in strength building.
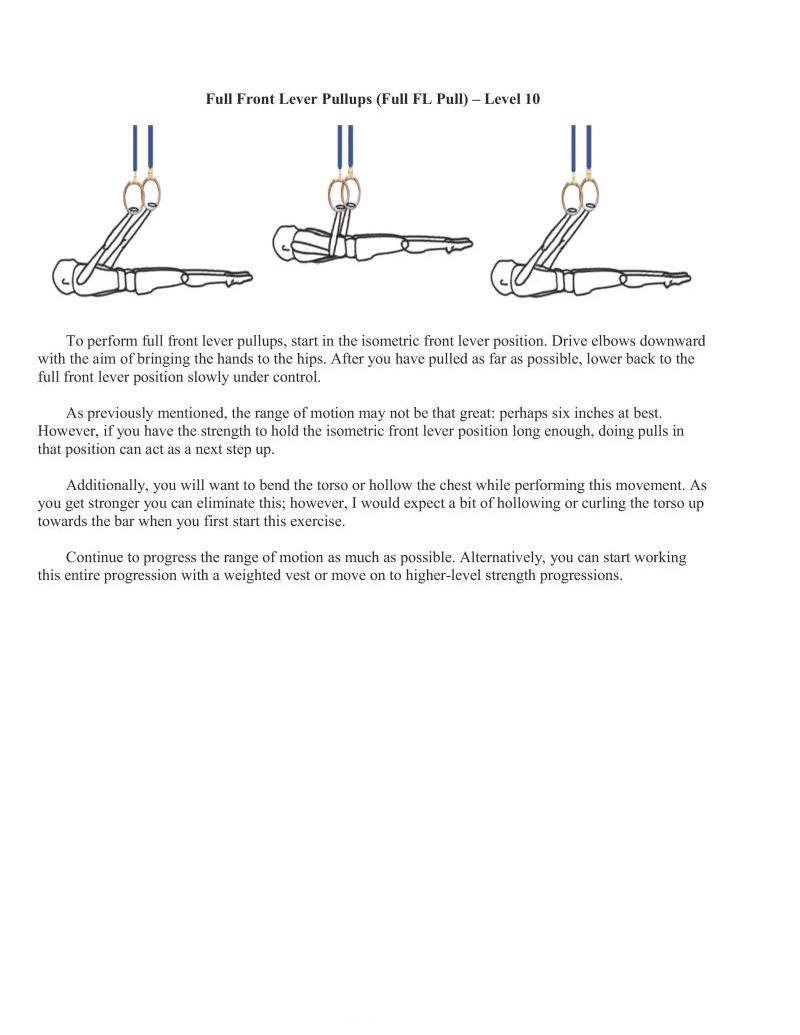
To perform ful front lever pullups, start in the isometric front lever position. Drive elbows downward with the aim of bringing the hands to the hips. After you have pulled as far as possible, lower back to the full front lever position slowly under control.
As previously mentioned, the range of motion may not be that great: perhaps six inches at best, However, if you have the strength to hold the isometric front lever position long enough, doing pulls in that position can actas a next step up.
Additionally, you will want to bend the torso or hollow the chest while performing this movement. As You get stronger you can eliminate this: however, I would expect a bit of hollowing or curling the torso up towards the bar when you first start this exercise.
Continue to progress the range of motion as much as possible. Alternatively, you can start working this entire progression with a weighted vest or move on to higher-level strength progressions.
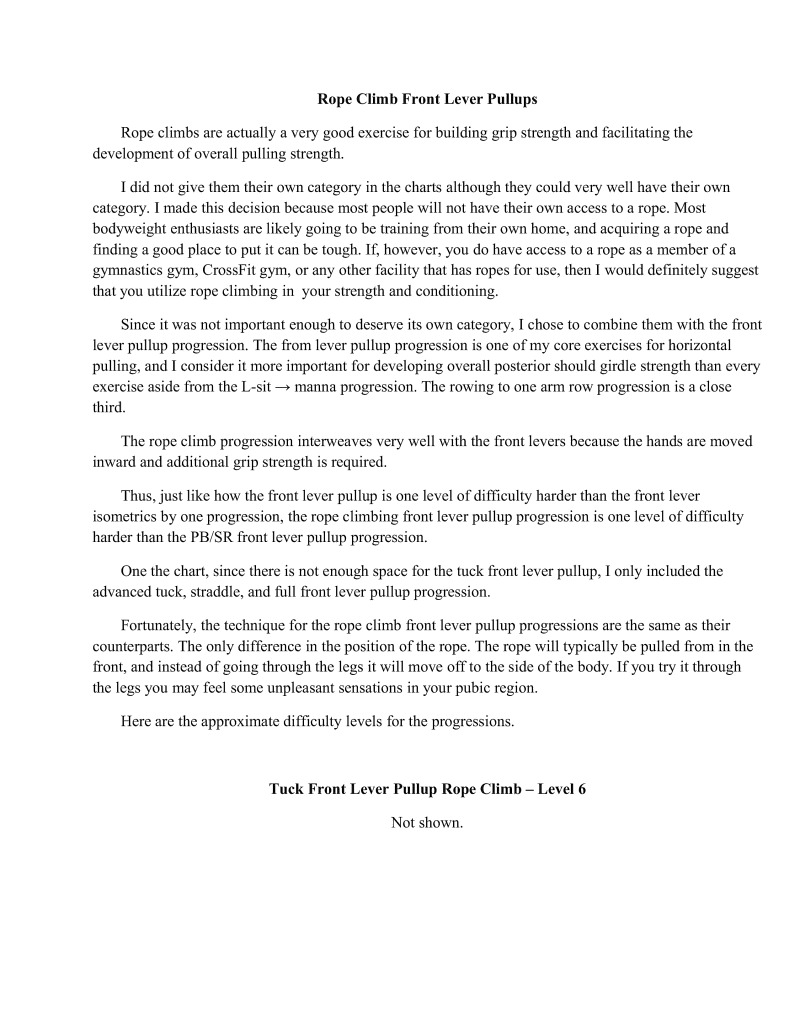
Rope climbs are actually a very good exercise for building grip strength and facilitating the development of overall pulling strength.
I did not give them their own category in the charts although they could very well have their own category. I made this decision because most people will not have their own access to a rope. Most bodyweight enthusiasts are likely going to be training from their own home, and acquiring a rope and finding a good place to put it can be tough. If, however, you do have access to a rope as a member of a gymnastics gym, CrossFit gym, or any other facility that has ropes for use, then I would definitely suggest that you utilize rope climbing inyour strength and conditioning.
Since it was not important enough to deserve its own category, I chose to combine them with the front lever pullup progression. The from lever pullup progression is one of my core exercises for horizontal pulling, and I consider it more important for developing overall posterior should girdle strength than every exercise aside from the L-sit — manna progression. The rowing to one arm row progression is a close third.
The rope climb progression interweaves very well with the front levers because the hands are moved inward and additional grip strength is required.
Thus, just like how the front lever pullup is one level of difficulty harder than the front lever isometrics by one progression, the rope climbing front lever pullup progression is one level of difficulty harder than the PB/SR front lever pullup progres.
One the chart, since there is not enough space for the tuck front lever pullup, I only included the advanced tuck, straddle, and full front lever pullup progression.
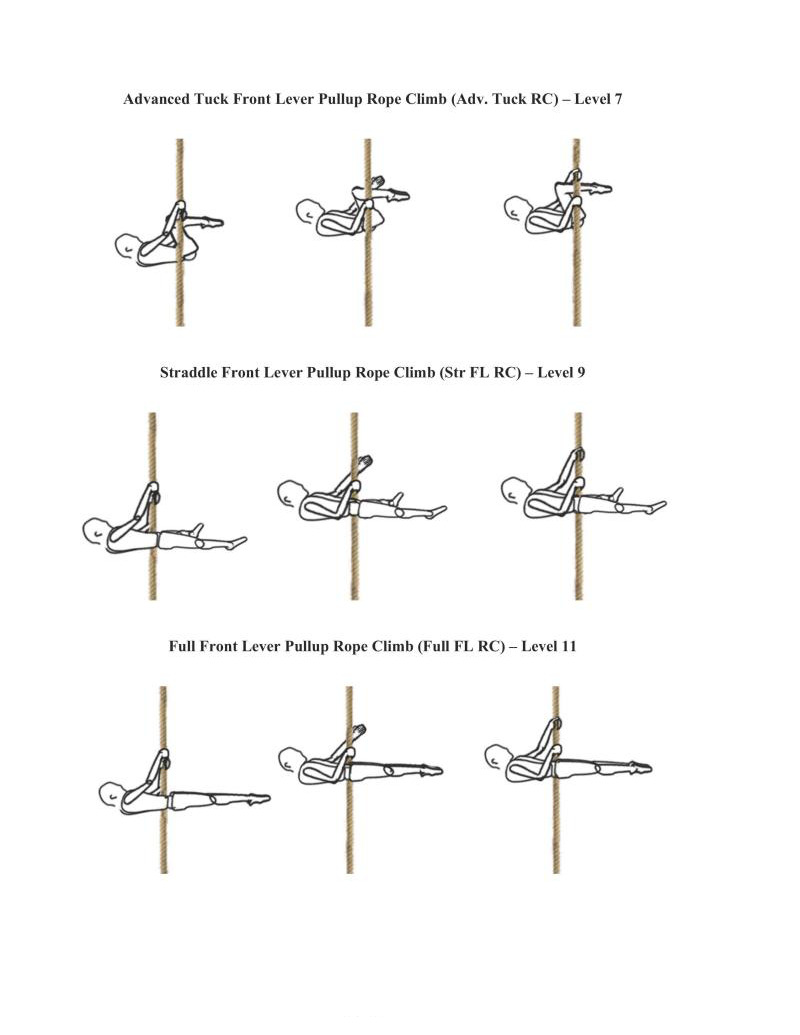
Fortunately, the technique for the rope climb front lever pullup progressions ar the same as their counterparts. The only difference in the position of the rope. The rope will typically be pulled from in the front, and instead of going through the legs it will move off to the side of the body. If you try it through the legs you may feel some unpleasant sensations in your pubie region.
Here are the appronate difficulty levels for the progress
Not shown
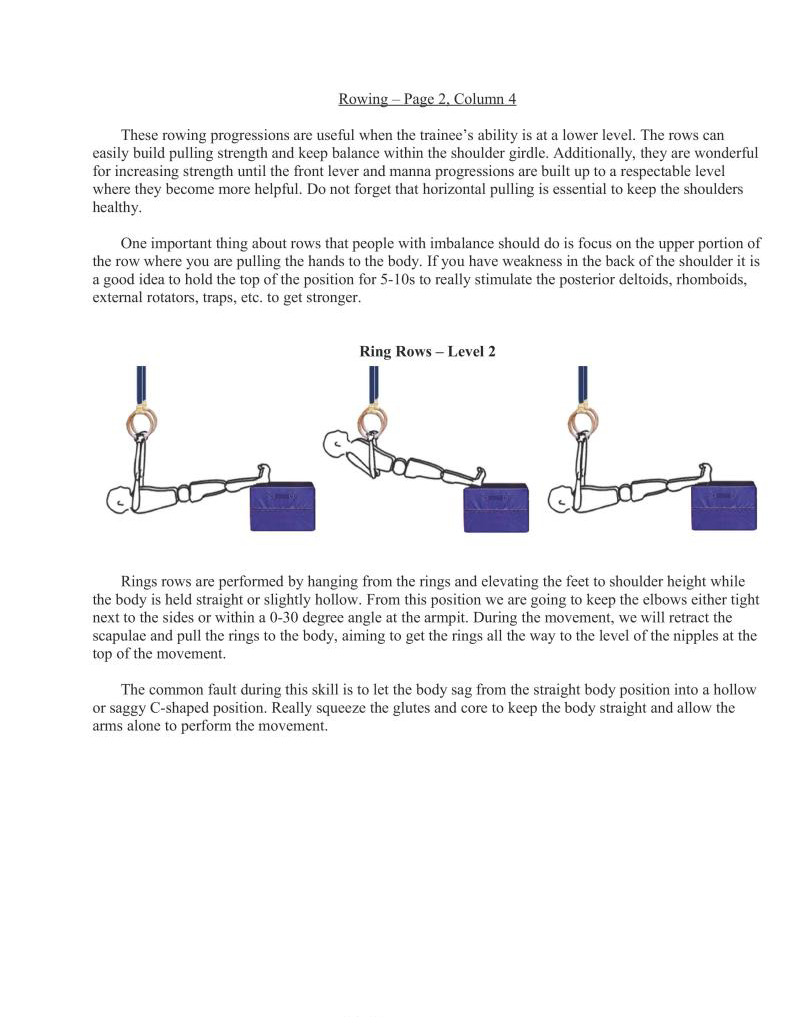
These rowing progressions are useful when the trainee’s ability is at a lower level. The rows can easily build pulling strength and keep balance within the shoulder girdle. Additionally, they are wonderful for increasing strength until the front lever and manna progressions are built up to a respectable level where they become more helpful. Do not forget that horizontal pulling is essential to keep the shoulders healthy.
One important thing about rows that people with imbalance should do is focus on the upper portion of the row where you are pulling the hands to the body. If you have weakness in the back of the shoulder it is a good idea to hold the top of the position for 5-10s to really stimulate the posterior deltoids, homboids, external rotators, traps, efc. to get stronger.
Rings rows are performed by hanging from the rings and elevating the feet to shoulder height while the body is held straight or slightly hollow. From this position we are going to keep the elbows either tight next to the sides or within a 0-30 degree angle at the armpit. During the movement, we will retract the scapulae and pull the rings to the body, aiming to get the rings all the way to the level of the nipples at the top of the movement.
The common fault during this skill is to let the body sag from the straight body position into a hollow or saggy C-shaped position. Really squeeze the glutes and core to keep the body straight and allow the arms alone to perform the movement.
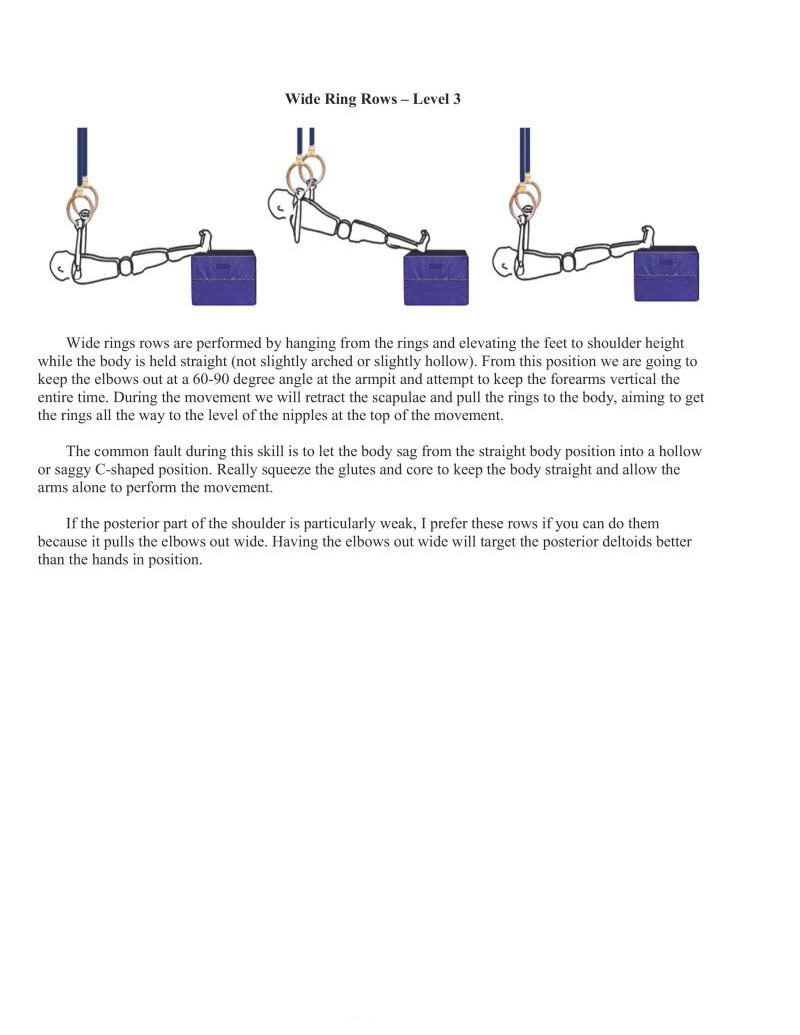
Wide rings rows are performed by hanging from the rings and elevating the feet to shoulder height while the body is held straight (not slightly arched or slightly hollow). From this position we are going to keep the elbows out at a 60-90 degree angle at the armpit and attempt to keep the forearms vertical the entire time. During the movement we will retract the scapulae and pull the rings to the body, aiming to get the rings all the way to the level of the nipples at the top of the movement
The common fault during this skill is to let the body sag from the straight body position into a hollow or saggy C-shaped position. Really squeeze the glutes and core to keep the body straight and allow the arms alone to perform the movement.
If the posterior part of the shoulder is particularly weak, I prefer these rows if you can do them because it pulls the elbows out wide. Having the elbows out wide will target the posterior deltoids better than the hands in position.
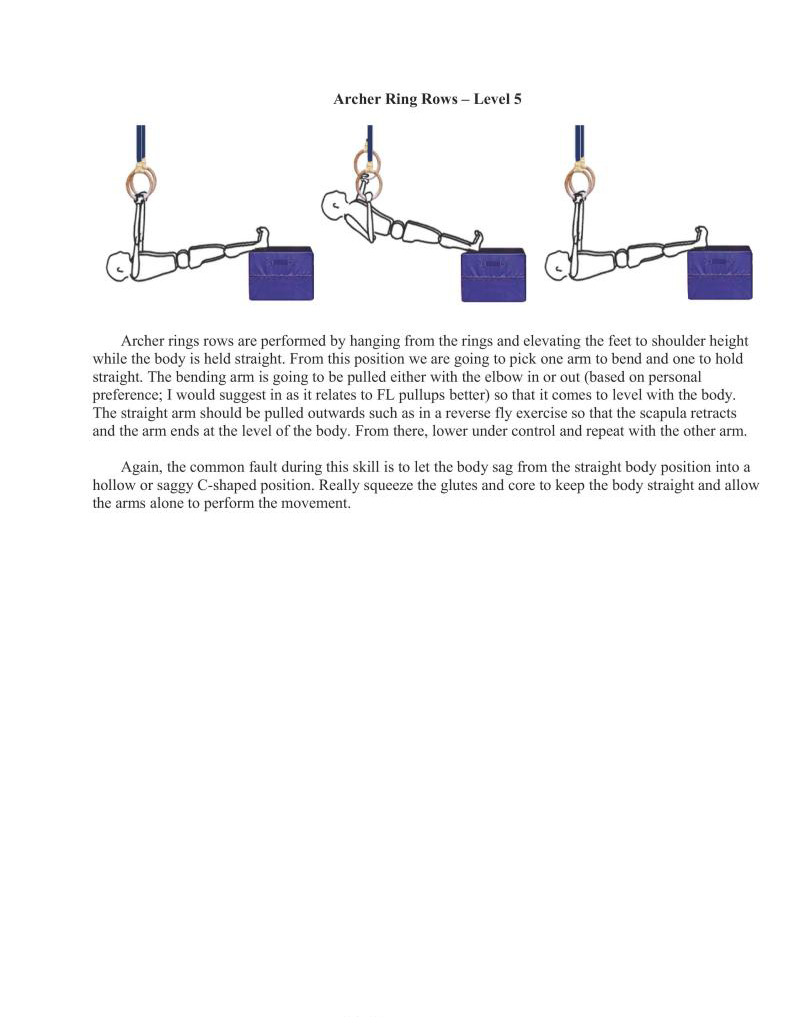
Archer rings rows are performed by hanging from the rings and elevating the feet to shoulder height while the body is held straight. From this position we are going to pick one arm to bend and one to hold straight. The bending arm is going to be pulled either with the elbow in or out (based on personal preference; I would suggest in as it relates to FL pullups better) so that it comes to level with the body. The straight arm should be pulled outwards such as in a reverse fly exercise so that the scapula retracts and the arm ends at the level of the body. From there, lower under control and repeat with the other arm.
Again, the common fault during this skill is to let the body sag from the straight body position into a hollow or saggy C-shaped position. Really squeeze the glutes and core to keep the body straight and allow the arms alone to perform the movement,
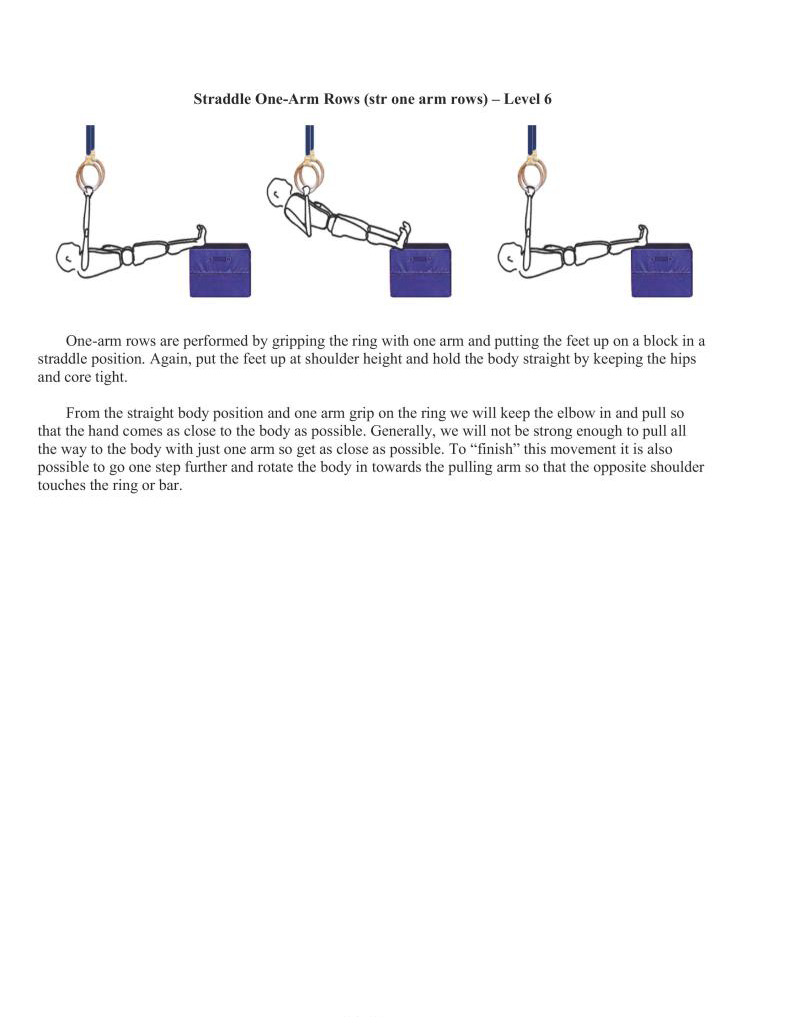
One-arm rows are performed by gripping the ring with one arm and putting the feet up on a block in a straddle position. Again, put the feet up at shoulder height and hold the body straight by keeping the hips and core tight.
From the straight body position and one arm grip on the ring we will keep the elbow in and pull so that the hand comes as close to the body as possible. Generally, we will not be strong enough to pull all the way to the body with just one arm so get as close as possible. To "finish" this movement it is also possible to 2o one step further and rotate the body in towards the pulling arm so that the opposite shoulder touches the ring or bar.

One-arm rows are performed by gripping the ring with one arm and putting the feet up on a block with the legs together. Again, put the feet up at shoulder height and hold the body straight by keeping the hips and core tight
From the straight body position and one arm grip on the ring we will keep the elbow in and pull so that the hand comes as close to the body as possible. Generally, we will not be strong enough to pull all the way to the body with just one arm so get as close as possible. To "finish" this movement it is also possible to go one step further and rotate the body in towards the pulling arm so that the opposite shoulder touches the ring or bar.
This is the final progression in the series. If you are at this level of strength I would suggest moving to the previous progression with the front lever puliups or adding a weight vest to this variation to make it more difficult
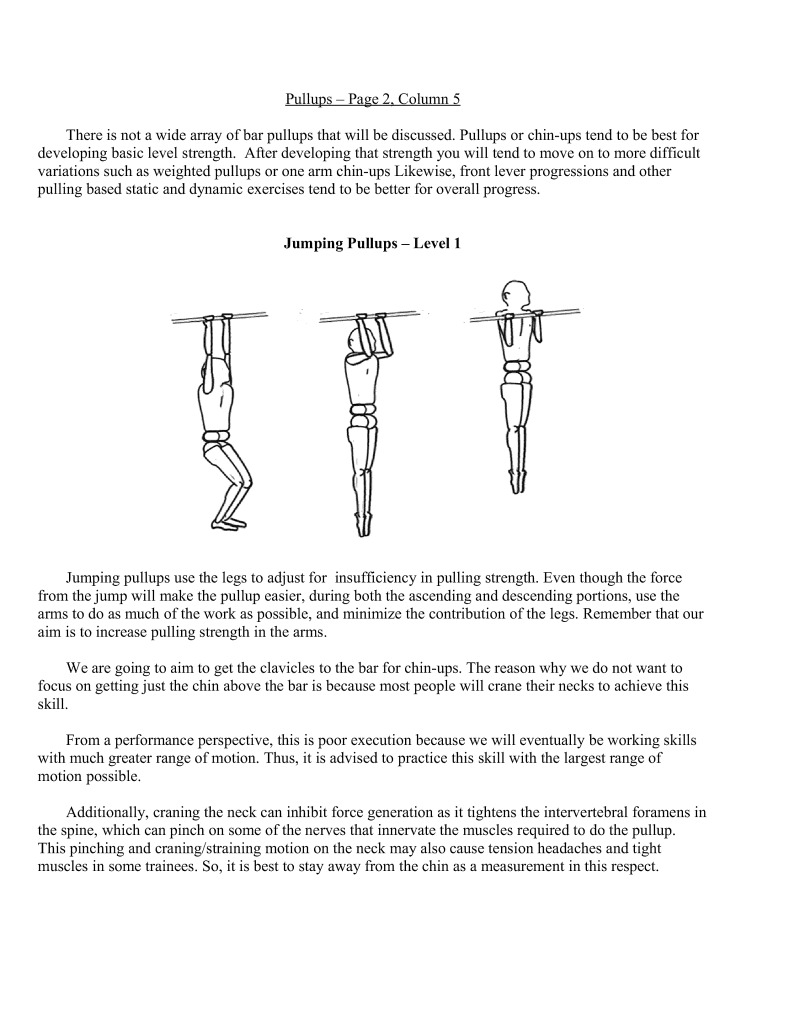
There is not a wide array of bar pullups that will be discussed. Pullups or chin-ups tend to be best for developing basic level strength. after developing that strength you will tend to move on to more difficult variations such as weighted pullups or one arm chin-ups Likewise, front lever progressions and other pulling based static and dynamic exercises tend to be better for overall progress.
Jumping pullups use the legs to adjust for_insufficiency in pulling strength. Even though the force from the jump will make the pullup easier, during both the ascending and descending portions, use the arms to do as much of the work as possible, and minimize the contribution of the legs. Remember that our aim is to increase pulling strength in the arms.
We are going to aim to get the clavicles to the bar for chin-ups. The reason why we do not want to focus on getting just the chin above the bar is because most people will crane their necks to achieve this skill
From a performance perspective, this is poor execution because we will eventually be working skills with much greater range of motion. Thus, it is advised to practice this skill with the largest range of ible.
itionally, craning the neck can inhibit force gencration as it tightens the intervertebral foramens in the spine, which can pinch on some of the nerves that innervate the muscles required to do the pullup.
This pinching and craning/straining motion on the neck may also cause tension headaches and tight muscles in some trainees. So, it is best to stay away from the chin as a measurement in this respect.

Eccentrics are one of the best ways to increase strength for movements that we cannot perform yet, but have enough strength to control the descending portion.
Aim to work up to holding the negative portion of the pullup for 6-8s and do 2-3 repetitions for 2-3 sets. Focus on activating the lats and biceps as much as possible.
Additionally, assistance can be used to gain strength at this level. The Gravitron machine, a spotter assisting us by lifting our hips or legs, using a pulley system, or using a resistance band at the feet can all be used to reduce the load so that the ascending portion can be completed. A combination of unassisted slow negatives and assisted positives are brutally effective at achieving a skill, particularly in attaining a pullup.
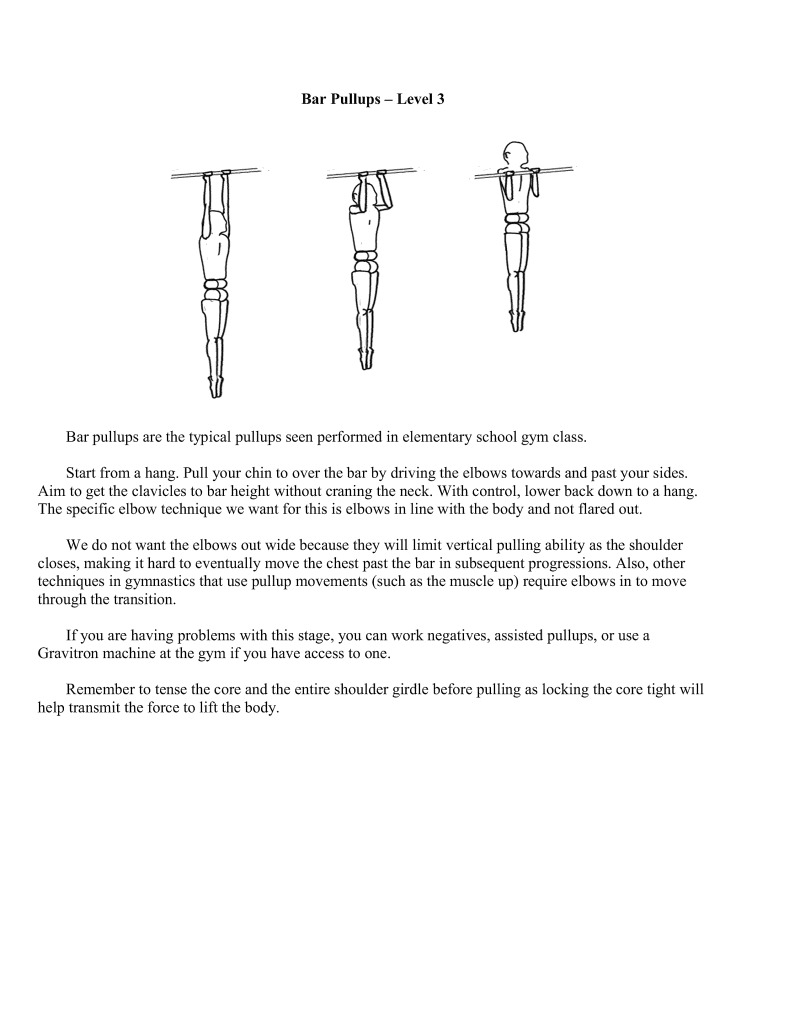
Bar pullups are the typical pullups scen performed in elementary school gym class.
Start from a hang. Pull your chin to over the bar by driving the elbows towards and past your sides. Aim to get the clavicles to bar height without craning the neck. With control, lower back down to a hang. The specific elbow technique we want for this is elbows in line with the body and not flared out.
We do not want the elbows out wide because they will limit vertical pulling ability as the shoulder closes, making it hard to eventually move the chest past the bar in subsequent progressions. Also, other techniques in gymnastics that use pullup movements (such as the muscle up) require elbows in to move through the trans
If you are having problems with this stage, you can work negatives, assisted pullups, or use a Gravitron machine at the gym if you have access to one.
Remember to tense the core and the entire shoulder girdle before pulling as locking the core tight will help transmit the force to lift the body.
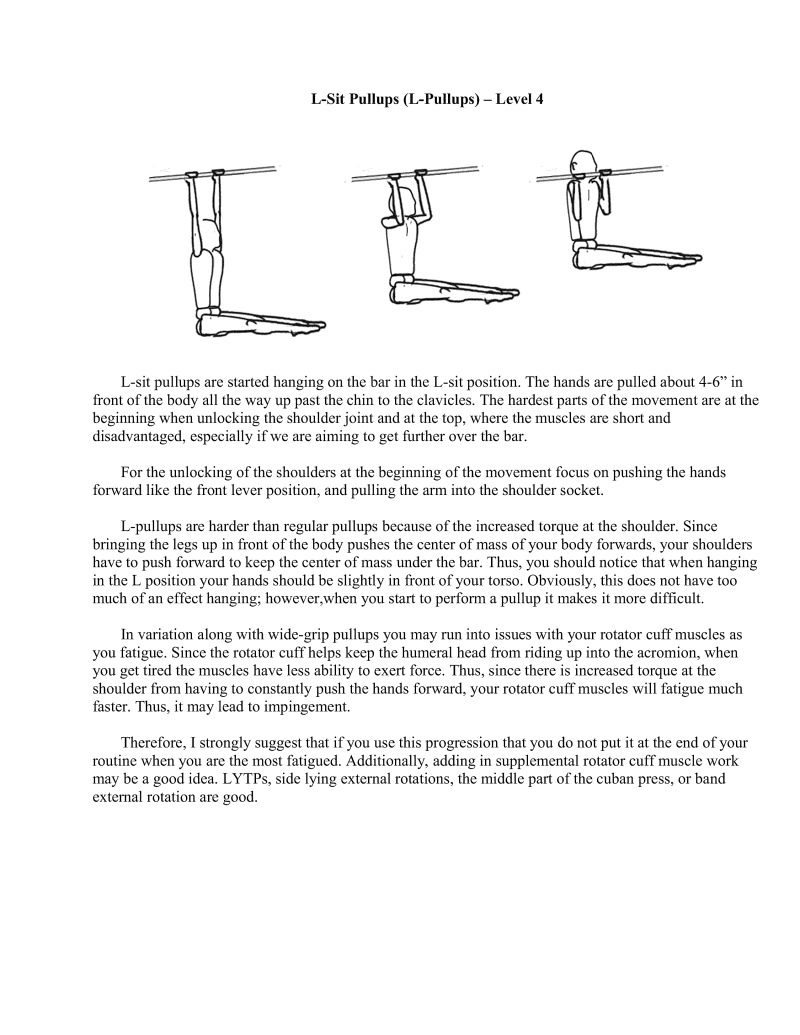
Lesit pullups are started hanging on the bar in the L-sit position. The hands are pulled about 4-6" in front of the body all the way up past the chin to the clavicles. The hardest parts of the movement are at the beginning when unlocking the shoulder joint and at the top, where the muscles are short and disadvantaged, especially if we are aiming to get further over the bar.
For the unlocking of the shoulders at the beginning of the movement focus on pushing the hands forward like the front lever position, and pulling the arm into the shoulder socket.
L-pullups are harder than regular pullups because of the increased torque at the shoulder. Since bringing the legs up in front of the body pushes the center of mass of your body forwards, your shoulders have to push forward to keep the center of mass under the bar. Thus, you should notice that when hanging in the L position your hands should be slightly in front of your torso. Obviously, this does not have too. much of an effect hanging; however.when you start to perform a pullup it makes it more difficult
In variation along with wide-grip pullups you may run into issues with your rotator cuff muscles as you fatigue. Since the rotator cuff helps keep the humeral head from riding up into the acromion, when You get tired the muscles have less ability to exert force. Thus, since there is increased torque at the Shoulder from having to constantly push the hands forward, your rotator cuff muscles will fatigue much faster. Thus, it may lead to impingement.
Therefore, I strongly suggest that if you use this progression that you do not put it at the end of your routine when you are the most fatigued. Additionally, adding in supplemental rotator cuff muscle work may be a good idea. LYTPs, side lying external rotations, the middle part of the cuban press, or band extemal rotation are good.
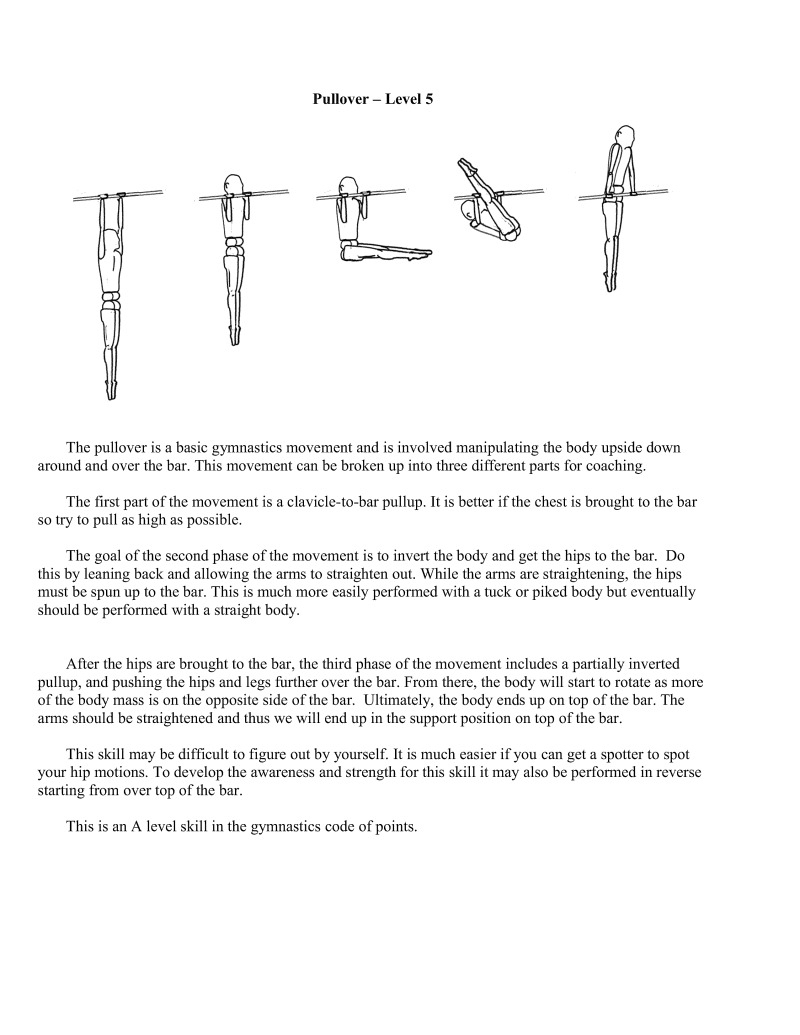
The pullover is a basic gymnastics movement and is involved manipulating the body upside down around and over the bar. This movement can be broken up into three different parts for coaching.
The first part of the movement is a clavicle-to-bar pullup. It is better if the chest is brought to the bar so1try to pull as high as possible.
The goal of the second phase of the movement is to invert the body and get the hips to the bar. Do this by leaning back and allowing the arms to straighten out. While the arms are straightening, the hips must be spun up to the bar. This is much more easily performed with a tuck or piked body but eventually should be performed with a straight body.
After the hips are brought to the bar, the third phase of the movement includes a partially inverted pullup, and pushing the hips and legs further over the bar. From there, the body will start to rotate as more of the body mass is on the opposite side of the bar. Ultimately, the body ends up on top of the bar. The arms should be straightened and thus we will end up in the support position on top of the bar.
This skill may be difficult to figure out by yourself. It is much easier if you can get a spotter to spot your hip motions. To develop the awareness and strength for this skill it may also be performed in reverse Starting from over top of the bar.
This is an A level skill in the gymnastics code of points.
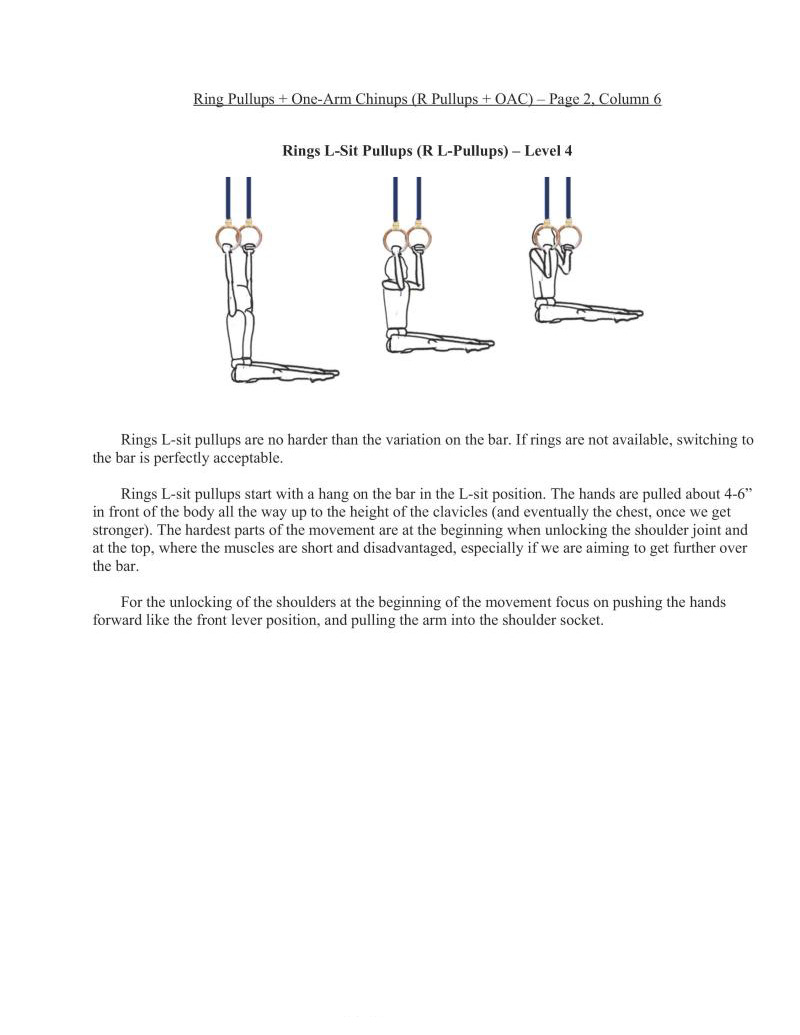
Rings L-sit pullups are no harder than the variation on the bar. If rings are not available, switching to the bar is perfectly acceptable.
Rings L-sit pullups start with a hang on the bar in the L-sit position. The hands are pulled about 4-6" in front of the body all the way up to the height of the clavicles (and eventually the chest, once we get stronger). The hardest parts of the movement are at the beginning when unlocking the shoulder joint and at the top, where the muscles are short and disadvantaged. especially if we are aiming to get further over the bar.
For the unlocking of the shoulders at the beginning of the movement focus on pushing the hands forward like the front lever position, and pulling the arm into the shoulder socket.
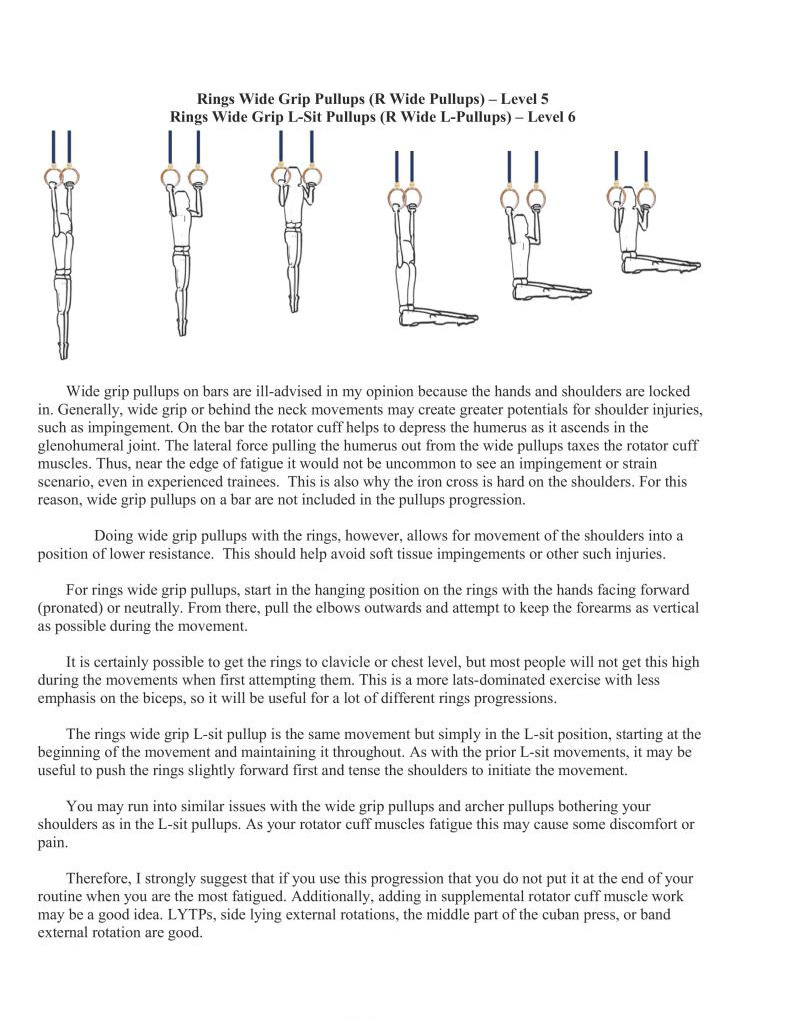
Wide grip pullups on bars are ill-advised in my opinion because the hands and shoulders are locked in. Generally, wide grip or behind the neck movements may create greater potentials for shoulder injuries, such as impingement. On the bar the rotator cuff helps to depress the humerus as it ascends in the glenohumeral joint. The lateral force pulling the humerus out from the wide pullups taxes the rotator cuff muscles. Thus, near the edge of fatigue it would not be uncommon to see an impingement or strain scenario, even in experienced trainees. Thisis also why the iron cross is hard on the shoulders. For this reason, wide grip pullups on a bar are not included in the pullups progression.
Doing wide grip pullups with the rings, however, allows for movement of the shoulders into a position of lower resistance. This should help avoid soft tissue impingements or other such injuries.
For rings wide grip pullups, start in the hanging position on the rings with the hands facing forward (pronated) or neutrally. From there, pull the elbows outwards and attempt to keep the forearms as vertical as possible during the movement.
It is certainly possible to get the rings to clavicle or chest level, but most people will not get this high during the movements when first attempting them. This is a more lats-dominated exercise with less. emphasis on the biceps, so it will be useful for a lot of different rings progressions.
The rings wide grip L-sit pullup is the same movement but simply in the L-sit position, starting at the beginning of the movement and maintaining it throughout. As with the prior L-sit movements, it may be useful to push the rings slightly forward first and tense the shoulders to initiate the movement.
You may run into similar issues with the wide grip pullups and archer pullups bothering your shoulders as in the L-sit pullups. As your rotator cuff muscles fatigue this may cause some discomfort or pain.
Therefore, I strongly suggest that f you use this progression that you do not put it at the end of your routine when you are the most fatigued. Additionally, adding in supplemental rotator cuff muscle work may be a good idea. LYTPs, side lying external rotations, the middle part of the cuban press, or band extemal rotation are good.
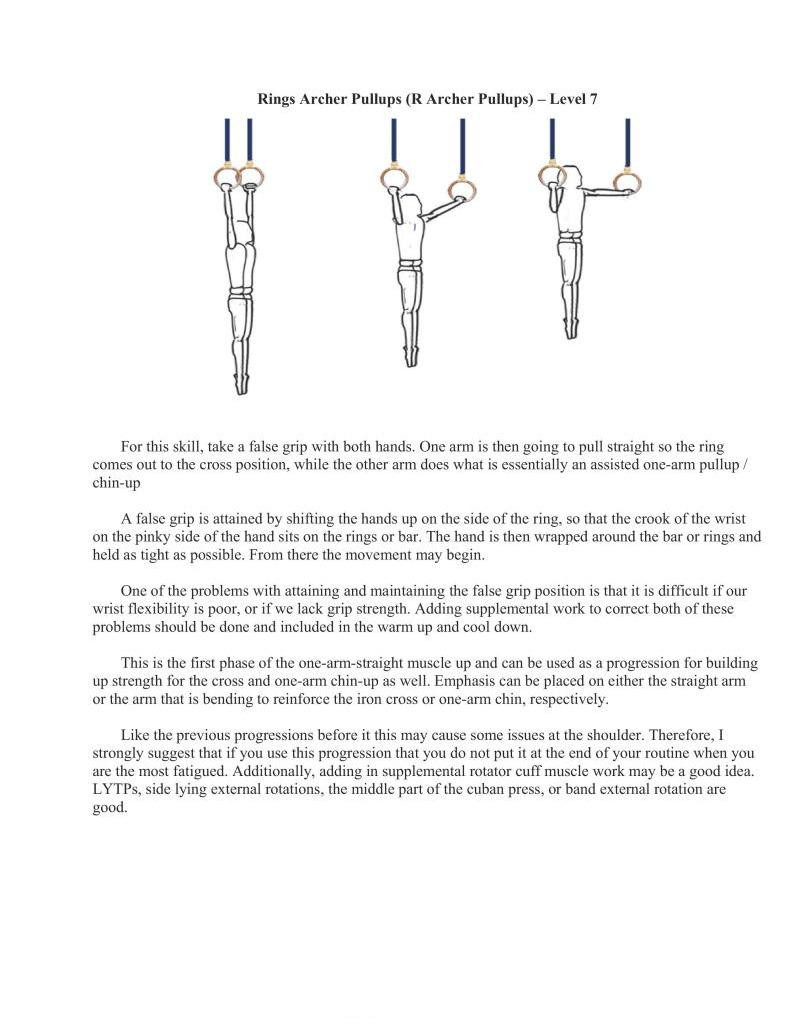
For this skill, take a false grip with both hands. One arm is then going to pull straight so the ring comes out to the cross position, while the other arm does what is essentially an assisted one-arm pullup / chin-up
A false grip is attained by shifting the hands up on the side of the ring, so that the crook of the wrist on the pinky side of the hand sits on the rings or bar. The hand is then wrapped around the bar or rings and held as tight as possible. From there the movement may begin.
One of the problems with attaining and maintaining the false grip position is that it is difficult if our wrist flexibility is poor, or if we lack grip strength. Adding supplemental work to correct both of these: problems should be done and included in the warm up and cool down.
This is the first phase of the one-arm-straight muscle up and can be used as a progression for bu up strength for the cross and one-arm chin-up as well. Emphasis can be placed on either the straight arm or the arm that is bending to reinforce the iron cross or one-arm chin, respectively.
Like the previous progressions before it this may cause some issues at the shoulder. Therefore, I strongly suggest that if you use this progression that you do not put it at the end of your routine when you are the most fatigued. Additionally, adding in supplemental rotator cuff muscle work may be a goo LYTPs, side lying external rotations, the middle part of the cuban press, or band extemal rotation are. good.
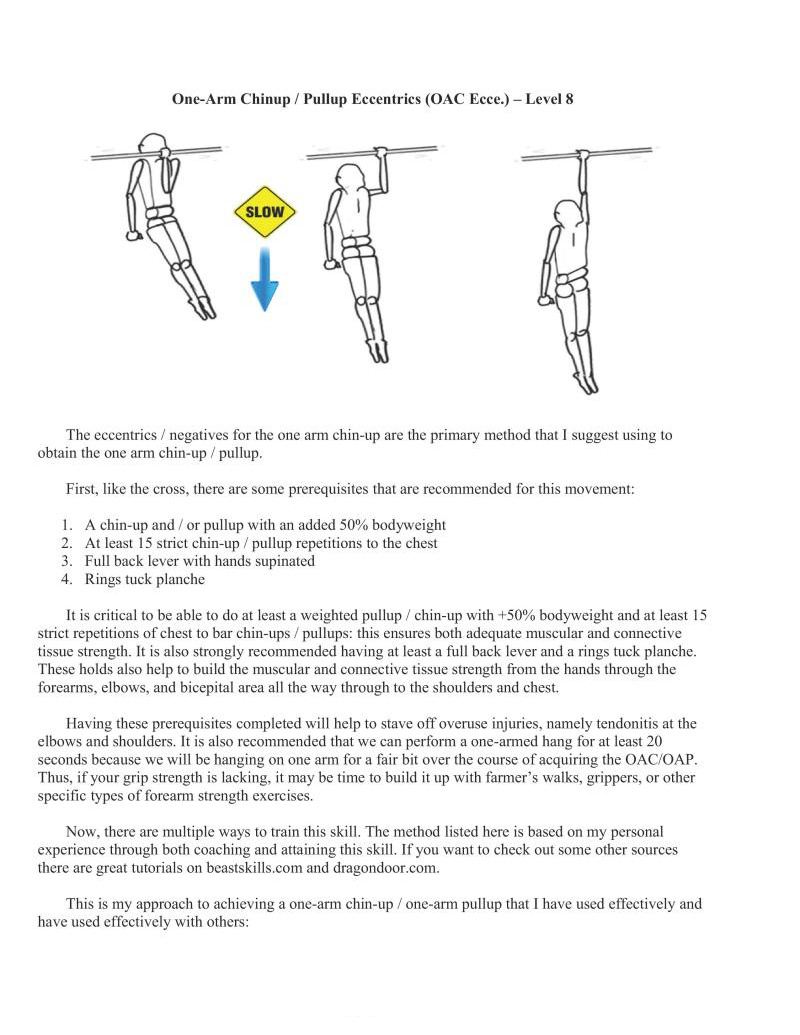
The eccentrics / negatives for the one arm chin-up are the primary method that I suggest using to obtain the one arm chin-up / pullup.
First, like the cross, there are some prerequisites that are recommended for this movement:
It is critical to be able to do at least a weighted pullup / chin-up with +50% bodyweight and at least 15 strict repetitions of chest to bar chin-ups / pullups: this ensures both adequate muscular and connective tissue strength. It is also strongly recommended having at least a full back lever and a rings tuck planche. These holds also help to build the muscular and connective tissue strength from the hands through the forearms, elbows, and bicepital area all the way through to the shoulders and chest.
Having these prerequisites completed will help to stave off overuse injuries, namely tendonitis at the elbows and shoulders. It is also recommended that we can perform a one-armed hang for at least 20 seconds because we will be hanging on one arm for a fair bit over the course of acquiring the OAC/OAP. Thus, if your grip strength is lacking, it may be time to build it up with farmer’s walks, grippers, or other specific types of forcarm strength exercises,
Now, there are multiple ways to train this skill. The method listed here is based on my personal experience through both coaching and attaining this skill. If you want to check out some other sources there are great tutorials on beastskills.com and dragondoor.com.
This is my approach to achieving a one-arm chin-up / one-arm pullup that I have used effectively and have used effectively with others:
If weighted pullups are not an option, the ratio would shift over to 67% on eccentrics vs. 33% on assisted concentrics.
For example, lets examine using a four days per week training schedule over the course of three weeks. With this schedule, there will generally be two days for eccentrics, one day for weighted pullups, and one day for assisted concentrics for vertical pulling movements. The programming for a three days per week schedule is similar. It simply spans the exercises over the course of four weeks, accomplishing what is done in three weeks with the four day per week schedule.
Eccentrics seem to be extremely effective with bodyweight exercises, especially pulling movements. Performing the movement itself with as little outside help as possible is preferred, so nassisted negatives with one arm take precedence over two-arm weighted pullups. Assisted concentrics work the whole of the movement to get in some extra practice, but still rely on outside help to be completed.
At this point in our journey it is likely that we will have been training for at least a year or two. Even So, intense negatives like these are usually limited to two times a week because they are particularly taxing on the CNS,
The OAC seems to best respond to 6-8 second long negatives. Typically, 2-3 repetitions and 2-3 sets of these will be used. Remember that the descent of these movements should be uniform. We want to avoid working the majority of the time at the top of the movement because that will be the strongest part: the muscles are in an advantageous position and we will be the freshest at the beginning. The end of the negative is often the most difficult part. Therefore, do not speed through the eccentric movement before you have reached the fully extended one arm hang position.
As aside note, the weighted pullups and assisted concentrics tend to best respond to 3 sets of 5-8 repetitions. Progress can often be made at about 5 lbs. / 2kg per workout or every other workout.
Approaching the assisted concentrics can be done a few ways. I do not like a spotter for this skill because they tend to help too much and the help is inconsistent. You can use a pulley system and hang weight that you can hold in the other hand or in a belt. Alternatively, we can hang a rope from the bar and progressively grab lower and lower, forcing the opposite hand to assist less and les
Finally, we can use less and less fingers on the opposing hand to assist. First we will eliminate fingers and do different combinations. Generally, the way to work down from the index to pinky fingers on the other hand will go something like this, listed from most assist to least
Oceasionally the last progression will be ring then pinky, but for most people ring finger is slightly weaker than the pinky finger.
Working with OAC eccentrics and assisted concentrics will vary a bit from person to person. From the top we can either face the bar or face it lengthwise. I would say the majority of the people feel more comfortable looking down the bar (lengthwisc) so that the hand is in the "hammer grip" position between pronation and supination. Most people will find themselves naturally gravitate towards this position anyways. It keeps the trainee from having to actively twist to keep the body facing one way or the other. Likewise, it allows for better squeezing of the arm to the chest, which will help generate more tension to perform the movement.
Whatever the preference we should make sure that we practice the chosen technique constantly to achieve the full movement, unless we take the long route and try to become good at many different types simultaneously. Likewise, if we are a rock climber it may be a good idea to practice the OAP (hand facing away from you) instead, because the hands need to be pronated for performing this movement on clim holds or ledges. Specificity is king.
Other exercises such as isometric holds at the top, middle, and bottom may also be of assistance.
These are particularly useful if any of those points are "sticking points" or "rough patches" that need to be strengthened. Otherwise, I would say they are not particularly useful. For instance, "frenchies" can have a solid place in a program to break "sticking points". This is where the negative exercise is performed, but the trainee stops and holds in isometric positions along the way.
Grip strength is also an important factor. The stronger we can hold onto the bar, rings, or other surface, the more innervation we can get to the proximal pulling muscles, resulting in a stronger, more concerted pull. If grip strength is limiting, be sure to add in supplemental work to address the g
Like the previous progressions, the one arm chin-up or one arm pullup creates significant torque at the shoulder. Like the L-pullup, wide pullup, and archer pullup variations this may cause discomfort at the shoulder. Therefore, I strongly suggest that if you use this progression that you do not put it at the end of your routine when you are the most fatigued. Additionally, adding in supplemental rotator cuff muscle work may be a good idea. LYTPs, side lying external rotations, the middle part of the cuban press, or band external rotation are good.
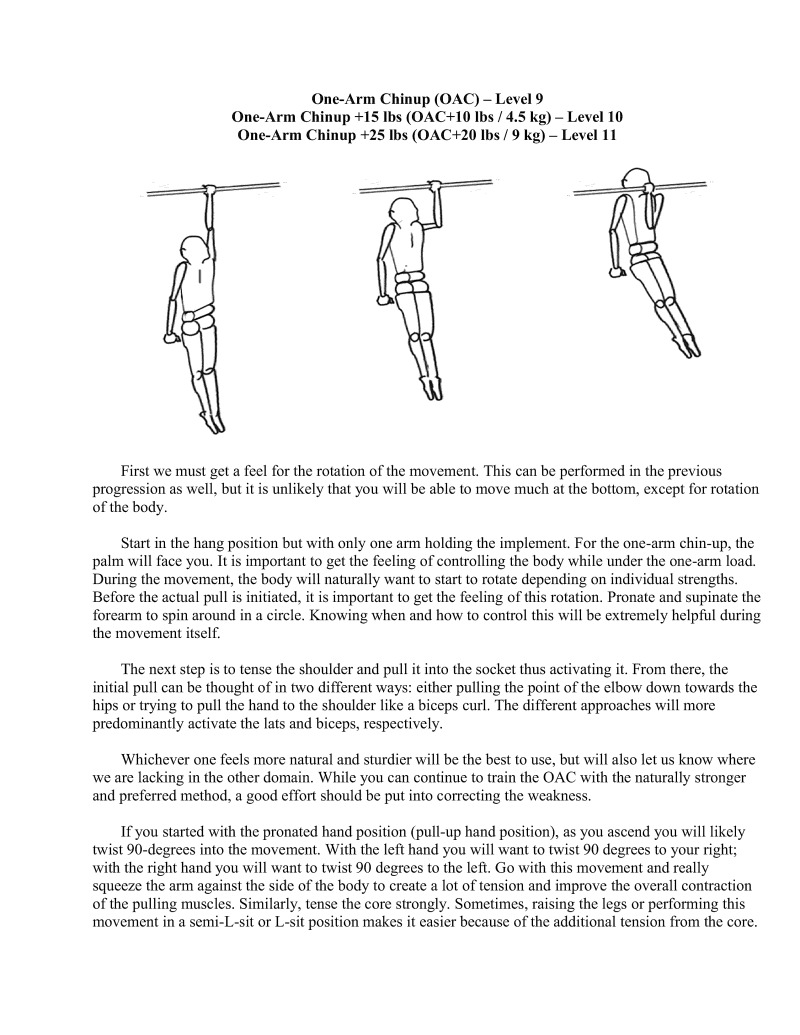
First we must get a feel for the rotation of the movement. This can be performed in the previous progression as well, but it is unlikely that you will be able to move much at the bottom, except for rotation of the body.
Start in the hang position but with only one arm holding the implement. For the one-arm chin-up, the palm will face you. It is important to get the feeling of controlling the body while under the one-arm load. During the movement, the body will naturally want to start to rotate depending on individual strengths. Before the actual pull is initiated, it is important to get the feeling of this rotation. Pronate and supinate the forearm to spin around in a circle. Knowing when and how to control this will be extremely helpful during the movement tself.
The next step is to tense the shoulder and pull it into the socket thus activating it. From there, the initial pull can be thought of in two different ways: either pulling the point of the elbow down towards the hips or trying to pull the hand to the shoulder like a biceps curl. The different approaches will more predominantly activate the lats and biceps, respectively.
Whichever one feels more natural and sturdier will be the best to use, but will also let us know where we are lacking in the other domain. While you can continu to train the OAC with the naturally stronger and preferred method. a good effort should be put into correcting the weakness.
If you started with the pronated hand position (pull-up hand position), as you ascend you will likely twist 90-degrees into the movement. With the left hand you will want to twist 90 degrees to your right; with the right hand you will want to twist 90 degrees to the left. Go with this movement and really squeeze the arm against the side of the body to create a lot of tension and improve the overall contraction of the pulling muscles. Similarly, tense the core strongly. Sometimes, raising the legs or performing this movement in a semi-L-sit or L-sit position makes it easier because of the additional tension from the core.
If you started with supinated hand position (chin-up hand position), as you ascend you will want to keep facing the bar the entire time
If you have an issue with a specific weakness, supplemental work can be done. Biceps curls can be added to correct the imbalance if that individual feels more shoulder / lats dominant in this movement. Conversely, strength in the biceps and weakness in the lats will require more straight-arm pulling work such as front lever variations, back lever variations, or weighted work such as straight-arm lat pull-downs and dumbbell weighted pullovers. Isolation exercises are usually improperly used and overdone, but if there were ever a time to use them it would be situations like this where imbalances need to be fixed.
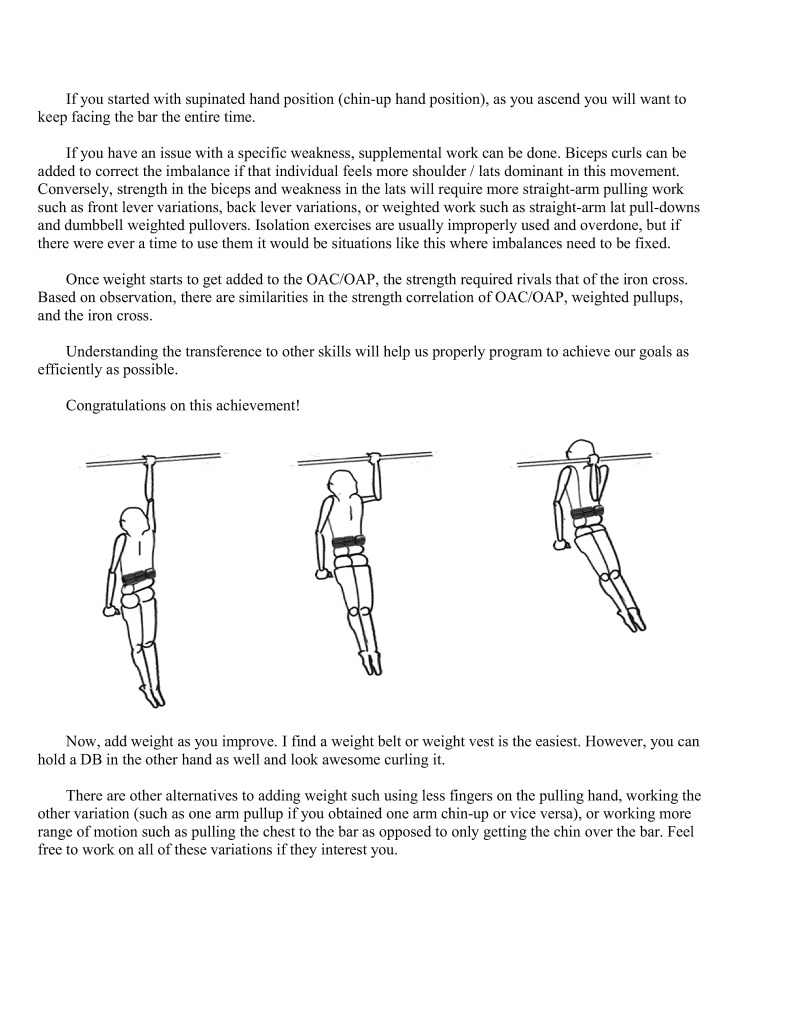
Once weight starts to get added to the OAC/OAP, the strength required rivals that of the iron cross. Based on observation, there are similarities in the strength correlation of OAC/OAP, weighted pullups, and the iron cross.
Understanding the transference to other skills will help us properly program to achieve our goals as efficiently as possible.
Congratulations on t
Now, add weight as you improve. I find a weight belt or weight vest is the easiest. However, you can hold a DB in the other hand as well and look awesome curling it.
There are other alternatives to adding weight such using less fingers on the pulling hand, working the other variation (such as one arm pullup if you obtained one arm chin-up or vice versa), or working more range of motion such as pulling the chest to the bar as opposed to only getting the chin over the bar. Feel free to work on all of these variations if they interest you.
There are some interesting correlations between many of the pulling exercises that I have noticed from training.
In particular, the back lever, front lever, one arm chin-up/pullup, iron cross, and many other pulling exercises have very similar levels of strength that carry over between each of the strength progressions.
Here are some of my estimations on the translation of one to the other.
Referring back to the progression charts, some of these associations are on the same level on the skill and strength. This is what makes the skill and strength progressions charts useful, because they allow identification of skills that are at a similar level of ability.
Regarding the translation to the full back lever, it is a bit more variable. The full back lever can be achieved around straddle FL progression, more or less. The straight arm pulling variations build the shoulder strength to execute the OAC / OAP, but the front lever in particular does not build the bent arm pulling strength while the back lever does, due to the high level of biceps stress.
Of course, there is still some level of specificity that is needed to achieve each of these skills. Likewise, with individual anthropometry there may be some difference with attaining these skills ranked ata similar level of strength.
Practice what you want to achieve, but do so in knowing that supplemental exercises from all of these categories have some carryover to each other.
Explosive pullups variations can be fun, exciting feats just like many of the strength moves. However, it takes a fair amount of dedication with both explosive and strength work to achieve the higher-level skills. Be diligent when working these progressions and, most of all, be safe. It is easy to miss and fall so always practice with a soft landing surface. If your strength is lacking I would avoid some of these progressions until you are at least level 3 or 4.
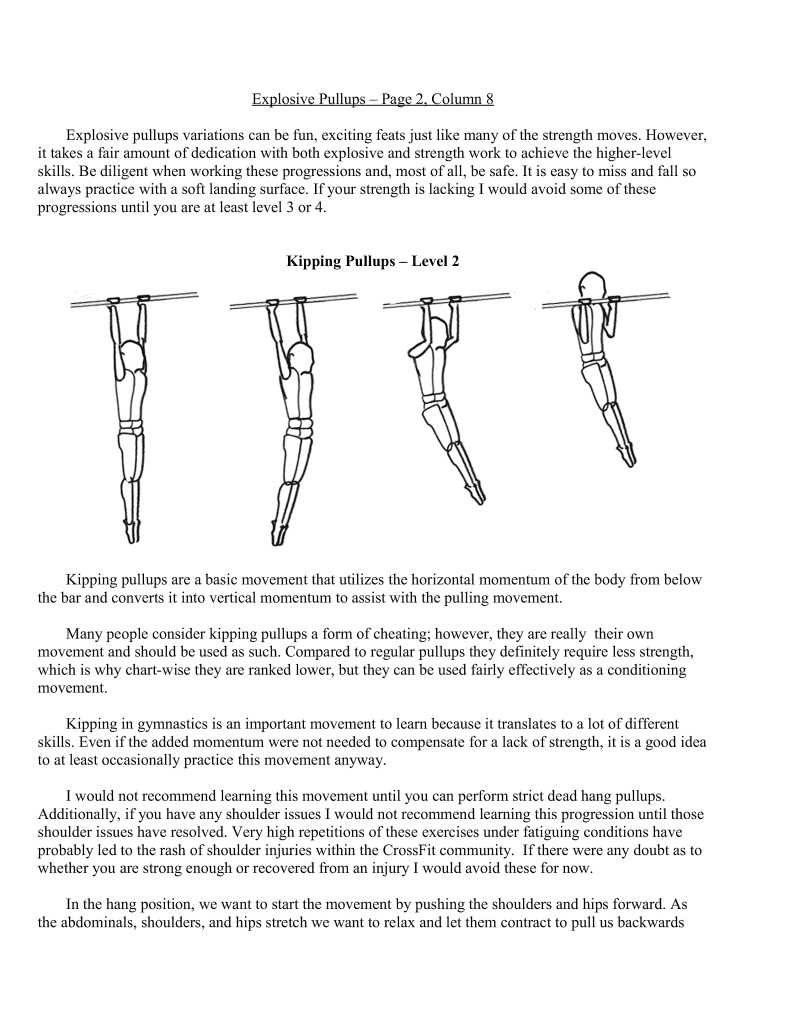
Kipping pullups are a basic movement that utilizes the horizontal momentum of the body from below the bar and converts it into vertical momentum to assist with the pulling movement.
Many people consider kipping pullups a form of cheating; however, they are really their own movement and should be used as such. Compared to regular pullups they definitely require less strength, which is why chart-wise they are ranked lower, but they can be used fairly effectively as a conditioning movement.
Kipping in gymnastics is an important movement to learn because it translates to a lot of different skills. Even if the added momentum were not needed to compensate for a lack of strength, it is a good idea to at least oceasionally practice this movement anyway.
I would not recommend learning this movement until you can perform strict dead hang pullups. Additionally, if you have any shoulder issues I would not recommend learning this progression until those shoulder issues have resolved. Very high repetitions of these exercises under fatiguing conditions have probably led to the rash of shoulder injuries within the CrossFit community. I there were any doubt as to whether you are strong enough or recovered from an injury I would avoid these for now.
In the hang position, we want to start the movement by pushing the shoulders and hips forward. As the abdominals, shoulders, and hips stretch we want to relax and let them contract to pull us backwards
into the hollow position. Repeat this to gain a bit more momentum. This time, after the arch phase as we start hollowing, we want to initiate the pullup portion as the shoulder angle should start to close.
When the clavicles are up to bar height (chest to bar is preferable when strength allows) to not immediately relax and drop down. We want to use our muscles to control the movement back. From the top position, push back away from the bar, and in a controlled eccentric motion allow the arms and shoulders to open, leaving you back in the arched starting position.
If we are having problems getting the movement, or even stringing them together, it may be a good idea to get some coaching by a gymnast or anyone else who knows how to perform kipping technique. 1f the shoulders start to hurt from this movement, back off from it for a while. Similarly, if we are jerking around a lot then back off for a bit and just practice the arch / hollow phase.
One of the ways to learn this movement without any abuse on the shoulders is to do it with the feet on the ground to get the feel of the shoulder movements.
The key to learning this movement is simply good practice: while it requires some strength it is mainly the coordination and technique that will need attention.
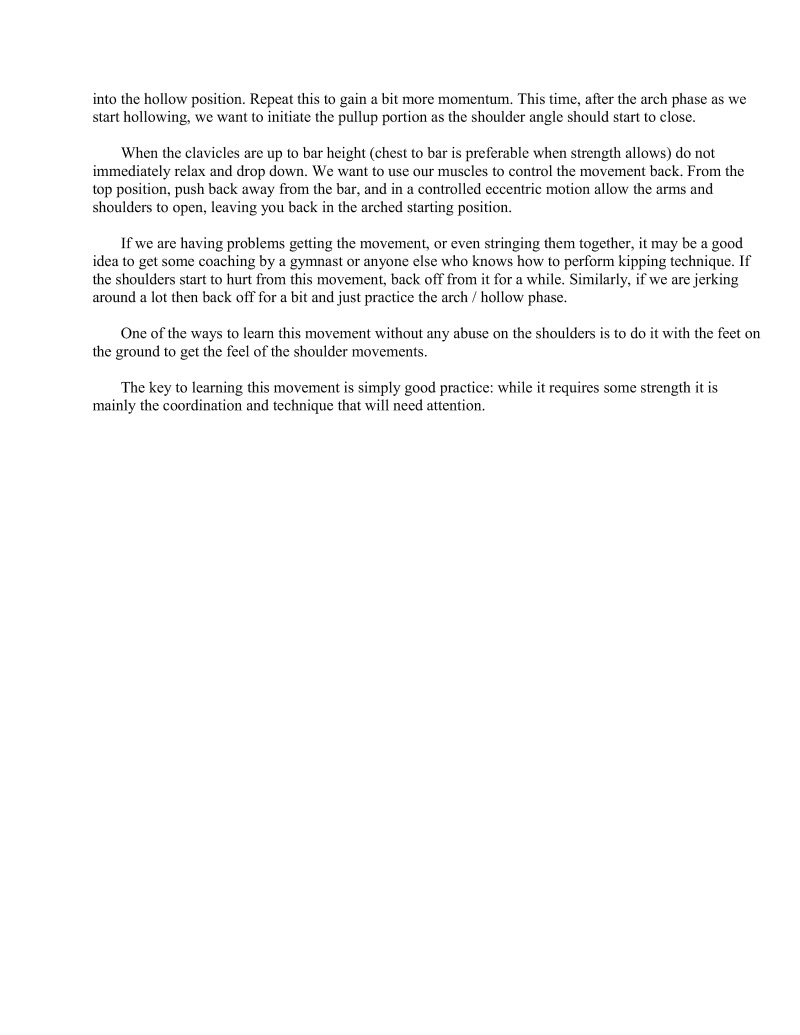
A standard bar pullup is the typical pullup seen performed in clementary school gym class, but this variation aims to pull as quickly as possible.
Start from hang. Pull your chin to over the bar (and as strength permits, aim to make the chest reach the bar) by driving the elbows towards and past your sides as fast as possible. Retun to hang slow and controlled. Then prepare for another powerful pull
The specific elbow technique we want for this is elbows in line with the body. We do not want the elbows out wide because they will limit vertical pulling ability is the shoulder closes, making it hard to move the chest past the bar. Also, other techniques in gymnastics that use the pullup as a segue (such as the muscle up) require elbows in to move through the transition.
Again, the primary point is to focus on pulling as explosively as is possible. As such, sets done with explosive bar pullups are kept low in repetitions because fatigue will quickly slow down the speed at which we can pull ourselves. Keep the rest high and movement fast.
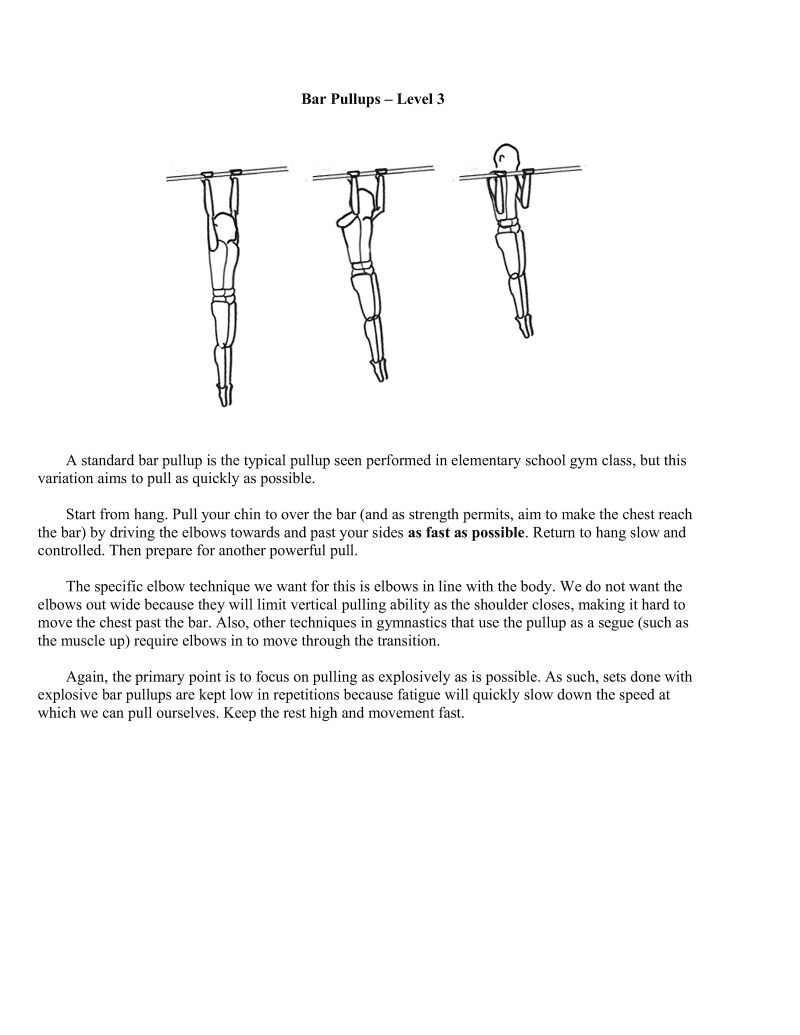
The kip allows the body to generate horizontal momentum, and then it can be applied vertically in an explosive full body contraction making upward movement much easier.
In many fitness circles it is considered cheating; however, it does have some merit in that in can help with developing full body coordination, development of explosive movement, and can be used as metabolic conditioning tool. We are specifically using it here as an explosive intermediate to bridge explosive pullups to non-kipping clapping pullups,
The kip technique requires the "arch-hollow" technique. During this technique, the oscillation of the body rotates around two points — the hands and the knees. Between the hands and the knees are two major fulerums where the movement is going to occur. The hips and shoulders should be thrust forward and backwards at the same time thus moving the body into an arch-hollow rocking movement.
When the movement is ready to be performed, during the transition of the body to the hollow phase, the arms should be contracted to harness the momentum and stretch reflex from the shoulder-hip complex to create vertical motion. As the chin ascends over the bar, the hands should be released into the clap motion as quickly as possible.
Likewise, the re-gripping of the bar should occur as quickly as possible to avoid plummeting to the carth. Lower in a controlled fashion to perform additional repetitions.
When you first try this, make sure to grab some padding or a spotter to make sure you do not slip off and hurt yourself. Never do this on a surface that may cause your grip to slip.
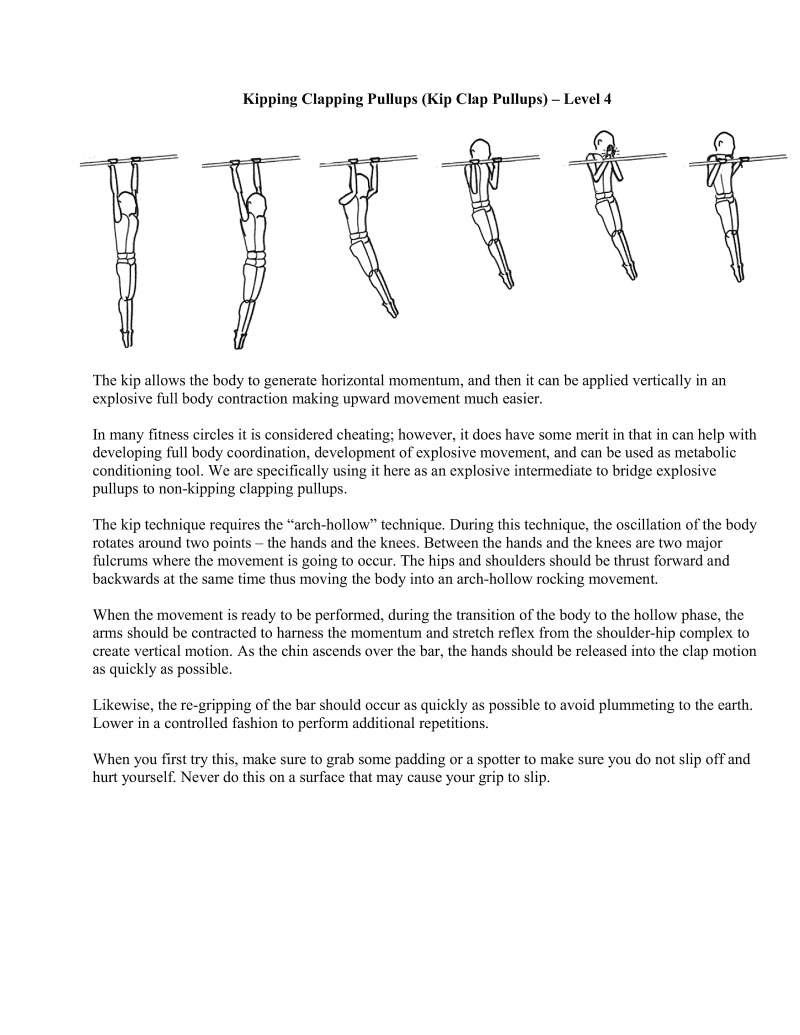
The technique for this skill requires much more brute pulling power than the kipping clapping pullup.
From the hanging position, pull explosively aiming to get the bar approximately 3-6 inches from the chest. This slight backwards motion will help avoid hitting the head with the bar.
Like with the kipping clapping pullups, the clap should be initiated just as the chin ascends above the bar. In some cases, if the pull is explosive enough, the release can happen once the head or eyes reach the plane of the bar if enough momentum has been generated to allow your chin to be over the bar for the clap. The re-gripping should be just as rapid to avoid falling.
Catch the bar and lower in controlled fashion for additional repetitions.

Lsit clapping pullups are the first generation of explosive pullups that add the L-sit to decrease leverage at the shoulder and thus increase difficulty. Since the L-sit forces the center of mass forward, this increases the angle at the shoulder effectively making it require much more force to generate the same vertical momentum used to propel the body upwards.
In this specific technique there is no need to focus on pulling a few inches in front the chest. Rather, since the hands will already be in front of the chest by a couple of inches (which decreases the leverage), the main focus is to keep the toes elevated in the L-sit by keeping the abdominals contracted, and pull the
hands down and the elbows to your sides as quickly as possible. It is a much different movement than the explosive pullups previously described, and will require a bit more practice.
This is the first movement in this progression without a kip besides the standard pullup, and it really requires a strong ability to apply force explosively.
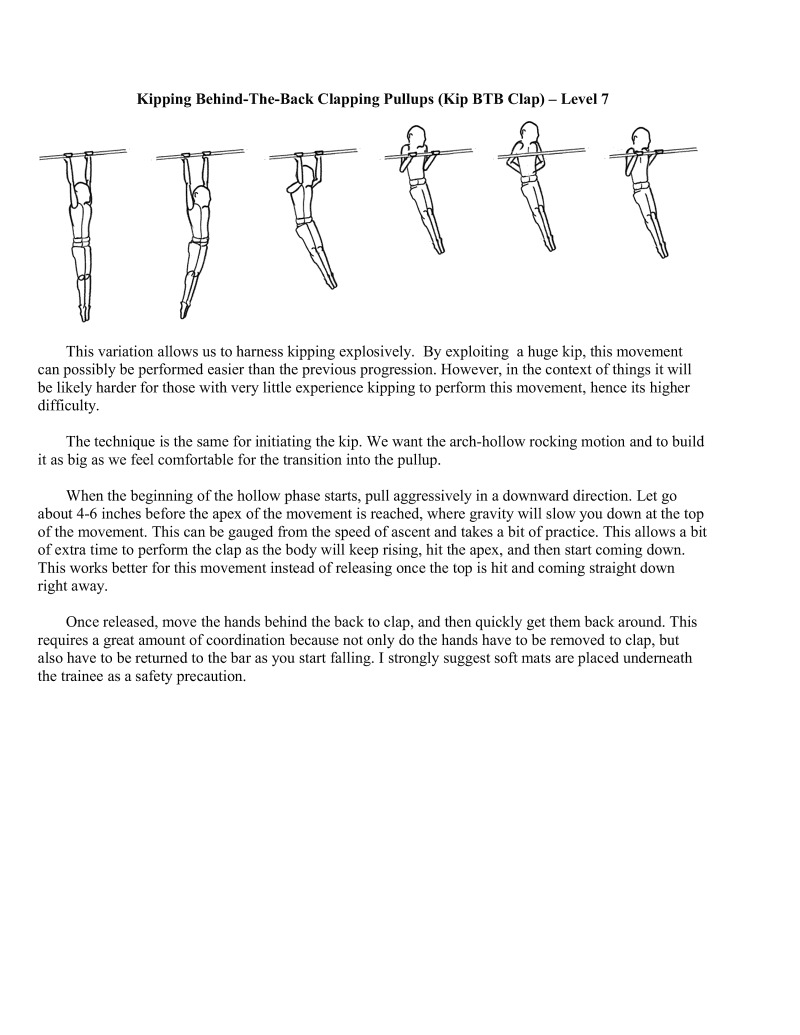
This variation allows us to harness kipping explosively. By exploiting a huge kip, this movement can possibly be performed easier than the previous progression. However, in the context of things it will be likely harder for those with very little experience kipping to perform this movement, hence its higher difficulty.
The technique is the same for initating the kip. We want the arch-hollow rocking motion and to build it as big as we feel comfortable for the transition into the pullup.
When the beginning of the hollow phase starts, pull aggressively in a downward direction. Let go about 4-6 inches before the apex of the movement is reached, where gravity will slow you down at the top of the movement. This can be gauged from the speed of ascent and takes a bit of practice. This allows a bit of extra time to perform the clap as the body will keep rising, hit the apex, and then start coming down. This works better for this movement instead of releasing once the top is hit and coming straight down right away.
Once released, move the hands behind the back to clap, and then quickly get them back around. This requires a great amount of coordination because not only do the hands have to be removed to clap, but also have (o be retumed to the bar as you start falling. I strongly suggest soft mats are placed underneath the trainee as a safety precaution.
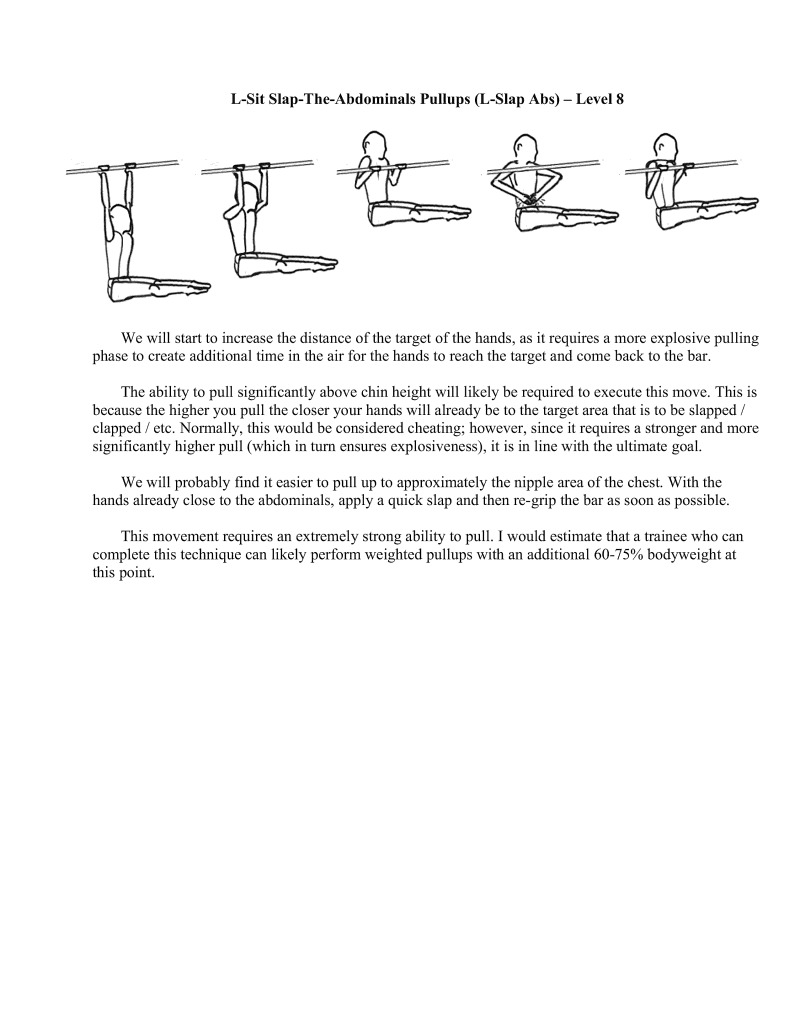
We will start to increase the distance of the target of the hands, as it requires a more explosive pulling phase to create additional time in the air for the hands to reach the target and come back to the bar.
The ability to pull significantly above chin height will likely be required to execute this move. This is because the higher you pull the closer your hands will already be to the target area that is to be slapped / clapped / etc. Normally, this would be considered cheating; however, since it requires a stronger and more significantly higher pull (which in tum ensures explosivenes in line with the ultimate goal
We will probably find it easier to pull up to approximately the nipple area of the chest. With the hands already close (o the abdominals, apply a quick slap and then re-grip the bar as soon as possible.
This movement requires an extremely strong ability to pull. I would estimate that a trainee who can complete this technique can likely perform weighted pullups with an additional 60-75% bodyweight at this point.
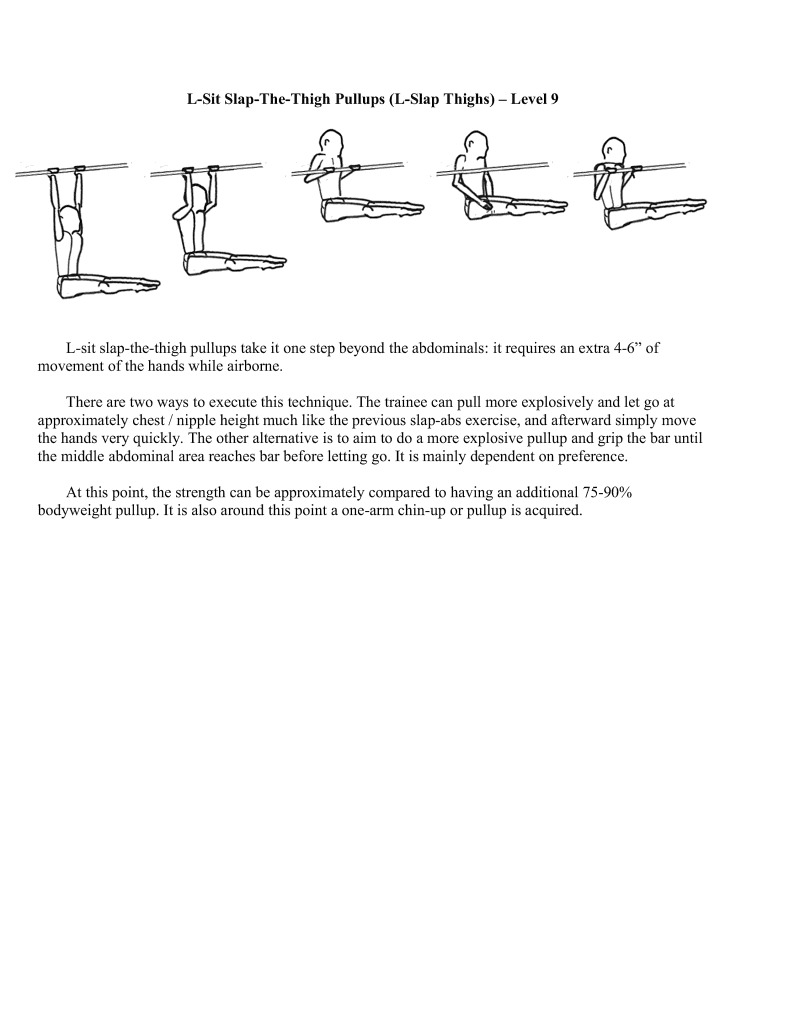
L-sit slap-the-thigh pullups take it one step beyond the abdominals: it requires an extra 4-6" of movement of the hands while airborne.
There are two ways to execute this technique. The trainee can pull more explosively and let go at approximately chest / nipple height much like the previous slap-abs exercise, and afterward simply move the hands very quickly. The other altenative is to aim to do a more explosive pullup and grip the bar until the middle abdominal area reaches bar before letting go. It is mainly dependent on preference.
At this point, the strength can be approximately compared to having an additional 75-90% bodyweight pullup. It is also around this point a one-arm chin-up or pullup is acquired.
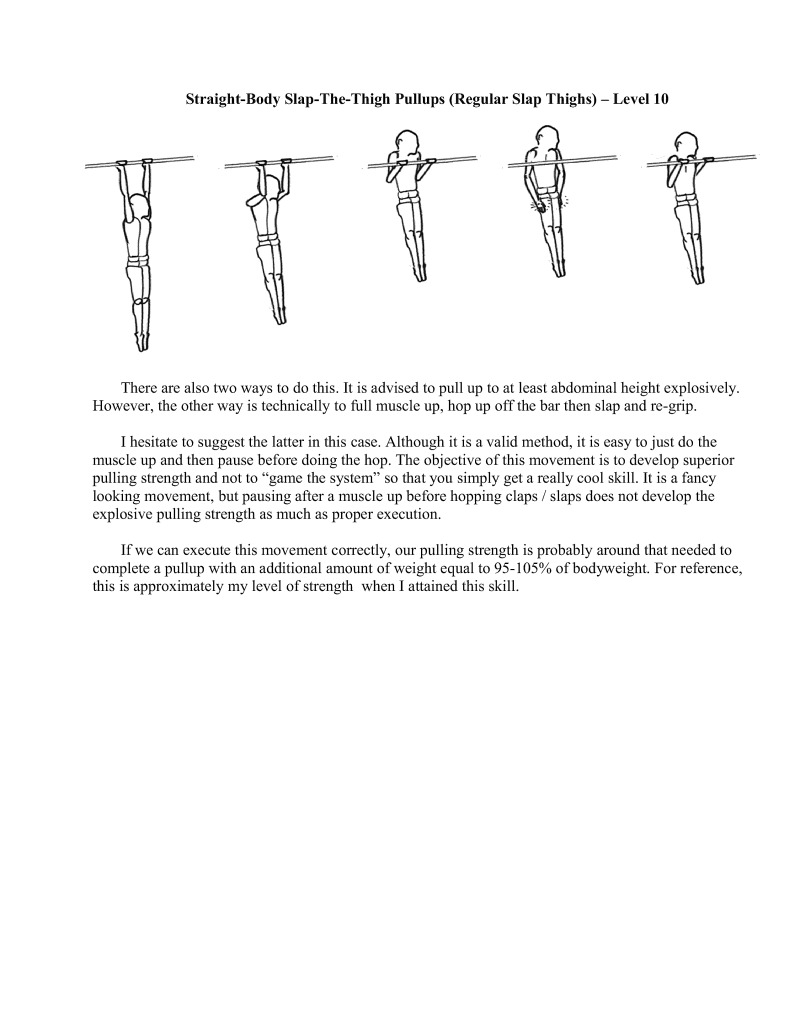
There are also two ways to do this. It is advised to pull up to at least abdominal height explosively. However, the other way is technically to full muscle up, hop up off the bar then slap and re-grip.
I hesitate to suggest the latter in this case. Although it is a valid method, it is easy to just do the muscle up and then pause before doing the hop. The objective of this movement is to develop superior pulling strength and not to "game the system" so that you simply get a really cool skill. It is a fancy looking movement, but pausing after a muscle up before hopping claps / slaps does not develop the explosive pulling strength as much as proper execution.
If we can execute this movement correctly, our pulling strength is probably around that needed to complete a pullup with an additional amount of weight equal to 95-105% of bodyweight. For reference, this is approximately my level of strength when I attained this skill.
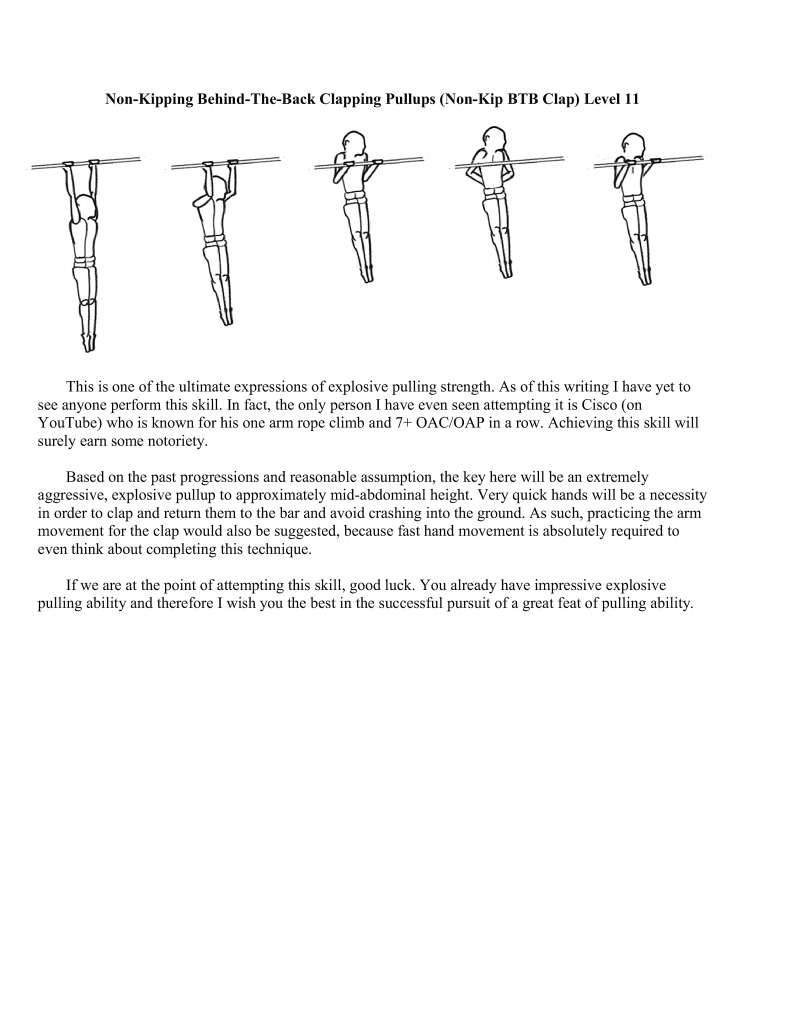
This is one of the ultimate expressions of explosive pulling strength. As of this writing I have yet to see anyone perform this skill. In fact, the only person I have even seen attempting it is Cisco (on YouTube) who is known for his one arm rope climb and 7+ OAC/OAP in a row. Achieving this skill will surely earn some notoriety.
Based on the past progressions and reasonable assumption, the key here will be an extremely aggressive, explosive pullup to approximately mid-abdominal height. Very quick hands will be a necessity in order to clap and return them to the bar and avoid crashing into the ground. As such, practicing the arm movement for the clap would also be suggested, because fast hand movement is absolutely required to even think about completing this technique.
If we are at the point of attempting this skill, good luck. You already have impressive explosive pulling ability and therefore I wish you the best in the successful pursuit of a great feat of pulling ability.
The iron cross could really have a whole chapter to itsel. The technique and demands of the portion, especially on the connective tissues, are high and can easily lead to overuse injuries if not approached properly.
In the skill progressions chart, the recommended prerequisites that will help develop adequate connective tissue and joint preparation for the rigorous nature of iron cross training are shaded. These are as follows:
All of these skills have a couple of things in common. Rings handstands ensure that there is a proper development of pressing strength, especially that of the anterior shoulder, which takes a lot of force during iron cross training. Additionally, all of the straight-arm work from the straight-arm press handstands, full back lever, front lever, and planche will ensure that the connective tissues of the shoulder and forearm are able to safely support the bodyweight under conditions of disadvantaged leverage. Similarly, the rings turned out dips have a stress component on the elbows and chest that mimic a lot of the stress that is experienced in the iron cross position.
This base amount of strength is crucial because the iron cross is executed with the body in an extremely disadvantaged position, more so than any of the moves above. We do not want any potential injuries to develop, and having enough base strength to safely begin progressions with the cross is key.
In regards to rings tured out dips, it is a requirement that you are competent in holding the rings turned out to 90 degrees (palms fully forward) position for at least 30 seconds. You will notice this causes a lot of strain on the inner elbow, biceps, and chest. This stress is the driver for adaptation needed to
protect our bodies from the harshness of iron cross trai

Methods of Training
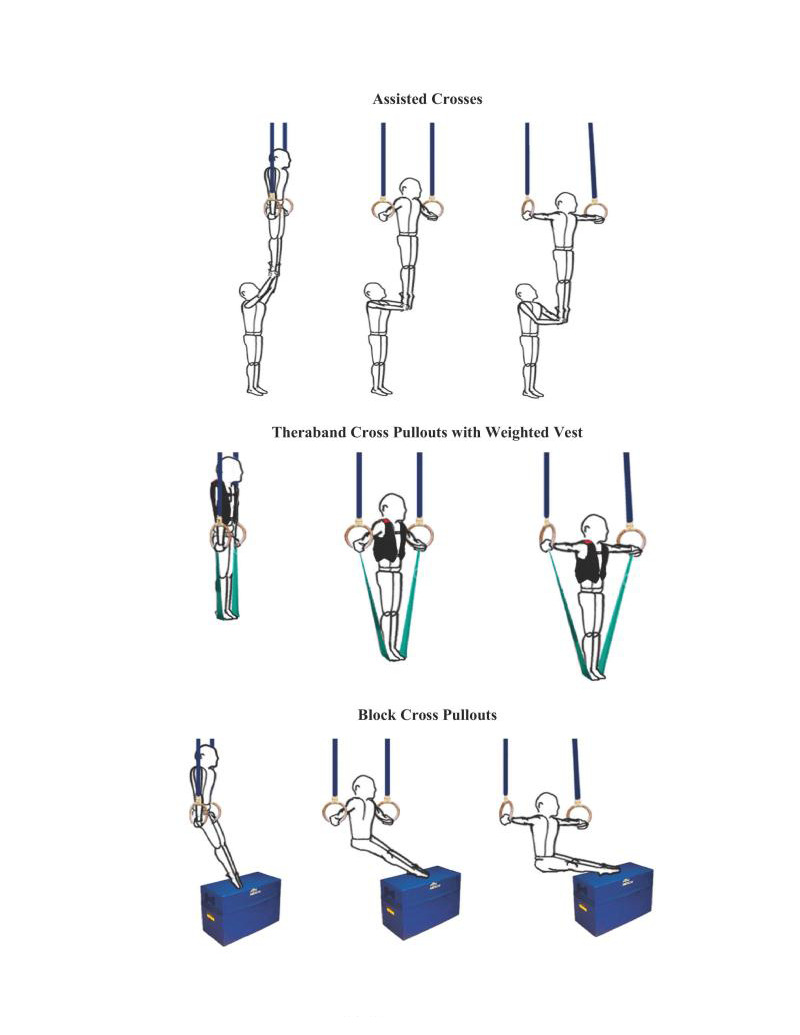
It preferable to simulate the cross position as best as possible, including keeping the trainee on the rings. Four common methods of training towards the iron cross are listed below and ordered from most to least effective.
From what I have seen and experienced, partner-assisted crosses are the best. They require muscles to be at or near maximum effort the whole time, which is extremely good for developing strength and muscle mass for the cross (provided that you are eating enough). In addition, a training partner typically makes workouts more effective through friendly competition and consistent encouragement.
The second best option would be Theraband cross pullouts with weighted progressions or a dream machine device with pulleys connected to weights (or your bodyweight). It simulates the cross position very well and is scalable with weights to mark continual strength progress. For the weighted progressions, dumbbells, weighted vests, or other implements can be used provided there is a system to consistently add or subtract weight from the body.
Block cross pullouts tend to put a bit more stress on the lats as opposed to the pecs. For this single reason they are rated below the above exercises in which you can achieve the actual iron cross position. On the other hand, block cross pullouts can be effective because progress can be measured either by how much of the legs are on the block or by the height of the block.
Last but not least is the Theraband-assisted cross (with therabands of different colors). It is rated last because the force is less measurable and so progress is less consistent. If using a block feels unnatural, switch to these instead, but do your absolute best to keep everything consistent to ensure steadier progression. If doing these, do your best to pick something that makes you struggle but allows you to eventually push through.
Pressing the rings into the forearms to decrease leverage is a valid method; however, performing iron cross exercises this way seems to not prepare the connective tissues enough. It is often the case that strength training for the iron cross may be limited or partially limited by the ability of the connective tissues to adapt to the stress. In particular, the connective tissues that are most affected are the ones at the elbow (medial epicondyle) and shoulder (otator cuff and surrounding muscular stabilizers). Thus, I would avoid using this as a primary technique.
Another alternative for exercises if you have a dream machine.
Theraband Cross Pullouts with Weighted Vest
Block Cross Pullouts
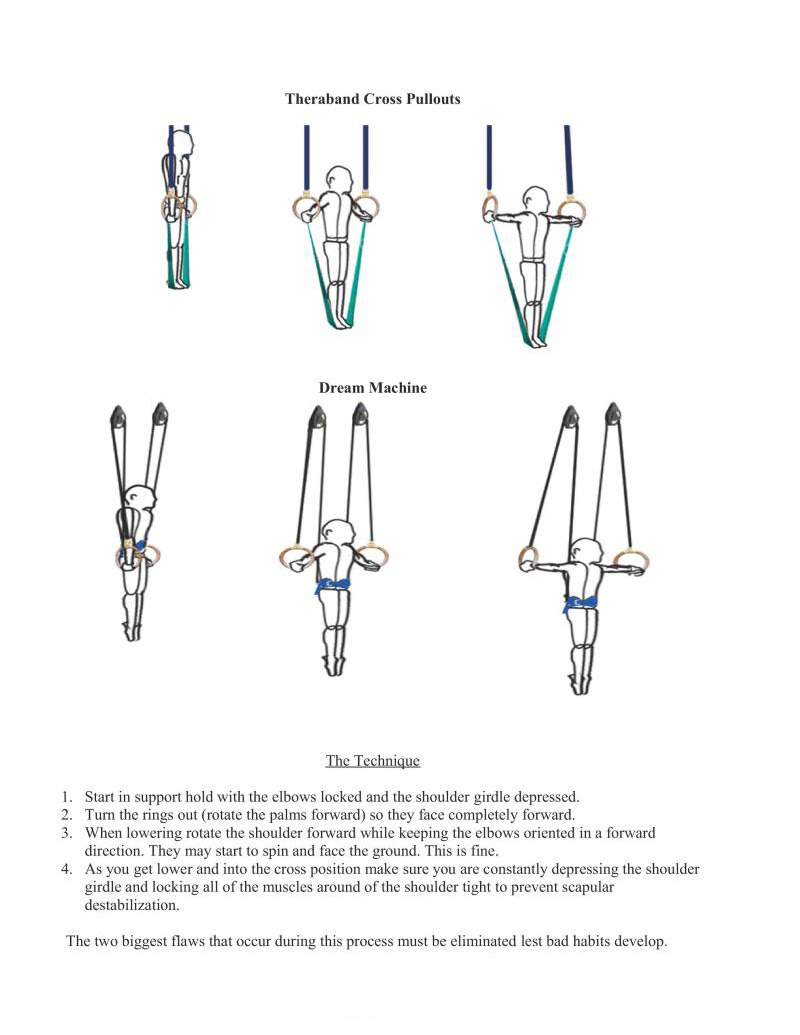
Theraband Cross Pullouts
Dream Machine The Technique
The two biggest flaws that occur during this process must be eliminated lest bad habits develop.
A The elbows must be locked straight at all imes. It is a common habit to bend the arms because it lessens the torque at the shoulder. It also puts more tension on the latissimus dorsi, which is stronger than the pectoralis muscle groups. Avoid this at all costs.
A Similarly, as the latissimus and pectoralis muscle groups become fatigued it is common to see the shoulder girdle elevate. This is a sign that your musculature can no longer safely support your shoulders and greatly increases the chances of shoulder injury. If you feel your humerus riding up in the shoulder you should terminate the set immediately because it is very easy to aggravate the Soft tissues there which may lead to rotator cuff tendos . or shoulder impingement.
There is an alterative technique to consider if rolling the shoulders forward aggravates the shoulder. It i possible to keep the shoulder in a neutral position, but that makes it a bit tougher on the elbows. If this the case and you would like to attempt this technique with neutral shoulders, then make sure your elbows are safe before going all out on exercises. You do lose the ability of the shoulders to naturally lock themselves when in the cross position as well.
There are a couple of other things to keep in mind because there are different accepted variations of the cross. First, the current official gymnastics code requires that you do not have a false grip. although it is easier to obiain the cross position with one. The false grip can be slid into while tuing the rings out and lowering if preferred.
The cross is very dangerous on the shoulder and elbows if your muscles and connective tissue are not prepared for it. I you do not have the prerequisites listed on the charts I suggest you do not even atiempt any of these progressions.
For further information, I have written extensively on the iron cross in an article for The Performance Menu journal
http://www.performancemenu.com/articles/article.php2articlelD=32
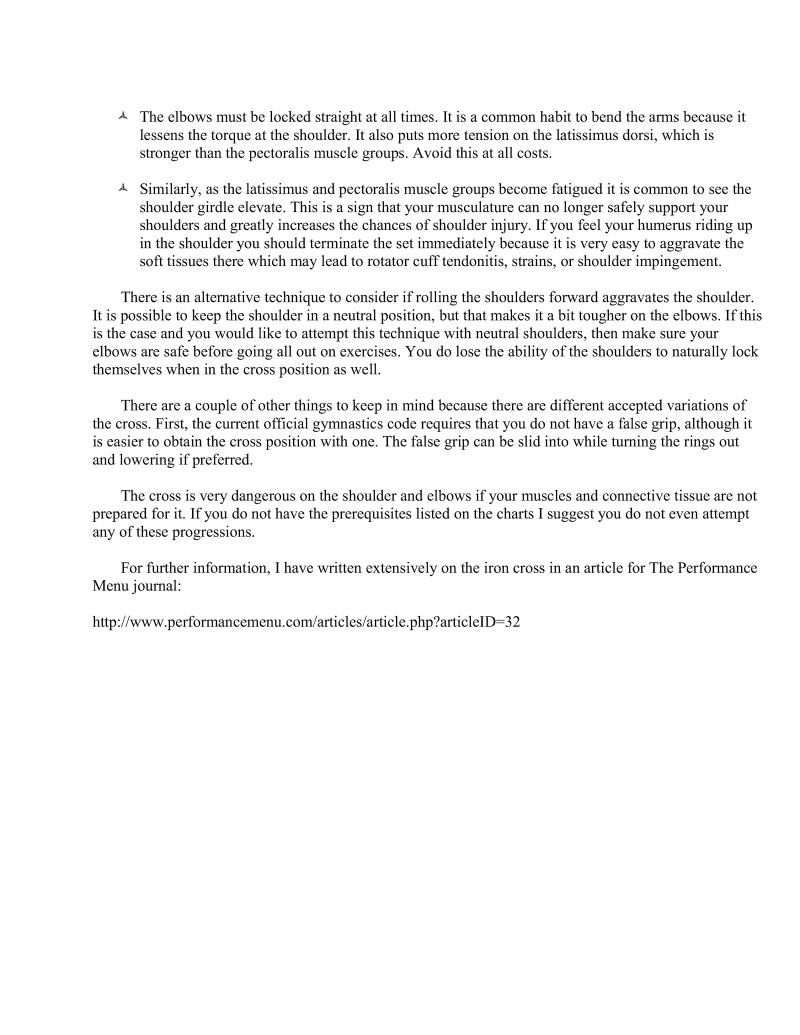
Now that you are very close to the iron cross or can momentarily pause in the position, it is recommend to integrate more assisted holds into the program to neurologically prime the body to hit the exact hold you want. We start with mostly eccentric/concentric movements in the beginning so that we can build a base of strength that encompasses all ranges of motion.
If you are training this position alone it may be very difficult to move your body from any type of support or movement into the hold. Also, strengthening the full movement helps extensively with most other corollary pulling movements such as back lever, front lever, and one-arm chin-ups
More on the recommended programming can be found in the article referenced in the previous section.
The sample programming section of this book also discusses some specific programming. Traditional light/heavy days work well in a comprehensive program. A system with daily-undulated periodization also works weil.
This is a B level skill in the gymnastics code of points.
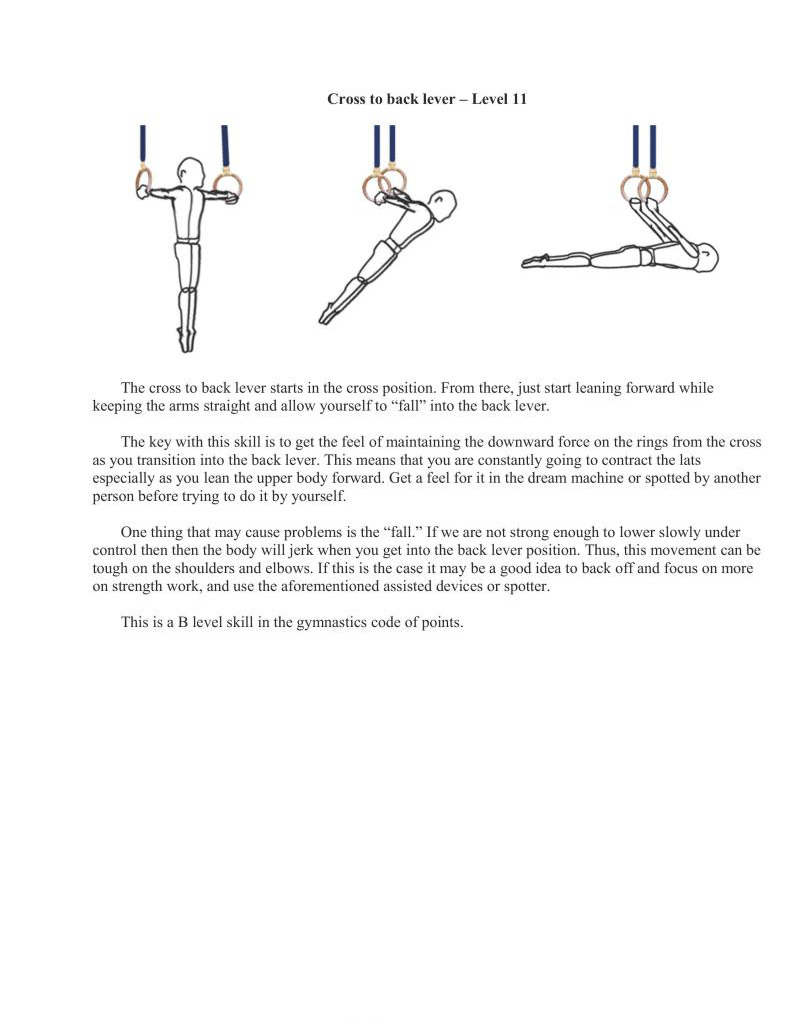
The cross to back lever starts in the cross position. From there, just start leaning forward while keeping the arms straight and allow yourself to "fall" into the back iever.
The key with this skill is to get the feel of maintaining the downward force on the rings from the cross S you transition into the back lever. This means that you are constantly going to contract the lats especially as you lean the upper body forward. Get a feel for it in the dream machine or spotted by another person before trying to do it by yourself.
One thing that may cause problems is the "fall." If we are not strong enough to lower slowly under control then then the body will jerk when you get into the back lever position. Thus, this movement can be tough on the shoulders and elbows. If this is the case it may be a good idea to back off and focus on more on strength work, and use the aforementioned assisted devices or spoter.
This is a B level skill in the gymnastic code of points.
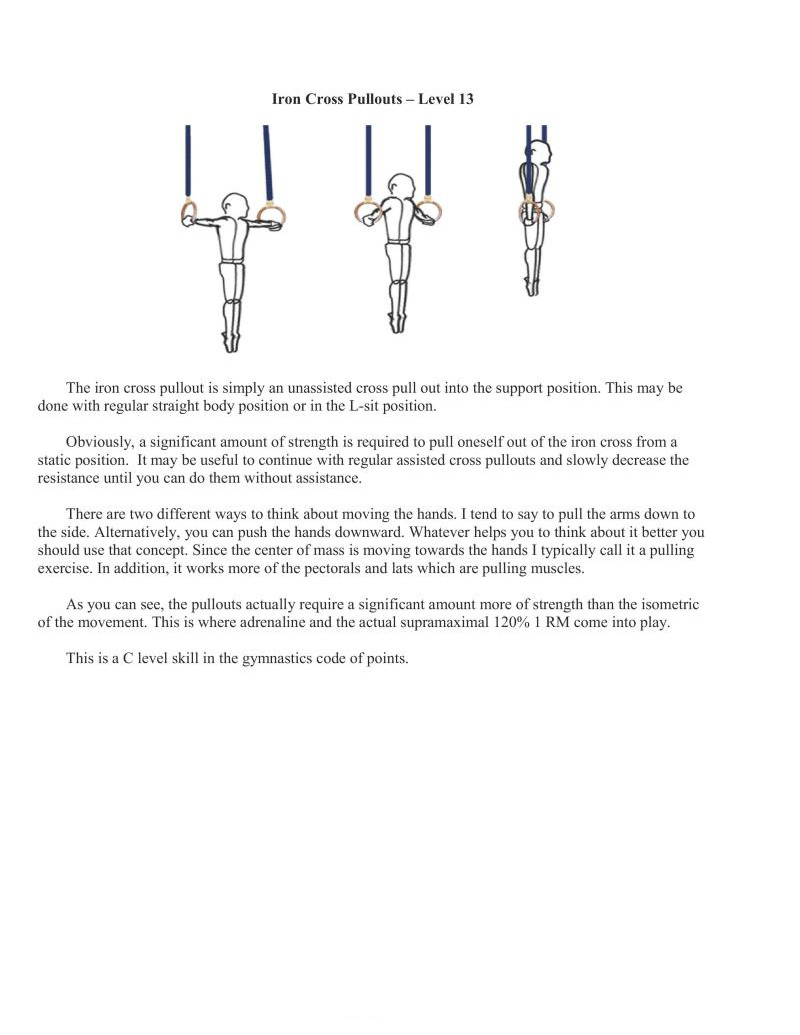
The iron cross pullout is simply an unassisted cross pull out into the support position. This may be done with regular straight body position or in the L-sit position.
Obviously, a significant amount of strength is required to pull oneself out of the iron cross from a static position. It may be useful to continue with regular assisted cross pullouts and slowly decrease the resistance until you can do them without assistance.
There are two different ways to think about moving the hands. I tend to say to pull the arms down to the side. Alternatively, you can push the hands downward. Whatever helps you to think about it better you should use that concept. Since the center of mass is moving towards the hands I typically call it a pulling exercise. In addition, it works more of the pectorals and lats which are pulling muscles.
As you can see, the pullouts actually require a significant amount more of strength than the isometric of the movement. This is where adrenaline and the actual supramaximal 120% 1 RM come into play.
This is a C level skill in the gymnastics code of points.
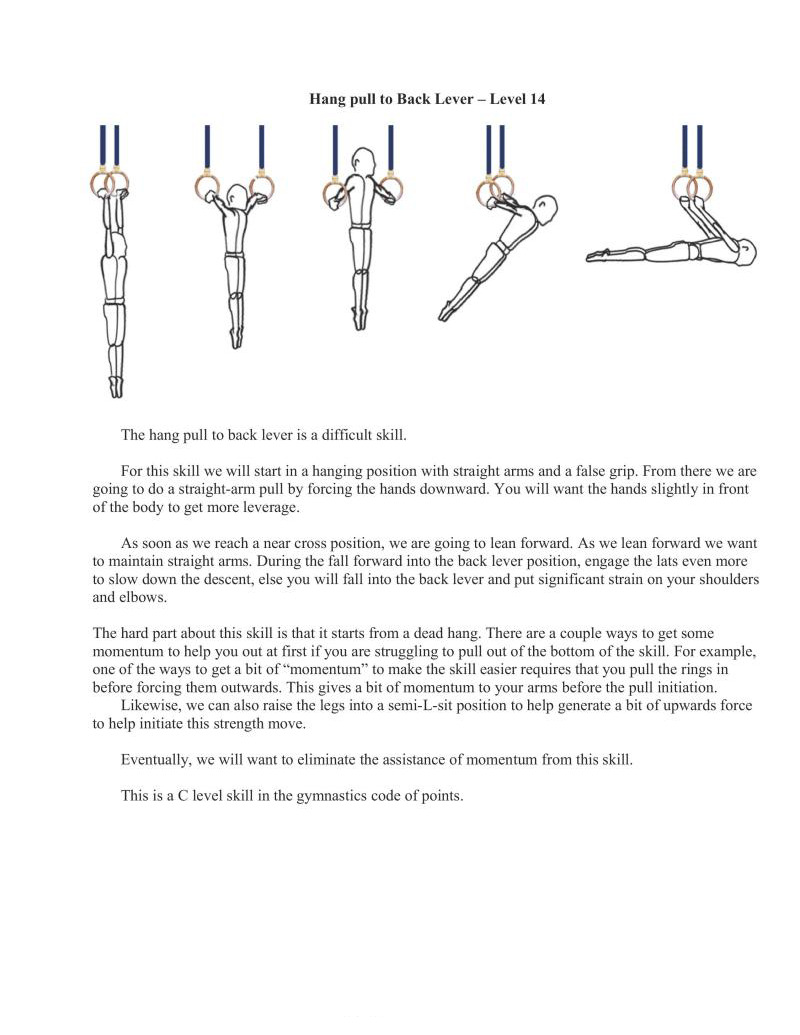
The hang pull to back lever is a difficult skill.
For this skill we will start in a hanging position with straight arms and a false grip. From there we are going to do a straight-arm pull by forcing the hands downward. You will want the hands slightly in front of the body to get more leverage.
As soon as we reach a near cross position, we are going to lean forward. As we lean forward we want to maintain straight arms. During the fall forward into the back lever position, engage the lats even more to slow down the descent, else you will fall into the back lever and put significant strain on your shoulders and elbows.
The hard part about this skillis that it starts from a dead hang. There are a couple ways to get some momentum to help you out at firstif you are struggling to pull out of the bottom of the skill. For example, one of the ways to get a bit of "momentum" to make the skill easier requires that you pull the rings in before forcing them outwards. This gives a bit of momentum to your arms before the pull initiation.
Likewise, we can also raise the legs into a semi-L-sit position to help generate a bit of upwards force o help initiate this strength move.
Eventually, we will want to eliminate the assistance of momentum from this skill.
This is a C level skill in the gymnastics code of points.
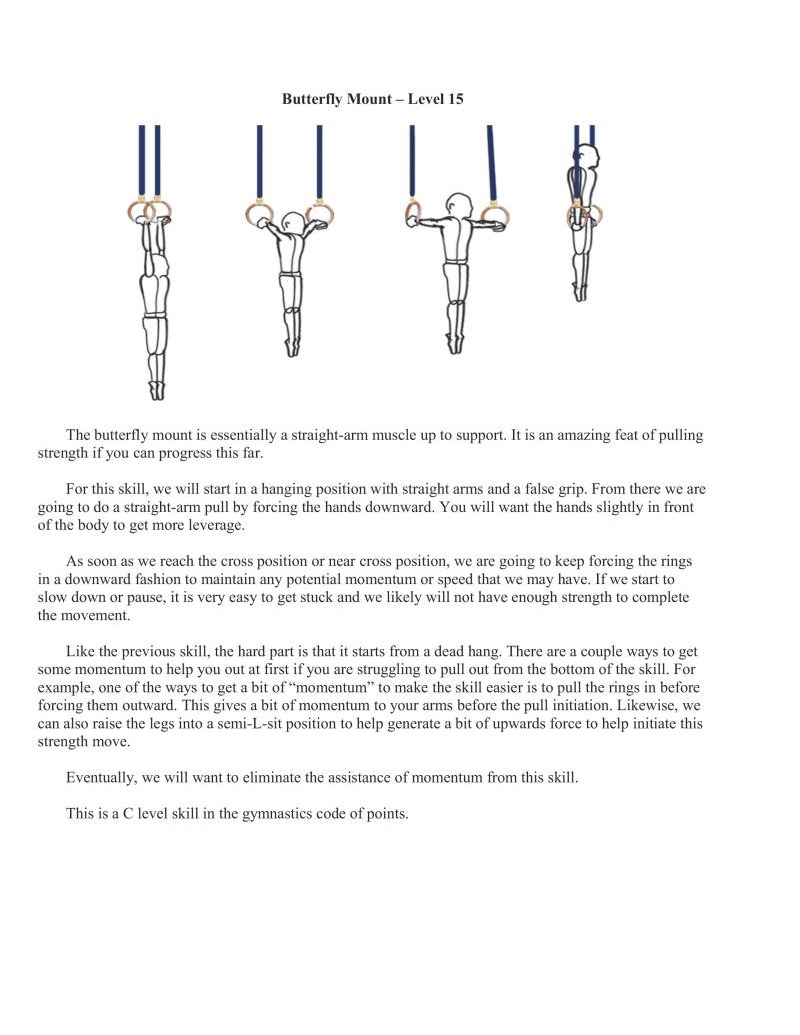
The butterfly mount is essentially a straight-arm muscle up to support. It is an amazing feat of pulling strength if you can progress this far.
For this skill, we will start in a hanging position with straight arms and a false grip. From there we are going to do a straight-arm pull by forcing the hands downward. You will want the hands slightly in front of the body to get more leverage.
As so0n as we reach the cross position or near cross position, we are going to keep forcing the rings in a downward fashion to maintain any potential momentum or speed that we may have. If we start to
slow down or pause, it is very easy to get stuck and we likely will not have enough strength to complete the movement.
In the the previous skill, the hard part is that it starts from a dead hang. There are a couple ways to get some momentum to help you out at first if you are struggling to pull out from the bottom of the skill. For example, one of the ways to get a bit of "momentum" to make the skill easier is to pull the rings in before forcing them outward. This gives a bit of momentum to your arms before the pull initiation. Likewise, we
can also raise the legs into a semi-L-sit position to help generate a bit of upwards force to help initiate this strength move.
Eventually, we will want to eliminate the assistance of momentum from this skill.
This is a C level skill in the gymnastics code of points.
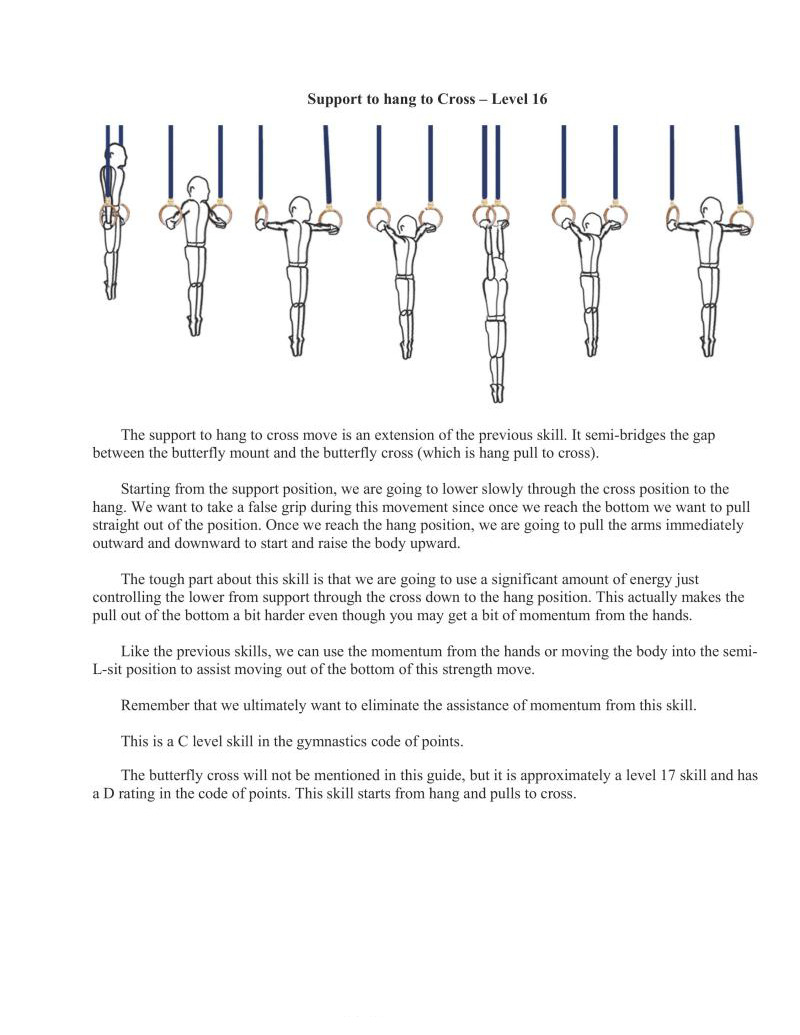
The support to hang to cross move is an extension of the previous skill. It semi-bridges the gap between the butterfly mount and the butterfly cross (which is hang pull to cross).
Starting from the support position, we are going to lower slowly through the eross position to the hang. We want to take a false grip during this movement since once we reach the bottom we want to pull straight out of the position. Once we reach the hang position, we are going to pull the arms immediately outward and downward to start and raise the body upward.
The tough part about this skill is that we are going to use a significant amount of energy just controlling the lower from support through the cross down to the hang position. This actually makes the pull out of the bottom a bit harder even though you may get a bit of momentum from the hands.
Like the previous skills, we can use the momentum from the hands or moving the body into the semi- position to assist moving out of the bottom of this strength move.
Remember that we ultimately want to eliminate the assistance of momentum from this skill.
This is a C level skill in the gymnastics code of points.
The butterfly cross will not be mentioned in this guide, but it is approximately a level 17 skill and has a D rating in the code of points. This skill starts from hang and pulls to cross.
Previous Chapter ... ... Next Chapter