Previous Chapter ... ... Next Chapter
Volumes could be writien on many of the singular techniques such as handstands. Important information regarding these techniques will be condensed so that one will not be required to read essays for every single technique but will still understand the important points. Unfortunately, some of the finer details are beyond the scope of this particular book.
Proper technique for the handstand is not preached solely for aesthetic appeal. It, more importantly, makes the handstand significantly easier by stacking all the joints on top of one another, dropping the need for excessive muscular contraction. For example, if the shoulders close and the lower back arches, the forces on the shoulders and abdominals increase, which makes the handstand more difficult. In addition, performing a handstand correctly improves body awareness and positioning for all other statics that are learned in gymnastics.
Handstands are the fundamental position in gymnastics much like the squat is for human movement. If our air squat is not up to par, it is unlikely that we will be able to correctly execute other techniques such as weighted back squats, front squats, overhead squats, and the Olympic lifts. Without a solid foundation in the squat all of the other core exercises will fail to develop correctly. Likewise, proper handstands have this same effect on many of the other positions and techniques in gymnastics.
The handstand is the one skill that should be trained every day for anyone with a commitment to bodyweight skill proficienc s. Variations such as the wall handstand make it very easy to get quality work in without jeopardizing rest and recovery. Constant practice and refinement of handstand technique will yield consistent rewards for those planning on sustained bodyweight work in their future.
Note that performance on skill-based movements will typically fall into a bell curve based on tency and progression. For example, when we start practicing handstands we will normally fail all the time. Then as we improve we may start getting 2-3s holds here and there. Further improvement leads 10 consistent 2-3s holds with occasional longer holds of 9-10s. From this we can conclude two things:
We do not want to focus on the outliers. The key for practicing skills is to make them consistent. We want to raise the consistency of our holds so that we can consistently perform the skill all of the time. For example, in a sample size of ten handstand holds we may get 0s once, 2s once, 4-5s six times, 8s once and 10s once. Our main goal is to focus in on obtaining that 4-3sec range and improving that.
Consistency in performing skills is the key to developing greater static and dynamic kinesthesia (o movement). As humans we like to focus on our best (and videotape it) and push the worst out of our mind. Instead, we should focus on being consistent and we will progress much faster.
This focus on consistency means that we need to be intentional about all our attempts at skill work. If we are tired and losing consistency in holds we should take a break. We should not keep trying to do our handstands in an attempt to get that one good long hold. That is not want we want. We want quality work all of the time.
Additionally, from the handstand position it is imperative that we minimize the roll out or pirouette fall from the handstands. Falling over in any handstand position reinforces bad habits. It tells the body that, "Hey, when I hit this point where I feel like I cannot keep siable I need to bail out." The correct way to go about it is to fight for every inch and every position, especially when we are leaning. Clearly, we want to emphasize form, but if we do not learn how to fight for the handstand position we (1) do not build the strength-stability in the muscles to fight for it, and (2) we teach our body that bad habit to get out as soon as things go wrong.
In summary, we want to:
Psychologically, if you are having issues with maintaining proper focus or your frustration is getting to you making your quality of holds go down, it is a good idea to step back and take a rest breath. Do a couple of deep breaths in through the nose and out through the mouth to help calm yourself down. Then visualize the movement in your mind before going back to it.
This can be used for any type of skill work not just handstands. Always remember that perfect practice makes perfect, and the only way to get perfect practice is to focus on quality in every single repetitions that you attempt.

Handstands are a critical component of bodyweight training. In particular, handstands lay the foundation upon which all gymnastics moves are based. It is important to properly develop this movement, which is why it is first in the skill category. Similarly, wall handstands are a category all to themselves for the first four difficulty levels. This is also why in-depth articles have extensively examined handstand technique development, such as Valentin Uzunov's in "The Handstand: a four stage training model". (Available in Gym Coach: Vol 2, August 2008 http://www.thegympress.net/journal/archive.html)
We will briefly go over all of the fundamental aspects of the handstand. Wall handstands should be performed with the following technique notes in mind:
What all of these body cues summarize is the position that we want to be in for handstand: a straight line — no bending anywhere in the body.
Since the body is going to be a rigid line like a plank of wood, we only want small movements to control it in the air. The forearms, through the hands on the floor, will perform all of these small movements. To allow the greatest amount of control, fingers should be spread out as far as possible and pressure exerted through the fingertips to maintain balance.
I will address hand position against the floor in the grip section.
As we can imagine, using only the wrists to control the handstand will be initially difficult. New people learning the handstand will want to use their shoulders and hips to change body shape to balance the handstand. This is to compensate for lack of the forearm control required to perform good handstand technique. Resist this temptation because it will instill bad habis that can be very hard to break. A proper handstand held for more than a minute should leave the forcarms exhausted, and the rest of the body should be relatively fresh and unused except maybe some slight burning in the shoulders.
Beginners want 1o have the tips of the toes touch the wall and nothing else. With hands as close to the wall as possible, any straying from the proper, straight body is easily identifiable. If we arch, our stomachs consequentially hit the wall or we are forced to come down with a forward roll or pirouctte.
Once we become proficient at wall handstands, we will advance through barely pushing our toes off the wall. Use wrists to correct the overbalance by digging down with the fingers to avoid from tipping over. Avoid arching the lower back to compensate when pushing the toes off. All adjustments should be done with the wrists,
As we improve, we will balance away from the wall for longer and longer periods. Once we are able to do this for at least 15-20s, we should split our workout: kick up to freestanding handstands while we continue to work wall handstands. After we can consistently exceed 30s wall handstand holds with proper balance and straight body then it is time to solely work on our freestanding kick to handstand.
These two techniques are the basic way to bail from the handstand. If you are working against the wall you should lean to roll out as it correlates a bit better to maintaining body positions. Pirouetting too early can develop some bad habits, so I am not doing to describe it here.
Rolling out of a handstand is an extension of the forward roll on the ground. If you are not proficient in the forward roll you should first practice them on a soft mat or on grass. In the forward roll you want to apply pressure through your hands such that when you tuck your chin to your chest you will be able to put your weight on the back of your neck and roll smoothly out of the movement.
Likewise, from the handstand position you are going to want to bend the arms slowly so that you lower towards the ground in a controlled fashion. From there you are going to tuck your chin to your check and curl your body into the fetal position and let gravity move you through the roll
If you are unsure of how to do this proficiently to too scared when attempting to use it from a handstand position you have two options. The first option, which is preferred, is to ask for help from a spotter. The spotter can hold your ankles up and help you execute the roll in slow motion so you get the hang of it. The other option is to go against our earlier advice, and learn how to pirouette out by twisting the body.

The lunge to kick up is very misunderstood. It can be practiced against the wall at first, with your back to the wall, to get a sense of how much force is needed. However, we need to make it as consistent as possible. Mechanically, there is a set of instructions that people new to kicking up should follow to help with this.
First we want to take the handstand position upright. We do this because it is easier transfer from a position we are already in rather than to kick up with a super-out-of-control body and attempt to move into the correct position. Thus, we start out with arms overhead, shoulders in the ears, chest up, shoulders tight, legs together, and tight through the core.
During the kick up motion we are only going to change one part of this set up: the lunging leg. The lunging leg is the hinge upon which the straight body will rotate thus not compromising the straight body, arms overhead position we so painstakingly set up.
The lunging leg should be placed approximately half of your height in front of you, and then weight is shified onto that leg as your body starts tilting over. Your hands lead the way. The key for the lunging leg is that your knee should be kept as straight as possible to keep tension in the hamstrings. Once the hands hit the ground, dig in with your fingertips to stabilize the handstand as it is coming up. The tension in the hamstrings can now be utilized to use that leg to kick up and bring it up to the other leg,
Once the legs come together we have the perfect straight body position. If anything came out of alignment, like the legs spreading apart, the handstand body shape is lost and compensation is required. This is not ideal, but it happens when learing. Grab a camera or a person who knows the movement to get the outside perspective on what you are doing wrong.
If you can execute the lunge to handstand correctly you ar in good shape. From there it is just modulating the force necessary to hit the correct position through the kick up and the pressure from the fingertips. Again, you may find it useful to use a wall at irst to figure out how much you power should be in your kick,
Once you get good at kicking up, you should feel like you can lock into a perfect handstand at the top of the movement and not wobble at all. Congratulations.
Note that the back to the wall handstand is a technique that can be used initially to teach the handstand. This is especially helpful if there is a general lack of strength or lack of technique that may cause bailing out of handstand with the stomach to the wall to be dangerous or not feasible. I would highly encourage that if this technique were used, one should phase it out as soon as possible. But if it needs to be used in the beginning then it is not incorrect to highly detrimental. Just remember that it is just a starting position and we want to eventually move on from there to focus on more productive tasks. So, focus on getting the body straight and learning correct technique so that we can move on.
There are a couple of different ways to grip the ground. One of the traditional ways is to use a flat hand against the ground. I am against this because the contact should generally be with the fingertips and back of the palm to allow balance of the handstand.
The alteratives are the full arched hand and the cambered hand.
The full arched hand (or dome hand) puts just the fingertips and back of the hand in contact with the ground. This allows for full balance of the handstand much easier.
The cambered hand is a bit different. It is utilized a lot in the hand balancing world because it helps to tighten up the muscles of the forearm much better giving more control. The cambered hand is performed by leaving the entire palm in contact with the ground. Once the whole palm is in contact, you will want to curl your fingertips such that there is only a dome made from the fingertips. This gives 3 points of contact to the ground which are the fingertips, the top of the palm, and the back of the palm.
This additional control may help those of you who are having problems with the balance of the skill. Although getting used to the new position may take a bit of more practice to get right.
This movement is not on the charts, but is included here for completeness. While it has its uses, the same body positions can be built more thoroughly doing a correct wall handstand.
Body positioning is the same except two key points. Firstly, the arms are bent, neglecting strengthening the straight-arm position. Shoulder strength and stability through straight-arm training is extremely ritical. Avoiding this element in the handstand, one of the most fundamental holds, will hold you back in bodyweight work. Secondly, using your head to help with balance neglects training the balance through the forearms needed for solid handstands. Eliminating the head from the equation right away does not cost us any potential benefits that cannot be achieved through proper wall handstands. The perfct straight body can be maintained in both positions, and so this movement is not needed.
I also like to exclude it because many people do not have the neck strength to handle it and may put their heads in awkward positions, leaving them susceptible to neck injuries. This is something we want to avoid at all costs.
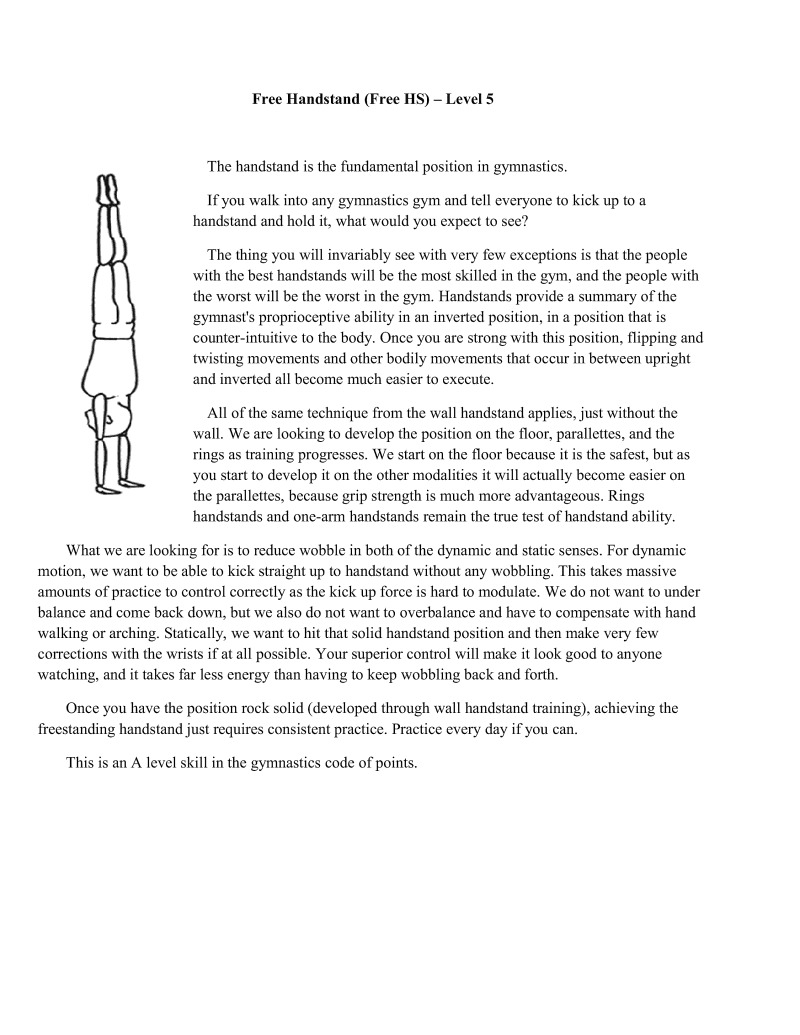
The handstand is the fundamental position in gymnastics.
If you walk into any gymnastics gym and tell everyone to kick up to a handstand and hold it, what would you expect to see?
The thing you will invariably see with very few exceptions is that the people with the best handstands will be the most skilled in the gym, and the people with the worst will be the worst in the gym. Handstands provide a summary of the gymnast's proprioceptive ability in an inverted position, in a position that is counter-intuitive to the body. Once you are strong with this position, flipping and twisting movements and other bodily movements that occur in between upright and inverted all become much easier to execute.
Al of the same technique from the wall handstand applics, just without the wall. We are looking to develop the position on the floor, parallettes, and the rings as training progresses. We start on the floor because it is the safest, but as youstart to develop it on the other modalities it will actually become easier on the parallettes, because grip strength is much more advantageous. Rings handstands and one-arm handstands remain the true test of handstand ability.
What we are looking for is to reduce wobble in both of the dynamic and static senses. For dynamic motion, we want to be able to kick straight up to handstand without any wobbling. This takes massive amounts of practice to control correctly as the kick up force is hard to modulate. We do not want to under balance and come back down, but we also do not want to overbalance and have to compensate with hand alking or arching. Statically, we want to hit that solid handstand position and then make very few corrections with the wrists if at all possible. Your superior control will make it look good to anyone watching, and it takes far less energy than having to keep wobbling back and forth.
Once you have the position rock solid (developed through wall handstand training), achieving the freestanding handstand just requires consistent practice. Practice every day if you can.
This is an A level skill in the gymnastics code of points.
For those on the road to one-arm handstand, your first steps begin here.
Using the wall to assist with one-arm handstands rarely works. For some reason, people like to take pictures of their one-arm handstands against the wall. While it makes a cute photo, using the wall does not help much with the skill set required for a true one-armed handstand. Yes, building up the required strength and conditioning, especially in the shoulders and the wrists, which take the brunt of the pressures, can be done using the wall. However, they to not help with the balance that is the foundation upon which the one-arm handstand is built.
To start learning the one-arm handstand I would suggest a few requirements. A solid, straight-body handstand is highly recommended. The variation that is going to be mainly used to develop a one-arm handstand is a freestanding straddled handstand with a slow, progressive weight shift to one side. We use the straddled handstand because straddling the legs lowers your center of gravity, making the skill much easier to perform. With the legs spread, leverage to the left and right is increased, making it harder for you to sway either way and consequentially keeping you more stable. As you become more experienced you can close the legs for a harder challenge,
The straddle handstand requires that you have a solid handstand because the core is more apt to be unstable in this position, and you need the tight body position to learn the correct balance at the wrists. Specifically, finding the correct center of balance in the hands is critical to learning this skill. We reduce help in the straddled handstand by slowly removing fingers from the skill. First to go is the pinky. Follow that with the ring finger and continue until the thumb (and therefore the entire hand) is no longer helping.
Since the balance at the wrists is critical to learning the skill, increased grip strength will significantly speed up its development. The balance of the one-arm handstand is somewhere near the joint of the ring finger (depending on a one’s anthropometry), so strengthening the whole grip is fine but you will see more results from specifically strengthening the last three fingers of each hand.
Going back to our freestanding handstand, I would strongly suggest that this skill is practiced either on hand balancing implements or on a hard floor. It is much easier to hold control with fingertips that are being pressed into a solid floor, or hands that are squeezing very strongly on implements or parallettes.
The key for this move is exactly like the freestanding handstand, except after you balance in the straddle handstand you are going to really lock the shoulder in the active position (shoulder carmuf) and slowly shift your weight onto one-arm. Since you are shifting your weight, the weight on the other arm decreases and causes most people to come up on the fingertips of that hand. This is absolutely fine and will be used to slowly decrease the amount of hand used.
If you feel yourself wobbling through the rest of your body as you transition and weight shifts to a one-arm hold, then keep practicing. Remember, the critical component of learning to one-arm handstand is balancing the move directly through the wrists. If your body is wobbling back and forth through the core or legs then you are not going to correctly learn the balance for the technique; effectively making it harder and longer to acquire than need be.
We notice as we lean over that the center of gravity in the hand is going to shift over as well. As mentioned, the center of balance is going to be somewhere near the first ring finger joint. Thus, this natural progression of weight shifting in the planted hand is natural so it would be a good idea to get used o this feeling (and remember you can supplement with specific grip work as well). The ring and the pinky finger are going to be straining a lot to put force through to keep balance centered in that small area, so it is important to take care of your joints. If you start practicing this movement and get significant joint soreness it is important to realize this is natural, and that if the soreness is lasting you should take a break for a couple days to let the tissues heal. Not doing so may lead to overuse injuries.
This skill was not included in the chart, but if it was categorized it would be in this position.
This is more of a dynamic and intermediate balance skill. The goal of this exercise is to balance from side to side and release the opposing hand at each juncture. This can serve as both an excellent conditioning exercise and to get 2 good feel of dynamic stability in one-arm positions while maintaining adequate body tension.
These can be performed against the wall to conditioning for handstands, but proper care must be taken to not break form and close the shoulder angle or arch the back.
I would not say these are a critical component of learning how to do a one-arm handstand. However, they are a very good supplement in learning dynamic awareness, especially if you need to improve handstand body position mechanics or want to do handstand walking for distance in the future.
Handstand walking can be implemented as a good supplement to developing the one arm handstand. T did not recommend handstand walking at all before this point because maintaining the correct tight body technique is critical for learning this skill. However, now that you have been able to advance this far with solid handstand technique you should be ready to execute handstand walking without arching the handstand. This dynamic stability will help in your weight shift, which will ultimately help your one arm handstand.
This is also another variation on the way to work towards one-arm handstand. In this technique we progressively move the hands closer together and start biasing weight onto one-arm. Eventually, this technique yields a handstand with one-arm on top of the other which can then be lifted off slowly to do a one-arm handstand. This is not as measurable as the other variation, so it is not as effective to us in training. This technique can be included as a supplement.
The next phase is reducing the support on the non-planted hand. For the three-finger support most people are going to want to take off the ring finger from support and balance solely on the middle, index, and thumb.
There is not much difference from the four-finger phase to the three finger phase except more weight is distributed to the planted hand. Again, if you feel the core or legs losing tension and wobbling you need to practice holding your body tight.
Keeping the arm fully extended and shoulder girdle tight along with the rest of the body should allow You to keep your focus on weight being shifted to the planted hand. Most often bad form in this position is due to looseness in the legs, core, or shoulders. Do not let these affect your body position and you will easily progress through this.
Free Handstand 2 Fingers for One-Arm Support (Free HS 2 fingers) — Level 8
This is the next step in the transition towards the one-arm handstand. Usually the index and thumb are used or alternatively the index and middle finger are used. Either way is fine, and if you find that another combination of two fingers works then that is acceptable as well. There is going to be very little weight on these two fingers at this point, so most of the weight and balance will be on the side that is bearing more of the load.
Again, there is not much change here except for more lean. As you start leaning more you will find that the strength requirement increases holding the active shoulder position and maintaining balance. To reiterate, wrists can be helped with specific grip work. The shoulders are often not conditioned to handle one-arm constant holds. If this becomes a problem, conditioning such as the handstand shoulder taps may be a good option. However, most of the work to adapt to this skill should be done through the skill tself.
When you reach this stage, you are a single step away from the one-arm handstand. At this point most people use their index finger on the other hand for balance. Since a single finger can apply very litile balance in the forward / backward plane we will see that the planted hand is already doing most of the work. The single finger at this point is mostly just giving you a slight bit of lateral (left / right) stability. When the pinky on the primary hand is not strong enough to handle the balance yet or there is too much overcompensation, this extra finger is the difference between enough training volume and coming down 100 s00n.
After you reach this point, body positions are firmly ingrained into your body. Frequency and volume of practice is the name of the game from here on out.
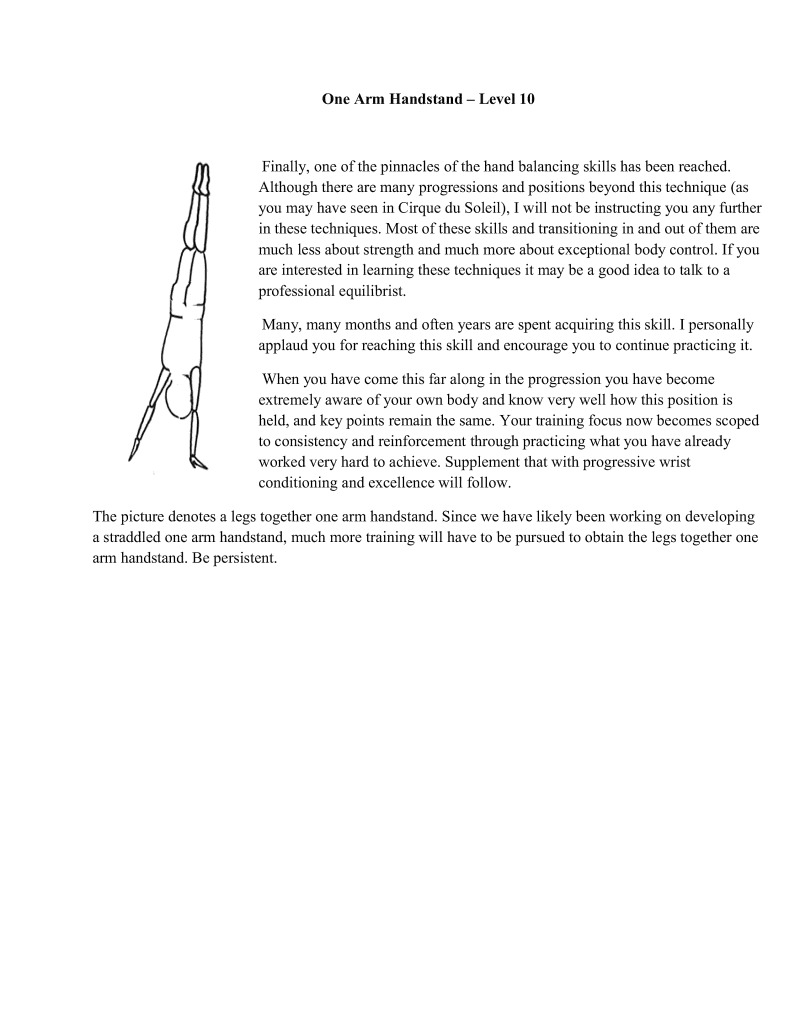
Finally, one of the pinnacles of the hand balancing skills has been reached. Although there are many progressions and positions beyond this technique (as you may have seen in Cirque du Soleil), I will not be instructing you any further in these techniques. Most of these skills and transitioning in and out of them are much less about strength and much more about exceptional body control. If you are interested in learning these techniques it may be a good idea to talk to a professional equilibri
Many, many months and often years are spent acquiring this skill. 1 personally applaud you for reaching this skill and encourage you to continue practicing it
When you have come this far along in the progression you have become extremely aware of your own body and know very well how this position is held, and key points remain the same. Your training focus now becomes scoped to consistency and reinforcement through practicing what you have already worked very hard to achieve. Supplement that with progressive wrist conditioning and excellence will follow.
The picture denotes a legs together one arm handstand. Since we have likely been working on developing a straddled one arm handstand, much more training will have to be pursued to obtain the legs together one arm handstand. Be persistent.
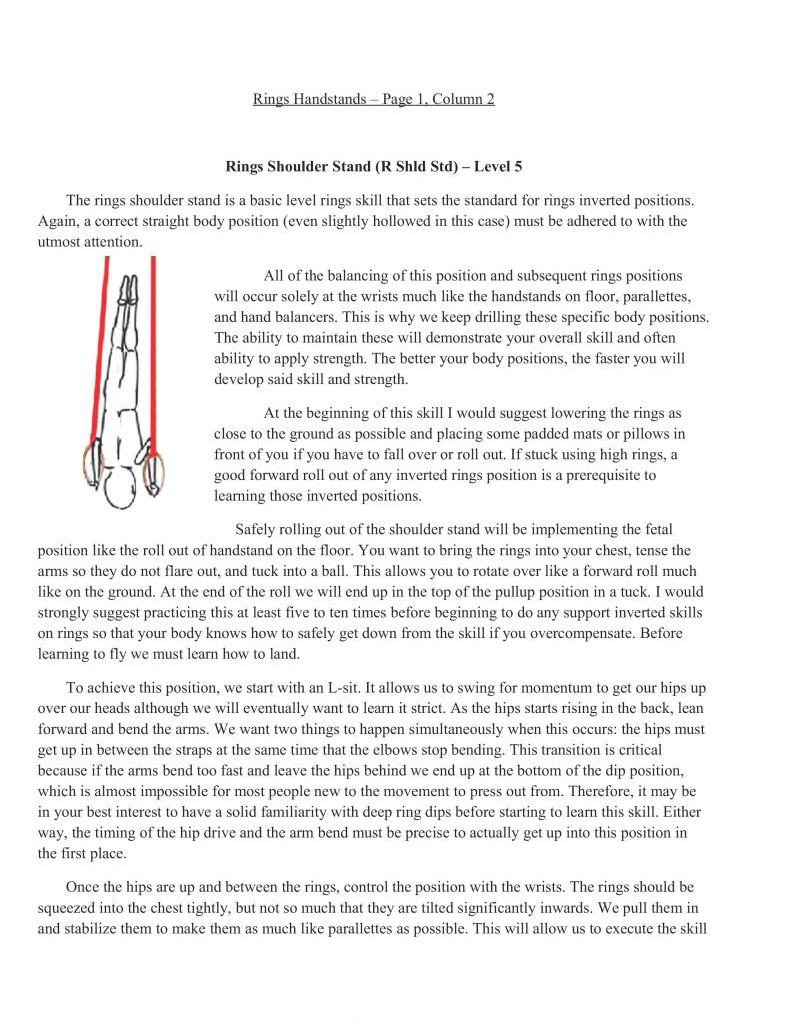
The rings shoulder stand is a basic level rings skill that sets the standard for rings inverted positions. Again, a correct straight body position (even slightly hollowed in this case) must be adhered to with the utmost attention.
All of the balancing of this position and subsequent rings positions will occur solely at the wrists much like the handstands on floor, parallettes, and hand balancers. This is why we keep drilling these specific body positions. The ability to maintain these will demonstrate your overall skill and often ability to apply strength. The better your body positions, the faster you will develop said skill and strength.
A the beginning of this skill I would suggest lowering the rings as close to the ground as possible and placing some padded mats or pillows in
front of you if you have to fall over or roll out. If stuck using high rings, a good forward roll out of any inverted rings position is a prerequisite to learning those inverted positions.
Safely rolling out of the shoulder stand will be implementing the fetal position like the roll out of handstand on the floor. You want to bring the rings into your chest, tense the arms so they do not flare out, and tuck into a ball. This allows you to rotate over like a forward roll much like on the ground. At the end of the roll we will end up in the top of the pullup position in a tuck. I would strongly suggest practicing this at least five to ten times before beginning to do any support inverted skills on rings is that your body knows how to safely get down from the skill if you overcompensate. Before learning to fly we must learn how to land,
To achieve this position, we start with an L-sit. It allows us to swing for momentum to get our hips up over our heads although we will eventually want to learn it strict. As the hips starts rising in the back, lean forward and bend the arms. We want two things to happen simultaneously when this occurs: the hips must getup in between the straps at the same time that the elbows stop bending. This transition is critical because if the arms bend too fast and leave the hips behind we end up at the bottom of the dip position, which is almost impossible for most people new to the movement to press out from. Thercfore, it may be in your best interest to have a solid familiarity with deep ring dips before starting to learn this skill. Either way, the timing of the hip drive and the arm bend must be precise to actually get up into this position in the first place,
Once the hips are up and between the rings, control the position with the wrists. The rings should be squeezed into the chest tightly, but not so much that they are tilted significantly inwards. We pull them in and stabilize them to make them as much like paralletres as possible. This will allow us to execute the skill
and to eliminate most of the wobbling. We should also be gripping the rings as tightly as possible and using that grip to control the position as the feet are brought above the head.
Most people will find it easier to raise the feet from the tuck position, but the tuck balance is very hard to control in the forward/backward plane with the wrists of a beginner. Piking, though slightly harder to execute initially, will allow the pelvis to act as a fulcrum for balance as you transition the legs up. We see time and time again that, because the rings are inherently unstable, adding components that help with the balance aspect will help speed progress by allowing for a higher volume of correct training. Thus, I would suggest learning with the pike, but you may also learn with the tuck as well. Aim for the pike as the goal.
Once you get the feet up and the body straight you should be slightly under-balanced. The feet should not be directly overhead compared to the shoulder position because the rings will be located slightly in front of the chest
If you are not aceustomed to this I would suggest spreading the legs out in a straddle to allow your legs to hit the cables / straps. Even if you are proficient with the safety protocols, tipping over in a handstand or shoulder stand is not conducive to proper learning
after your legs have gone up and hit the straps we are going to want to slowly bring them together. At first you can place them on the inside of the cables if you need some more balance, but the end goal is to have your feet touching. Remember, when you bring your feet together we want to hit the proper body position (straight body) as soon as possible. Your wrists are the control mechanism, so engage them hard as soon as you take away the extra balance from the straps.
The key to this movement is keeping the body as still as possible and using the wrists to manipulate the movement. Because your hands are much closer to your body than in a handstand, you have the mechanical advantage through the wrists. Remembering this will quickly make the rings shoulder stand a simple position,
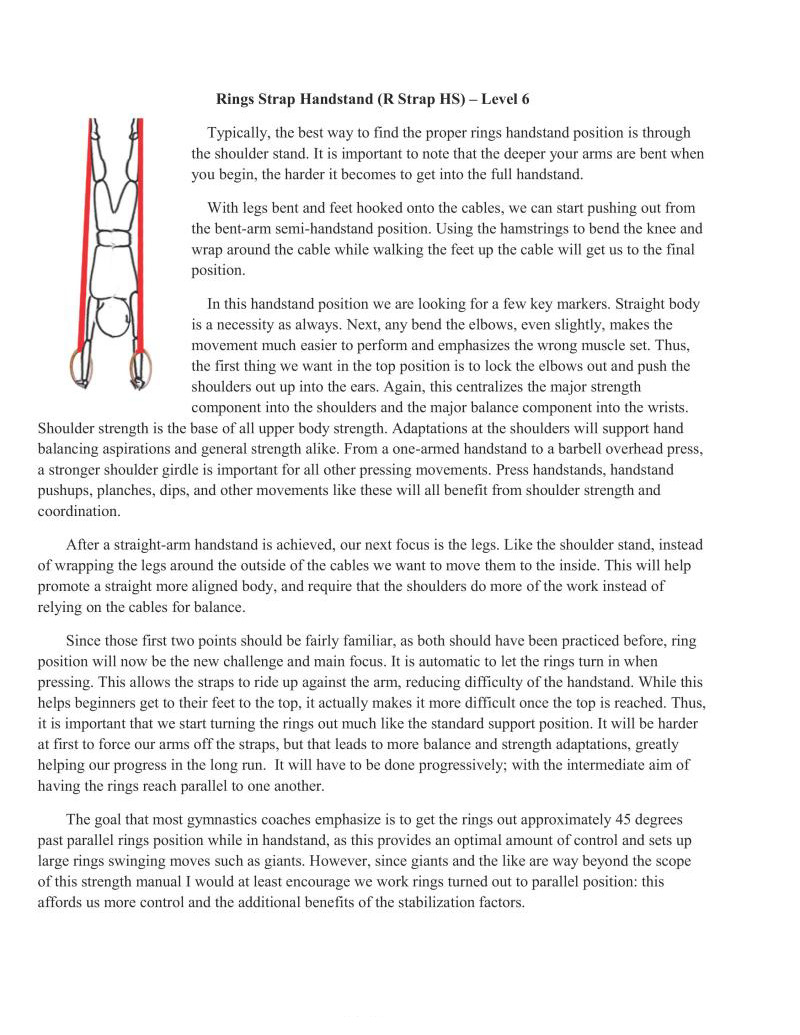
Typically, the best way to find the proper rings handstand position is through the shoulder stand. It is important to note that the deeper your arms are bent when you begin, the harder it becomes to get into the full handstand,
With legs bent and feet hooked onto the cables, we can start pushing out from the bent-arm semi-handstand position. Using the hamstrings to bend the knee and wrap around the cable while walking the feet up the cable will get us to the final position.
In this handstand position we are looking for a few key markers. Straight body is a necessity as always. Next, any bend the elbows, even slightly, makes the movement much easier to perform and emphasizes the wrong muscle set. Thus, the first thing we want in the top position is to lock the elbows out and push the shoulders out up into the cars. Again, this centralizes the major strength component into the shoulders and the major balance component into the wrists. Shoulder strength is the base of all upper body strength. Adaptations at the shoulders will support hand balancing aspirations and general strength alike. From a one-armed handstand to a barbell overhead press, a stronger shoulder girdle is important for all other pressing movements. Press handstands, handstand pushups, planches, dips, and other movements like these will all benefit from shoulder strength and coordination.
After a straight-arm handstand is achieved, our next focus is the legs. Like the shoulder stand, instead of wrapping the legs around the outside of the cables we want to move them to the inside. This will help promote a straight more aligned body, and require that the shoulders do more of the work instead of relying on the cables for balance.
Since those first two points should be fairly familiar, as both should have been practiced before, ring position will now be the new challenge and main focus. It is automatic to let the rings turn in when pressing. This allows the straps to ride up against the arm, reducing difficulty of the handstand. While this helps beginners get to their feet to the top, it actually makes it more difficult once the top is reached. Thus, it is important that we start tuming the rings out much like the standard support position. It will be harder at first to force our arms off the straps, but that leads to more balance and strength adaptations, greatly helping our progress in the long run. It will have to be done progressively; with the intermediate aim of having the rings reach parallel to one another.
The goal that most gymnastics coaches emphasize is to get the rings out approximately 43 degrees past parallel rings position while in handstand, as this provides an optimal amount of control and sets up large rings swinging moves such as giants. However, since giants and the like are way beyond the scope of this strength manual I would at least encourage we work rings turned out to parallel position: this affords us more control and the additional benefits of the stabilization factors.
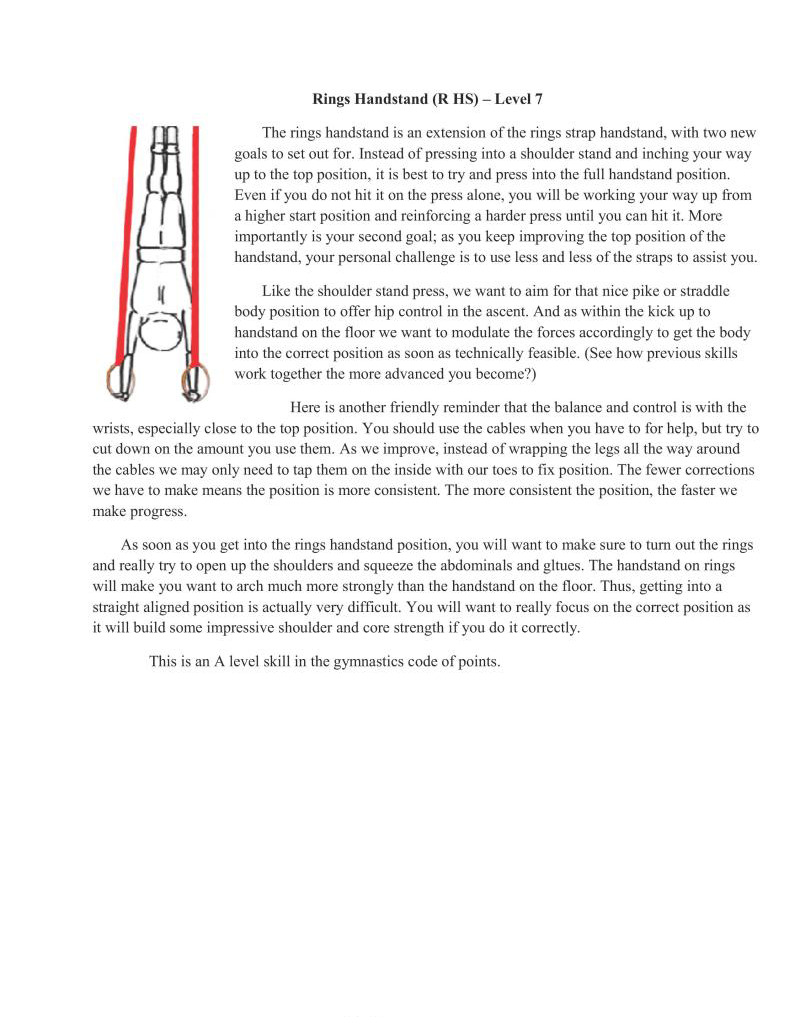
The rings handstand is an extension of the rings strap handstand, with two new goals to set out for. Instead of pressing into a shoulder stand and inching your way up to the top position, it is best to try and press into the full handstand position. Even if you do not hit it on the press alone, you will be working your way up from a higher start position and reinforcing a harder press until you can hit it. More importantly is your second goal; as you keep improving the top position of the handstand, your personal challenge is to use less and less of the straps to as you.
I Like the shoulder stand press, we want to aim for that nice pike or straddle body position to offer hip control in the ascent. And as within the kick up to handstand on the floor we want to modulate the forces accordingly to get the body into the correct position as soon as technically feasible. (See how previous skills work together the more advanced you become?)
Here is another friendly reminder that the balance and control is with the wrists, especially close to the top position. You should use the cables when you have to for help, but try to cut down on the amount you use them. As we improve, instead of wrapping the legs all the way around the cables we may only need to tap them on the inside with our toes to fix position. The fewer corrections tent the position, the faster we make progrss
we have to make means the position is more consistent. The more con:
As s00n as you get into the rings handstand position, you will want to make sure to tum out the rings and really try to open up the shoulders and squeeze the abdominals and gltues. The handstand on rings will make you want to arch much more strongly than the handstand on the floor. Thus, getting straight aligned position is actually very difficult. You will want to really focus on the correct position as it will build some impressive shoulder and core strength if you do it correctly.
This is an A level skill in the gymnastics code of points.
The key with the handstand pushup series is to emphasize good body positions again. If we are wobbly or have a poor body position then we are only stunting our own development of strength and kinesthetic awareness
Note: If you are referring to the chart, you will see that I skipped column 3, which will be next because of the order of how the chart works. More specifically, combination of column 2 and 4 skills create the hybrid category of column 3.
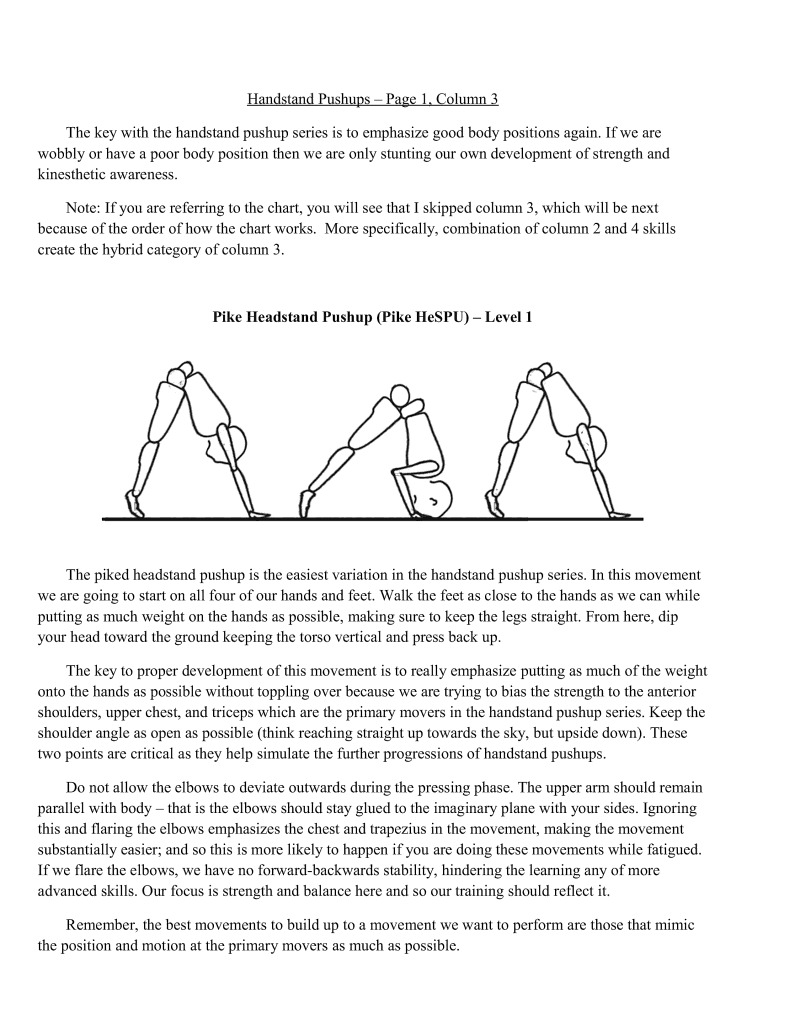
The piked headstand pushup is the easiest variation in the handstand pushup series. In this movement we are going to start on all four of our hands and feet. Walk the feet as close to the hands as we can while putting as much weight on the hands as possible, making sure to keep the legs straight. From here, dip your head toward the ground keeping the torso vertical and press back up
The key to proper development of this movement is to really emphasize putting as much of the weight onto the hands as possible without toppling over because we are trying to bias the strength to the anterior shoulders, upper chest, and triceps which are the primary movers in the handstand pushup series. Keep the shoulder angle as open as possible (think reaching straight up towards the sky, but upside down). These two points are critical as they help simulate the further progressions of handstand pushups.
Do not allow the elbows to deviate outwards during the pressing phase. The upper arm should remain parallel with body — that is the elbows should stay glued to the imaginary plane with your sides. Ignoring this and flaring the elbows emphasizes the chest and trapezius in the movement, making the movement substantially easier; and so this is more likely to happen if you are doing these movements while fatigued. If we flare the elbows, we have no forward-backwards stability, hindering the learning any of more advanced skills. Our focus is strength and balance here and so our training should reflect it
Remember, the best movements to build up to 2 movement we want to perform are those that mimic the position and motion at the primary movers as much as possible.
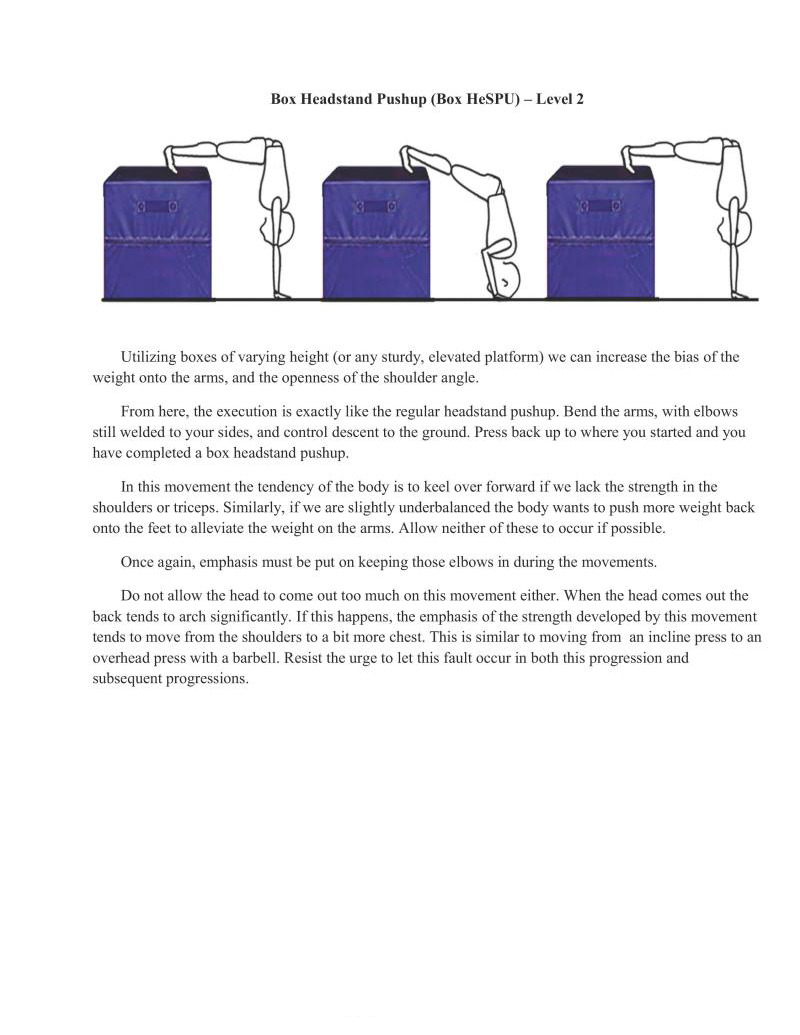
Utilizing boxes of varying height (or any sturdy, elevated platform) we can increase the bias of the weight onto the arms, and the openness of the shoulder angle.
From here, the execution is exactly like the regular headstand pushup. Bend the arms, with elbows. still welded to your sides, and control descent to the ground. Press back up to where you started and you have completed a box headstand pushup.
In this movement the tendency of the body is to kel over forward if we lack the strength in the shoulders or triceps. Similarly, if we are slightly underbalanced the body wants to push more weight back onto the feet to alleviate the weight on the arms. Allow neither of these to occur if possible.
Once again, emphasis must be put on keeping those elbows in during the movements.
Do not allow the head to come out too much on this movement either. When the head comes out the back tends to arch significantly. If this happens, the emphasis of the strength developed by this movement tends to move from the shoulders to a bit more chest. This is similar to moving from an incline press to an overhead press with a barbell. Resist the urge to let this fault occur in both this progression and subsequent progressions.
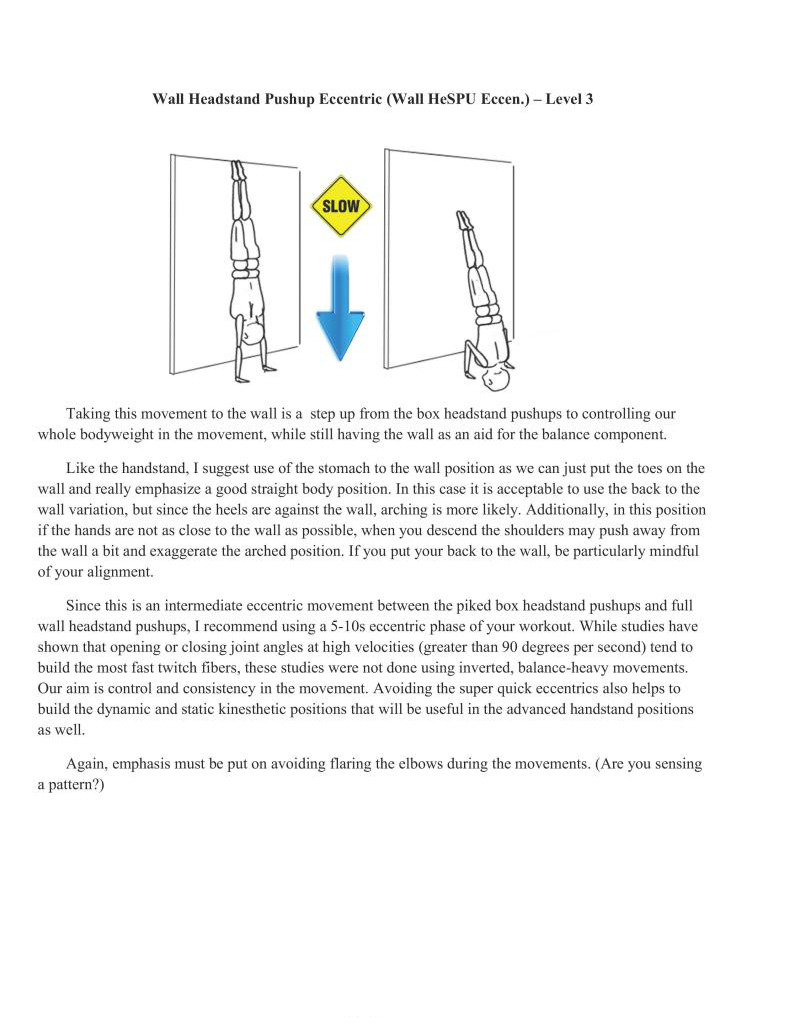
Taking this movement to the wall is a step up from the box headstand pushups to controlling our whole bodyweight in the movement, while still having the wall as an aid for the balance component.
Like the handstand, I suggest use of the stomach to the wall position as we can just put the toes on the wall and really emphasize a good straight body position. In this case it is acceptable to use the back to the
wall variation, but since the heels are against the wall, arching is more likely. Additionally, in this position if the hands are not as close to the wall as possible, when you descend the shoulders may push away from the wall a bit and exaggerate the arched position. If you put your back to the wall, be particularly mindful of your alignment.
Since this is an intermediate eccentric movement between the piked box headstand pushups and full wall headstand pushups, I recommend using a 5-10s eccentric phase of your workout, While studies have shown that opening or closing joint angles at high velocities (greater than 90 degrees per second) tend to build the most fast twitch fibers, these studies were not done using inverted, balance-heavy movements Our aim is control and consistency in the movement. Avoiding the super quick eccentrics also helps to build the dynamic and static kinesthetic positions that will be useful in the advanced handstand positions as well.
Again, emphasis must be put on avoiding flaring the elbows during the movements. (Are you sensing a pattern?)
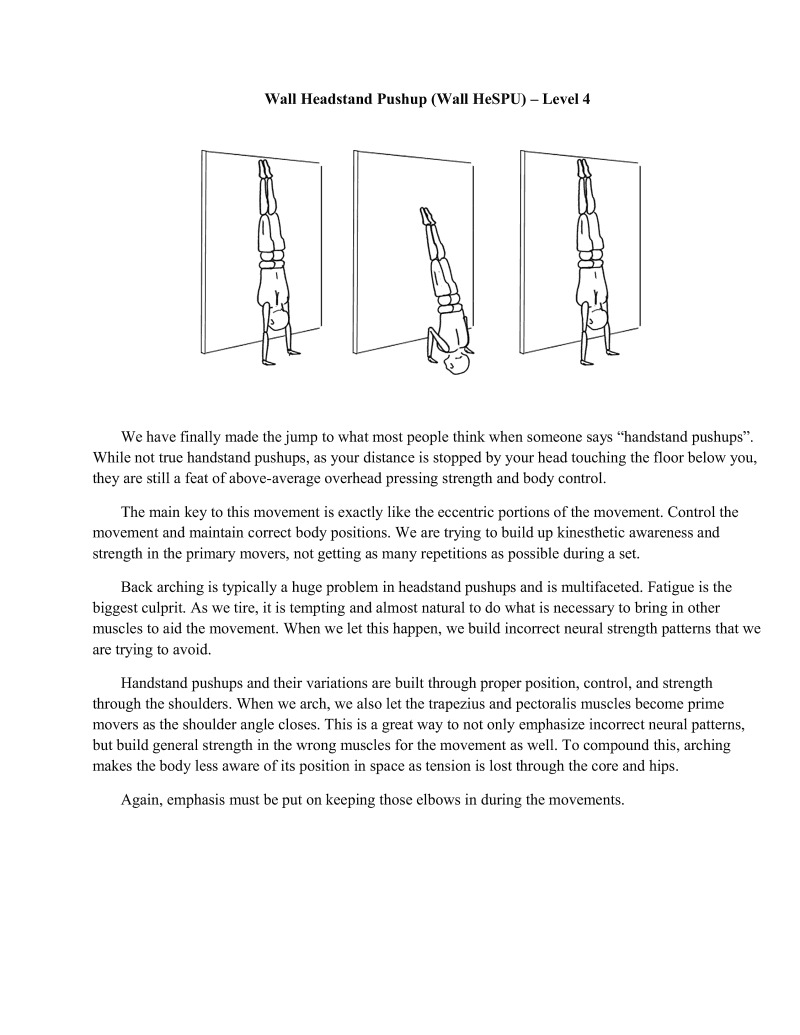
We have finally made the jump to what most people think when someone says "handstand pushups". While not true handstand pushups, as your distance is stopped by your head touching the floor below you, they are still a feat of above-average overhead pressing strength and body control.
The main key to this movement is exactly like the eccentric portions of the movement. Control the movement and maintain correct body positions. We are trying to build up kinesthetic awareness and strength in the primary movers, not getting as many repetitions as possible during a set.
Back arching is typically a huge problem in headstand pushups and is multifaceted. Fatigue is the biggest culprit. As we tire, it is tempting and almost natural to do what is necessary to bring in other muscles to aid the movement. When we let this happen, we build incorrect neural strength patterns that we are trying to avoid.
Handstand pushups and their variations are built through proper position, control, and strength through the shoulders. When we arch, we also let the trapezius and pectoralis muscles become prime movers as the shoulder angle closes. This is a great way to not only emphasize incorrect neural patterns, but build general strength in the wrong muscles for the movement as well. To compound this, arching makes the body less aware of its position in space as tension is lost through the core and hips.
Again, emphasis must be put on keeping those elbows in during the movements.
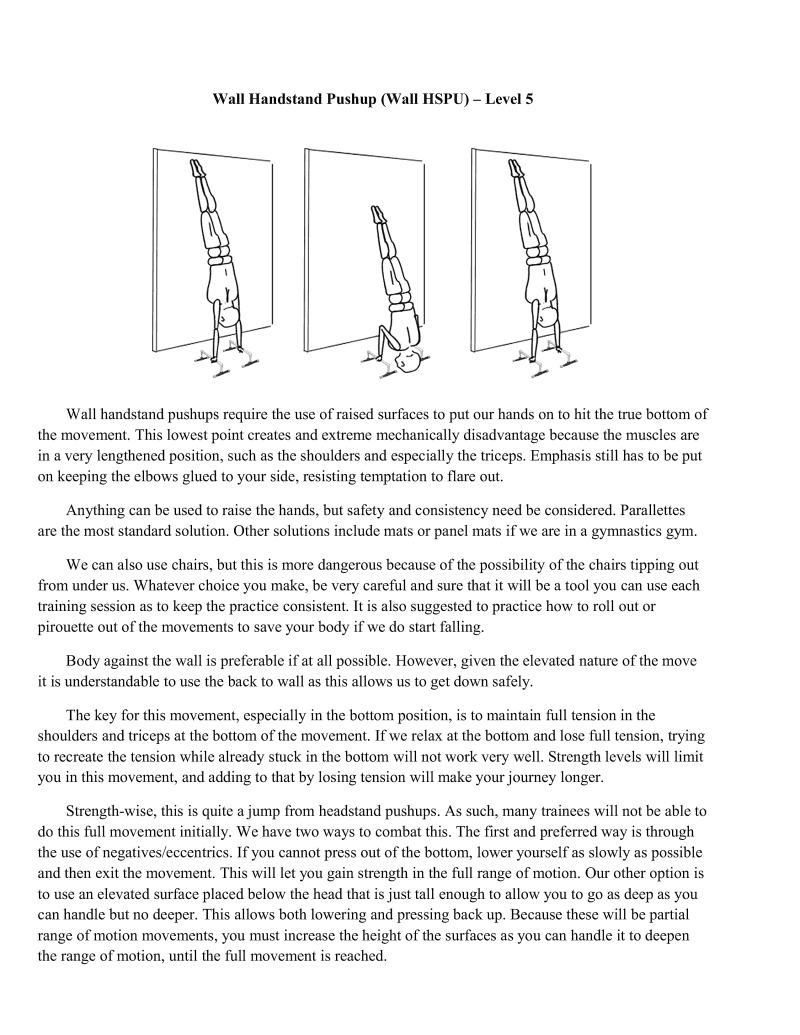
Wall handstand pushups require the use of raised surfaces to put our hands on to hit the true bottom of the movement. This lowest point creates and extreme mechanically disadvantage because the muscles are in a very lengthened position, such as the shoulders and especially the triceps. Emphasis still has to be put on keeping the elbows glued to your side, resisting temptation to flare out.
Anything can be used to raise the hands, but safety and consistency need be considered. Parallettes are the most standard solution. Other solutions include mats or panel mats if we are in a gymnastics gym.
We can also use chairs, but this is more dangerous because of the possibility of the chairs tipping out from under us. Whatever choice you make, be very careful and sure that it will be a tool you can use each training session as to keep the practice consistent. It is also suggested to practice how to roll out or pirouete out of the movements to save your body if we do start falling.
Body against the wall is preferable if at all possible. However, given the elevated nature of the move it is understandable to use the back to wall as this allows us to get down safely.
The key for this movement, especially in the bottom position, is to maintain full tension in the shoulders and triceps at the bottom of the movement. If we relax at the bottom and lose full tension, trying 10 recreate the tension while already stuck in the bottom will not work very well. Strength levels will limit You in this movement, and adding to that by losing tension will make your journey longer.
Strength-wise, this is quite a jump from headstand pushups. As such, many trainees will not be able to do this full movement initially. We have two ways to combat this. The first and preferred way is through the use of negatives/eccentrics. If you cannot press out of the bottom, lower yourself as slowly as possible and then exit the movement. This will let you gain strength in the full range of motion. Our other option is to use an elevated surface placed below the head that is just tall enough to allow you to go as deep as you can handle but no deeper. This allows both lowering and pressing back up. Because these will be pa range of motion movements, you must increase the height of the surfaces as you can handle it to decpen the range of motion, until the full movement is reached.
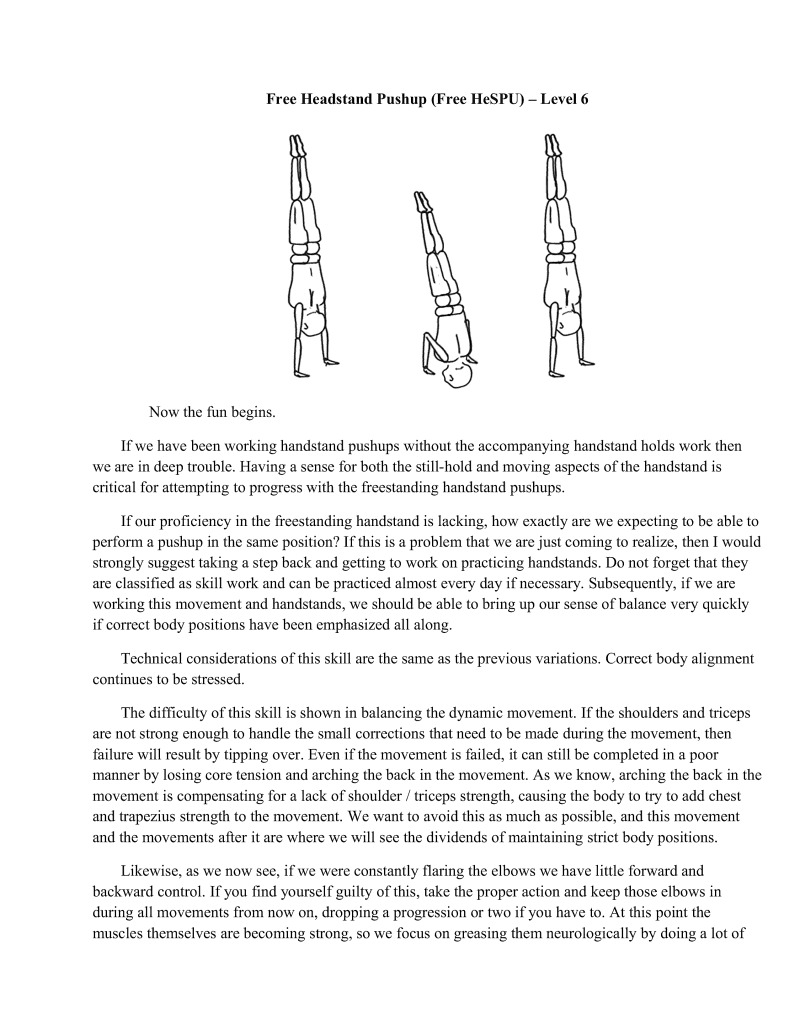
Now the fun begins.
If we have been working handstand pushups without the accompanying handstand holds work then we are in deep trouble. Having a sense for both the still-hold and moving aspects of the handstand is critical for attempting to progress with the freestanding handstand pushups.
If our proficiency in the freestanding handstand is lacking, how exactly are we expecting to be able to perform a pushup in the same position? If this is a problem that we are just coming to realize, then I would strongly suggest taking a step back and getting to work on practicing handstands. Do not forget that they are classified as skill work and can be practiced almost every day if necessary. Subsequently, if we are working this movement and handstands, we should be able to bring up our sense of balance very quickly if correct body positions have been emphasized all along.
Technical considerations of this skill are the same as the previous variations. Correct body alignment continues to be stressed.
The difficulty of this skill is shown in balancing the dynamic movement. If the shoulders and triceps are not strong enough to handle the small corrections that need to be made during the movement, then failure will result by tipping over. Even if the movement is failed, it can still be completed in a poor manner by losing core tension and arching the back in the movement. As we know, arching the back in the movement is compensating for a lack of shoulder / triceps strength, causing the body to try to add chest and trapezius strength to the movement. We want to avoid this as much as possible, and this movement and the movements after it are where we will see the dividends of maintaining strict body positions.
Likewise, as we now see, if we were constantly flaring the elbows we have little forward and backward control. If you find yourself guilty of this, take the proper action and keep those elbows in during all movements from now on, dropping a progression or two if you have to. At this point the muscles themselves are becoming strong, so we focus on greasing them neurologically by doing a lot of
the new correct technique. Though, due to the increased difficulty, strength gains with proper form may take a bit longer.
Allowing weight to be put on the head when we touch the ground is unwanted. This lets us stabilize the headstand position before pushing out. We absolutely do not want to do this because it ignores the need for control deep down near the bottom of the movement. Eliminating that balance will blunt progressions of other higher-level strength skills later on.
Aim to avoid putting any weight on the head in the bottom of the position besides brushing it on the ground. Maintain correct arm, elbow, and body position and given the strength and balance this movement will come. Then we can impress our friends with a nice clean handstand pushup instead of looking like we are flailing around everywhere.
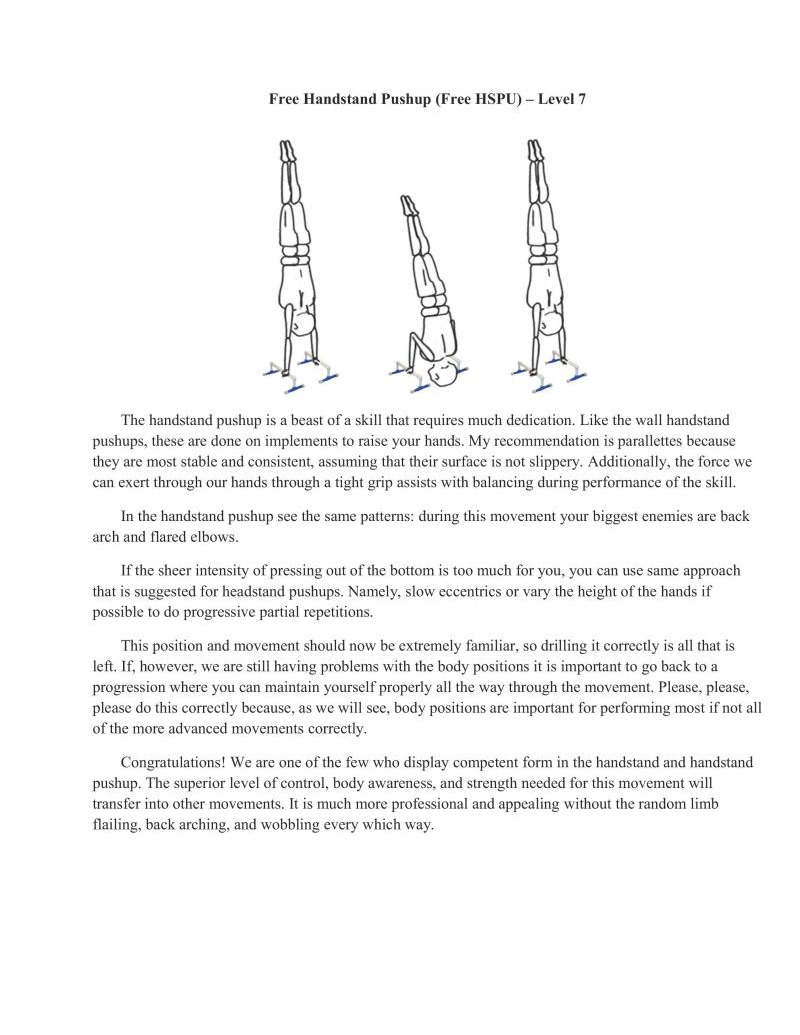
The handstand pushup I that requires much dedication. Like the wall handstand pushups, these are done on implements to raise your hands. My recommendation is paralleties because they are most stable and consistent, assuming that their surface is not slippery. Additionally, the force we can exert through our hands through a tight grip assists with balancing during performance of the skill.
In the handstand pushup see the same pattens: during this movement your biggest enemies are back arch and flared elbows.
I the sheer intensity of pressing out of the bottom is too much for you, you can use same approach that is suggested for headstand pushups. Namely, slow eccentrics or vary the height of the hands if possible to do progressive partial repetitions.
This position and movement should now be extremely familiar, so drilling it correctly is all that is left. If, however, we are still having problems with the body positions it is important to go back to a progression where you can maintain yourself properly all the way through the movement. Please. please, please do this corretly because, as we will see, body positions are important for performing most if not all of the more advanced movements correctly.
Congratulations! We are ane of the few who display competent form in the handstand and handstand pushup. The superior level of control, body awareness, and strength needed for this movement will transfer into other movements. It is much more professional and appealing without the random limb flailing, back arching, and wobbling every which way.
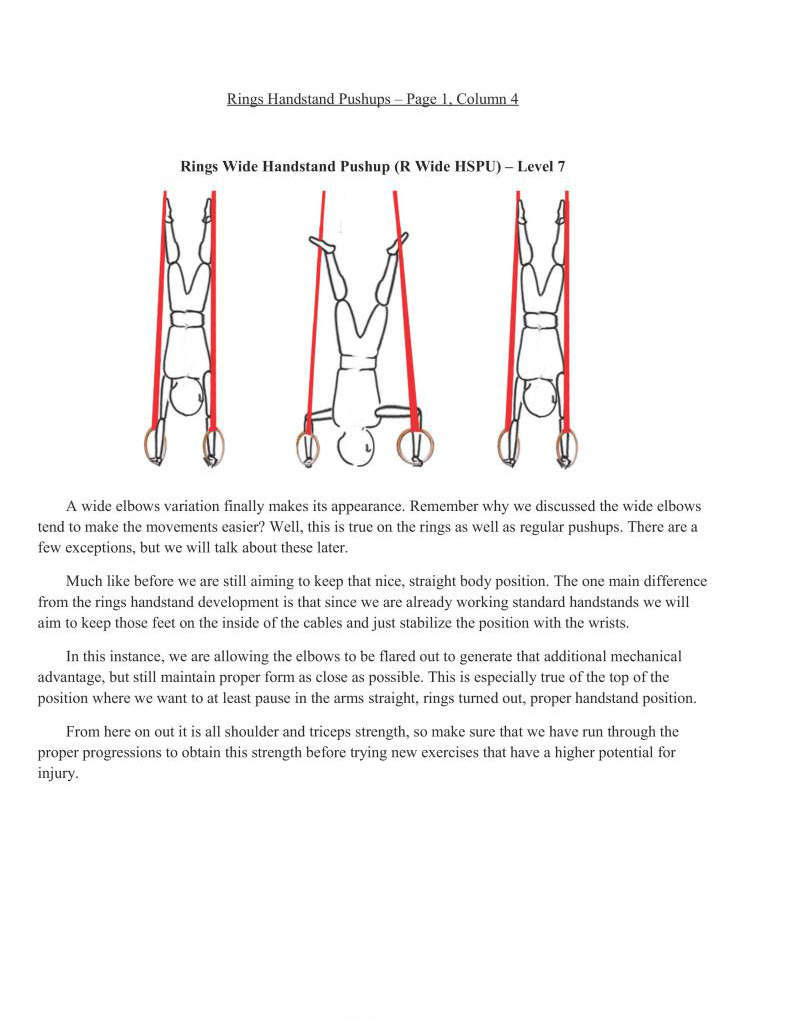
A wide elbows variation finally makes its appearance. Remember why we discussed the wide elbows
tend to make the movements easier? Well, this is true on the rings as well as regular pushups. There are a few exceptions, but we will talk about these later.
Much like before we are still aiming to keep that nice, straight body position. The one main difference from the rings handstand development is that since we are already working standard handstands we will aim to keep those feet on the inside of the cables and just stabilize the position with the wrists.
In this instance, we are allowing the elbows to be flared out to generate that additional mechanical advantage, but still maintain proper form as close as possible. This is especially true of the top of the position where we want to at least pause in the arms straight, rings turned out, proper handstand position.
From here on out it is all shoulder and triceps strength, so make sure that we have run through the proper progressions to obtain this strength before trying new exercises that have a higher potential for injury.
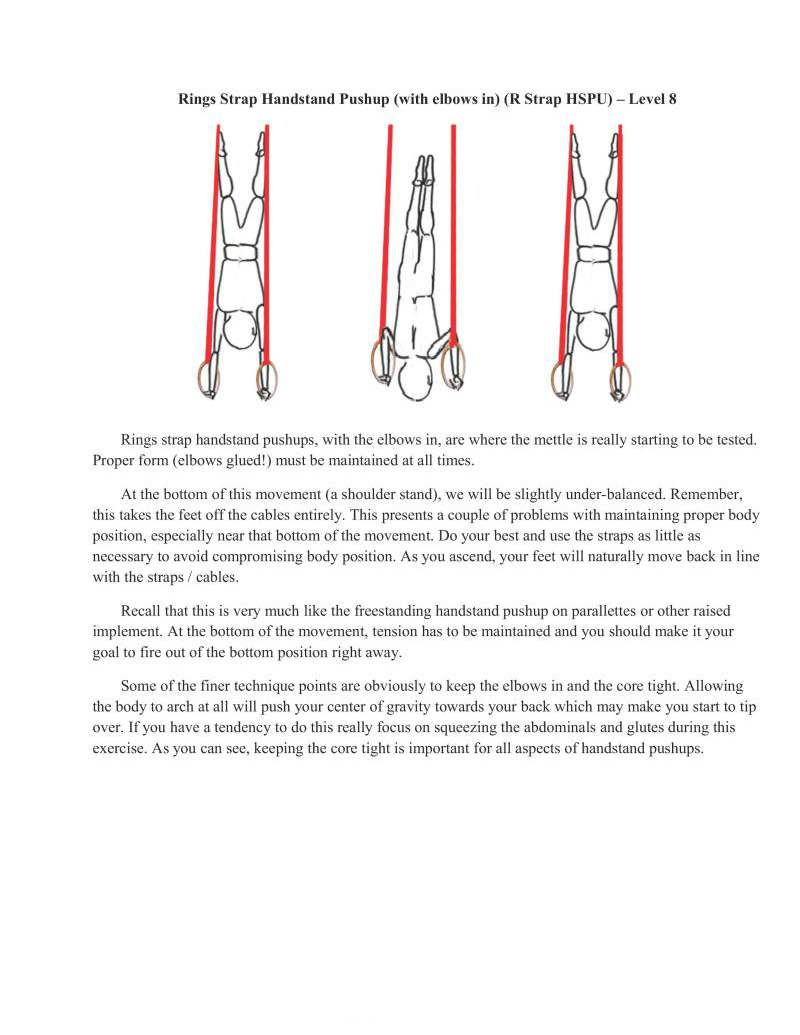
Rings strap handstand pushups, with the elbows in, are where the mettle is really starting to be tested.
Proper form (elbows glued!) must be maintained at all times.
At the bottom of this movement (a shoulder stand), we will be slightly under-balanced. Remember, this takes the feet off the cables entirely. This presents a couple of problems with maintaining proper body position, especially near that bottom of the movement, Do your best and use the straps as litrle as necessary to avoid compromising body position. As you ascend, your feet will naturally move back in line with the straps / cables.
Recall that this is very much like the freestanding handstand pushup on parallettes or other raised implement. At the bottom of the movement, tension has to be maintained and you should make it your goal to fire out of the bottom position right away.
Some of the finer technique points are obviously to keep the elbows in and the core tight. Allowing the body to arch at all will push your center of gravity towards your back which may make you start to tip over. If you have a tendency to do this really focus on squeezing the abdominals and glutes during this excreise. As you can see, keeping the core tight is important for all aspects of handstand pushups.
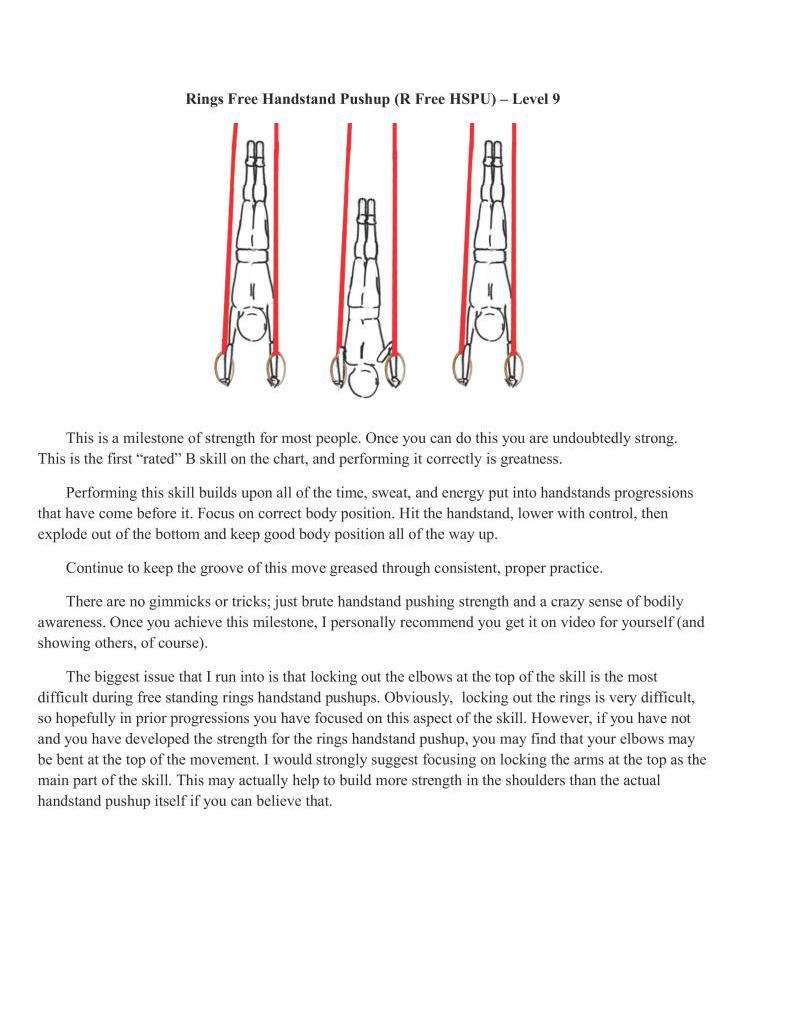
This is a milestone of strength for most people. Once you can do this you are undoubtedly strong. This is the first "rated" B skill on the chart, and performing it correctly is greatness.
Performing this skill builds upon all of the time, sweat, and energy put into handstands progressions that have come before it. Focus on correct body position. Hit the handstand, lower with control, then explode out of the bottom and keep good body position all of the way up.
Continue to keep the groove of this move greased through consistent, proper practice.
There are no gimmicks or tricks; just brute handstand pushing strength and a crazy sense of bodily awareness. Once you achieve this milestone, I personally recommend you get it on video for yourself (and showing others, of course).
The biggest issue that I run into is that locking out the elbows at the top of the skill is the most difficult during free standing rings handstand pushups. Obviously, locking out the rings is very difficult, so hopefully in prior progressions you have focused on this aspect of the skill. However, if you have not and you have developed the strength for the rings handstand pushup, you may find that your elbows may be bent at the top of the movement. I would strongly suggest focusing on locking the arms at the top as the main part of the skill. This may actually help to build more strength in the shoulders than the actual handstand pushup itself if you can believe that.
1 put the press right afer the handstand pushups categories because it strongly relates to these types of skills.
A true freestanding handstand pushup will typically be about 85-95% of a bodyweight press. This is because the weight of the arms is not factored into the weight of the handstand pushup
Both sets of skills require good core strength and control, but they are a bit different. Obviously, pushing the bodyweight in an inverted position is not exactly like pushing your bodyweight overhead.
1 think the main thing to keep in mind is that you will get better at what you practice the most. There is some good translation from both skills because they involve pressing weight over your head. But there are no hard-set numbers that correlate from one to another.
This strength "connection" was just to give you an idea of what you may expect in regards to pres strength if you were to train both simultaneously. Individual anthropometry plays a role as well. For example, those with longer bodies may have a harder time controlling a freestanding handstand pushup.
The most important factor in how good you are at an exercise is how much you practice the exercise in question. In this respect, you will be better at what you do more. But if you need some supplementary work for one skill or the other these two progressions relate to each other fairly well.

Bent arm press handstands are a series of skills that everyone seems to want to learn. Just like the other handstand work (and all movements, really), proper care must be taken to learn and continually reinforce good technique.
A proficient handstand is required before beginning to learn this movement. If we cannot hold the handstand, how exactly will we make it up to the ending position — a handstand — without falling over?
That said, we are learning this position from either a bent arm straddle or a bent arm pike position. Tucking is not preferred. It makes the beginning of the movement slightly easier, but once the legs are starting to be extended it is much more unstable than straight legs throughout, In the context of progression and consistency. ignoring straight legs now will only mean trying to learn them later when the intensity is already higher on its own. Typically it ends in having to switch to a lower progression anyway, 50 bite the bullet and put the work in from the start.
Wrist control will always be crucial in any handbalancing feat, and these movements are no exception. Firmly plant the hands on the floor with fingers extended, ready to give feedback and control.
Initially, balancing the skill will be difficult, and it is likely that forward rolling out of the skill will happen. Our aim is to completely avoid this, but be prepared for it to happen if you significantly lose your balance forwards
Starting in the piked or straddled position, our first goal is to bend the arms slightly but not let them bend more than 90 degrees. As the arms bend, tension from the hands to the shoulders provides a stable base for the hips to rise overhead; but allowing them bend too much puts too much force on the triceps to handle when pressing out for people new to this skill,
Once the hips are more aligned over the head, begin to straighten out the handstand by bringing the legs up. Depending on the position we are using the difficulty can vary.
Straddle position is usually the harder one at first simply because of the flexibility requirements and the lack of awareness in this position. To fix these problems, it is also suggested to use this position.
Pike position is cleaner looking and more comfortable but is also more difficult. Once the legs start making their way up, they make a longer lever than the straddle. This shifts the center of gravity closer to the feet and further away from the wrists. To compensate, the shoulders have to lean forward more, decreasing the shoulder musculature’s leverage and effectively increasing the intensity of forces on the shoulders
Whichever position is chosen, if we have the adequate strength to perform this skill it is just a matter of practice. With a solid handstand this should not take longer than a month or two. Given the basic naturc of this skill and its applicability into most other progressions I would suggest practicing both variations.
Take care not to bend the arms too much as you may not be strong enough to push out of a greater than 90 degree bend in the elbows. This goes for this and every progression hence forth.
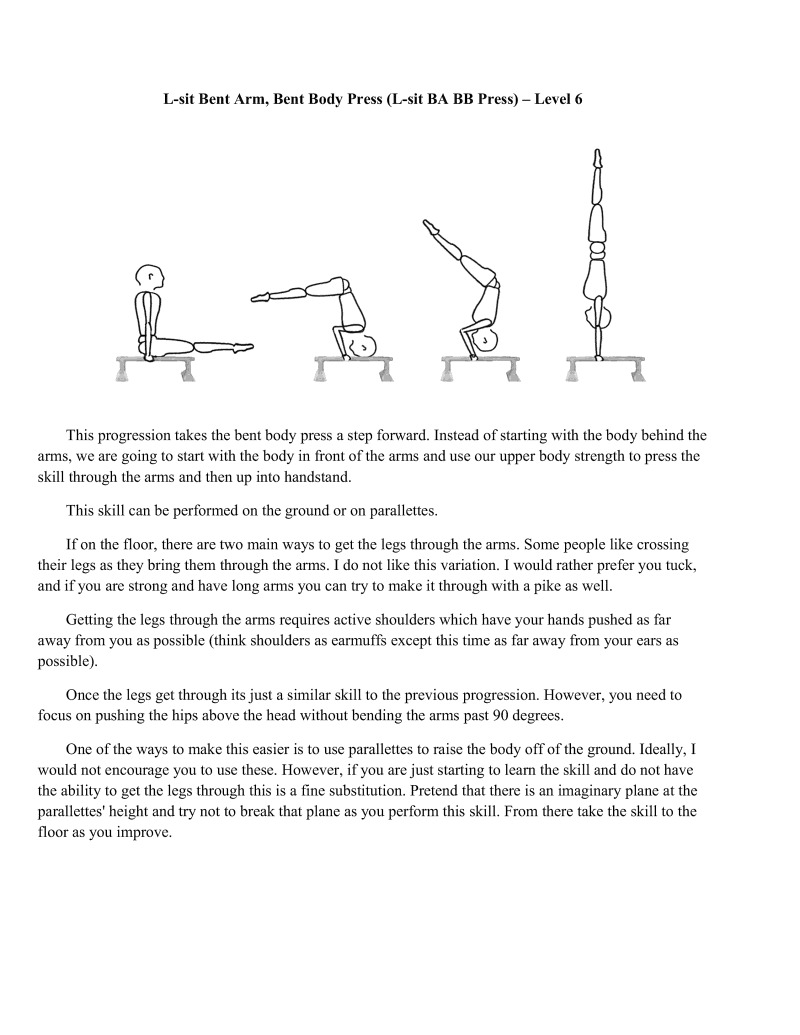
This progression takes the bent body press a step forward. Instead of starting with the body behind the arms, we are going to start with the body in front of the arms and use our upper body strength to press the skill through the arms and then up into handstand.
This skill can be performed on the ground or on paralletics.
If on the floor, there are two main ways to get the legs through the arms. Some people like crossing their legs as they bring them through the arms. I do not like this variation. I would rather prefer you tuck, and if you are strong and have long arms you can try to make it through with a pike as well.
Getting the legs through the arms requires active shoulders which have your hands pushed as far away from you as possible (think shoulders as carmuffs except this time as far away from your ears as possible).
Once the legs get through its just a similar skill to the previous progression. However, you need to focus on pushing the hips above the head without bending the arms past 90 degrees.
One of the ways to make this easier is to use parallettes to raise the body off of the ground. Ideally, I would not encourage you to use these. However, if you are just starting to learn the skill and do not have the ability to get the legs through this is a fine substitution. Pretend that there is an imaginary plane at the parallettes' height and try not to break that plane as you perform this skill. From there take the skill to the floor as you improve.
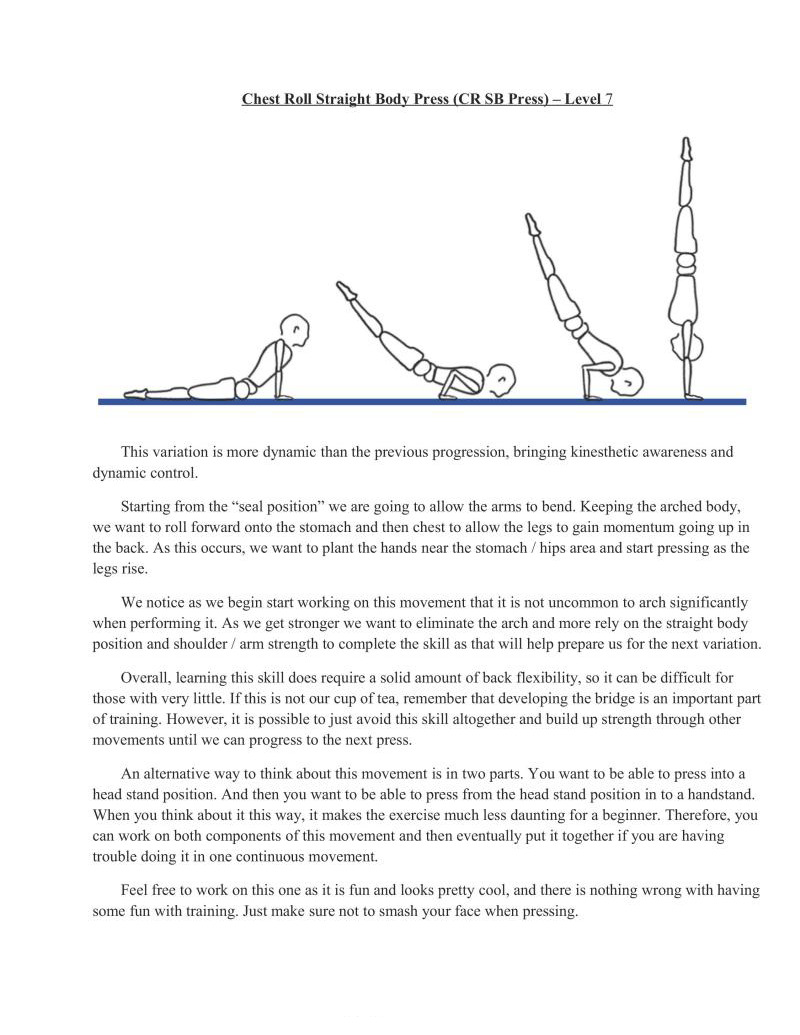
This variation is more dynamic than the previous progression, bringing kinesthetic awareness and dynamic control.
Starting from the "seal position" we are going to allow the arms to bend. Keeping the arched body, we want to roll forward onto the stomach and then chest to allow the legs to gain momentum going up in the back. As this occurs, we want to plant the hands near the stomach / hips area and start pressing as the legs rise.
We notice as we begin start working on this movement that it is not uncommon to arch significantly when performing it. As we gt stronger we want to eliminate the arch and more rely on the straight body position and shoulder / arm strength to complete the skill as that will help prepare us for the next variation.
Overall, learning this skill does require a solid amount of back flexibility, so it can be difficult for those with very little. If this is not our cup of tea, remember that developing the bridge is an important part of training. However, it is possible to just avoid this skill altogether and build up strength through other movements until we can progress to the next press,
An alternative way to think about this movement is in two parts. You want to be able to press into a head stand position. And then you want to be able to press from the head stand position in to a handstand. When you think about it this way, it makes the exercise much less daunting for a beginner. Therefore, you can work on both components of this movement and then eventually put it together if you are having trouble doing it in one continuous movement.
Feel free to work on this one as it is fun and looks pretty cool, and there is nothing wrong with having some fun with training. Just make sure not to smash your face when pres
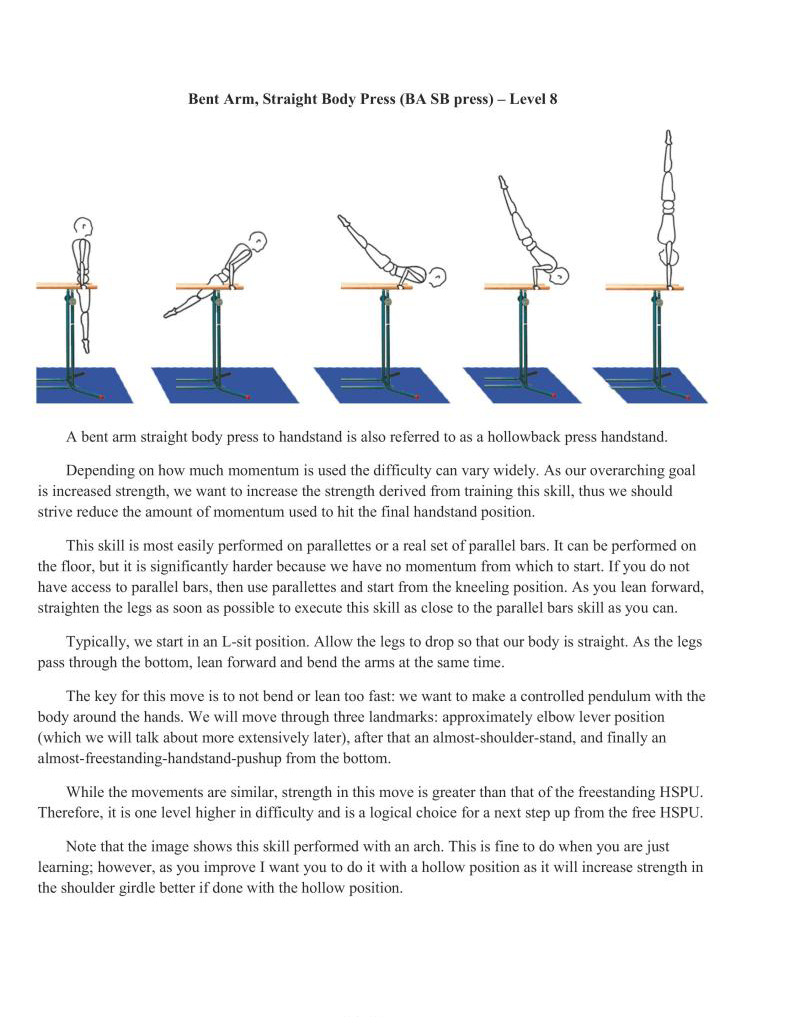
A bent arm straight body press to handstand is also referred to as a hollowback press handstand.
Depending on how much momentum is used the difficulty can vary widely. As our overarching goal is increased strength, we want to increase the strength derived from training this skill, thus we should strive reduce the amount of momentum used to hit the final handstand position,
This skill is most easily performed on parallettes or a real set of parallel bars. It can be performed on the floor, but it is significantly harder because we have no momentum from which to start. If you do not have access to parallel bars, then use parallettes and start from the kneeling position. As you lean forward, straighten the legs as soon as possible to execute this skill as close to the parallel bars skill as you can.
Typically, we start in an L-sit position. Allow the legs to drop so that our body is straight. As the legs pass through the bottom, lean forward and bend the arms at the same time.
The key for this move is to not bend or lean too fast: we want to make a controlled pendulum with the body around the hands. We will move through three landmarks: approximately elbow lever position (which we will talk about more extensively later), after that an almost-shoulder-stand, and finally an almos-freestanding-handstand-pushup from the bottom.
While the movements are similar, strength in this move is greater than that of the freestanding HSPU. Therefore, it is one level higher in difficulty and is a logical choice for a next step up from the free HSPU.
Note that the image shows this skill performed with an arch. This is fine to do when you are just learning; however, as you improve I want you to do it with a hollow position as it will increase strength in the shoulder girdle better if done with the hollow position.
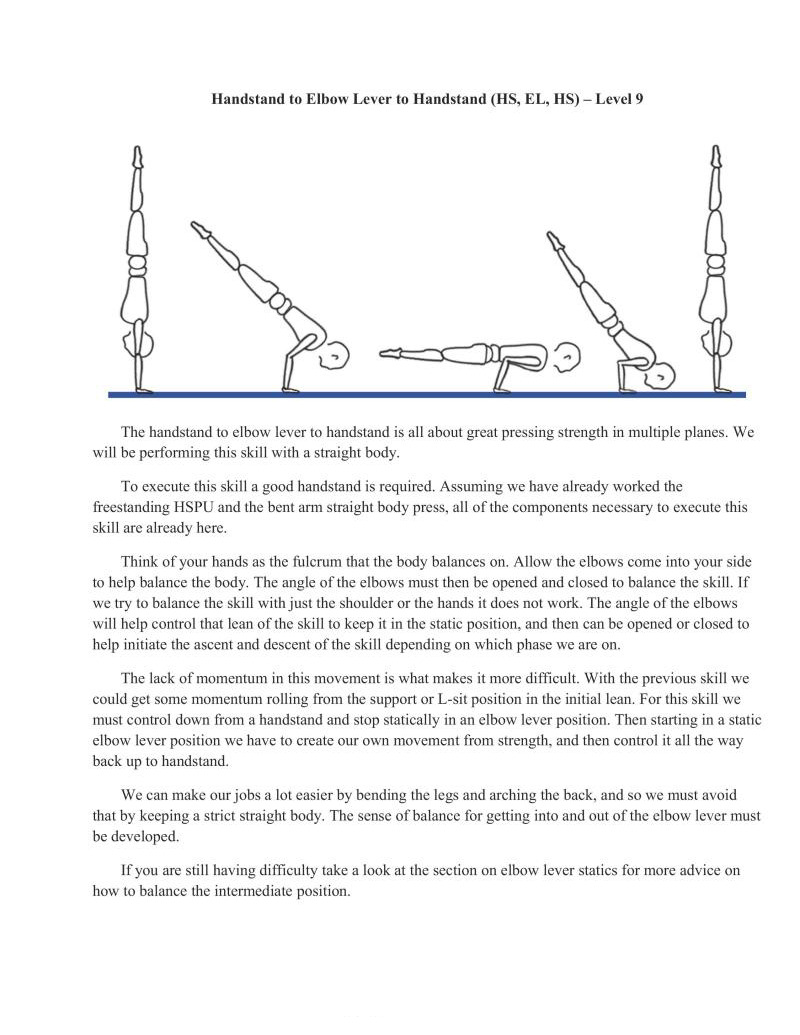
The handstand to elbow lever to handstand is all about great pressing strength in multiple planes. We will be performing this skill with a straight body.
To execute this skill a good handstand is required. Assuming we have already worked the freestanding HSPU and the bent arm straight body press, all of the components necessary to execute this skill are already here.
Think of your hands as the fulerum that the body balances on. Allow the elbows come into your side 10 help balance the body. The angle of the elbows must then be opened and closed to balance the skill. If we try to balance the skill with just the shoulder or the hands it does not work. The angle of the elbows will help control that lean of the skill to keep it in the static position, and then can be opened or closed to help initiate the ascent and descent of the skill depending on which phase we are on.
The lack of momentum in this movement is what makes it more difficult. With the previous skill we could get some momentum rolling from the support or L-sit position in the initial lean. For this skill we must control down from a handstand and stop statically in an elbow lever position. Then starting in a static elbow lever position we have to create our own movement from strength, and then control it all the way back up to handstand.
We can make our jobs a lot easier by bending the legs and arching the back, and so we must avoid that by keeping a strict straight body. The sense of balance for getting into and out of the elbow lever must be developed.
If you are still having difficulty take a look at the section on elbow lever statics for more advice on how to balance the intermediate position.

This feat of strength tests the body through the full range of pushing movements. This move requires a set of parallel bars as we need to be the bottom of a full dip to get the whole strength benefit of this
progression. From the bottom of the dip position we want to keep the body straight (do not arch!) and lean forward and press into a handstand.
Alternatively, this skill can be performed with parallettes, if you start from the third frame in this sequence. This is not preferred since you do not get the full range of motion to build strength, but starting from a static position in the third frame is sufficiently difficult to challenge your strength.
The movement should be initiated by leaning the body forward while straightening the arms so that the shoulders "slide" along the rails. This will help place the hands closer to the hips, which is needed to get the rest of the body leaning forward to push out of the deep dip position into the ascent.
As the body approaches parallel with the bars, we will be in a deep semi-elbow lever position. Do not stop in this position, as it is much more difficult than a regular elbow lever. We want to keep leaning forward and opening the elbow angle so that the feet keep rising until we hit close to a shoulder stand on the parallel bars. From there, it is just the bottom part of the freestanding handstand pushup.
The first phase—the dip to approximate shoulder stand—is the hardest. Handstand pushups are typically comfortable for trainees at this level and are less of a problem. Do note, though, that it will be slightly more difficult because we taxing ourselves in the first phase, before the handstand pushup.
Form should be solid as stone. From there it is developing the strength and figuring out how to manipulate that elbow angle to allow us to change the angle of the body to set us up for the press.
The rings bent arm presses will come after the chair handstands. I would actually have given them their own category, but there was not enough room to keep the charts down to fewer pages. Therefore, 1 am placing chair handstands in this category.
The "upper" level chair handstand, the illusion, actually requires a lot of the stability and strength that fends a bit of help towards learning the rings bent arm press handstands. That is why I put it in this place on the charts. These are a good segue into rings handstands and they are cool to learn.
Obviously, other work on rings may be more useful such as getting up in the handstands and performing rings handstand pushups. However, typically I think that these are best learned concurrently. The rings bent arm presses specifically benefit from learning:
A Straight and Bent Arm Press Handstands on PB/FX
The prerequisites that I recommend before attempting this skill are (1) having a solid 30s handstand, and (2) being able to bent arm press handstand or very close to be able to do straight arm straddle press handstand.
You need to be able to hold a solid handstand, and you need to be able to press to a handstand to correctly execute this skill. There will be some weight shifting involved so having the solid handstand is critical. Likewise, if you cannot press to handstand there is no way you are going to make it up controlled enough to hold the handstand.
Handstand pushups may help with the strength, but they are not a prerequisite because you should not be significantly pressing into the position with bent arms on both sides.
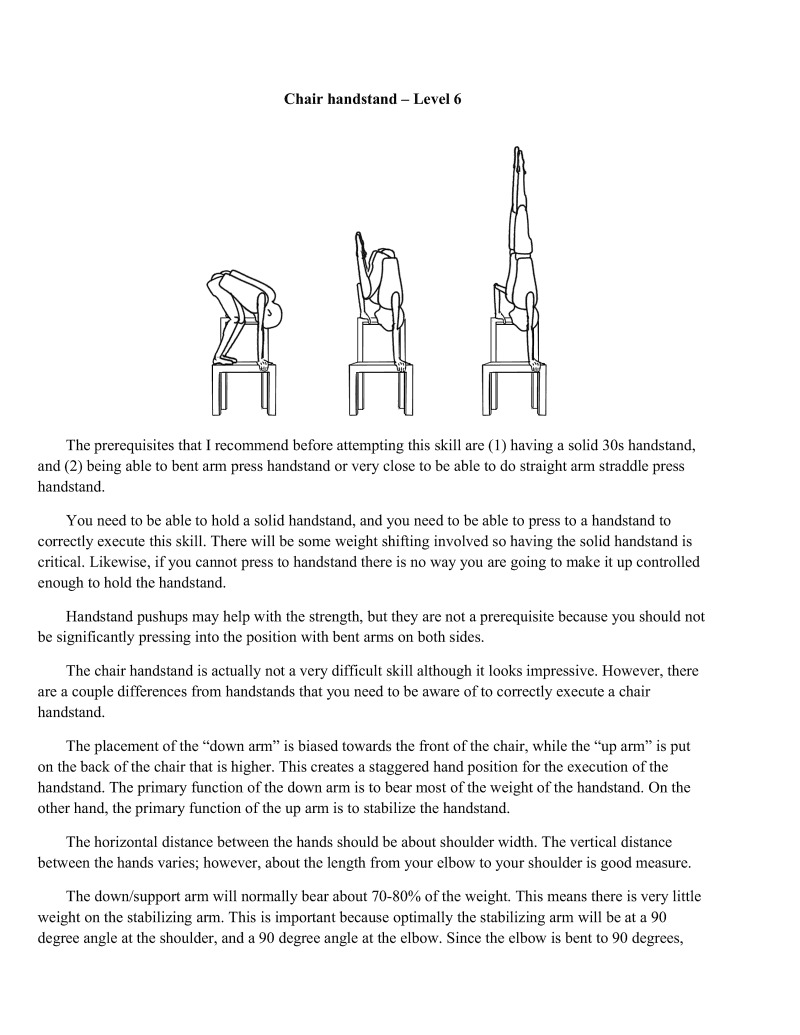
The chair handstand is actually not a very difficult skill although it looks impressive. However, there are a couple differences from handstands that you need to be aware of to correctly execute a chair handstand.
The placement of the "down arm’ up arm" is put on the back of the chair that is higher. This creates a staggered hand position for the execution of the handstand. The primary function of the down arm is to bear most of the weight of the handstand. On the other hand, the primary function of the up arm is to stabilize the handstand.
ased towards the front of the chair, while the
The horizontal distance between the hands should be about shoulder width. The vertical distance between the hands varies; however, about the length from your elbow to your shoulder is good measure.
The down/support arm will normally bear about 70-80% of the weight. This means there is very little weight on the stabilizing arm. This is important because optimally the stabilizing arm will be at a 90 degree angle at the shoulder, and a 90 degree angle at the elbow. Since the elbow is bent to 90 degrees,
unless you are exceptionally strong you cannot put that much weight on that arm. Therefore, the weight distribution will be biased more towards the down arm.
I would start learning these against the wall because the potential for falling out of the chair press is high. If you have already practiced against the wall and are ready to take it away from the wall, make sure there is a softer surface in front of you if you start to fall over forwards. Additionally, make sure you have practiced your piroutres.
First, get on the chair. Now find the correct hand placements as described above. The first thing you will do is to raise your butt up in the air. Then start leaning forwards
The chair press handstand, like the other press handstands, can be thought of as a two step process. The goal of the initial part of the press is to get the hips directly overhead. The second step of the chair press is to slowly extend the legs overhead while keeping the shoulders, core, and hips stable so you do not fall forward or backward.
The "down" arm should be kept as straight as possible when the press begins. This is why it is useful to already have a straight arm press. If you start bending the arm more than about 20-30 degrees, your body will start rotating and fail the press. The "up" arm can support some weight, but since it is bent you do not have a lot of leverage and likely will not have enough strength to support any significant weight on that arm.
Continue to lean forward and put weight on the down arm. Aim to push the down arm hand upwards and backwards over your head. This will help counteract the force as you lean forward and lift your hips up.
You may have your legs in either a tuck or straddle position when you attempt this press. It matters very little. Most people like doing it in tuck, but straddle makes it slightly easier especially if you have been practicing straddle presses. The only thing you need to be aware of if you use the straddle is that your feet may hit the back rest of the chair.
Now that you have gotten your hips above your head, slowly extend the legs overhead. If you try to do this too quickly, you will likely arch and lose your balance. Most of the time you will lose your balance falling over; thus, this is why I recommend that you lean to do this against the wall first. When you are learning it free away from the wall, knowing how to pirouette out of a handstand is effective for coming down. You absolutely do not want to fall straight over and land on the floor on your back.
after you have reached the handstand, make sure you keep the body tight. Since you may not be used to the weight shift of about 70-80% of the weight onto the planted down arm, any potential core or leg movements may destabilize your press. You will control the press from falling over with your planted arm applying force to keep you from falling over, and you will control the coming back down from the up arm placed on the back rest. This semi-torquing movement may be hard to handle at first and you may start to twist. However, after you get the hang of it then it will go away.
Make sure that the elbow of the planted arm does not flare outwards. You want to keep it in line with the body both as you are pressing and in the handstand. This may be one of the issues that you may run into if you keep twisting and are not sure why.
Coming down out of the chair press is exactly like going up. First, you want to bring the legs down slowly until you are in the straddled or tucked position with the hips up. Then you want to use your arms 10 slowly bend and support your weight. Then bring the hips down from overhead. Ideally, you will be able to come down without wobbling and without slamming your feet down into the chair or falling over.
After you have completed this skill, start thinking about holding it longer periods of time to improve stability just like the handstand.
Eventually, you can practice it from it from a seated sideways position on the chair. This is a lot like the L-sit press handstand variation. The tough part about this skillis getting the butt up from the scat all the way overhead. Work on your pressing abilities to obtain this skill.
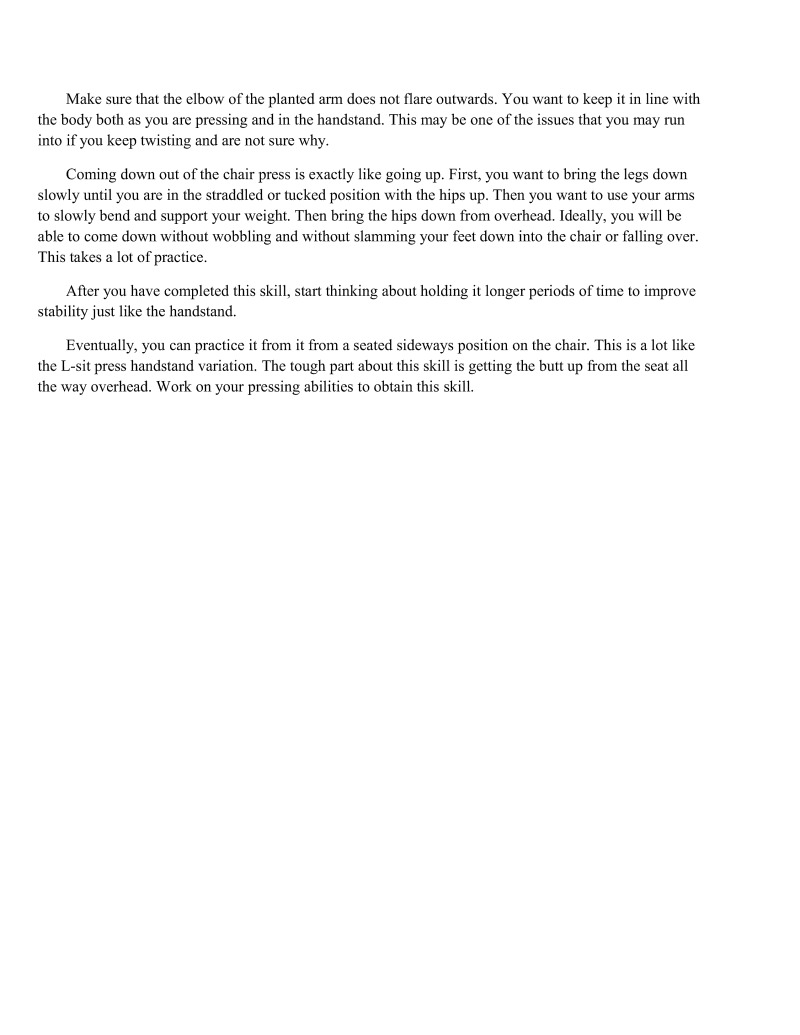
The illusion handstand utilizes two chairs. Instead of placing your hand down on the first chair, the second chair's back legs are going to be placed where you would place your plant arm. Thus, your new down arm is going to be on the back of the chair, and your new up arm will be on the back of the other chair.
The press is the same as the previous chair presses, but is difficulty for two distinct reasons,
Thus, the weight shifting is more biased towards the down arm.
Aside from the increased weight distribution, you have to worry about stabilizing the chair with the high / control arm. I discussed that you should try to pin the arm in line with the body in the previous skill. This means that the elbow will be "in" and not flared out — you have to keep it in line with the body. This is why I have really reinforced how important it is to keep the elbows in during all of these handstand pushups and handstand press skills. The chair handstand support arm needs to be kept in just like any of the floor or rings handstands. Thus, if you are having issues with this, it may be a good idea to go back to working some presses on the floor or parallettes to help assist with getting in the habit of keeping the elbow in.
There is an intermediate position that can be utilized to practice this skill. If you are able to get three chairs, you can start out with the top chair resting on two bottom chairs. Then after you do the chair press handstand, you can take control of the chair and pull it up so it is not resting on the third chair. If you have
someone around, they can pull out third chair. This is where the name "illusion" comes from because the third chair was actually needless.
As always, this skill can be practiced against the wall as well if you are uncomfortable with falling over. As you are stacking a chair on top of another chair, the height of the stack is higher. Therefore, if you do start to fall over it is farther to fall. Thus, practicing against the wall or having a soft surface to fall over onto may be helpful at least from a psychological standpoint.
After this skill is obtained, there are some things you can do to make it more difficult such as straightening out the supporting arm. Alternatively, if you actually do have access to chairs that can stack you can go higher. Check out some of the cirus chairs routines on youtube for more ideas.
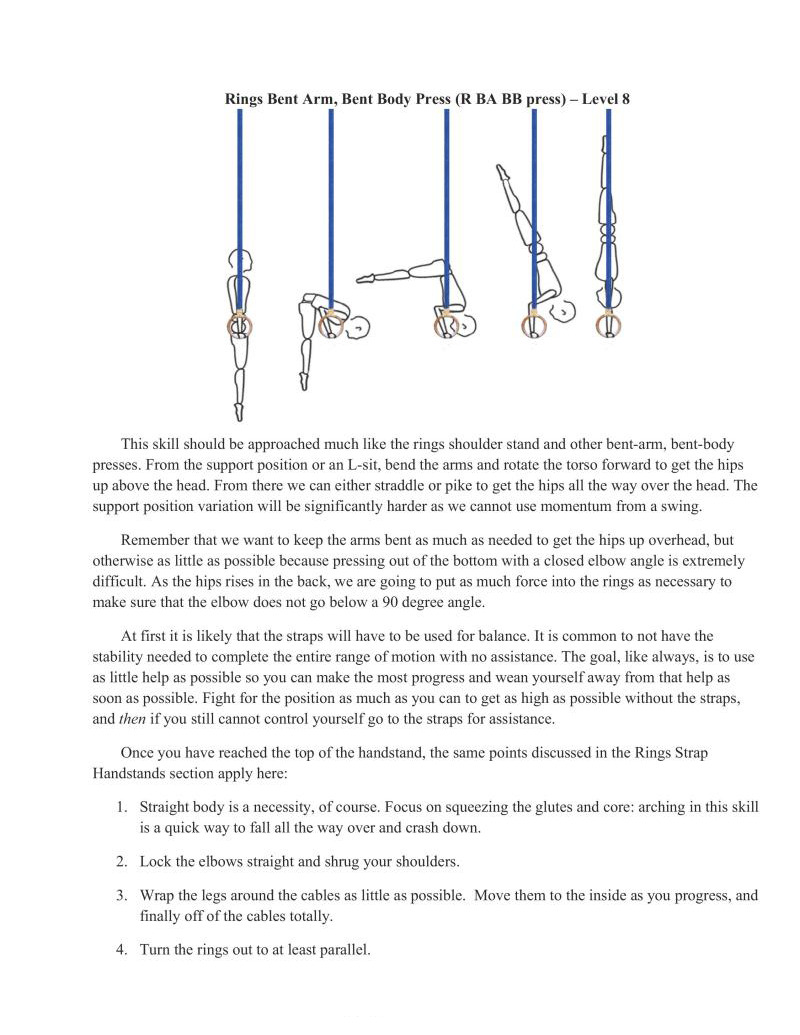
This skill should be approached much like the rings shoulder stand and other bent-arm, bent-body presses. From the support position or an L-sit, bend the arms and rotate the torso forward to get the hips up above the head. From there we can either straddle or pike to get the hips all the way over the head. The support position variation will be significantly harder as we cannot use momentum from a swing.
Remember that we want to keep the arms bent as much as needed to get the hips up overhead, but otherwise as little as possible because pressing out of the bottom with a closed elbow angle is extremely difficult. As the hips rises in the back, we are going to put as much force into the rings as necessary to make sure that the elbow does not go below a 90 degree angle.
At first it is likely that the straps will have to be used for balance. It is common to not have the stability needed to complete the entire range of motion with no assistance. The goal, like always, is to use le help as possible so you can make the most progress and wean yourself away from that help as soon as possible. Fight for the position ou can to get as high as possible without the straps, and then if you still cannot control yourself go to the straps for assistance.
much as
Once you have reached the top of the handstand, the same points discussed in the Rings Strap Handstands section apply here:
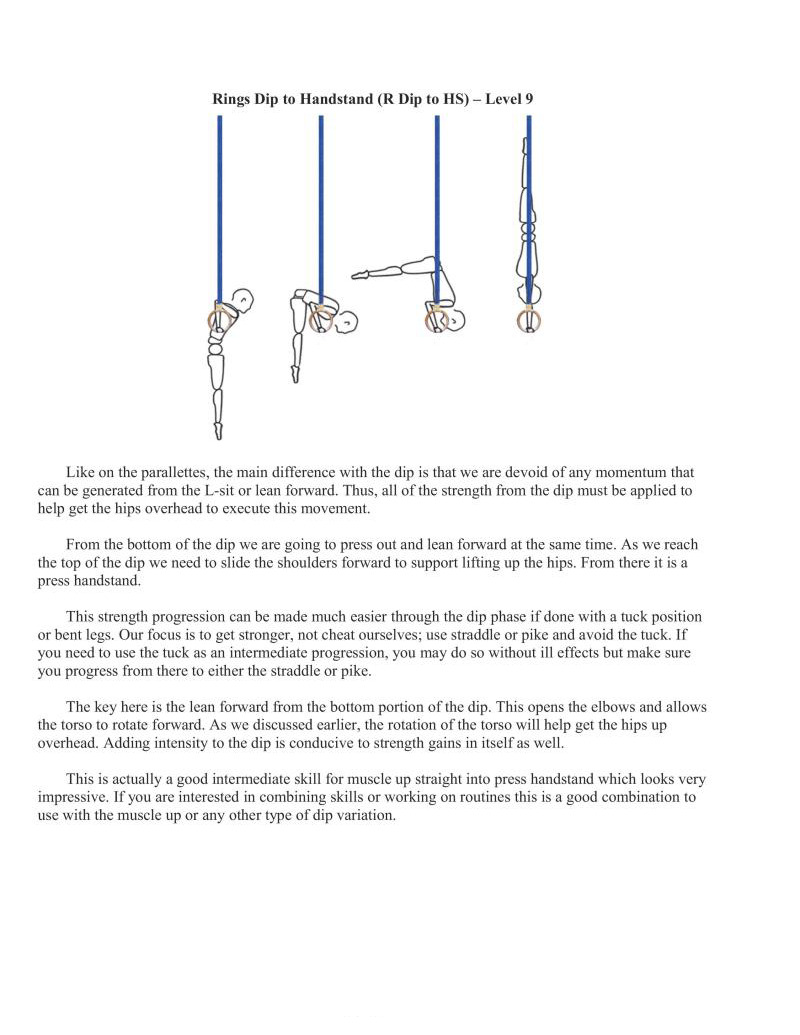
on the parallettes, the main difference with the dip is that we are devoid of any momentum that can be generated from the L-sit or lean forward. Thus, all of the strength from the dip must be applied to help get the hips overhead to execute this movement.
From the bottom of the dip we are going to press out and lean forward at the same time. As we reach the top of the dip we need to slide the shoulders forward to support lfting up the hips. From there it is a press handstand.
This strength progression can be made much easier through the dip phase if done with a tuck position or bent legs. Our focus is to get stronger, not cheat ourselves; use straddle or pike and avoid the tuck. If you need to use the tuck as an intermediate progression, you may do so without ill effects but make sure You progress from there to either the straddle or pike.
The key here is the lean forward from the bottom portion of the dip. This opens the elbows and allows the torso to rotate forward. As we discussed earlier, the rotation of the torso will help get the hips up overhead. Adding intensity to the dip is conducive to strength gains in itself as well,
This is actually a good intermediate skill for muscle up straight into press handstand which looks very impressive. If you are interested in combining skills or working on routines this is a good combination to use with the muscle up or any other type of dip variation.
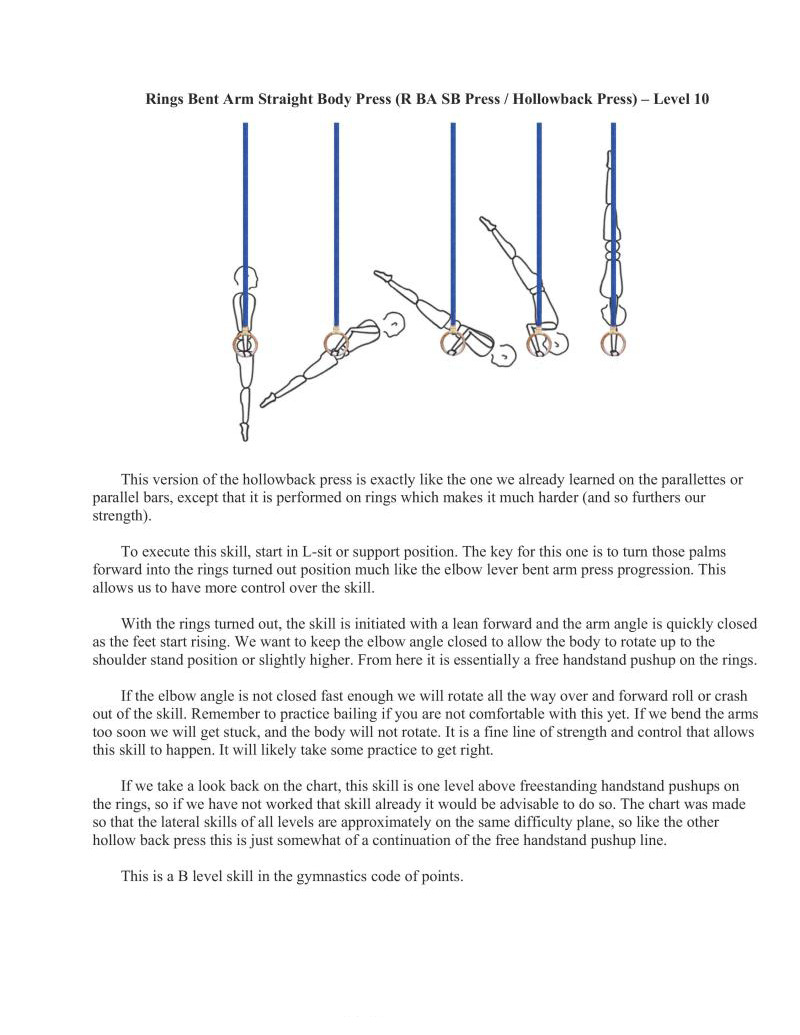
This version of the hollowback press is exactly like the one we already learned on the paralleties or parallel bars, except tht it is performed on rings which makes it much harder (and so furthers our strength).
To execute this sk, start in L-sit or support position. The key for this one is to tum those palms forward into the rings turned out position much like the elbow lever bent arm press progression. This allows us to have more control over the skill.
With the rings turned out, the skill is initiated with a lean forward and the arm angle is quickly closed as the feet start rising. We want to keep the elbow angle closed to allow the body to rotate up to the shoulder stand position or slightly higher. From here it is essentially a free handstand pushup on the rings.
If the elbow angle is not closed fast enough we will rotate all the way over and forward roll or crash out of the skill. Remember to practice bailing if you are not comfortable with this yet. If we bend the arms 100 s00n we will get stuck, and the body will not rotate. It is a fine line of strength and control that allows this skill to happen. It will likely take some practice to get right.
If we take a look back on the chart, this skill is one level above freestanding handstand pushups on the rings, so if we have not worked that skill already it would be advisable to do so. The chart was made so that the lateral skills of all levels are approximately on the same difficulty plane, so like the other hollow back press this is just somewhat of a continuation of the free handstand pushup line.
This is a B level skill in the gymnastics code of points.
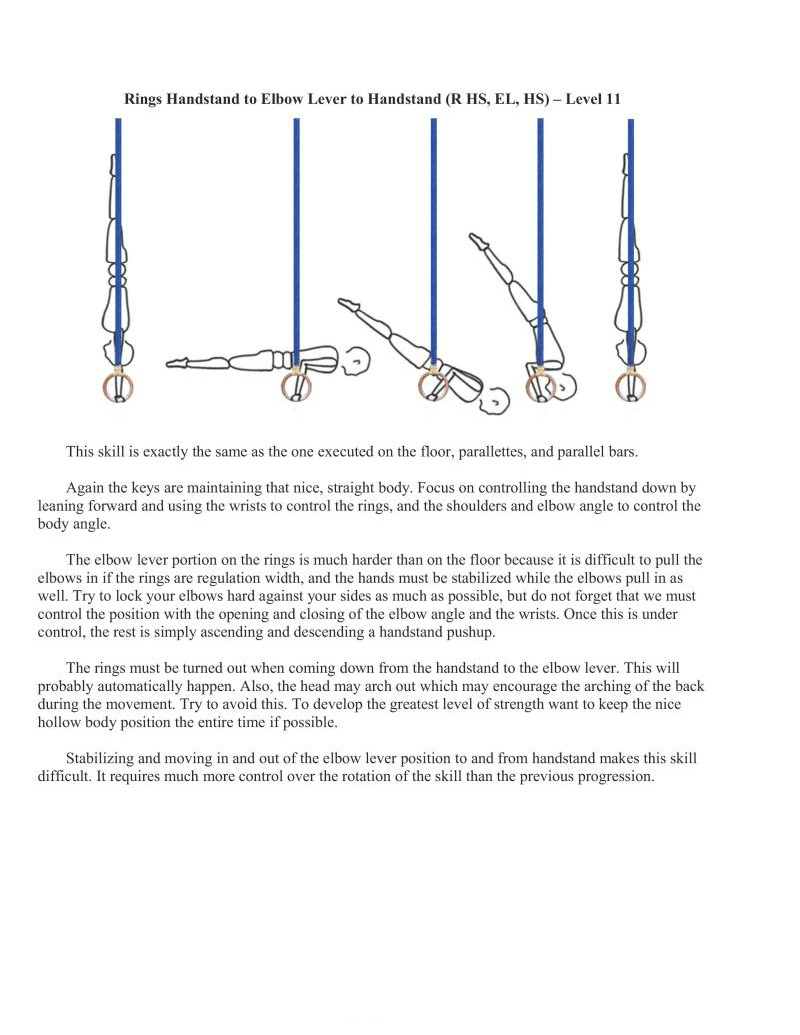
This skill is exactly the same as the one executed on the floor, parallettes, and parallel bars.
Again the keys are maintaining that nice, straight body. Focus on controlling the handstand down by leaning forward and using the wrists to control the rings, and the shoulders and elbow angle to control the body angle.
The elbow lever portion on the rings is much harder than on the floor because it is difficult to pull the elbows in if the rings are regulation width, and the hands must be stabilized while the elbows pull in as well. Try to lock your elbows hard against your sides as much as possible, but do not forget that we must control the position with the opening and closing of the elbow angle and the wrists. Once this is under control, the rest is simply ascending and descending a handstand pushup.
The rings must be turned out when coming down from the handstand to the elbow lever. This will probably automatically happen. Also, the head may arch out which may encourage the arching of the back during the movement. Try to avoid this. To develop the greatest level of strength want to keep the nice hollow body position the entire time if possible.
Stabilizing and moving in and out of the elbow lever position to and from handstand makes difficult. It requires much more control over the rotation of the skill than the previous progression.

Exactly the same as the previous variation on dip straight body to handstand except on the rings. Like the previous two skills the rings must be turned out to control this skill in the ascent phase.
At the bottom of the dip with the rings turned out, the skill is initiated by pushing the shoulders forward so that the hands will center ncar the stomach / hips. As the body approaches parallel with the bars, we will be in a deep semi-elbow lever position. This is a hybrid between a planche pushup and a maltese pushup.
We want to keep leaning forward and opening the elbow angle so that the feet keep rising until we hit close to a shoulder stand on the rings. From there i i just the bottom part of the freestanding handstand pushup.
The most difficult phase is at the bottom of the skill, but make sure to keep good form. From there just develop the strength and figure out how manipulate that elbow angle to appropriately allow us to bring the body overhead. When this skill becomes comfortable you have become a master of bent arm press handstands and completed quite the milestone. Congratulations!
Now to add a weight vest...
The straight-arm press handstand variations are extremely underutilized in non-gymnastics scenarios. Everyone wants to obtain cool skills like handstand pushups and static holds like the planche, but very few have the dedication to commit to achieving both the strength and flexibility for this skill set progression.
It is unfortunate that this is the case because the strength and control that we can gain from the variety of straight-arm presses actually help significantly with the development of other straight-arm pressing skills such as the planche.
Thus, if we have any aspirations for planche skills and even most of the other bent arm pressing skills, I would strongly advise developing this set of progressions for pressing first. Learning to control the body from just the shoulders will be so important that we will see benefits from these progressions not only in all of our pressing skills, but most of the pulling skills that require straight arm stabilization such as back levers, front levers, and even the iron cross.

This is the first progression in the series of progressions that will significantly help our active flexibility and shoulder strength.
Wall straddle press handstand eccentrics can be either executed on the floor to with parallettes against the wall. To make it easier, the hands can be moved farther away from the wall at a more oblique angle, Conversely. to progress the intensity the hands can be moved closer.
In this exercise, we start with our backs against the wall in a handstand. Before we start we must make sure we are keeping core tension not arching. From there, to initiate the movement, we will straddle our legs as far as possible.
In the second phase of the movement, we are going to slowly rotate the hips so that our feet start dropping towards the ground, and our groin moves toward our abdominal region. We want to keep the back straight against the wall. If it comes off we will likely fall off of the wall and the exercise will be over. This phase of the movement continues, slowly, until the feet touch the ground.
There are two parts of this movement that require great active flexibility: the straddle within the logs, and the closing of the hips within the groin. Also, keeping that back against the wall takes a lot of core control and shoulder strength.
The difficulty of this skill lies in the need for great active flexibility and its control, while simultaneously having to drive the shoulders hard into the wall to keep the back in position.
We can progress two ways to improve the quality of our repetitions.
These two transitions need to be worked thoroughly before progressing to the next.
Even though it seems like an easy movement, there will likely be cramping for most trainees. And as simple as it is, this is an exercise that requires such a high degree of concentration, strength, and control that will make most people break into a heavy sweat after performing just a couple of reps. This is all for a basic gymnastics skill with a Level of 5. This is probably the hardest level 5 skill on the progression charts, but also it is one of the most critical to develop for straight-arm strength.
Even a "small" 5-10 degree bend in the elbows will make the movement about 10-30% easier. Resist the urge. This is why gymnastics coaches do not tcach any bent arm pressing until straight-arm pressing is learned, since reinforeing bent arms during a press is a bad habit that is hard to eliminate,
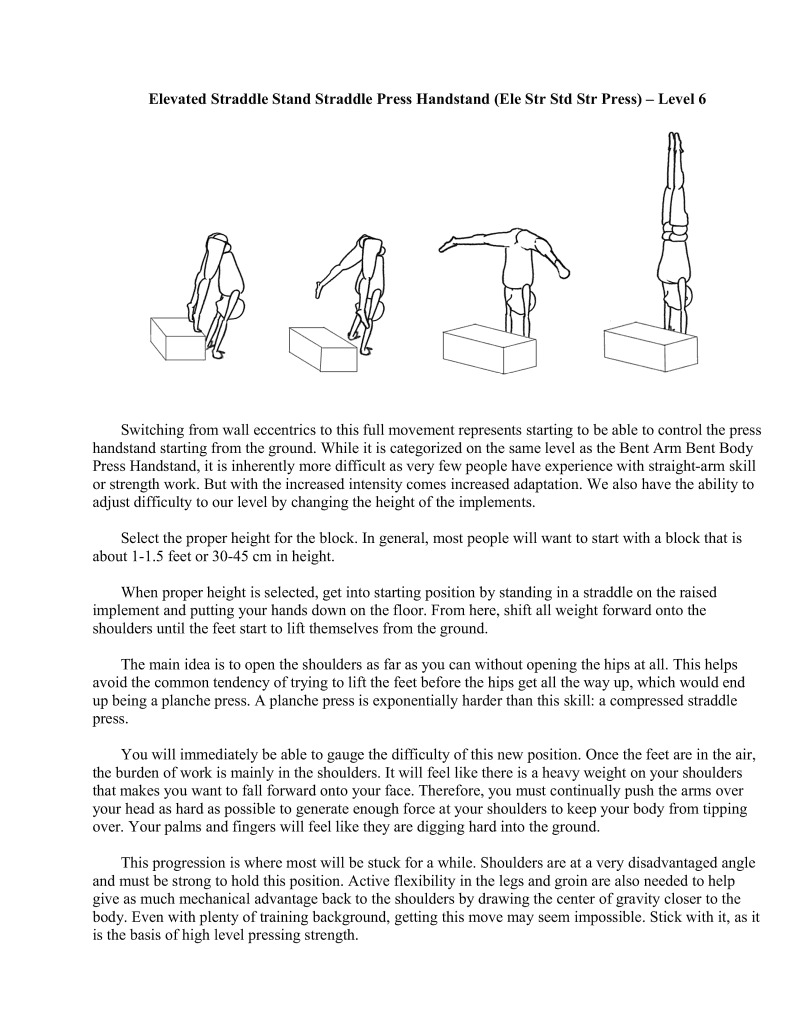
Switching from wall eccentrics to this full movement represents starting to be able to control the press handstand starting from the ground. While it is categorized on the same level as the Bent Arm Bent Body Press Handstand, it is inherently more difficult as very few people have experience with straight-arm skill or strength work. But with the increased intensity comes increased adaptation. We also have the ability to adjust difficulty to our level by changing the height of the implements.
Select the proper height for the block. In general, most people will want to start with a block that is about 1-1.5 feet or 30-45 cm in height.
When proper height is selected, get into starting position by standing in a straddle on the raised implement and putting your hands down on the floor. From here, shift all weight forward onto the shoulders until the feet start to lift themselves from the ground.
The main idea is to open the shoulders as far as you can without opening the hips at all. This helps avoid the common tendency of trying to lift the fet before the hips get all the way up, which would end up being a planche press. A planche press is exponentially harder than this skill: a compressed straddle press.
You will immediately be able to gauge the difficulty of this new position. Once the feet are in the air, the burden of work is mainly in the shoulders. It will feel like there is a heavy weight on your shoulders that makes you want to fall forward onto your face. Therefore, you must continually push the arms over your head as hard as possible to generate enough force at your shoulders to keep your body from tipping over. Your palms and fingers will feel like they are digging hard into the ground
This progression is where most will be stuck for a while. Shoulders are at a very disadvantaged angle and must be strong to hold this position. Active flexibility in the legs and groin are also needed to help give as much mechanical advantage back to the shoulders by drawing the center of gravity closer to the body. Even with plenty of training background, getting this move may seem impossible. Stick with it, as it is the basis of high level pressing strength.
If truly needed, get someone to help spot the skill at the hips from behind. They can brace our shoulders with their knees, and move the hips to get the legs up while forcing us to maintain a good body position.
Continue to lower the height of the implement (and consequentially the feet) as strength and flexibility allows. Once we are able to lift the feet from the floor, be sure to lft slowly. Use the lower back to help control the ascent of the legs, and make sure to keep the chest open and the stomach tight to keep the back aligned
When the angle of arms to torso exactly matches the angle of thighs to torso, you are approaching the top. Exert the shoulders even harder at this point to finish with the straight vertical straddle handstand position, and then top that off by cleanly bringing the legs together from straddle.
If everything is starting to fall into place, but moving the legs together from the straddle handstand to full handstand is troublesome, negatives of this movement away from the wall are a great way to seal the gap. Additionally, practice of straddle handstands may prove uscful.
Even a "small" 5-10 degree bend in the elbows will make the movement about 10-30% easier. Resist the urge. This is why gymnastics coaches do not teach any bent arm pressing until straight-arm pressing is learned because reinforcing bending the arms during a press is a bad habit that is hard to eliminate.
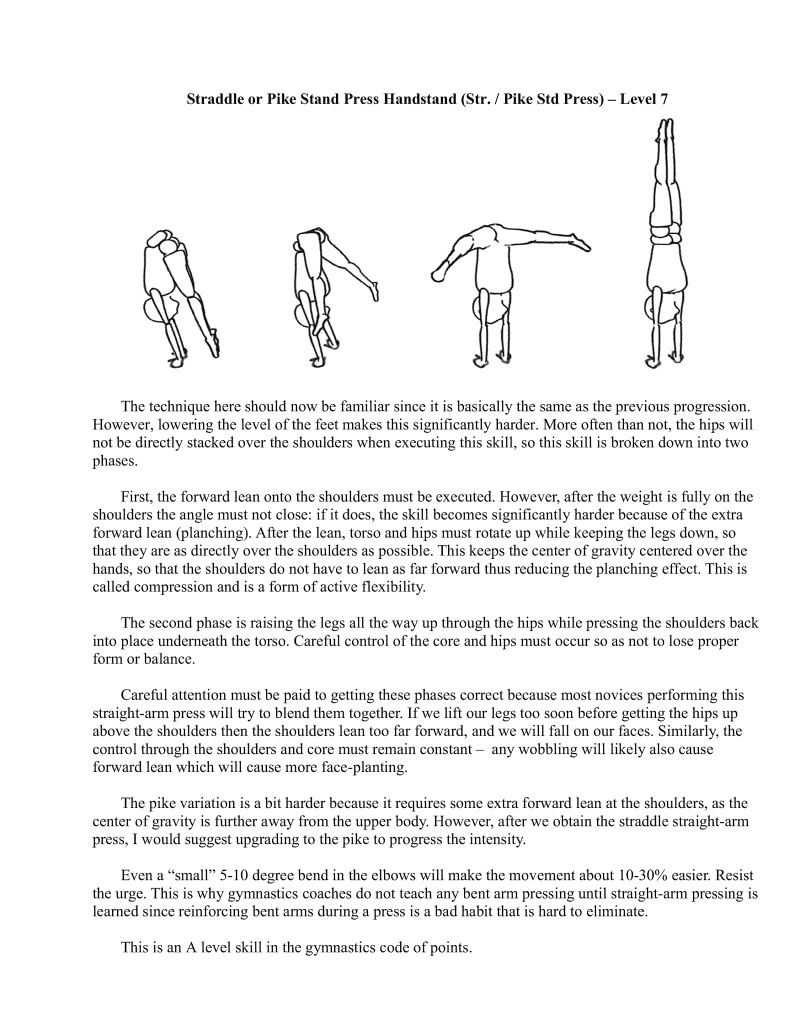
The technique here should now be familiar since it is basically the same as the previous progression.
However, lowering the level of the feet makes this significantly harder. More often than not, the hips will not be directly stacked over the shoulders when executing this skill, so this skill is broken down into two phases.
First, the forward lean onto the shoulders must be executed. However, after the weight is fully on the shoulders the angle must not close: if it does, the skill becomes significantly harder because of the extra forward lean (planching). After the lean, torso and hips must rotate up while keeping the legs down, so that they are as directly over the shoulders as possible. This keeps the center of gravity centered over the hands, so that the shoulders do not have to lean as far forward thus reducing the planching effect. This is called compression and is a form of active flexibility.
The second phase is raising the legs all the way up through the hips while pressing the shoulders back into place underneath the torso. Careful control of the core and hips must occur so as not to lose proper form or balance.
Careful attention must be paid to getting these phases correct because most novices performing this straight-arm press will try to blend them together. If we lift our legs too soon before getting the hips up above the shoulders then the shoulders lean too far forward, and we will fall on our faces. Similarly, the control through the shoulders and core must remain constant — any wobbling will likely also cause forward lean which will cause more face-planting.
The pike variation is a bit harder because it requires some extra forward lean at the shoulders, as the center of graviy is further away from the upper body. However, after we obiain the straddle straight-arm press, | would suggest upgrading to the pike to progress the intensity.
Even a "small" 5-10 degree bend in the elbows will make the movement about 10-30% easicr. R the urge. This is why gymnastics coaches do not teach any bent arm pressing until straight-arm pressing is learned since reinforcing bent arms during a press is a bad habit that is hard to el
This is an A level skill in the gymnastics code of points.
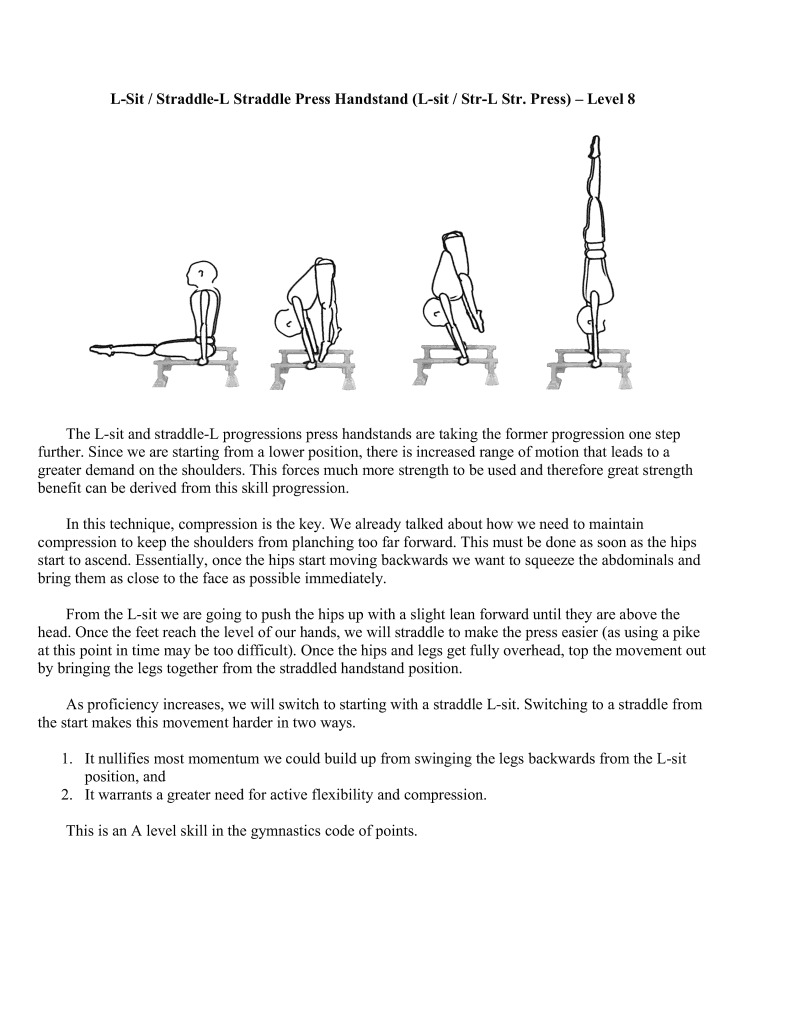
The L-Sit and straddle-L progressions press handstands are taking the former progression one step further. Since we are starting from a lower position, there is increased range of motion that leads to greater demand on the shoulders. This forces much more strength to be used and therefore great strength benefit can be derived from this skill progression.
In this technique, compression is the key. We already talked about how we need to maintain compression to keep the shoulders from planching too far forward. This must be done as soon as the hips start to ascend. Essentially, once the hips start moving backwards we want to squeeze the abdominals and bring them as close to the face as possible immediately.
From the L-sit we are going to push the hips up with a slight lean forward until they are above the head. Once the feet reach the level of our hands, we will straddle to make the press easier (as using a pike at this point in time may be too difficult). Once the hips and legs get fully overhead, top the movement out by bringing the legs together from the siraddled handstand position.
As proficiency increases, we will switch to starting with a straddle L-sit. Switching to a straddle from the start makes this movement harder in two ways.
This is an A level skill in the gymnastics code of points.
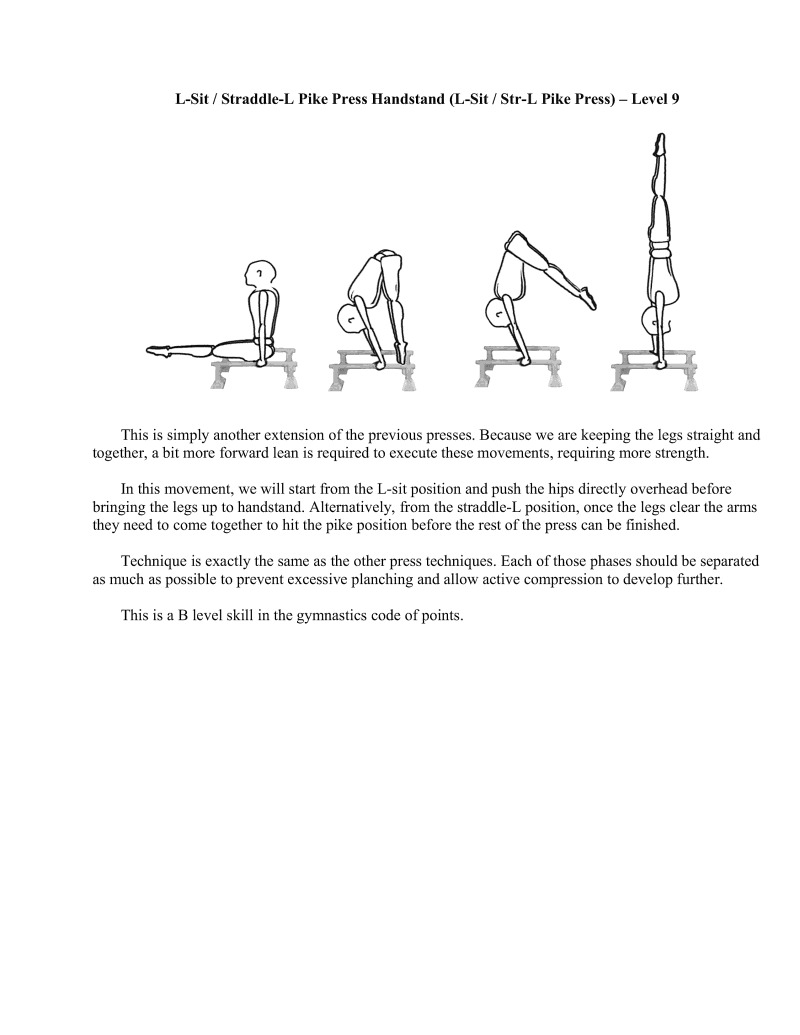
This is simply another extension of the previous presses. Because we are keeping the legs straight and together, a bit more forward lean is required to execute these movements, requiring more strength.
In this movement, we will start from the L-sit position and push the hips directly overhead before bringing the legs up to handstand. Alternatively, from the straddle-L position, once the legs they need to come together to hit the pike position before the rest of the press can be finished.
Technique is exactly the same as the other press techniques. Each of those phases should be separated as much as possible to prevent excessive planching and allow active compression to develop further.
This is a B level skill in the gymnastics code of points.
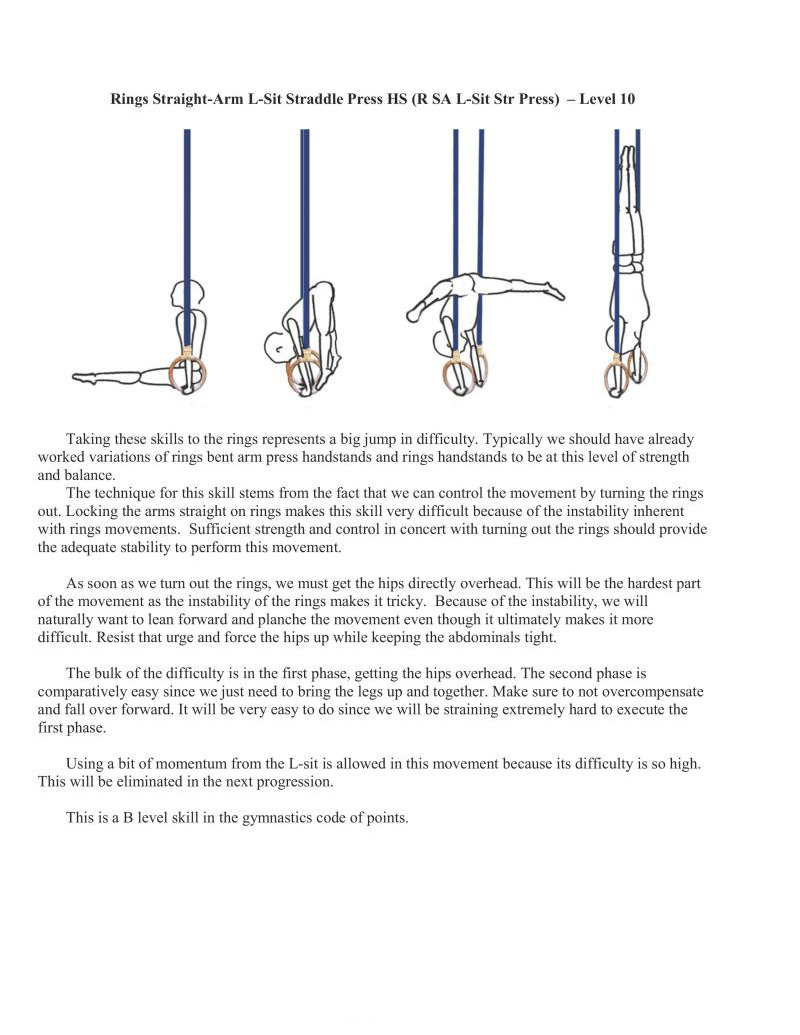
Taking these skills to the rings represents a big jump in difficulty. Typically we should have already worked variations of rings bent arm press handstands and rings handstands to be at this level of strength and balance.
The technique for this skill stems from the fact that we can control the movement by tuming the rings out. Locking the arms straight on rings makes this skill very difficult because of the instability inherent with rings movements. Sufficient strength and control in concert with turning out the rings should provide the adequate stability to perform this movement.
As soon as we turn out the rings, we must get the hips dircctly overhead. This will be the hardest part of the movement as the instability of the rings makes it tricky. Because of the instability, we will naturally want to lean forward and planche the movement even though it ultimately makes it more difficult. Resist that urge and force the hips up while keeping the abdominals tigh.
The bulk of the difficulty is in the first phase, getting the hips overhead. The second phase is comparatively easy since we just need to bring the legs up and together. Make sure to not overcompensate and fall over forward. It will be very easy to do since we will be straining extremely hard to execute the first phase.
Using a bit of momentum from the L-sit is allowed in this movement because its difficulty is so high. This will be eliminated in the next progression.
This is a B level skill in the gymnastics code of points.
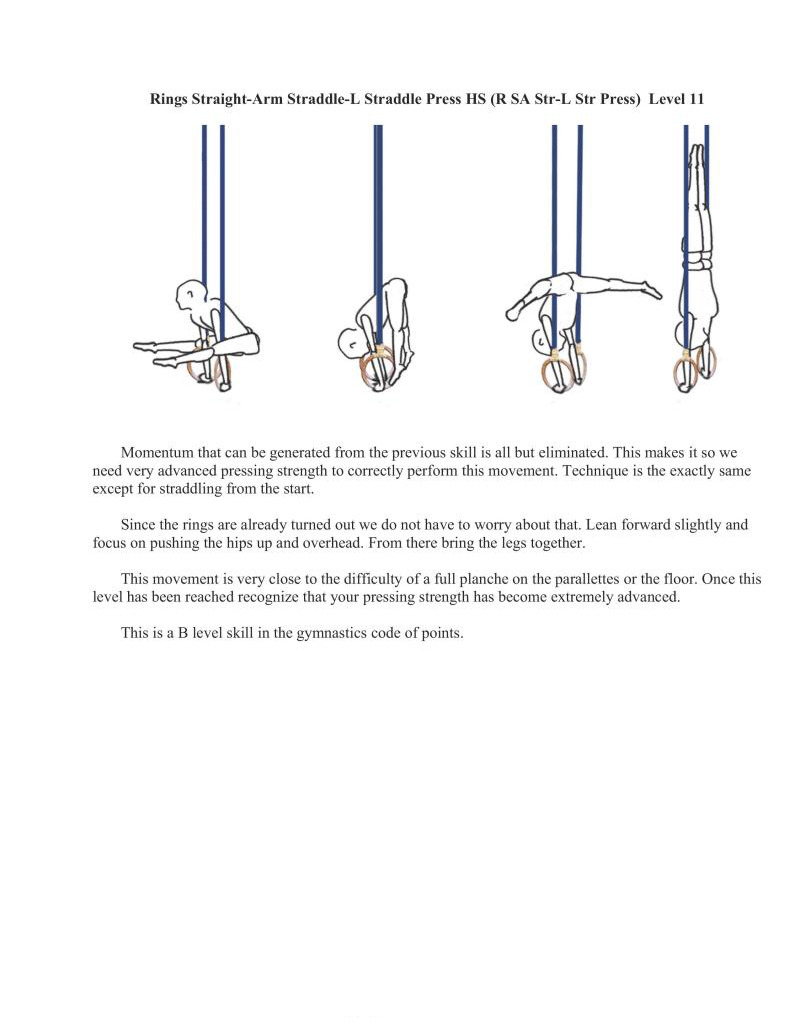
Momentum that can be generated from the previous skill is all but eliminated. This makes it 50 we need very advanced pressing strength to correctly perform this movement, Technique is the exactly same except for straddling from the start
Since the rings are already turned out we do not have to worry about that. Lean forward slightly and focus on pushing the hips up and overhead. From there bring the legs together.
This movement is very close to the difficulty of a full planche on the parallettes or the floor. Once this level has been reached recognize that your pressing strength has become extremely advanced
This is a B level skill in the gymnastics code of points.
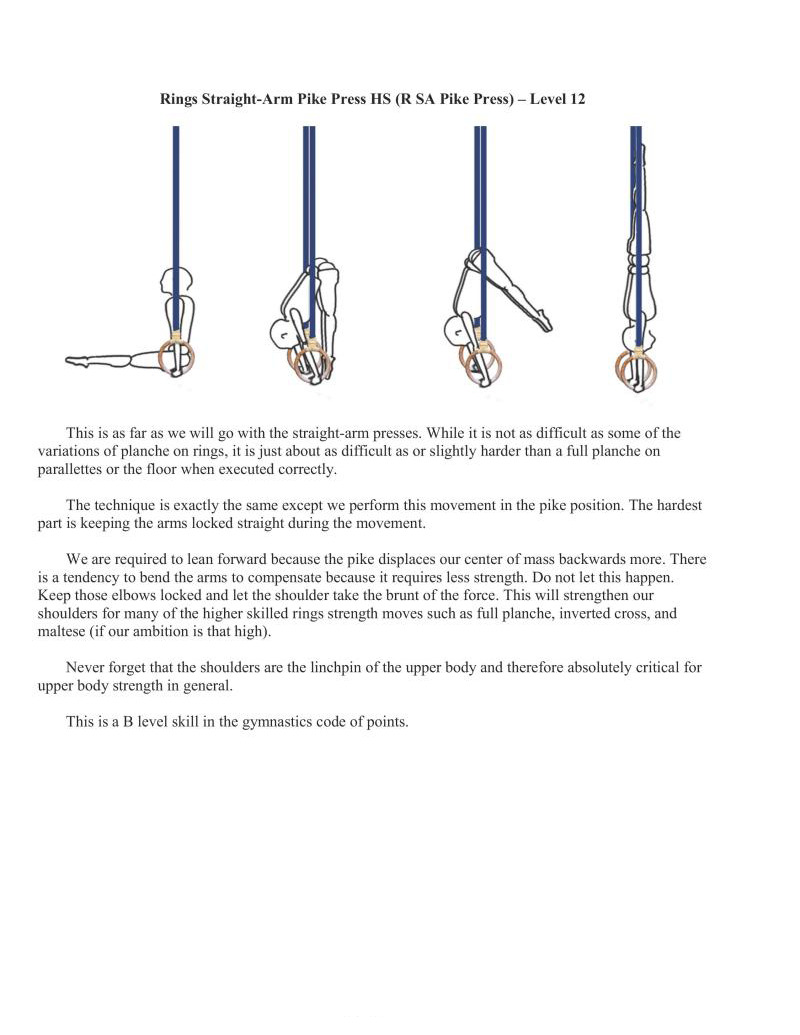
This is as far as we will go with the straight-arm presses. While it is not as difficult as some of the variations of planche on rings, it is just about as difficult as or slightly harder than a full planche on parallettes or the floor when executed correctly.
The technique is exactly the same except we perform this movement in the pike position. The hardest part is keeping the arms locked straight during the movement.
We are required to lean forward because the pike displaces our center of mass backwards more. There i a tendency to bend the arms to compensate because it requires less strength. Do not let this happen. Keep those elbows locked and let the shoulder take the brunt of the force. This will strengthen our shoulders for many of the higher skilled rings strength moves such as full planche, inverted cross, and maltese (if our ambition is that high).
Never forget that the shoulders are the linchpin of the upper body and thercfore absolutely critical for upper body strength in general.
This isa B level skill in the gymnastics code of points.
Experience with training the V-sit and Manna has shown that there are approximately four different phases and within each we should focus on different concepts. I will group these skills into phases for cach step in the progression, to avoid vague advice such as, "You just need to go higher".
If you are following along with the chart, I marked varying angles fairly arbitrarily just because it will give us a decent measure of where we are on the A-C range in our development. This is helpful since the Vesit has an A Level and the manna has a C Level in the gymnastics Code of Points. In doing so I tried to keep the difficulty on the progression charts true to their gymnastics origins while simultaneously presenting indicators for progress between each phase. This applies to all exercises I listed, not just this specific progression.
We notice on the chart that there is actually a big variation in the angles per level. Near the beginning there is a big jump up to 100 degrees and then it keeps on slowly decreasing from there. This is because as the angle decreases, the torque increases exponentially (especially with other skills like this, such as iron cross and planche). Since the muscles move outside of the optimal range of motion the force output of the muscles in that range decrease. This makes it so that every increase in about 30 degrees approximately doubles the difficulty in execution.
It is my sincere hope that anyone who wants to begin serious bodyweight strength training at least attempt to learn the V-sit and manna progression because not only are the skills pleasing to the eye, they are also excellent for working the muscles in the posterior shoulder and scapular areas which are needed for shoulder health.
Because gymnastics based bodyweight strength training is a very "hands in front of the body" endeavor, it lends itself to build muscular imbalances in the front of the body that often lead to the caveman look. Upper crossed syndrome — shoulders hunched forwards, neck craned out - not only looks bad but it also leads to increased potential for injury, something that we are trying to avoid.
Training this serics of progressions will help keep those shoulders healthy and lead towards a longer training career, and more impressive feats including these feats themselves. Good luck.
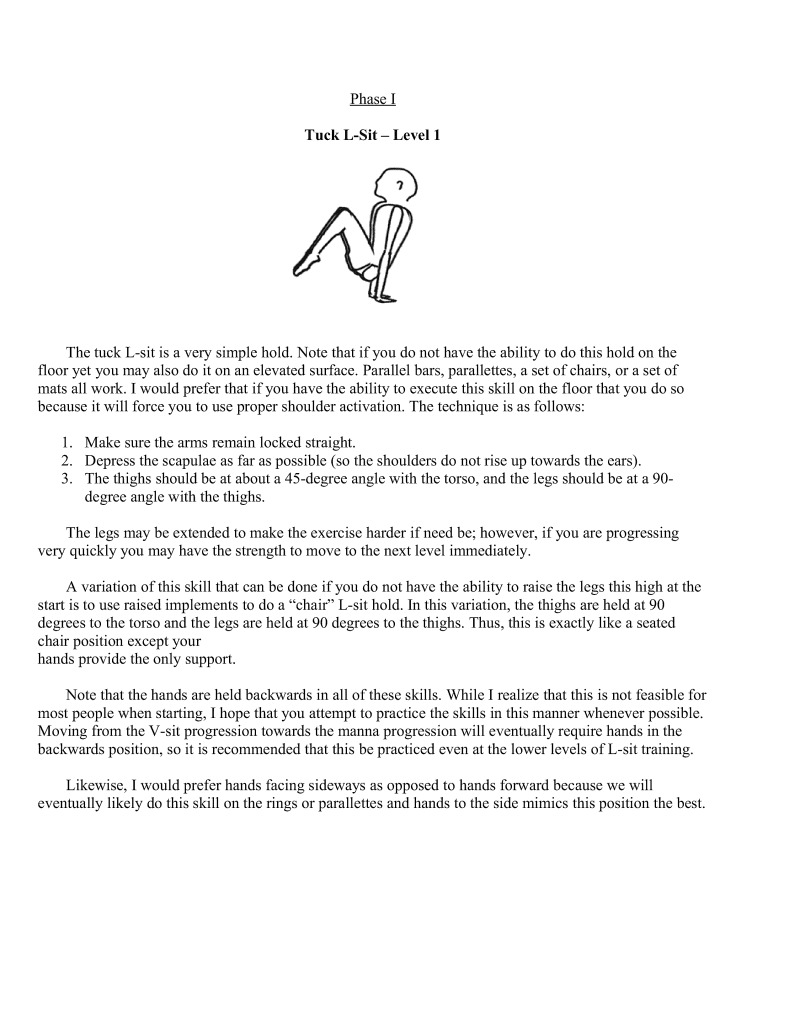
The tuck L-sit is a very simple hold. Note that if you do not have the ability to do this hold on the floor yet you may also do it on an elevated surface. Parallel bars, parallettes, a set of chairs, or a set of mats all work. I would prefer that if you have the ability to execute this skill on the floor that you do so because it will force you to use proper shoulder activation. The technique is as follows:
The legs may be extended to make the exercise harder if need be; however, if you are progressing very quickly you may have the strength to move to the next level immediately.
A variation of this skill that can be done if you do not have the ability to raise the legs this high at the start i 1o use raised implements to do a "chair" L-sit hold. In this variation, the thighs are held at 90 degrees to the torso and the legs are held at 90 degrees to the thighs. Thus, this is exactly like a seated chair position except your hands provide the only support.
Note that the hands are held backwards in all of these skills. While I realize that this is not feasible for most people when starting, I hope that you attempt to practice the skills in this manner whenever possible. Moving from the V-sit progression towards the manna progression will eventually require hands in the backwards position, so it is recommended that this be practiced even at the lower levels of L-sit raining.
Likewise, I would prefer hands facing sideways as opposed to hands forward because we will eventually likely do this skill on the rings or paralleties and hands to the side mimics this position the best.
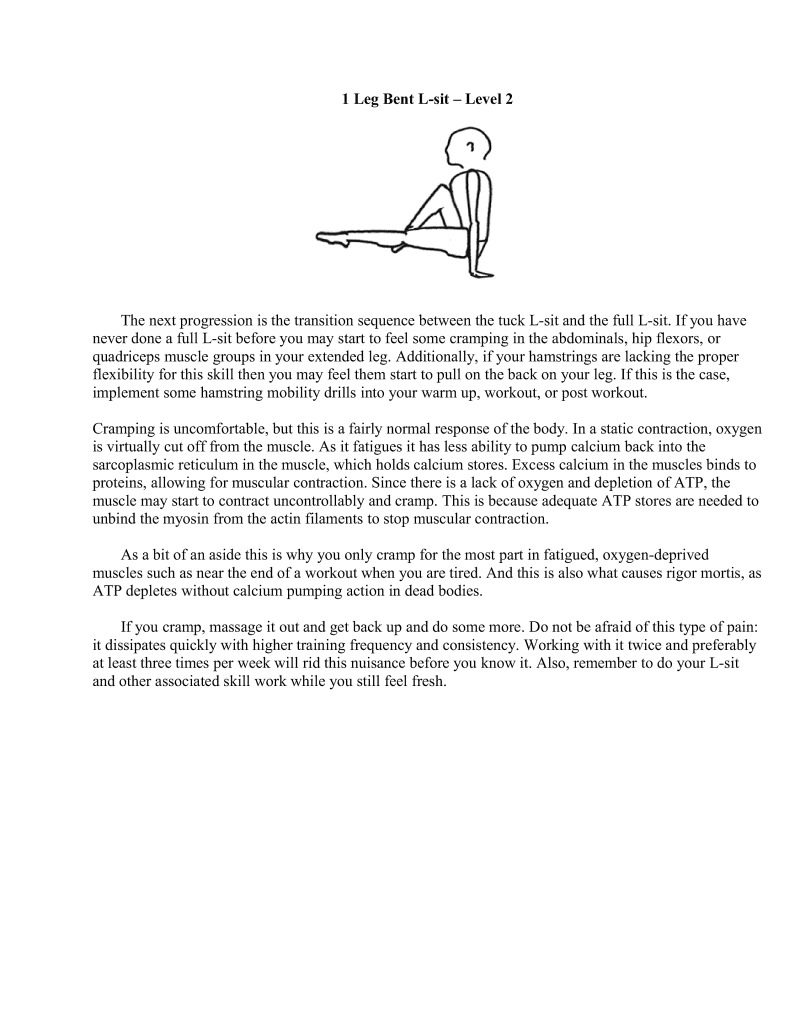
The next progression is the transition sequence between the tuck L-sit and the full L-sit. If you have never done a full L-sit before you may start to feel some cramping in the abdominals, hip flexors, or quadriceps muscle groups in your extended leg. Additionally, if your hamstrings are lacking the proper flexibility for this skill then you may feel them start to pull on the back on your leg. If this is the case, implement some hamstring mobility drills into your warm up, workout, or post workout.
Cramping is uncomfortable, but this is a fairly normal response of the body. In a static contraction, oxygen is virtually cut off from the muscle. As it fatigues it has less ability to pump calcium back into the sarcoplasmic reticulum in the muscle, which holds calcium stores. Excess calcium in the muscles binds to proteins, allowing for muscular contraction. Since there is a lack of oxygen and depletion of ATP, the muscle may start to contract uncontrollably and cramp. This is because adequate ATP stores are needed to unbind the myosin from the actin filaments to stop museular contraction.
As abit of an aside this is why you only cramp for the most part in fatigued, oxygen-deprived muscles such as near the end of a workout when you are tired. And this is also what causes rigor mortis, as ATP depletes without caleium pumping action in dead bodies.
If you cramp, massage it out and get back up and do some more. Do not be afraid of this type of pain: it dissipates quickly with higher training frequency and consistency. Working with it twice and preferably at least three times per week will rid this nuisance before you know it. Also, remember to do your L-sit and other associated skill work while you still feel fresh.
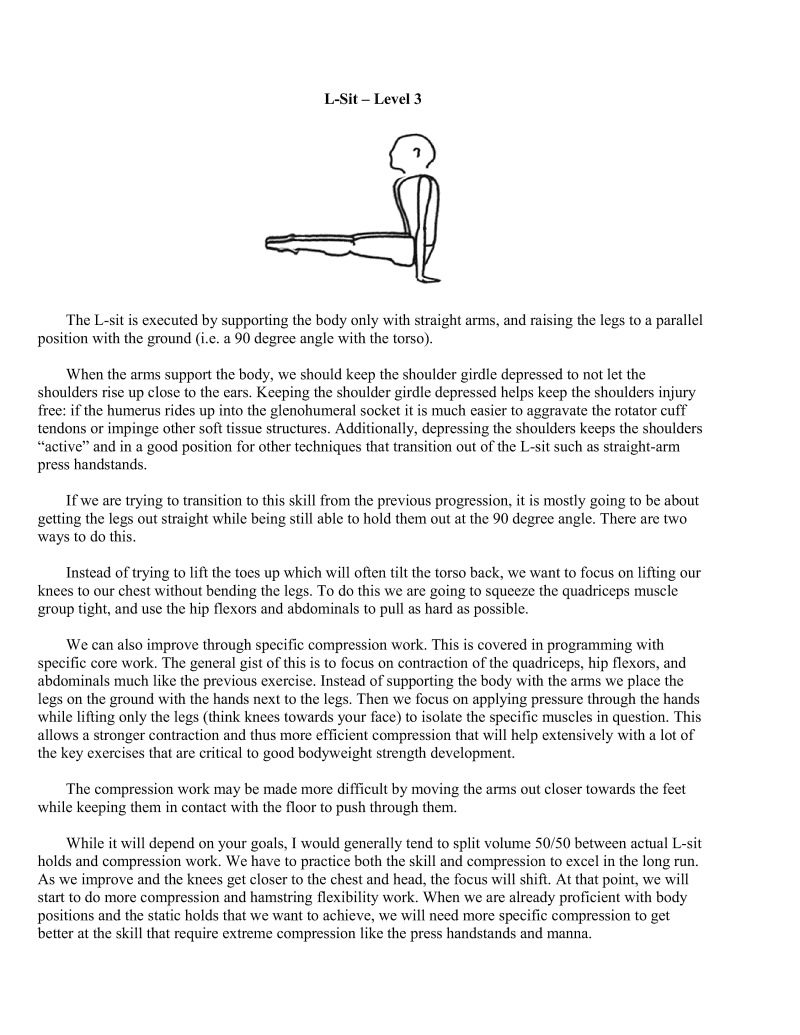
The L-sit is executed by supporting the body only with straight arms, and raising the legs to a parallel position with the ground (i.c. a 90 degree angle with the torso).
When the arms support the body, we should keep the shoulder girdle depressed to not let the shoulders rise up close to the cars. Keeping the shoulder girdle depressed helps keep the shoulders injury free: if the humerus rides up into the glenohumeral socket it is much casicr to aggravate the rotator cuff tendons or impinge other soft issue structures. Additionally, depressing the shoulders keeps the shoulders active" and in a good position for other techniques that transition out of the L-sit such is straight-arm press handstands.
If we are trying to transition to this skill from the previous progression, it is mostly going to be about getting the legs out straight while being still able to hold them out at the 90 degree angle. There are two ways 10 do this.
Instead of trying to lift the toes up which will often ilt the torso back, we want to focus on lifting our knees to our chest without bending the legs. To do this we are going to squeeze the quadriceps muscle group tight, and use the hip flexors and abdominals to pull as hard as possible.
We can also improve through specific compression work. This is covered in programming with specific core work. The general gist of this is to focus on contraction of the quadriceps, hip flexors, and abdominals much like the previous exercise. Instead of supporting the body with the arms we place the legs on the ground with the hands next to the legs. Then we focus on applying pressure through the hands while lifting only the legs (think knces towards your face) to isolate the specific muscles in question. This allows a stronger contraction and thus more efficient compression that will help extensively with a lot of the key exercises that are critical to good bodyweight strength development.
The compression work may be made more difficult by moving the arms out closer towards the feet while keeping them in contact with the floor to push through them.
While it will depend on your goals, I would generally tend to split volume 50/50 between actual L-sit holds and compression work. We have to practice both the skill and compression to excel in the long run. As we improve and the knees get closer to the chest and head, the focus will shift. At that point, we will start to do more compression and hamstring flexibility work. When we are already proficient with body positions and the static holds that we want to achieve, we will need more specific compression to get better at the skill that require extreme compression like the press handstands and manna,
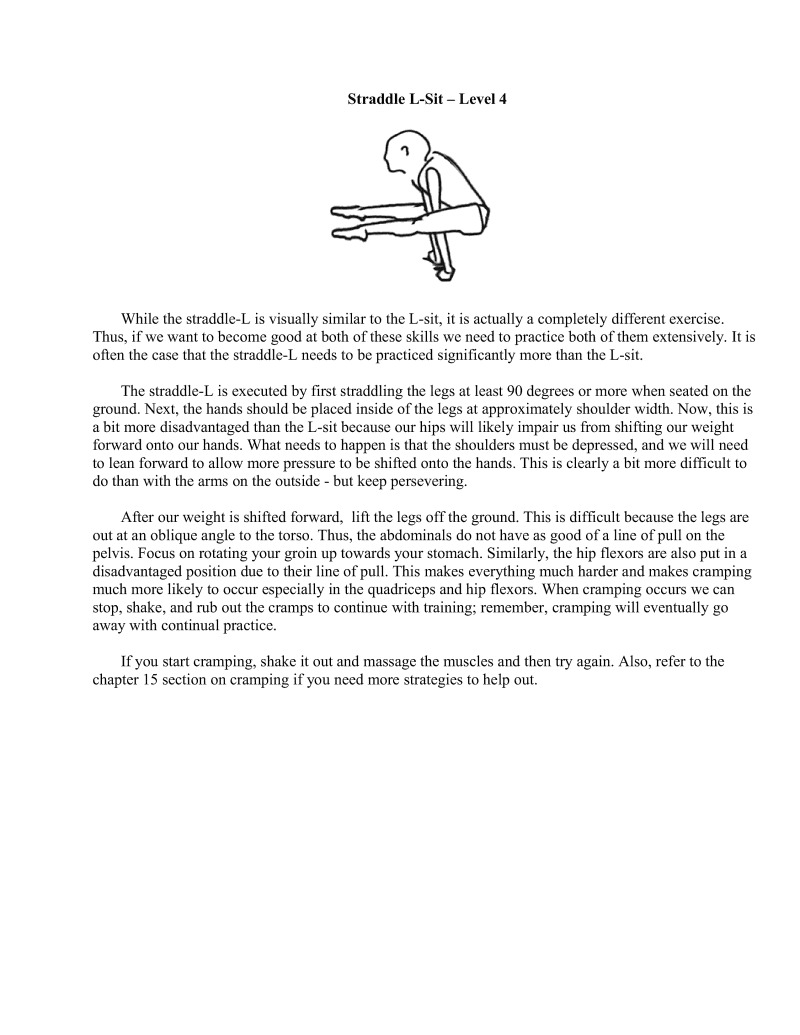
While the straddle-L is visually similar to the L-sit, it is actually a completely different exercise. Thus, if we want to become good at both of these skills we need to practice both of them extensively. It is often the case that the straddle-L needs to be practiced significantly more than the L-sit.
The straddle-L is executed by first straddling the legs at least 90 degrees or more when seated on the ground. Next, the hands should be placed inside of the legs at approximately shoulder width. Now, this is a bit more disadvantaged than the L-sit because our hips will likely impair us from shifting our weight forward onto our hands. What nceds to happen is that the shoulders must be depressed, and we will need to lean forward to allow more pressure to be shifted onto the hands. This is clearly a bit more difficult to do than with the arms on the outside - but keep persevering.
after our weight is shified forward, lift the legs off the ground. This is difficult because the legs are outat an oblique angle to the torso. Thus, the abdominals do not have as good of a line of pull on the pelvis. Focus on rotating your groin up towards your stomach. Similarly, the hip flexors are also put in a disadvantaged position due to their line of pull. This makes everything much harder and makes cramping much more likely to occur especially in the quadriceps and hip flexors. When cramping occurs we can stop, shake, and rub out the cramps to continue with training; remember, cramping will eventually go away with continual practice.
If you start cramping, shake it out and massage the muscles and then try again. Also, refer to the chapter 15 section on cramping if you need more strategies to help out.
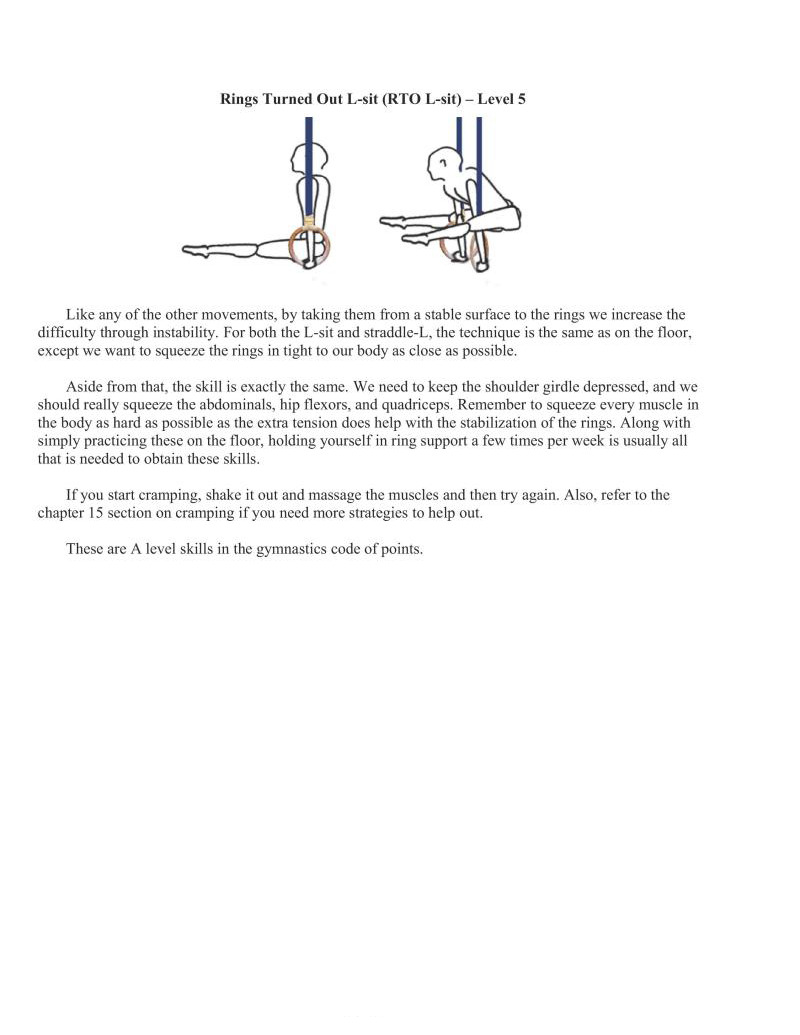
Like any of the other movements, by taking them from a stable surface to the rings we increase the difficulty through instability. For both the L-sit and straddle-L, the technique is the same as on the floor, except we want to squeeze the rings in tight to our body is close as possible.
Aside from that, the skill is exactly the same. We need to keep the shoulder girdle depressed, and we should really squeeze the abdominals, hip flexors, and quadriceps. Remember to squeeze every muscle in the body as hard as possible as the extra tension does help with the stabilization of the rings. Along with simply practicing these on the floor, holding yourself in ring support a few times per week is usually all that is needed to obtain these skills.
If you start cramping, shake it out and massage the muscles and then try again. Also, refer to the chapter 15 section on cramping if you need more strategies to help out.
These are A level skills in the gymnastics code of points.
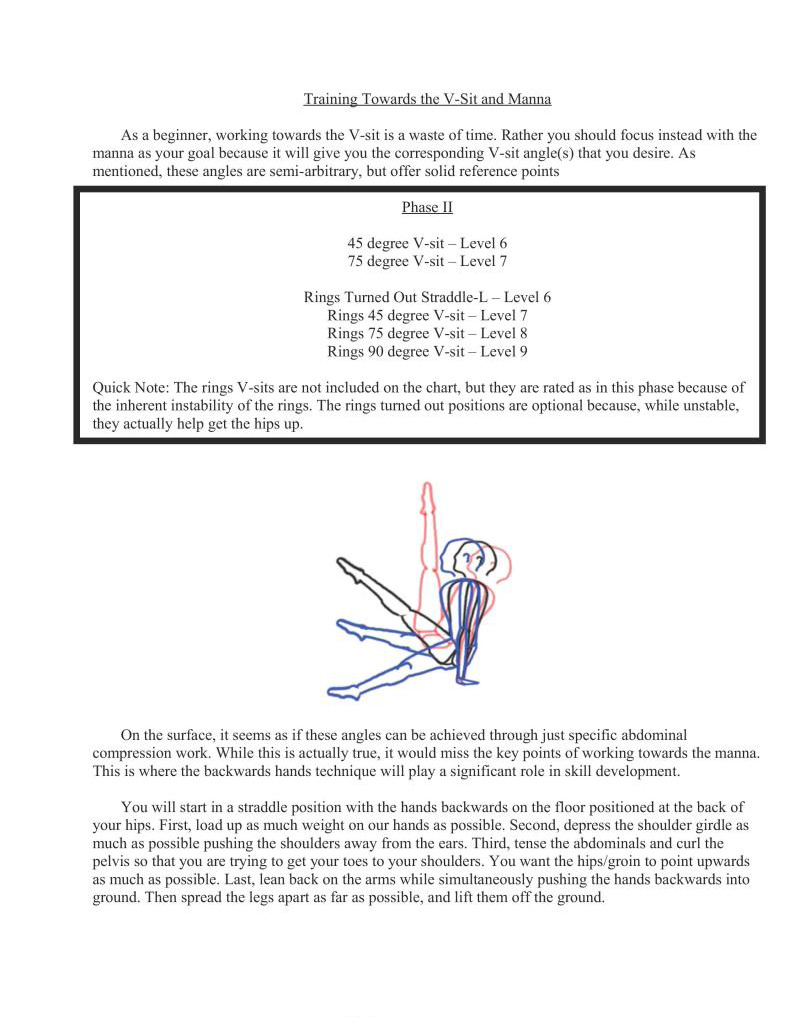
As a beginner, working towards the V-sit is a waste of time. Rather you should focus instead with the manna as your goal because it will give you the corresponding V-sit angle(s) that you desire. As mentioned, these angles are semi-arbitrary, but offer solid reference points
Quick Note: The rings V-sits are not included on the chart, but they are rated as in this phase because of the inherent instability of the rings. The rings turned out positions are optional because, while unstable, they actually help get the hips up.
On the surface, it seems as if these angles can be achieved through just specific abdominal compression work. While this is actually true, it would miss the key points of working towards the manna.
This is where the backwards hands technique will play a significant role in skill development. You will start in a straddle position with the hands backwards on the floor positioned at the back of your hips. First, load up as much weight on our hands as possible. Second, depress the shoulder girdle as much as possible pushing the shoulders away from the ears. Third, tense the abdominals and curl the pelvis so that you are trying to get your toes to your shoulders. You want the hips/groin to point upwards as much as possible, Last, lean back on the arms while simultaneously pushing the hands backwards into ground. Then spread the legs apart as far as possible, and lift them off the ground.

We want to get as proficient as possible with this vital position. Depressing the shoulder girdle consistently and rounding the back and pelvis are the main focus as this position will be critical all the way up to the mannaiitself.
After this position has been established and reinforced, the progression of the manna is all about pushing the hips forward. We have two mental cues used to achieve this.
Depending on your compression abilities, you might be able to lft the legs up into the V-sit to 45 or 75 degrees right away. Do not practice this now in favor of learning how to progress into the next phase. Instead, couple compression work with the above hips forward training.
Thus, we can think of this phase in terms of terms of two important concepts. We want to focus on this hold to reinforce the hip push, and we want to better improve our core compression. Each of those factors is critical not only to the development of the V-sit and manna but to extremely good core strength and control.
Supplementary work will work wonders since this is such an inherently difficult progression. These are two recommended supplements to keep in mind when training manna
German Hang / Skin the Cat - an excellent shoulder stretching exercise that puts the shoulder into extreme hyperextension. Ultimately, the manna requires excellent shoulder mobility in that range. German hangs work well especially right before any manna training attempts because stretching out the opposing muscles (namely the pectorals, latissimus dorsi, and anterior deltoids) statically for a period of 30+ seconds helps to inhibit the force generation in those muscles. I have personally experienced that it is possible to get a 10-15 degree greater angle of improvement in the next attempt after German Hang.
Hamstrings Stretching - In the manna we are pushing up into a compressed straddle position, stretching in the straddle position is preferable. Any hamstring stretching will help. Once we advance to of manna training by pushing the hips forward more significantly, the inhibition (looseness) gs will allow a much needed deeper compression by letting the quadriceps, hip flexors, and abdominals pull the knees closer to the face with less self-resistance. This allows us a higher angle to be achieved, and actually improves the balance of the skill. Compression moves the center of mass closer to the hands allowing the torque generated on the arms and shoulders to lessen.
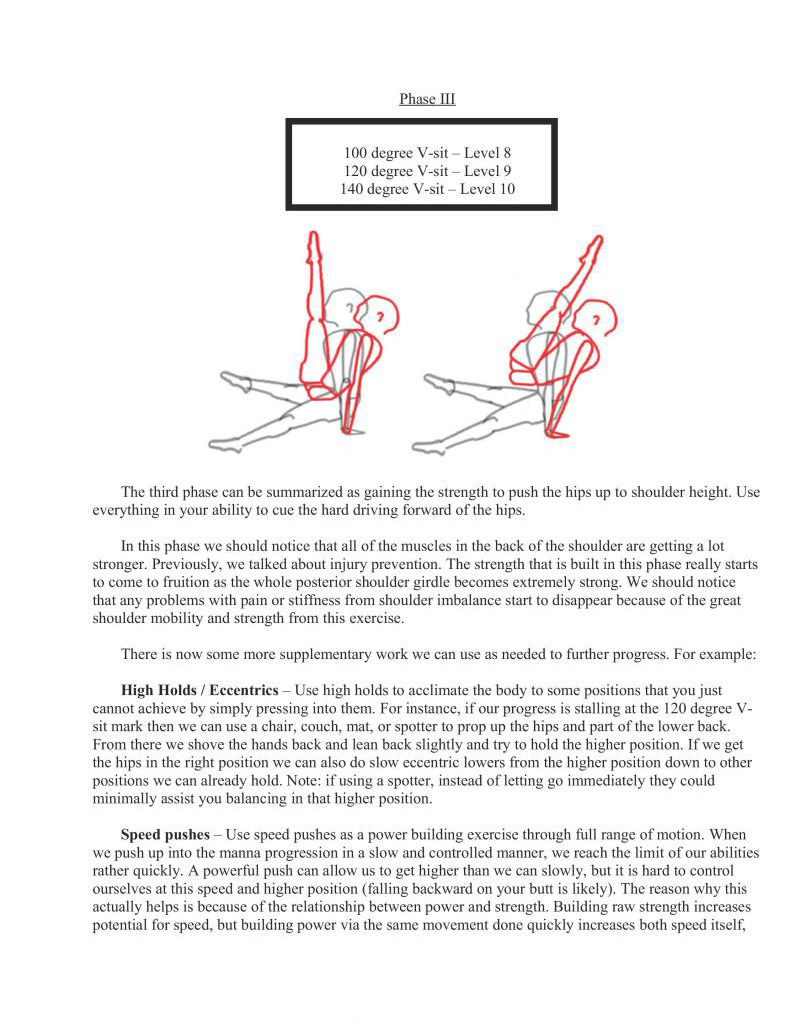
Phase III
The third phase can be summarized as gaining the strength to push the hips up to shoulder height. Use everything in your ability to cue the hard driving forward of the hips.
In this phase we should notice that all of the muscles in the back of the shoulder are getting a lot stronger. Previously, we talked about injury prevention. The strength that is built in this phase really to come to fruition as the whole posterior shoulder girdle becomes extremely strong. We should notice
that any problems with pain or stiffness from shoulder imbalance start to disappear because of the great shoulder mobility and strength from this exercise.
There is now some more supplementary work we can use as needed to further progress. For example:
High Holds / Eccentrics — Use high holds to acclimate the body to some positions that you just cannot achicve by simply pressing into them. For instance, if our progress is stalling at the 120 degree V- sit mark then we can use a chair, couch, mat, or spotter to prop up the hips and part of the lower back. From there we shove the hands back and lean back slightly and try to hold the higher position. If we get the hips in the right position we can also do slow eccentric lowers from the higher position down to other positions we can already hold. Note: if using a spotter, instead of letting go immediately they could minimally assist you balancing in that higher position.
Speed pushes — Use speed pushes as a power building exercise through full range of motion. When we push up into the manna progression in a slow and controlled manner, we reach the limit of our abilities rather quickly. A powerful push can allow us to get higher than we can slowly, but it is hard to control ourselves at this speed and higher position (falling backward on your butt is likely). The reason why this actually helps is because of the relationship between power and strength. Building raw strength increases potential for speed, but building power via the same movement done quickly increases both speed itself,

and strength as well. However, doing quick movements avoids building the static stability and sacrifices total volume through less time spent being held in the position.
Thus a combination of presses, high holds, and speed pushes best contributes to success with achieving manna.
Presses into the top holds and high holds should compose most of the training volume. With most end range of motion skills, the best way to b g in that end range of motion. There are three reasons for this

Getting the hips up above shoulder height, the last phase of the manna, is by far the most difficult,
At this point, with the high holds approach we may actually be able to hold the manna. Similarly, if we are a gymnast or other athlete it may be possible to swing to manna or kick up to the manna position and hold it. At the same time, it is likely compression and hamstring flexibility has progressed as far as it needs to and also merely needs be maintained. If this is the case, you will merely need to maintain flexibility and compression from this point on.
We still may need to keep working on the press into manna as the strength built from this technique will assist in injury prevention, continue to improve strength in extension, reinforce proper fundamental positions, and help with working progressions beyond this.
Speed pushes and regular, slow, controlled pushes should make up the majority of the work at this point. If there is a little more way to go, you can use someone to help the hips get that last litte bit, or do eccentrics from the high holds.
Getting the last 25 degrees will probably be the most frustrating work you will do compared to all of the other holds. Keep plugging away: if you obtain it you will have one of the most rare static strength skills in the world (and healthy shoulders).
This is a C level skill in the gymnastics code of points.
Previous Chapter ... ... Next Chapter