Previous Chapter ... ... Next Chapter
Overcoming Gravity is not intended to diagnose injuries of any kind. If there is a potential injury, schedule an appointment with your doctor, physical therapist, or medical professional. Always listen to the advice of your medical professionalover anything read in this or any other book. These chapters are for informational purposes. If this information is used, it should only be done after consulting with your medical professionals. This book covers a wide variety of topics and will not delve into heavy physiological details. The information contained in this chapter will be presented in a conceptual way. Keep in mind that while the injuries discussed may be the most common, just because you are experiencing and injury in an area described does not mean you necessarily have that particular dysfunction. The goal of this chapter is to expand your knowledge on common problem areas so that you can use correct prehabilitation measures. This information is not to be used in lieu of rehabilitation work. Rehabilitation work requires specific information tailored to your body, rather than the general information presented here.
Tendonitis is an overuse injury where the ability of the tendon to sustain a workload is insufficient. There are many possible ways for it to develop, including muscle imbalances, general overuse, under-recovery, or even sudden injuries. Tendonitis typically develops because connective tissues adapt slower than muscles. As you get stronger, fast progression or a high volume of training may be too much for your connective tissues, even if your muscles are able to handle the workload. Over time this can have negative consequences, which could include tendonitis.
The scientific literature calls any pain and dysfunction of the tendinous structure "tendinopathy." There has been some debate over whether or not stages exist, but if they do, these are the general stages:
The sensitization of the body from soreness and discomfort of the tendon to full-blown pain is usually a continuum rather than a process measurable in stages. You would not be able to determine whether you had tendonitis or tendinosis unless you had a biopsy done and were able to look at your tendon under a microscope. Because of this, you should treat the stages as one continuous stage and incrementally prehabilitate the injury to full health.
Here are some of the most common sites tendonitis can develop while doing bodyweight exercises:
Proper corrective measures far tendonitis will typically be a combination of prehabilitation exercises and those listed in the general health and injury management section. Avoid Aggravating Exercises: Overuse tendonitis gets worse if you continue to do exercises that aggravate it. Listen to your body. Continua! aggravation of an injury will significantly hinder your training.
Avoiding injury-aggravating exercises will salve 95% of potential overuse injuries with no further steps needed. After you substitute an offending exercise for another or drop down a progression, you can always move back into it as your condition improves.
Mobility Work: Recent research shows that in the case of tendonitis, it is much better to perform mobility work than totally resting. Mobility work will promote healing because you are moving the affected area. Your tendons will be worked very lightly, which will not aggravate them further. This will allow any needed remodeling to take place and prevent disuse atrophy.
One to two weeks of mobility work should clear up mild tendonitis because the initial inflammation will promote healing. This does not mean you have to cease working out altogether; just avoid exercises that aggravate the overused area where the tendonitis is present. If this is successful, work your way back into exercise by starting with 40% volume and adding 10% back each week. Note that it is very easy to aggravate a sensitive area again (this is why you only add 10% volume each week). If there are signs of aggravation in regard to making it worse, immediately back off for the day. It is better to be conservative than to develop a chronic condition.
Unfortunately, chronic tendonitis may not respond favorably to mobility work and removing offending exercises. If the tendonitis does not clear up within a few weeks, there is a chance you are dealing with a case that is further along in the tendonitis continuum. This needs to be treated differendy than mild tendonitis: rehabilitation exercises are needed to stimulate the inflammatory process along with massage to promote healing. Any other exercises that aggravate the affected area should be eliminated.
Self-Massage: Massage may help improve tissue quality by helping to release and reorganize the tissue via the body's natural inflammatory processes, as well as break up any potential scar tissues or adhesions that may be limiting proper movement of the affected and surrounding area. The concept of increasing blood flow to the tendon is false in light of current research.
While you should not aggressively massage the tendon area; some massage therapies might help. Cross-friction massage and myofascial release are two common techniques that can be used. Cross-friction massage is oriented perpendicular to a tendon, and myofascial release is oriented parallel to a tendon. If you can locate the muscle that the tendon connects to, you can attempt to loosen it up with the two aforementioned massage techniques. The goal is to loosen up the muscle tissues so that tension is not placed on the tendon at all times, as this may aggravate it.
To ensure the surrounding musculature is operating correctly and not causing excess strain to the affected area, apply cross-friction massage and myofascial release to the area between the joints that surround it. For example, with medial epicondylitis, massage all of the muscles between the shoulder and wrist. With patellar tendonitis, massage all of the muscles between the ankle and hip. If you desire, you can apply very light massage to the tendon as well and see if that helps in the long run. Start out very lightly, as the tendon may be sensitive. Soft tissue work that is too aggressive may further aggravate the injury.
Using alternative manual massage techniques may help. Graston technique, ART or trigger-points therapy, foam rolling, and golf/tennis hall rolling are some methods to consider. It is recommended that you talk to a medical professional to find out what is best for your particular case.
If your doctors clears it, aim for anywhere from five to thirty minutes of massage per day. Most of this should be focused on the muscle. If you find tight muscles with adhesions in the surrounding musculature,

focus on those areas as well. The time of day when you do this does not matter, so you can break this up into a few sessions if need be.
Heat or Contrast Baths: Chapter 15 discussed MEAT vs. RICE and gave various reasons why it. is no longer considered the best treatment far sprains. If excessive swelling is present, use compression and/or anti-inflammatories.
Switching from it. to heat and contrast baths has shown some results in practice. It typically works well to complete two to five 15-minute sessions per day. For contrast baths you can alternate between cold or it. water and hot water every minute. Do this far five to eight rounds.
Light Stretching: Although studies show that stretching does not prevent injuries, it can be used effectively in programs to prehabilitate before an injury and rehabilitate after an injury. This is particularly important in cases of tendonitis where the muscles of the involved tendon may be excessively tight and have a limited range of motion. Pain causes muscles to tighten up, so stretching is generally useful.
Stretching should be aimed at the agonist muscles-the muscles that connect to the tendon in question-because they become tight and short from both pain and overuse, which may contribute to excessive strain on the tendon. On top of that, when there is distinct overuse on one side, there is usually an existing muscle imbalance. This puts stress on the joints and supporting structures like tendons and ligaments. Correcting the imbalance and loosening tight muscles should help get the tissue functioning properly.
Focus your stretching on the agonist muscles connected to the tendon and focus your strengthening far the antagonistic muscles on the opposite side. If you are dealing with medial epicondylitis at the elbow, stretch your forearm flexors and do strengthening work far your forearm extensors. For patellar tendonitis, stretch your quads and strengthen your hamstrings.
Light Eccentric Exercises: Research has consistently proven that eccentric exercises are the most effective protocol far rehabilitation of tendonitis. doing eccentric exercises increases collagen farmation and normalizes dysfunctional tendon structure. Bear in mind that sometimes the musculature at the affected joint will be unable to properly execute a movement due to pain compensation. If this is the case, eccentric exercises also help re-educate your nervous system to fire correctly.
Begin with a very light weight and work on the eccentric portion of the lift slowly and assuredly. The eccentric movement should take five to seven seconds. As you improve significantly, you can add in the concentric portion. Be careful not to overdo it. As stated in Chapter 15, this tends to be a 5121-type tempo. The concentric should be controlled (but not fast) with pauses at the end ranges of movement, and the eccentric should be longer. Start with twenty repetitions per set and work your way up to the thirty to fifty range before you increase intensity or add weight. This allows your body to adapt to the workload, which decreases the risk of making your injury worse and/or re-injuring yourself. do not-to-failure so as not to aggravate any existing injury.
Generally speaking, pain is not an accurate indicator during execution of an exercise in determining if you are doing too much. Rehabilitation may be good with or without pain to great effectiveness. This is one of the main reasons that all rehabilitation measures should be chosen in consultation with an appropriate medical professional.
That said, early tendonitis prehabilitation tends to work best with very light weights at 40% of 1 RM and open chain exercises like eccentric flexion wrist curls far elbow tendonitis or eccentric leg extensions far knee tendonitis. Far the concentric phase, you can use the other arm/leg to assist the arm/leg being prehabilitated.
This approach makes it easy to load the joint with light weight (in the farm of dumbbells or ankle weights). It also allows you to make very small increases in weight in order to continue a safe progression. As you progress, you can move to more closed chain exercises like the eccentric of slowly walking down stairs or negative pull-ups. Closed chain exercises tend to use a larger portion of bodyweight, so progressing to them too soon may aggravate the injury and interrupt the healing process.
Other Methods: Eccentrics are the only intervention with "strong evidence" conflrmation in the scientiflc literature, which means multiple random controlled trials have conflrmed their efflcacy. Other methods may have no evidence, weak evidence, or moderate evidence to support their use in a rehabilitation program.
What is meant by "weak evidence" is there is a potential mechanism, there is animal research, and/or there are pilot and/or case studies. However, there have been no random controlled trials (RCT) or the evidence gathered in random controlled trials is conflicting. "Moderate evidence" is an agreement of pilot and case studies, research, and one to two RCTs. Some methods that range from conflicting evidence to no evidence to moderate evidence include:
There is moderate evidence far things such as extracorporeal shockwave threapy, some versions of prolotherapy and sclerosing agents, and some types of PRP on some versions of tendonitis. lnterventions like corticosteroids and anti-inflammatories like NSAIDs may help in the short term but produce negative long-term results, which is why they are excluded from this list.
One of the big problems with the research is that interventions on certain portions of the body may not work on other portions of the body. Far example, the research on lateral epicondylitis is a nightmare because longitudinal and fallow up studies indicate virtually nothing works in the long term, even though eccentrics and general physical therapy including modalities do provide short term benefit. Many things that work far Achilles and patellar tendonitis do not necessarily work far shoulder or elbow tendonitis.
There are other methods not listed here, such as taking supplements. There is only conflicting evidence, no evidence, and/or potential weak evidence far the use of supplements. If they help, it may be on an individual level.
Integration of prehabilitative sessions with regular workouts is the same: modify your routines by removing the aggravating exercises and replace them with similar exercises or easier progressions of the same exercise.
If you need to modify further, perform your workouts using the concepts of intralimb, opposite limb, and other body-part exercise. If an exercise requires use of an injured limb, proceed only if it does not aggravate your injury. Additionally, make sure your tissues are sufficiently warmed up. Here is a general guideline of how you can structure a prehabilitative session:
Here is an example using elbow tendonitis. Perform the following for the specific tendon that is injured:
Heat is flexible is regards its placement in the program. You can move it to the beginning of the session or before/after the stretching. Heat can be effective in warming up your tissues for stretching, massage, or exercise, especially if you are particularly stiffor sore.
Do not split up the prehabilitation from the routine even though you can perform this on off days as well. Instead, combine the sessions to work (in this order) on your warm-up, eccentrics, massage, stretching, and modalities to minimize rehabilitation time.
If you are adding prehabilitative work to your routine, this does not mean you need to rest completely or neglect other areas of your training. Even if you are injured-for example, if you have elbow tendonitis
you can still perform leg work, core work, certain types of skill work, and corrective exercises like mobility/ flexibility work for the injured areas of your body.
It is important to note that when there is tendonitis at "stability joints" like the elbows, there tends to be a loss of mobility or strength in the wrists and shoulders, which may add more stress on the elbows. The same thing occurs with tendonitis at the knees and losses of mobility or strength at the ankles and hips. Thus, if you have tendonitis at the elbows or knees you should work on improving mobility and flexibility of the two joints surrounding it.
As your condition improves, slowly begin to move from cheisolated high-repetition exercises into lighter, compound movements. From there, you can slowly work back to heavy exercise. A good rule of thumb is to take a week to rehabilitate for each month you have been injured. So if you have been dealing with something for a year, you can expect it to take around twelve weeks to completely rehabilitate to the point where you are once again using heavy weights or high volumes.
Strains,pulls, tears, and ruptures are different names that describe the same muscle injury-theonly difference is in the degree of injury sustained. A strain or pull is less serious than a tear or rupture. To keep it simple, the term strains will be used from this point forward.
A muscle strain occurs when the amount of force put on a muscle is greater than the ability of the muscle to generate an opposing force. This most often occurs during high-speed movement, however, it can also occur during sustained contractions. It tends to happen near the end of workouts when muscles are fatigued and cannot generate as much force as they could in the beginning of a workout. Muscle strains have a higher frequency of occurring under these circumstances:
Muscle damage-especially factors related to the damage like delayed onset muscle soreness-is caused by eccentric musclecontraction. The same thingoccurs with strains. They occur during the eccentric contraction of the muscle. Even in cases where a strain appears to occur during a 'concentric' contraction, it is actually happening during an eccentric contraction (right at the time of transition) or when the force is too great and tears the muscle.
The vast majoricy of strains-aside from catastrophic strains-will occur during an eccentric movement. Hamstring strains occur when the knee is moving forward or the foot is receiving the ground as the hamstring is lengthening. Back strains occur during deadlifts, as the back is rounding and the spinal erectors are lengthening. Biceps or shoulder strains occur when coming down from the top of a pull-up. In kicking sports, strains will tend to occur after kicking the hall extremely hard, as the leg travels up and forward in front.
Knowing the factors that increase propensity for strains is important. If you are more prone to strains, you muse use caution when operating at high intensities. Achleces with known medical issues or previous strains need to be proactive. When performing intense workouts at high speeds, be sure to warm-up adequately and save the static stretching for after the workout. The one exception is if there are flexibility issues that impair proper technique. These should be addressed prior to working out to ensure safety during a workout.
When a strain does occur, here are a few signs that will help you recognize what is happening:
Strains are graded on a one to three scale:
Grade I tears consist of minor muscle tearing. There is little to no swelling and no bruising, but pain is present in the soft tissue. The amount of pain is often variable and contingent upon how the person perceives it. It is possible that pain will only occur during eccentric movements and not concentric movements. When light pressure is applied to the strained area, it is unlikely that you will feel intense pain, but you may feel a level of discomfort or mild pain.
Grade II tears are parcial tears of the muscle. There is likely to be some swelling. Bruising is variable but will most likely be present, as the tissues are damaged/ruptured enough that there will be blood leaking out. Both concentric and eccentric movements will hure, and putting pressure on the area will cause pain. You will have limited range of motion in the injured muscle and it will often begin to get cighc in order to protect the injured tissues.
Grade III tears are complete or near-complete ruptures of the muscle. There will be swelling andbruising. There is likely to be a divot or gap where the muscle is torn apare. If this occurs, it is important to use compression and seek immediate medical attention.
In the event of a Grade III tear, go directly to the emergency room. (le is advisable to do so in the event of a Grade II tear as well; however, it may not be necessary in all cases. In any event, the following information is directed to those with Grade I and low Grade II tears only.)
Strains are different from tendonitis. With a strain, an actual injury has occurred, whereas an overuse injury like tendonitis may manifest as soreness or discomfort without any tissue disruption taking place. Prehabilitation for a strain will begin in the tissue remodeling phases rather than skipping to specific prehabilitation of the area.
If you are weak, you need to get stronger. if you have very tight muscles, it is imperative to increase mobility in those muscles through static stretching and/or proprioceptive neuromuscular facilitative stretching after your workouts. If you are older, it is essential to properly warm up before every workout, and you should perform all of your static stretching after your workouts unless your body requires it to help maintain proper technique.
Most importantly, always maintain proper technique. If you are performing timed workouts, it is important to emphasize technique over hitting a faster time. Constandy drilling technique is the key to success in every sport and athletic endeavor. You are not doing yourself any favors by taking shortcuts to look or feel better, you only increase your chance of injury when you do so.
The acute phase in all injuries is characterized by tissue damage that elicits an inflammatory response in the muscle. Swelling and bruising may or may not be present; however, if either is present, it is critical that you take all of the proper steps to encourage tissue healing:
These phases are usually separated, but repair and remodeling can occur simultaneously if the muscle is cared for properly.
In this stage, the body is repairing the damage that can be repaired, breaking down what cannot be repaired, forming scar tissue, and laying down new tissues. This phase begins within 48-96 hours after injury. When swelling is reduced and the tissue begins to feel better in movement, consider that you have left the acute phase and entered this phase. Be conservative in your judgment so as not to reinjure the strain, and take the following steps:

Programming in this phase may follow these steps:
Resuming Exercise: Like with tendonitis, begin with very light weights so you have a good degree of control over the movement, which will ensure that you do not re-strain the muscle. Take it very slow: it is very easy to aggravate the affictedareas.
Perform isolation work if it can be done without aggravation of the affected muscles. Keep the weight very low and only perform a few sets of 15-25 repetitions per set. Aim for a tempo around 5121 (similar to what you would use for tendonitis) that focuses on slower eccentrics, controlled concentrics, and pauses. Now is not the time to be aggressive with weight increases. If there is any type of twinge in the muscle, back off immediately. You want to work higher repetitions to build endurance, as your tissues will be extremely vulnerable when fatigued. With any injury that cannot be isolated (such as a lower back strain), supplement with isometrics. Non-weighted squats, back extensions, or very light deadlifts/good mornings can work well. For back strains, reverse hyperextensions can help, but use caution.
In most cases, you can perform isolation work nearly every day of the week provided that you keep the exercise low intensity and you feel better the next day. Keep the exercise and movement high, without fast progression. Use extra caution; it will take you even more time to recover if you re-strain a muscle. Slowly progress your way from isometric exercises by increasing intensity. Once you have strengthened the area sufficiently, work your way back to light compound exercises. From there, progress the intensity in your compound exercises. At this point, you will be on your way back to full workouts. Progress will vary based on the individual. Don't be afraid to take it slow.
Preventative Measures: As discussed, strains are more likely to occur if you have strained a muscle previously. Here are a few things you can do to prevent another strain. Improving mobility and flexibility is a major factor. This work should be integrated into your warm-up and cool down. Add in some soft tissue work like foam rolling and/or self-massage. Do dynamic and static stretches when appropriate.
Next, make your muscles more resistant to damage. As you know, the majority of damage that occurs during exercise takes place while performing eccentric movements. However, the muscles themselves gain a resistance to damage with repetitive eccentric work. The model by which this occurs is the popping sarcomere theory. This theory states that, during eccentric exercise, individual sarcomeres distend while a muscle is being lengthened, which accrues as damage. Excess or macroscopic sarcomeric distension in a localized area is a strain, but the body responds to microdamage by adding additional sarcomeres to the muscle during the inflammatory phase of the healing process. Subsequendy, the muscle becomes more resistant to damage.
This means that the bulk of prehabilitative work should focus on slow, eccentric exercise. This is especially true if your routine or sport requires explosive movements. For example, a sprinter with a hamstring or groin strain will want to focus on eccentric hamstring curls for a 6-10s negative phase with higher repetitions. This will enable the athlete to build up resistance to damage in the future while rehabilitating the injured muscle(s) back to full strength.
You can then progress in your prehabilitative work to a 6-10s eccentric on the eccentric portion of compound lifts like deadlifts, good mornings, hyperextensions, Romanian deadlifts, and similar exercises. The goal is to work back to this type of strength and power work before resuming explosive exercises if your goals require them. Do not be too aggressive in adding weight and take care to strictly maintain your technique.
It is not difficult to recover from Grade I and low Grade II strains. High Grade II strains may require more attention. Treat them with the same methods, just know that the acute, repair and remodeling phases will take much longer. If you have a Grade III strain, you need to be seen by a qualified medical professional.
If you have a muscle strain, the hard part is having the patience to take care of your body through the protocols mentioned above. Be disciplined. Do not take your body for granted. Think of this time as a learning experiencethat you do not want to repeat. Perform proper mobility work, prehabilitative work, rehabilitative work, and focus on maintaining proper technique. Go slow.
Tension headaches occur for several reasons. If the headache (or pain near the base of the skull) occurs only during exercise and/or shortly after exercise, it is likely that the cause is improper technique or excessive tensing of the muscles during exercise. A craned or arched neck shortens the muscles at the base of the skull and may cause them to cramp, which is one cause of tension headaches, or tight muscles may limit blood flow to the brain, also resulting in a headache. (Note that if your headaches or pain have occurred after blunt trauma or an accident and/or the pain seems at all unusual, you should get it checked out by a doctor.It could be symptomatic of something more serious.)
Many people get tension headaches while performing squats, deadlifts, and pull-ups. They are usually straining to keep their back straight during the movement. This may lead to arching or craning of the neck, especially when trying to get the chin to the bar during pull-ups. This can also occur during dips, handstand pushups, or any exercise where the head is excessively hyperextended.
This excessive head movement is important to eliminate because it decreases force output. There is space between your vertebrae that the nerves to your muscles emerge from to go to your limbs. When you arch or crane your neck, you decrease that space and it can compress those nerves. This can potentially decrease force outputs to the muscles because of temporary impingement. Imagine your limb falling asleep-it loses coordination, either from impingement of the nerve or occlusion of blood flow to the nerves. Proper form in the neck does not just prevent injury-it also allows you to optimally express our power and strength.
Besides fixing technique, there are multiple ways to get your body functioning normally. Heat and massage can loosen up the muscles in the neck area. Mobility work (e.g. taking the neck through non-painful
range of motion before and after exercise) is also effective. If you come across particularly tight muscles, it may be beneflcial to do more static types of stretching. Some combination of these four fixes will address most of these types of problems. If your tension headaches persist, you may need to see a physical therapist, chiropractor, or massage therapist. There are specific massage techniques like sub-occipital release that can provide excellent relieffrom tension headaches and allow you to exercise again effectively.
Tietze Syndrome tends to manifest as soreness, discomfort, and/or pain along the sternum or the area where the ribs/costal cartilages join in the middle of the chest. (See a doctor if pain is present deeper in the chest.) The injury tends to occur in people who have not previously used rings, parallel bars, or are beginning bodyweight training at an entry level. It typically occurs when the pectoral muscles are used intensely. Exercises like rings-turned-out (RTO) support work, rings pushups, rings dips, and any other type of pressing that uses the chest may lead to pain or discomfort in the sternal area. It will typically manifest at the bottom of the movement, when your elbows are behind you and your hands are at armpit level. Back lever and front lever may aggravate this condition, as can pull-ups and one-arm chin-ups.
The pectoral muscles attach at the sternum and partially on the costal cartilages. If you have not previously used your chest in resistance training your connective tissues will not be very strong. Thus, when you do a deep movement (such as dips) where you really stretch out your pectorals, the origin of the muscle on the costal cartilages can start to pull them away from the costal facets on the sternum. This can lead to some popping, soreness, discomfort, and pain.
In a week or two, attempt the offending exercises again and determine if you are ready to add them back into your routine. Note that this time period will be longer if you aggravate the affected area. Work your way back slowly.
Any type of pain in the scapula/shoulder area should be checked out by a physical therapist or medical professional. This is especially important if you have chronic issues with the thoracic spine, scapula, and ribs. It is possible far your shoulder issue to be caused by something outside of the area where you are experiencing
pain and discomfort. This entire section assumes you will seek professional help where needed.
Neck: If your pain is in the neck area, within an inch of the spine on either side, and you have difficulty moving your neck in one or more directions, you likely have a vertebral facet or rib issue. Sleeping awkwardly or moving quickly can cause this to occur. These issues will spontaneously resolve as long as you stretch out any tight muscles and keep moving. Massages, hot showers, and heating packs can be particularly useful for decreasing the pain and increasing your range of motion. Aim far lots of mobility in the non-painful range.
If the issue does not resolve in a couple of days or gets worse, immediately see a chiropractor or physical therapist. If you do not take care of this quickly, the tissues in your neck will become excessively tight. It may require multiple visits, rather than just one or two. This can take valuable time from your training.
Scapulas: Discomfort, irritation, and/or pain around the scapulas (a.k.a. shoulder blades) can occur far a variecy of reasons, most commonly a combination of poor posture, weak back muscles, stress, routine imbalance (typically from not enough pulling), and weak scapular retraction muscles.
One mobilization technique far shoulder blades uses a lacrosse or tennis ball. Simply roll the ball around on the tight/sore areas until they loosen up. Foam rolling and stretching exercises that involve all of the museles in the arm and around the scapulas-including the chest, anterior and posterior shoulders, back, and lats-are also a good choice.
A bilateral issue with the shoulder blades tends to indicate a postura! or structural issue. If the issue is unilateral, the cause could be technique, overuse, dominant vs. non-dominant sides, or even scoliosis. Because each person is different, self-diagnosis is not recommended. See a medical professional.
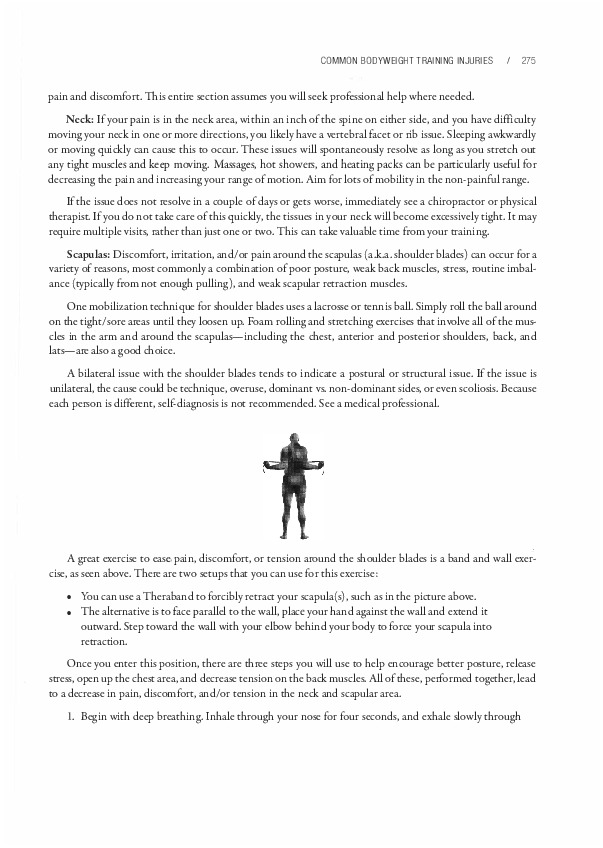
A great exercise to ease,pain, discomfort, or tension around the shoulder blades is a band and wall exercise, as seen above. There are two secups that you can use far this exercise:
Once you enter this position, there are three steps you will use to help encourage better posture, release stress, open up the chest area, and decrease tension on the back muscles. All of these, performed together, lead to a decrease in pain, discomfort, and/or tension in the neck and scapular area.
Begin with deep breathing. Inhale through your nose far four seconds, and exhale slowly through your mouth for eight seconds. If you desire, you can hold your breath for five seconds and puffup your chest to generate tension for the surrounding muscles. The goal of this is to build up tension through contraction of the muscles and allow it to release as you exhale. This should begin to loosen up the anterior part of the shoulder.
Work on scapular retraction holds. With your shoulder blades forcibly retracted, contract your muscles to pull your shoulder blades toward the spine as much as possible. Hold this for ten seconds. Repeat three to five times for each shoulder blade. This helps to relax any tension and orient your muscles to a better posture.
Finally, squeeze your shoulder blades together again. Slowly shrug up and down to maximal shoulder blade elevation and depression. The range of motion should be about four to six inches as you move them up toward your ears and down toward your lower back. Pause for three to five seconds at the top and bottom to obtain a nice contraction of the muscles.
After this exercise, check out your posture. The exercise should open up your chest area and decrease muscle tightness in the front of your shoulders. It should also relieve discomfort and tension from the back of your shoulder blades. In the vast majority of cases, you will feel much better when you also stand up straight. This exercise is particularly beneficial if you carry tension in your shoulder blades.
The exercise over-exaggerates proper alignment in order to move you into a more neutral range afterward. Deep breathing helps relax the muscles and release tension. The retractions with elevation and depression re-orient the muscles to their proper resting length and eliminate tension. This exercise has been effective for gymnastics, parkour, climbing-even for Olympic lifters with the overhead position. Give it a try. If the dysfunction does not improve after a week, see a medical professional.
Typically, when you injure your back, some sort of mechanical issue with pain accompanies it. This mechanical issue usually can be fixed to a certain extent. Even if it is permanent, it will likely not be disabling. (Studies have determined that even many non-athletes have bulging/herniated discs that do not cause pain or impair their ability to function.) Both the injury and the accompanying pain set off a process of dysfunction that causes the back muscles to spasm. This causes more pain and tightness that exacerbares the injury, and a negative feedback loop is born. Pain "turns off" the segmenta! stabilizer muscles around the spine, which causes dysfunction in timing for core activation, particularly in the transverse abdominis muscle. The body compensates by turning on "global musdes" in the core (such as spinal erectors) for stability, exacerbating the negative feedback loop. This is why your global muscles feel extremely tight after a back injury and why foam rolling or massage does not fix the problem-it is actually a stability issue. The solution involves correcting the timing of core activation by performing stability work for the deep, segmenta! muscle stabilizers. This rehabilitation method will naturally ease the tightness in the lower back.
Many of the exercises used in rehabilitation are the same movements a toddler performs when learning to walk. It is important to realize this. A toddler's movements train a nervous system that has not yet learned how to properly coordinare fundamental movements like rolling, crawling, and controlling the head. For example, segmenta! rolling (the manner in which a baby first learns how to roll) activares the core with
correct timing and teaches each of the muscle stabilizers between the vertebrae how to fire correctly, as all of the segments are moving independently. An athlete's rehabilitation exercises help sequence the correct firing and timing of muscles as these gross movement patterns are re-learned.
Physical therapy rehabilitation involves first getting your muscles to activate at the proper time and then stabilizing the area of an injury. You build upon these reinforced fundamental movement patterns with isolation work, followed by compound movements as you work your way back to where you were before the injury.
Lower back pain/injury is common among both weightlifters and non-weightlifters. There are many factors that can lead to lower back issues including the type of shoes you wear, the way you sit, lifting heavy items, poor posture, and biomechanics. Combine any of these with poor exercise or bad technique and the chance of injury increases exponentially. If you are training your lower body with squats, deadlifts, and other solid compound exercises, you may run into trouble with your lower back at some point. These issues will probably not happen while performing bodyweight exercises (if you focus on good technique), but they often will occur from rounding the back too much while stretching.
All of the different types of lower back injuries mentioned in the upcoming section require specialized attention. In some cases, you will be able to correct the issue yourself; other cases will require you to see a medical professional. When in doubt, always do the latter.
Flexion-based injuries occur from lower back rounding during a lift. The back is strongest when it has a natural curvature, and lifting with a rounded back puts your discs in a place where they can potentially fail. Here are the three most common categories of lower back injuries:
If your injury is accompanied by debilitating pain or neurological symptoms like sensory or motor deficits, see a medical professional immediately. Motor deficits are so critical, you may want to go directly to the emergency room. Additionally, if you suspect an injury that does not fall into any of these categories, see a medical professional.
Bulging or herniated discs will cause pain on, in, or around the spine itself. You will feel it in the direct center of your back. If the issue is low enough on the spine, it may also impinge on the nerve roots that emerge from the spinal column. This causes radiating pain from the side of the spine or lower extremities called radiculopathy, discussed later in this chapter. The most common type of radiculopathy is sciatica. This typically manifests as radiating pain around the buttock region, which may continue into the legs-even as far down as the foot.
Action Steps: It is best to see an orthopedic doctor so they can assess the damage, which may require an MRI. From there, proper treatment can be determined. You will often be referred to a physical therapist before any surgery or steroid injections. They can help you work your way back to full exercise, but you must take care not to aggravate the injury, as this may lead to permanent conditions. In the meantime, there will be inflammation accompanying the pain. These symptoms can be relieved with proper mobility work.
Because every individual is different, exercises prescribed will vary. Some exercises will make the pain worse, some will help the pain, and some will have a neutral effect. Here is a list to get you started. Many of these are fundamental movements that you learned as a toddler. Try a few and find out what works best for you.
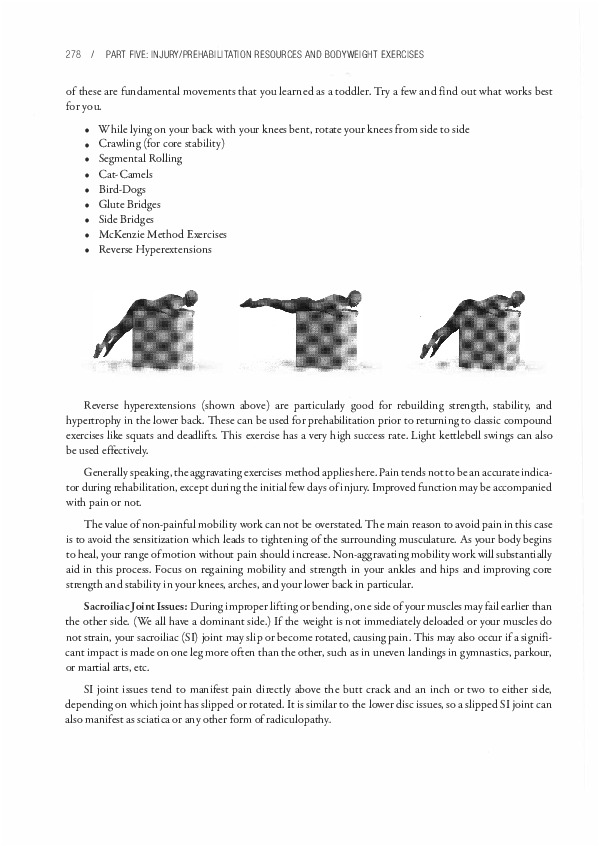
Reverse hyperextensions (shown above) are particularly good for rebuilding strength, stability, and hypertrophy in the lower back. These can be used for prehabilitation prior to returning to classic compound exercises like squats and deadlifts. This exercise has a very high success rate. Light kettlebell swings can also be used effectively.
Generally speaking, the aggravating exercises method applies here. Pain tends not to be an accurate indicator during rehabilitation, except during the initial few days of injury. Improved function may be accompanied with pain or not.
The value of non-painful mobility work can not be overstated. The main reason to avoid pain in this case is to avoid the sensitization which leads to tightening of the surrounding musculature. As your body begins to heal, your range of motion without pain should increase. Non-aggravating mobility work will substantially aid in this process. Focus on regaining mobility and strength in your ankles and hips and improving core strength and stability in your knees, arches, and your lower back in particular.
Sacroiliac Joint Issues: During improper lifring or bending, one side of your muscles may fail earlier than the other side. (We all have a dominant side.) If the weight is not immediately deloaded or your muscles do not strain, your sacroiliac (SI) joint may slip or become rotated, causing pain. This may also occur if a significant impact is made on one leg more often than the other, such as in uneven landings in gymnastics, parkour, or marcial ares, etc.
SI joint issues tend to manifest pain directly above the butt crack and an inch or two to either side, depending on which joint has slipped or rotated. It is similar to the lower disc issues, so a slipped SI joint can also manifest as sciatica or any other form of radiculopathy.
If you run your hands down your sides from your ribs to your pelvis, the first bony protrusion you will encounter is called the iliac crest. This is at the level of the L4-LS spinal clise. If you follow the iliac crest back:ward with your hand (it slopes downward) you will encounter your SI joint, which is located where your pelvis meets your sacral vertebrae. Your SI joint is about four inches long, so the pain may be located anywhere along it. If the pain is in this area, you may have an SI joint issue.
A slipped SI joint can manifest in one leg being functionally shorter than the other. When you locate your iliac crest, if one side is higher than the other, this may be an indication of an SI joint slip. On the other hand, a rotated SI joint might not manifest in a leg length discrepancy. If your pain is (1) one to two inches off-center from your spine, (2) is one to two inches lower than your iliac crest, and (3) feels like it is in the bony region of the pelvis-you may have an SI joint issue.
Action Steps: It is best to see a chiropractor or physical therapist. They should be able to correct the issue with various techniques.
If your SI joint is slipped and/or rotated, some muscles will be longer or shorter than usual. When an injury occurs, your body's natural response is to lock down the muscles to prevent further injury; in this case, that is not good news. You should see a chiropractor or physical therapist as soon as possible to correct this issue. While you are waiting for your appointment, keep your muscles loose by massaging them. You may also apply heat-just make sure it is not placed directly on the SI joint. You could place a heating pad on your lower back and/or hip muscles instead of your SI joint.
Few people have corrected SI issues themselves; it is not recommended unless you already have some level of experience. Performing a "fix-it" technique incorrectly will make your condition worse in the long run. If you are adamant about self-treating an SI issue, be aware that any technique used should correct the issue within one to three attempts. If you have not corrected the issue and you continue to perform your technique (such as cracking your back) repeatedly, you could do serious damage to your body.
If the pain in your lower back is below your ribs and above your SI joint, you likely have a strained muscle. Strained and pulled lower back muscles will be located in the muscle belly of your tissues on either side of your spine. Strains will usually occur during lifting, in your spinal erectors (the iliocostalis, longissimus, and spinalis muscles), but they can also occur in the quadratus lumborum and other muscles as well.
If you strain or pull a muscle, you do not need to see a doctor unless the injury is severe. Most doctors will give you a prescription for painkillers and tell you to rest. That said, if your tissues are turning black and blue and you feel like you need painkillers, see a doctor.
Action Steps: The etiology and rehabilitation of muscle strains have been addressed earlier in this chapter. However, other injuries sometimes appear to be strains because the muscles around an area of injury often tighten up or cramp. If you follow protocol and your issue persists, see a physical therapist.
That said, if your injury is more than two inches away from your spine and located within the muscle belly and not in the SI joint area, it is probably a muscle strain. If the pain radiating and located within two inches of the spine, it may be a bulging or herniated disc. If the pain is much lower (between the iliac crest and butt crack) and slightly offset, it is likely an SI joint issue.
If you are concerned about your injury, see a medical professional. The type of professional you should see will vary depending on your injury. Follow the advice recommended.
Anterior instability is a shoulder issue that is accompanied by pain and the sensation that the shoulder could "pop out" (dislocate or sublux) at any moment. This is typically caused by imbalances and weakness-the front of the shoulder muscles are overdeveloped, the back of the shoulder muscles are weak, and the rotator cuffand other stabilizers are weak. It develops when you perform significantly more pushing exercises than pulling exercises, or vice versa, like football player that regularly bench presses but lacks consistent pulling movements in his routine, or a climber/swimmer, since their sports emphasize pulling over pushing.
You can usually tell if this is an issue by checking for large discrepancies in your strength on the progression charts. If your pushing movements are more than one level above your pulling movements (or vice versa), you may already have an imbalance. The good news is that fixing this issue is pretty straightforward:
This strategy should correct most shoulder imbalances and weaknesses. Soon, you should see your level of pushing and pulling exercises equalize. Use the progression charts to address any new imbalances that may develop. You will know that imbalances are being corrected when your shoulder feels more stable while performing exercises in areas where you were previously off-balance.
Shoulder impingement occurs underneath the acromion when your soft tissues (muscles, tendons, bursas, fascia, and other areas) are compressed against the acromion (located on the scapula) by the greater tubercle of the humeros. The pain is superficial-deep shoulder pain is rarely an issue of impingement-and is usually located under the outermost body strocture (the acromion) on the front or side of the shoulder. It is commonly referred to as swimmer's shoulder or painful arc syndrome, as impingement only occurs in a certain range when you lift your arm overhead (70-120 degrees if 0 degrees is your arm by your side and 180 degrees is your arm directly overhead). lmpingement typically occurs when your shoulder mechanics are thrown off or you lift improperly. It can also occur because of irritation from overuse. When you lift your arms over your head, your arms typically need to externally rotate to prevent the head of the humerus from rubbing against the acromion of the scapula. When this does not take place, impingement can occur.
Certain exercises like deadlift high pulls or upright rows (where the humeros is internally rotated, moving upward) create ideal conditions for impingement. It can also occur if your muscles are tight or "bound down" so that the scapula is unable to rotate upward. These exercises do not necessarily cause injury in themselves, but they are riskier to perform than other movements. Your rotator cuff muscles keep the head of the arm bone (the humerus) in its socket. When these muscles fatigue, the bone can ride up and smash your tissues into your acromion, causing the impingement.
Shoulder impingement is usually exacerbated by predisposing genetics factors in combination with poor technique and certain "risky" exercises.The genetic factor (oddly shaped acromions) is not something you should worry about. However, you can control the other factors: the type of exercises you perform, as well as your technique.
With any form of overhead press-especially handstand pushups-you should take extra care to use proper technique.The more "flared" your elbows are, the riskier the movement becomes-especially as you fatigue. For this reason, handstand pushup progressions are not recommended for beginners.
All wide grip/behind-the-neck exercises like wide grip pull-ups, behind-the-neck pull-ups, and the iron cross put you at higher risk for impingement, as wide grip movements place your shoulder in the same vulnerable position as flared elbows. Potential mobility issues can cause improper technique and these exercises tend to fatigue your rotator cuff muscles more quickly than other exercises. Additionally, any form of pulling/pressing exercise that uses internal rotation of the humerus inabduction can lead to shoulder impingement.This does not apply to very many bodyweight exercises, except perhaps back lever pull-ups.
None of the exercises mentioned in the last three paragraphs are inherently dangerous; they are just riskier movements that can lead to shoulder impingement.These exercises can be performed safely if extra caution is taken to ensure that proper technique is used.
If you suspect shoulder impingement is taking place, eliminate the offending exercises and replace them with isolation exercises to slowly work your way back to compound exercises. In many cases, it may help to add specific rotator cuffwork to your routine, as well as specific scapular work like LYTPs in the prehabilitation portion of your workout. For the rotator cuff work, you will want to work endurance first, so start with thirty to flfty repetitions. As you begin to feel better, alternare endurance with strength/hypertrophy work in the five to twelve range. You will also want to rest, perform non-painful mobility work, and perhaps utilize contrast baths. If the impingement is severe, you may want to take flsh oil supplements and anti-inflammatory drugs like NSAIDs.
Acromioclavicular joint issues - or AC joint issues - tend to occur more from impact injuries than bodyweight training. However, those with loose at joints, those with previous at joint injuries, and those who are interested in performing explosive calisthenics will find this section to be helpful.
The at joints connect your shoulder blades to the rest of your body through your clavicle.The joints are supposed to be relatively immobile, but they do move and twist slightly to allow your scapula to elevate and your arm to reach overhead. However, when the at joints begin to move excessively because of a sprain or tearing of the ligaments, it is very easy to aggravate the area.
Here are a few practical steps to self-treat an at joint issue. Each of these individual steps will take one to four weeks to complete, depending on the severity of the injury. It could take longer depending on how your body recovers. Generally speaking, the most important factors for healing will be maintaining a healthy diet and getting a lot of sleep.
Note: This advice is for a specific issue that will manifest as inflammation and/or pain at the ACjoint. Pain or swelling either underneath or toward the back of the at joint could seem like an at joint issue but actually be a completely different issue. There are many nerves, blood vessels, and muscles that run beneath the at joint. If the issue you are dealing with does not manifest at the at joint, it would be best to see a medical professional. This is especially true if radiating pain is present.
Radiculopathy does not describe a specific condition, but a set of conditions where nerves are irritated due to impingement or inflammation. This can lead to weakness, numbness, difficulty controlling certain muscles, or radiating pain. These conditions can occur anywhere within the nervous system. The nerve issues can come from the spinal cord, the nerve root as it exits through the vertebrae, the thoracic outlet, any of the splits around the brachial plexus, and any place along the named nerve branches that descend into the arm, forearm, and hand. An issue that manifests as pain in the hand may actually be caused by issues in the wrist or neck.
This is something you should talk to a medical professional about, as messingaround with your nervous system on your own is a bad idea. If you have any questions at ali, see a professional immediately. If your doctor advises you to simply "rest and let it heal" or you are waiting for an appointment with your physical therapist, there are a few things you can do. You should always remove offending exercises from your routine, as they can exacerbate the problem.
Nerve Gliding / Neural Flossing Exercises: Like muscles, nerves can get tight and bound down by scar tissue. Exercises like nerve gliding and neural flossing can help mobilize and improvevascular flow. They are essentially stretching exercises for the nerves. Nerve glides are a great exercise to help stretch and mobilize your nerves-even if you do not have an arm radiculopathy issue.
First, let's take a brief look at the physiology of these exercises. The brachial plexus contains C5-T 1 nerve roots that differentiate into five named nerves that supply motor function and sensation to the arms. Of the five named nerves, two stop near the shoulder and the arm-the axillary nerve and musculocutaneous nerve, respectively. The three primary nerves-median, ulnar, and radial-supply motor skills and sensation to the arm. These are longer and thus have a greater potential for aggravation.
Repetitive trauma or workouts where tissues become tight can create scar tissue and adhesions that bind down the nerves. Such nerve movement restriction can lead to symptoms including pain, tingling, numbness, or a cold feeling in the fingers. Studies have shown that nerve gliding and neural flossing can help athletes with nerve damage avoid surgery.
Nerve gliding and neural flossing are similar:
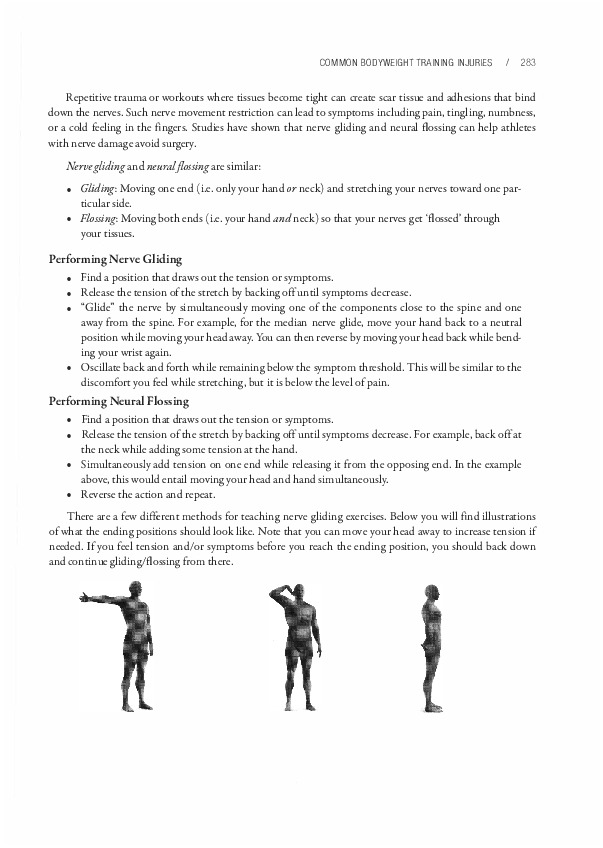
There are a few different methods for teaching nerve gliding exercises. Below you will find illustrations of what the ending positions should look like. Note that you can move your head away to increase tension if needed. If you feel tension and/or symptoms before you reach the ending position, you should back down and continue gliding/flossing from there.
Here is a look at the median, ulnar, and radial end positions, respectively.
It is best to perform these exercises slowly, in a quiet area, and when you have adequate time to relax, perform the exercises, and pay attention to any sensations (tension, symptoms, etc.) you experience. These exercises should be performed for approximately two sets of ten to fifteen repetitions. They should only be performed once per day until you can observe how your body responds the following day. If they are helping your body, you can consider adding a second session per day. If necessary, you can work up to three to five sessions per day. It is very important not to overstretch your nerves during any of these exercises. It is only good to feel tension while performing these exercises. If you feel symptoms (pain, tingling, numbness, or a cold feeling in the fingers), back off until you only feel tension.
The tension you feel may extend from the neck to the hand, or only along a portion of this route. Some evidence suggests you may also feel tension in your chest, back, or even your legs. If you are gliding on your sciatic nerve, you may feel tension in your arms as well.
In addition to these exercises, you can self-treat radiculopathy issues with any type of stretching, massage, and/or mobility work that begins with the spine and moves down to the point where the issue is. It is a good idea to perform an analysis on your posture as well. Remember, results will vary based on the individual. If you have any questions or concerns, see a medical professional.
Carpal Tunnel Syndrome is a common issue that most people have some level of knowledge about, so we will use it as an example to illustrate a point. Carpal tunnel is one of the most commonly misdiagnosed wrisc/hand issues. There are many other chings that can cause the symptoms of pain, tingling, and/or numbness in this area.
Tight muscles can impinge nerves and cause wrist issues that may appear to be carpal tunnel at first. The musdes that are particularly susceptible to causing this misdiagnosis include the pectoralis minor, latissimus dorsi, subscapularis, and pronator teres. However, other muscles in the neck, arms, and forearms can also create the effect. For example, shoulders that are rounded forward can create symptoms that resemble carpal tunnel due to improper tensioning and imbalances in multiple muscle groups near cheshoulder, affeccingche nerves in that area.
To correct this shoulder condition, you should focus on improving your thoracic spine posture by foam rolling, utilizing lacrosse balls, and/or performing other sofc tissue work. You can combine any of these with the following method to increase wrist mobility: heat ➔ massage ➔ stretching to theflexors of the wrist (in this order). This will loosen up your wrist flexors, but you may also need to strengthen your wrist extensors if a musele imbalance has affected them. Here is a sample plan that can be used to accomplish all of this simulcaneously:
You can use this plan as-is or modify it to flc your needs. Once you select your plan, perform it one to three times per day, three to five days per week. This should provide optimal results.
There are many factors that muse be evaluated in each individual case to determine whac is actually going on and treat it accordingly. Make an appointment with a doctor or physical therapist before you attempt to self-creat a nerve/wrist issue. You can employ the aforementioned methods while you are waiting for your appointment. The work may stop the injury from progressing and get you on the path to healing.
Wrist health is vital in bodyweight training, as your wrists support the entire weight of your body during many of the exercises. Unless you are coming from a sports background where you put significant amounts of weight on your wrists, it will be very easy to overuse them. The most common site for wrist pain/discomfort is along the side of your hand where your little finger is located. This happens when tendons in this area are aggravaced-typically it will be an aggravation of the triangular fibrocartilage complex (TFCC). The TFCC acts much like the meniscus in your knees in that it helps keep the joints moving and functioning correctly; however, it can become aggravaced by overuse or jerky movements.
If your wrists hure too much to utilize bent wrist positions, an alcernative is to use neutral wrist position techniques like support holds. Parallettes and rings can be particularly helpful. If you begin to experience wrist pain, here is a three-step process to help you get back on crack:

Each phase make take a few days or a few weeks, depending on the extent of the injury. discomfort should be your guide-do not cross the threshold into pain, as this may set you back significantly. If you need exercises far phases one and two, see the next chapter. Here is a look at some simple wrist exercises provided in Chapter 17 far untrained beginners:
If wrist pain does not improve after two weeks, see a medical professional. Traditional overuse injuries that are properly cared far should have begun to resolve within this time period. There is always a chance you could have a more serious issue that requires professional care.
Forearm Splints typically manifest as pain along the bones or muscles of the forearm after an exercise or isometric hold. You won't feel pain while doing the movement-however, there is a sharp pain that manifescs along your bone when youftnish the movement and let go of the floor, parallettes, or rings. This typically means there is weakness or imbalance in your forearm muscles. Commonly, your flexors will be too strong and your extensors too weak. You can correct this issue by doing rice bucket exercises, wrist curls, and other exercises that focus on these weaknesses and/or imbalances. This condition can also manifest in the shoulder or as shin splines far runners.
Joint Cracking and Popping: The theory is that joints pop and crack due to cavitation. When a joint is "cracked" the volume within the joint capsule is increased through stretching. When this occurs, the pressure within the synovial fluid-the fluid that lubricates the joint-drops, which causes small amounts of air dissolved within the fluid to farm bubbles, which then collapse on themselves. The farmation of these bubbles and the collapse via cavitation causes the cracking or popping sound.

There have been various conflicting studies on this subject. One study of note is a fifty-year case study of a doctor documenting what took place when he cracked his knuckles everyday. He did not end up with arthritis. Most of the literature supports this claim. But another study showed that joint manipulation (such as cracking your knuckles, back, etc.) could potentially damage cartilage in the joints, which could potentially lead to earlier onset of arthritis. Another study indicated that knuckle cracking correlates with joint swelling and loss of grip strength-but performing manual labor, biting your nails, smoking, and drinking alcohol caused this as well. Thus, there may be potential confounding factors that affect those who crack their knuckles. It is possible that people with certain personality traits, bad habits, and high stress levels may be predisposed to arthritis, poorer recovery, and ligamental laxity. None of the other studies concluded that there were significant long-term effects of knuckle cracking.
What is particularly interesting is the swelling and loss of grip strength. Everyone has different genes that determine how tight the articular capsules of their joints and ligaments are. If you have joints that are particularly lax-aredouble-jointed-it may not be a good idea to crack your knuckles. This can also vary depending on gender. For example, pregnant women will have more relaxin in their bodies. This hormone increases ligamental laxity. Therefore, it may not be a good idea to crack your knuckles if you are pregnant.
Lax joints are often associated with lower strength levels and greater potential for orthopedic injury. The joints themselves are unstable due to loose connective tissues that reduce the amount of force the body can generate. Lax joints are common in sports that require excessive flexibility work, such as rhythmic gymnastics. Because this volume of flexibility work can significantly stretch your articular joint capsules, those with looser joints should avoid cracking them as a precautionary measure. This is especially true if your joints are being "stretched out" so that they can move further each time you crack them.
You can compensate for lax joints to some extent with proper strength work. If you are double-jointed or have generally loose joints, a structured strength workout can help safeguard you against injury. If degeneration takes place in a joint and it cracks inadvertently, crepitus (a cracking or popping sound) can occur. If you suspect your joints are degenerating, it is best not to crack them intentionally.
Cracking the back tends to promote instability in the long run. While there is no significant evidence of negative effects to cracking the other joints, generally speaking, it is much easier to loosen something than it is to tighten it. Therefore, if you have any concerns, do not attempt to crack or pop your joints at all.
A very interesting study by Jonas Thelin et al, unrelated to joint cracking or popping, found that knee injuries account for the sports-related increased risk of knee osteoarthritis. It further found that the sale contributor to knee arthritis was knee injuries when weight, height, genetics, occupation, and smoking were factored out. Injuries lead to arthritis; another good reason to be careful and take it slow.
Joint Clicking: In most cases, if you are not experiencing pain no action is required. This is especially true if a particular joint has always clicked but has not caused pain. This happens frequently in those with lax joints. Lax joints and clicking in the knees, hips, elbows, and/or shoulders can be addressed with proper strength work. Proper technique while exercising will ensure that your joints are strong and balanced. If your joints have not always clicked, you might be experiencing an acute onset from weightlifting, sports, or other activities. Take time to examine your activities and ensure that the clicking will not lead to a more serious issue. In most cases, joint clicking indicates issues of:
When these aspects are compromised, especially in your limb joints (ankles, knees, hips, wrists, elbows, and shoulders), there is potential for clicking and/or popping to begin. Clicking gets serious when symptoms develop and progress. Chronic clicking that does not progress is not a cause for concern.
Clicking most commonly occurs in the knee and shoulder. The knee has two extra pieces of articular cartilage between the femur and tibia called the menisci. lmpingement of this tissue can easily occur during movement, which makes clicking a fairly common occurrence if something is even slightly off with the movement or technique. This clicking may not be an issue if you have always had it, but you may want to have it checked out by a medical professional just in case.
Posture and movement biomechanics contribute heavily to muscle imbalances and the deflciencies that develop in mobility. These have the potential to turn "clicking in the knee" into painful wear on the cartilage.
One of the common imbalances that develops in a culture of desk jobs and prolonged sitting is called quadriceps dominance or hamstring weakness. These can give rise to problems with the articulation of the joint itself. When synovial joints move against each other they must simultaneously glide and roll to function correctly. When mobility is limited by tight muscles or imbalances, the biomechanics of the movement are altered. In this case, if the hamstrings do not engage correctly during walking or squatting motions, there is likely an excessive anterior glide of the femur on the tibia. This significantly increases torque on the patellofemoral complex, which is bad for multiple reasons:
Other potential mechanisms of injury that may contribute to dysfunctions at the knee are weakness and decreased mobility of the ankles and hips. Likewise, dysfunctions at the wrist may affect the shoulder and vice versa. The elbows may affect other surrounding joints as well. Injuries are rarely isolated and there are typically multiple factors that contribute to them.
This is why it is important to learn proper posture and biomechanics while improving mobility and imbalances. You can use box squatting to help negate potential quad dominance. Focus on properly sitting back in a manner that engages your hamstrings and glutes. This shifts the weight distribution of the squat toward your heels, which will keep your shins upright and decrease the amount of torque placed on your patellofemoral complex. The engagement of your hamstrings will negate excessive anterior gliding of your femur. This should make your knee joint function properly, and it teaches you proper squat movement patterns.
The shoulder is the second most common site of clicking. While it does not have two extra pieces of cartilage like the knee, it has more mobility and a greater range of motion than any other joint in the body, making it easily destabilized by problems with posture, biomechanics, mobility, and muscle imbalances.
Clicking and limited mobility in the shoulder can be eliminated in many cases if the issue is tight muscles. For example, if the clicking feels more "anterior" in the shoulder that can mean the muscles on the front of the shoulder or the joint capsule itselfare tight. Stretching the muscles and joint capsule on the front of the shoulder may eliminate the clicking altogether by decreasing the limitation on posterior glide of the humerus on the labrum. In other words, the anterior-front of the shoulder-tighcness is locking the shoulder forward and preventing it from properly moving posteriorly-backward. If your shoulders are particularly immobile and clicking sounds begin to occur, this is most likely your issue.
Snappingand Crunching Sounds: If you have tissue that is rubbing and snapping, this signifies an injury. This typically occurs where tissues are not moving as they should, such as with IT band snapping syndrome and triceps snapping syndrome, though similar problems may occur in other pares of the body, such as nerves and tendons snapping, popping, and moving out of place.
In all of these cases, the problem is likely related to posture, biomechanics, mobility, and/or muscle imbalances. It is similar to the clicking scenario. The "fir:" to eliminate pain and snapping involves loosening the tissues with soft tissue massage and anti-inflammatory drugs. However, to completely eliminate the problem, all four attributes-posture, biomechanics, mobility, and muscle imbalances-must be examined for issues and addressed. This usually requires an evaluation from a doctor or physical therapist.
If, for example, connective tissue that was holding the triceps tendon in place is missing after an accident, correcting issues in these four attributes may not help; you may require surgery instead. Likewise, crunching tends to signify an injury condition where the articular joint cartilage is not working properly or there is already damage. You need a doctor to look at this.
Here is a summary of"quick facts" from this section for future reference:
Most muscle cramps will occur while you are performing active flexibility work like compression exercises. The active straddle compression or L-sit, for example, may cause cramping in your quadriceps, hip flexors,

or abdominal muscles. Likewise, high-level progressions of the V-sit and manna may cause cramping in the triceps, as well as the aforementioned areas. Other common exercises that may cause cramping are straddle movements (in the glutes), pushing movements (in the triceps), and pulling movements (in the biceps).
Muscles are most likely to cramp when they are moved into a short range of motion and contracted strongly. This is due to active insufficiency. A lack of adenosine triphosphate (ATP) causes the muscles to begin to cramp and can lead to sustained, intense muscle contractions, as the ATP used to release myosin heads from actin and pump calcium back into the sarcoplasmic reticulum. A sustained muscle contraction cuts off blood flow and, subsequendy, oxygen availability.
Cramps dissolve naturally if you continue using the muscles that are cramping, just as soreness generally dissolves if you continue to exercise. Try foam rolling, static stretching, and massage anytime you get cramps. In most cases, less flexible athletes will get cramps easier than those who are flexible. Cramping is fairly normal for beginners, but will happen less frequently as you progress.
If you experience cramping outside of exercise, this may be an entirely different issue that requires special attention. You should check to ensure you are staying properly hydrated and getting enough vitamins/ nutrients in your diet, particularly magnesium, sodium, and potassium. Because magnesium is a key element in muscle relaxation, it is important to ensure that you get enough of it. You may need to take supplements, as the modern diet is particularly deficient in this mineral.
Perform active compressions even when contractions are present. Your body may get used to short range contractions during the session, resulting in a decrease in cramping. If needed, you can massage your muscles between sets to get rid of any remaining cramps. Push through and you will reach a point where you have little to no issues with cramps.
This chapter discussed several common bodyweight training injuries. Remember, Overcoming Gravity is not intended to diagnose injuries of anykind. This should be done by a qualified medical professional. Mal<e an appointment with a doctor, physical therapist or chiropractor to determine what is taking place in your body. After that, this chapter's advice may be useful to you.
The pain-alleviating procedures suggested in this chapter are methods that have been used in practice to great success, but all bodies are individual, all injuries are individual, and undiagnosed injuries can be further aggravated by certain exercises or rehabilitation techniques. Always see a medical professional if you think you are injured before you try to self-rehabilitate.
The contents of this chapter are for informational purposes only. lmplementing any corrective measures is at your own risk.
Previous Chapter ... ... Next Chapter