Intro:
If you haven’t already, Read Pt 1 of the handstand pushup tutorial before you read on.
If you have read it and have mastered the exercises outlined, you should have fairly good overhead pressing strength and you should be familiar with the movement pattern involved in the full push-up (atleast against the wall). This tutorial will cover the methods you can use to progress to a full wall handstand push-up and all of the supplementary skill based exercises to help you transfer that strength into a freestanding handstand push-up.
Strength Exercises:
Now that you are ready to move on to wall handstand push-ups, it is important to note that the point that all wall handstands are not created equal for push-up training. If you kick-up to a handstand and do a push-up with your back to the wall, it will definitely be a harder shoulder workout than box pike push-ups covered in part 1 of this tutorial but it will have little to no carryover to a freestanding push-up. This is because your back is forced to arch as you try to keep your feet on the wall, and it is much harder if not impossible to glide forwards to keep your forearms straight as there is a wall in your way. In a real handstand push-up your body will also not naturally move straight up and down, as shown in the GIF. Your upper body will glide in front of your hands and consequently your legs will have to drift backwards in order to keep your center of gravity over your base of support. This is my best attempt to do a good form handstand push-up with my back to the wall. As you can see, my elbows drift backwards which puts a lot of tension where it shouldn’t be, but on top of that, my back arches way too much and you can see how my legs glide up and down against the wall:
The preferable alternative is to do a chest to wall handstand. Sadly, for a movement as complicated as a freestanding handstand push-up, it is not easy enough to have a linear progression, so simply doing enough of these will not mean you can do one away from the wall. This will, however, give you the necessary overhead pressing strength to do it, and in terms of transferable strength within a movement that more accurately simulates the real deal, this is much better than kicking up with your back to the wall:
The form for these is exactly the same as in the first tutorial, but also making sure your body is hollow like in the hollow tutorial (although if you are practising proper handstands alongside this, as is advised, this should be familiar) and legs are straight.
From here you have the strength to do the full movement away from the wall, but not the skill. The next few exercises will cover the methods used to get there as comprehensively as possible.
One exercise that is a fun kind of bridge between the skill and strength exercises for the freestanding handstanding push-up, yet I would not necessarily call a skill, is the Floating Pike Push-up. To perform the floating pike push-up, you do a pike push-up leant forward far enough that your feet come off the ground and all of your weight is on your hands and the position is being held tight and stable by your core and back. This is cool because it helps you get used to the bottom of the push-up with all of your weight on your hands, helps you learn how to lift your legs up with your hips and begins to open up the ability to do Bent-Arm Handstand Presses.
Skill, once you have the strength:
Up until now in both parts of this tutorial, it was not necessary for you to be able to do a freestanding handstand as there was no balance element to any of these skills. However from here, you will need to be able to consistently hold 10-20 second handstands, on top of a level of proficiency with the chest to wall handstand push-ups mentioned above. These are called ‘skills’ but in fact they will still count as part of your strength training and you will get stronger doing them. I separated them from the earlier progressions because the difficulty with these is overwhelmingly skill based, with a bit of strength, if you can already do wall handstand push-ups.
Bottom ROM Holds
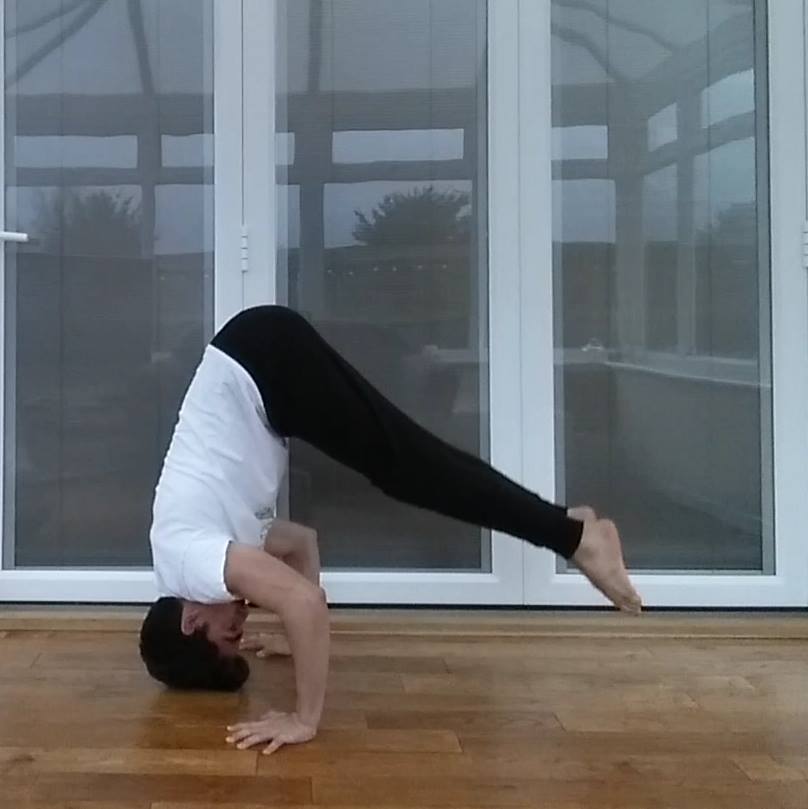
This one is intended to help you get used to the bottom position of a free-standing push-up because often times, when people I’ve seen or when I myself was training for a free-standing handstand push-up, the thing that happens most commonly is you can lower yourself down all right, but your legs fall too far down in the process and you just drop to the ground before you can push back up. This was, for me, the pivotal drill that got me from hopelessly trying again and again to my first full range handstand push-up.
For clarification, in this title, ROM stands for Range of Motion, so ‘Bottom ROM’ is just sitting just before the very end of the handstand push-up, like so:
You can try this drill with Tucked legs, and once you are proficient with that, try straightening out into a position reminiscent of a headstand with your head off the ground.
Negative HSPU
Once you can do Bottom ROM Holds and Chest to Wall Handstand Push-ups, you can start doing slow negatives in a handstand, stopping at the bottom ROM hold for a second or two at a time. This will help you get the motion of your legs drifting back as your upper body drifts forward, and helps calibrate what that feels like to you.
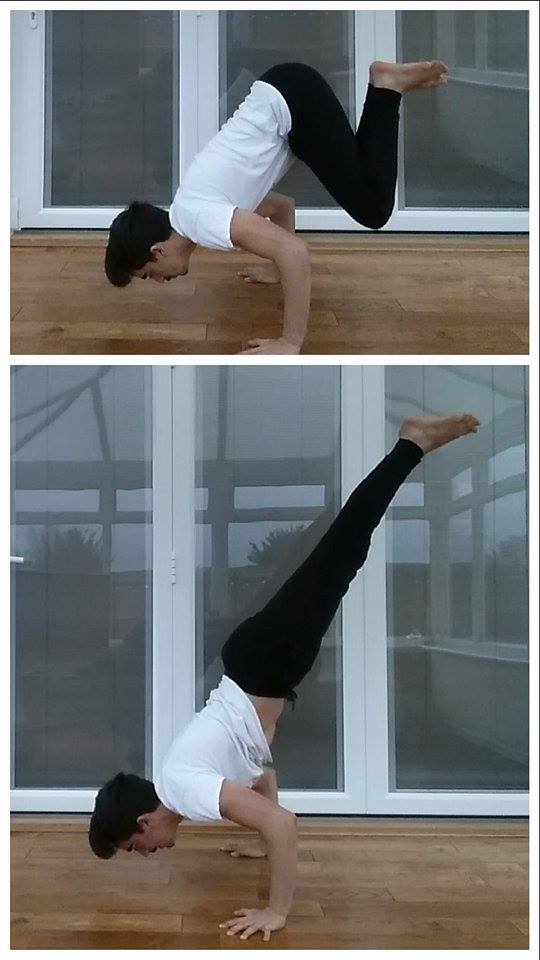
Bottom ROM Hold to Handstand
Once you can balance at the bottom (Bottom ROM Hold), understand the change of alignment between the top and bottom position with control (Negatives), and also have the strength to push your whole body overhead (Chest to Wall HSPU), the only thing to do is put all of those things together while also learning how to reverse that lowering motion with your body, by pushing UP! This could be done by just practicing freestanding handstand push-ups, but if you are truly struggling and can’t bridge the gap, then just practicing the concentric motion and focusing on being able to stay in the handstand after locking out is a great way to do it.
FINALLY!
If you have mastered all of these progressions, you should be (or be very close to be) able to do a full freestanding handstand push-up. Congratulations, you are a total bad-ass. From here you can work on doing deficit handstand pushups, where you do them on paralettes or a beam, so instead of your head reaching hand level, your shoulders reach hand level, effectively doubling the rang of motion. Very cool stuff. Good luck!


Leave a Reply
Your email is safe with us.
You must be logged in to post a comment.