Previous Chapter ... ... Next Chapter
The muscle-up is a fundamental movement that is very important for beginners to learn. Not only does the muscle-up get you above the rings, it also develops strength in your full range of motion through the pull-up and dip positions. Once you reach a certain point, you will transition from the strict pull-up and dip muscle-up to more difficult pulling skills, pushing skills, and isometrics in succession with the muscle-up transition. This will help build strength as you move from one position to another, thus allowing you to build routines and sequences that can be utilized for strength and conditioning. By the time you reach the high end of the intermediate strength level, the muscle up has outlived its usefulness, and may be abandoned for more challenging movements.
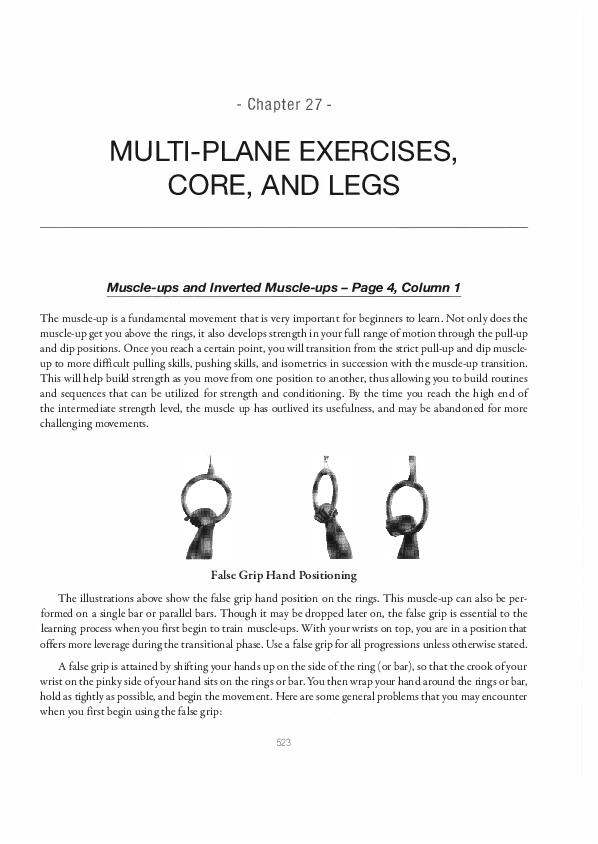
The illustrations above show the false grip hand position on the rings. This muscle-up can also be performed on a single bar or parallel bars. Though it may be dropped later on, the false grip is essential to the learning process when you first begin to train muscle-ups. With your wrists on top, you are in a position that offers more leverage during the transitional phase. Use a false grip for all progressions unless otherwise stated.
A false grip is attained by shifting your hands up on the side of the ring (or bar), so that the crook of your wrist on the pinky side of your hand sits on the rings or bar. You then wrap your hand around the rings or bar, hold as tightly as possible, and begin the movement. Here are some general problems that you may encounter when you first begin using the false grip:
It is possible to perform a muscle-up when you can achieve five dips and five chest-to-bar pull-ups wth full range of motion if you utilize a correct false grip. If you are much stronger than this and still have issues with a muscle up, your false grip positioning may not be correct. Alternatively, you may have other technique issues
If your wrists are being torn up cluring your training, you have a few options. The first is to clecrease the frequency. This will allow your skin to heal and toughen up into calluses-much like how your hands will toughen up when you have trained long enough. Another option is to get wristbancls or use athletic tape around the wrist to blunt the friction. (This generally makes it harder to hold a false grip, however.) Gloves can of course be used, but this takes away from grip strength and is not recommended.
By this point you should know that working through injuries could prolong them. There is no reason to destroy the skin on your wrists or even on your hands. Consider torn up wrists a sports injury that takes away from your training. The recommended method to address this is to train a different skill or similar progression while your wrists are healing and come back to the muscle-up when you are healed.
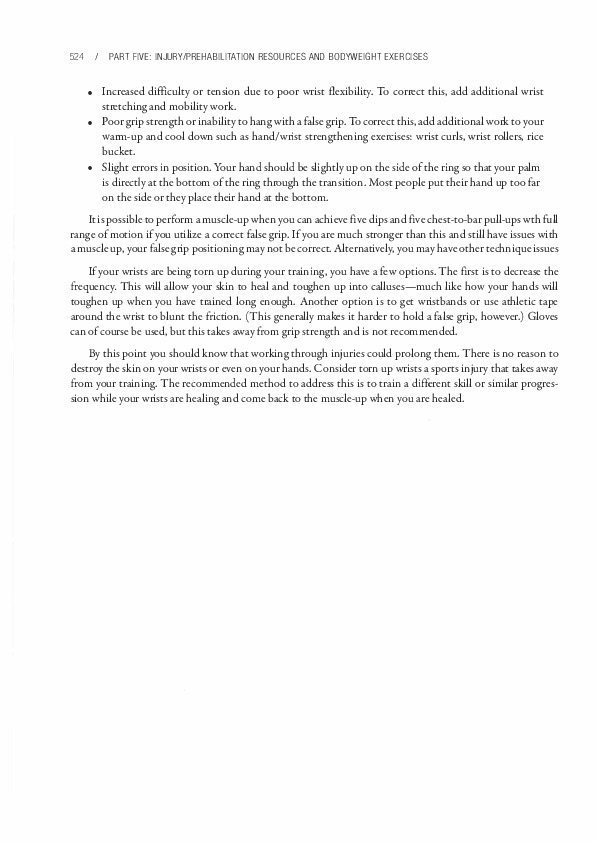
Scapular Positioning: Begin in the rings support position, with your scapulas depressed. They will remain depressed to the bottom of the dip position. Once there, relax your scapulas and allow them to elevate. As you move through the transition, depress them again and lower to a hang position.
Technique: From the straight-arm support position, lower slowly to the bottom of a dip position. Be sure to keep the rings close to your sides. Once you reach the bottom of the dip, the following must occur during the transition phase-simultaneously:
For muscle-up negatives (which can be abbreviated MUNegatives), you should focus on performing muscle-up technique exactly in reverse. This is the key to learning the movement before your strength allows you to complete it. Additionally, learning to control and manipulate negatives will allow you to chain consecutive muscle-ups together faster.
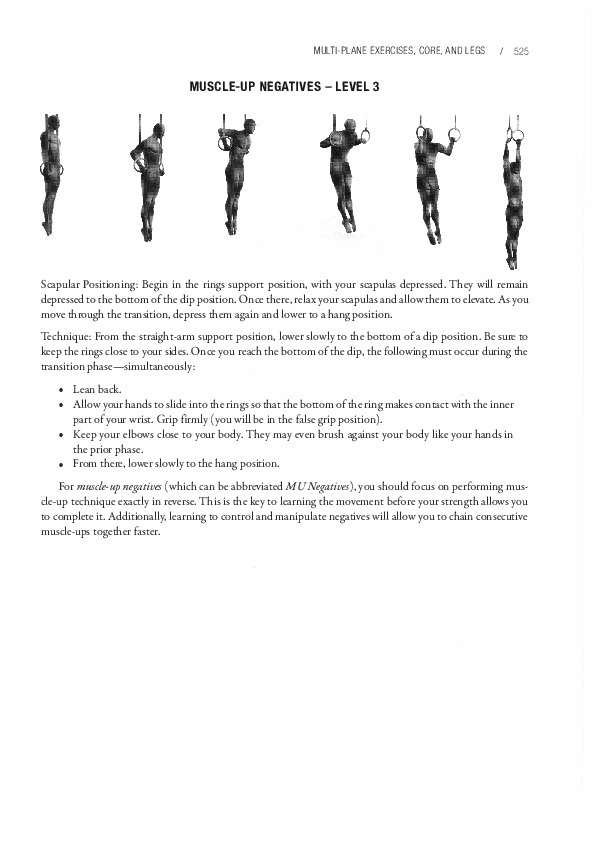
Scapular Positioning: Begin with your shoulders relaxed. As you move up from the swing, activate your shoulders by depressing your scapulas. As you enter the transition phase, retract them strongly. As you push out of the dip, they should be depressed.
Technique: Begin with an arch-hollow motion by pushing your hips and shoulders alternately forward and backward. On the final arch, initiate the pull-up. As your hands begin to near your chin, continue pullinguntil they reach your chest. From there:
The key with kipping muscle-ups (which can be abbreviated (KippingMU) is to reinforce proper movement patterns and build strength through your complete range of motion while using the lower-intensity kipping method. Assisted-muscle ups (with a spotter or leg/band assistance) also fall into this category, and can be used as an alternative to kipping muscle-ups.
For most people, this is their first introduction to muscle-ups. If the kipping muscle-ups are not working, the difficulty most likely lies in the transition. You can lower the rings and practice the transition from a rowing position, or you can use a spotter to reduce the load while practicing the proper technique to move through the transition. If a pulley system is available to help decrease the load, this can also be used.
Most of the difficulties in this movement are grounded in two places. First, many people do not pull high enough to make it through the transition phase. This can be counteracted with increased strength, by including practice using the techniques oudined above. Second, many people will have problems stabilizing the position above the rings. This is also an issue of support hold practice, as well as practicing ring dips. You really have to focus on gluing the rings to your side to make sure that you do not wobble or fall out of the dip or support position while above the rings.
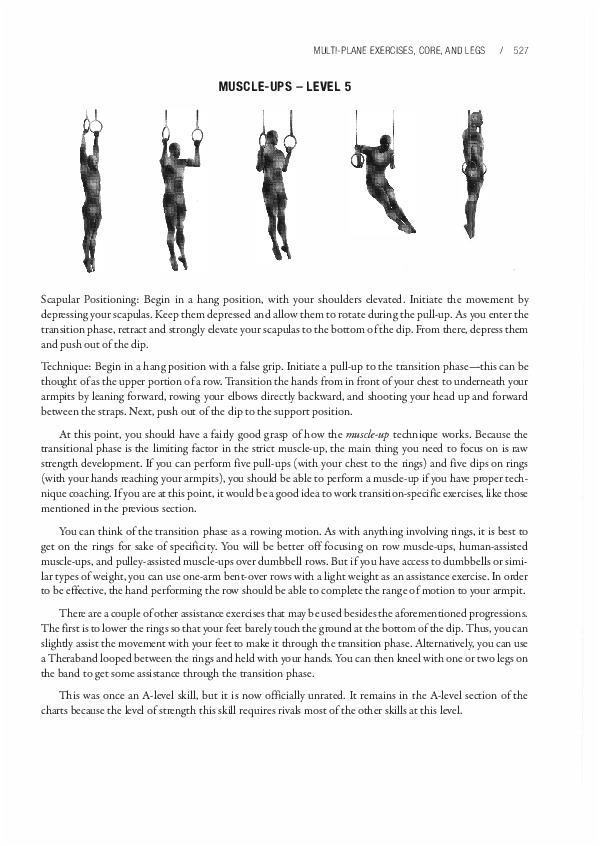
Scapular Positioning: Begin in a hang position, with your shoulders elevated. Initiate the movement by clepressing your scapulas. Keep them depressed and allow them to rotate cluring the pull-up. As you enter the transition phase, retract and strongly elevate your scapulas to the bottom of the dip. From there, clepress them and push out of the dip.
Technique: Begin in a hang position with a false grip. Initiate a pull-up to the transition phase-this can be thought of as the upper portion of a row. Transition the hands from in front of your chest to underneath your armpits by leaning forward, rowing your elbows directly backward, and shooting your head up and forward between the straps. Next, push out of the dip to the support position.
At this point, you should have a fairly goocl grasp of how the muscle-up technique works. Because the transitional phase is the limiting factor in the strict muscle-up, the main thing you need to focus on is raw strength development. If you can perform five pull-ups (with your chest to the rings) and five dips on rings (with your hands reaching your armpits), you should be able to perform a muscle-up if you have proper technique coaching. If you are at this point, it would be a good idea to work transition-specifi.c exercises, like those mentioned in the previous section.
You can think of the transition phase as a rowing motion. As with anything involving rings, it is best to get on the rings for sake of specifi.city. You will be betcer off focusing on row muscle-ups, human-assisted muscle-ups, and pulley-assisted muscle-ups over dumbbell rows. But if you have access to clumbbells or similar types of weight, you can use one-arm bent-over rows with a light weight as an assistance exercise. In order to be effective, the hand performing the row should be able to complete the range of motion to your armpit. There are a couple of other assistance exercises that may be used besides the aforementioned progressions.
The first is to lower the rings so that your feet barely touch the ground at the boctom of the dip. Thus, you can slightly assist the movement with your feet to make it through the transition phase. Alternatively, you can use a Theraband looped between the rings and held with your hands. You can then kneel with one or two legs on the bancl to get some assistance through the transition phase.
This was once an A-level skill, but it is now officially unrated. It remains in the A-level section of the charts because the level of strength this skill requires rivals most of the other skills at this level.
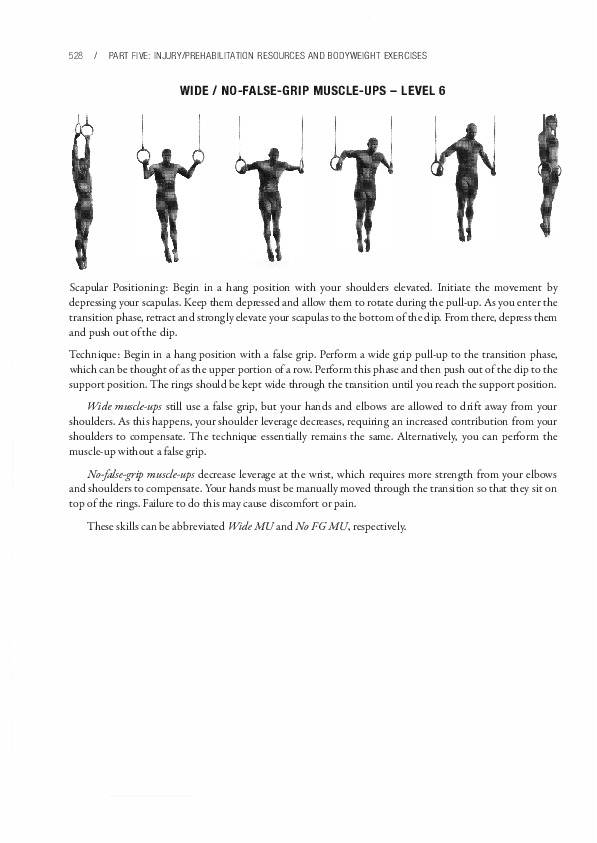
Scapular Positioning: Begin in a hang position with your shoulders elevated. Iniciare the movement by depressing your scapulas. Keep them depressed and allow them to rotate during the pull-up. As you enter the transition phase, retract and strongly elevate your scapulas to the bottom of the dip. From there, depress them and push out of the dip.
Technique: Begin in a hang position with a false grip. Perform a wide grip pull-up to the transition phase, which can be thought of as the upper portion of a row. Perform this phase and then push out of the dip to the support position. The rings should be kept wide through the transition until you reach the support position.
Wide muscle-ups still use a false grip, but your hands and elbows are allowed to drift away from your shoulders. As this happens, your shoulder leverage decreases, requiring an increased contribution from your shoulders to compensate. The technique essentially remains the same. Alternatively, you can perform the muscle-up without a false grip.
No false-grip muscle-ups decrease leverage at the wrist, which requires more strength from your elbows and shoulders to compensate. Your hands muse be manually moved through the transition so that they sic on top of the rings. Failure to do this may cause discomfort or pain. These skills can be abbreviated WideMUand No FGMU, respectively.

Scapular Positioning: Begin in a hang position with your shoulders elevated. Initiate the movement by depressing your scapulas. Keep them depressed and allow them to rotate during the pull-up. As you enter the transition phase, retract and strongly elevate your scapulas to the bottom of the dip. From there, depress them and push out of the dip.
Technique: Begin in a hang position with a false grip. Pull-up to your chest. Row your elbows behind you and force your chest over the bar. Push out of the dip to the bar support position.
The strict bar muscle-up (which can be abbreviated Strict Bar MU) is performed without a kip, which makes it difficult. A false grip may be used for this movement. Since your body cannot go through the bar like it can with rings, it has to move behind the bar with your hands in front. This backward displacement of the body creates increased torque at your hands, which must be countered by an increase in elbow and shoulder strength.
It may be useful to use a semi-L-sit position for this movement, as it will push your torso back behind the bar. As your head is pulled up and past your chin, pressure must continually be exerted on your hands and wrists. As soon as your chest passes your hands, lean forward and drive your hands toward your stomach to compensate. You can drop the L-sit legs position at this point. The transition then occurs into a dip on the bar. From there, push the dip out to the support position above the bar.
The illustrations above do not depict the L-sit position, but they do show the type of muscle-up that you are working toward.
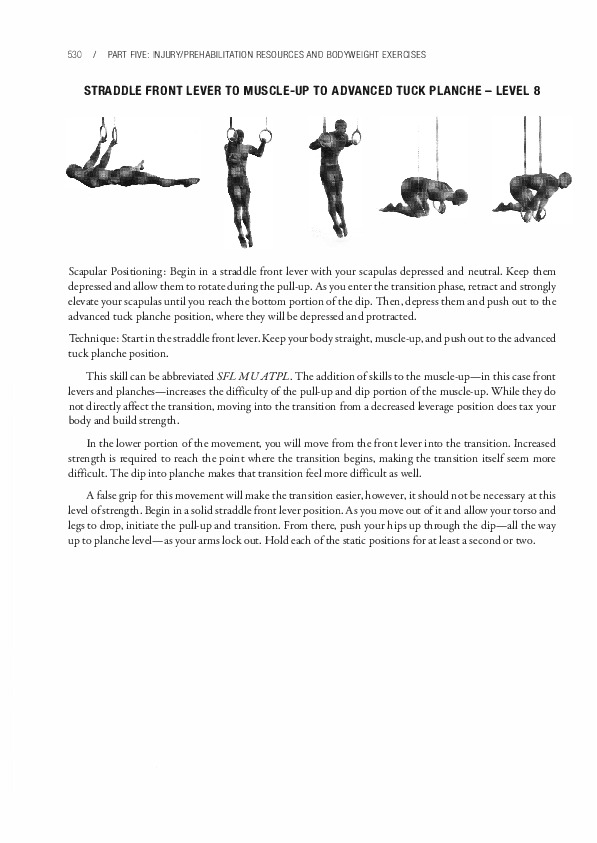
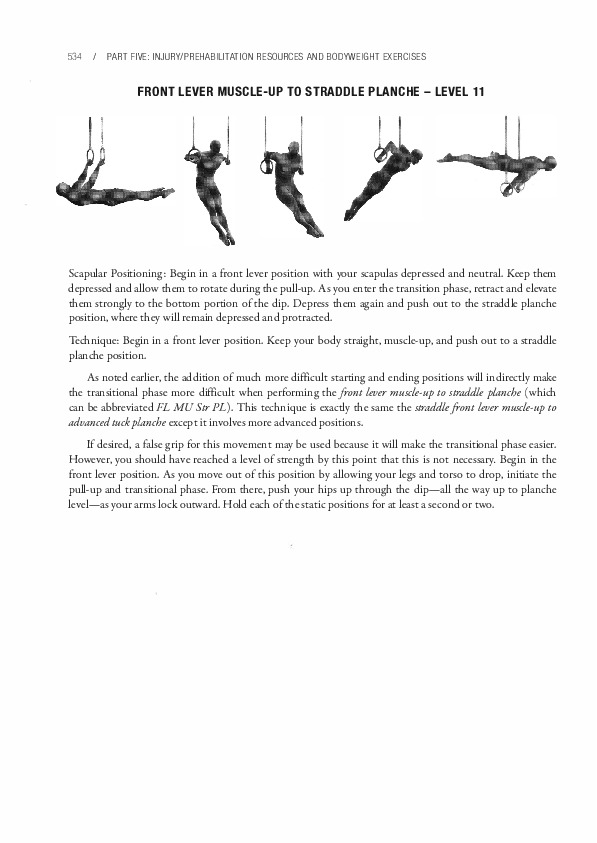
Scapular Positioning: Begin in a straddle front lever with your scapulas depressed and neutral. Keep them depressed and allow them to rotate during the pull-up. As you enter the transition phase, retract and strongly elevate your scapulas until you reach the bottom portion of the dip. Then, depress them and push out to the advanced tuck planche position, where they will be depressed and protracted.
Technique: Start in the straddle front lever. Keep your body straight, muscle-up, and push out to the advanced tuck planche position.
This skill can be abbreviated SFL MUATPL. The addition of skills to the muscle-up-in this case front levers and planches-increases the difficulty of the pull-up and dip portion of the muscle-up. While they do not directly affect the transition, moving into the transition from a decreased leverage position does tax your body and build strength.
In the lower portion of the movement, you will move from the front lever into the transition. Increased strength is required to reach the point where the transition begins, making the transition itself seem more difficult. The dip into planche makes that transition feel more difficult as well.
A false grip for this movement will make the transition easier, however, it should not be necessary at this level of strength. Begin in a solid straddle front lever position. As you move out of it and allow your torso and legs to drop, initiate the pull-up and transition. From there, push your hips up through the dip-all the way up to planche level-as your arms lock out. Hold each of the static positions for at least a second or two.
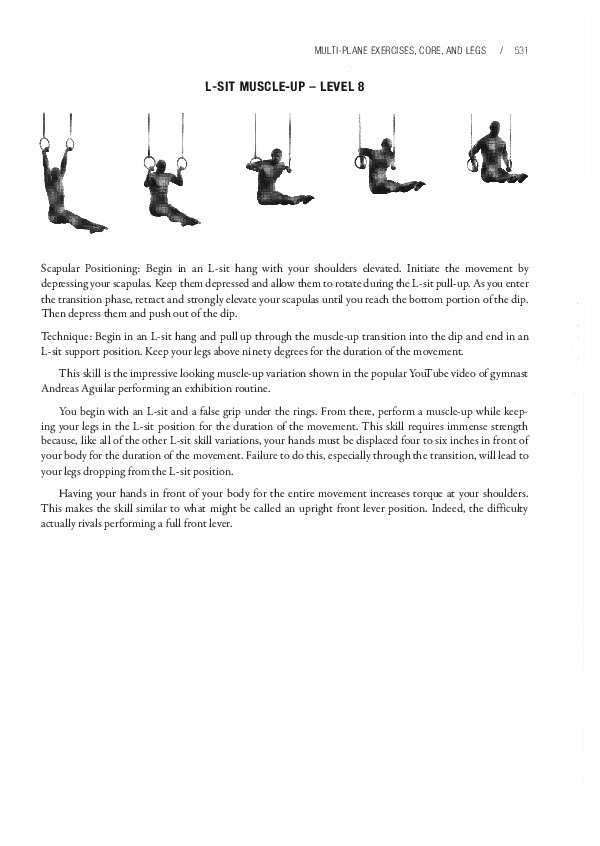
Scapular Positioning: Begin in an L-sit hang with your shoulders elevated. Initiate the movement by depressing your scapulas. Keep them depressed and allow them to rotate during the L-sit pull-up. As you enter the transition phase, retract and strongly elevate your scapulas until you reach the bottom portion of the dip. Then depress them and push out of the dip.
Technique: Begin in an L-sit hang and pull up through the muscle-up transition into the dip and end in an L-sit support position. Keep your legs above ninety degrees for the duration of the movement. This skill is the impressive looking muscle-up variation shown in the popular YouTube video of gymnast Andreas Aguilar performing an exhibition routine.
You begin with an L-sit and a false grip under the rings. From there, perform a muscle-up while keeping your legs in the L-sit position for the duration of the movement. This skill requires immense strength because, like all of the other L-sit skill variations, your hands must be displaced four to six inches in front of your body for the duration of the movemen.t. Failure to do this, especially through the transition, will lead to your legs dropping from the L-sit position.
Having your hands in front of your body for the entire movement increases corque at your shoulders. This makes the skill similar to what might be called an upright front lever position. Indeed, the difficulty actually rivals performing a full front lever.
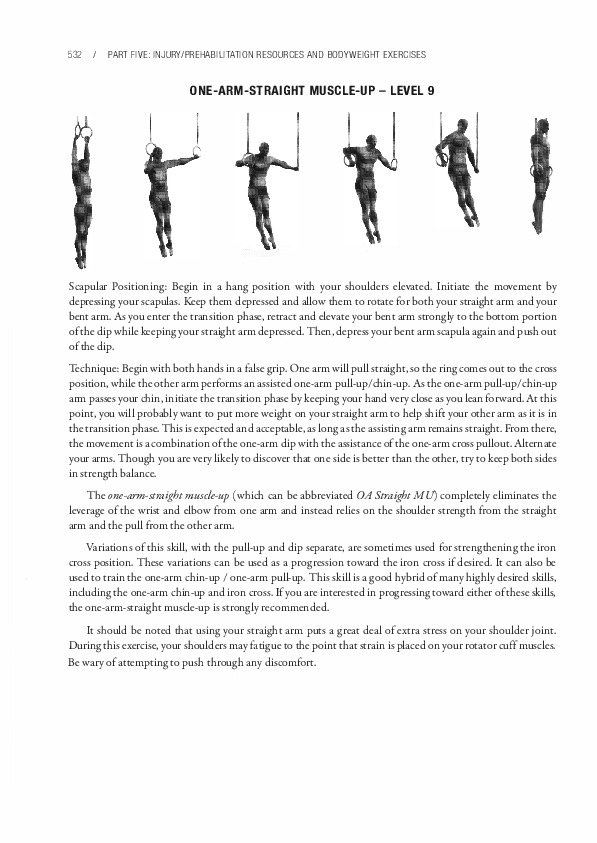
Scapular Positioning: Begin in a hang position with your shoulders elevated. Initiate the movement by depressing your scapulas. Keep them depressed and allow them to rotate far both your straight arm and your bent arm. As you enter the transition phase, retract and elevate your bent arm strongly to the bottom portion of the dip while keeping your straight arm depressed. Then, depress your bent arm scapula again and push out of the dip.
Technique: Begin with both hands in a false grip. One arm will pull straight, so the ringcomes out to the cross position, while the other arm gs an assisted one-arm pull-up/chin-up. As the one-arm pull-up/chin-up arm passes your chin, initiate the transition phase by keepingyour hand very close as you lean forward. At this point, you will probably want to put more weight on your straight arm to help shift your other arm as it is in the transition phase. This is expected and acceptable, as longas the assistingarm remains straight. From there, the movement is a combination of the one-arm dip with the assistance of the one-arm cross pullout. Alternate your arms. Though you are very likely to discover that one side is better than the other, try to keep both sides in strength balance.
The one-arm-straight muscle-up (which can be abbreviated OA Straight MU) completely eliminates the leverage of the wrist and elbow from one arm and instead relies on the shoulder strength from the straight arm and the pull from the other arm.
Variations of this skill, with the pull-up and dip separate, are sometimes used far strengthening the iron cross position. These variations can be used as a progression toward the iron cross if desired. It can also be used to train the one-arm chin-up / one-arm pull-up. This skill is a good hybrid of many highly desired skills, including the one-arm chin-up and iron cross. If you are interested in progressing toward either of these skills, the one-arm-straight muscle-up is strongly recommended.
It should be noted that using your straight arm puts a great deal of extra stress on your shoulder joint. During this exercise, your shoulders may fatigue to the point that strain is placed on your rotator cuff muscles. Be wary of attempting to push through any discomfort.
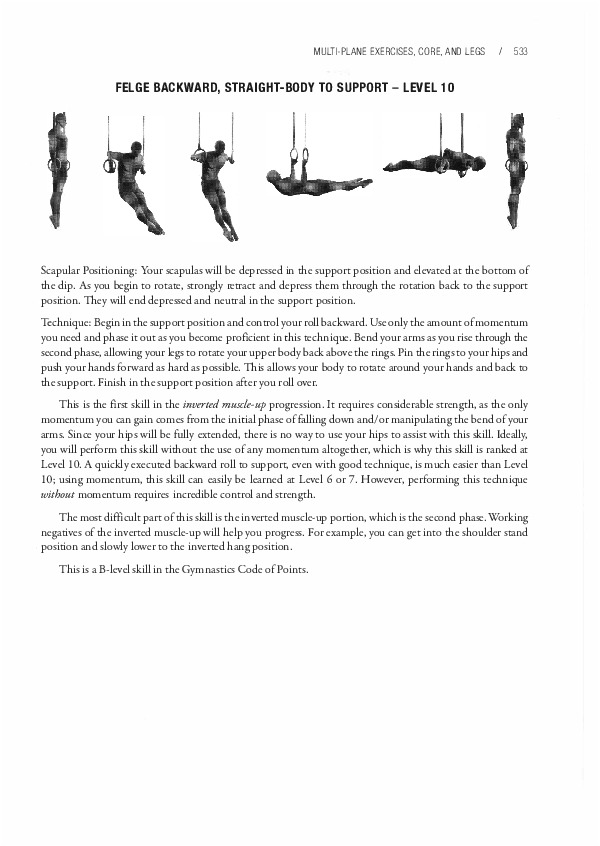
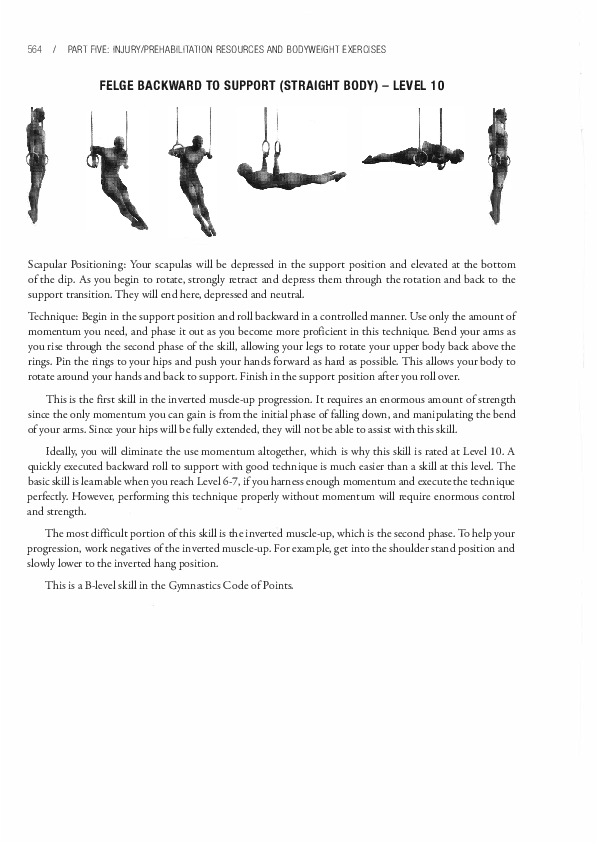
Scapular Positioning: Your scapulas will be depressed in the support position and elevated at the bottom of the dip. As you begin to rotate, strongly retract and depress them through the rotation back to the support position. They will end depressed and neutral in the support position.
Technique: Begin in the support position and control your roll backward. Use only the amount of momentum you need and phase it out as you become proficient in this technique. Bend your arms as you rise through the second phase, allowing your legs to rotate your upper body back above the rings. Pin the rings to your hips and push your hands forward as hard as possible. This allows your body to rotate around your hands and back to the support. Finish in the support position after you roll over.
This is the first skill in the inverted muscle-up progression. It requires considerable strength, as the only momentum you can gain comes from the inicial phase of falling down and/or manipulating the bend of your arms. Since your hips will be fully extended, there is no way to use your hips to assist with this skill. Ideally, you will perform this skill without the use of any momentum altogether, which is why this skill is ranked at Level 10. A quickly executed backward roll to support, even with good technique, is much easier than Level 10; using momentum, this skill can easily be learned at Level 6 or 7. However, performing this technique without momentum requires incredible control and strength.
The most difficult part of this skill is the inverted muscle-up portion, which is the second phase. Working negatives of the inverted muscle-up will help you progress. Far example, you can get into the shoulder stand position and slowly lower to the inverted hang position.
This is a B-level skill in the Gymnastics Code of Points.
Scapular Positioning: Begin in a front lever position with your scapulas depressed and neutral. Keep them depressed and allow them to rotate during the pull-up. As you enter the transition phase, retract and elevate them strongly to the bottom portion of the dip. Depress them again and push out to the straddle planche position, where they will remain depressed and protracted.
Technique: Begin in a front lever position. Keep your body straight, muscle-up, and push out to a straddle planche position.
As noted earlier, the addition of much more difficult starting and ending positions will indirectly make the transitional phase more difficult when performing cheJront lever muscle-up to straddle planche (which can be abbreviated FL MU Str PL). This technique is exactly the same the straddleJront lever muscle-up to advanced tuckplanche except it involves more advanced positions.
If desired, a false grip for this movement may be used because it will make the transitional phase easier.
However, you should have reached a level of strength by this point that this is not necessary. Begin in the front lever position. As you move out of this position by allowing your legs and torso to drop, initiate the pull-up and transitional phase. From there, push your hips up through the dip-all the way up to planche level-as your arms lock oucward. Hold each of the static positions for at least a second or two.
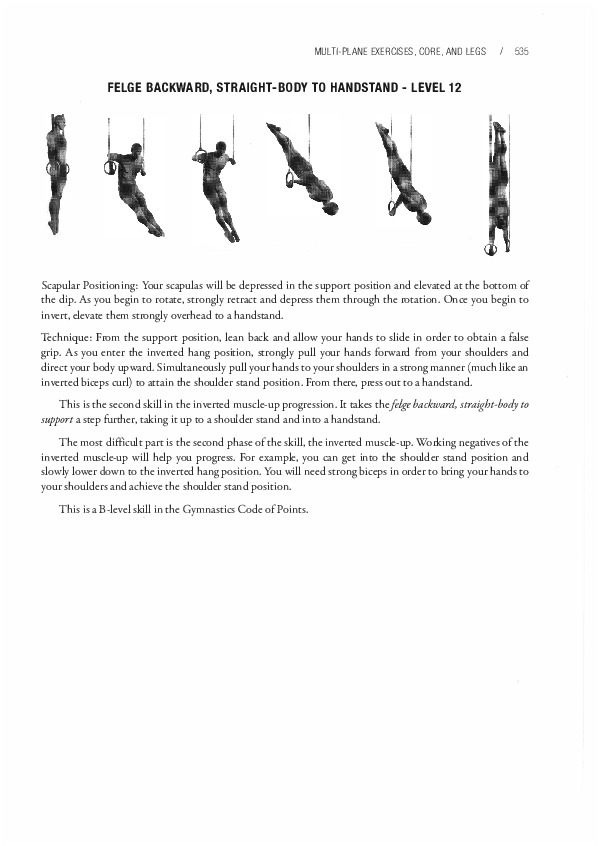
Scapular Positioning: Your scapulas will be depressed in the support position and elevated at the bottom of the dip. As you begin to rotate, strongly retract and depress them through the rotation. Once you begin to invert, elevate them strongly overhead to a handstand.
Technique: From the support position, lean back and allow your hands to slide in order to obtain a false grip. As you enter the inverted hang position, strongly pull your hands forward from your shoulders and direct your body upward. Simultaneously pull your hands to your shoulders in a strong manner (much like an inverted biceps curl) to attain the shoulder stand position. From there, press out to a handstand.
This is the second skill in the inverted muscle-up progression. It takes the felge backward, straight-body to support a step further, taking it up to a shoulder stand and into a handstand.
The most difficult part is the second phase of the skill, the inverted muscle-up. Working negatives of the inverted muscle-up will help you progress. For example, you can get into the shoulder stand position and slowly lower down to the inverted hang position. You will need strong biceps in order to bring your hands to your shoulders and achieve the shoulder stand position.
This is a B-level skill in the Gymnastics Code of Points.
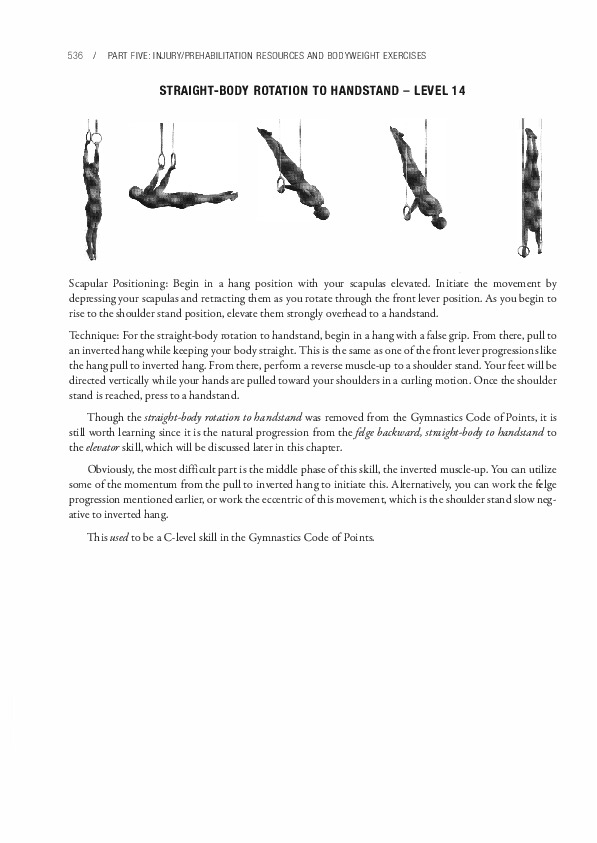
Scapular Positioning: Begin in a hang position with your scapulas elevated. Iniciare the movement by depressing your scapulas and retracting them as you rotate through the front lever position. As you begin to rise to the shoulder stand position, elevate them strongly overhead to a handstand.
Technique: For the straight-body rotation to handstand, begin in a hang with a false grip. From there, pull to an inverced hang while keeping your body straight. This is the same as one of the front lever progressions like the hang pull to inverted hang. From there, perform a reverse muscle-up to a shoulder stand. Your feet will be directed vertically while your hands are pulled toward your shoulders in a curling motion. Once the shoulder stand is reached, press to a handstand.
Though the straight-body rotation to handstand was removed from the Gymnastics Code of Points, it is still worch learning since it is the natural progression from the felge backward, straight-body to handstand to the elevator skill, which will be discussed later in this chapter.
Obviously, the most difficult pare is the middle phase of this skill, the inverced muscle-up. You can ucilize some of the momentum from the pull to inverced hang to iniciare this. Alcernatively, you can work the felge progression mentioned earlier, or work the eccentric of this movement, which is the shoulder stand slow negative to inverted hang.
This used to be a C-level skill in the Gymnastics Code of Points.
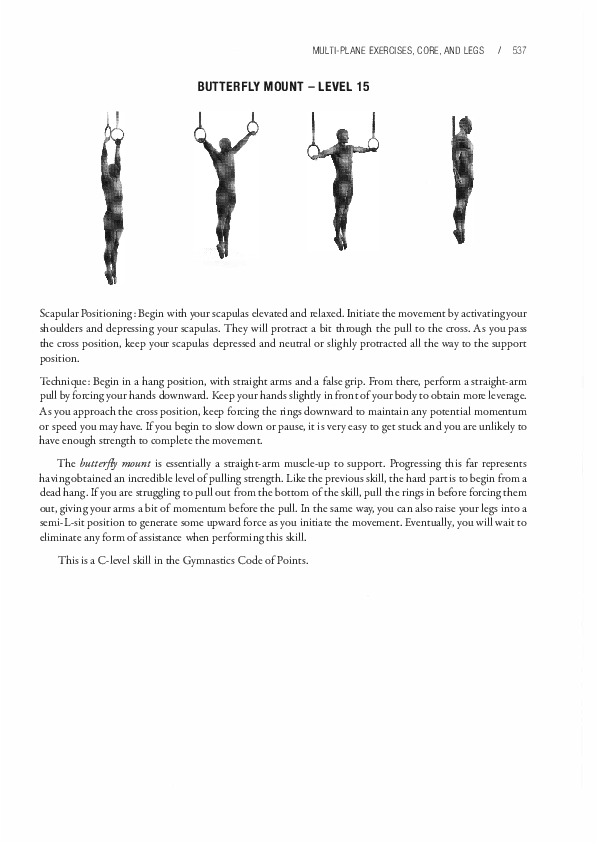
Scapular Positioning: Begin with your scapulas elevated and relaxed. Initiate the movement by activatingyour shoulders and depressing your scapulas. They will protract a bit through the pull to the cross. As you pass the cross position, keep your scapulas depressed and neutral or slighly protracted all the way to the support position.
Technique: Begin in a hang position, with straight arms and a false grip. From there, perform a straight-arm pull by forcing your hands downward. Keep your hands slightly in front of your body to obtain more leverage.
As you approach the cross position, keep forcing the rings downward to maintain any potential momentum or speed you may have. If you begin to slow down or pause, it is very easy to get stuck and you are unlikely to have enough strength to complete the movement.
The butterjly mount is essentially a straight-arm muscle-up to support. Progressing this far represents having obtained an incredible level of pulling strength. Like the previous skill, the hard part is to begin from a dead hang. If you are struggling to pull out from the bottom of the skill, pull the rings in before forcing them out, giving your arms a bit of momentum before the pull. In the same way, you can also raise your legs into a semi-L-sit position to generate some upward force as you initiate the movement. Eventually, you will wait to eliminate any form of assistance when performing this skill.
This is a C-level skill in the Gymnastics Code of Points.
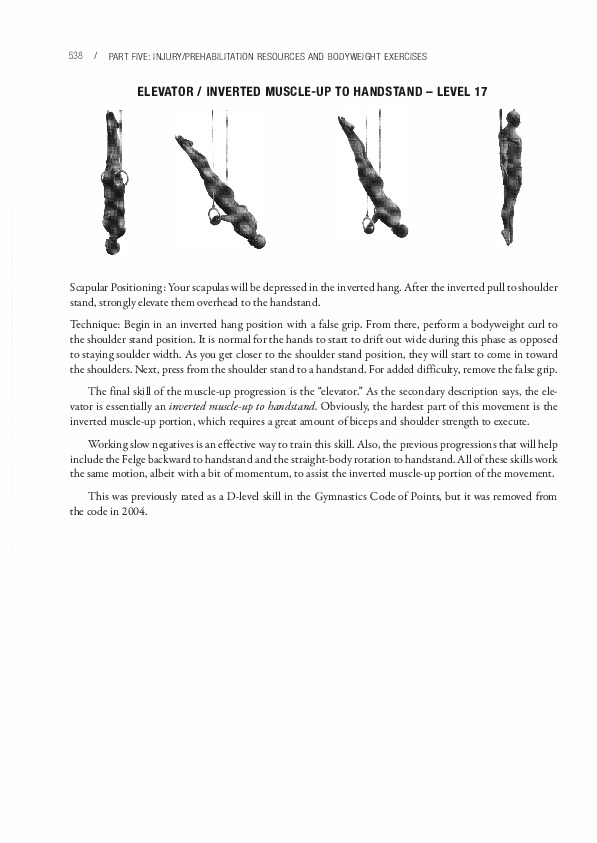
Scapular Positioning: Your scapulas will be depressed in the inverted hang. After the inverted pull to shoulder stand, strongly elevate them overhead to the handstand.
Technique: Begin in an inverted hang position with a false grip. From there, perform a bodyweight curl to the shoulder stand position. It is normal for the hands to start to drift out wide during this phase as opposed to staying soulder width. As you get closer to the shoulder stand position, they will start to come in toward the shoulders. Next, press from the shoulder stand to a handstand. For added difficulty, remove the false grip.
The final skill of the muscle-up progression is the "elevator." As the secondary description says, the elevator is essentially an inverted muscle-up to handstand. Obviously, the hardest pare of this movement is the inverted muscle-up portion, which requires a great amount of biceps and shoulder strength to execute.
Working slow negatives is an effective way to train this skill. Also, the previous progressions that will help include the Felge backward to handstand and the straight-body rotation to handstand. All of these skills work the same motion, albeit with a bit of momentum, to assist the inverted muscle-up portion of the movement.
This was previously rated as a D-level skill in the Gymnastics Code of Points, but it was removed from the code in 2004.
The elbow lever progressions are mainly based on balancing ability. While some degree of strength is required to maintain the positions, practice is the main factor in attaining these skills. Therefore, level increases in these skills are inconsistent with the other skills and strength progressions on the charts.
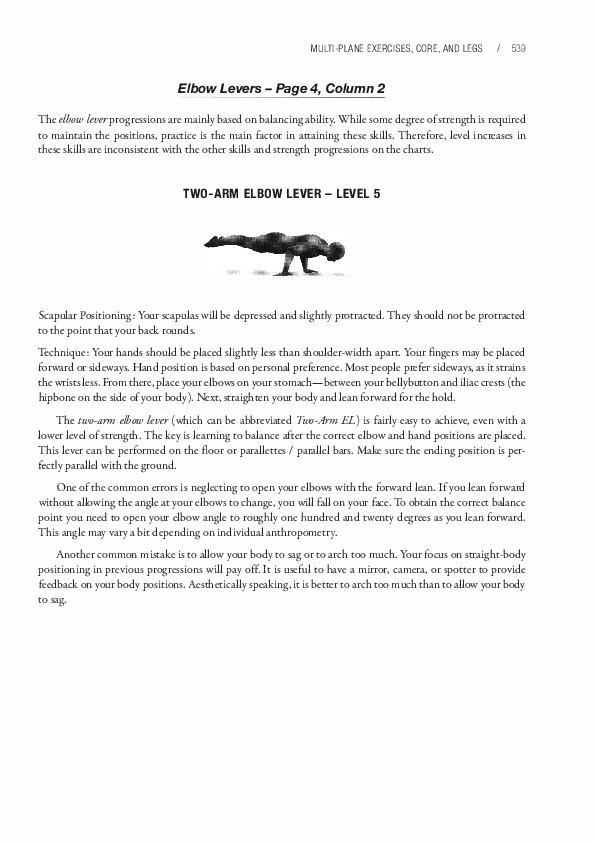
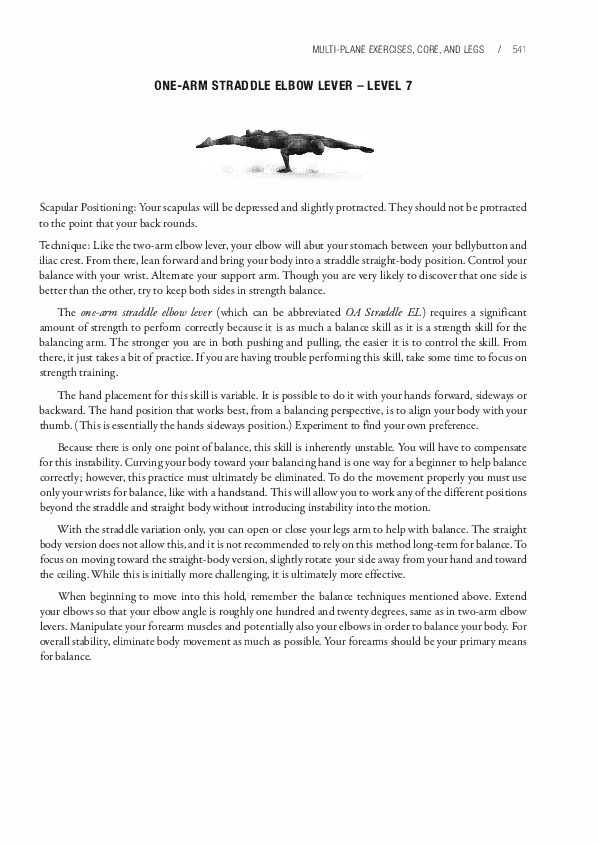
Scapular Positioning: Your scapulas will be depressed and slightly protracted. They should not be protracted to the point that your back rounds.
Technique: Your hands should be placed slightly less than shoulder-width apart. Your fingers may be placed forward or sideways. Hand position is based on personal preference. Most people prefer sideways, as it strains the wrists less. From there, place your elbows on your stomach-between your bellybutton and iliac crests (the hipbone on the side of your body). Next, straighten your body and lean forward for the hold.
The two-arm elbow lever (which can be abbreviated Two-Arm EL) is fairly easy to achieve, even with a lower level of strength. T he key is learning to balance after the correct elbow and hand positions are placed.
This lever can be performed on the floor or parallettes / parallel bars. Make sure the ending position is perfectly parallel with the ground.
One of the common errors is neglecting to open your elbows with the forward lean. If you lean forward without allowing the angle at your elbows to change, you will fall on your face. To obtain the correct balance point you need to open your elbow angle to roughly one hundred and twenty degrees as you lean forward.
This angle may vary a bit depending on individual anthropometry.
Another common mistake is to allow your body to sag or to arch too much. Your focus on straight-body positioning in previous progressions will pay off It is useful to have a mirror, camera, or spotter to provide feedback on your body positions. Aesthetically speaking, it is better to arch too much than to allow your body to sag.

Scapular Positioning: Your scapulas will be depressed and slightly protracted. They should not be protracted to the point that your back rounds.
Technique: Your hands should be placed slightly less than shoulder-width apart. Your fingers may be placed forward or sideways, based on personal preference, though be aware that sideways will strain the wrists less. From there, place your elbows on your stomach-between your bellybutton and iliac crests (the hipbone on the side of your body). Next, straighten your body and lean forward for the hold.
The rings two-arm elbow lever (which can be abbreviated Rings Two-Arm EL) is a more difficult variation of the elbow lever, due to the instability of the rings. Other than the inherent instability of the apparatus, the skill is performed in exactly the same manner as an elbow lever is performed on the parallettes or floor. When performing this skill, ensure that your body is perfectly parallel with the ground when you reach the ending position. You can turn the rings out to improve control for the hold.
This lever is typically approached in two different ways. For the first method, begin in an L-sit. As you come out and lean forward, you can pull the rings in and place your elbows on your stomach. From there, lean forward into the skill while opening your elbows and straightening your body simultaneously. This takes practice to carry out correctly.
For the second method, begin in a rings shoulder stand position. Bring the rings in close to your body while maintaining the position and allow your elbows to make contact with your body. As you begin to lower from the shoulder stand you can adjust the elbow position. From there, all you need to do is lower your legs while keeping your body straight, and open your arms to achieve a rings elbow lever position.
Scapular Positioning: Your scapulas will be depressed and slightly protracted. They should not be protracted to the point that your back rounds.
Technique: Like the two-arm elbow lever, your elbow will abut your stomach between your bellybutton and iliac crest. From there, lean forward and bring your body into a straddle straight-body position. Control your balance with your wrist. Alternate your support arm. Though you are very likely to discover that one side is better than the other, try to keep both sides in strength balance.
The one-arm straddle elbow lever (which can be abbreviated OA Straddle EL) requires a significant amount of strength to do correctly because it is as much a balance skill as it is a strength skill far the balancing arm. The stronger you are in both pushing and pulling, the easier it is to control the skill. From there, it just takes a bit of practice. If you are having trouble doing this skill, take some time to focus on strength training.
The hand placement far this skill is variable. It is possible to do it with your hands forward, sideways or backward. The hand position that works best, from a balancing perspective, is to align your body with your thumb. (This is essentially the hands sideways position.) Experiment to find your own preference.
Because there is only one point of balance, this skill is inherendy unstable. You will have to compensate far this instability. Curving your body toward your balancing hand is one way far a beginner to help balance correctly; however, this practice must ultimately be eliminated. To do the movement properly you must use only your wrists far balance, like with a handstand. This will allow you to work any of the different positions beyond the straddle and straight body without introducing instability into the motion.
With the straddle variation only, you can open or close your legs arm to help with balance. The straight body version does not allow this, and it is not recommended to rely on this method long-term far balance. To focus on moving toward the straight-body version, slightly rotate your side away from your hand and toward the ceiling. While this is initially more challenging, it is ultimately more effective.
When beginning to move into this hold, remember the balance techniques mentioned above. Extend your elbows so that your elbow angle is roughly one hundred and twenty degrees, same as in two-arm elbow levers. Manipulate your forearm muscles and potentially also your elbows in order to balance your body. Far overall stability, eliminate body movement as much as possible. Your forearms should be your primary means far balance.
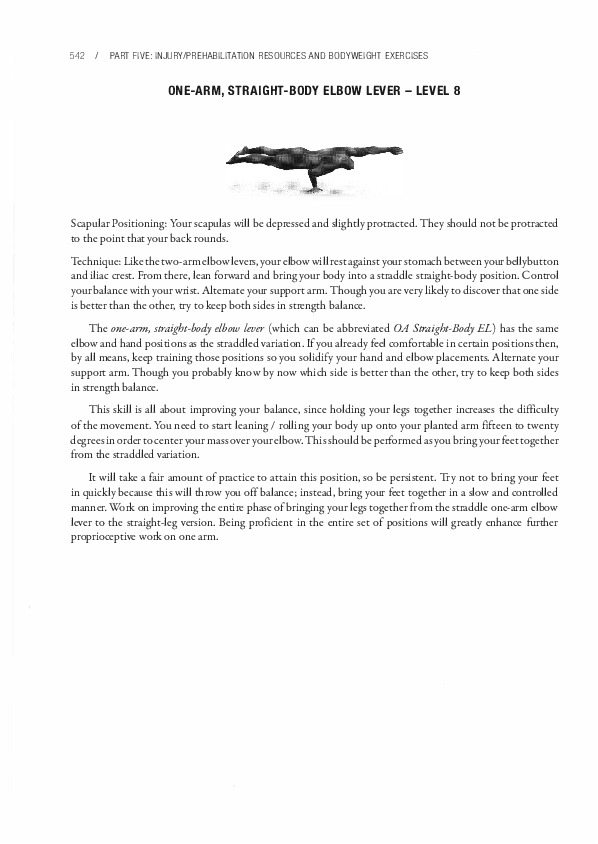
Scapular Positioning: Your scapulas will be depressed and slightly protracted. They should not be protracted to the point that your back rounds.
Technique: Like the two-arm elbow levers, your elbow will rest against your stomach between your belly button and iliac crest. From there, lean forward and bring your body into a straddle straight-body position. Control your balance with your wrist. Alternare your support arm. Though you are very likely to discover that one side is better than the other, try to keep both sides in strength balance.
The one-arm, straight-body elbow lever (which can be abbreviated OA Straight-Body EL) has the same elbow and hand positions as the straddled variation. If you already feel comfortable in certain positions then, by all means, keep training those positions so you solidify your hand and elbow placements. Alternare your support arm. Though you probably know by now which side is better than the other, try to keep both sides in strength balance.
This skill is all about improving your balance, since holding your legs together increases the difficulty of the movement. You need to start leaning / rolling your body up onto your planted arm fifteen to twenty degreesin order tocenter your mass over your elbow. This should be performed as you bringyour feet together from the straddled variation.
It will take a fair amount of practice to attain this position, so be persistent. Try not to bring your feet in quickly because this will throw you off balance; instead, bring your feet together in a slow and controlled manner. Work on improving the entire phase of bringing your legs together from the straddle one-arm elbow lever to the straight-leg version. Being proficient in the entire set of positions will greatly enhance further proprioceptive work on one arm.
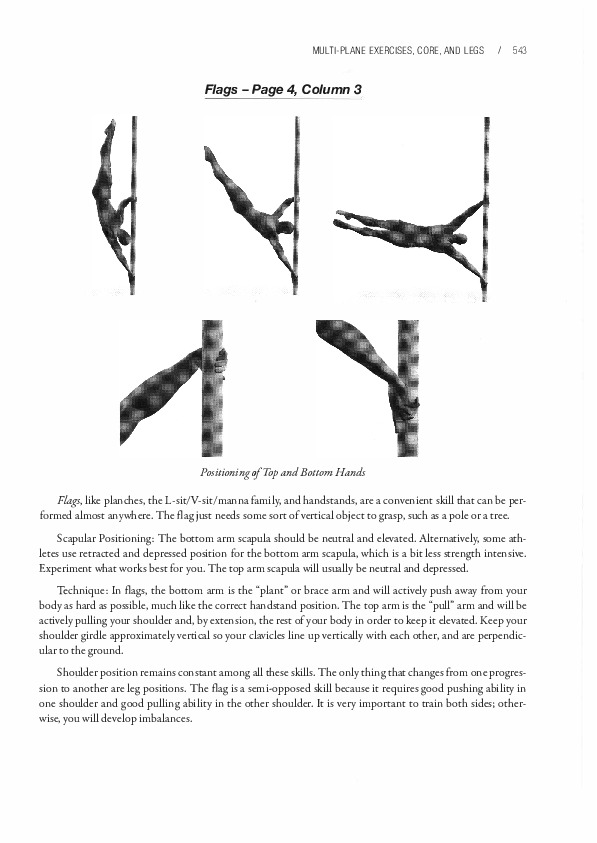
Flags, like planches, the L-sit/V-sit/rnanna farnily, and handstands, are a convenient skill that can be performed alrnost anywhere. The flag just needs some sort of vertical object to grasp, such as a pole or a tree.
Scapular Positioning: The bottom arm scapula should be neutral and elevated. Alternatively, some athletes use retracted and depressed position for the bottom arm scapula, which is a bit less strength intensive. Experiment what works best for you. The top arm scapula will usually be neutral and depressed.
Technique: In flags, the bottom arm is the "plant" or brace arm and will actively push away from your body as hard as possible, much like the correct handstand position. The top arm is the "pull" arm and will be actively pulling your shoulder and, by extension, the rest of your body in order to keep it elevated. Keep your shoulder girdle approximately vertical so your clavicles line up vertically with each other, and are perpendicular to the ground.
Shoulder position remains constant among all these skills. The only thing that changes from one progression to another are leg positions. The flag is a semi-opposed skill because it requires good pushing ability in one shoulder and good pulling ability in the other shoulder. It is very important to train both sides; otherwise, you will develop imbalances.
Your hands should be greater than shoulder width apart-anywhere from a thirty to forty-five degree angle from horizontal for each arm. Try different angles to see what works best for you. Every person is different, so some people will want their arms to be slightly wider or narrower.
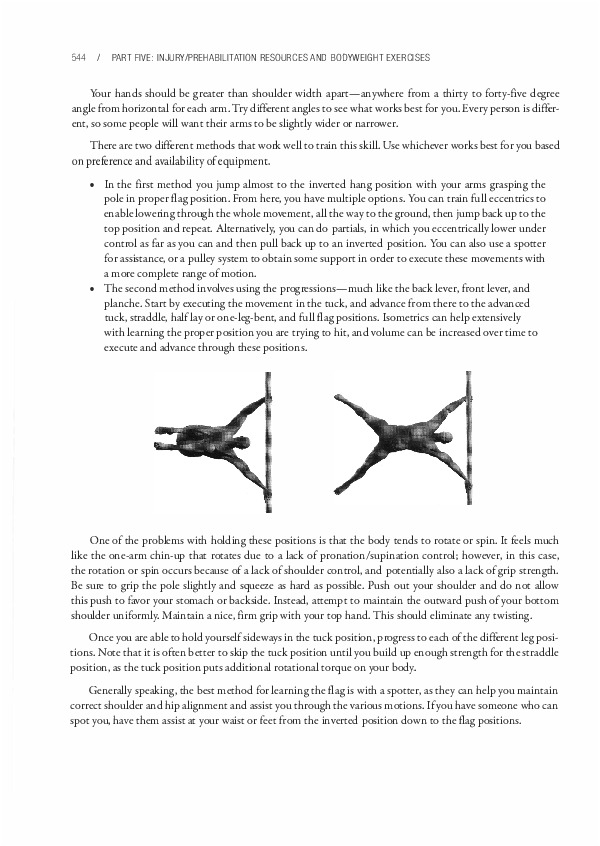
There are two different methods that work well to train this skill. Use whichever works best for you based on preference and availabilicy of equipment.
One of the problems with holding these positions is that the body tends to rotate or spin. It feels much like the one-arm chin-up that rotates due to a lack of pronation/supination control; however, in this case, the rotation or spin occurs because of a lack of shoulder control, and potentially also a lack of grip strength.
Be sure to grip the pole slightly and squeeze as hard as possible. Push out your shoulder and do not allow this push to favor your stomach or backside. Instead, attempt to maintain the outward push of your bottom shoulder uniformly. Maintain a nice, firm grip with your top hand. This should eliminate any twisting.
Once you are able to hold yourself sideways in the tuck position, progress to each of the different leg positions. Note that it is often better to skip the tuck position until you build up enough strength for the straddle position, as the tuck position puts additional rotational torque on your body.
Generally speaking, the best method for learning the flag is with a spotter, as they can help you maintain correct shoulder and hip alignment and assist you through the various motions. If you have someone who can spot you, have them assist at your waist or feet from the inverted position down to the flag positions.
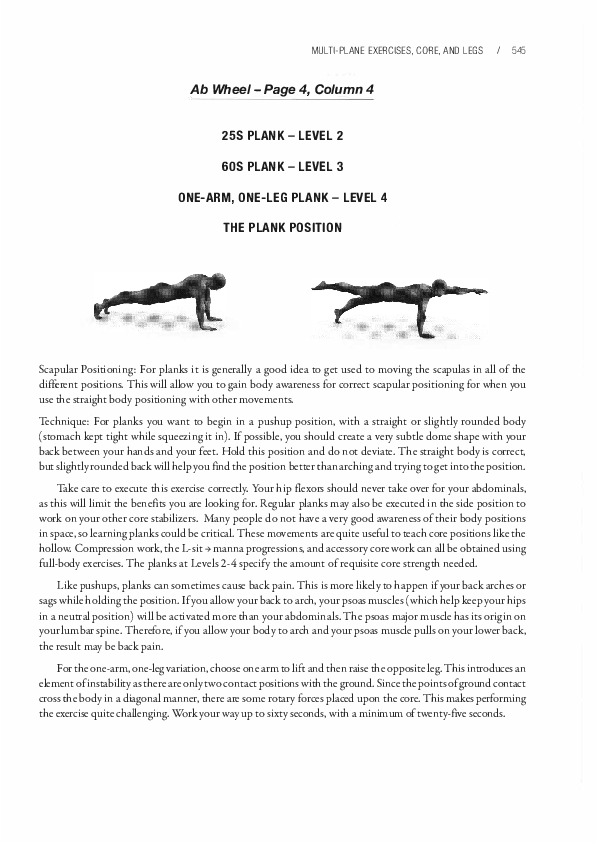
Scapular Positioning: Far planks it is generally a good idea to get used to moving the scapulas in all of the different positions. This will allow you to gain body awareness for correct scapular positioning for when you use the straight body positioning with other movements.
Technique: Far planks you want to begin in a pushup position, with a straight or slightly rounded body (stomach kept tight while squeezing it in). If possible, you should create a very subtle dome shape with your back between your hands and your feet. Hold this position and do not deviate. The straight body is correct, but slightly roundedback will help youfind the position better than archingand trying to get intothe position.
Take care to execute this exercise correctly. Your hip flexors should never take over for your abdominals, as this will limit the benefits you are looking for. Regular planks may also be executed in the side position to work on your other core stabilizers. Many people do not have a very good awareness of their body positions in space, so learning planks could be critical. These movements are quite useful to teach core positions like the hollow. Compression work, the L-sit ➔ manna progressions, and accessory core work can all be obtained using full-body exercises. The planks at Levels 2-4 specify the amount of requisite core strength needed.
Like pushups, planks can sometimes cause back pain. This is more likely to happen if your back arches or sags while holdingthe position. If you allow your back to arch, your psoas muscles (which help keep your hips in a neutral position) will be activated more than your abdominals. The psoas major muscle has its origin on your lumbar spine. Therefore, if you allow your body to arch and your psoas muscle pulls on your lower back, the result may be back pain.
For the one-arm, one-legvariation, choose one arm to lift and then raise the opposite leg. This introduces an element of instability asthere are only twocontact positions with the ground. Since thepointsof ground contact cross the body in a diagonal manner, there are some rotary forces placed upon the core. This makes performing the exercise quite challenging. Work your way up to sixty seconds, with a minimum of twenty-five seconds.
Scapular Positioning: Begin with your scapulas depressed and protracted. As you move through the movement, your scapulas will naturally start to elevate as your arms move overhead. Allow this to happen. At the end of the movement, reverse the scapular positions from elevated and protracted to depressed and protracted to complete the movement.
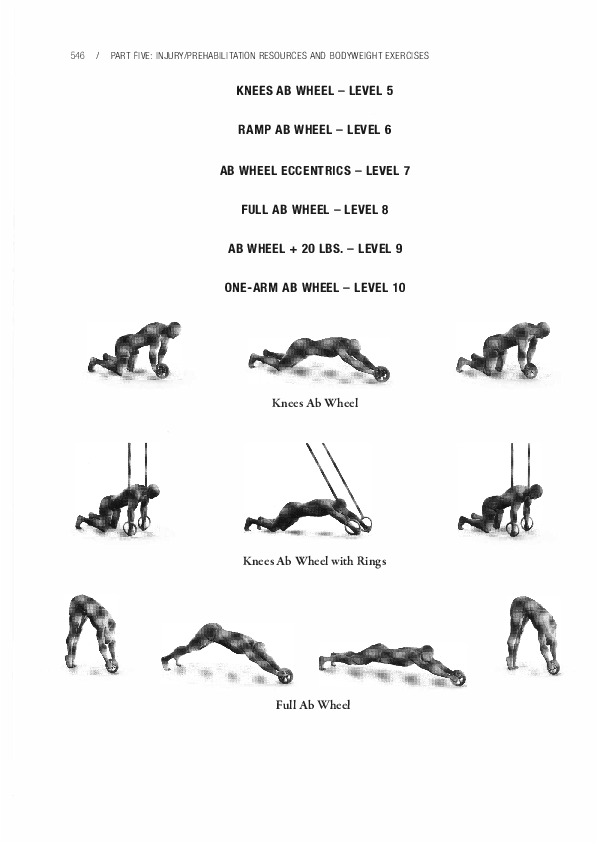
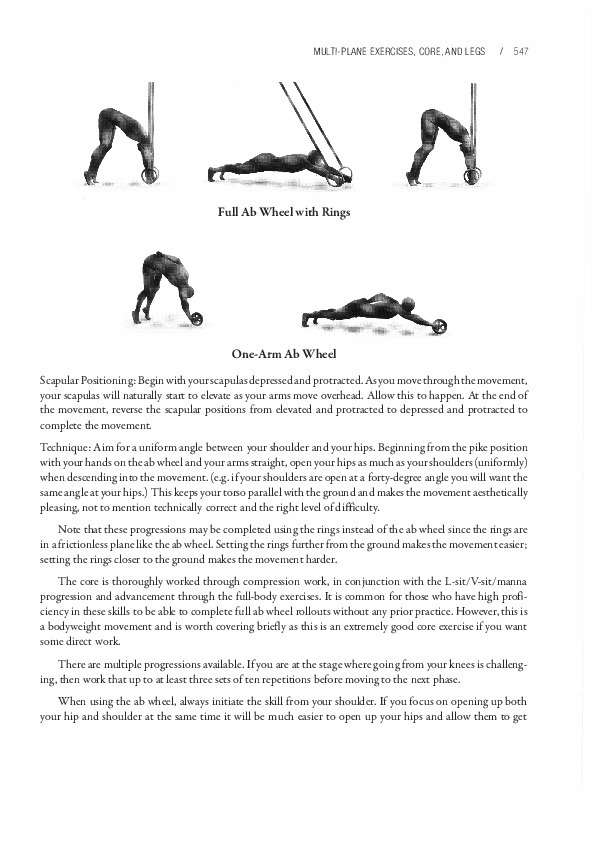
Technique: Aim for a uniform angle between your shoulder and your hips. Beginning from the pike position with your hands on the ab wheel and your arms straight, open your hips as much as your shoulders (uniformly) when descending into the movement. (e.g. if your shoulders are open at a forty-degree angle you will want the same angle at your hips.) This keeps your torso parallel with the ground and makes the movement aesthetically pleasing, not to mention technically correct and the right level of difficulty.
Note that these progressions may be completed using the rings instead of the ab wheel since the rings are in a frictionless plane like the ab wheel. Setting the rings further from the ground makes the movement easier; setting the rings closer to the ground makes the movement harder.
The core is choroughly worked through compression work, in conjunction with the L-sit/V-sit/manna progression and advancement through the full-body exercises. It is common for those who have high proficiency in these skills to be able to complete full ab wheel rollouts without any prior practice. However, this is a bodyweight movement and is worth covering briefly as this is an extremely good core exercise if you want some direct work.
There are multiple progressions available. If you are at the stage wheregoing from your knees is challenging, then work that up to at least three sets often repetitions before moving to the next phase. When using the ab wheel, always iniciare the skill from your shoulder. If you focus on opening up both your hip and shoulder at the same time it will be much easier to open up your hips and allow them to get ahead of you. Iniciare the movement with your shoulders so you can keep your hips under control and open them uniformly. Your shoulders should initiate the movement.
There are multiple methods for improving this skill. All of these approaches will work, so select the one you prefer:
There is one injury aspect that is important to note. The ab wheel is not a lower back exercise. You should not be feeling it inyour back. If you do, it is an indicator that your hip flexors - parcicularly your psoas major - are firing too much. While your psoas major is pare of the chain that connects your core, it has origins on your lumbar spine. Therefore, if you feel pain or discomfort in your lower back, your psoas major muscle is overactive. Back off from the progression until you can achieve a nice, solid rollout without feeling any pain or discomfort in your lower back. The lasc ching you want to do is strain your back and have to take time off from training!
There are multiple methods to make the ab wheel more challenging. Some of these variations are included on the charts (not illustrated). One of the variations is to wear a weighted vest. Since the vest is at your core, it will exert downward force in the middle of the movement, thus making the opposice side of your core work much harder. Adding a twenty-pound vest takes the skill to Level 9.
To further tax the rotary and stability of both your core and shoulder you can remove limbs from the equation. For example, the Level 10 ab wheel variation uses only one arm. You will need an ab wheel with two wheels on the outside of the handles to perform this variation. Since you are only using one arm, there will be a rotation corque along the body as you go further down, like with the one-arm pushup. Your weight will only be on one shoulder instead of both. which makes the movement more difficult. Build up to the one-arm rollout by utilizing the same cechniques you would use to build up to the two-arm rollout: a wall, a ramp, and eccentrics.
You can increase the challenge factor of the one-arm rollout even more by wearing a weighted vest or lifting one of your legs while you are performing the skill.
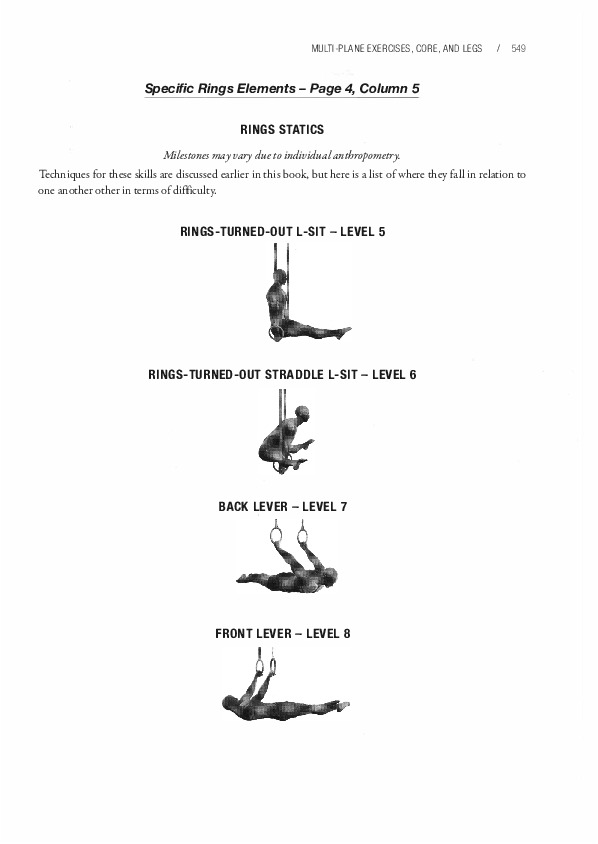
Milestones may vary due to individual anthropometry.
Techniques for these skills are discussed earlier in this book, but here is a list of where they fall in relation to one another other in terms of difficulty.
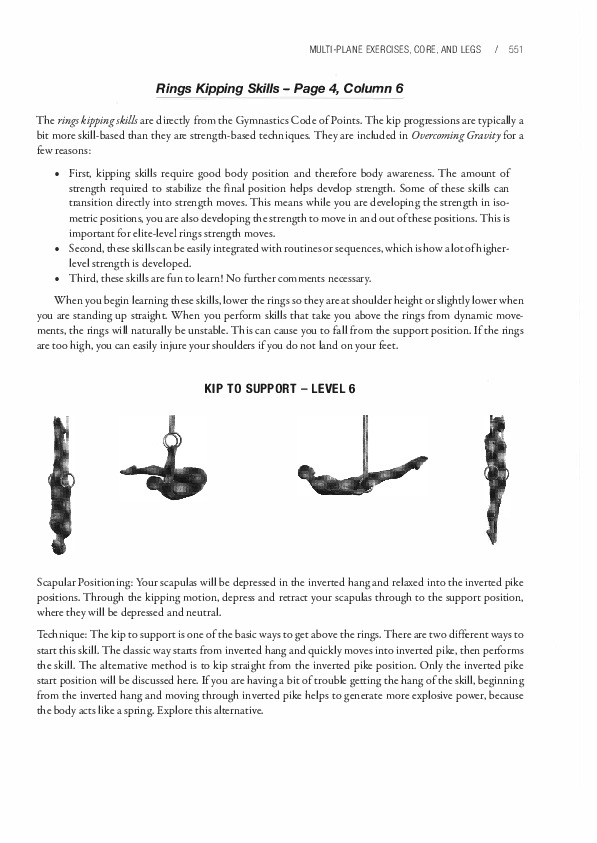
The rings kipping skills are directly from the Gymnastics Code of Points. The kip progressions are typically a bit more skill-based than they are strength-based techniques. They are included in Overcoming Gravity for a few reasons:
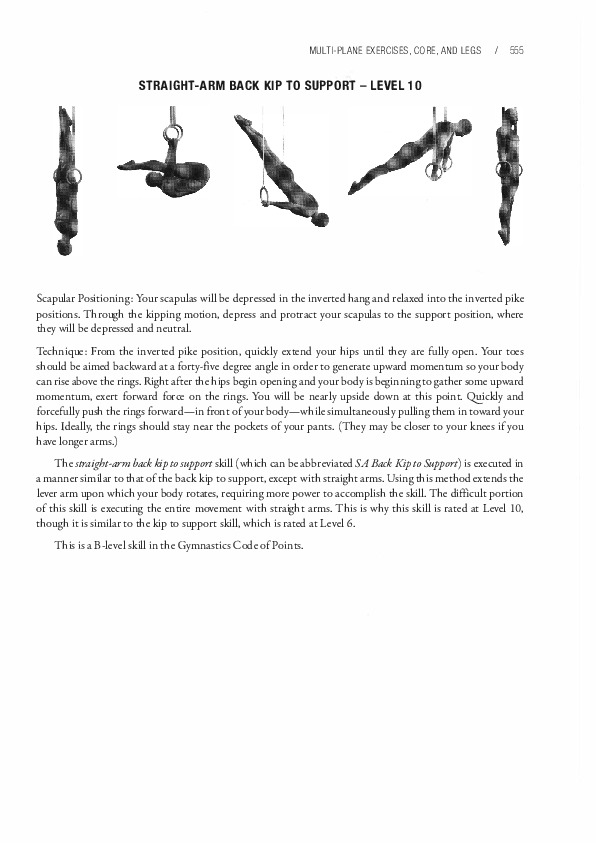
Scapular Positioning: Your scapulas will be depressed in the inverted hang and relaxed into the inverted pike positions. Through the kipping motion, depress and retract your scapulas through to the support position, where they will be depressed and neutral.
Technique: The kip to support is one of the basic ways to get above the rings. There are two different ways to start this skill. The classic way starts from inverted hang and quickly moves into inverted pike, then performs the skill. The alternative method is to kip straight from the inverted pike position. Only the inverted pike start position will be discussed here. If you are having a bit of trouble getting the hang of the skill, beginning from the inverted hang and moving through inverted pike helps to generate more explosive power, because the body acts like a spring. Explore this alternative.
Initially, most people will bend their arms and, if the rings are stabilized, they will end up in the middle or bottom of a rings dip. To correct this, focus on simultaneously exploding and pushing on the rings hard, and not bending your arms as you travel upward. Once you start to get the hang of the skill, you will typically end up in the transition phase of the muscle-up or in the deep pare of the dip. This usually implies at leas tone of the following problems: First, you might not be exerting enough force through the rings. Second, it is possible that your explosiveness out of the inverted pike position is lacking. Third, it could be a combination of the coordination between the first and second elements involved in the movement.
Keep practicing. If you are still having serious issues, seek advice from people who know how to execute the skill or have coaching experience. You will get it with enough practice.
This is an A-level skill in the Gymnastics Code of Points.
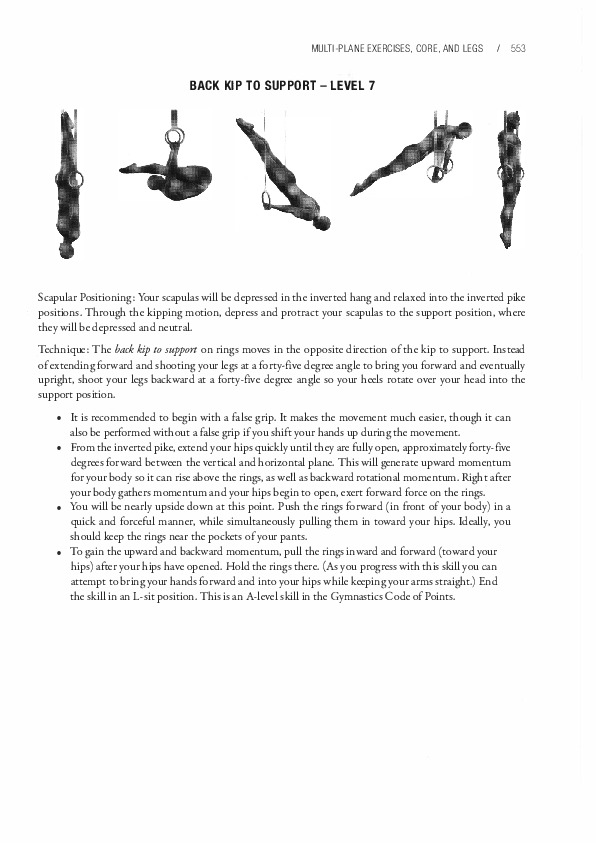
Scapular Positioning: Your scapulas will be depressed in the inverted hang and relaxed into the inverted pike positions. Through the kipping motion, depress and protract your scapulas to the support position, where they will be depressed and neutral.
Technique: The back kip to support on rings moves in the opposite direction of the kip to support. Instead of extending forward and shooting your legs at a forty-five degree angle to bring you forward and eventually upright, shoot your legs backward at a forty-five degree angle so your heels rotate over your head into the support position.
It is recommended to begin with a false grip. It makes the movement much easier, though it can also be performed without a false grip if you shift your hands up during the movement.
From the inverted pike, extend your hips quickly until they are fully open, approximately forty-five degrees forward between the vertical and horizontal plane. This will generate upward momentum for your body so it can rise above the rings, as well as backward rotational momentum. Right after your body gathers momentum and your hips begin to open, exert forward force on the rings.
You will be nearly upside down at this point. Push the rings forward (in front of your body) in a quick and forceful manner, while simultaneously pulling them in toward your hips. Ideally, you should keep the rings near the pockets of your pants.
To gain the upward and backward momentum, pull the rings inward and forward (toward your hips) after your hips have opened. Hold the rings there. (As you progress with this skill you can attempt to bring your hands forward and into your hips while keeping your arms straight.) End the skill in an L-sit position. This is an A-level skill in the Gymnastics Code of Points.

Scapular Positioning: Your scapulas will be depressed in the inverted hang and relaxed into the inverted pike positions. Through the kipping motion, depress and protract your scapulas to the support position, where they will be depressed and neutral.
Technique: The technique is exactly the same as the previous skill. From the inverted pike position, explosively open your hips (but not fully) to maintain the L-sit position. The more quickly this occurs, the easier the skill becomes. Simultaneously, exert backward force on the rings to allow you to rotate up on your hands to the supported L-sit position.
The straight-arm kip to L-sit (which can be abbreviated SA Kip to L-Sit) takes the kip to the support position and raises the challenge level since the L-sit is achieved before the support position is reached. Since the skill ends in an L-sit position, you need to generate significantly more momentum from the initial inverted pike hang and-while keeping your arms straight-pull backward significantly harder to get your body above the rings.
The most difficult portion of this skill is executing the entire movement with straight arms. Additionally, you must end in an L-sit position without dipping your legs past parallel. This is why this skill is rated at Level 9 though the similar kip-to-support skill is rated only at Level 6.
This is one of the easier B-level skills in the Gymnastics Code of Points because you do not need extremely good strength or technique to execute it. If you do have a good combination of both you should be able to execute this skill correctly. This is the first B-level skill that most trainees achieve.
Scapular Positioning: Your scapulas will be depressed in the inverted hang and relaxed into the inverted pike positions. Through the kipping motion, depress and protract your scapulas to the support position, where they will be depressed and neutral.
Technique: From the inverted pike position, quickly extend your hips until they are fully open. Your toes should be aimed backward at a forty-five degree angle in order to generate upward momentum so your body can rise above the rings. Right after the hips begin opening and your body is beginning to gather some upward momentum, exert forward force on the rings. You will be nearly upside down at this point. Quickly and forcefully push the rings forward-in front of your body-while simultaneously pulling them in toward your hips. Ideally, the rings should stay near the pockets of your pants. (They may be closer to your knees if you have longer arms.)
The straight-arm back kip to support skill (which can be abbreviated SABack Kip to Support) is executed in a manner similar to that of the back kip to support, except with straight arms. Using this method extends the lever arm upan which your body rotates, requiring more power to accomplish the skill. The difficult portion of this skill is executing the entire movement with straight arms. This is why this skill is rated at Level 10, though it is similar to the kip to support skill, which is rated at Level 6.
This is a B-level skill in the Gymnastics Code of Points.
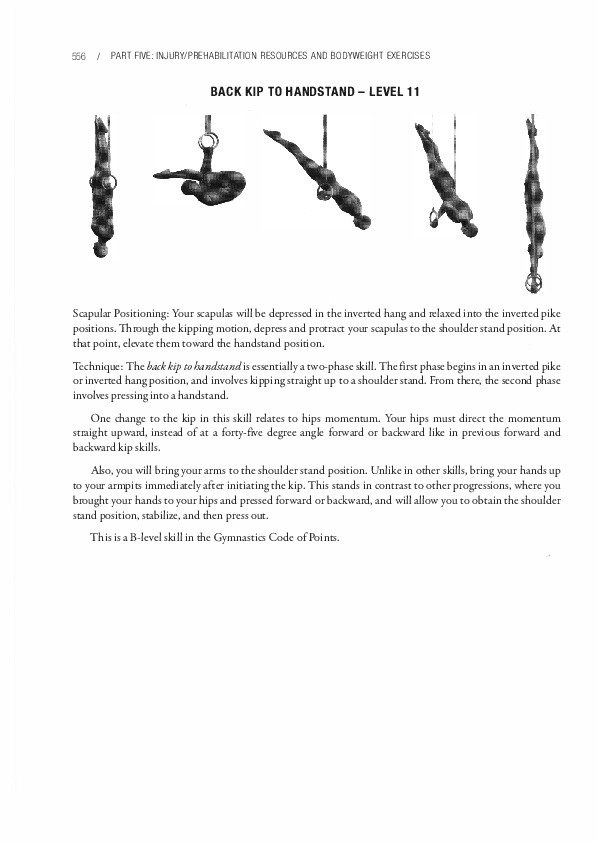
Scapular Positioning: Your scapulas will be depressed in the inverted hang and relaxed into the inverted pike positions. Through the kipping motion, depress and protract your scapulas to the shoulder stand position. At that point, elevate them toward the handstand position.
Technique: The back kip to handstandis essentially a two-phase skill. The first phase begins in an inverted pike or inverted hang position, and involves kipping straight up to a shoulder stand. From there, the second phase involves pressing into a handstand.
One change to the kip in this skill relates to hips momentum. Your hips must direct the momentum straight upward, instead of at a forty-five degree angle forward or backward like in previous forward and backward kip skills.
Also, you will bring your arms to the shoulder stand position. Unlike in other skills, bring your hands up to your armpits immediately after initiating the kip. This stands in contrast to other progressions, where you brought your hands to your hips and pressed forward or backward, and will allow you to obtain the shoulder stand position, stabilize, and then press out.
This is a B-level skill in the Gymnastics Code of Points.
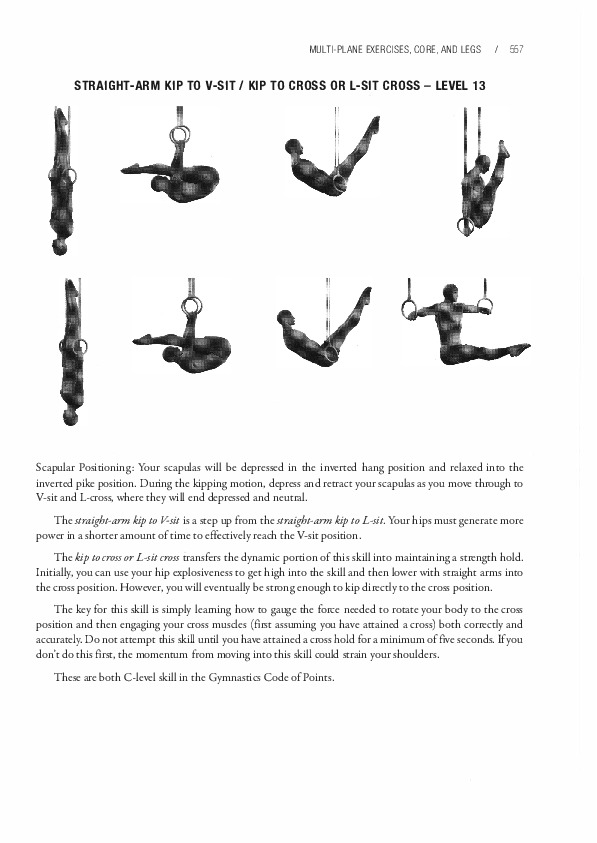
Scapular Positioning: Your scapulas will be depressed in the inverted hang position and relaxed into the inverted pike position. During the kipping motion, depress and retract your scapulas as you move through to V-sit and L-cross, where they will end depressed and neutral.
The straight-ann kip to V-sit is a step up from the straight-ann kip to L-sit. Your hips must generate more power in a shorter amount of time to effectively reach the V-sit position.
The kip to cross or L-sit cross transfers the dynamic portion of this skill into maintaining a strength hold. lnitially, you can use your hip explosiveness to get high into the skill and then lower with straight arms into the cross position. However, you will eventually be strong enough to kip directly to the cross position.
The key for this skill is simply learning how to gauge the force needed to rotate your body to the cross position and then engaging your cross muscles (first assuming you have attained a cross) both correctly and accurately. Do not attempt this skill until you have attained a cross hold for a minimum of five seconds. If you don't do this first, the momentum from moving into this skill could strain your shoulders.
These are both C-level skill inthe Gymnastics Code of Points.
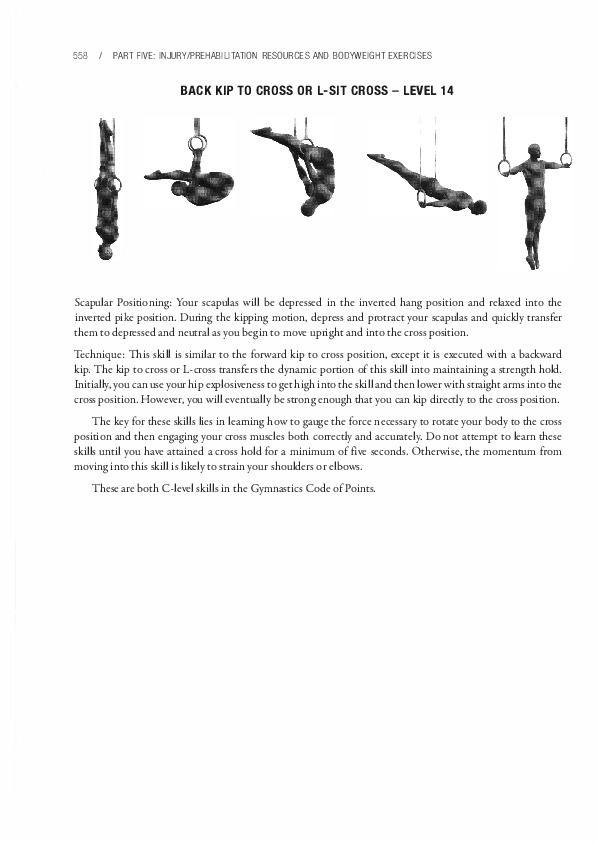
Scapular Positioning: Your scapulas will be depressed in the inverted hang position and relaxed into the inverted pike position. During the kipping motion, depress and protract your scapulas and quickly transfer them to depressed and neutral as you begin to move upright and into the cross position.
Technique: This skill is similar to the forward kip to cross position, except it is executed with a backward kip. The kip to cross or L-cross transfers the dynamic portion of this skill into maintaining a strength hold. lnitially, you can use your hip explosiveness to get high into the skill and then lower with straight arms into the cross position. However, you will eventually be strong enough that you can kip directly to the cross position.
The key for these skills lies in learning how to gauge the force necessary to rotate your body to the cross position and then engaging your cross muscles both correctly and accurately. Do not attempt to learn these skills until you have attained a cross hold for a minimum of five seconds. Otherwise, the momentum from moving into this skill is likely to strain your shoulders or elbows.
These are both C-level skills in the Gymnastics Code of Points.
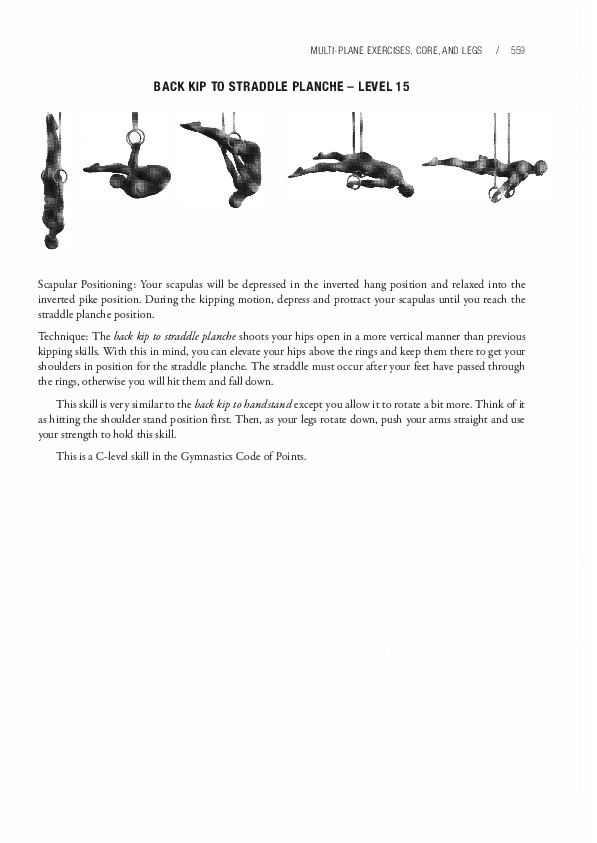
Scapular Positioning: Your scapulas will be depressed in the inverted hang position and relaxed into the inverted pike position. During the kipping motion, depress and protract your scapulas until you reach the straddle planche position.
Technique: The back kip to straddle planche shoots your hips open in a more vertical manner than previous kipping skills. With this in mind, you can elevate your hips above the rings and keep them there to get your shoulders in position for the straddle planche. The straddle must occur after your feet have passed through the rings, otherwise you will hit them and fall down.
This skill is very similar to the back kip to handstand except you allow it to rotate a bit more. Think of it as hitting the shoulder stand position first. Then, as your legs rotate down, push your arms straight and use your strength to hold this skill.
This is a C-level skill in the Gymnastics Code of Points.
The rings felge skills are a series of forward and backward rolls performed on the rings, to either the support position or to various strength skills. When integrated into routines, they are a lot of fun to perform-and to just show off!
The variations of these skills using the tuck position have not been included, because they are either too easy or they are not aesthetically pleasing. However, these skills can always be learned in the tuck position before progressing to the pike position. Keep this in mind if the pike or straight-body variations are too challenging at first.
Before starting these skills, lower the rings so they are at shoulder height when you are standing up straight. Due to the nature of these movements, the natural instability of the rings can cause you to fall from the support position. If the rings are too high, you can easily injure your shoulders if you don't land on your feet.
The rings felge skills are typically more strength-based than they are kipping techniques. The tuck variations of the felge forward and felge backward to support, though not included in the charts, are approximately one level easier than their pike counterparts.
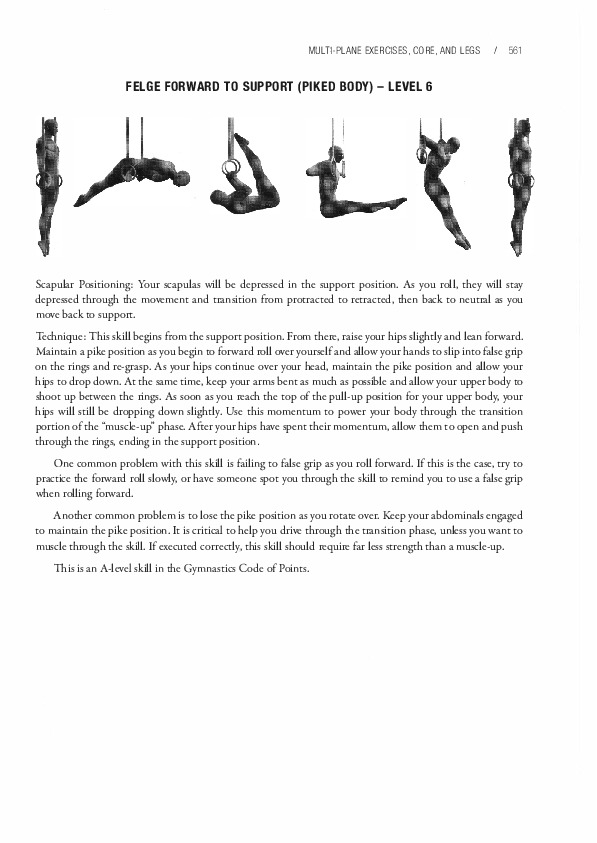
Scapular Positioning: Your scapulas will be depressed in the support position. As you roll, they will stay depressed through the movement and transition from protracted to retracted, then back to neutral as you move back to support.
Technique: This skill begins from the support position. From there, raise your hips slightly and lean forward. Maintain a pike position as you begin to forward roll over yourself and allow your hands to slip into false grip on the rings and re-grasp. As your hips continue over your head, maintain the pike position and allow your hips to drop down. At the same time, keep your arms bent as much as possible and allow your upper body to shoot up between the rings. As soon as you reach the top of the pull-up position for your upper body, your hips will still be dropping down slightly. Use this momentum to power your body through the transition portion of the "muscle-up" phase. After your hips have spent their momentum, allow them to open and push through the rings, ending in the support position.
One common problem with this skill is failing to false grip as you roll forward. If this is the case, try to practice the forward roll slowly, or have someone spot you through the skill to remind you to use a false grip when rolling forward.
Another common problem is to lose the pike position as you rotate over. Keep your abdominals engaged to maintain the pike position. It is critical to help you drive through the transition phase, unless you want to muscle through the skill. If executed correctly, this skill should require far less strength than a muscle-up.
This is an A-level skill in the Gymnastics Code of Points.
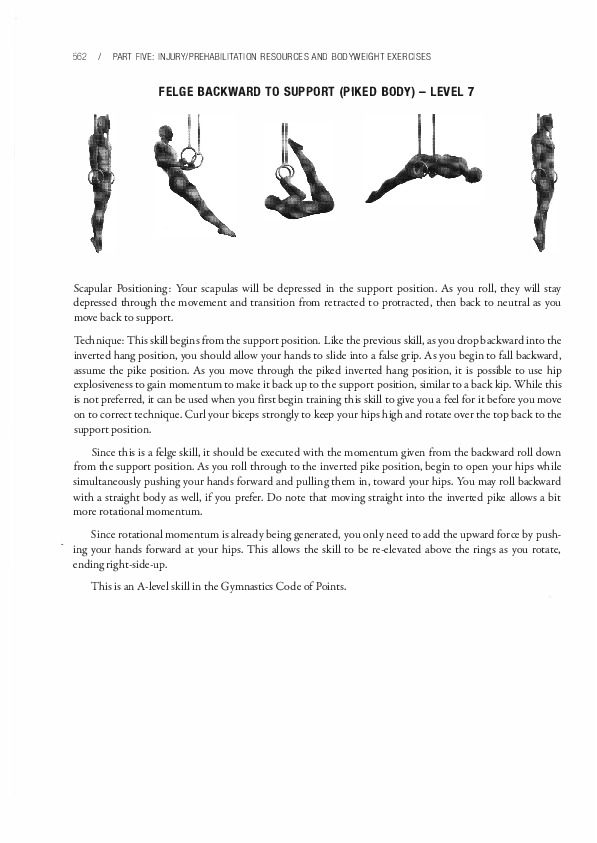
Scapular Positioning: Your scapulas will be depressed in the support position. As you roll, they will stay depressed through the movement and transition from retracted to protracted, then back to neutral as you move back to support.
Technique: This skill begins from the support position. Like the previous skill, as you drop backward into the inverted hang position, you should allow your hands to slide into a false grip. As you begin to fall backward, assume the pike position. As you move through the piked inverted hang position, it is possible to use hip explosiveness to gain momentum to make it back up to the support position, similar to a back kip. While this is not preferred, it can be used when you first begin training this skill to give you a feel for it before you move on to correct technique. Curl your biceps strongly to keep your hips high and rotate over the top back to the support position.
Since this is a felge skill, it should be executed with the momentum given from the backward roll down from the support position. As you roll through to the inverted pike position, begin to open your hips while simultaneously pushing your hands forward and pulling them in, toward your hips. You may roll backward with a straight body as well, if you prefer. Do note that moving straight into the inverted pike allows a bit more rotational momentum.
Since rotational momentum is already being generated, you only need to add the upward force by pushing your hands forward at your hips. This allows the skill to be re-elevated above the rings as you rotate, ending right-side-up.
This is an A-level skill in the Gymnastics Code of Points.
Scapular Positioning: Your scapulas will be depressed in the support position and elevated at the bottom of the dip. As you begin to rotate, strongly retract and depress them through the rotation and back to the support transition. They will end here, depressed and neutral.
Technique: Begin in the support position and roll backward in a controlled manner. Use only the amount of momentum you need, and phase it out as you become more proficient in this technique. Bend your arms as you rise through the second phase of the skill, allowing your legs to rotate your upper body back above the rings. Pin the rings to your hips and push your hands forward as hard as possible. This allows your body to rotate around your hands and back to support. Finish in the support position after you roll over.
This is the first skill in the inverted muscle-up progression. It requires an enormous amount of strength since the only momentum you can gain is from the inicial phase of falling down, and manipulating the bend of your arms. Since your hips will be fully extended, they will not be able to assist with this skill.
Ideally, you will eliminate the use momentum altogether, which is why this skill is rated at Level 10. A quickly executed backward roll to support with good technique is much easier than a skill at this level. The basic skill is learnable when you reach Level 6-7, if you harness enough momentum and execute the technique perfectly. However, performing this technique properly without momentum will require enormous control and strength.
The most difficult portion of this skill is the inverted muscle-up, which is the second phase. To help your progression, work negatives of the inverted muscle-up. For example, get into the shoulder stand position and slowly lower to the inverted hang position.
This is a B-level skill in the Gymnastics Code of Points.
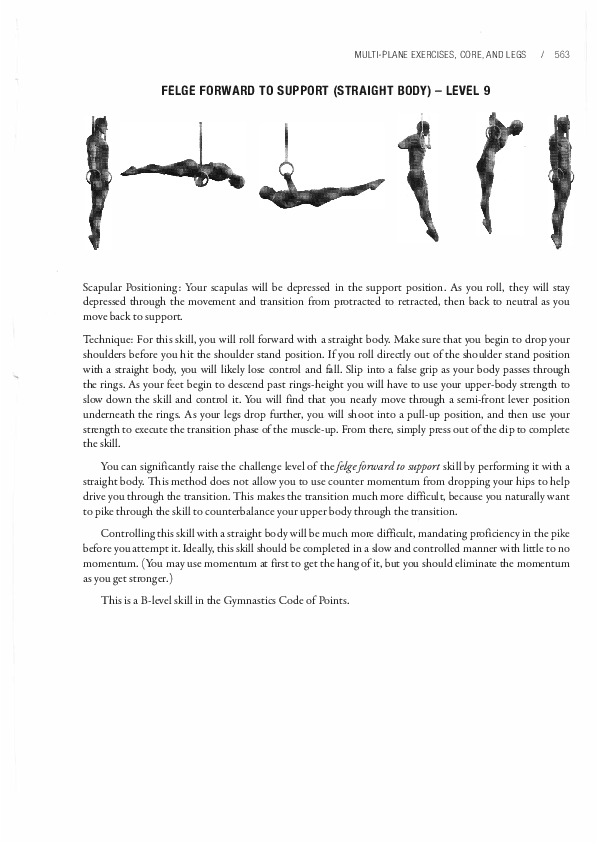
Scapular Positioning: Your scapulas will be depressed in the support position. As you roll, they will stay depressed through the movement and transition from protracted to retracted, then back to neutral as you move back to support.
Technique: Far this skill, you will roll forward with a straight body. Make sure that you begin to drop your shoulders before you hit the shoulder stand position. If you roll directly out of the shoulder stand position with a straight body, you will likely lose control and fall. Slip into a false grip as your body passes through the rings. As your feet begin to descend past rings-height you will have to use your upper-body strength to slow down the skill and control it. You will find that you nearly move through a semi-front lever position underneath the rings. As your legs drop further, you will shoot into a pull-up position, and then use your strength to execute the transition phase of the muscle-up. From there, simply press out of the dip to complete the skill.
You can significantly raise the challenge level of the felge forward to support skill by doing it with a straight body. This method does not allow you to use counter momentum from dropping your hips to help drive you through the transition. This makes the transition much more difficult, because you naturally want to pike through the skill to counterbalance your upper body through the transition.
Controlling this skill with a straight body will be much more difficult, mandating proficiency in the pike before you attempt it. Ideally, this skill should be completed in a slow and controlled manner with little to no momentum. (You may use momentum at first to get the hang of it, but you should eliminate the momentum as you get stronger.)
This is a B-level skill in the Gymnastics Code of Points.
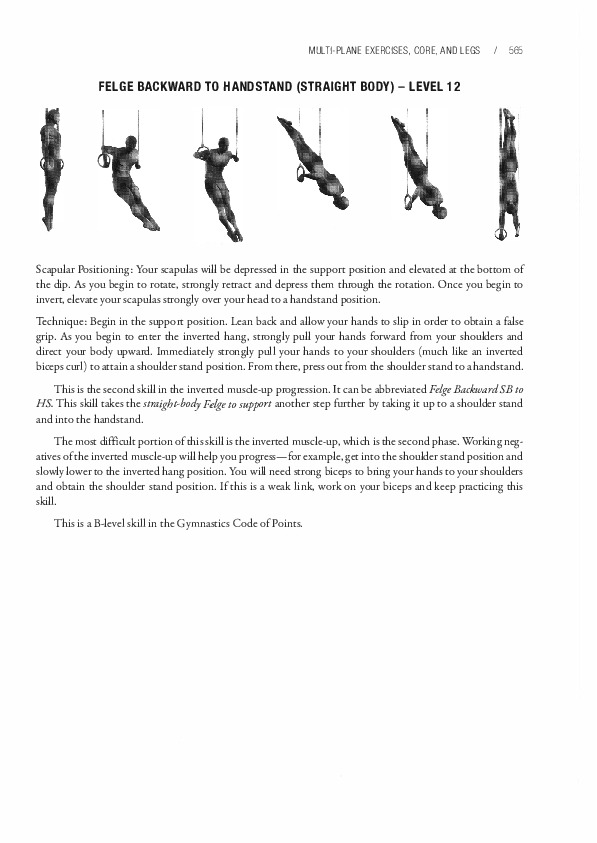
Scapular Positioning: Your scapulas will be depressed in the support position and elevated at the bottom of the dip. As you begin to rotate, strongly retract and depress them through the rotation. Once you begin to invert, elevate your scapulas strongly over your head to a handstand position.
Technique: Begin in the support position. Lean back and allow your hands to slip in order to obtain a false grip. As you begin to enter the inverted hang, strongly pull your hands forward from your shoulders and direct your body upward. Immediately strongly pull your hands to your shoulders (much like an inverted biceps curl) to attain a shoulder stand position. From there, press out from the shoulder stand to a handstand.
This is the second skill in the inverted muscle-up progression. It can be abbreviated Felge Backward SB to HS. This skill takes the straight-body Felge to support another step further by taking it up to a shoulder stand and into the handstand.
The most difficult portion of this skill is the inverted muscle-up, which is the second phase. Working negatives of the inverted muscle-up will help you progress-for example, get into the shoulder stand position and slowly lower to the inverted hang position. You will need strong biceps to bring your hands to your shoulders and obtain the shoulder stand position. If this is a weak link, work on your biceps and keep practicing this skill.
This is a B-level skill in the Gymnastics Code of Points.
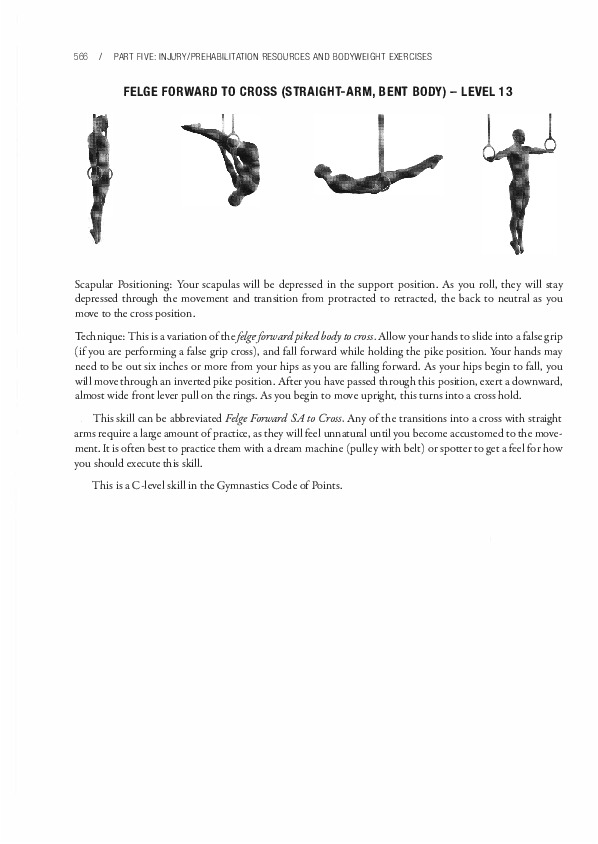
Scapular Positioning: Your scapulas will be depressed in the support position. As you roll, they will stay depressed through the movement and transition from protracted to retracted, the back to neutral as you move to the cross position.
Technique: This is a variationof the felge forward piked body to cross. Allow your hands to slide into a false grip (if you are performing a false grip cross), and fall forward while holding the pike position. Your hands may need to be out six inches or more from your hips as you are falling forward. As your hips begin to fall, you will move through an inverted pike position. After you have passed through this position, exert a downward, almost wide front lever pull on the rings. As you begin to move upright, this turns into a cross hold.
This skill can be abbreviated Felge Forward SA to Cross. Any of the transitions into a cross with straight arms require a large amount of practice, as they will feel unnatural until you become accustomed to the movement. It is often best to practice them with a dream machine (pulley with belt) or spotter to get a feel far how you should execute this skill.
This is a C-level skill in the Gymnastics Code of Points.

Scapular Positioning: Your scapulas will be depressed in the support position. As you roll, they will stay depressed through the movement and transition from protracted to retracted to the support position. As you move into the straddle planche, your scapulas will be depressed and protracted.
Technique: First, lean forward in support and slip into a false grip (if preferred). Next, use piked hips to drive your body above the rings during the transition and ascent phase. As you roll over, move into an inverted hang position. Force the rings out as wide as possible. As you begin to ascend, apply outward and downward pressure, moving through thewide arm front lever position. Push through the cross position into support and continue the rotation of your body to lift your hips. Continue lifting your hips and split your legs to hit the straddle planche position.
This skill can be abbreviated Felge Forward SA to Str PL. Since your arms will be straight, it is very likely that you will pass through a near-cross position. This will occur as you push out of the skill, and will likely be the most difficult portien of the skill. From there, continue to lean forward as you approach the support position and press into a straddle planche.
This is a C-level skill in the Gymnastics Code of Points.
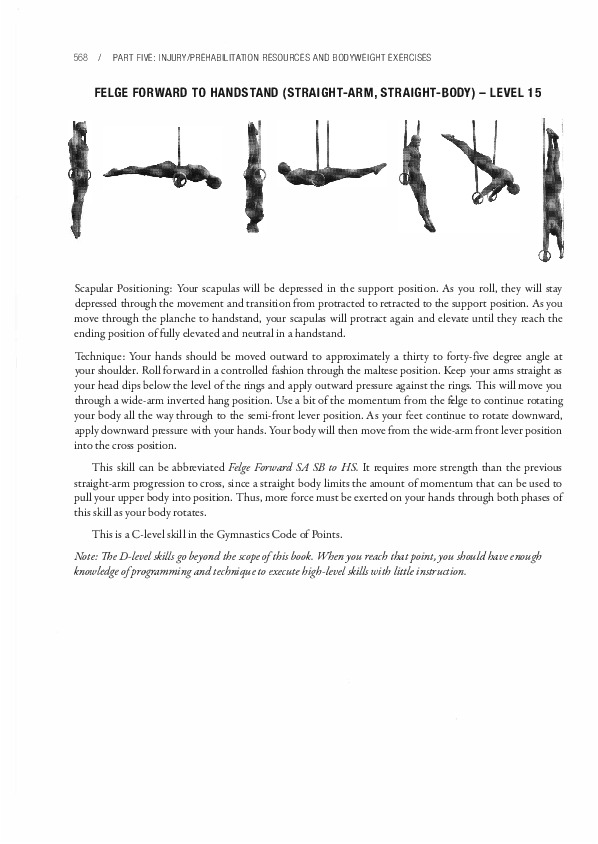
Scapular Positioning: Your scapulas will be depressed in the support position. As you roll, they will stay depressed through the movement and transition from protracted to retracted to the support position. As you move through the planche to handstand, your scapulas will protract again and elevate until they reach the ending position of fully elevated and neutral in a handstand.
Technique: Your hands should be moved outward to approximately a thirty to forty-five degree angle at your shoulder. Roll forward in a controlled fashion through the maltese position. Keep your arms straight as your head dips below the level of the rings and apply outward pressure against the rings. This will move you through a wide-arm inverted hang position. Use a bit of the momentum from the felge to continue rotating your body all the way through to the semi-front lever position. As your feet continue to rotate downward, apply downward pressure with your hands. Your body will then move from the wide-arm front lever position into the cross position.
This skill can be abbreviated Felge Forward SA SB to HS. It requires more strength than the previous straight-arm progression to cross, since a straight body limits the amount of momentum that can be used to pull your upper body into position. Thus, more force must be exerted on your hands through both phases of this skill as your body rotates.
This is a C-level skill in the Gymnastics Code of Points.
Note: The D-level skills go beyond the scope of this book. When you reach that point, you should have enough knowledge of programming and technique to execute high-level skills with little instruction.
As I have stated previously, barbell exercises are superior to bodyweight exercises for both strength and hypertrophy for the legs. However, since the focus of Overcoming Gravity is bodyweight strength training, here are some basic progressions you can use to gain strength and hypertrophy without weights. (Do try to gain access to weights-whether from a cheap gym, buying them off Craigslist or another Internet site, yard sales, friends and family, or even making your own.)
The two primary leg exercises recommended for bodyweight exercises are the pistol progression as well as the lunge into deep step up progression. I will discuss the the squat progression into pistol, but I will only briefly discuss the lunge into deep step up progression. There are also other bodyweight leg exercises such as shrimp squats, king deadlifts, and the like, which may be useful to train if these progressions are inadequate not preferred.
There are also other alternative bodyweight leg exercises that are more explosive. For example, vertical leaping, broad jumping, box jumps, plyometrics, sprinting, hill sprints, and many other forms of running or even cycling can be effective to train the lower body for both strength and hypertrophy. Likewise, many of the exercises within this section can be utilized with these alternatives. pistol squats can be trained for height, for distance, or box jumping. Typically, the difficult part of some of these exercises like sprinting is that they are hard to gauge in terms of effective volume for strength and hypertrophy.
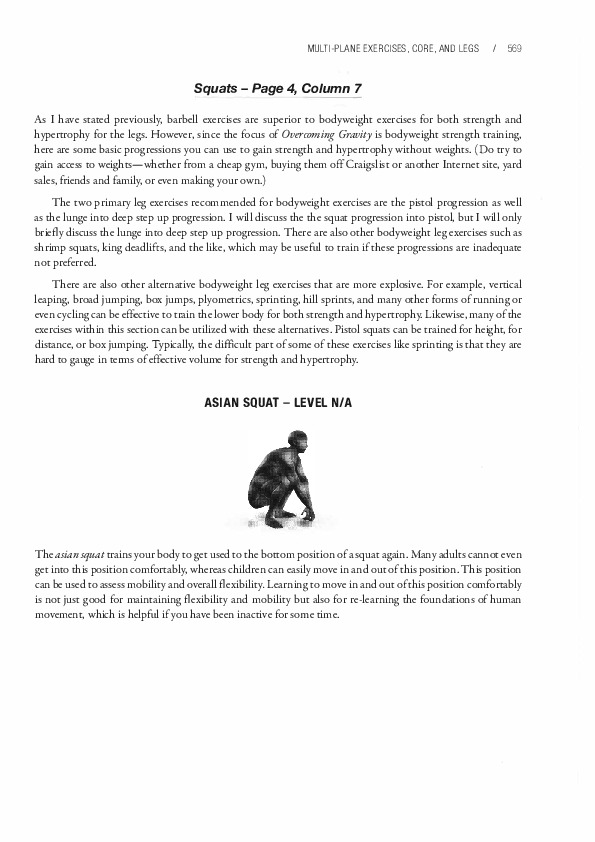
The asian squat trains your body to get used to the bottom position of a squat again. Many adults cannot even get into this position comfortably, whereas children can easily move in and out of this position. This position can be used to assess mobility and overall flexibility. Learning to move in and out of this position comfortably is not just good for maintaining flexibility and mobility but also for re-learning the foundations of human movement, which is helpful if you have been inactive for some time.
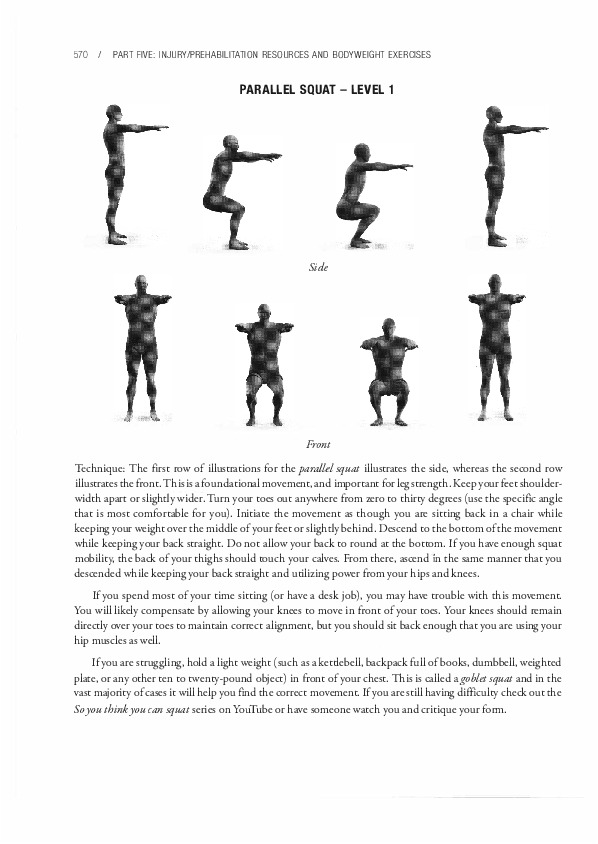
Technique: The first row of illustrations for the parallel squat illustrates the side, whereas the second row illustrates the front. This is a foundational movement, and important for leg strength. Keep your feet shoulder-width apart or slightly wider. Turn your toes out anywhere from zero to thirty degrees (use the specific angle that is most comfortable for you). Initiate the movement as though you are sitting back in a chair while keeping your weight over the middle of your feet or slightly behind. Descend to the bottom of the movement while keeping your back straight. Do not allow your back to round at the bottom. If you have enough squat mobility, the back of your thighs should touch your calves. From there, ascend in the same manner that you descended while keeping your back straight and utilizing power from your hips and knees.
If you spend most of your time sitting (or have a desk job), you may have trouble with this movement. You will likely compensate by allowing your knees to move in front of your toes. Your knees should remain directly over your toes to maintain correct alignment, but you should sic back enough that you are using your hip muscles as well.
If you are struggling, hold a light weight (such as a kettlebell, backpack full of books, dumbbell, weighted place, or any other ten to twenty-pound object) in front of your chest. This is called agoblet squat and in the vast majority of cases it will help you find the correct movement. If you are still having difficulty check out the So you think you can squat series on YouTube or have someone watch you and critique your form.
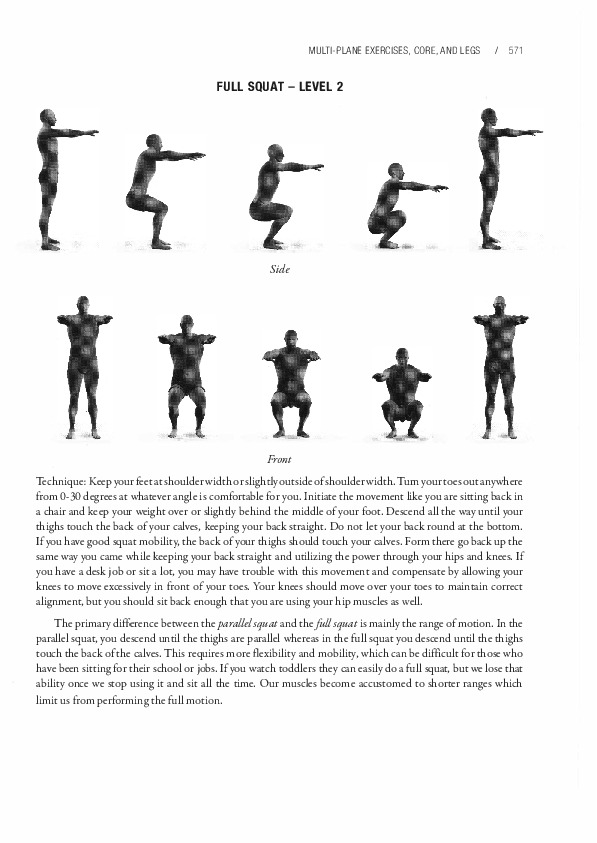
Technique: Keep your feet at shoulder width or slightly outside of shoulder width. Turn your toes out anywhere from 0-30 degrees at whatever angle is comfortable for you. Initiate the movement like you are sitting back in a chair and keep your weight over or slightly behind the middle of your foot. Descend all the way until your thighs touch the back of your calves, keeping your back straight. Do not let your back round at the bottom.
If you have good squat mobility, the back of your thighs should touch your calves. Form there go back up the same way you came while keeping your back straight and utilizing the power through your hips and knees. If you have a desk job or sit a lot, you may have trouble with this movement and compensate by allowing your knees to move excessively in front of your toes. Your knees should move over your toes to maintain correct alignment, but you should sit back enough that you are using your hip muscles as well.
The primary difference between the parallel squat and the full squat is mainly the range of motion. In the parallel squat, you descend until the thighs are parallel whereas in the full squat you descend until the thighs touch the back of the calves. This requires more flexibility and mobility, which can be difficult for those who have been sitting for their school or jobs. If you watch toddlers they can easily do a full squat, but we lose that ability once we stop using it and sit all the time. Our musdes become accustomed to shorter ranges which limit us from performing the full motion.
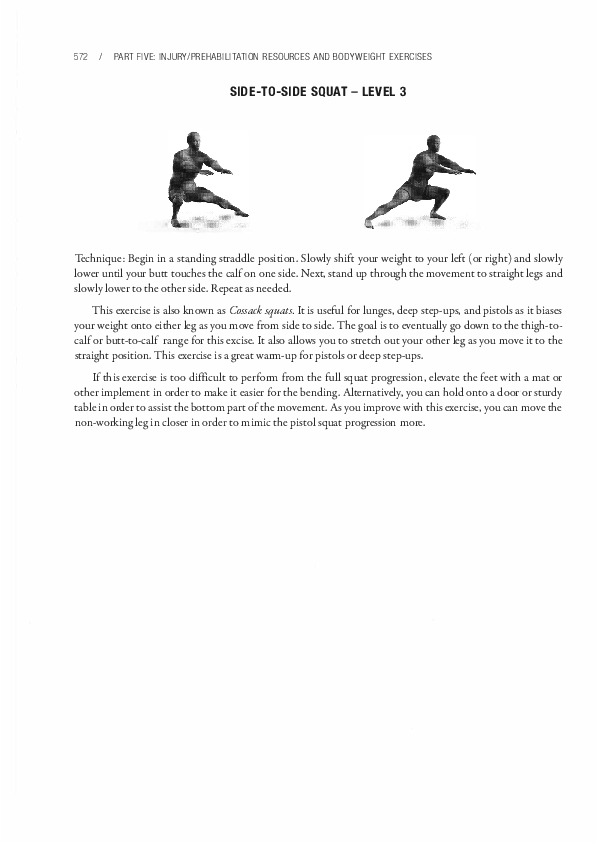
Technique: Begin in a standing straddle position. Slowly shift your weight to your left (or right) and slowly lower until your butt touches the calf on one side. Next, stand up through the movement to straight legs and slowly lower to the other side. Repeat as needed.
This exercise is also known as Cossack squats. It is useful for lunges, deep step-ups, and pistols as it biases your weight onto either leg as you move from side to side. The goal is to eventually go down to the thigh-to-calf or butt-to-calf range for this excise. It also allows you to stretch out your other leg as you move it to the straight position. This exercise is a great warm-up for pistols or deep step-ups.
If this exercise is too difficult to perform from the full squat progression, elevate the feet with a mat or other implement in order to make it easier for the bending. Alternatively, you can hold onto a door - or sturdy table in order to assist the bottom part of the movement. As you improve with this exercise, you can move the non-working leg in closer in order to mimic the pistol squat progression more.

Technique: Stand on one leg. Slowly sit back into the movement and allow the knee to come forward over the toe. Continue to slowly descend into the bottom of the movement. Keep your muscles tight at the bottom when your butt hits your calves. Then push through your foot to stand up.
Pistols or single-leg squats are the single-leg movement that many bodyweight practitioners use to improve their strength and hypertrophy. The stair-assist and chair-assist methods (shown above in the second and third rows of illustrations, respectively) can be used to work up to the full-range depth as you progress. However, there are other ways this can be accomplished:
Make sure that you have good knee control. The knee should always crack over the toes and not inside of it. if it tracks inside that generally means you have poor hip control. This can potentially lead to knee pain. As long as you control the knee cracking over the toe well you will not have this issue. Therefore, execute the movement slowly unless you have good technique. If you need any extra advice do not be afraid to ask someone who has more experience. In general, pistols are not dangerous as long as you focus on knee control during the whole movement.
GMB's pistol tutorial may also be useful if you are having difficulty: https://gmb.io/pistol-squat/
Once you have mastered bodyweight pistols, you can add weight to this progression to increase the difficulty level. There are other options with pistol squats, such as jumping for height or distance. I am not particularly a fan of the jumping method unless you want to build explosive static one leg strength. In most cases, it is much better to train standard barbell exercises because most jumping is not static off of one leg. It is either static off of two legs or it is a running plyometric movement off of one leg which needs to be trained differently than a static element.
The one negative regarding weighted pistols is that many people round their back at the bottom of the pistol which is fine without weight, but when you start weighting them there is the potential for injury. However, in training I have not seen much to indicate that it dangerous as long as you work up slowly and have no other pre-existing back injuries. Hence, after you can perform pistols sufficiently then barbell leg exercises are typically a superior option for both strength and hypetrophy.
These are the list of progressions on the chart:
For example, what l.5x bodyweight pistol means is that if you were 150 lbs you would add +75 lbs to perform a pistol. This is usually in the form a dumbell, plates, or kettlebells as they are the easiest way to add weight.
A general comparison to bodyweight exercises is that a l.5x bodyweight pistol is approximately equal to a 2x bodyweight back squat. This means that at 150 lbs for a +75 lbs pistol is equivalent to approximately a 300 lbs back squat.
This is a general comparison and your individual results may vary due the nature of specific practice. Someone who performs only weighted barbell squats may not be able to transfer to pistols at +50% bodyweight right away due the the nature of learning the balance and technique of a pistol. Likewise, someone who only performs weighted pistols may not necessarily be able to go straight away to a barbell and squat 2x their bodyweight. However, if you were to train both at the same time, it is a similar comparison to the approximate strength you would obtain from the relative neurological adaptations and hypertrophy.
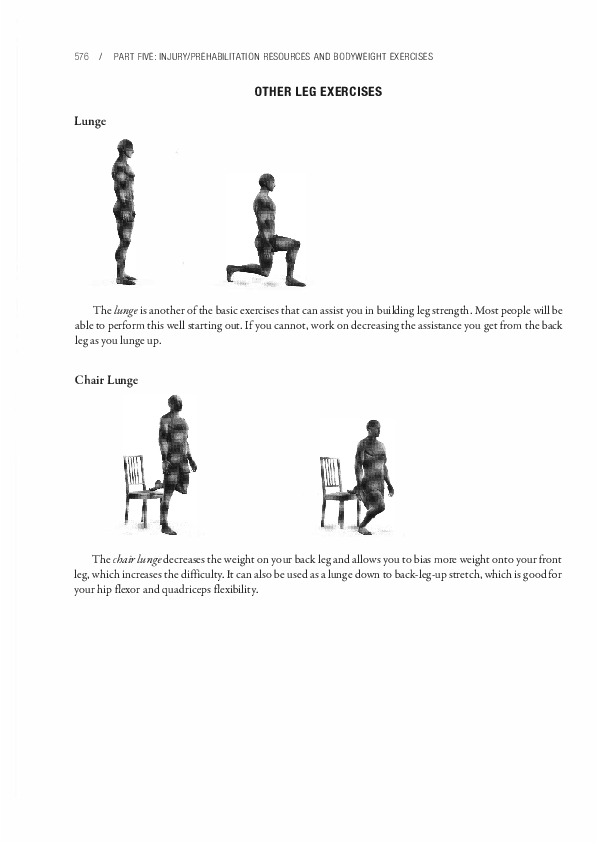
The lunge is another of the basic exercises that can assist you in building leg strength. Most people will be able to perform this well starting out. If you cannot, work on decreasing the assistance you get from the back leg as you lunge up.
The chair funge decreases the weight on your back leg and allows you to bias more weight onto your front leg, which increases the difficulty. It can also be used as a lunge down to back-leg-up stretch, which is good for your hip flexor and quadriceps flexibility.
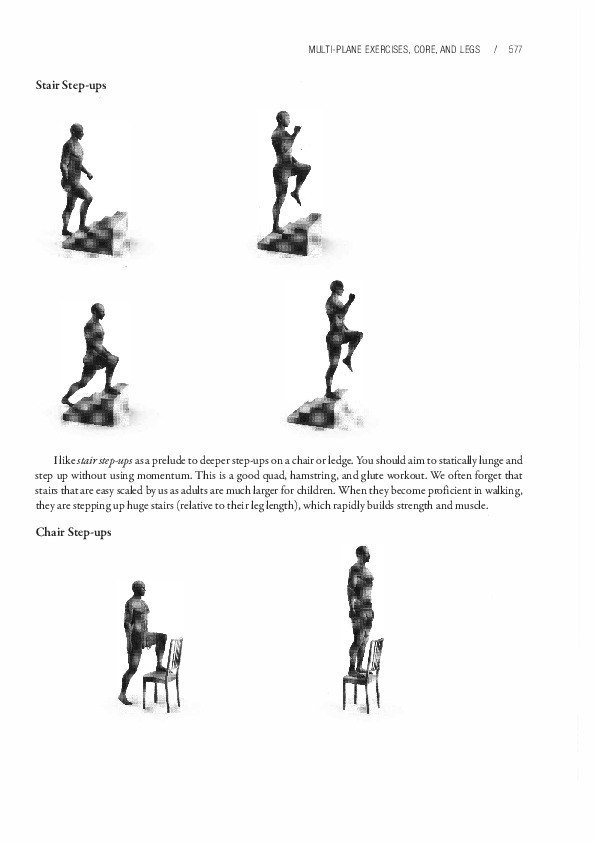
I like stairstep-ups as a prelude to deeper step-ups on a chair or ledge. You should aim to statically lunge and step up without using momentum. This is a good quad, hamstring, and glute workout. We often forget that stairs that are easy scaled by us as adults are much larger for children. When they become proficient in walking, they are stepping up huge stairs (relative to their leg length), which rapidly builds strength and muscle. Chair Step-ups
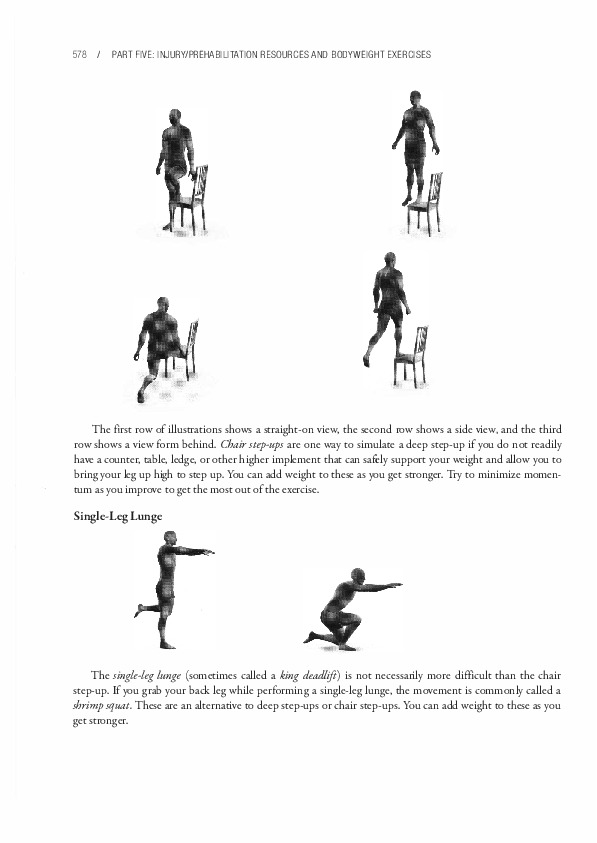
The first row of illustrations shows a straight-on view, the second row shows a side view, and the third row shows a view form behind. Chair step-ups are one way to simulare a deep step-up if you do not readily have a counter, table, ledge, or other higher implement that can safely support your weight and allow you to bring your leg up high to step up. You can add weight to these as you get stronger. Try to minimize momentum as you improve to get the most out of the exercise.
The single-leg funge (sometimes called a king deadlift) is not necessarily more difficult than the chair step-up. If you grab your back leg while performing a single-leg lunge, the movement is commonly called a shrimp squat. These are an alternative to deep step-ups or chair step-ups. You can add weight to these as you get stronger.
Not all types of bodyweight exercises are covered in this book. It focuses only on the exercises that are critical for strength development. Some useful exercises that had to be omitted due to space constraints include: regular rope climbs, hanging leg raises, and rings flys, or any variations thereof. In short, you should use whatever best helps you achieve your goals safely. If you are interested in customizing and enhancing the charts by adding exercise progressions or various levels, fee free to do so. It is always good to a useful resource better, so any suggestions for building upon and improving Overcoming Gravity are warmly welcome. If you believe you have some useful ideas, spread the word on the Internet or in your exercise community. You can reach Steven Low via his website or Reddit.
https://www.reddit.com/r/overcominggravity
Previous Chapter ... ... Next Chapter