Previous Chapter ... ... Next Chapter
There are four different phases to training the V-sit and Manna, with different concepts to focus on in each phase. In order to avoid vague coaching advice likejust go higher, these skills are grouped into phases for each step in the progression.
If you are following the charts you will see that varying angles are marked somewhat subjectively. Knowing your angles will give you a decent measure of where you are on theA-C range in your development. This is helpful since theV-sit is an A-Level skill and the manna is a C-Level skill in the Gymnastics Code of Points. The difficulty on the progression charts is true to their respective gymnastics origins while simultaneously presenting indicators for progress between each phase. This applies to all of the exercises listed, not just this specific progression.
You will notice on the charts that there is a lot of variation in the angles per level. You'll see a big jump to 100 degrees near the beginning and it slowly decreases from there. This is because as the angle decreases, torque increases exponentially. When your muscles move outside of the optimal range of motion, the force output of your muscles decreases in that range. Every 30-degree increase essentially doubles the level of difficulty for execution. This is especially true with similar skills like the iron cross and planche.
Anyone who wants to begin serious bodyweight strength training should at least attempt to learn the V-sit and manna progression. Not only are these skills pleasing to the eye, they are also excellent for working the muscles in your posterior shoulder and scapular areas, which are necessary to shoulder health.
Because gymnastics-based bodyweight strength training is a very "hands in front of the body" endeavor, it lends itself to building muscular imbalances in the front of your body that often lead to a "caveman" look (shoulders hunched forward, neck craned out). This is called upper-crossed syndrome, which not only looks bad, but also increases your chance of injury. Training this series of progressions will help keep your shoulders healthy and lead toward a longer training career in which you will accomplish great feats (including these).
Note that your hands will be held backward in all of these skills. Most beginners will have to scart with their hands sideways. However, try to train some with the hands backward to get used to the posicion. When you transition from the V-sic progression to the manna progression, hands held backwards will be a requirement, which is why praccicing it at the lower levels of L-sic training is recommended. Until that time, your hands should face sideways as opposed to forward because you will probably wanc to perform this skill on rings or parallecces at some point.
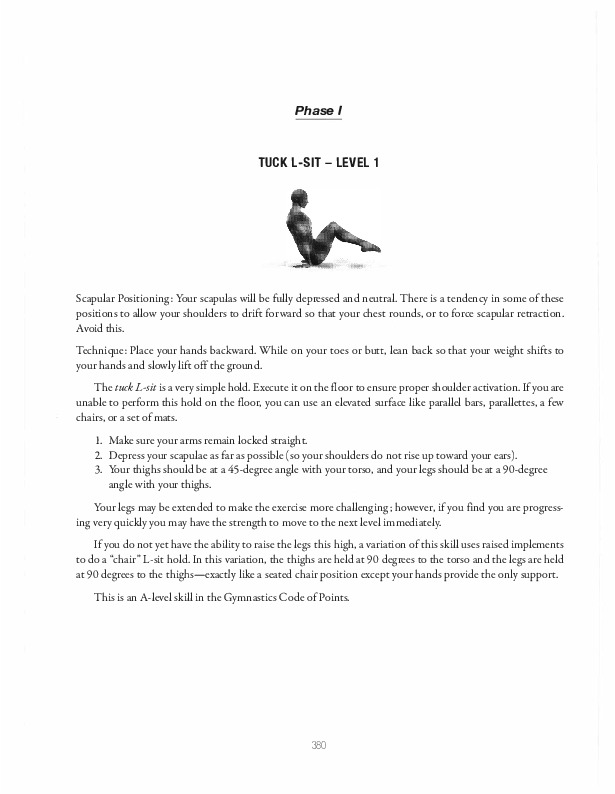
Scapular Positioning: Your scapulas will be fully depressed and neutral. There is a tendency in some of these positions to allow your shoulders to drifc forward so that your chest rounds, or to force scapular retraction. Avoid this.
Technique: Place your hands backward. While on your toes or buce, lean back so that your weight shifcs to your hands and slowly lifc off the ground.
The tuck L-sit is a very simple hold. Execute it on the floor to ensure proper shoulder activation. If you are unable to perform this hold on the floor, you can use an elevated surface like parallel bars, parallettes, a few chairs, or a set of mats.
Your legs may be extended to make the exercise more challenging; however, if you find you are progressing very quickly you may have the strength to move to the next level immediately.
If you do not yet have the abilicy to raise the legs this high, a variation of this skill uses raised implements to do a "chair" L-sit hold. In this variation, the thighs are held at 90 degrees to the torso and the legs are held at 90 degrees to the chighs-exactly like a seated chair position except your hands provide the only support. This is an A-level skill in the Gymnastics Code of Points.
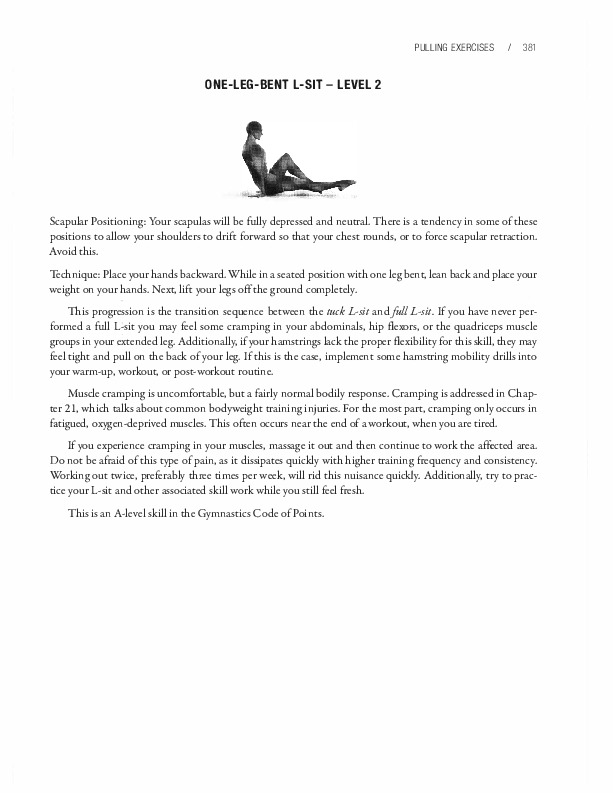
Scapular Positioning: Your scapulas will be fully depressed and neutral. There is a tendency in some of these positions to allow your shoulders to drift forward so that your chest rounds, or to force scapular retraction. Avoid this.
Technique: Place your hands backward. While in a seated position with one leg bent, lean back and place your weight on your hands. Next, lift your legs off the ground completely.
This progression is the transition sequence between the tuck L-sit andfull L-sit. If you have never performed a full L-sit you may feel some cramping in your abdominals, hip flexors, or the quadriceps muscle groups in your .extended leg. Additionally, if your hamstrings lack the proper flexibility for this skill, they may feel tight and pull on the back of your leg. If this is the case, implement some hamstring mobility drills into your warm-up, workout, or post-workout routine.
Muscle crarilping is uncomfortable, but a fairly normal bodily response. Cramping is addressed in Chapter 21, which talks about common bodyweight training injuries. For the most part, cramping only occurs in fatigued, oxygen-deprived muscles. This often occurs near the end of a workout, when you are tired. If you experience cramping in your muscles, massage it out and then continue to work the affected area. Do not be afraid of this type of pain, as it dissipates quickly with higher training frequency and consistency. Working out twice, preferably three times per week, will rid this nuisance quickly. Additionally, try to practice your L-sit and other associated skill work while you still feel fresh.
This is an A-level skill in the Gymnastics Code of Points.
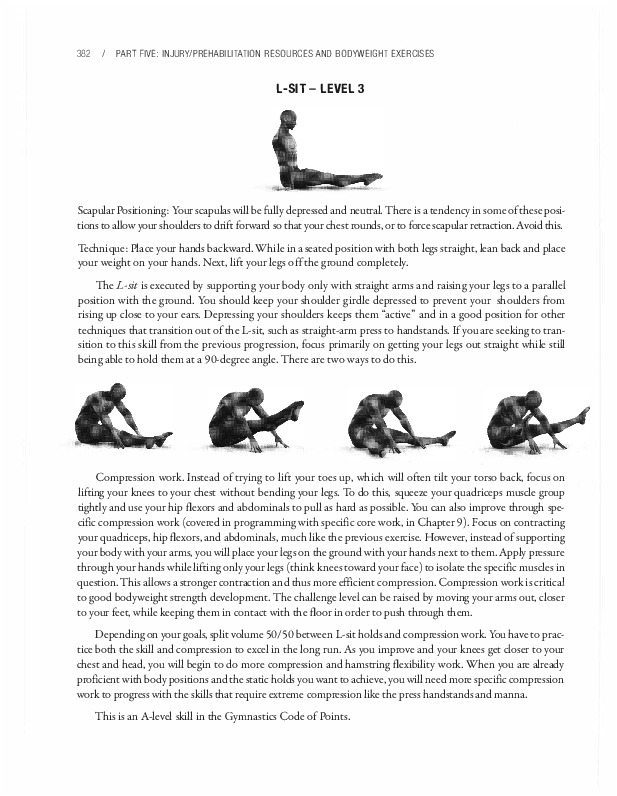
Scapular Positioning: Your scapulas will be fully depressed and neutral. There is a tendency in some of these positions to allow your shoulders to drift forward so that your chest rounds, or to force scapular retraction. Avoid this.
Technique: Place your hands backward. While in a seated position with both legs straight, lean back and place your weight on your hands. Next, lift your legs off the ground completely.
The L-sit is executed by supporting your body only with straight arms and raising your legs to a parallel position with the ground. You should keep your shoulder girdle depressed to prevent your shoulders from rising up close to your ears. Depressing your shoulders keeps them "active" and in a good position for other techniques that transition out of the L-sit, such as straight-arm press to handstands. If you are seeking to transition to this skill from the previous progression, focus primarily on getting your legs out straight while still being able to hold them at a 90-degree angle. There are two ways to do this.
Compression work. Instead of trying to lift your toes up, which will often tilt your torso back, focus on lifting your knees to your chest without bending your legs. To do this, squeeze your quadriceps muscle group tightly and use your hip flexors and abdominals to pull as hard as possible. You can also improve through specific compression work (covered in programming with specific core work, in Chapter 9). Focus on contracting your quadriceps, hip flexors, and abdominals, much like the previous exercise. However, instead of supporting your body with your arms, you will place your legs on the ground with your hands next to them. Apply pressure through your hands while lifting only your legs (think knees toward your face) to isolate the specific muscles in question. This allows a stronger contraction and thus more efficient compression. Compression work is critical to good bodyweight strength development. The challenge level can be raised by moving your arms out, closer to your feet, while keeping them in contact with the floor in order to push through them.
Dependingon your goals, split volume 50/50 between L-sit holds and compression work. You have to practice both the skill and compression to excel in the long run. As you improve and your knees get closer to your chest and head, you will begin to do more compression and hamstring flexibility work. When you are already proficient with body positions and the static holds you want to achieve, you will need more specific compression work to progress with the skills that require extreme compression like the press handstands and manna.
This is an A-level skill in the Gymnastics Code of Points.
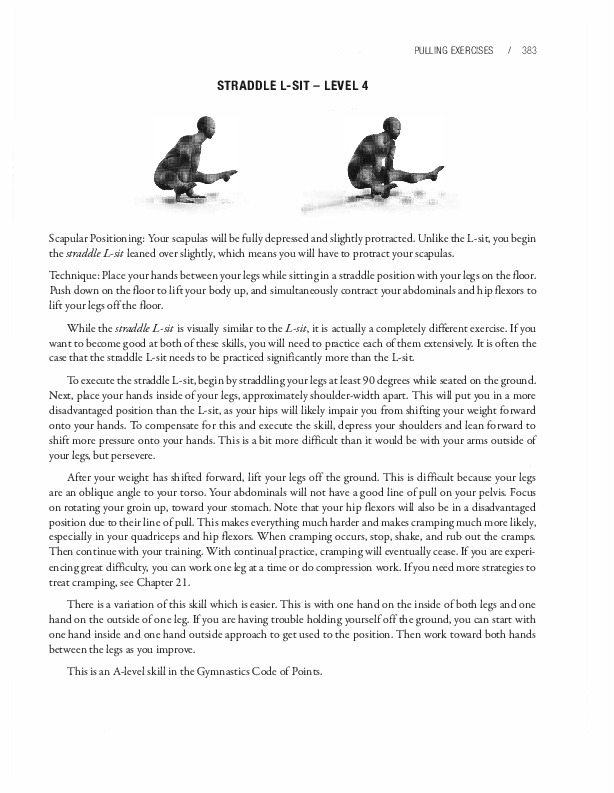
Scapular Positioning: Your scapulas will be fully depressed and slightly protracted. Unlike the L-sit, you begin the straddle L-sit leaned over slightly, which means you will have to protract your scapulas.
Technique: Place your hands between your legs while sittingin a straddle position with your legs on the floor. Push down on the floor to lift your body up, and simultaneously contract your abdominals and hip flexors to lift your legs off the floor.
While the straddle L-sit is visually similar to the L-sit, it is actually a completely different exercise. If you want to become good at both of these skills, you will need to practice each of them extensively. It is often the case that the straddle L-sit needs to be practiced significantly more than the L-sit.
To execute the straddle L-sit, begin by straddling your legs at least 90 degrees while seated on the ground. Next, place your hands inside of your legs, approximately shoulder-width apart. This will put you in a more disadvantaged position than the L-sit, as your hips will likely impair you from shifting your weight forward onto your hands. To compensate for this and execute the skill, depress your shoulders and lean forward to shift more pressure onto your hands. This is a bit more difficult than it would be with your arms outside of your legs, but persevere.
After your weight has shifted forward, lift your legs off the ground. This is difficult because your legs are an oblique angle to your torso. Your abdominals will not have a good line of pull on your pelvis. Focus on rotating your groin up, toward your stomach. Note that your hip flexors will also be in a disadvantaged position due to their line of pull. This makes everything much harder and makes cramping much more likely, especially in your quadriceps and hip flexors. When cramping occurs, stop, shake, and rub out the cramps. Then continue with your training. With continual practice, cramping will eventually cease. If you are experiencing great difficulty, you can work one leg at a time or do compression work. If you need more strategies to treat cramping, see Chapter 21.
There is a variation of this skill which is easier. This is with one hand on the inside of both legs and one hand on the outside of one leg. If you are having trouble holding yourself off the ground, you can start with one hand inside and one hand outside approach to get used to the position. Then work toward both hands between the legs as you improve.
This is an A-level skill in the Gymnastics Code of Points.
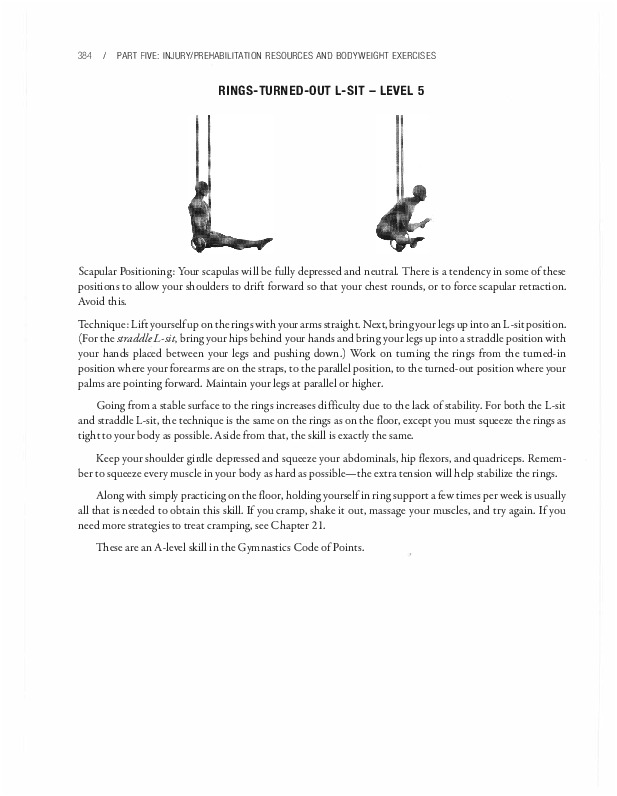
Scapular Positioning: Your scapulas will be fully depressed and neutral. There is a tendency in some of these positions to allow your shoulders to drift forward so that your chest rounds, or to force scapular retraction. Avoid this.
Technique: Lift yourself upon the ringswith your arms straight. Next, bringyour legs upinto an L-sit position. (For the straddleL-sit, bring your hips behind your hands and bring your legs up into a straddle position with your hands placed between your legs and pushing down.) Work on turning the rings from the turned-in position where your forearms are on the straps, to the parallel position, to the turned-out position where your palms are pointing forward. Maintain your legs at parallel or higher.
Going from a stable surface to the rings increases difficulty due to the lack of stability. For both the L-sit and straddle L-sit, the technique is the same on the rings as on the floor, except you must squeeze the rings as tight to your body as possible. Aside from that, the skill is exactly the same.
Keep your shoulder girdle depressed and squeeze your abdominals, hip flexors, and quadriceps. Remember to squeeze every muscle in your body as hard as possible-the extra tension will help stabilize the rings. Alongwith simply practicingon the floor, holding yourself in ring support a few times per week is usually all that is needed to obtain this skill. If you cramp, shake it out, massage your muscles, and try again. If you need more strategies to treat cramping, see Chapter 21.
These are an A-level skill in the Gymnastics Code of Points.
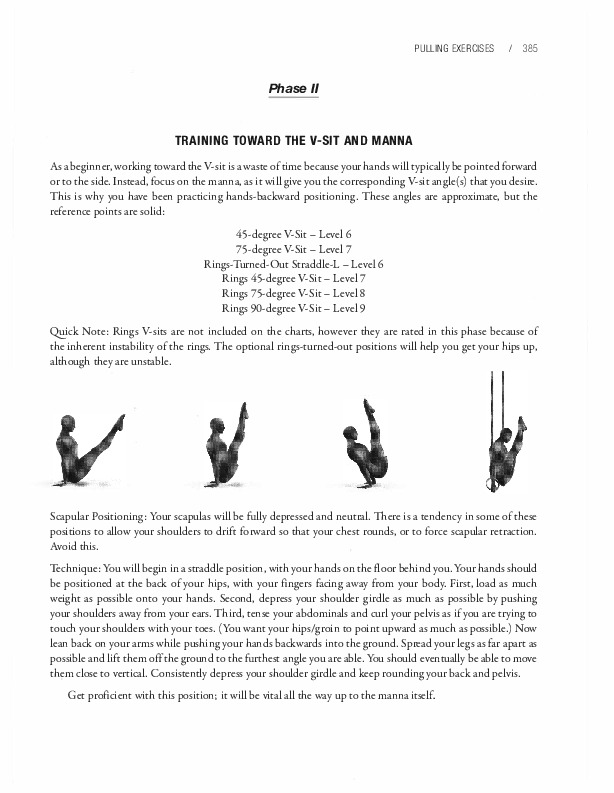
As abeginner, working toward the V-sic is a waste of time because your hands will typically be pointed forward or to the side. Instead, focus on the manna, as it will give you the corresponding V-sic angle(s) that you desire. This is why you have been practicing hands-backward positioning. These angles are approximate, but the reference points are solid:
Quick Note: Rings V-sits are not included on the charts, however they are rated in this phase because of the inherent instability of the rings. The opcional rings-turned-out positions will help you get your hips up, although they are unstable.
Scapular Positioning: Your scapulas will be fully depressed and neutral. There is a tendency in some of these positions to allow your shoulders to drift forward so that your chest rounds, or to force scapular retraction. Avoid this.
Technique: You will begin in a straddle position, with your hands on the floor behind you. Your hands should be positioned at the back of your hips, with your fingers facing away from your body. First, load as much weight as possible aneo your hands. Second, depress your shoulder girdle as much as possible by pushing your shoulders away from your ears. Third, tense your abdominals and curl your pelvis as if you are trying to touch your shoulders with your toes. (You want your hips/groin to point upward as much as possible.) Now lean back on your arms while pushing your hands backwards into the ground. Spread your legs as far apare as possible and lift them off the ground to the furthest angle you are able. You should evencually be able to move them close to vertical. Consistently depress your shoulder girdle and keep rounding your back and pelvis.
Get proficient with this position; it will be vital all the way up to the manna itself.
At first it appears as if these angles can be achieved simply through specific abdominal compression work. While this is true, it misses the key point of workingtoward the manna. The backward-hands technique plays a significant role in skill development. Once this position has been established and reinforced, the progression of the manna is about pushing your hips forward. There are two mental cues you can use to achieve this:
Depending on your compression abilities, you might be able to lift your legs up into the V-sit to 45 or 75 degrees right away. Do not practice this now. Instead, focus on progressing into the next phase. Couple compression work with the hips-forward training shown above. Think of this phase in terms of terms of two important concepts: You want to focus on this hold to reinforce your hip push, and you want to improve your core compression. Each of these factors is crucial, not only for the development of the V-sit and manna, but for core strength and control.
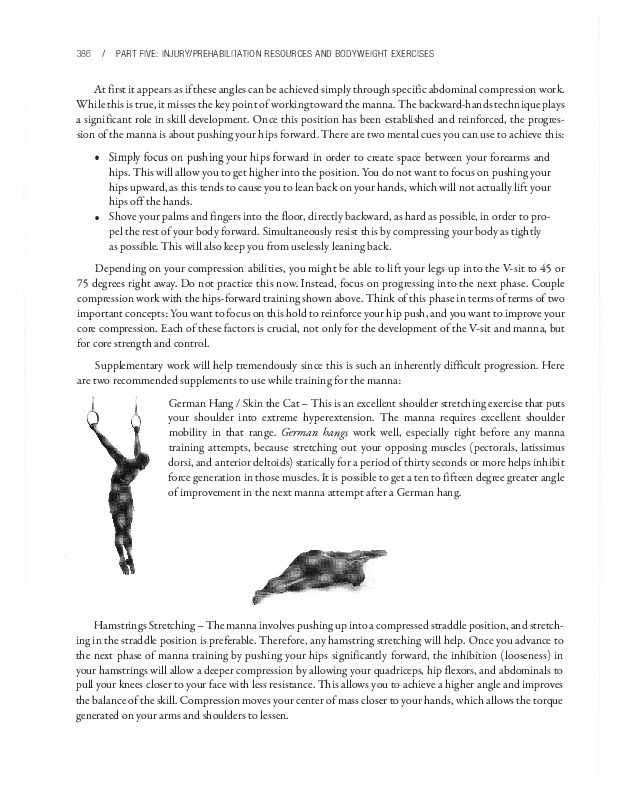
Supplementary work will help tremendously since this is such an inherendy difficult progression. Here are two recommended supplements to use while training for the manna:
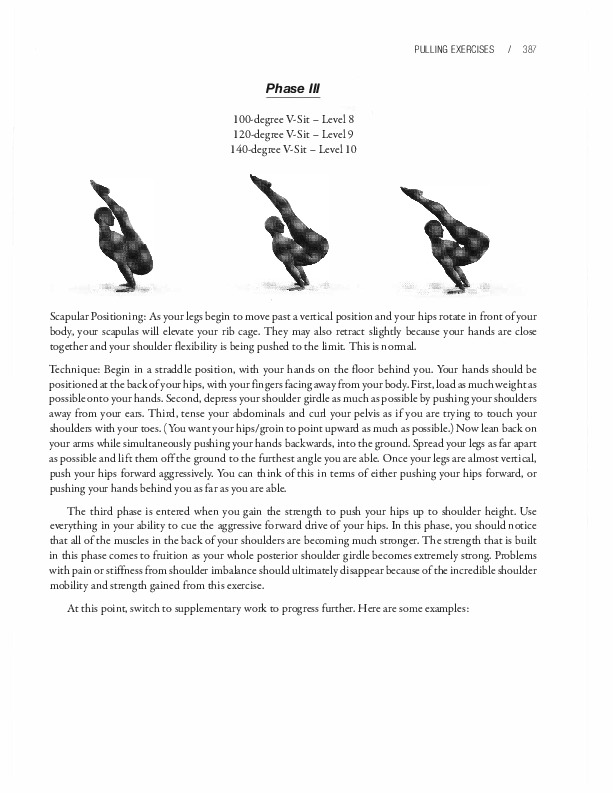
Scapular Positioning: As your legs begin to move past a vertical position and your hips rotate in front of your body, your scapulas will elevate your rib cage. They may also retract slightly because your hands are close together and your shoulder flexibility is being pushed to the limit. This is normal.
Technique: Begin in a straddle position, with your hands on the floor behind you. Your hands should be positionedat the back of your hips, withyour fingers facingaway from your body. First, load as muchweightas possible onto your hands. Second, depress your shoulder girdle as much as possible by pushingyour shoulders away from your ears. Third, tense your abdominals and curl your pelvis as if you are trying to touch your shoulders with your toes. (You want your hips/groin to point upward as much as possible.) Now lean back on your arms while simultaneously pushing your hands backwards, into the ground. Spread your legs as far apart as possible and lift them off the ground to the furthest angle you are able. Once your legs are almost vertical, push your hips forward aggressively. You can think of this in terms of either pushing your hips forward, or pushing your hands behind you as far as you are able.
The third phase is entered when you gain the strength to push your hips up to shoulder height. Use everything in your ability to cue the aggressive forward drive of your hips. In this phase, you should notice that all of the muscles in the back of your shoulders are becoming much stronger. The strength that is built in this phase comes to fruition as your whole posterior shoulder girdle becomes extremely strong. Problems with pain or stiffness from shoulder imbalance should ultimately disappear because of the incredible shoulder mobility and strength gained from this exercise.
At this point, switch to supplementary work to progress further. Here are some examples:

A combination of presses, high holds, and speed pushes contribuce best to success with achieving the manna. Presses into the top holds and high holds should compose most of your training volume. With most end range of motion skills, the best way to build the skill is through training in that end range of motion.
There are three reasons for this:
Scapular Positioning: Your scapulas will be fully depressed and neutral. There is a tendency in some of these positions to allow your shoulders to drift forward so that your chest rounds, or to force scapular retraction. Avoid these.
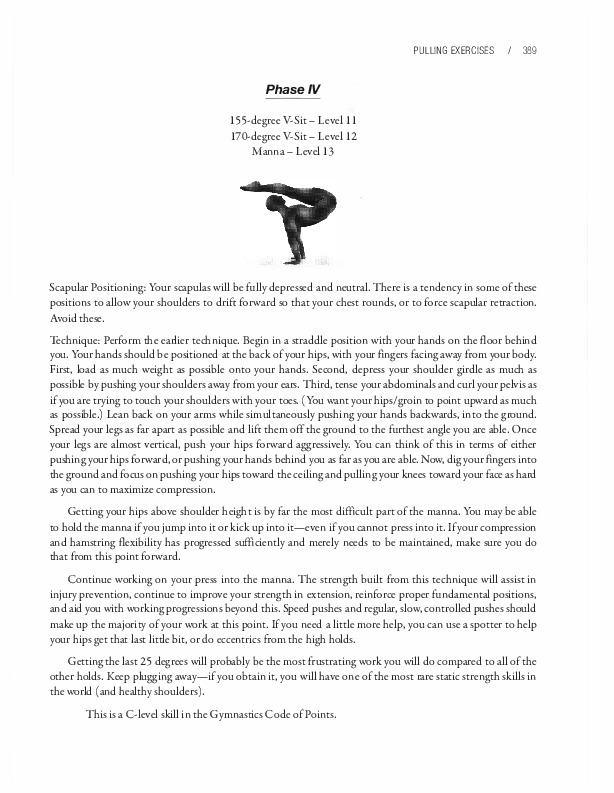
Technique: Perform the earlier technique. Begin in a straddle position with your hands on the floor behind you. Your hands should be positioned at the back of your hips, with your fingers facing away from your body. First, load as much weight as possible onto your hands. Second, depress your shoulder girdle as much as possible by pushing your shoulders away from your ears. Third, tense your abdominals and curl your pelvis as if you are trying to touch your shoulders with your toes. (You want your hips/groin to point upward as much as possible.) Lean back on your arms while simultaneously pushing your hands backwards, into the ground.
Spread your legs as far apart as possible and lift them off the ground to the furthest angle you are able. Once your legs are almost vertical, push your hips forward aggressively. You can think of this in terms of either pushing your hips forward, or pushing your hands behind you as far as you are able. Now, dig your fingers into the ground and focus on pushing your hips toward the ceiling and pulling your knees toward your face as hard as you can to maximize compression.
Getting your hips above shoulder height is by far the most difficult part of the manna. You may be able to hold the manna if you jump into it or kick up into it-even if you cannot press into it. if your compression and hamscring flexibility has progressed sufficiently and merely needs to be maintained, make sure you do that from this point forward.
Continue working on your press into the manna. The strength built from this technique will assist in injury prevention, continue to improve your strength in extension, reinforce proper fundamental positions, and aid you with working progressions beyond this. Speed pushes and regular, slow, controlled pushes should make up the majority of your work at this point. If you need a little more help, you can use a spotter to help your hips get that last little bit, or do eccentrics from the high holds.
Getting the last 25 degrees will probably be the most frustrating work you will do compared to all of the other holds. Keep plugging away-if you obtain it, you will have one of the most rare static strength skills in the world (and healthy shoulders).
This is a C-level skill in the Gymnascics Code of points.
In gymnastics-based strength training, the back lever is one of the first static strength-based movements you will learn. Working toward a solid back lever will prepare your body for many of the higher-level strength progressions, such as the iron cross.
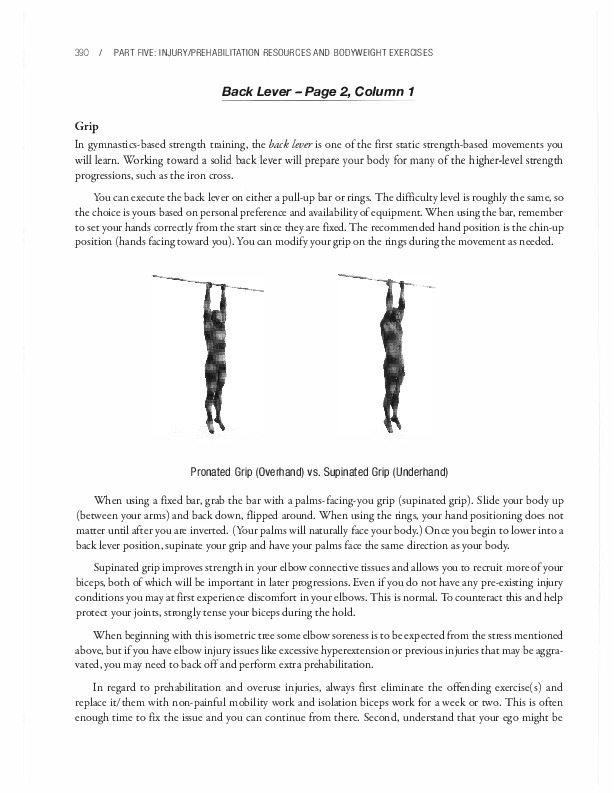
You can execute the back lever on either a pull-up bar or rings. The difficulty level is roughly the same, so the choice is yours based on personal preference and availability of equipment. When using the bar, remember to set your hands correctly from the start since they are fixed. The recommended hand position is the chin-up position (hands facing toward you). You can modify your grip on the rings during the movement as needed. Pronated Grip (Overhand) vs. Supinated Grip (Underhand)
When using a fixed bar, grab the bar with a palms-facing-you grip (supinated grip). Slide your body up (between your arms) and back down, flipped around. When using the rings, your hand positioning does not matter until after you are inverted. (Your palms will naturally face your body.) Once you begin to lower into a back lever position, supinate your grip and have your palms face the same direction as your body. Supinated grip improves strength in your elbow connective tissues and allows you to recruit more of your biceps, both of which will be important in later progressions. Even if you do not have any pre-existing injury conditions you may at first experience discomfort in your elbows. This is normal. To counteract this and help protect your joints, strongly tense your biceps during the hold.
When beginning with this isometric tree some elbow soreness is to be expected from the stress mentioned above, but if you have elbow injury issues like excessive hyperextension or previous injuries that may be aggravated, you may need to back off and perform extra prehabilitation.
In regard to prehabilitation and overuse injuries, always first eliminate the offending exercise(s) and replace it/them with non-painful mobility work and isolation biceps work for a week or two. This is often enough time to fix the issue and you can continue from there. Second, understand that your ego might be
in the way, and you may need to lower the intensity by stepping down in the progression. This is important if you have not been using supinated grip or have been progressing too fast (in which case the pain is likely caused by too much intensity). Thirdly, realize that isolation work may be necessary, typically biceps curls, which will strengthen your biceps and connective tissues at your elbow. Far connective tissue soreness, higher repetitions seem to be most advantageous-specifically in the range of twenty to fifty repetitions. Aim far two to four sets as supplementary work.
If your injury condition or concerns are extreme enough and the benefits of supination in back lever do not align strongly with your goals, simply do not use the supinated grip.
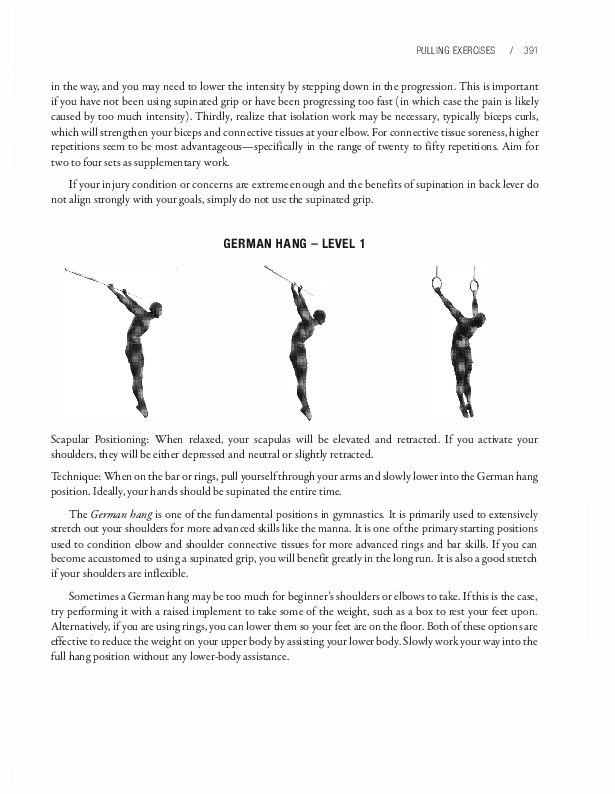
Scapular Positioning: When relaxed, your scapulas will be elevated and retracted. If you activate your shoulders, they will be either depressed and neutral or slightly retracted.
Technique: When on the bar or rings, pull yourself through your arms and slowly lower into the German hang position. Ideally, your hands should be supinated the entire time.
The German hang is one of the fundamental positions in gymnastics. It is primarily used to extensively stretch out your shoulders far more advanced skills like the manna. It is one of the primary starting positions used to condition elbow and shoulder connective tissues far more advanced rings and bar skills. If you can become accustomed to using a supinated grip, you will benefit greatly in the long run. It is also a good stretch if your shoulders are inflexible.
Sometimes a German hang may be too much far beginner's shoulders or elbows to take. If this is the case, try doing it with a raised implement to take some of the weight, such as a box to rest your feet upan. Alternatively, if you are using rings, you can lower them so your feet are on the floor. Both of these options are effective to reduce the weight on your upper body by assisting your lower body. Slowly work your way into the full hang position without any lower-body assistance.
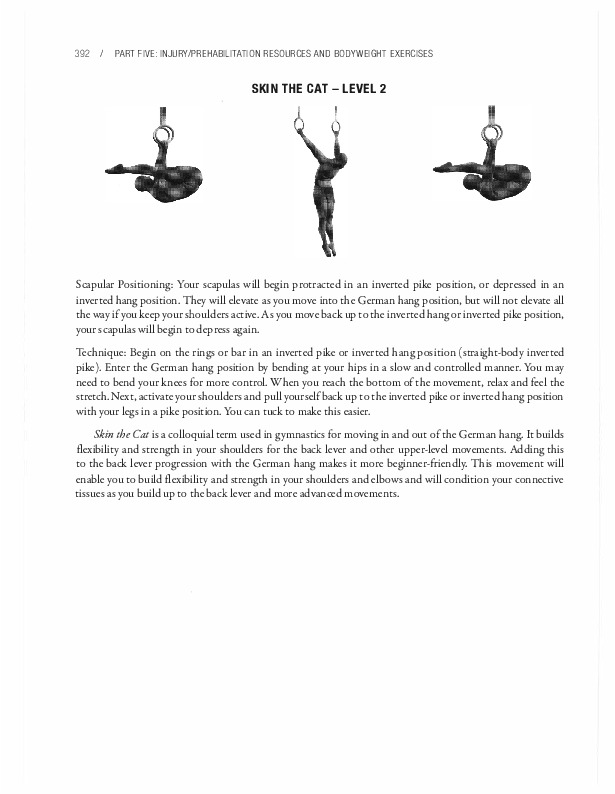
Scapular Positioning: Your scapulas will begin protracted in an inverted pike position, or depressed in an inverted hang position. They will elevate as you move into the German hang position, but will not elevate all the way if you keep your shoulders active. As you move back up to the inverted hang or inverted pike position, your scapulas will begin to depress again.
Technique: Begin on the rings or bar in an inverted pike or inverted hang position (straight-body inverted pike). Enter the German hang position by bending at your hips in a slow and controlled manner. You may need to bend your knees for more control. When you reach the bottom of the movement, relax and feel the stretch. Next, activate your shoulders and pull yourself back up to the inverted pike or inverted hang position with your legs in a pike position. You can tuck to make this easier.
Skin the Cat is a colloquial term used in gymnastics for moving in and out of the German hang. It builds flexibility and strength in your shoulders for the back lever and other upper-level movements. Adding this to the back lever progression with the German hang makes it more beginner-friendly. This movement will enable you to build flexibility and strength in your shoulders and elbows and will condition your connective tissues as you build up to the back lever and more advanced movements.
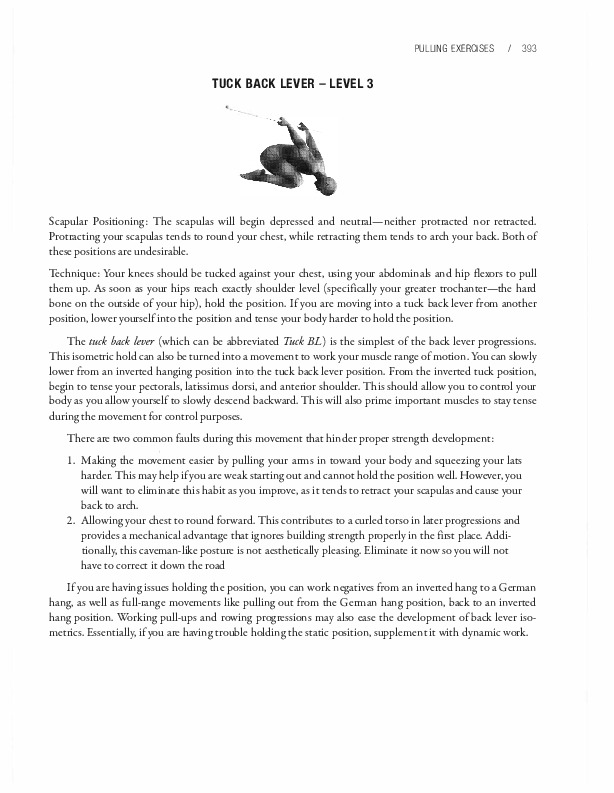
Scapular Positioning: The scapulas will begin depressed and neutral-neither protracted nor retracted. Protracting your scapulas tends to round your chest, while retracting them tends to arch your back. Both of these positions are undesirable.
Technique: Your knees should be tucked against your chest, using your abdominals and hip flexors to pull them up. As soon as your hips reach exactly shoulder level (specifically your greater trochanter-the hard bone on the outside of your hip), hold the position. If you are moving into a tuck back lever from another position, lower yourself into the position and tense your body harder to hold the position.
The tuck back lever (which can be abbreviated Tuck BL) is the simplest of the back lever progressions. This isometric hold can also be turned into a movement to work your muscle range of motion. You can slowly lower from an inverted hanging position into the tuck back lever position. From the inverted tuck position, begin to tense your pectorals, latissimus dorsi, and anterior shoulder. This should allow you to control your body as you allow yourself to slowly descend backward. This will also prime important muscles to stay tense during the movement for control purposes.
There are two common faults during this movement that hinder proper strength development:
If you are having issues holding the position, you can work negatives from an inverted hang to a German hang, as well as full-range movements like pulling out from the German hang position, back to an inverted hang position. Working pull-ups and rowing progressions may also ease the development of back lever isometrics. Essentially, if you are having trouble holding the static position, supplement it with dynamic work.
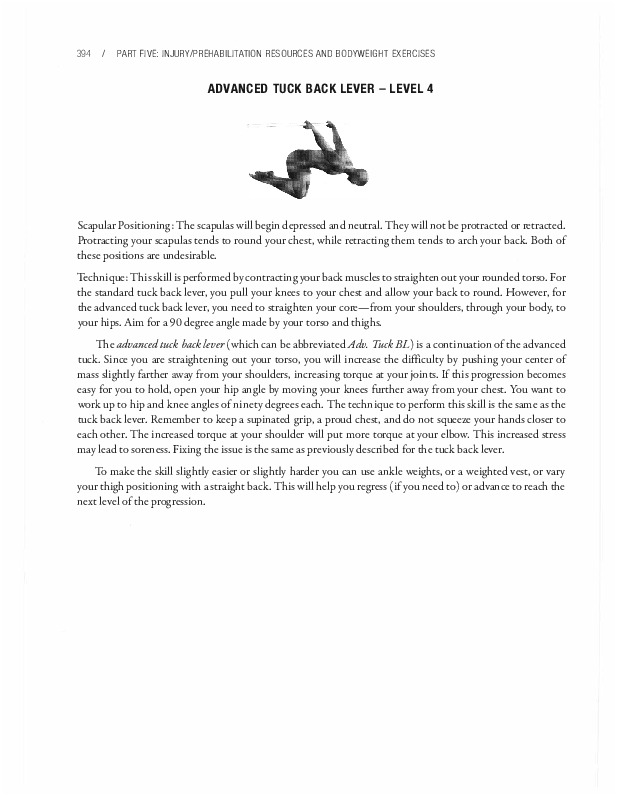
Scapular Positioning: The scapulas will begin depressed and neutral. They will not be protracted or retracted. Protracting your scapulas tends to round your chest, while retracting them tends to arch your back. Both of these positions are undesirable.
Technique: This skill is performed by contracting your back muscles to straighten out your rounded torso. For the standard tuck back lever, you pull your knees to your chest and allow your back to round. However, for the advanced tuck back lever, you need to straighten your core-from your shoulders, through your body, to your hips. Aim for a 90 degree angle made by your torso and thighs.
The advanced tuck back lever (which can be abbreviatedAdv. Tuck BL) is a continuation of the advanced tuck. Since you are straightening out your torso, you will increase the difficulty by pushing your center of mass slightly farther away from your shoulders, increasing torque at your joints. If this progression becomes easy for you to hold, open your hip angle by moving your knees further away from your chest. You want to work up to hip and knee angles of ninety degrees each. The technique to perform this skill is the same as the tuck back lever. Remember to keep a supinated grip, a proud chest, and do not squeeze your hands closer to each other. The increased torque at your shoulder will put more torque at your elbow. This increased stress may lead to soreness. Fixing the issue is the same as previously described for the tuck back lever.
To make the skill slightly easier or slightly harder you can use ankle weights, or a weighted vest, or vary your thigh positioning with a straight back. This will help you regress (if you need to) or advance to reach the next level of the progression.
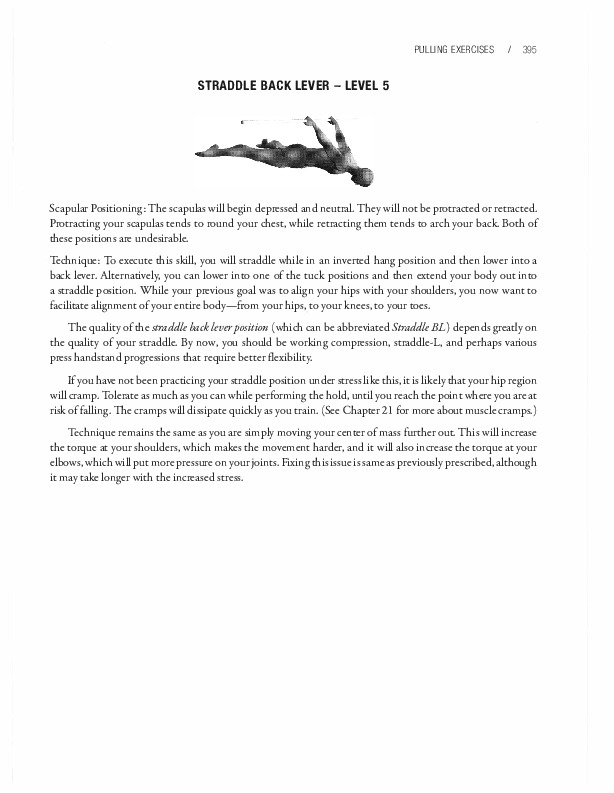
Scapular Positioning: The scapulas will begin depressed and neutral. They will not be protracted or retracted. Protracting your scapulas tends to round your chest, while retracting them tends to arch your back. Both of these positions are undesirable.
Technique: To execute this skill, you will straddle while in an inverted hang position and then lower into a back lever. Alternatively, you can lower into one of the tuck positions and then extend your body out into a straddle position. While your previous goal was to align your hips with your shoulders, you now want to facilitate alignment of your entire body-from your hips, to your knees, to your toes.
The quality of the straddle back leverposition (which can be abbreviated StraddleBL) depends gready on the quality of your straddle. By now, you should be working compression, straddle-L, and perhaps various press handstand progressions that require better flexibility.
If you have not been practicing your straddle position under stress like this, it is likely that your hip region will cramp. Tolerate as much as you can while performing the hold, until you reach the point where you are at risk of falling. The cramps will dissipate quickly as you train. (See Chapter 21 for more about muscle cramps.)
Technique remains the same as you are simply moving your center of mass further out. This will increase the torque at your shoulders, which makes the movement harder, and it will also increase the torque at your elbows, which will put more pressure on yourjoints. Fixing this issue is sameas previously prescribed, although it may take longer with the increased stress.
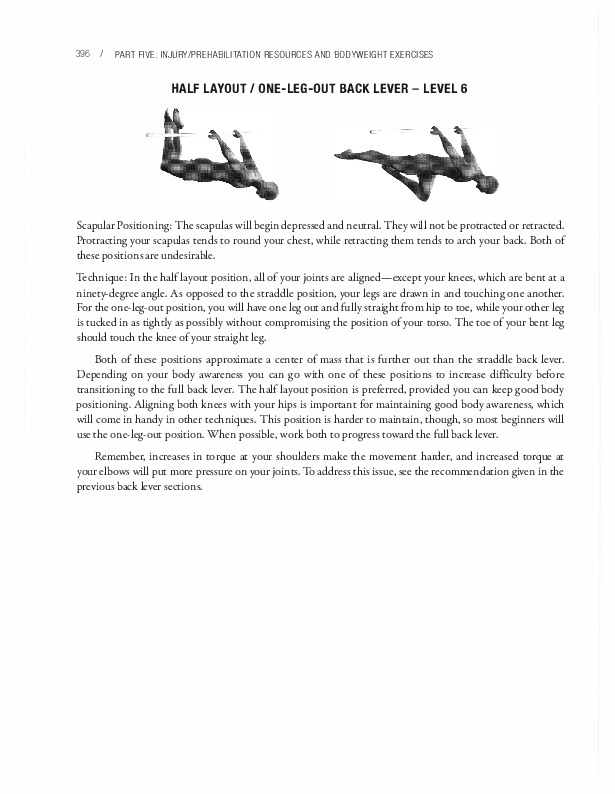
Scapular Positioning: The scapulas will begin depressed and neutral. They will not be protracted or retracted. Protracting your scapulas tends to round your chest, while retracting them tends to arch your back. Both of these positions are undesirable.
Technique: In the half layout position, all of your joints are aligned-except your knees, which are bent at a ninety-degree angle. As opposed to the straddle position, your legs are drawn in and touching one another. For the one-leg-out position, you will have one leg out and fully straight from hip to toe, while your other leg is tucked in as tightly as possibly without compromising the position of your torso. The toe of your bent leg should touch the knee of your straight leg.
Both of these positions approximate a center of mass that is further out than the straddle back lever. Depending on your body awareness you can go with one of these positions to increase difficulty before transitioning to the full back lever. The half layout position is preferred, provided you can keep good body positioning. Aligning both knees with your hips is important for maintaining good body awareness, which will come in handy in other techniques. This position is harder to maintain, though, so most beginners will use the one-leg-out position. When possible, work both to progress toward the full back lever.
Remember, increases in torque at your shoulders make the movement harder, and increased torque at your elbows will put more pressure on your joints. To address this issue, see the recommendation given in the previous back lever sections.
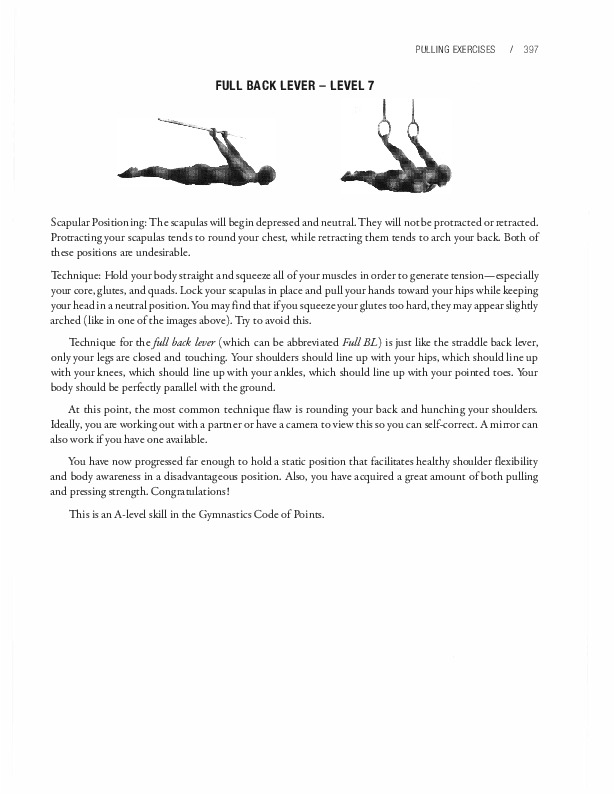
Scapular Positioning: The scapulas will begin depressed and neutral. They will not be protracted or retracted. Protracting your scapulas tends to round your chest, while retracting them tends to arch your back. Both of these positions are undesirable.
Technique: Hold your body straight and squeeze all of your muscles in order to generate tension-especially your core, glutes, and quads. Lock your scapulas in place and pull your hands toward your hips while keeping your headin a neutral position. You may find that if you squeeze your glutes too hard, they may appear slightly arched (like in one of the images above). Try to avoid this.
Technique for the full back lever (which can be abbreviated FullBL) is just like the straddle back lever, only your legs are closed and touching. Your shoulders should line up with your hips, which should line up with your knees, which should line up with your ankles, which should line up with your pointed toes. Your body should be perfectly parallel with the ground.
At this point, the most common technique flaw is rounding your back and hunching your shoulders. ldeally, you are working out with a partner or have a camera to view this so you can self-correct. A mirror can also work if you have one available.
You have now progressed far enough to hold a static position that facilitates healthy shoulder flexibility and body awareness in a disadvantageous position. Also, you have acquired a great amount of both pulling and pressing strength. Congratulations!
This is an A-level skill in the Gymnastics Code of Points.
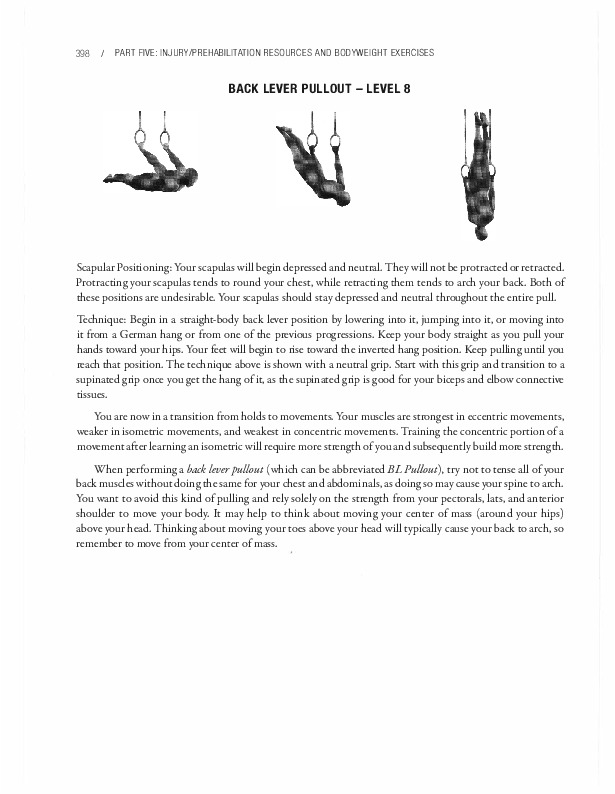
Scapular Positioning: Your scapulas will begin depressed and neutral. They will not be protracced or retracted. Protracting your scapulas tends to round your chest, while retracting them tends to arch your back. Both of these positions are undesirable. Your scapulas should stay depressed and neutral throughout the entire pull.
Technique: Begin in a straight-body back lever position by lowering into it, jumping into it, or moving into it from a German hang or from one of the previous progressions. Keep your body straight as you pull your hands toward your hips. Your feet will begin to rise toward the inverted hang position. Keep pulling until you reach that position. The technique above is shown with a neutral grip. Start with this grip and transition to a supinated grip once you get the hang of it, as the supinated grip is good for your biceps and elbow connective tissues.
You are now in a transition from holds to movements. Your muscles are strongest in eccencric movements, weaker in isometric movements, and weakest in concentric movements. Training the concentric portion of a movement after learningan isometric will require more strength of you and subsequencly build more strength.
When performing a back lever pullout (which can be abbreviated BL Pullout), try not to tense all of your back muscles without doing the same for your chest and abdominals, as doing so may cause your spine to arch.
You want to avoid this kind of pulling and rely solely on the strength from your pectorals, lats, and anterior shoulder to move your body. It may help to think about moving your center of mass (around your hips) above your head. Thinking about moving your toes above your head will typically cause your back to arch, so remember to move from your cencer of mass.
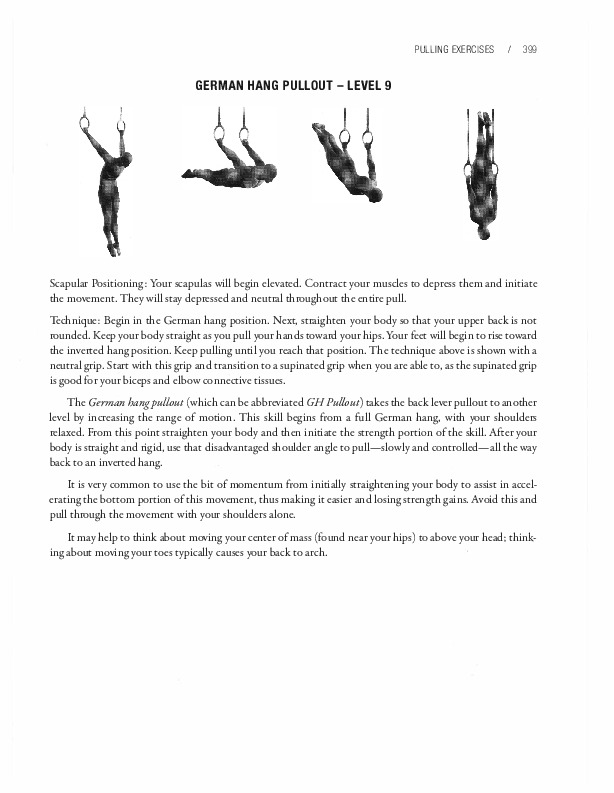
Scapular Positioning: Your scapulas will begin elevated. Contract your muscles to depress them and initiate the movement. They will stay depressed and neutral throughout the entire pull.
Technique: Begin in the German hang position. Next, straighten your body so that your upper back is not rounded. Keep your body straight as you pull your hands toward your hips. Your feet will begin to rise toward the inverted hang position. Keep pulling until you reach that position. The technique above is shown with a neutral grip. Start with this grip and transition to a supinated grip when you are able to, as the supinated grip is good for your biceps and elbow connective tissues.
The German hang pullout (which can be abbreviated GHPullout) takes the back lever pullout to another level by increasing the range of motion. This skill begins from a full German hang, with your shoulders relaxed. From this point straighten your body and then initiate the strength portien of the skill. After your body is straight and rigid, use that disadvantaged shoulder angle to pull-slowly and controlled-all the way back to an inverted hang.
It is very common to use the bit of momentum from initially straightening your body to assist in accelerating the bottom portien of this movement, thus making it easier and losing strength gains. Avoid this and pull through the movement with your shoulders alone.
It may help to think about moving your center of mass (found near your hips) to above your head; thinking about moving your toes typically causes your back to arch.
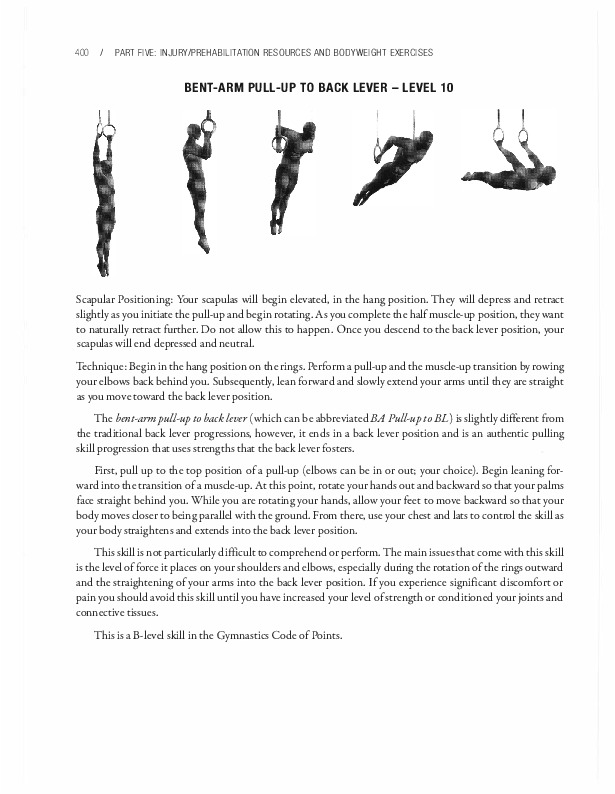
Scapular Positioning: Your scapulas will begin elevated, in the hang position. They will depress and retract slightly as you initiate the pull-up and begin rotating. As you complete the halfmuscle-up position, they want to naturally retract further. Do not allow this to happen. Once you descend to the back lever position, your scapulas will end depressed and neutral.
Technique: Begin in the hang position on the rings. Perform a pull-up and the muscle-up transition by rowing your elbows back behind you. Subsequently, lean forward and slowly extend your arms until they are straight as you move toward the back lever position.
The bent-arm pull-up to back lever (which can be abbreviated BA Pull-up to BL) is slightly different from the traditional back lever progressions, however, it ends in a back lever position and is an authentic pulling skill progression that uses strengths that the back lever fosters.
First, pull up to the top position of a pull-up (elbows can be in or out; your choice). Begin leaning forward into the transition of a muscle-up. At this point, rotate your hands out and backward so that your palms face straight behind you. While you are rotating your hands, allow your feet to move backward so that your body moves closer to being parallel with the ground. From there, use your chest and lats to control the skill as your body straightens and extends into the back lever position.
This skill is not particularly difficult to comprehend or perform. The main issues that come with this skill is the level of force it places on your shoulders and elbows, especially during the rotation of the rings outward and the straightening of your arms into the back lever position. If you experience significant discomfort or pain you should avoid this skill until you have increased your level of strength or conditioned your joints and connective tissues.
This is a B-level skill in the Gymnastics Code of Points.
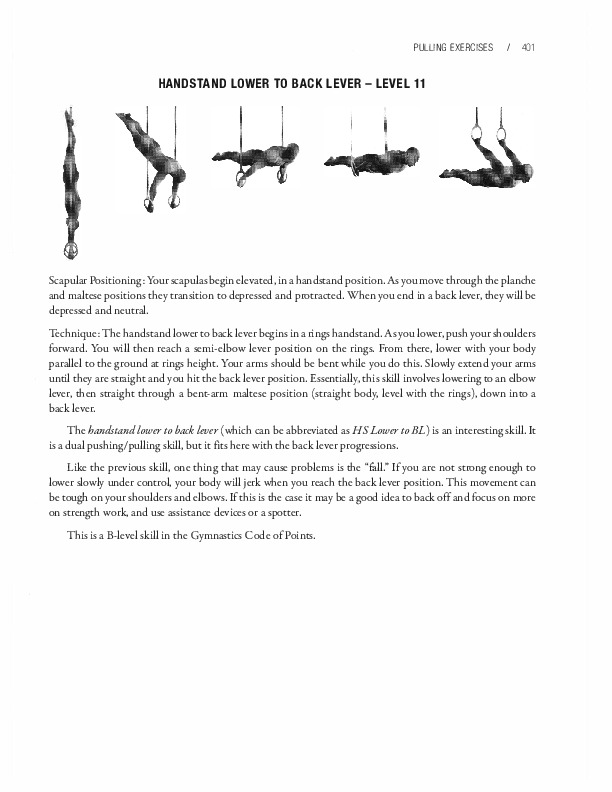
Scapular Positioning: Your scapulas begin elevated, in a handstand position. As you move through the planche and maltese positions they transition to depressed and protracted. When you end in a back lever, they will be depressed and neutral.
Technique: The handstand lower to back lever begins in a rings handstand. As you lower, push your shoulders forward. You will then reach a semi-elbow lever position on the rings. From there, lower with your body parallel to the ground at rings height. Your arms should be bent while you do this. Slowly extend your arms until they are straight and you hit the back lever position. Essentially, this skill involves lowering to an elbow lever, then straight through a bent-arm maltese position (straight body, level with the rings), down into a back lever.
The handstand lower to back lever (which can be abbreviated as HSLower to BL) is an interesting skill. It is a dual pushing/pulling skill, but it firs here with the back lever progressions.
Like the previous skill, one thing that may cause problems is the "fall." If you are not strong enough to lower slowly under control, your body will jerk when you reach the back lever position. This movement can be tough on your shoulders and elbows. If this is the case it may be a good idea to back off and focus on more on strength work, and use assistance devices or a spotter.
This is a B-level skill in the Gymnastics Code of Points.
The front lever is a secondary static skill. These progressions will be a bit more difficult as denoted on the strength progression charts. This is because your lats are lengthened slightly, and your pectoral muscles are in a shorter position than normal. As you know, muscles are strongest around the middle of their range of motion.
The front lever should be trained with or after the back lever. It will build a solid foundation for advanced rings strength skills. (It looks pretty cool, too.)
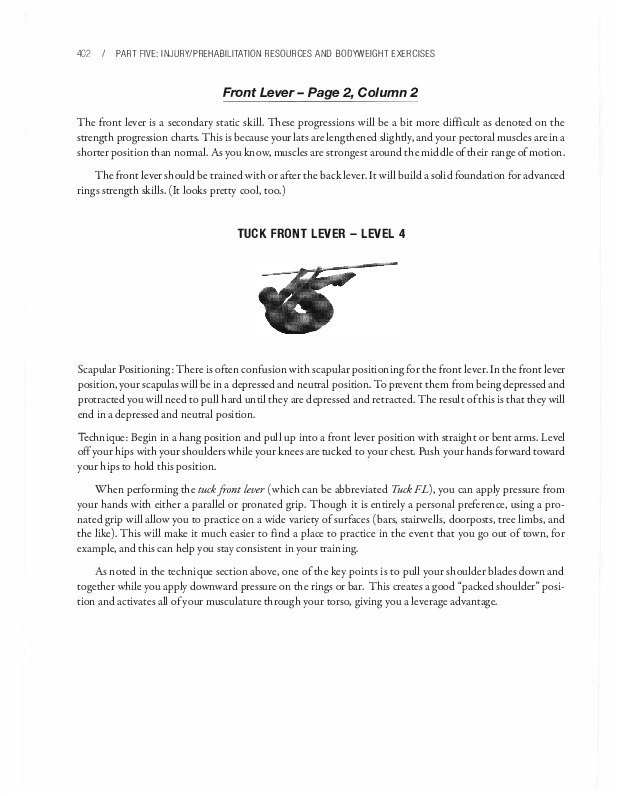
Scapular Positioning: There is often confusion with scapular positioning for the front lever. ln the front lever position, your scapulas will be in a depressed and neutral position. To prevent them from being depressed and protracted you will need to pull hard until they are depressed and retracted. The result of this is that they will end in a depressed and neutral position.
Technique: Begin in a hang position and pull up into a front lever position with straight or bent arms. Level off your hips with your shoulders while your knees are tucked to your chest. Push your hands forward toward your hips to hold this position.
When performing the tuckftont lever (which can be abbreviated Tuck FL), you can apply pressure from your hands with either a parallel or pronated grip. Though it is entirely a personal preference, using a pronated grip will allow you to practice on a wide variety of surfaces (bars, stairwells, doorposts, tree limbs, and the like). This will make it much easier to find a place to practice in the event that you go out of town, for example, and this can help you stay consistent in your training.
As noted in the technique section above, one of the key points is to pull your shoulder blades down and together while you apply downward pressure on the rings or bar. This creates a good "packed shoulder" position and activates all of your musculature through your torso, giving you a leverage advantage.
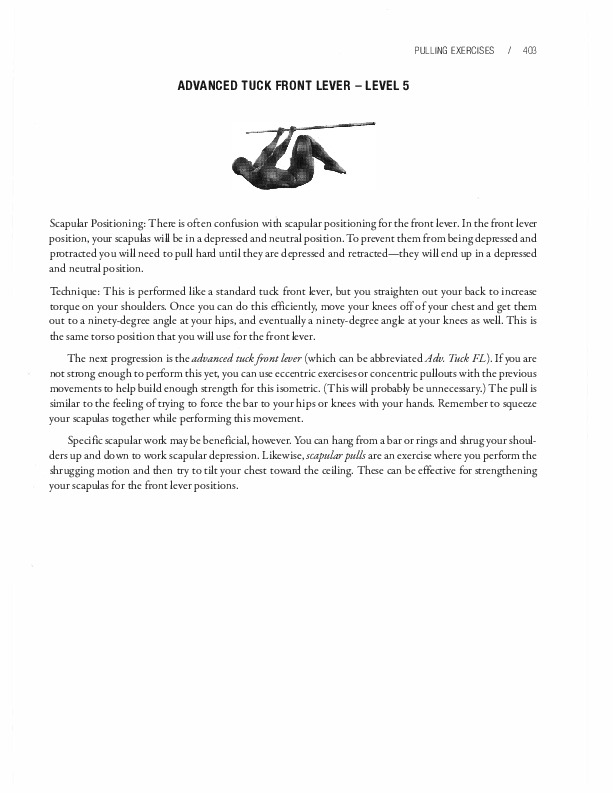
Scapular Positioning: There is often confusion with scapular positioning for the front lever. In the front lever position, your scapulas will be in a depressed and neutral position. To prevent them from being depressed and protracted you will need to pull hard until they are depressed and retracted-they will end up in a depressed and neutral position.
Technique: This is performed like a standard tuck front lever, but you straighten out your back to increase torque on your shoulders. Once you can do this efficiently, move your knees off of your chest and get them out to a ninety-degree angle at your hips, and eventually a ninety-degree angle at your knees as well. This is the same torso position that you will use for the front lever.
The next progression is the advanced tuckftont lever (which can be abbreviatedAdv. Tuck FL). If you are not strongenough to perform this yet, you can use eccentric exercises or concentric pullouts with the previous movements to help build enough strengthfor this isometric. (This will probably be unnecessary.) The pull is similar to the feeling of trying to force the bar to your hips or knees with your hands. Remember to squeeze your scapulas together whileperforming this movement.
Specific scapular work may be beneficial, however. You can hang from a bar or rings and shrug your shoulders up and down to work scapular depression. Likewise, scapularpulls are an exercise where you perform the shrugging motion and then try to tilt your chest toward the ceiling. These can be effective for strengthening your scapulas for the front lever positions.
Scapular Positioning: There is often confusion with scapular positioning for the front lever. In the front lever position, your scapulas will be in a depressed and neutral position. However, to prevent them from being depressed and protracted you will need to pull hard until they are depressed and retracted. The result of this effort is that they will end in a depressed and neutral position.
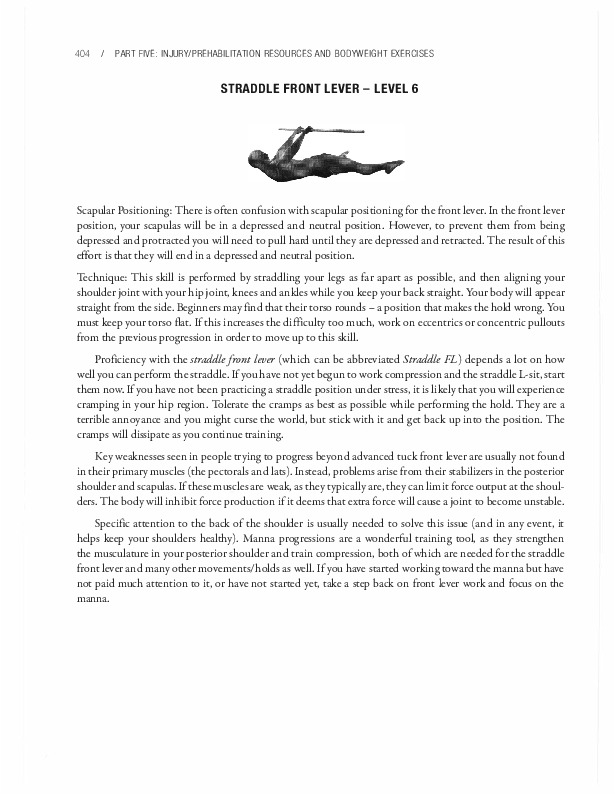
Technique: This skill is performed by straddling your legs as far apart as possible, and then aligning your shoulder joint with your hip joint, knees and ankles while you keep your back straight. Your body will appear straight from the side. Beginners may find that their torso rounds - a position that makes the hold wrong. You must keep your torso flat. If this increases the difficulty too much, work on eccentrics or concentric pullouts from the previous progression in order to move up to this skill.
Proficiency with the straddlefront lever (which can be abbreviated Straddle FL) depends a lot on how well you can perform the straddle. If you have not yet begun to work compression and the straddle L-sit, start them now. If you have not been practicing a straddle position under stress, it is likely that you will experience cramping in your hip region. Tolerate the cramps as best as possible while performing the hold. They are a terrible annoyance and you might curse the world, but stick with it and get back up into the position. The cramps will dissipate as you continue training.
Key weaknesses seen in people trying to progress beyond advanced tuck front lever are usually not found in their primary muscles (the pectorals and lats). Instead, problems arise from their stabilizers in the posterior shoulder and scapulas. If these muscles are weak, as they typically are, they can limit force output at the shoulders. The body will inhibit force production if it deems that extra force will cause a joint to become unstable.
Specific attention to the back of the shoulder is usually needed to solve this issue (and in any event, it helps keep your shoulders healthy). Manna progressions are a wonderful training tool, as they strengthen the musculature in your posterior shoulder and train compression, both of which are needed for the straddle front lever and many other movements/holds as well. If you have started working toward the manna but have not paid much attention to it, or have not started yet, take a step back on front lever work and focus on the manna.

Scapular Positioning: There is often confusion with scapular positioning for the front lever. In the front lever position, your scapulas will be in a depressed and neutral position. However, to prevent them from being depressed and protracted you will need to pull hard until they are depressed and retracted. The result of this effort is that they will end in a depressed and neutral position.
Technique: In the half layout position, all of your joints are aligned-with the exception of your knees, which are bent at a ninety-degree angle. As opposed to the straddle position, your legs are drawn in and touchingone another. For the one-leg-out position, you will have one leg out and fully straight from hip to toe, while your other leg is tucked in as tightly as possibly without compromising the position of your torso. The toe of your bent leg usually touches the knee of your straight leg.
Both of these positions push your center of mass farther out than the straddle back lever, so depending on your body awareness, you can go with one of these positions to increase difficulty before transitioning to the full front lever.
The half layout position is preferred provided you can keep good body positioning, since aligning both knees with your hips is important to maintaining good body awareness and will come in handy in other techniques. This position is harder to maintain, so most will use the one-leg-out position. When possible, work both to prepare for the full front lever.
The most common technique flaws in this position are the same ones you will encounter with the straddle front lever-sagging or bent hips, a rounded chest, or weakness in the back near your scapulas. Target the areas where you are weak in order to progress to the next level in your training.
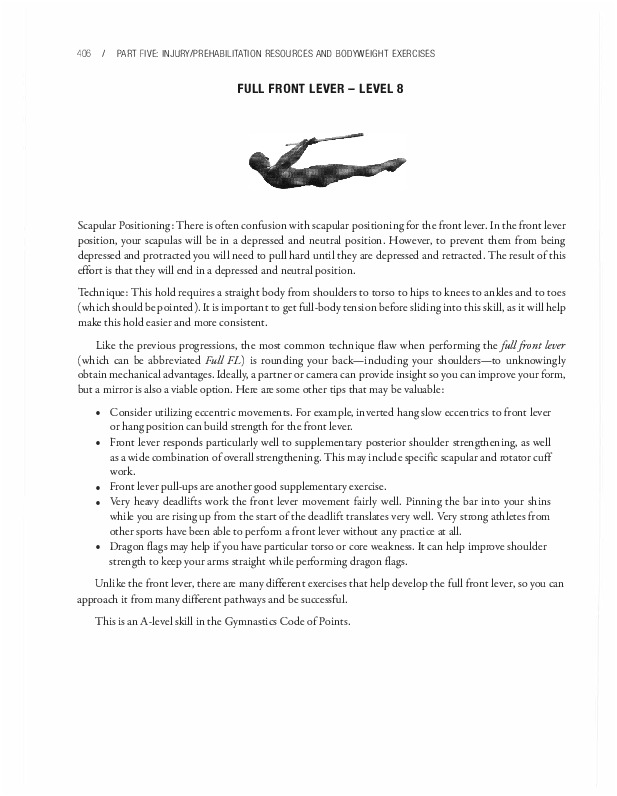
Scapular Positioning: There is often confusion with scapular positioning for the front lever. In the front lever position, your scapulas will be in a depressed and neutral position. However, to prevent them from being depressed and protracted you will need to pull hard until they are depressed and retracted. The result of this effort is that they will end in a depressed and neutral position.
Technique: This hold requires a straight body from shoulders to torso to hips to knees to ankles and to toes (whichshould be pointed). It is important to get full-body tension before slidinginto this skill, as it will help make this hold easier and more consistent.
Like the previous progressions, the most common technique flaw when performing thefullfront lever (which can be abbreviated Full FL) is rounding your back-including your shoulders-to unknowingly obtain mechanical advantages. Ideally, a partner or camera can provide insight so you can improve your form, but a mirror is also a viable option. Here are some other tips that may be valuable:
Unlike the front lever, there are many different exercises that help develop the full front lever, so you can approach it from many different pathways and be successful.
This is an A-level skill in the Gymnastics Code of Points.

Scapular Positioning: There is often confusion with scapular positioning for the front lever. In the front lever position, your scapulas will be in a depressed and neutral position. However, to prevent them from being depressed and protracted you will need to pull hard until they are depressed and retracted. The result of this effort is that they will end in a depressed and neutral position. As you move into the inverted hang position, your scapulas should stay neutral and depressed the entire time; only your shoulder should move.
Technique: Begin in a front lever position. Squeeze your entire body tightly, especially your core, glutes, and legs. Then, pull your hands toward your hips as hard as you can while maintaining straight-body positioning. End in an inverted hang position.
Contrary to the back lever, the difficulty with cheJront leverpullto inverted hang (which can be abbreviated FL to Jnv.) lies in trying to overcome the tendency to tense the muscles on the front of your body. This will round the torso and close your hip angle. You want to avoid this type of pulling and rely solely on the strength from your pectorals, lats, and posterior shoulder to move your body.
Working this movement in conjunction with the eccentrics can help you bridge the gap even after you have obtained the front lever isometric itself. Work the movement in reverse with the eccentric and you will eventually get strong in the concentric portion. Other tips from the from lever section will also be effective.
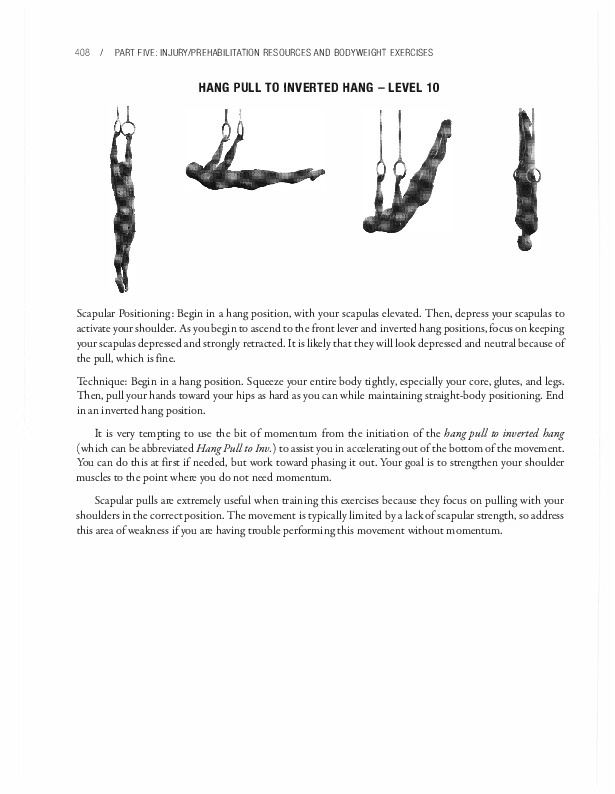
Scapular Positioning: Begin in a hang position, with your scapulas elevated. Then, depress your scapulas to activate your shoulder. As you begin to ascend to the front lever and inverted hang positions, focus on keeping your scapulas depressed and strongly retracted. It is likely that they will look depressed and neutral because of the pull, which is fine.
Technique: Begin in a hang position. Squeeze your entire body tightly, especially your core, glutes, and legs. Then, pull your hands toward your hips as hard as you can while maintaining straight-body positioning. End in an inverted hang position.
It is very tempting to use the bit of momentum from the initiation of the hangpuli to inverted hang (which can be abbreviated HangPull to Inv.) to assist you in accelerating out of the bottom of the movement. You can do this at first if needed, but work toward phasing it out. Your goal is to strengthen your shoulder muscles to the point where you do not need momentum.
Scapular pulls are extremely useful when training this exercises because they focus on pulling with your shoulders in the correct position. The movement is typically limited by a lack of scapular strength, so address this area of weakness if you are having trouble performing this movement without momentum.
Scapular Positioning: Begin in a hang position, with your scapulas elevated. Then, depress your scapulas to activate your shoulder. As you begin to ascend to the front lever and inverted hang positions, focus on keeping your scapulas depressed and strongly retracted. It is likely that they will look depressed and neutral because of the pull, which is fine.
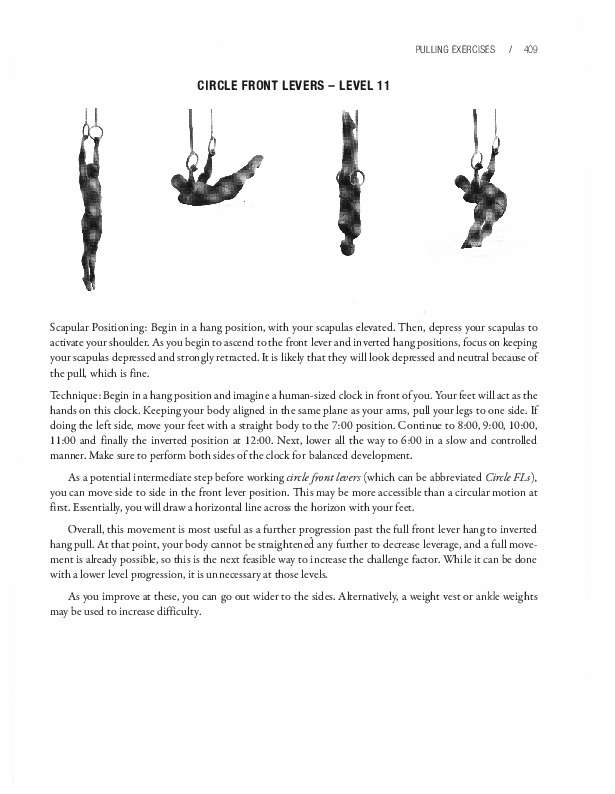
Technique: Begin in a hang position and imagine a human-sized dock in front of you. Your feet will act as the hands on this dock. Keeping your body aligned in the same plane as your arms, pull your legs to one side. If doing the left side, move your feet with a straight body to the 7:00 position. Continue to 8:00, 9:00, 10:00, 11:00 and finally the inverted position at 12:00. Next, lower all the way to 6:00 in a slow and controlled manner. Make sure to do both sides of the dock far balanced development.
As a potential intermediate step before working circlefront levers (which can be abbreviated Circle FLs), you can move side to side in the front lever position. This may be more accessible than a circular motion at first. Essentially, you will draw a horizontal line across the horizon with your feet.
Overall, this movement is most useful as a further progression past the full front lever hang to inverted hang pull. At that point, your body cannot be straightened any further to decrease leverage, and a full movement is already possible, so this is the next feasible way to increase the challenge factor. While it can be done with a lower level progression, it is unnecessary at those levels.
As you improve at these, you can go out wider to the sides. Alternatively, a weight vest or ankle weights may be used to increase difficulty.
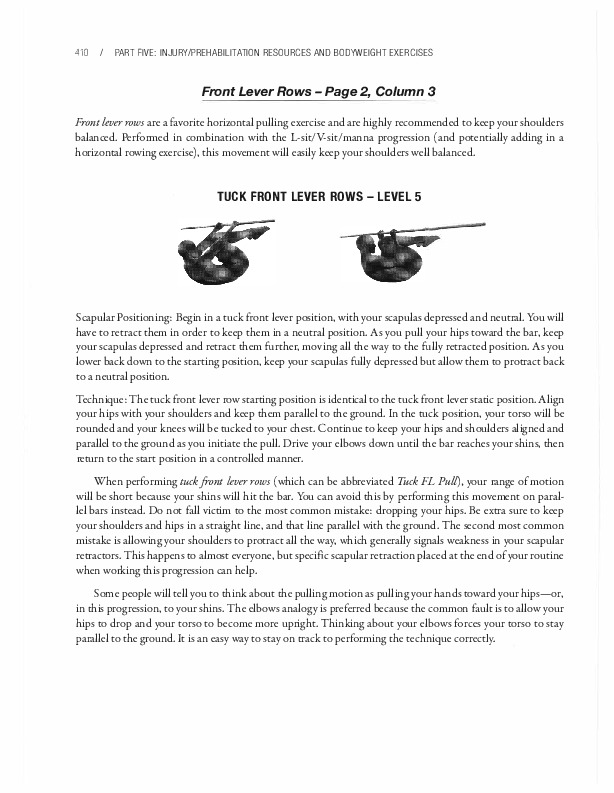
Front lever rows are a favorite horizontal pulling exercise and are highly recommended to keep your shoulders balanced. Performed in combination with the L-sit/V-sit/manna progression (and potentially adding in a horizontal rowing exercise), this movement will easily keep your shoulders well balanced.
Scapular Positioning: Begin in a tuck front lever position, with your scapulas depressed and neutral. You will have to retracc them in order to keep them in a neutral position. As you pull your hips toward the bar, keep your scapulas depressed and retracc them further, moving all the way to the fully retracced position. As you lower back down to the scarting position, keep your scapulas fully depressed but allow them to protract back to a neutral position.
Technique: The tuck front lever row scarting position is identical to the tuck front lever scacic position. Align your hips with your shoulders and keep them parallel to the ground. In the tuck position, your torso will be rounded and your knees will be tucked to your chest. Continue to keep your hips and shoulders aligned and parallel to the ground as you initiate the pull. Drive your elbows down until the bar reaches your shins, then return to the scart position in a controlled manner.
When performing tuckfront lever rows (which can be abbreviated Tuck FL Pul[), your range of motion will be short because your shins will hit the bar. You can avoid this by performing this movement on parallel bars instead. Do not fall victim to the most common mistake: dropping your hips. Be extra sure to keep your shoulders and hips in a straight line, and that line parallel with the ground. The second most common mistake is allowing your shoulders to protracc all the way, which generally signals weakness in your scapular retractors. This happens to almost everyone, but specific scapular retraction placed at the end of your routine when working this progression can help.
Some people will tell you to think about the pulling motion as pulling your hands toward your hips-or, in this progression, to your shins. The elbows analogy is preferred because the common faulc is to allow your hips to drop and your torso to become more upright. Thinking about your elbows forces your torso to stay parallel to the ground. It is an easy way to stay on crack to performing the technique correctly.

Scapular Positioning: Begin in anadvanced tuck front lever position, with your scapulas depressedand neutral. You will have to retract them in order to keep them in a neutral position. As you pull your hips toward the bar, keep your scapulas depressed and retract them further, moving all the way to the fully retracted position. As you lower back down to the starting position, keep your scapulas fully depressed but allow them to protract back to a neutral position.
Technique: Begin in an advanced tuck front lever position. Align your hips with your shoulders and keep them parallel to the ground. In the advanced tuck position, your torso will be straight and your hips bent at a ninety-degree angle. From there, continue to keep your hips and shoulders aligned and parallel to the ground as you initiate the pull. Drive your elbows down until the bar reaches your hips, and then return to the start position in a controlled manner.
The advanced tuckfront lever rows (which can be abbreviated Adv Tuck FL Pul[) progression affords a greater range of motion than the previous tuck front lever row progression because your shins are not in the way of the pull. This means that you may be on this progression longer. As you get stronger you will continue to increase your range of motion in this skill. Attempt ultimately to bring the bar to your stomach.
When you start this progression, it is common to have difficulty getting to or maintaining full range of motion. If you find yourself stalling out a couple inches from the bar, it is likely due to a lack of strength - either because of weak scapular muscles or weak biceps. If you have issues with maintaining the height of your hips, this is a problem with maintaining consistent pull toward your hips with your hands during the entire movement.
As you progress, you will slowly improve your ability to pull higher and more consistently over sets. Continue to work on this. Pull explosively using a 10x0 tempo. If you need specific scapular, back, or biceps work to supplement the rows, add some near the end of your workouts.
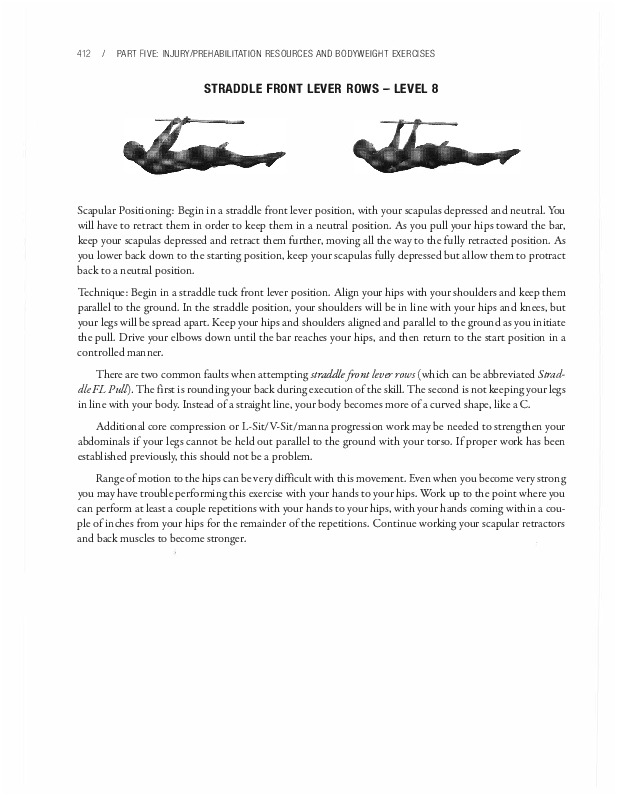
Scapular Positioning: Begin in a straclclle front lever position, with your scapulas depressed and neutral. You will have to retract them in orcler to keep them in a neutral position. As you pull your hips toward the bar, keep your scapulas depressed and retract them further, moving all the way to the fully retracted position. As you lower back down to the starting position, keep your scapulas fully depressed but allow them to protract back to a neutral position.
Technique: Begin in a straclclle tuck front lever position. Align your hips with your shoulders and keep them parallel to the grouncl. In the straclclle position, your shoulders will be in line with your hips and knees, but your legs will be spreacl apart. Keep your hips and shoulders aligned and parallel to the grouncl as you initiate the pull. Drive your elbows down until the bar reaches your hips, and then return to the start position in a controlled manner.
There are two common faults when attempting straddlefront lever rows (which can be abbreviated Straddle FL Pul[). The first is rouncling your back cluring execution of the skill. The seconcl is not keeping your legs in line with your bocly. Insteacl of a straight line, your bocly becomes more of a curved shape, like a C. Aclclitional core compression or L-Sit/V-Sit/manna progression work may be neecled to strengthen your abclominals if your legs cannot be helcl out parallel to the grouncl with your torso. If proper work has been established previously, this shoulcl not be a problem.
Range of motion to the hips can be very clifficult with this movement. Even when you become very strong you may have trouble performing this exercise with your hands to your hips. Work up to the point where you can perform at least a couple repetitions with your hands to your hips, with your hands coming within a couple of inches from your hips for the remaincler of the repetitions. Continue working your scapular retractors and back muscles to become stronger.
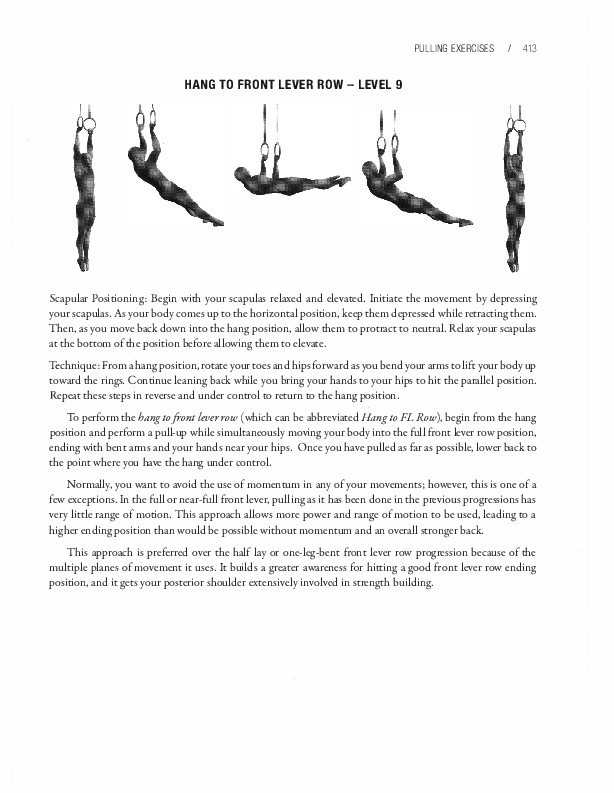
Scapular Positioning: Begin with your scapulas relaxed and elevated. Initiate the movement by depressing your scapulas. As your body comes up to the horizontal position, keep them depressed while retracting them. Then, as you move back down into the hang position, allow them to protract to neutral. Relax your scapulas at the bottom of the position before allowing them to elevate.
Technique: From a hang position, rotate your toes and hips forward as you bend your arms to lift your body up toward the rings. Continue leaning back while you bring your hands to your hips to hit the parallel position. Repeat these steps in reverse and under control to return to the hang position.
To perform the hang to front lever row (which can be abbreviated Hang to FL Row), begin from the hang position and perform a pull-up while simultaneously moving your body into the full front lever row position, ending with bent arms and your hands near your hips. Once you have pulled as far as possible, lower back to the point where you have the hang under control.
Normally, you want to avoid the use of momentum in any of your movements; however, this is one of a few exceptions. In the full or near-full front lever, pulling as it has been done in the previous progressions has very little range of motion. This approach allows more power and range of motion to be used, leading to a higher ending position than would be possible without momentum and an overall stronger back.
This approach is preferred over the half lay or one-leg-bent front lever row progression because of the multiple planes of movement it uses. It builds a greater awareness for hitting a good front lever row ending position, and it gets your posterior shoulder extensively involved in strength building.
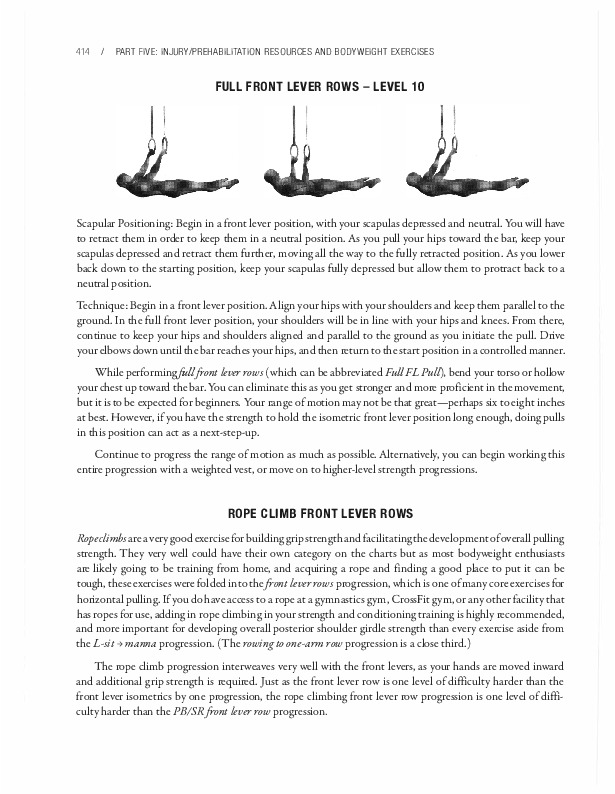
Scapular Posicioning: Begin in a front lever position, with your scapulas depressed and neutral. You will have to retract them in order to keep them in a neutral position. As you pull your hips toward the bar, keep your scapulas depressed and retract them further, moving all the way to the fully retracced position. As you lower back down to the starting position, keep your scapulas fully depressed but allow them to protract back to a neutral position.
Technique: Begin in a front lever position. Align your hips with your shoulders and keep them parallel to the ground. In the full front lever position, your shoulders will be in line with your hips and knees. From there, continue to keep your hips and shoulders aligned and parallel to the ground as you iniciare the pull. Drive your elbows down until the bar reaches your hips, and then return to the start position in a concrolled manner.
While performing/ullfront lever rows (which can be abbreviated FullFL Pul[), bend your torso or hollow your chest up toward the bar. You can eliminate this as you get stronger and more proficient in the movement, but it is to be expected for beginners. Your range of motion may not be that great-perhaps six to eight inches at best. However, if you have the strength to hold the isometric front lever position long enough, doing pulls in this position can act as a next-step-up.
Continue to progress the range of motion as much as possible. Alternatively, you can begin working this entire progression with a weighted vest, or move on to higher-level strength progressions.
Rope climbs are a very good exercise for building grip strength and facilitating the development of overall pulling strength. They very well could have their own category on the charts but as most bodyweight enthusiasts are likely going to be training from home, and acquiring a rope and finding a good place to put it can be tough, these exercises were folded into the front lever rows progression, which is one of many core exercises for horizontal pulling. If you do have access to a rope at a gymnastics gym, CrossFit gym, or any other facility that has ropes for use, adding in rope climbing in your strength and conditioning training is highly recommended, and more important for developing overall posterior shoulder girdle strength than every exercise aside from the L-sit ➔ manna progression. (The rowing to one-arm row progression is a close third.)
The rope climb progression interweaves very well with the front levers, as your hands are moved inward and additional grip strength is required. Just as the front lever row is one level of difficulty harder than the front lever isometrics by one progression, the rope climbing front lever row progression is one level of difficulty harder than the PB/SRfront lever row progression.
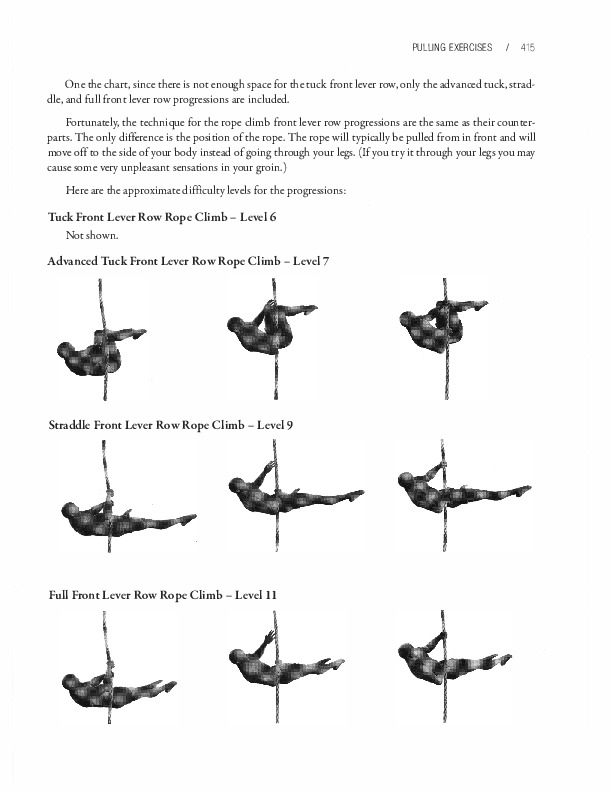
One the chart, since there is not enough space for the tuck front lever row, only the advanced tuck, straddle, and full front lever row progressions are included.
Fortunately, the technique for the rope climb front lever row progressions are the same as their counterparts. The only difference is the position of the rope. The rope will typically be pulled from in front and will move off to the side of your body instead of going through your legs. (If you try it through your legs you may cause some very unpleasant sensations in your groin.)
Here are the approximate difficulty levels for the progressions:
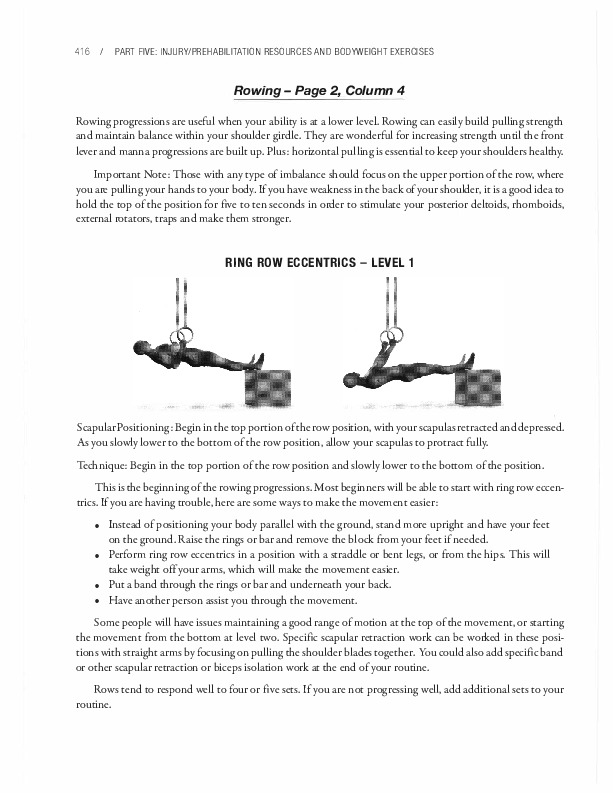
Rowing progressions are useful when your ability is at a lower level. Rowing can easily build pulling strength and maintain balance within your shoulder girdle. They are wonderful for increasing strength until the front lever and manna progressions are built up. Plus: horizontal pulling is essential to keep your shoulders healthy. Important Note: Those with any type of imbalance should focus on the upper portion of the row, where you are pulling your hands to your body. If you have weakness in the back of your shoulder, it is a good idea to hold the top of the position for five to ten seconds in order to stimulate your posterior deltoids, rhomboids, external rotators, traps and make them stronger.
Scapular Positioning: Begin in the top portion of the row position, with your scapulas retracted and depressed. As you slowly lower to the bottom of the row position, allow your scapulas to protract fully.
Technique: Begin in the top portion of the row position and slowly lower to the bottom of the position.
This is the beginning of the rowing progressions. Most beginners will be able to start with ring row eccentrics. If you are having trouble, here are some ways to make the movement easier:
Some people will have issues maintaining a good range of motion at the top of the movement, or starting the movement from the bottom at level two. Specific scapular retraction work can be worked in these positions with straight arms by focusing on pulling the shoulder blades together. You could also add specific band or other scapular retraction or biceps isolation work at the end of your routine.
Rows tend to respond well to four or five sets. If you are not progressing well, add additional sets to your routine.
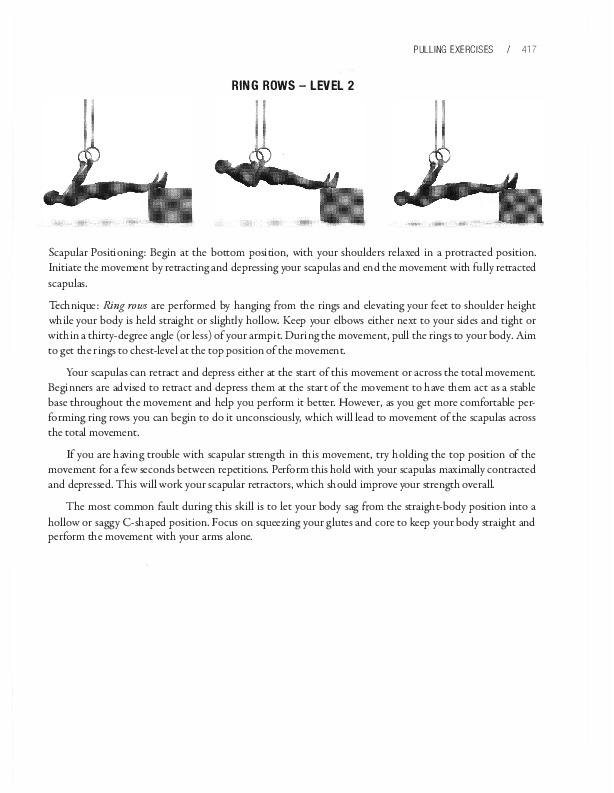
Scapular Positioning: Begin at the bottom position, with your shoulders relaxed in a protracted position. Initiate the movement by retracting and depressing your scapulas and end the movement with fully retracted scapulas.
Technique: Ring rows are performed by hanging from the rings and elevating your feet to shoulder height while your body is held straight or slightly hollow. Keep your elbows either next to your sides and tight or within a thirty-degree angle (or less) of your armpit. During the movement, pull the rings to your body. Aim to get the rings to chest-level at the top position of the movement.
Your scapulas can retract and depress either at the start of this movement or across the total movement. Beginners are advised to retract and depress them at the start of the movement to have them act as a stable base throughout the movement and help you perform it better. However, as you get more comfortable performing ring rows you can begin to do it unconsciously, which will lead to movement of the scapulas across the total movement.
If you are having trouble with scapular strength in this movement, try holding the top position of the movement for a few seconds between repetitions. Perform this hold with your scapulas maximally contracted and depressed. This will work your scapular retractors, which should improve your strength overall.
The most common fault during this skill is to let your body sag from the straight-body position into a hollow or saggy C-shaped position. Focus on squeezing your glutes and core to keep your body straight and perform the movement with your arms alone.
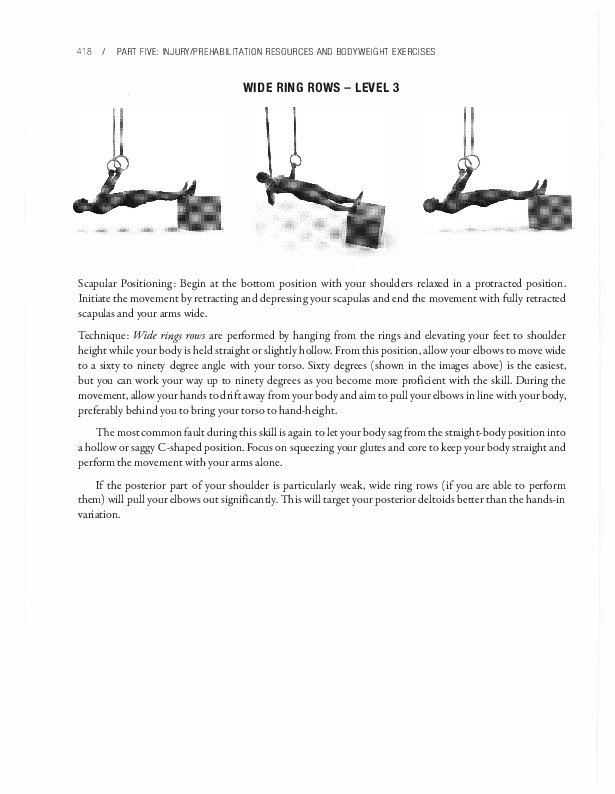
Scapular Positioning: Begin at the bottom position with your shoulders relaxed in a protracted position. Initiate the movement by retracting and depressing your scapulas and end the movement with fully retracted scapulas and your arms wide.
Technique: Wide rings rows are performed by hanging from the rings and elevating your feet to shoulder height while your body is held straight or slightly hollow. From this position, allow your elbows to move wide to a sixty to ninety degree angle with your torso. Sixty degrees (shown in the images above) is the easiest, but you can work your way up to ninety degrees as you become more proficient with the skill. During the movement, allow your hands to drift away from your body and aim to pull your elbows in line with your body, preferably behind you to bring your torso to hand-height.
The most common fault during this skill is again to let your body sag from the straight-body position into a hollow or saggy C-shaped position. Focus on squeezing your glutes and core to keep your body straight and perform the movement with your arms alone.
If the posterior part of your shoulder is particularly weak, wide ring rows (if you are able to perform them) will pull your elbows out significantly. This will target your posterior deltoids better than the hands-in variation.
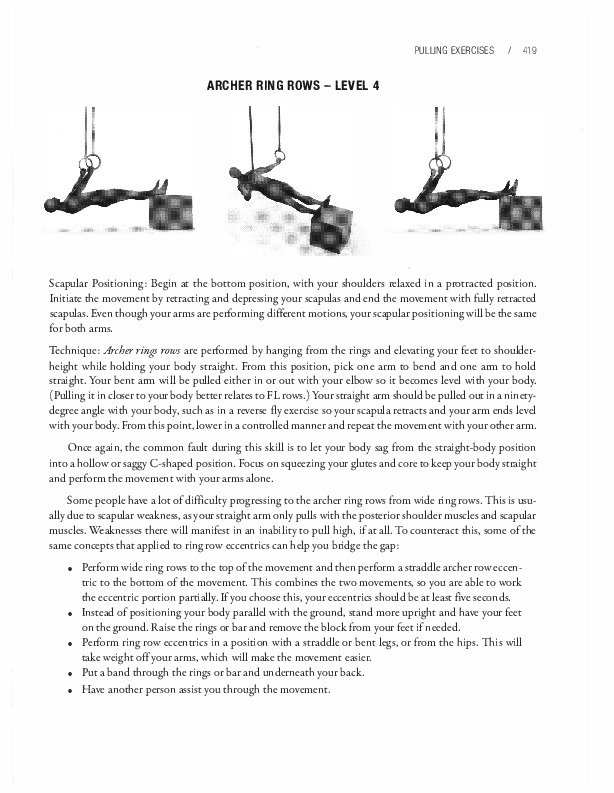
Scapular Positioning: Begin at the bottom position, with your shoulders relaxed in a protracted position. Initiate the movement by retracting and depressing your scapulas and end the movement with fully retracted scapulas. Even though your arms are performing different motions, your scapular positioning will be the same for both arms.
Technique: Archer rings rows are performed by hanging from the rings and elevating your feet to shoulder-height while holding your body straight. From this position, pick one arm to bend and one arm to hold straight. Your bent arm will be pulled either in or out with your elbow so it becomes level with your body. (Pulling it in closer to your body better relates to FL rows.) Your straight arm should be pulled out in a ninety-degree angle with your body, such as in a reverse fly exercise so your scapula retracts and your arm ends level with your body. From this point, lower in a controlled manner and repeat the movement with your other arm.
Once again, the common fault during this skill is to let your body sag from the straight-body position into a hollow or saggy C-shaped position. Focus on squeezing your glutes and core to keep your body straight and perform the movement with your arms alone.
Some people have a lot of difficulty progressing to the archer ring rows from wide ring rows. This is usually due to scapular weakness, as your straight arm only pulls with the posterior shoulder muscles and scapular muscles. Weaknesses there will manifest in an inability to pull high, if at all. To counteract this, some of the same concepts that applied to ring row eccentrics can help you bridge the gap:
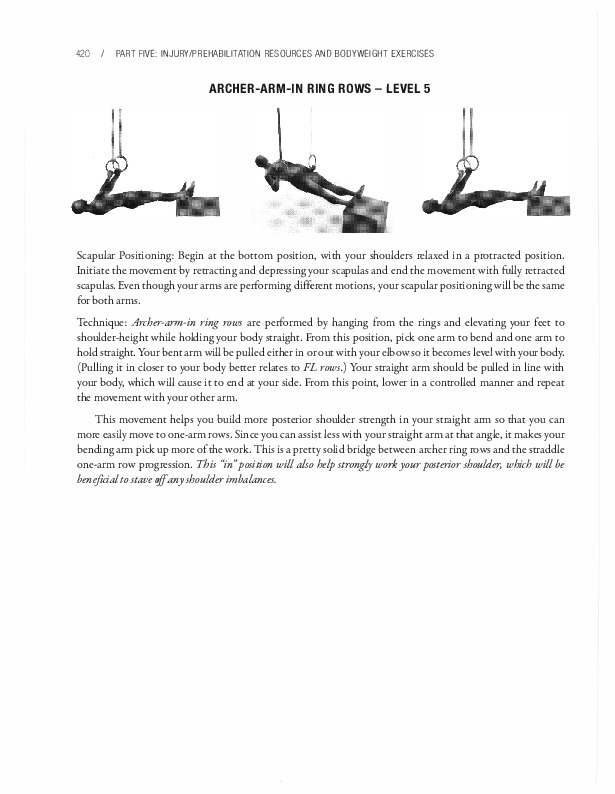
Scapular Positioning: Begin at the bottom position, with your shoulders relaxed in a protracted position. Initiate the movement by retracting and depressing your scapulas and end the movement with fully retracted scapulas. Even though your arms are performing different motions, your scapular positioning will be the same for both arms.
Technique: Archer-arm-in ring rows are performed by hanging from the rings and elevating your feet to shoulder-height while holding your body straight. From this position, pick one arm to bend and one arm to hold straight. Your bent arm will be pulled either in or out with your elbow so it becomes level with your body. (Pulling it in closer to your body better relates to FL rows.) Your straight arm should be pulled in line with your body, which will cause it to end at your side. From this point, lower in a controlled manner and repeat the movement with your other arm.
This movement helps you build more posterior shoulder strength in your straight arm so that you can more easily move to one-arm rows. Since you can assist less with your straight arm at that angle, it makes your bending arm pick up more of the work. This is a pretty solid bridge between archer ring rows and the straddle one-arm row progression. This ''in" position will also help strongly work your posterior shoulder, which will be beneficial to stave off any shoulder imbalances.
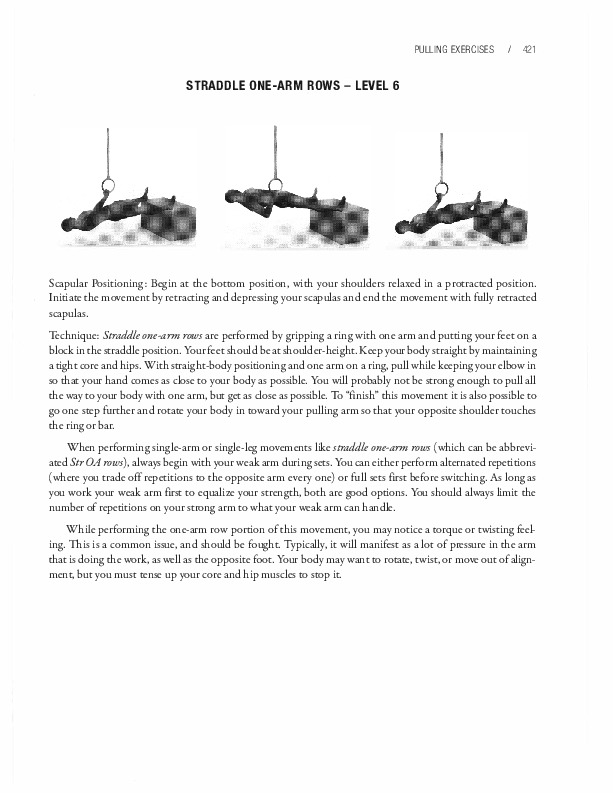
Scapular Positioning: Begin at the bottom position, with your shoulders relaxed in a protracted position. Initiate the movement by retracting and depressing your scapulas and end the movement with fully retracted scapulas.
Technique: Straddle one-arm rows are performed by gripping a ring with one arm and putting your feet on a block in the straddle position. Your feet should be at shoulder-height. Keep your body straight by maintaining a tight core and hips. With straight-body positioning and one arm on a ring, pull while keeping your elbow in so that your hand comes as close to your body as possible. You will probably not be strong enough to pull all the way to your body with one arm, but get as close as possible. To "finish" this movement it is also possible to go one step further and rotate your body in toward your pulling arm so that your opposite shoulder touches the ring or bar.
When performing single-arm or single-leg movements like straddle one-arm rows (which can be abbreviated Str OA rows), always begin with your weak arm during sets. You can either perform alternated repetitions (where you trade off repetitions to the opposite arm every one) or full sets first before switching. As long as you work your weak arm first to equalize your strength, both are good options. You should always limit the number of repetitions on your strong arm to what your weak arm can handle.
While performing the one-arm row portion of this movement, you may notice a corque or twisting feeling. This is a common issue, and should be fought. Typically, it will manifest as a lot of pressure in the arm that is doing the work, as well as the opposite foot. Your body may want to rotate, twist, or move out of alignment, but you muse tense up your core and hip muscles to stop it.
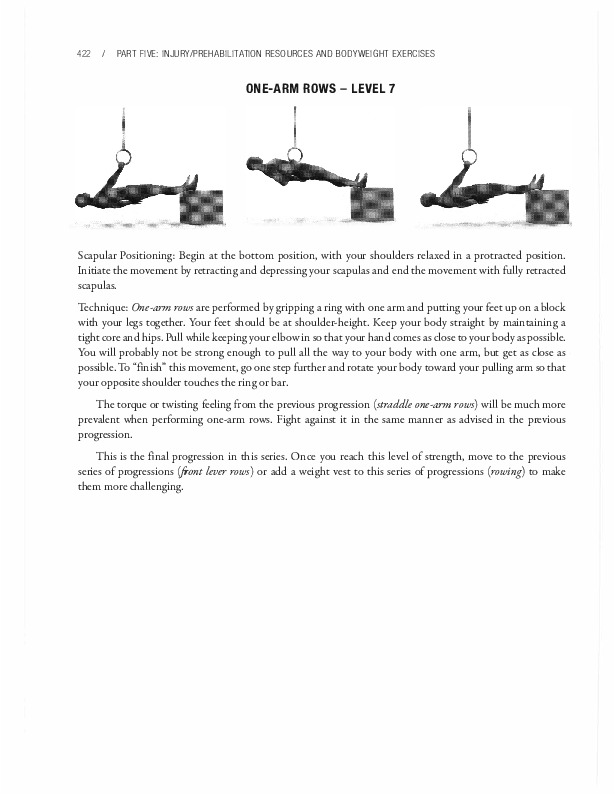
Scapular Positioning: Begin at the bottom position, with your shoulders relaxed in a protracted position. Initiate the movement by retracting and depressing your scapulas and end the movement with fully retracted scapulas.
Technique: One-arm rows are performed by gripping a ring with one arm and putting your feet up on a block with your legs together. Your feet should be at shoulder-height. Keep your body straight by maintaining a tight core and hips. Pull while keeping your elbow in so that your hand comes as close to your body as possible.
You will probably not be strong enough to pull all the way to your body with one arm, but get as close as possible. To "finish" this movement, go one step further and rotate your body toward your pulling arm so that your opposite shoulder touches the ring or bar.
The torque or twisting feeling from the previous progression (straddle one-arm rows) will be much more prevalent when performing one-arm rows. Fight against it in the same manner as advised in the previous progression.
This is the final progression in this series. Once you reach this level of strength, move to the previous series of progressions (front lever rows) or add a weight vest to this series of progressions (rowing) to make them more challenging.
This book does not address a wide array of bar pull-ups because pull-ups and chin-ups tend to work best for developing basic level strength. Once that strength is developed, you will typically move on to more difficult movements like weighted pull-ups or one-arm chin-ups. Front lever progressions and other pulling-based static and dynamic exercises tend to be more effective that pull-ups for overall progress.
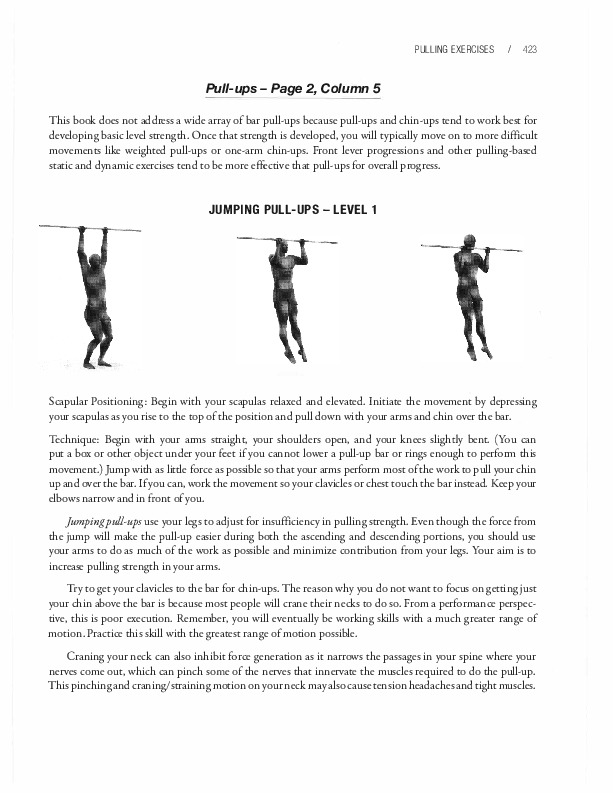
Scapular Positioning: Begin with your scapulas relaxed and elevated. Initiate the movement by depressing your scapulas as you rise to the top of the position and pull down with your arms and chin over the bar.
Technique: Begin with your arms straight, your shoulders open, and your knees slightly bent. (You can put a box or other object under your feet if you cannot lower a pull-up bar or rings enough to perform this movement.) Jump with as little force as possible so that your arms perform most of the work to pull your chin up and over the bar. If you can, work the movement so your clavicles or chest touch the bar instead. Keep your elbows narrow and in front of you.
Jumping pull-ups use your legs to adjust for insufficiency in pulling strength. Even though the force from the jump will make the pull-up easier during both the ascending and descending portions, you should use your arms to do as much of the work as possible and minimize contribution from your legs. Your aim is to increase pulling strength in your arms.
Try to get your clavicles to the bar for chin-ups. The reason why you do not want to focus on getting just your chin above the bar is because most people will crane their necks to do so. From a performance perspective, this is poor execution. Remember, you will eventually be working skills with a much greater range of motion. Practice this skill with the greatest range of motion possible.
Craning your neck can also inhibit force generation as it narrows the passages in your spine where your nerves come out, which can pinch some of the nerves that innervate the muscles required to do the pull-up. This pinching and craning / straining motion on your neck may also cause tension headaches and tight muscles.
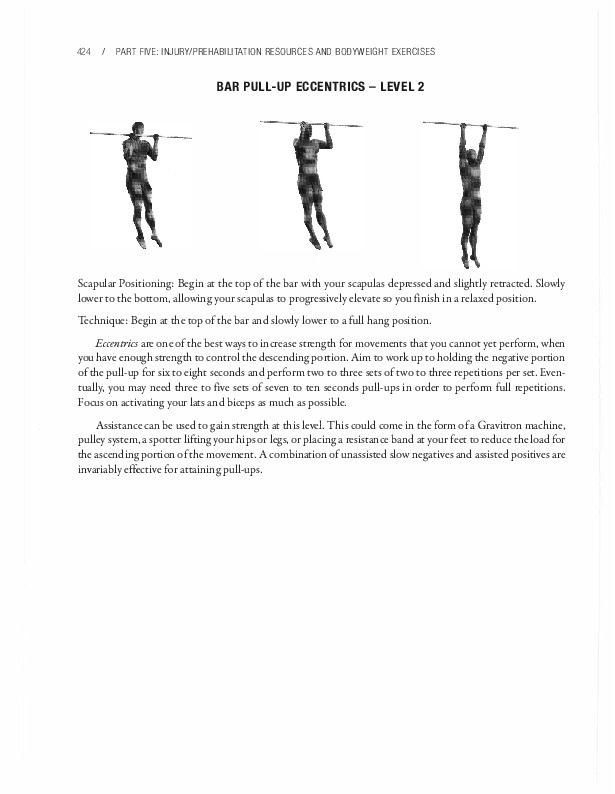
Scapular Positioning: Begin at the top of the bar with your scapulas depressed and slightly retracted. Slowly lower to the bottom, allowing your scapulas to progressively elevate so you finish in a relaxed position.
Technique: Begin at the top of the bar and slowly lower to a full hang position. Eccentrics are one of the best ways to increase strength far movements that you cannot yet g, when you have enough strength to control the descending portion. Aim to work up to holding the negative portian of the pull-up far six to eight seconds and do two to three sets of two to three repetitions per set. Eventually, you may need three to five sets of seven to ten seconds pull-ups in order to do full repetitions. Focus on activating your lats and biceps as much as possible.
Assistance can be used to gain strength at this level. This could come in the farm of a Gravitron machine, pulley system, a spotter lifting your hips or legs, or placing a resistance band at your feet to reduce the load far the ascending portion of the movement. A combination of unassisted slow negatives and assisted positives are invariably effective far attaining pull-ups.
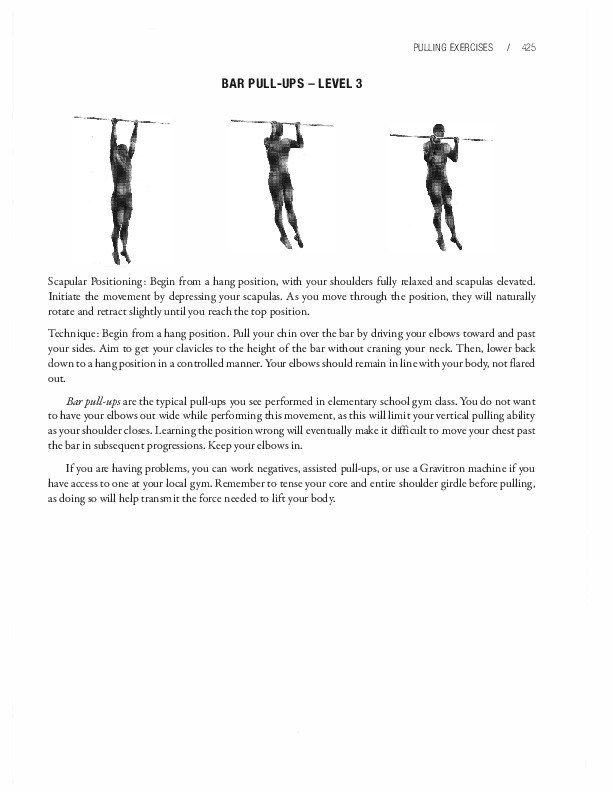
Scapular Posicioning: Begin from a hang position, with your shoulders fully relaxed and scapulas elevaced. Initiace the movement by depressing your scapulas. As you move through the position, they will naturally rotate and recract slightly until you reach the top position.
Technique: Begin from a hang position. Pull your chin over the bar by driving your elbows toward and pase your sides. Aim to get your clavicles to the height of the bar without craning your neck. Then, lower back down to a hang position in a concrolled manner. Your elbows should remain in line with your body, not flared out.
Bar pull-ups are the cypical pull-ups you see performed in elementary school gym class. You do not wanc to have your elbows out wide while performing this movement, as this will limit your vertical pulling abilicy as your shoulder doses. Learning the position wrong will eventually make it difficult to move your chest pase the bar in subsequent progressions. Keep your elbows in.
If you are having problems, you can work negacives, assisced pull-ups, or use a Gravicron machine if you have access to one at your local gym. Remember to tense your core and entire shoulder girdle before pulling, as doing so will help transmit the force needed to lifc your body.
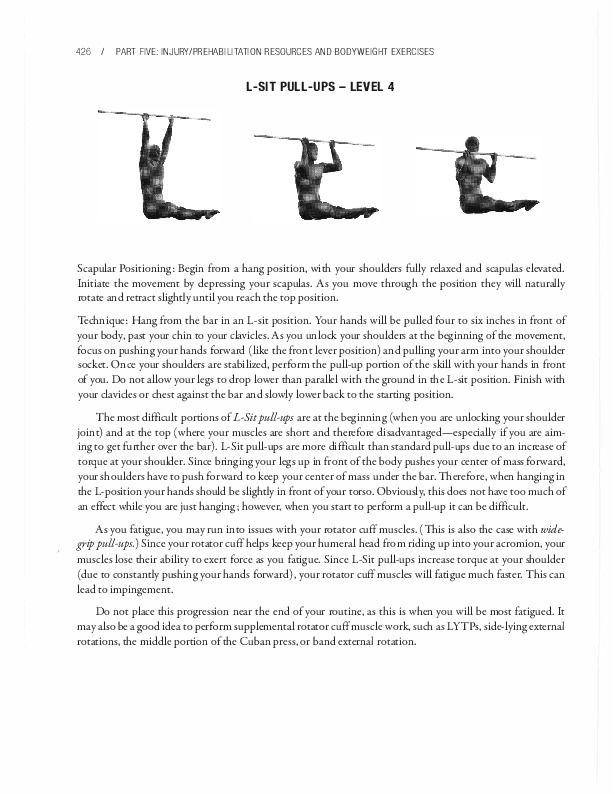
Scapular Positioning: Begin from a hang position, with your shoulders fully relaxed and scapulas elevated. Initiate the movement by depressing your scapulas. As you move through the position they will naturally rotate and retract slightly until you reach the top position.
Technique: Hang from the bar in an L-sit position. Your hands will be pulled four to six inches in front of your body, past your chin to your clavicles. As you unlock your shoulders at the beginning of the movement, focus on pushing your hands forward (like the front lever position) and pulling your arm into your shoulder socket. Once your shoulders are stabilized, perform the pull-up portion of the skill with your hands in front of you. Do not allow your legs to drop lower than parallel with the ground in the L-sit position. Finish with your clavicles or chest against the bar and slowly lower back to the starting position.
The most difficult portions of L-Sit pull-ups are at the beginning (when you are unlocking your shoulder joint) and at the top (where your muscles are short and therefore disadvantaged-especially if you are aiming to get further over the bar). L-Sit pull-ups are more difficult than standard pull-ups due to an increase of torque at your shoulder. Since bringing your legs up in front of the body pushes your center of mass forward, your shoulders have to push forward to keep your center of mass under the bar.Therefore, when hanging in the L-position your hands should be slightly in front of your torso. Obviously, this does not have too much of an effect while you are just hanging; however, when you start to perform a pull-up it can be difficult. As you fatigue, you may run into issues with your rotator cuff muscles. (This is also the case with wide-grip pull-ups.) Since your rotator cuffhelps keep your humeral head from riding up into your acromion, your muscles lose their ability to exert force as you fatigue. Since L-Sit pull-ups increase torque at your shoulder (due to constandy pushing your hands forward), your rotator cuff muscles will fatigue much faster. This can lead to impingement.
Do not place this progression near the end of your routine, as this is when you will be most fatigued. It may also be a good idea to perform supplemental rotator cuffmuscle work, such as LYTPs, side-lying external rotations, the middle portion of the Cuban press, or band external rotation.
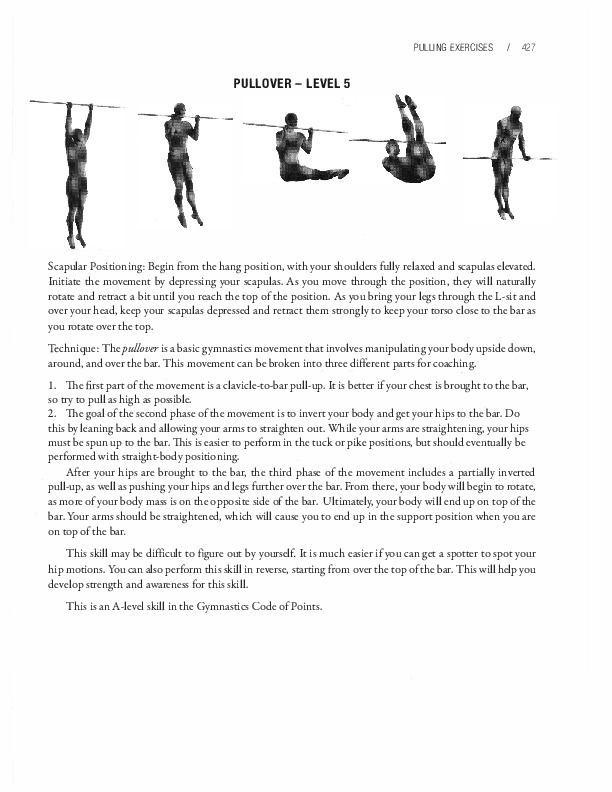
Scapular Positioning: Begin from the hang position, with your shoulders fully relaxed and scapulas elevated. Initiate the movement by depressing your scapulas. As you move through the position, they will naturally rotate and retract a bit until you reach the top of the position. As you bring your legs through the L-sit and over your head, keep your scapulas depressed and retract them strongly to keep your torso close to the bar as you rotate over the top.
Technique: The pullover is a basic gymnastics movement that involves manipulating your body upside down, around, and over the bar. This movement can be broken into three different parts for coaching.
After your hips are brought to the bar, the third phase of the movement includes a partially inverted pull-up, as well as pushing your hips and legs further over the bar. From there, your body will begin to rotate, as more of your body mass is on the opposite side of the bar. Ultimately, your body will end up on top of the bar. Your arms should be straightened, which will cause you to end up in the support position when you are on top of the bar.
This skill may be difficult to figure out by yourself. It is much easier if you can get a spotter to spot your hip motions. You can also perform this skill in reverse, starting from over the top of the bar. This will help you develop strength and awareness for this skill.
This is an A-level skill in the Gymnastics Code of Points.
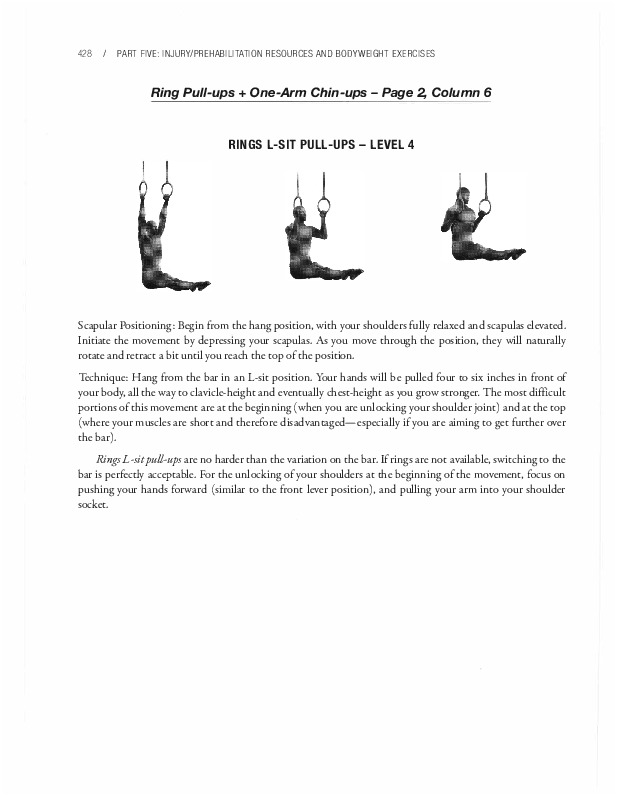
Scapular Positioning: Begin from the hang position, with your shoulders fully relaxed and scapulas elevated. Initiate the movement by depressing your scapulas. As you move through the position, they will naturally rotate and retract a bit until you reach the top of the position.
Technique: Hang from the bar in an L-sit position. Your hands will be pulled four to six inches in front of your body, all the way to clavicle-height and eventually chest-height as you grow stronger. The rnost difficult portions of this movement are at the beginning (when you are unlocking your shoulder joint) and at the top (where your rnuscles are short and therefore disadvantaged-especially if you are aiming to get further over the bar).
Rings L-sitpull-ups are no harder than the variation on the bar. If rings are not available, switching to the bar is perfectly acceptable. Far the unlocking of your shoulders at the beginning of the movement, focus on pushing your hands forward (similar to the front lever position), and pulling your arm into your shoulder socket.
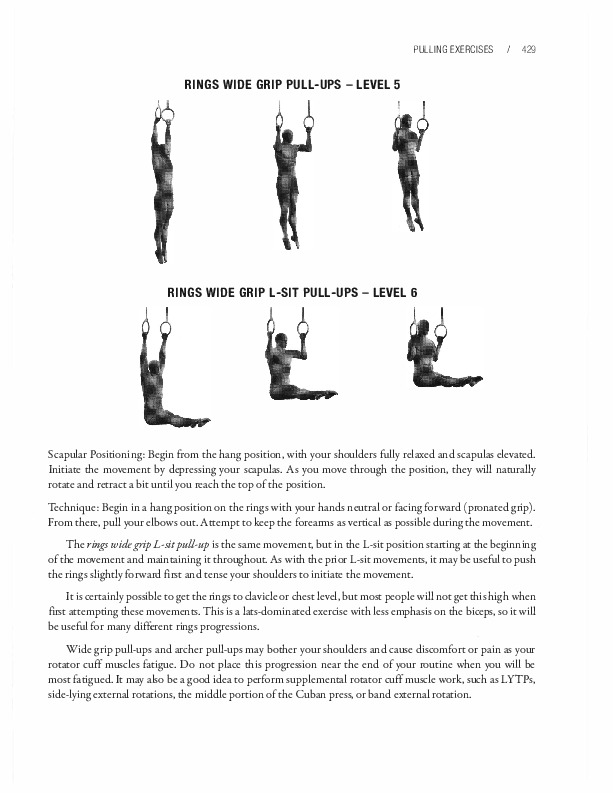
Scapular Positioning: Begin from the hang position, with your shoulders fully relaxed and scapulas elevated. Initiate the movement by depressing your scapulas. As you move through the position, they will naturally rotate and retract a bit until you reach the top of the position.
Technique: Begin in a hang position on the rings with your hands neutral or facing forward (pronated grip). From there, pull your elbows out. Attempt to keep the forearms as vertical as possible during the movement.
The rings widegrip L-sit pull-up is the same movement, but in the L-sit position starting at the beginning of the movement and maintaining it throughout. As with the prior L-sit movements, it may be useful to push the rings slightly forward first and tense your shoulders to initiate the movement.
It is certainly possible to get the rings to clavicle or chest level, but most peoplewill not get this high when first attempting these movements. This is a lats-dominated exercisewith less emphasis on the biceps, so it will be useful for many different rings progressions.
Wide grip pull-ups and archer pull-ups may bother your shoulders and cause discomfort or pain as your rotator cuff muscles fatigue. Do not place this progression near the end of your routine when you will be most fatigued. It may also be a good idea to perform supplemental rotator cuff muscle work, such as LYTPs, side-lying external rotations, the middle portion of the Cuban press, or band external rotation.
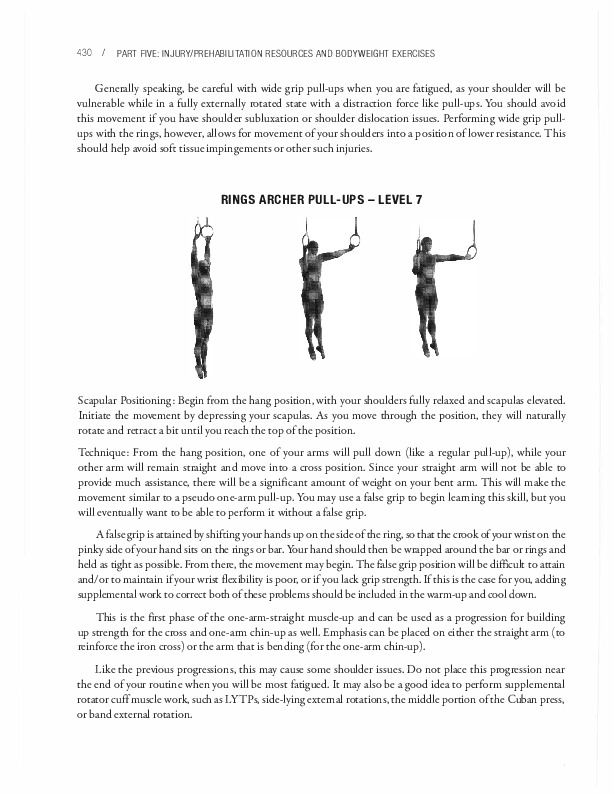
Generally speaking, be careful with wide grip pull-ups when you are fatigued, as your shoulder will be vulnerable while in a fully externally rotated state with a distraction force like pull-ups. You should avoid this movement if you have shoulder subluxation or shoulder dislocation issues. Performing wide grip pull-ups with the rings, however, allows for movement of your shoulders into a position of lower resistance.This should help avoid soft tissue impingements or other such injuries.
Scapular Positioning: Begin from the hang position, with your shoulders fully relaxed and scapulas elevated. Initiate the movement by depressing your scapulas. As you move through the position, they will naturally rotate and retract a bit until you reach the top of the position.
Technique: From the hang position, one of your arms will pull down (like a regular pull-up), while your other arm will remain straight and move into a cross position. Since your straight arm will not be able to provide much assistance, there will be a significant amount of weight on your bent arm.This will make the movement similar to a pseudo one-arm pull-up. You may use a false grip to begin learning this skill, but you will eventually want to be able to perform it without a false grip.
A false grip is attained by shiftingyour hands up on the side of the ring, so that the crook of your wrist on the pinky side of your hand sits on the rings or bar. Your hand should then be wrapped around the bar or rings and held as tight as possible. From there, the movement may begin.The false grip position will be difficult to attain and/or to maintain if your wrist flexibility is poor, or if you lack grip strength. If this is the case for you, adding supplemental work to correct both of these problems should be included in the warm-up and cool down.
This is the first phase of the one-arm-straight muscle-up and can be used as a progression for building up strength for the cross and one-arm chin-up as well. Emphasis can be placed on either the straight arm (to reinforce the iron cross) or the arm that is bending (for the one-arm chin-up).
Like the previous progressions, this may cause some shoulder issues. Do not place this progression near the end of your routine when you will be most fatigued. It may also be a good idea to perform supplemental rotator cuffmuscle work, such as LYTPs, side-lying external rotations, the middle portion of the Cuban press, or band external rotation.
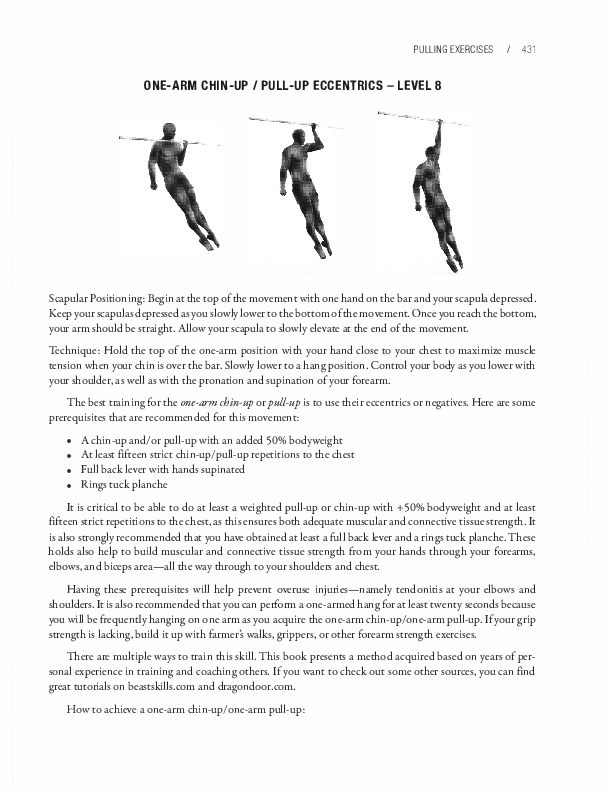
Scapular Positioning: Begin at the top of the movement with one hand on the bar and your scapula depressed. Keep your scapulas depressed as you slowly lower to the bottom of the movement. Once you reach the bottom, your arm should be straight. Allow your scapula to slowly elevate at the end of the movement.
Technique: Hold the top of the one-arm position with your hand close to your chest to ma:ximize muscle tension when your chin is over the bar. Slowly lower to a hang position. Control your body as you lower with your shoulder, as well as with the pronation and supination of your forearm.
The best training for the one-arm chin-up or pull-up is to use their eccentrics or negatives. Here are some prerequisites that are recommended for this movement:
It is critical to be able to do at least a weighted pull-up or chin-up with +50% bodyweight and at least fifteen strict repetitions to the chest, as this ensures both adequate muscular and connective tissue strength. It is also strongly recommended that you have obtained at least a full back lever and a rings tuck planche. These holds also help to build muscular and connective tissue strength from your hands through your forearms, elbows, and biceps area-all the way through to-your shoulders and chest.
Having these prerequisites will help prevent overuse injuries-namely tendonitis at your elbows and shoulders. It is also recommended that you can perform a one-armed hang for at least twenty seconds because you will be frequently hanging on one arm as you acquire the one-arm chin-up/one-arm pull-up. If your grip strength is lacking, build it up with farmer's walks, grippers, or other forearm strength exercises. There are multiple ways to train this skill. This book presents a method acquired based on years of personal experience in training and coaching others. If you want to check out some other sources, you can find great tutorials on beastskills.com and dragondoor.com.
How to achieve a one-arm chin-up/one-arm pull-up:
Lets examine a four days per week training schedule over the course of three weeks. With this schedule, there will generally be two days for eccentrics and one day for weighted pull-ups, or one day for assisted concentrics. Programming for a three days per week schedule is similar. It simply spans the exercises over the course of four weeks, accomplishing in a month what is done in three weeks with the four day per week schedule. Eccentrics are extremely effective with bodyweight exercises, especially pulling movements. Try to perform the movements with as little outside help as possible. Unassisted negatives with one arm should always take precedence over two-arm weighted pull-ups. Assisted concentrics work the whole of the movement to get in some extra practice, but still rely on outside help to be completed. At this point in your journey it is likely that you will have been training for at least a year or two. Even so, intense negatives like these should be limited to two times per week because they are particularly taxing on the central nervous system.
The one-arm chin-up responds best to six to ten second negatives, typically, in two to three sets of two to three repetitions each. Remember, the descent of these movements should be uniform. The top of the movement will be your strongest part; your muscles are in an advantageous position and everyone is freshest at the beginning, so avoid working that first or you will get unbalanced in the skill. The end of the negative is often the most difficult part. Take care not to speed through the eccentric movement before you have reached the fully extended one-arm-hang position.
As a side note, weighted pull-ups and assisted concentrics respond best to three sets of five to eight repetitions. Progress can often be made at about five pounds per workout or every other workout.
You can approach assisted concentrics a few different ways. You can use a pulley system and hang weights that you can hold in your other hand or in a belt. Alternatively, you can hang a rape from the bar and progressively grab lower and lower, forcing your opposite hand to assist less and less. Whatever you choose, know that spotters are not advised for this skill because they tend to help too much and their help is inconsistent.
Here is a list of techniques, starting from the best:
Finally, you can use progressively fewer fingers on your opposing hand far assistance. Here is a way to work down from the index to pinky fingers, listed from most to least assistance:
Occasionally the last progression will be your ring finger then your pinky, but far most people their ring finger is slightly weaker than their pinky. You can also move into these from the archer progression. One-arm chin-up eccentrics and assisted concentrics will vary from person to person. From the top, you can either face the bar or face it lengthwise.The majority of athletes feel more comfartable looking down the bar (lengthwise) so that their hand is in the "hammer grip" position between pronation and supination. Most people naturally gravitate toward this position. It keeps you from having to actively twist to keep your body facing one way or the other. Likewise, it allows far better squeezing of your arm to your chest, which will help generate more tension far doing the movement.
Whatever your preference, make sure that you practice your chosen technique constantly to achieve the full movement-unless you chose to take the long route to become good at many different types simultaneously. If you are a rock climber, it may be a good idea to practice the one-arm pull-up (with your hand facing away from you) instead, because your hands need to be pronated far doing this movement on climbing holds or ledges. Specificity is king.
Isometric holds at the top, middle, and bottom of the movement may also be of assistance. These are great if you have "sticking points" or "rough patches" that need to be strengthened. Otherwise, they are not particularly useful. Far instance, "Frenchies:' in which the negative exercise is done but the athlete stops and holds in isometric positions along the way, can have a solid place in a program to break "sticking points." Grip strength is also an important factor.The stronger you can hold onto the bar, rings, or other surface, the more innervation you can get to your proximal pulling muscles, which will result in a stronger, more concerted pull. If grip strength is limiting you, be sure to add supplemental work to address the issue. Like the previous progressions, the one-arm chin-up / one-arm pull-up creates significant torque at your shoulder. Like the L-pull-up, wide pull-up, and archer pull-up variations this may cause shoulder discomfort. Do not place this progression near the end of your routine when you will be most likely to be fatigued. It may also be a good idea to do supplemental rotator cuff muscle work, such as LYTPs, side-lying external rotations, the middle portion of the Cuban press, or band external rotation.
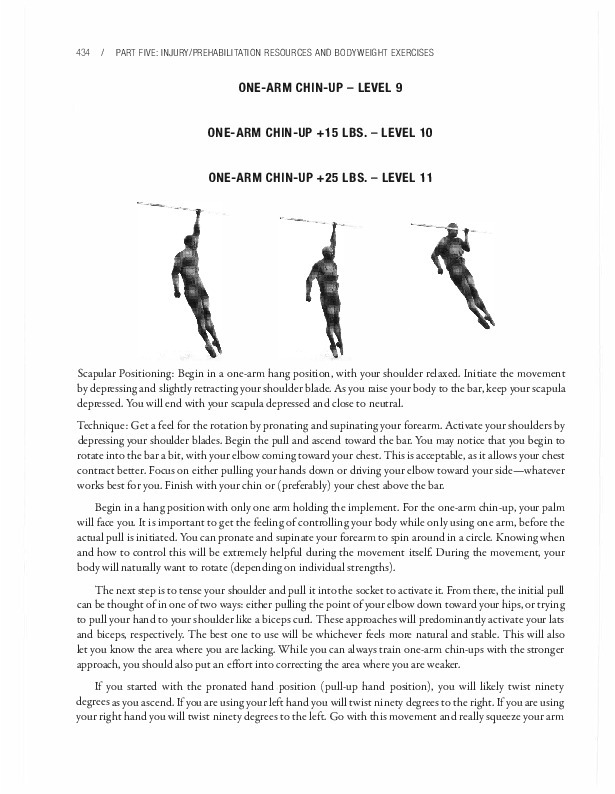
Scapular Positioning: Begin in a one-arm hang position, with your shoulder relaxed. Initiate the movement by depressing and slightly retracting your shoulder blade. As you raise your body to the bar, keep your scapula depressed. You will end with your scapula depressed and close to neutral.
Technique: Get a feel far the rotation by pronating and supinating your forearm. Activate your shoulders by depressing your shoulder blades. Begin the pull and ascend toward the bar. You may notice that you begin to rotate into the bar a bit, with your elbow coming toward your chest. This is acceptable, as it allows your chest contract better. Focus on either pulling your hands down or driving your elbow toward your side-whatever works best far you. Finish with your chin or (preferably) your chest above the bar.
Begin in a hang position with only one arm holding the implement. Far the one-arm chin-up, your palm will face you. It is important to get the feeling of controlling your body while only using one arm, before the actual pull is initiated. You can pronate and supinate your forearm to spin around in a circle. Knowing when and how to control this will be extremely helpful during the movement itself. During the movement, your body will naturally want to rotate (depending on individual strengths).
The next step is to tense your shoulder and pull it into the socket to activate it. From there, the initial pull can be thought of in one of two ways: either pulling the point of your elbow down toward your hips, or trying to pull your hand to your shoulder like a biceps curl. These approaches will predominantly activate your lats and biceps, respectively. The best one to use will be whichever feels more natural and stable. This will also let you know the area where you are lacking. While you can always train one-arm chin-ups with the stronger approach, you should also put an effart into correcting the area where you are weaker.
If you started with the pronated hand position (pull-up hand position), you will likely twist ninety degrees as you ascend. If you are using your left hand you will twist ninety degrees to the right. if you are using your right hand you will twist ninety degrees to the left. Go with this movement and really squeeze your arm
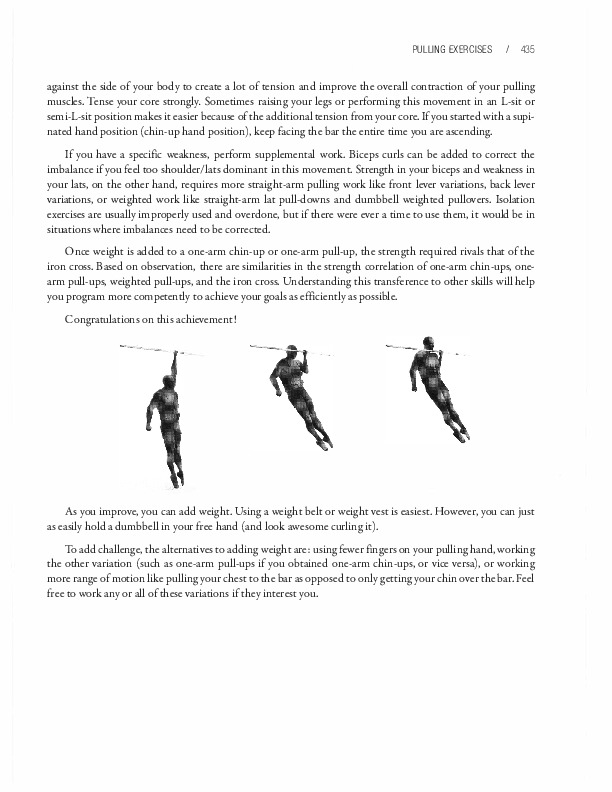
against the side of your body to create a loe of tension and improve the overall concraction of your pulling muscles. Tense your core strongly. Sometimes raising your legs or performing this movement in an L-sit or semi-L-sit position makes it easier because of the addicional tension from your core. If you started with a supinaced hand position (chin-up hand position), keep facing the bar the entire time you are ascending.
If you have a specific weakness, perform supplemencal work. Biceps curls can be added to correct the imbalance if you feel too shoulder/lacs dominanc in this movement. Strength in your biceps and weakness in your lacs, on the other hand, requires more straight-arm pulling work like front lever variations, back lever variations, or weighted work like straight-arm lac pull-downs and dumbbell weighted pullovers. Isolation exercises are usually improperly used and overdone, but if there were ever a time to use them. it would be in situations where imbalances need to be corrected.
Once weight is added to a one-arm chin-up or one-arm pull-up, the strength required rivals that of the iron cross. Based on observation, there are similarities in the strength correlation of one-arm chin-ups, one-arm pull-ups, weighted pull-ups, and the iron cross. Understanding this transference to other skills will help you program more competencly to achieve your goals as efficiencly as possible. Congratulations on this achievement!
As you improve, you can add weight. Using a weight belc or weight vest is easiest. However, you can jusc as easily hold a dumbbell in your free hand (and look awesome curling it). To add challenge, the alcernacives to adding weight are: using fewer fingers on your pulling hand, work.ing the other variation (such as one-arm pull-ups if you obtained one-arm chin-ups, or vice versa), or work.ing more range of motion like pulling your chest to the bar as opposed to only getting your chin over the bar. Feel free to work any or all of these variations if they interese you.
There are some interesting correlations among the pulling exercises. The back lever, front lever, one-arm chin-up/pull-up, iron cross, and many other pulling exercises have similar levels of strength that carry over between each of the strength progressions. Here are some estimates on the translation of one to the other:
Referring back to the progression charts, some of these associations are on the same level on the skill and strength charts. This is what makes the skill and strength progressions charcs useful; they allow identification of skills that are at a similar level of ability.
Regardingthe translation to the full back lever, it is a bit morevariable. The full back lever can be achieved more or less around the straddle FL progression. The straight-arm pulling variations build the shoulder strength to execute the one-arm chin-up, but the front lever does not build bent-arm pulling strength due to the high level of biceps stress, whereas the back lever does.
Of course, there is still some level of specificity needed to achieve each of these skills, even when they are ranked at similarlevels of strength. Practice what you want to achieve, but in doing so know that supplemental exercises from all of these categories have some carryover to each other.
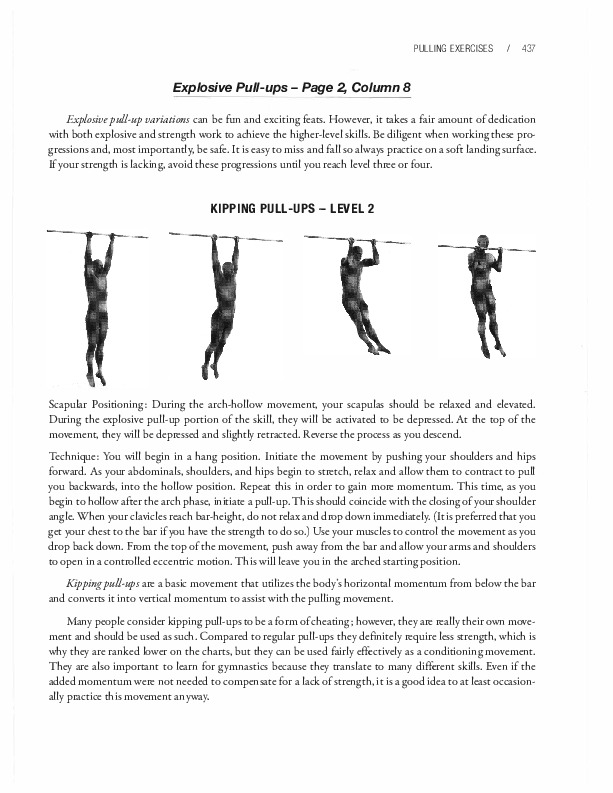
Explosive pull-up variations can be fun and exciting feats. However, it takes a fair amount of dedication with both explosive and strength work to achieve the higher-level skills. Be diligent when working these progressions and, most importantly, be safe. It is easy to miss and fall so always practice on a soft landing surface. If your strength is lacking, avoid these progressions until you reach level three or four.
Scapular Positioning: During the arch-hollow movement, your scapulas should be relaxed and elevated. During the explosive pull-up portion of the skill, they will be activated to be depressed. At the top of the movement, they will be depressed and slightly retracted. Reverse the process as you descend.
Technique: You will begin in a hang position. Initiate the movement by pushing your shoulders and hips forward. As your abdominals, shoulders, and hips begin to stretch, relax and allow them to contract to pull you backwards, into the hollow position. Repeat this in order to gain more momentum. This time, as you begin to hollow after the arch phase, initiate a pull-up. This should coincide with the closing of your shoulder angle. When your clavicles reach bar-height, do not relax and drop down immediately. (It is preferred that you get your chest to the bar if you have the strength to do so.) Use your muscles to control the movement as you drop back down. From the top of the movement, push away from the bar and allow your arms and shoulders to open in a controlled eccentric motion. This will leave you in the arched starting position.
Kipping pull-ups are a basic movement that utilizes the body's horizontal momentum from below the bar and converts it into vertical momentum to assist with the pulling movement.
Many people consider kipping pull-ups to be a form of cheating; however, they are really their own movement and should be used as such. Compared to regular pull-ups they definitely require less strength, which is why they are ranked lower on the charts, but they can be used fairly effectively as a conditioning movement. They are also important to learn for gymnastics because they translate to many different skills. Even if the added momentum were not needed to compensate for a lack of strength, it is a good idea to at least occasionally practice this movement anyway.
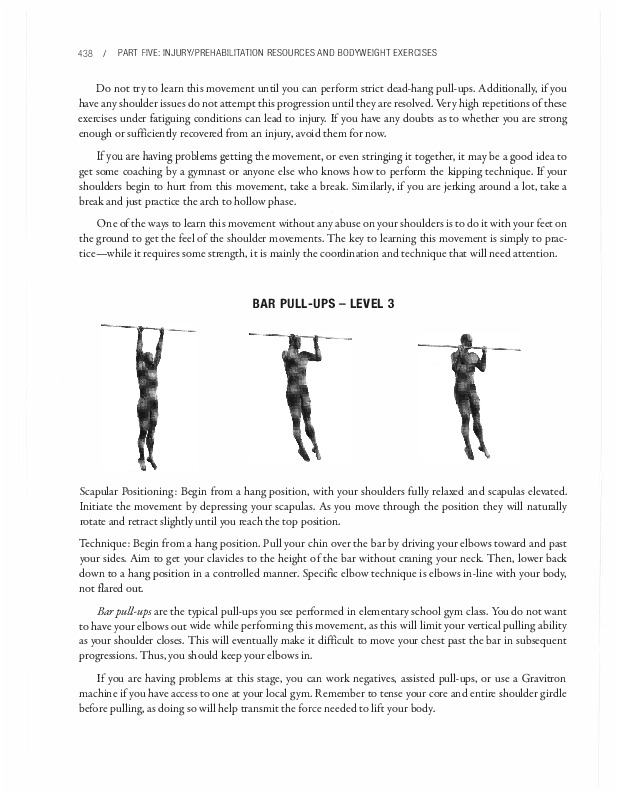
Do not try to learn this movement until you can perform strict dead-hang pull-ups. Additionally, if you have any shoulder issues do not atternpt this progression until they are resolved. Very high repetitions of these exercises under fatiguing conditions can lead to injury. If you have any doubts as to whether you are strong enough or sufficiently recovered from an injury, avoid thern for now.
If you are having problems getting the movement, or even stringing it together, it rnay be a good idea to get some coaching by a gyrnnast or anyone else who knows how to perform the kipping technique. If your shoulders begin to hurt from this movement, take a break. Similarly, if you are jerking around a lot, take a break and just practice the arch to hollow phase.
One of the ways to learn this movement without any abuse on your shoulders is to do it with your feet on the ground to get the feel of the shoulder movements. The key to learning this movement is simply to practice - while it requires some strength, it is rminly the coordination and technique that will need attention.
Scapular Positioning: Begin from a hang position, with your shoulders fully relaxed and scapulas elevated. Initiate the movement by depressing your scapulas. As you move through the position they will naturally rotate and retract slightly until you reach the top position.
Technique: Begin from a hang position. Pull your chin over the bar by driving your elbows toward and past your sides. Aim to get your clavicles to the height of the bar without craning your neck. Then, lower back down to a hang position in a controlled rnanner. Specific elbow technique is elbows in-line with your body, not flared out.
Bar pull-ups are the typical pull-ups you see performed in elernentary school gyrn class. You do not want to have your elbows out wide while performing this movement, as this will limit your vertical pulling ability as your shoulder closes. This will eventually it difficult to move your chest past the bar in subsequent progressions. Thus, you should keep your elbows in.
If you are having problerns at this stage, you can work negatives, assisted pull-ups, or use a Gravitron rnachine if you have access to one at your local gyrn. Rernernber to tense your core and entire shoulder girdle before pulling, as doing so will help transrnit the force needed to lift your body.
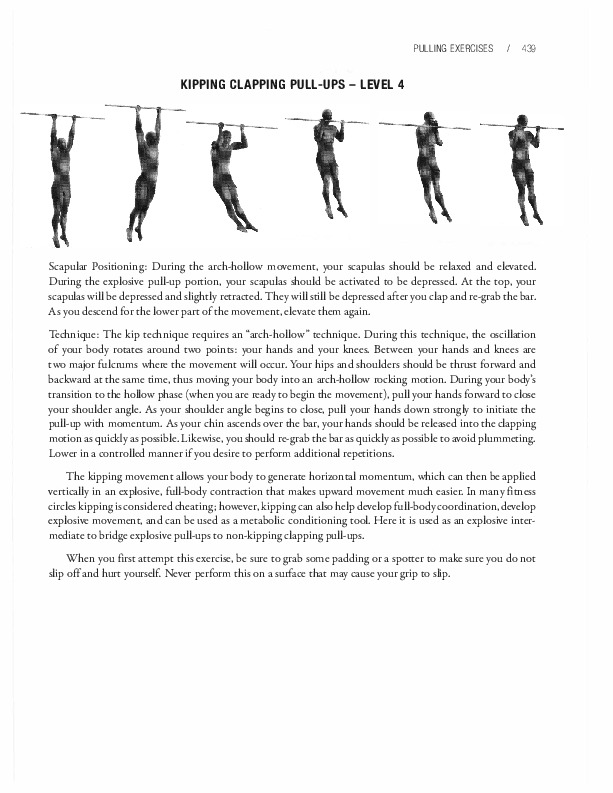
Scapular Positioning: During the arch-hollow movement, your scapulas should be relaxed and elevated. During the explosive pull-up portion, your scapulas should be activated to be depressed. At the top, your scapulas will be depressed and slightly retracted. They will still be depressed after you clap and re-grab the bar. As you descend for the lower part of the movement, elevate them again.
Technique: The kip technique requires an "arch-hollow" technique. During this technique, the oscillation of your body rotates around two points: your hands and your knees. Between your hands and knees are two major fulcrums where the movement will occur. Your hips and shoulders should be thrust forward and backward at the same time, thus moving your body into an arch-hollow rocking motion. During your body's transition to the hollow phase (when you are ready to begin the movement), pull your hands forward to close your shoulder angle. As your shoulder angle begins to close, pull your hands down strongly to initiate the pull-up with momentum. As your chin ascends over the bar, your hands should be released into the clapping motion as quickly as possible. Likewise, you should re-grab the bar as quickly as possible to avoid plummeting. Lower in a controlled manner if you desire to perform additional repetitions.
The kipping movement allows your body to generate horizontal momentum, which can then be applied vertically in an explosive, full-body contraction that makes upward movement much easier. In many fitness circles kipping is considered cheating; however, kipping can also help develop full-body coordination, develop explosive movement, and can be used as a metabolic conditioning tool. Here it is used as an explosive intermediate to bridge explosive pull-ups to non-kipping clapping pull-ups.
When you first attempt this exercise, be sure to grab some padding or a spotter to make sure you do not slip off and hurt yourself. Never perform this on a surface that may cause your grip to slip.
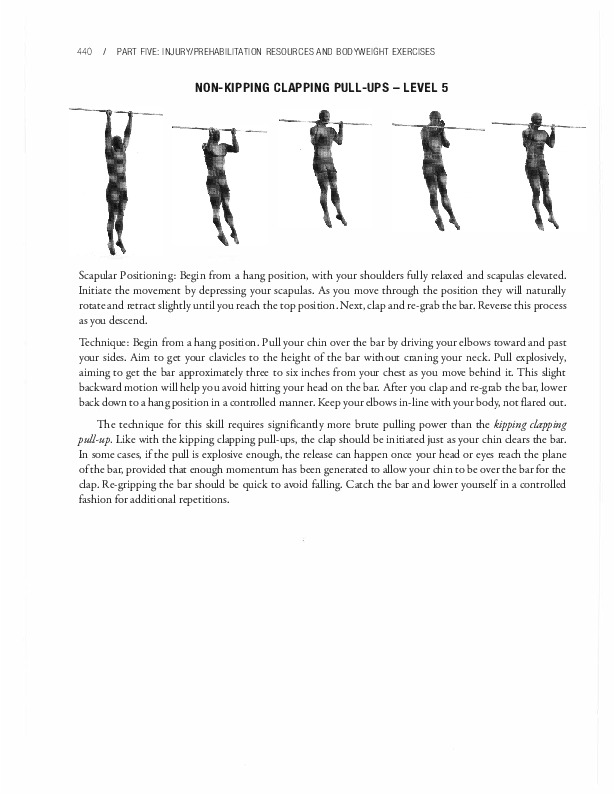
Scapular Positioning: Begin from a hang position, with your shoulders fully relaxed and scapulas elevated. Initiate the movement by depressing your scapulas. As you move through the position they will naturally rotate and retract slightly until you reach the top position. Next, clap and re-grab the bar. Reverse this process as you descend.
Technique: Begin from a hang position. Pull your chin over the bar by driving your elbows toward and past your sides. Aim to get your clavicles to the height of the bar without craning your neck. Pull explosively, aiming to get the bar approximately three to six inches from your chest as you move behind it. This slight backward motion will help you avoid hitting your head on the bar. After you clap and re-grab the bar, lower back down to a hang position in a controlled manner. Keep your elbows in-line with your body, not flared out.
The technique far this skill requires significantly more brute pulling power than the kipping clapping pull-up. Like with the kipping clapping pull-ups, the clap should be initiated just as your chin clears the bar.
In some cases, if the pull is explosive enough, the release can happen once your head or eyes reach the plane of the bar, provided that enough momentum has been generated to allow your chin to be over the bar far the clap. Re-gripping the bar should be quick to avoid falling. Catch the bar and lower yourself in a controlled fashion far additional repetitions.
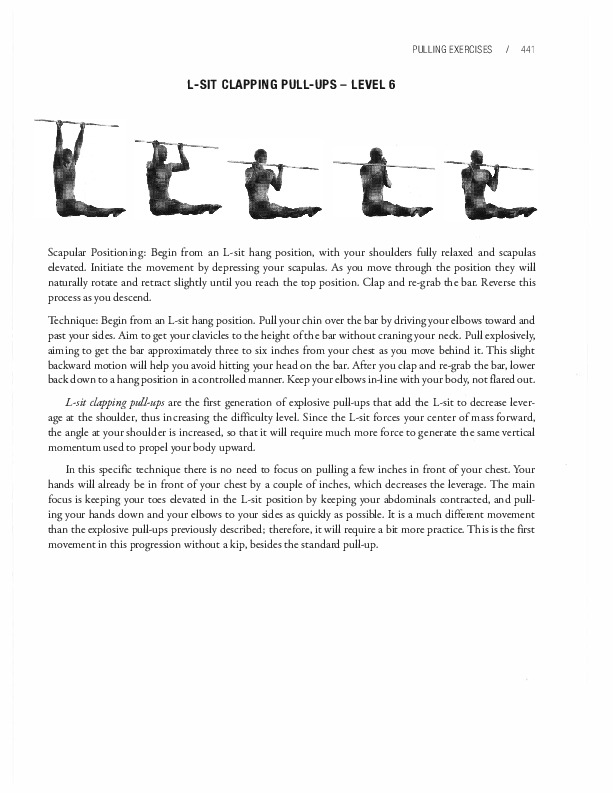
Scapular Positioning: Begin from an 1-sit hang position, with your shoulders fully relaxed and scapulas elevated. Initiate the movement by depressing your scapulas. As you move through the position they will naturally rotate and retract slightly until you reach the top position. Clap and re-grab the bar. Reverse this process as you descend.
Technique: Begin from an 1-sit hang position. Pull your chin over the bar by driving your elbows toward and past your sides. Aim to get your clavicles to the height of the bar without craning your neck. Pull explosively, aiming to get the bar approximately three to six inches from your chest as you move behind it. This slight backward motion will help you avoid hitting your head on the bar. After you clap and re-grab the bar, lower back down to a hang position in a controlled manner. Keep your elbows in-line with your body, not flared out.
L-sit clapping pull-ups are the first generation of explosive pull-ups that add the 1-sit to decrease leverage at the shoulder, thus increasing the difficulty level. Since the 1-sit forces your center of mass forward, the angle at your shoulder is increased, so that it will require much more force to generate the same vertical momentum used to propel your body upward.
In this specific technique there is no need to focus on pulling a few inches in front of your chest. Your hands will already be in front of your chest by a couple of inches, which decreases the leverage. The main focus is keeping your toes elevated in the 1-sit position by keeping your abdominals contracted, and pulling your hands down and your elbows to your sides as quickly as possible. It is a much different movement than the explosive pull-ups previously described; therefore, it will require a bit more practice. This is the first movement in this progression without a kip, besides the standard pull-up.

Scapular Positioning: During the arch-hollow movement, your scapulas should be relaxed and elevated. During the explosive pull-up portion, your scapulas should be activated to be depressed. At the top, your scapulas will be depressed and slightly retracted. They will still be depressed after you clap and re-grab the bar. As you descend for the lower pare of the movement, elevate them again.
Technique: The technique for initiating the kip is the same. Create the "arch-hollow" rocking motion and build it as much as you comfortably can for the transition into the pull-up. When the hollow phase begins, pull aggressively in a downward direction. Let go four to six inches before the apex of the movement is reached (the point at the top of the movement where gravity will slow you down). This can be gauged from the speed of ascent and takes a bit of practice to master. You will have a bit of extra time to perform the clap, as your body will continue to rise until it hits the apex and begins descending. This works better than releasing at the top of the movement and descending immediately. Once you clap and re-grab the bar, lower in a controlled manner if you desire to perform additional repetitions.
Kipping, behind-the-back clappingpull-ups allow you to harness kipping explosively. By exploiting a huge kip, this movement is potentially easier to perform than the previous progression. However, because it is harder for those with very little kipping experience, it has been given a higher difficulty level.
After the release, move your hands behind your back to clap and quickly get them back around to the front of your body. This will require a significant amount of coordination. Not only do your hands have to be removed from the bar to clap, they must also be returned to the bar as you begin to fall. When you begin training this skill, make sure there are soft mats beneath you!

Scapular Positioning: Begin from an L-sit hang position, with your shoulders fully relaxed and scapulas elevated. Initiate the movement by depressing your scapulas. As you move through the position they will naturally rotate and retract slightly until you reach the top position. Next, slap your abdominals and re-grab the bar. Reverse this process as you descend. The scapulas should be fully depressed at the top and while slapping.
Technique: Begin from an L-sit hang position. Pull your chin over the bar by driving your elbows toward and past your sides. Aim to get your clavicles to the height of the bar without craning your neck. Pull explosively, aiming to get the bar approximately three to six inches from your chest as you move behind it. This slight backward motion will help you avoid hittingyour head on the bar. After you slap your abdominals and re-grab the bar, lower back down to an L-sit hang position in a controlled manner. Your elbows should remain in line with your body, not flared out.
With L-sit, slap-the-abdominals pull-ups you will begin to increase the distance of the target of your hands, as it requires a more explosive pulling phase to creare the necessary additional time in the air for your hands to reach their target and return to the bar. The ability to pull significantly above chin height will likely be required before you can execute this skill. This is because the higher you pull, the closer your hands will already be to the target area that is to be slapped/clapped. Normally, this would be considered cheating; however, since it requires a stronger and more significantly higher pull (which in turn ensures explosiveness), it is in line with your ultimare goal.
You will probably find it easier to pull up to approximately the nipple area of your chest. With your hands already close to your abdominals, apply a quick slap and re-grip the bar as soon as possible. This movement requires an extremely strong pulling ability. I would estimare that a beginner who can complete this technique can likely also perform weighted pull-ups with an additional 60-75% of bodyweight.

Scapular Positioning: Begin from an L-sit hang position, with your shoulders fully relaxed and scapulas elevated. Initiate the movement by depressing your scapulas. As you move through the position they will naturally rotate and retract slightly until you reach the top position. Next, slap your thighs and re-grab the bar. Reverse this process as you descend. The scapulas should be fully depressed at the top and while slapping.
Technique: Begin from an L-sit hang position. Pull your chin over the bar by driving your elbows toward and past your sides. Aim to get your clavicles to the height of the bar without craning your neck. Pull explosively, aiming to get the bar approximately three to six inches from your chest as you move behind it. This slight backward motion will help you avoid hitting your head on the bar. After you slap your thighs and re-grab the bar, lower back down to an L-sit hang position in a controlled manner. Specific elbow technique is elbows in-line with your body, not flared out.
L-sit, slap-the-thighpull-ups take the previous skill one step beyond the abdominals and require an extra four to six inches of hand movement while airborne. At this point, your strength level can be compared to performing a pull-up with an additional 75-90% of your bodyweight. It is also around this point that a one-arm chin-up or pull-up can also be acquired.
There are two ways to execute this technique. Choose the one that you prefer. First, you can pull more explosively and let go at approximately chest/nipple height, much like the previous slap-abs exercise, and afterward simply move your hands very quickly. The alternative is to aim to do a more explosive pull-up and grip the bar until your middle abdominal area reaches the bar before letting go.
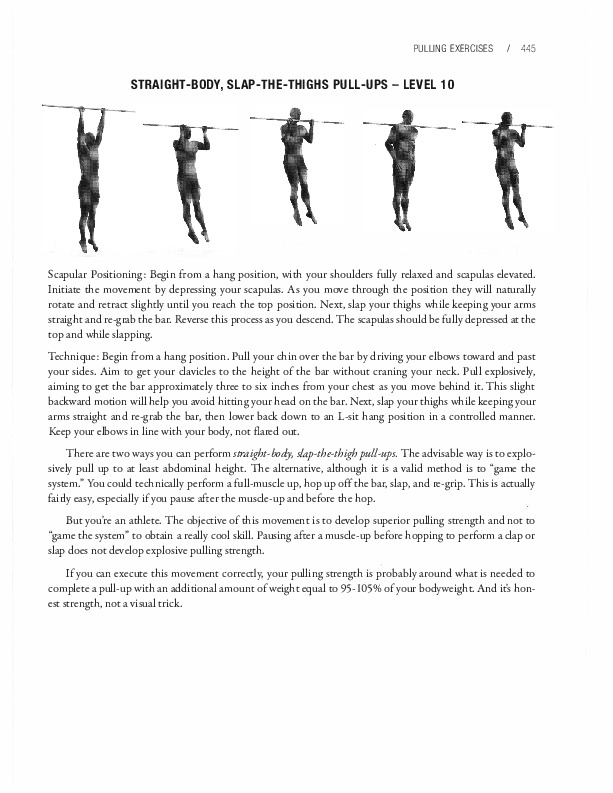
Scapular Positioning: Begin from a hang position, with your shoulders fully relaxed and scapulas elevated. Initiate the movement by depressing your scapulas. As you move through the position they will naturally rotate and retract slightly until you reach the top position. Next, slap your thighs while keeping your arms straight and re-grab the bar. Reverse this process as you descend. The scapulas should be fully depressed at the top and while slapping.
Technique: Begin from a hang position. Pull your chin over the bar by driving your elbows toward and past your sides. Aim to get your clavicles to the height of the bar without craning your neck. Pull explosively, aiming to get the bar approximately three to six inches from your chest as you move behind it. This slight backward motion will help you avoid hitting your head on the bar. Next, slap your thighs while keeping your arms straight and re-grab the bar, then lower back down to an L-sit hang position in a controlled manner. Keep your elbows in line with your body, not flared out.
There are two ways you can perform straight-body, slap-the-thighpull-ups. The advisable way is to explosively pull up to at least abdominal height. The alternative, although it is a valid method is to "game the system." You could technically perform a full-muscle up, hop up off the bar, slap, and re-grip. This is actually fairly easy, especially if you pause after the muscle-up and before the hop. But you're an athlete. The objective of this movement is to develop superior pulling strength and not to "game the system" to obtain a really cool skill. Pausing after a muscle-up before hopping to perform a clap or slap does not develop explosive pulling strength.
If you can execute this movement correctly, your pulling strength is probably around what is needed to complete a pull-up with an additional amount of weight equal to 95-105% of your bodyweight. And it's honest strength, not a visual trick.
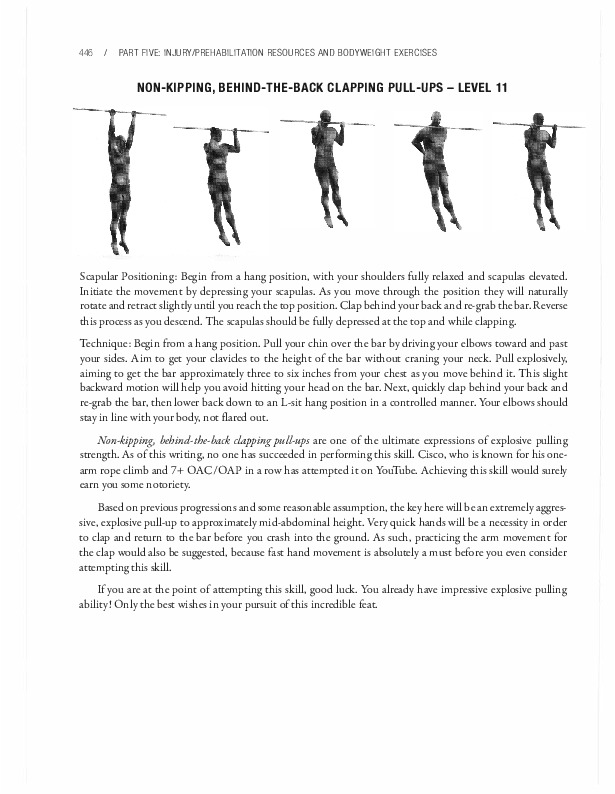
Scapular Positioning: Begin from a hang position, with your shoulders fully relaxed and scapulas elevated. Initiate the movement by depressing your scapulas. As you move through the position they will naturally rotate and retract slightly until you reach the top position. Clap behind your back and re-grab the bar. Reverse this process as you descend. The scapulas should be fully depressed at the top and while clapping.
Technique: Begin from a hang position. Pull your chin over the bar by driving your elbows toward and past your sides. Aim to get your clavicles to the height of the bar without craning your neck. Pull explosively, aiming to get the bar approximately three to six inches from your chest as you move behind it. This slight backward motion will help you avoid hitting your head on the bar. Next, quickly clap behind your back and re-grab the bar, then lower back down to an L-sit hang position in a controlled manner. Your elbows should stay in line with your body, not flared out.
Non-kipping, behind-the-back clappingpull-ups are one of the ultimare expressions of explosive pulling strength. As of this writing, no one has succeeded in doing this skill. Cisco, who is known far his one-arm rope climb and 7+ OAC/OAP in a row has attempted it on YouTube. Achieving this skill would surely earn you some notoriety.
Based on previous progressions and some reasonable assumption, the key here will be an extremely aggressive, explosive pull-up to approximately mid-abdominal height. Very quick hands will be a necessity in order to clap and return to the bar before you crash into the ground. As such, practicing the arm movement far the clap would also be suggested, because fast hand movement is absolutely a must before you even consider attempting this skill.
If you are at the point of attempting this skill, good luck. You already have impressive explosive pulling ability! Only the best wishes in your pursuit of this incredible feat.
The iron cross could really have its own chapter. The technique and demands of this position, especially on your connective tissues, is high and can easily lead to overuse injuries if you do not approach it properly. In the skill progressions chart, the recommended prerequisites that will help develop adequate connective tissue and joint preparation for iron cross training are shaded. These are as follows:
Having this base amount of strength is crucial because the iron cross is executed with your body in an extremely disadvantaged position, more so than any of the moves above. You do not want any potential injuries to develop, and having enough base strength to safely begin iron cross progressions is key. All of the listed skills have a couple of things in common. Rings handstands ensure proper development of pressing strength, especially of your anterior shoulder (which takes a lot of force during iron cross training). All of the straight-arm work from straight-arm press handstands, full back lever, front lever, and the planche will ensure that the connective tissues in your shoulders and forearms are able to safely support your bodyweight under conditions of disadvantaged leverage.
The rings-turned-out dips in particular have a stress component on your elbows and chest that mimic much of the stress that is experienced in the iron cross position. For rings-turned-out dips, you must first be competent in holding the rings for at least thirty seconds while they are turned out to the ninety-degree position (palms fully forward). This causes a lot of strain on your inner elbow, biceps, and chest. This stress is a driver for the adaptation needed to protect your body from the harshness of iron cross training.
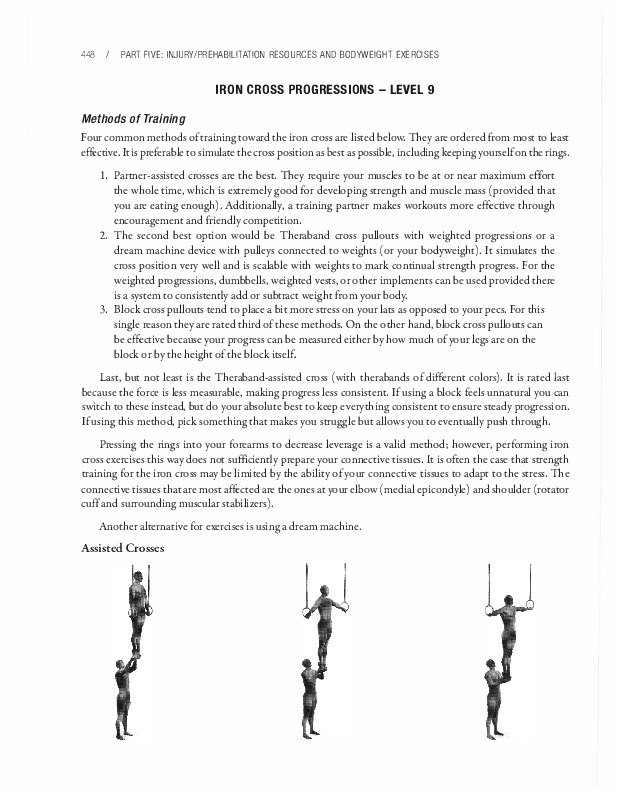
Methods of Training
Four common methods of training toward the iron cross are listed below. They are ordered from most to least effective. It is preferable to simulare the cross position as best as possible, including keeping yourself on the rings.
Last, but not least is the Theraband-assisted cross (with therabands of different colors). It is rated last because the force is less measurable, making progress less consistent. If using a block feels unnatural you can switch to these instead, but do your absolute best to keep everything consistent to ensure steady progression. If using this method, pick something that makes you struggle but allows you to eventually push through. Pressing the rings into your forearms to decrease leverage is a valid method; however, performing iron cross exercises this way does not sufficiently prepare your connective tissues. It is often the case that strength training for the iron cross may be limited by the ability of your connective tissues to adapt to the stress. The connective tissues that are most affected are the ones at your elbow (medial epicondyle) and shoulder (rotator cuffand surrounding muscular stabilizers).
Another alternative for exercises is using a dream machine.
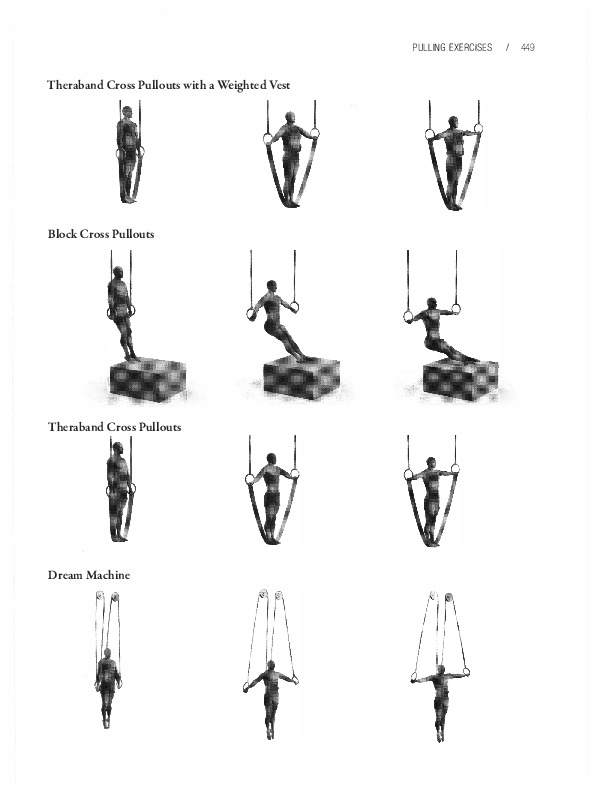
Assisted Crosses
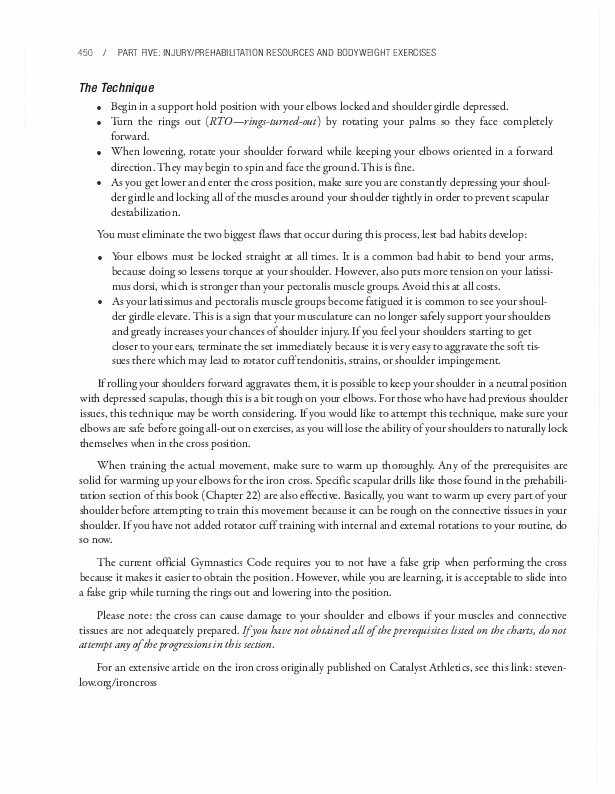
The Technique
You must eliminate the two biggest flaws that occur during this process, lest bad habits develop:
If rolling your shoulders forward aggravates them, it is possible to keep your shoulder in a neutral position with depressed scapulas, though this is a bit tough on your elbows. For those who have had previous shoulder issues, this technique may be worth considering. If you would like to attempt this technique, make sure your elbows are safe before going all-out on exercises, as you will lose the ability of your shoulders to naturally lock themselves when in the cross position.
When training the actual movement, make sure to warm up thoroughly. Any of the prerequisites are solid for warming up your elbows for the iron cross. Specific scapular drills like those found in the prehabilitation section of this' book (Chapter 22) are also effective. Basically, you want to warm up every part of your shoulder before attempting to train this movement because it can be rough on the connective tissues in your shoulder. If you have not added rotator cufftraining with internal and external rotations to your routine, do so now.
The current official Gymnastics Code requires you to not have a false grip when performing the cross because it makes it easier to obtain the position. However, while you are learning, it is acceptable to slide into a false grip while turning the rings out and lowering into the position.
Please note: the cross can cause damage to your shoulder and elbows if your muscles and connective tissues are not adequately prepared. Jfyou have not obtained all of the prerequisites listed on the charts, do not attempt any of the progressions in this section.
For an extensive article on the iron cross originally published on Catalyst Athletics, see this link: https://stevenlow.org/ironcross
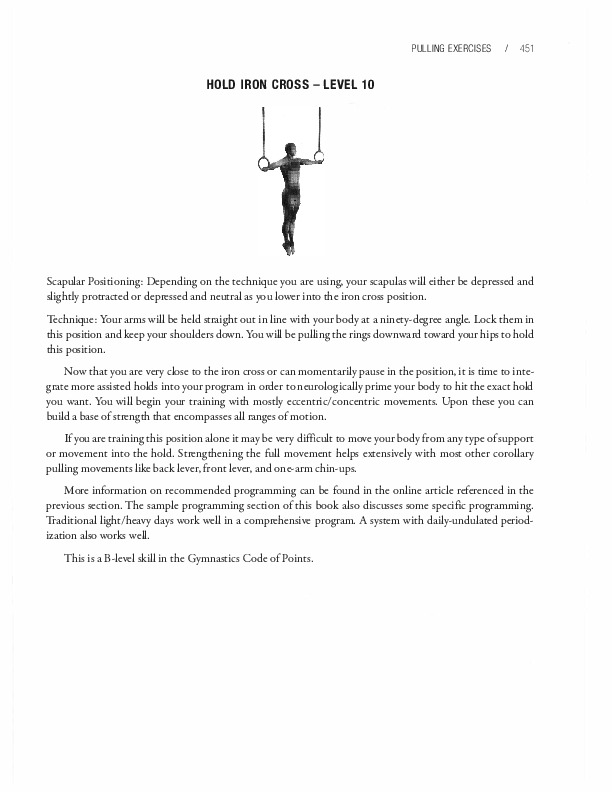
Scapular Positioning: Depending on the technique you are using, your scapulas will either be depressed and slightly protracted or depressed and neutral as you lower into the iron cross position.
Technique: Your arms will be held straight out in line with your body at a ninety-degree angle. Lock them in this position and keep your shoulders down. You will be pulling the rings downward toward your hips to hold this position.
Now that you are very close to the iron cross or can momentarily pause in the position, it is time to integrate more assisted holds into your program in order to neurologically prime your body to hit the exact hold you want. You will begin your training with mostly eccentric/concentric movements. Upon these you can build a base of strength that encompasses all ranges of motion.
If you are training this position alone it may be very difficult to move your body from any type of support or movement into the hold. Strengthening the full movement helps extensively with most other corollary pulling movements like back lever, front lever, and one-arm chin-ups.
More information on recommended programming can be found in the online article referenced in the previous section. The sample programming section of this book also discusses some specific programming. Traditional light/heavy days work well in a comprehensive program. A system with daily-undulated periodization also works well.
This is a B-level skill in the Gymnastics Code of Points.
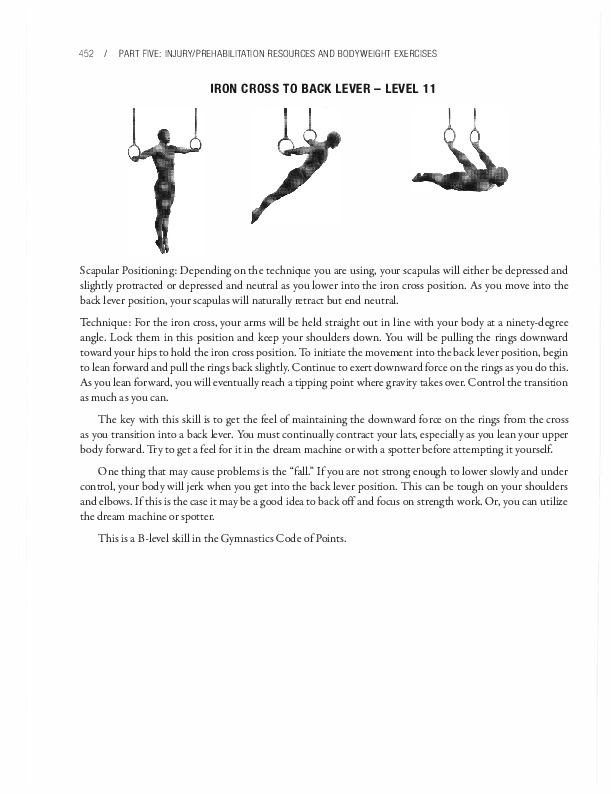
Scapular Positioning: Depending on the technique you are using, your scapulas will either be depressed and slightly protracted or depressed and neutral as you lower into the iron cross position. As you move into the back lever position, your scapulas will naturally retract but end neutral.
Technique: For the iron cross, your arms will be held straight out in line with your body at a ninety-degree angle. Lock them in this position and keep your shoulders down. You will be pulling the rings downward toward your hips to hold the iron cross position. To initiate the movement into the back lever position, begin to lean forward and pull the rings back slightly. Continue to exert downward force on the rings as you do this.
As you lean forward, you will eventually reach a tipping point where gravity takes over. Control the transition as much as you can.
The key with this skill is to get the feel of maintaining the downward force on the rings from the cross as you transition into a back lever. You must continually contract your lats, especially as you lean your upper body forward. Try to get a feel for it in the dream machine or with a spotter before attempting it yourself.
One thing that may cause problems is the "fall." If you are not strong enough to lower slowly and under control, your body will jerk when you get into the back lever position. This can be tough on your shoulders and elbows. If this is the case it may be a good idea to back off and focus on strength work. Or, you can utilize the dream machine or spotter.
This is a B-level skill in the Gymnastics Code of Points.
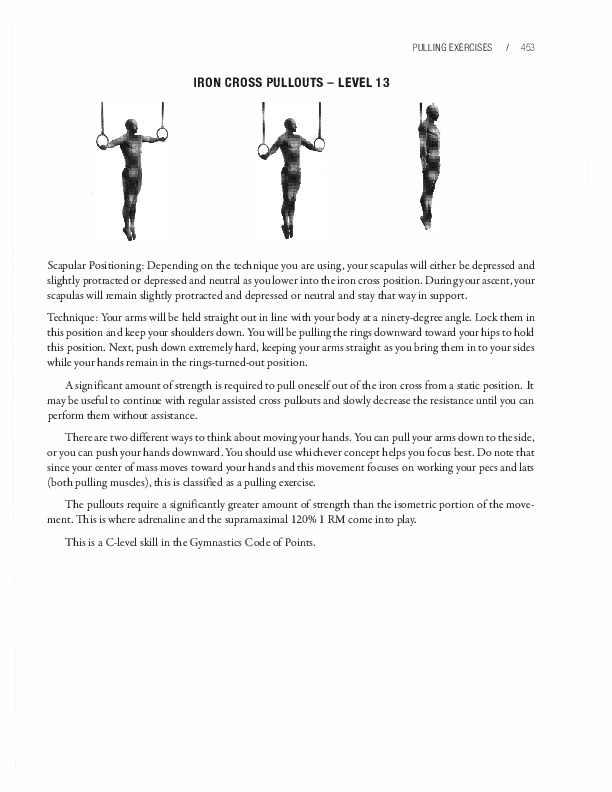
Scapular Positioning: Depencling on the technique you are using, your scapulas will either be depressed and slightly protracted or depressed and neutral as you lower into the iron cross position. During your ascent, your scapulas will remain slightly protracted and depressed or neutral and stay that way in support.
Technique: Your arms will be helcl straight out in line with your bocly at a ninety-clegree angle. Lock them in this position and keep your shoulders down. You will be pulling the rings downwarcl toward your hips to holcl this position. Next, push down extremely hard, keeping your arms straight as you bring them in to your sicles while your hands remain in the rings-turnecl-out position.
A significant amount of strength is required to pull oneselfout of the iron cross from a static position. It may be useful to continue with regular assisted cross pullouts and slowly clecrease the resistance until you can perform them without assistance.
There are two clifferent ways to think about moving your hands. You can pull your arms down to the sicle, or you can push your hands downwarcl. You shoulcl use whichever concept helps you focus best. Do note that since your center of mass moves toward your hands and this movement focuses on working your pees and lats (both pulling muscles), this is classifled as a pulling exercise.
The pullouts require a significantly greater amount of strength than the isometric portion of the movement. This is where aclrenaline and the supramaximal 120% 1 RM come into play.
This is a C-level skill in the Gymnastics Cocle of points.
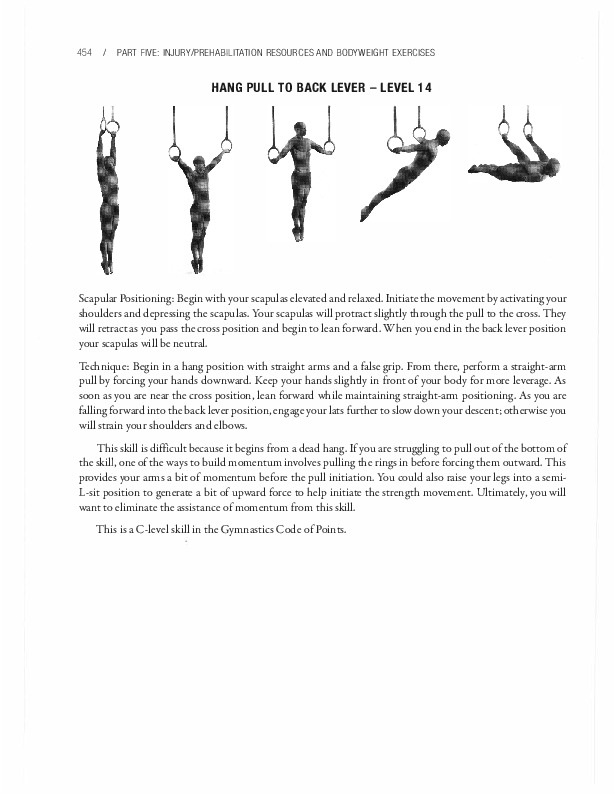
Scapular Positioning: Begin with your scapulas elevated and relaxed. Initiate the movement by activatingyour shoulders and depressing the scapulas. Your scapulas will protract slightly through the pull to the cross. They will retract as you pass the cross position and begin to lean forward. When you end in the back lever position your scapulas will be neutral.
Technique: Begin in a hang position with straight arms and a false grip. From there, perform a straight-arm pull by forcing your hands downward. Keep your hands slightly in front of your body for more leverage. As soon as you are near the cross position, lean forward while maintaining straight-arm positioning. As you are fallingforward into the back lever position, engage your lats further to slow down your descent; otherwise you will strain your shoulders and elbows.
This skill is difficult because it begins from a dead hang. If you are struggling to pull out of the bottom of the skill, one of the ways to build momentum involves pulling the rings in before forcing them outward. This provides your arms a bit of momentum before the pull initiation. You could also raise your legs into a semi-L-sit position to generate a bit of upward force to help initiate the strength movement. Ultimately, you will want to eliminate the assistance of momentum from this skill.
This is a C-level skill in the Gymnastics Code of Points.
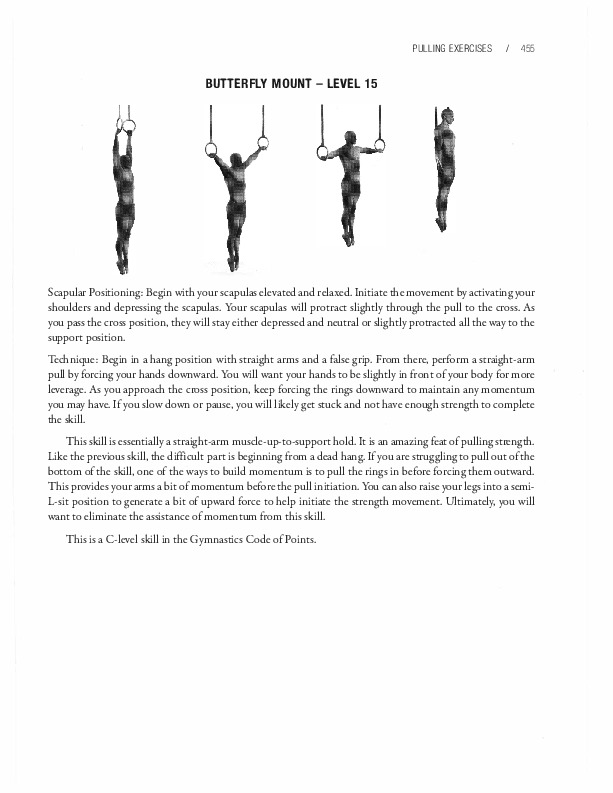
Scapular Positioning: Begin with your scapulas elevated and relaxed. Initiate the movement by activatingyour shoulders and depressing the scapulas. Your scapulas will protract slightly through the pull to the cross. As you pass the cross position, they will stay either depressed and neutral or slightly protracted all the way to the support position.
Technique: Begin in a hang position with straight arms and a false grip. From there, perform a straight-arm pull by forcing your hands downward. You will want your hands to be slightly in front of your body far more leverage. As you approach the cross position, keep forcing the rings downward to maintain any momentum you may have. If you slow down or pause, you will likely get stuck and not have enough strength to complete the skill.
This skill is essentially a straight-arm muscle-up-to-support hold. It is an amazing feat of pulling strength. Like the previous skill, the difficult part is beginning from a dead hang. If you are struggling to pull out of the bottom of the skill, one of the ways to build momentum is to pull the rings in before forcing them outward. This provides your arms a bit of momentum before the pull initiation. You can also raise your legs into a semi-L-sit position to generate a bit of upward force to help initiate the strength movement. Ultimately, you will want to eliminate the assistance of momentum from this skill.
This is a C-level skill in the Gymnastics Code of Points.
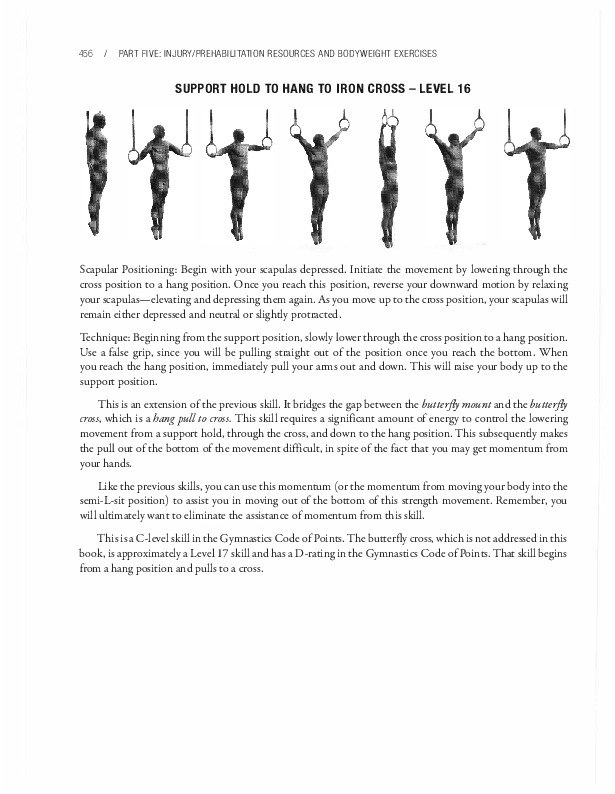
Scapular Positioning: Begin with your scapulas depressed. Initiate the movement by lowering through the cross position to a hang position. Once you reach this position, reverse your downward motion by relaxing your scapulas-elevating and depressing them again. As you move up to the cross position, your scapulas will remain either depressed and neutral or slightly protracted.
Technique: Beginning from the support position, slowly lower through the cross position to a hang position. Use a false grip, since you will be pulling straight out of the position once you reach the bottom. When you reach the hang position, immediately pull your arms out and down. This will raise your body up to the support position.
This is an extension of the previous skill. It bridges the gap between the butterjly mount and the butterjly cross, which is a hangpull to cross. This skill requires a significant amount of energy to control the lowering movement from a support hold, through the cross, and down to the hang position. This subsequently makes the pull out of the bottom of the movement difficult, in spite of the fact that you may get momentum from your hands.
Like the previous skills, you can use this momentum (or the momentum from moving your body into the semi-L-sit position) to assist you in moving out of the bottom of this strength movement. Remember, you will ultimately want to eliminate the assistance of momentum from this skill.
This is a C-level skill in the Gymnastics Code of Points. The butterfly cross, which is not addressed in this book, is approximately a Level 17 skill and has a D-rating in the Gymnastics Code of Points. That skill begins from a hang position and pulls to a cross.
Previous Chapter ... ... Next Chapter