Copyright © 2011 Steven Low All rights reserved.
ISBN: 1467933120 ISBN-13: 978-1467933124
This book is dedicated to everyone who loves training bodyweight skills and to those who have pioneered the extraordinary capacity of human movement
Many thanks to...
Chris Salvato for the motivation to write the book, and for co-founding eatmoveimprove.com with me to put out quality health, fitness, and injuries articles. Also, for writing most of chapter 3 and other editing.
Valentin Uzunov for the all of the illustrations for the exercise section and the cover. KC Parsons for editing and obtaining photographs and images. Nick Parente, Sharon, Justine and Emily for assisting with photographs and/or images.
The contributions of Christopher Sommer & Ido Portal to the gymnastics & bodyweight community.
By using Overcoming Gravity: A Systematic Approach to Gymnastics and Bodyweight Strength (hereafter as referred to the "Book"), you (hereafter referred to as the "User") signify your agreement to these Terms and Conditions. If you do not agree to all of these Terms and Conditions of use, do not use the Book!
The use of the Book and suggested workouts, exercise routines, nutritional suggestions, or other suggestions is at your own risk. In no event shall the Book, its author, editors, illustrators, its suppliers, or any third parties mentioned in the Book be liable for any damages in the future including, but not limited to, heart attacks, muscle strains, pulls to tears, neck, back, shoulder, elbow, wrist, hand, finger, and/or hip injuries, and other illness/disease, or injury/damage (mental, physical, financial), however caused, occurring during or after altering any personal nutritional/fitness/lifestyle habits or actions. The Book and author do not assume any responsibility for any aspect of healthcare administered with the aid of content available in the Book. User understands that any and all advice/programs concerning exercise not done under supervision of a qualified trainer and nutrition is for educational purposes only. User understands nutritional advice is not intended as a substitute for professional medical advice, diagnosis or treatment. User has been advised to seek medical advice from a physician before altering their nutritional daily diet or beginning an exercise program.
When I first wrote The Fundamentals of Bodyweight Strength Training article for eatmoveimprove.com, I never imaged it would be as popular as it has become. So here we are 20 months later with a whole book dedicated to this subject. I hope you enjoy.
Mastering your own body requires much hard work and persistence, but potential for overall results is astounding. Bodyweight exercises can be done almost anywhere with minimal equipment, are fun to do, and have an impressive visual appeal. Strength levels acquired from proper bodyweight training transfers over to all other forms of strength, including weight training. In these respects, bodyweight strength training is extremely rewarding.
In addition to the impressive levels of strength that can be attained, bodyweight strength training for the upper body requires excellent kinesthesia, proprioception, and control.
Force output of a muscle is based on cross sectional area of the muscle, angle of attack on the joint, individual limb length, and most importantly neural factors. Developing strength with focus on these neural factors in conjunction with muscle mass gains will provide for faster results. Since manipulating the body in space requires kinesthesia, proprioception, and control, there is a greater emphasis on these neural factors, which yields much faster results.
Nothing worthwhile comes without hard work and a fair share of frustration. Bodyweight strength training is no exception. Unlike with barbells there are very few gauges for progress. Trainees may become stuck on certain strength progressions for weeks or even months at a time with very little clue how to break through plateaus. Stagnation is a very real problem, but with good programming we can fight this tendency. Programming is all about planning, and good planning will help minimize the plateaus.
In most of the major sports such as track and field, football, basketball, swimming, etc. strength and conditioning has been constantly refined and modified. However, in the context of gymnastics and bodyweight training, there are very few people who know how to effectively implement progressions and programming in the context of bodyweight strength. Gymnastics gyms just do not have the monetary resources or consumer demand to hire strength and conditioning professionals to help refine the physical preparation that is required. Likewise, there are no requirements for coaches to know much about strength and conditioning.
Thus, there are very few sources of true bodyweight strength programming available. Most of the information is in the heads of high level gymnastics coaches who do not have the time or inclination to write down their thoughts. Similarly, knowing progressions for exercises alone does not necessarily mean that one has enough knowledge to implement effective programming.
This writing is an attempt to change that. The primary goal is to allow novice and intermediate trainees to delve into the world of bodyweight strength training and progress effectively and safely.
On a basic level, force is force. Thus, if we can apply the correct stress to the muscles and nervous system through various exercises we can sec increases in both strength and mass.
Rather than adding weight to the body, bodyweight strength programs provide structured progressions through which the training stimulus on the muscles can be increased without increases in body mass. This is done through decreasing leverage
Leverage is a mechanical1 advantage gained by using a lever. In this case, we are decreasing the leverage which means we are going to decrease the mechanical advantage that our bodies have during exercise. By doing this, it effectively increases the forces that the muscles need to apply to obtain certain positions or movements. This is how astounding strength can be built without the use of external weight.
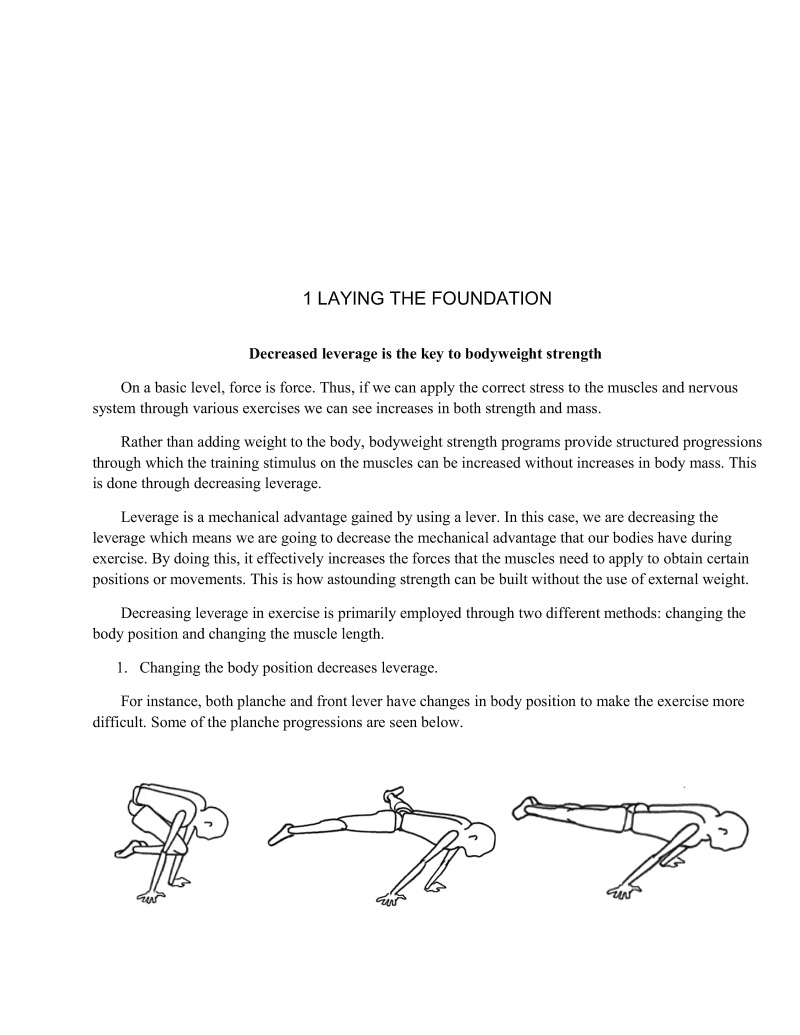
Decreasing leverage in exercise is primarily employed through two different methods: changing the body position and changing the muscle length.
For instance, both planche and front lever have changes in body position to make the exercise more difficult. Some of the planche progressions are seen below.

Basic physics show us that as the body is extended the exercises become progressively harder. Our bones are the levers, our joints act as fulcrums, and our muscles act to apply force. These forces are applied to the bones (levers) which rotate around the joints (fulcrums) to move weight against gravity and to manipulate external objects in our environments.
In the case of the planche progressions, the center of mass of the body is shifted further away from the shoulder. This increases the torque on the shoulder which is the force applied around an axis of rotation. Since our bodies are built on these leverage methods, all forces on the muscles can be thought of in terms of torque on the muscles at certain joint angles. This is the basis of biomechanics.
Muscles are strongest at their resting length because that is the point where the most contractile fibers overlap. Thus, if we lengthen or shorten muscles and then place the same load on the body, we stimulate an adaptation as if we are using more weight or mass
The reason why this works is because maximal or near-maximal contractions stimulates similar neural and muscular adaptations regardless of the force that is being placed on the muscles. For example, if we perform decline biceps curls we will have to use less weight than if we did regular standing biceps curls since the biceps is lengthened and thus able to 1ft less weight. However, the strength and mass adaptations that are gained are similar.
The phenomenon of placing the muscles to short or lengthened states at the edge of their range of motion is termed active insufficiency and passive insufficiency respectively.
Active tension is the force that we can generate. Passive tension is what occurs when we stretch a muscle out really far to the edge of its range of motion. At this point structures like connective tissues such as ligaments, joint capsules, etc. generate force. Likewise, muscle spindles tell our nervous system
that the muscle is lengthening too much, so it causes the body to contract its muscle involuntarily. Thus, passive tension does not include any of the forces we actively exert.
By working at the edges of the range of motion where the active tension we can generate is the lowest, we can actually use this to generate a strength training stimulus even though we are not using any additional weight.
Typically this is seen with more advanced strength moves on rings where the arms are held in straight arm position. The straight arm position places the biceps at maximal length and thus requires significant amounts of strength and mass to perform the skills safely.
Similarly, in the planche the primary shoulder muscle (anterior deltoid) is placed in a more extended position compared exercises such as an overhead press. Lengthening the muscle makes the exercise much harder to perform.
Open kinetic chain (OKC) exercises are exercises that are performed where the limbs are free to move. These exercises are movements of the limbs in space, unweighted or weighted. The weighted version of these exercises tend to be isolation exercises such as leg extensions and hamstring curls on machines. Some examples of OKC upper body movements are biceps curls and triceps extensions. Most dumbbell exercises are OKC exercises.
Closed chain exercises (CKC) are exercises that are performed where the limbs are not free to move. Typically, these movements are performed with barbells or bodyweight, Weighted versions of these exercises are squats, deadlifts, the Olympic lifts, etc. where the feet are fixed against the ground.
Likewise, almost all bodyweight movements are closed chain where the hands or feet are fixed against the ground or other implements. Sprinting, pistols, dips, pullups, handstand pushups, pushups, etc. all have the hands fixed against the ground, bars, or rings.
Bench and press are exercises with the barbell that are stabilized in space; this represents somewhat of a hybrid between OKC and CKC exercises because you are stabilizing the weight like many OKC exercises, but the hands are also fixed like CKC exercises. When we take a look at the strength difference between semi-OKC exercises such as the press/military press and a pure CKC exercise such as the handstand pushup, we see that the CKC exercise tends to be stronger than the semi-OKC exercise. For example, if we subtract the arm weight from the handstand pushups, we find out that we can perform more handstand pushups comparable to the weight we can press. This is likely due to internal factors due to co- contraction and increases in kinesthetic feedback to the body.
The main thing to keep in mind is that typically CKC exercises are a bit more applicable for building strength in the upper body. However, they are harder to track progress with. If you have the option between barbells and dumbbells, barbells will likely be superior at least to start out with.
If your goal is hypertrophy, typically CKC and semi-CKC exercises work best. This means compound barbell exercises in most cases such as the squat, deadlift, bench press, etc. Also, the opposite occurs in some comparisons: the press will be superior to the handstand pushup. Since there is comparatively less body feedback in the press compared to the HSPU, there is less neural strength generated with the press. Thus, to gain strength the body must compensate with hypertrophy (increase in cross sectional area) of the muscle.
Thus, if your ultimate goal is pure hypertrophy it is generally a good idea to perform mostly barbell type exercises. This is not to say you cannot gain an impressive physique with bodyweight exercises because you can (e.g. gymnasts' physiques). It will just take longer. Thus, from a purely aesthetics standpoint you will want to be doing mostly barbell exercises.
For rehabilitation, we will primarily use OKC exercises because they are very easy to isolate specific weaknesses, target specific structures that need to be strengthened, or improve certain movement patterns. Eventually, the goal of therapy is to work our way back into gross motor CKC movements.
For example, an ankle sprain will start with more OKC exercises to help strengthen the muscles in the leg and keep them from atrophying. However, as we improve strength, range of motion, etc. we will start 10 target more gross movement patterns such as squats, running, etc. to strengthen the ankle for athletic movements. Likewise, with something like elbow tendonitis you start out with isolation exercises to rehab it back, and then to start building more strength and function based movement you will go back to pullups or other compound exercises. We will talk more about this in the injury sections.
In summary, closed chain exercises emphasize that the body stabilize itself through the core and extremities because of its interaction with the ground, parallettes, or rings. This means that bodyweight exercises tend to rely more on progressions rather than adding weight. They are extremely good in both the development of strength, proprioception, and kinesthetic awareness. When you can add weight to them such as with a weighted vest it makes progressions much easier to handle. We will discuss multiple ways 10 do this later in the sample programming section.
The benefit of more open kinetic chain exercises is that they can be regulated easier with weights. This is especially the case if there is an injury or other weakness where focused exercise may be beneficial to certain muscles, tendons, or other structures.
Al these different movements are useful in their different contexts. I assume that if you are reading this you have some interest in bodyweight strength including the various isometric hold positions that gymnastics is known for. Additionally, most people have some aesthetic goals such as looking good naked. If these are your goals then this book is a good fit for you.
We learned that decreased leverage is the key to gaining strength with bodyweight exercises. Decreasing the leverage during exercises occurs through two different methods, namely:
Additionally, OKC and CKC exercises are useful for different purposes.
CKC movements are typically better for generating strength and muscle mass. Specifically, CKC bodyweight movements are better at generating strength. CKC barbell exercises are better at generating hypertrophy. They do overlap some.
OKC exercises are good for targeting specific weaknesses or rehabbing injuries
I am going to assume, based on this writing’s subject, that since you are reading this you want to know how to train bodyweight strength rather than endurance. At the very least you want to be able to increase your strength to work on all of the cool gymnastics isometrics, or you want to be able to use the bodyweight strength for various disciplines such as gymnastics, parkour, wrestling, martial arts, or MMA.
We are going to briefly touch over the concepts that will be applicable to our strength progressions beyond the concept of decreased leverage. These are important because knowing how our bodies respond o the stresses we put on them will be advantageous when we start to program our routines.
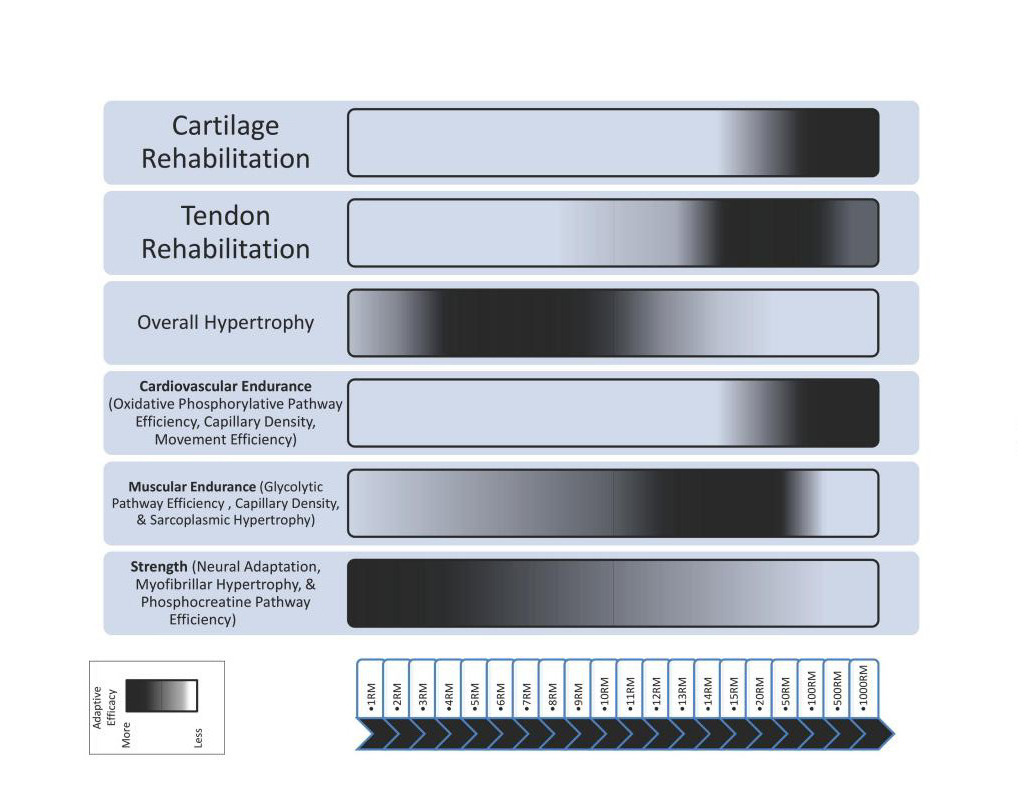
The repetition continuum has strength at one end and endurance at the other. The strength side is attained through low repetitions and heavier weight where a 1 repetition maximum (1 RM) emits the most strength. Endurance occurs with less weight and more repetitions. There are three very important points to take away from the repetition continuum:
The chart on the next page is just to give you a general idea of the different adaptations stimulated at different repetition ranges.
Our bodies are composed of three distinct sets of muscle fibers — type I, type IIa, and type IIb — which are innervated by motor neurons. A "motor unit" is a motor neuron and all of the fibers it innervates or can stimulate to contract.
Type I fibers are our "slow twitch" fibers and are red in color because of the enormous number of mitochondria that are located within them. They have a high capacity for endurance and are the primary muscle fiber type developed by endurance sports. These fibers have the least potential for hypertrophy.
Type IIa fibers are our "adaptable" fibers that are pink in color. They have characteristics of each of the type I and type b fibers. Therefore, the type of training can bias these fibers towards either the strength and power side or the endurance side. This is why training must be specific to the sport: among other adaptations, adapting these fibers towards the wrong side will make you perform more poorly
compared to your competitors. Specificity in sport is king.
Type IIb fibers are our "fast twitch" fibers which are white in color. They fatigue very rapidly because they can only use anaerobic metabolism to supply their energy, but they also contract very rapidly and are the main type of fiber developed in power and strength sports. These have the most potential for hypertrophy.
Motor units and the central nervous system
Motor units are composed of a motor neuron and all of the muscle fibers it innervates. A single motor unit may innervate many different fibers within a muscle, but only innervates muscle fibers of one of the three types,
Motor units are categorized into a continuum similar to the muscle fiber types. At one end we have low threshold motor units (LTMUs) and at the other we have high threshold motor units (HTMUs). In general, the LTMUs correspond to the motor units that innervate the type I slow twitch fibers, and
HTMU correspond to motor units that innervate type IIb fast twitch fibers. Between those are the type IIa muscle fibers in the middle.
The LTMUs are composed of motor units that activate when the required force to move an object is small. Conversely, HTMU are only activated when the force requirement is high. For example, LTMUs are active when we want to lift a small object such as a cup, but HTMU are only activated when we need to use most of our strength such as in a near max effort deadlift. Note that during near max effort or max effort lifts, LTMUS are active along with the HTMU as well.
What this means is that to gain strength and hypertrophy we will always be want to using weights that are heavy. We want to preferentially increase the rate of growth and development of HTMU. Therefore, this can be done by moving weights or bodyweight close to near maximal loads, or it can be done with lighter exercises that are moving quickly. Either way, we will want to accelerate the weight through the
movement. So if the weigh is heavy or the bodyweight movement is tough and we can only move slow we still want to focus on performing it with good technique as fast as possible.
There are six primary ways that the nervous system can increase strength aside from the hypertrophy of muscles. These will be the primary adaptations in any strength program, so it important to know how they work because the principles of some training are based upon these phenomena.
We will talk about each one of these.
Recruitment increases as the force requirements increase. The nervous system has limiters on the amount of force we can produce. Golgi tendon organs in our musculotendinous junctions provide inhibitory feedback as the forces against those tissues increase. Fortunately, with training the inhibitory effect on this can be reduced which increases recruitment of muscle fibers. This effect is greatly enhanced and maximized around then 85-90% 1 RM threshold.
Firing rate increases begin to occur after all motor units in a muscle are recruited. When the nervous system senses the recruitment of all motor units, it further increases strength by sending more rapid electrical signals to the muscles to tell them to contract faster. For most large muscles used mainly for locomotion, this occurs at approximately 90-92% of 1RM (or 3 RM). In many of the more fine motor muscles located in the forearm, rate coding may start to occur as low as 50% of 1RM. Postural muscles in the core and support muscles such as the calves also highly rely on rate coding for improvements in performance.
Synchronization refers to the nervous system’s ability to organize the muscle fiber contractions to make the system more efficient. In untrained individuals, the motor units fire randomly to recruit the forces necessary. As we further train a movement the motor cortex is able to synchronize the firing of motor units. Imagine a game of tug-of-war. When a team pulls together (in synchronization) the force much greater than each person pulling by himself out of synch with everyone else.
Skills and exercises that are repeated often show the greatest increases in recruitment and synchronization. Indeed, recruitment and synchronization are the methods by which the body will increase its strength. This is consistent with practicing skills many times throughout the week, and repeating exercises multiple times a week over the course of a program.
For example, Starting Strength by Mark Rippetoe (Aasgard Press) suggests that novices perform the squat three times per week. More advanced strength programs such as Bulgarian weightlifting protocol may have their athletes performing the Olympic lifts as many as 2-3 times per day for six to seven days a week. Many other sports such as gymnastics, running, etc. which benefit from massive amounts of technical practice require optimal recruitment and synchronization to perform at the highest level. This is true for every sport; Michael Phelps swims miles everyday.
Simply put, if we want to get really good at something we have to do it a lot. This will be an important thing to remember when we start to construct routines.
Rate coding/firing matters very little for a strength-based program, but is useful to note for those seeking hypertrophy. Muscles that rely more on rate coding tend to be composed of more slow-twitch fibers. Therefore, they respond better to higher repetitions. Thus, the core, forearms, calves, and other highly rate coded muscles, use higher repetitions more often for growth.
Antagonistic disinhibition can improve contraction of the muscle. This is usually done by extensively stretching the opposing muscle you are planning to work beforehand. The reflexes operate similarly. For example, when the doctor hits your patellar tendon with the reflex hammer the leg kicks out. This is called reciprocal inhibition where the nervous system activates the quadriceps to fire while it simultaneously inhibits the hamstrings from firing. Thus, we can harness this phenomena to increase contractions in particular muscles
Neural growth/pruning occurs automatically in the brain and is mostly active for movements that are repeatedly practiced. This occurs all over the cortex in motor planning, the primary motor cortex, cerebellum, etc. This is a primary adaptation of skill work, but it is arguably impossible to train consciously. Therefore, we need not go into more detail about it.
The main thing to take away from this is that perfect practice makes perfect, If you are training skill work or movements always make sure to perform them technically correct so you can get the best practice possible. It will greatly improve your abilities if you practice like this.
The central nervous system (CNS) governs the activation of motor units through a variety of systems that are involved with motor planning, activation, and proprioception. Since we are not going to look at this in detail, we can just say that the CNS, like the muscles, has a set point at which it must be stressed to bring about adaptations.
The CNS has a set amount of recovery that it needs to operate at full capacity. We can think of this as a pool. Every time we exercise we take out some water, and every time we sleep, take a day off, cat well, etc. we put a little back in. Over time, the size of our pool (and therefore capacity for water) will increase. The same thing occurs with adaptations for muscular hypertrophy. When we take out too much without replacing it bad things start to happen. This would be where a trainee starts delving into the overreaching and overtraining realm.
Programs for more advanced trainees that are well constructed have planned overreaching built into them. For example, after a program is completed and a deload week is taken, an athlete usually comes back much stronger or faster. This athlete’s pool has become larger in capacity during the program, but still has not sufficiently replaced the water inside of it until that week of recovery where resting and sleeping help fill it back up to capacity.
I mention these because there are a variety of things that are more taxing than others. For example, in weightlifting, deadlifts are one of the more taxing exercises and thus we accumulate much more fatigue doing this exercise than with almost any other. This is why they are put at the end of many beginner programs. Performing them near the beginning would significantly detract from all of the exercises in the workout program.
In bodyweight training this is analogous to working with supramaximal eccentrics and isometrics. All of these are very taxing on the CNS. Thus, when working with many of these types of exercises each week, one has to be aware that stagnation may indicate the need for rest. Most trainees new to exercise
will think that more more exercises or volume are needed which is not the case.
When we get into programming, this is why we will build in deload periods every 4-8 weeks.
We did not talk about eccentrics and isometrics before, and they are of particular importance when discussing bodyweight programming. The studies indicate that isometrics and eccentrics tend to recruit HTMUS right off the bat to sustain their contractions. This makes sense because they are very difficult movements to sustain. However, the occluded blood flow to the muscle and greater time under tension also means that they are also biasing towards metabolic slow twitch adaptations. They will tend to be used by us mainly in supramaximal contractions (for the eccentrics) and near maximal contractions for the isometrics, so it will bias it more towards the HTMU adaptation which is favorable.
Isometric holds too short will not give us enough volume to force adaptations. However, isometrics held too long may bias our adaptations towards more endurance. Therefore, we need to perform our isometrics in the "sweet spot." I will talk about this more in the programming section how we can effectively do this.
As we talked about above, HTMUS have the greatest propensity for hypertrophy. Since fast twitch motor units have very low energy supplies (only anaerobic glycolysis), they fatigue very quickly. Rapid fatigue leads to mechanical intracellular stress. One example of mechanical stress that occurs is that when there is not enough ATP within the muscle. This means that there is an inability to contract the muscles fully and results in more protein breakdown during the eccentric portion of the movements.
Likewise, there is a neural aspect of fatigue that makes hypertrophy increase much more in the fast twitch fibers than the slow twitch. When a motor unit that is connected to a fast twitch fiber is transplanted onto a slow twitch fiber, the slow twitch fiber morphologically changes to a fast twitch fiber. I do not believe this is fully understood yet, but it does mean that there is a neurological component to hypertrophy.
Myofibrillar and sarcoplasmic hypertrophy are the two types of hypertrophy that occur primarily in HTMUs and LTMUs respectively. As we talked about above, hypertrophy in HTMUS result primarily from protein breakdown of the actin and myosin proteins which facilitate muscular contractions. Thus, the body starts adding more contractile proteins — myofibrils — in response to the break down to mitigate it next time. This is the essence of myofibrillar hypertrophy.
Conversely, since LTMUs have many mitochondria they fatigue much slower than the fast twitch counterparts. Thus, most of the stress on the cell is metabolic accumulation of muscular acidosis, reactive oxygen species, and free radicals. In response to this stress, the LTMUs add additional proteins and metabolites which draw more water into the cell creating sarcoplasmic hypertrophy.
Obviously, unless one of your main goals is hypertrophy, we are going to want to limit the amount of sarcoplasmic hypertrophy and focus on myofibrillar hypertrophy. The sarcoplasmic hypertrophy just adds dead weight into bodyweight exercises. There is some overlap so it is impossible to eliminate each one, but we can bias towards one or the other through specific training with lower repetitions at higher intensities.
In lighter sets of lifting such as an 12 RM, all motor units are fatigued or used within 4-5 repetitions. However, since HTMUs fatigue much quicker and recover much slower, most of the stress is placed onto the MTMUS (medium threshold) and LTMU. This is is why they are going to undergo most of the hypertrophy and adaptive stress placed on them. Additionally, the adaptive type IIa fibers are going to be biased more towards endurance especially as the amount of repetitions increase per set.
This is why for strength it is important to primarily be working at or under the 10 RM range. My preference is working between 3-8 repetitions to adequately get enough stress to force the most HTMU strength and hypertrophy adaptations.
There is some inconsistent information out there if your goal is pure hypertrophy. The 5-8 repetition range is optimal for hypertrophy for beginners. Working the higher repetitions such as 9-12 does work fairly well because there is some overlap, but there will be better gains in the 5- range. Most of the primary barbell beginner programs that work effectively — Starting Strength, StrongLifts 55, etc. — will use repetitions in the 5-8 range.
Now, once your body gets used to lifting heavier weights, then mixing it up with alternate repetitions ranges can provide good progress for hypertrophy. This is similar to a lot of the variations in programming that need to be used to advance in strength. So there is a time and a place for different repetitions ranges. If you are interested in hypertrophy, I would suggest that you stick with the 5-8 repetition range for the most part as a beginner.
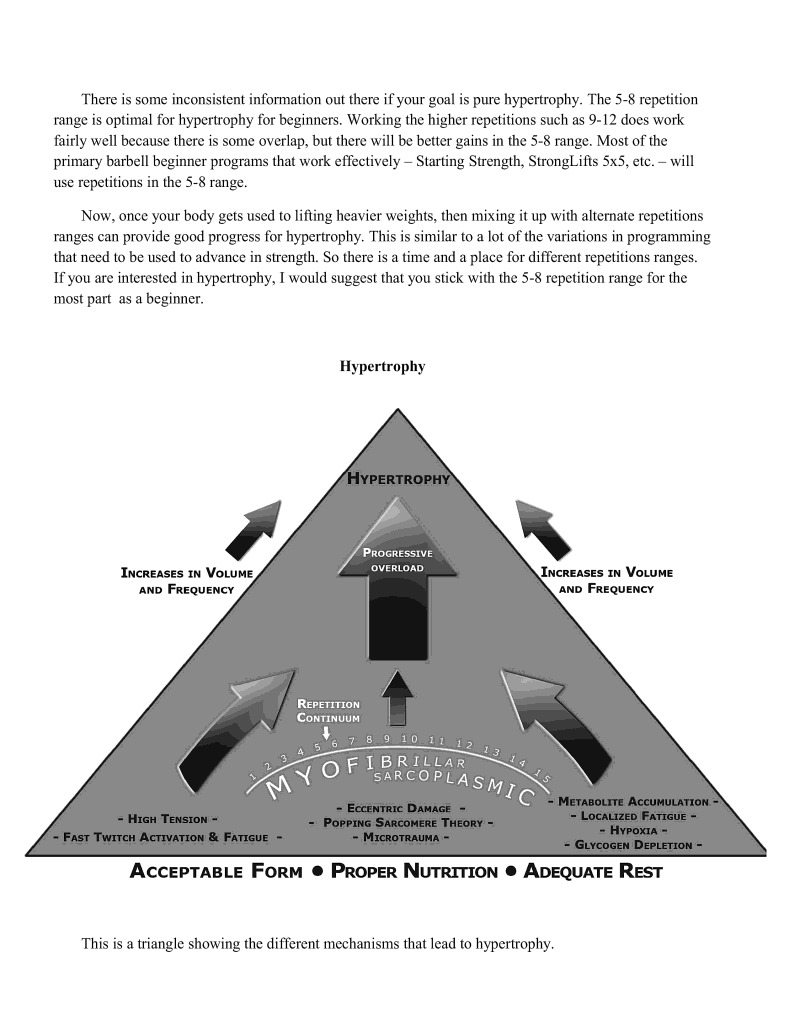
This is a triangle showing the different mechanisms that lead to hypertrophy.
There are mainly 3 different pathways in the body that lead to hypertrophy. The first is high tension and fast twitch activation and fatigue. The second is eccentric damage via the popping sarcomere theory and microtrauma. The third is metabolic accumulation, local growth factors, hypoxia, and glycogen depletion based hypertrophy,
When you think about it in terms of these concepts we will see that "myofibrillar" and "sarcoplasmic’ hypertrophy all occur under these branches to varying degrees as shown by the big letters and small letters of the myofibrillar and sarcoplasmic on the picture.
HTMU / fast twitch activation and fatigue tends to give the most myofibrillar hypertrophy which typically gives the dense look that Olympic lifters and other high strength athletes have. When these structures fatigue, the body thinks that it needs to be able to output more force. Therefore, it adds more myofibrils to help increase strength and power output. Eccentrics and isometrics which typically are at very high intensities also induce this type of muscular hypertrophy.
In between the 5-12 repetition range is where the best hypertrophy occurs. Although this range for beginners is typically in the 5-8 repetition range. This is because the weights are heavy enough to create damage to the muscles, but is also light enough to perform for enough repetitions to create the damage. Since this accumulation of repetitions at a certain weight takes a certain amount of time to perform, many trainers have specified this type of induced hypertrophy as time under tension ~ the total amount of time that the muscle needs to be under to adapt by hypertrophy.
Lastly, we have the metabolite accumulation, hypoxia, local factors, etc. induced hypertrophy. This type of hypertrophy makes the muscle bigger by increasing the volume of the sarcoplasmic elements. For example, adding additional mitochondria, glycogen, enzymes, etc. to the muscle contents draws more water into the cell giving it a more "bloated" look. This typically occurs from the 8-ish repetition range all the way up to about the 15-20 repetition range where the body moves into more endurance after that.
Isometrics, in particular, are interesting because they branch over multiple different pathways of hypertrophy. Since they work at high intensities, they activate HTMU hypertrophy. However, since they occlude blood flow from getting to the muscles they also have some component of hypoxia induced hypertrophy. In fact, most different methods of exercise are usually a combination of one or two of these different pathways. Eccentrics are biased towards HTMU and eccentric damage hypertrophy the most.
When we look at what different exercises force in regards to hypertrophy we can see that it falls along the repetition continuum as displayed on the chart. Changing the "intensity" (c.g. percentage of 1 RM) also changes the amount of repetitions you can perform which is consist with how the body adapts with the differences in the various methods of hypertrophy. Making the rest times longer or shorter can bias towards the left or right on the chart respectively. Adding total volume with sets and./or more exercises allows manipulation of how much damage and stress is applied to the muscles.As you get better at programming, you will be able to figure out how much is optimal much easier.
The same thing applies for strength based gains. Therefore, even if your goal is not hypertrophy, knowing how these processes work also will help you learn how to program effectively for working towards the strength based bodyweight exercises,
We learned that if our goal is strength and obtaining strength moves then we want to execute movements as explosively as possible with good technique. This will help recruit and stimulate the HTMUS that are key for developing the strength that we desire.
Likewise, we want to avoid high repetitions and focus on difficult movements so that our sets utilize the 3-8 repetition range. We work the lower end of the spectrum of repetitions to preferentially stimulate the HTMUS, to maximize the myofibrillar hypertrophy, and minimize the sarcoplasmic hypertrophy.
Eccentrics and isometrics can be used effectively, but they should not make up the majority of our program because they are extremely taxing on the central nervous system.
If this was a basic routine we would first ask in what direction do you want to move. For example, remember back to the repetition continuum. It has strength at one end and endurance at the other. Additionally, we cannot optimally train strength and endurance at the same time, Since this book is based on strength progressions, I am assuming that we are going to train for strength. However, first we will look at a couple of other points in regards to endurance and training.
If we were training for bodyweight endurance we would focus mostly on increasing the repetitions or density/volume of work in a set amount of time. This would be consistent with our goals.
Similarly, I would not recommend trying to train both strength and endurance simultaneously. However, for some athletes it is necessary for their sport or other competitions. Thus, in these cases setting both strength and endurance goals would be useful. Recognize that strength goals tend to include movements with high weight and low repetitions and that are difficult to perform. Endurance exercises will tend to include movements with low weight and high repetitions that result in the "burning" feeling in our muscles.
A problem that we often see is that people either do not know how to set goals or they just do not care about setting goals. This is a mistake. They are an integral component of an effective program as they give guidance in structuring a workout plan. Sure, one can make progress without goals — but performance increases skyrocket when high quality goals are set
According to Merriam Webster, goals are "the end toward which effort is directed." Within the context of training, high quality goals are tangible feats that can be measured by numbers. Below are some examples of high quality goals
When most people set their goals for the first time it is common to see very low quality goals. Low quality goals are ill defined and/or not based on measurables that can be accomplished. For example, some low quality goals are listed below:
As previously stated, routines are constructed around high quality goals. If you have a goal to perform 10 dips then it is logical that you need to first build up the capacity to perform a single dip, then 2 dips, then 3 dips, etc
If you are sill having a hard time understanding how to set high quality goals then keep the SMART model in mind:
S Specific
M Measurable
A Action-Oriented
R Realistic
T Time and Resource Constrained
Make sure that your goals are in line with your overarching objective. Let us use John and Alice as examples. John wants to "get stronger" but has set a goal of 150 pushups in a single set. This is somewhat lackluster since 150 pushups in row is a feat of endurance, not a feat of strength. In another example, Alice wants to "have great handstands" so a goal of performing 30 pullups will not move her closer to her goal
An easy way to make sure that your SMART goals are in line with your ultimate aim, you should break down your desired movements into separate, distinct components. Going back to John, he may want to consider pursuing high strength gymnastics techniques like the planche or perhaps set a goal of performing a squat with two times his body weight on his back. Alice, by contrast, may want to break

down the handstand into two separate SMART goals of holding a handstand for 2 minutes against the wall and perform a 30 second freestanding handstand.
One caveat is that many trainees feel that they can improve their performance by sticking to low intensity body weight exercises. An example of this is John's initial goal; he wants to "get strong" by doing 150 pushups in a single set. Let us be clear, though, doing 150 push-ups in a row does not mean you are strong — it means you have good endurance at performing push-ups. If you wish to gain strength through bodyweight training then you must get creative and broaden your horizons. If you really have an interest in increasing endurance then you will find that it is much easier to see endurance gains when you are already very strong and powerful.
A lack of strength will always limit you in all other domains — technique, endurance, skill, balance, flexibility (active and passive), agility, coordination, etc. You must be strong in order to excel in all of these other domains. The converse is typically not true. It is important to keep this in mind as you set your goals.
Once your goals are set then you will definitely want to put them on paper. Declaring your goals is a commitment. Psychologically, we are more likely to follow through on things to which we have committed. This is very well proven in psychological research and has been used by sales teams for decades. If you are skeptical, then here is an interesting quote from the Amway Corporation’s sales training manual:
One final thing before you get started: Set a goal and write it down. Whatever the goal, the important thing is that you set it, so you've got something for which to aim — and that you write it down. There is something magical about writing things down. So set a goal and write it down. When you reach that goal, set another and write that down. You'll be off and running.
If you want to increase the likelihood of success then you should set your goals and write them down. Scratching things off a list is just a very simple way that you can positively reinforce yourself to continue training. The objective here is to change your lifestyle — and positive reinforcement is one of the most effective means of doing so.
I strongly suggest that you keep your goals written in your training journal. A training journal can be in a notebook or online but ts existence ensures progress. If necessary, keep your log by your bed, next to the fridge, near your computer, saved as your homepage, or minimized on your desktop so that you see it regularly during the day. If you realized that you have not done your workout then the log will serve as a reminder to get out and do it before you eat or get sucked into wasting your time online or doing other mundane things to procrastinate.
One of the hardest things to do is to get into the habit of your workout routine and these methods all make this much more possible. Once you get into the groove of your routine the benefits are stark and undeniable.
Grab 4-5 sheets of plain paper. We are going to take you through the process of building a series of goals and constructing it into a well developed routine.
First, write down all of the goals you want to accomplish in regards to bodyweight training.
If you do not know about what type of goals you want to accomplish take a look through Appendix B which is the exercise reference. Appendix B shows many of the different skills and exercise progressions that you can learn. That may help you decide certain things that you want to learn or accomplish.
Appendix C shows the different charts upon which the exercises are based. We will discuss this more thoroughly in chapter 5.
Second, refine them and make them into SMART goals.
We will help you further refine them later and construct a routine around them.
First, we want to select goals according to the SMART acronym.
S Specific
M Measurable
A Action-Oriented
R Realistic
T Time and Resource Constrained
We want them to be both quantitative and qualitative. They should focus overall onto what we are aiming for which is the development of strength.
Secondly, we want to commit to achieve these goals. Write them down and place them somewhere where we can look at them often and continually think about achieving them
Lastly, keep a workout log. It is infinitely useful to look back and see how far we have come. Additionally. it is good to also look back and see what has worked well for us and what has not. This will help in future planning of training programs.
Before we consider selecting exercises to compliment our goals and forming them into routine, we need to consider how particular exercises will affect our bodies.
The most absurd example, of course, is when we look into a typical commercial gym. If you have never done this you will see many guys performing exercises focused on increasing the aesthetics of their beach muscles." The exercises that are abused the most are the bench press and biceps curls. They are under the delusion that this will make them attractive or big and strong
The shoulder is unique because it allows for most range of motion of any joint in the upper body. That is to say it has the capacity for the greatest amount of mobility. However, the small amount of joint contact space also means that any sort of imbalance that may develop puts the shoulder at risk for pain and injuries. Thus, it is extremely important to build a routine focused on optimal shoulder health. After all, how can we train if we are in injured or in pain?
Therefore, our first axiom is:
This is not to say we are going to ignore the elbows, wrists, and rest of the articulations in the upper body. Rather, focusing on the shoulder will allow us to correctly select exercises that will build a properly balanced routine.
The second axiom builds off of this point:
All upper body moves go through the shoulder. For this reason alone I believe most of the exercise selection of a routine should be based upon the different articulations of the shoulder.
Bodyweight skills have a unique quality that sets them apart from typical barbell exercises. This unique quality is that many of them require excellent upper body flexibility/mobility to perform. For example, proper handstands require 180 degree shoulder mobility and strength in that position. Likewise, manna, back lever, and one arm pullups all have shoulder mobility requirements that need to be properly developed to ensure success.
The simple method of maintaining structural balance
There are two guidelines for exercise selection that I use. The simplest is based on using push and pull exercises to offset each other. This will allow us to maintain a healthy balance of strength and hypertrophy at the shoulder. Pulling and pushing exercises are defined below.
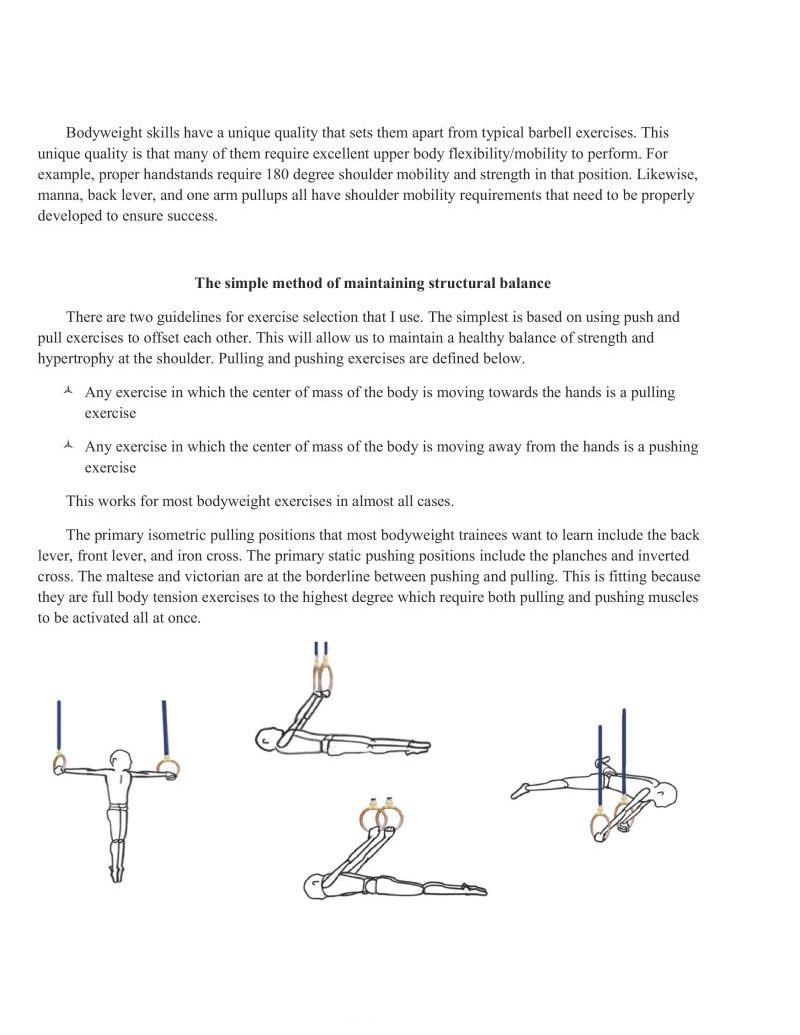
Any exercise in which the center of mass of the body is moving towards the hands is a pulling exercise
Any exercise in which the center of mass of the body is moving away from the hands is a pushing exercise
This works for most bodyweight exercises in almost all cases.
The primary isometric pulling positions that most bodyweight trainees want to learn include the back lever, front lever, and iron cross. The primary static pushing positions include the planches and inverted cross. The maltese and victorian are at the borderline between pushing and pulling. This is fitting because they are full body tension exercises to the highest degree which require both pulling and pushing muscles to be activated all at once.
Everything else falls into its own particular categories.
Vertical pushing includes two sets of movements each at the opposite end of the range of motion such as handstands, overhead presses / handstand presses and dips. Horizontal pushing includes all different types of pushup variations. Vertical pulling include pullups and inverted pullups variations. Horizontal pulling includes any and all rowing variations. Therefore, in this type of system we look to balance vertical and horizontal pushing, and vertical and horizontal pulling.
As stated above, push and pull type exercises are delineated into two different categories for each. There is vertical and horizontal pushing exercises, and there are vertical and horizontal pulling exercises. Since there are a fair amount of straight arm techniques in bodyweight strength training, I want to clarify the methods of integrating these different planes of motion when choosing exercises for certain goals.
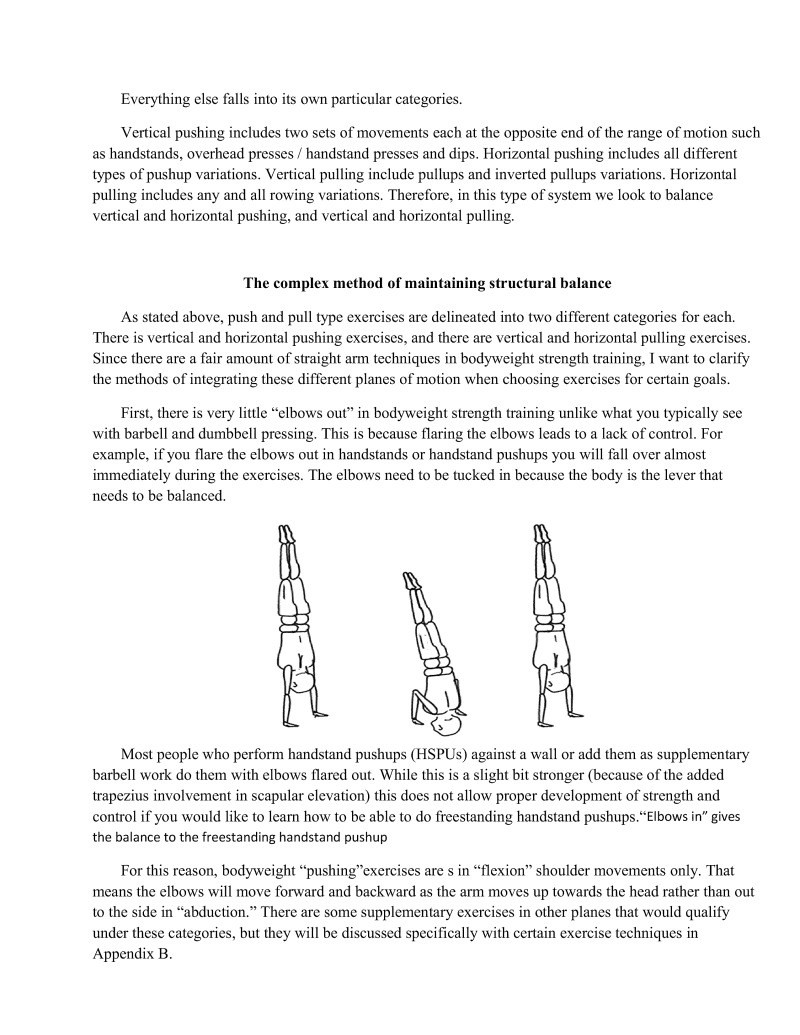
First, there is very little "elbows out" in bodyweight strength training unlike what you typically see with barbell and dumbbell pressing. This is because flaring the elbows leads to a lack of control. For example, if you flare the elbows out in handstands or handstand pushups you will fall over almost immediately during the exercises. The elbows need to be tucked in because the body is the lever that needs to be balanced.
Most people who perform handstand pushups (HSPUs) against a wall or add them as supplementary barbell work do them with elbows flared out. While this is a slight bit stronger (because of the added trapezius involvement in scapular elevation) this does not allow proper development of strength and control if you would like to learn how to be able to do freestanding handstand pushups."Elbows in" gives the balance to the freestanding handstand pushup
For this reason, bodyweight "pushing exercises are is in "flexion" shoulder movements only. That means the elbows will move forward and backward as the arm moves up towards the head rather than out to the side in "abduction." There are some supplementary exercises in other planes that would qualify under these categories, but they will be discussed specifically with certain exercise techniques in Appendix B.
I would further subdivide the pushing exercises into two separate categories that are similar to the vertical and horizontal pushing categories.
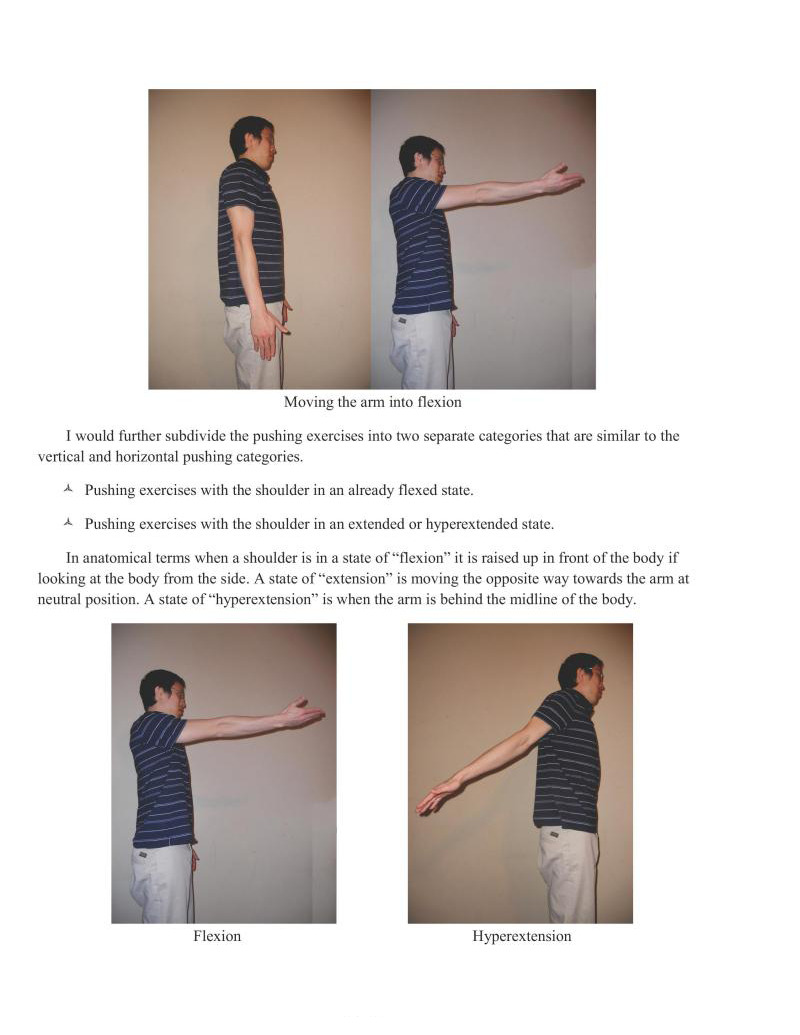
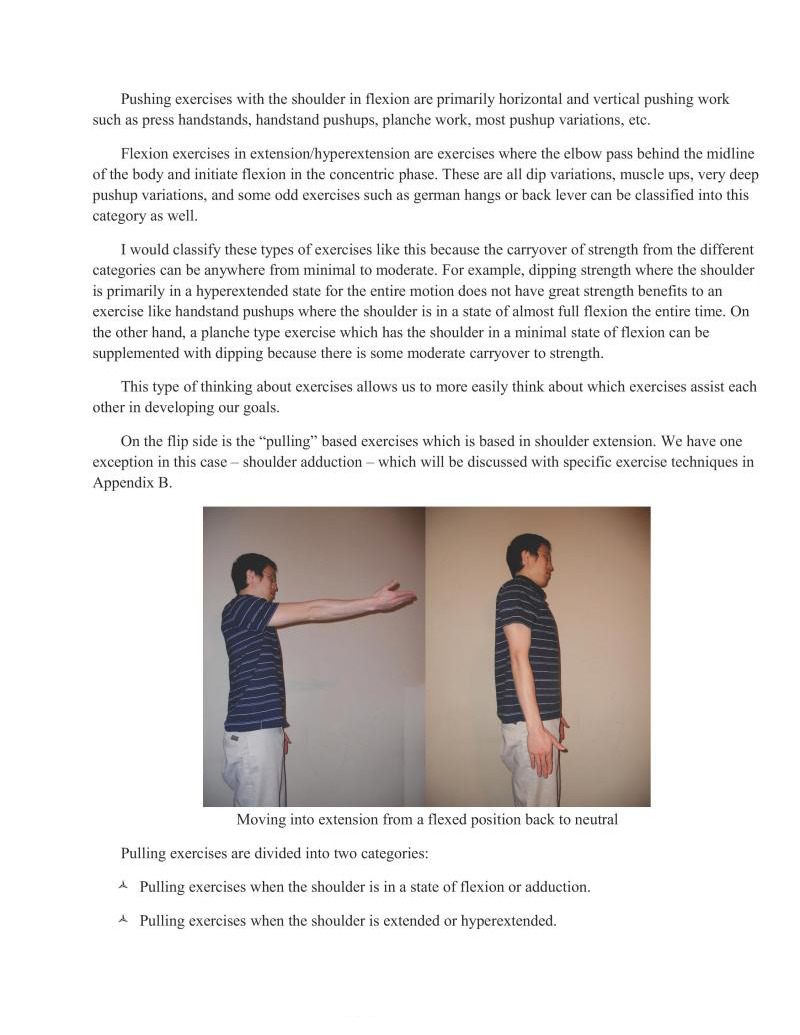
In anatomical terms when a shoulder is in a state of "flexion" it is raised up in front of the body if looking at the body from the side. A state of "extension" is moving the opposite way towards the arm at neutral position. A state of "hyperextension" is when the arm is behind the midline of the body.
Pushing exercises with the shoulder in flexion are primarily horizontal and vertical pushing work such as press handstands, handstand pushups, planche work, most pushup variations, etc.
Flexion exercises in extension/hyperextension are exercises where the elbow pass behind the midline of the body and initiate flexion in the concentric phase. These are all dip variations, muscle ups, very deep pushup variations, and some odd exercises such as German hangs or back lever can be classified into this category as well.
I would classify these types of exercises like this because the carryover of strength from the different categories can be anywhere from minimal to moderate. For example, dipping strength where the shoulder is primarily in a hyperextended state for the entire motion does not have great strength benefits to an exercise like handstand pushups where the shoulder is in a state of almost full flexion the entire time. On the other hand, a planche type exercise which has the shoulder in a minimal state of flexion can be supplemented with dipping because there is some moderate carryover to strength.
This type of thinking about exercises allows us to more easily think about which exercises assist each other in developing our goals
On the flip side is the "pulling" based exercises which is based in shoulder extension. We have one exception in this case ~ shoulder adduction ~ which will be discussed with specific exercise techniques in Appendix B.
Pulling exercises are divided into two categories:
Pulling exercises which extend the shoulder when it is in a state of flexion or adduction are compromised of most of the vertical pulling variations such as pullups, front lever progressions, and pullup variations. Additionally, the "adduction exercises are comprised of specific work with wide grip pullups and other specific techniques such as the iron cross progressions. Most of the bodyweight type rowing exercises can be categorized here too.
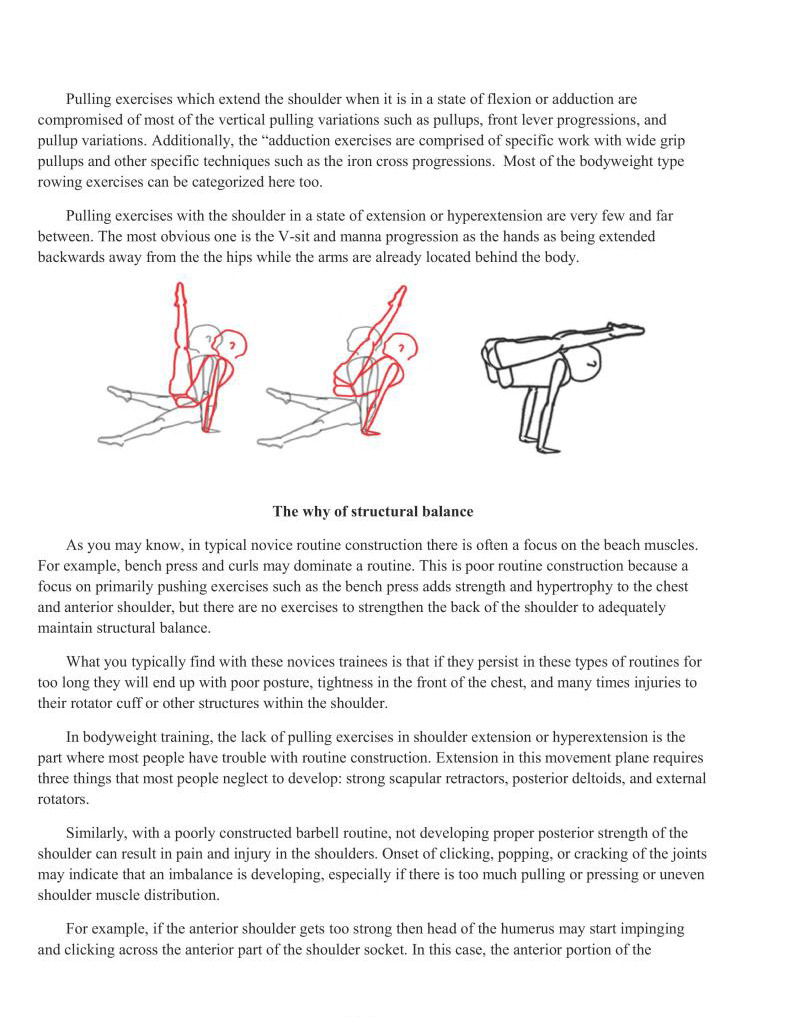
Pulling exercises with the shoulder in a state of extension or hyperextension are very few and far between. The most obvious one is the V-sit and manna progression as the hands as being extended backwards away from the the hips while the arms are already located behind the body.
As you may know, in typical novice routine construction there is often a focus on the beach muscles. For example, bench press and curls may dominate a routine. This is poor routine construction because a focus on primarily pushing exercises such as the bench press adds strength and hypertrophy to the chest and anterior shoulder, but there are no exercises to strengthen the back of the shoulder to adequately maintain structural balance
What you typically find with these novice trainees is that if they persist in these types of routines for too long they will end up with poor posture, tightness in the front of the chest, and many times injuries to their rotator cuff or other structures within the shoulder.
In bodyweight training, the lack of pulling exercises in shoulder extension or hyperextension is the part where most people have trouble with routine construction. Extension in this movement plane requires three things that most people neglect to develop: strong scapular retractors, posterior deltoids, and external rotators.
Similarly, with a poorly constructed barbell routine, not developing proper posterior strength of the shoulder can result i pain and injury in the shoulders. Onset of clicking, popping, or cracking of the joints may indicate that an imbalance is developing, especially if there is too much pulling or pressing or uneven shoulder muscle distribution.
For example, if the anterior shoulder gets too strong then head of the humerus may start impinging and clicking across the anterior part of the shoulder socket. In this case, the anterior portion of the
shoulder labrum may be the piece of the shoulder that i clicking or popping. Further imbalances may start to wear down the labrum leading to potential tears or intractable damage.
Clicking, popping, etc. may not always indicate such a problem as you will find out in chapter 15. If someone has always had clicking, it is likely nothing to worry about. However, it may be a problem if it gets louder or there is an onset of pain especially if it develops simultaneously with an imbalanced routine.
In addition, the body does not like its muscles and joints getting out of balance. The body is much smarter than we give it credit for because all of the sensation and proprioception feedback to the nervous system can subconsciously limit force development. If the body senses that there is an imbalance that may lead to an injury, it will limit strength and musculature development in the surrounding area. Keeping proper routine balance is key to avoid these sorts of problems.
This is why the L-sit/V-sit/manna progression is so important. It effectively counteracts the effects of a pushing heavy routine with one simple exercise series. This st of progressions works the scapular retractors, posterior deltoids, and external rotators without doing 2-3 different exercises saving much time and effort. Plus, we get to work towards an awesome skill.
1 talk about potential injury i bodyweight exercises. Far from it actually. Exercising and getting stronger is important and critical to developing healthy bodies.
issues not to scare any of us away from exercising or performing
However, my primary goal here is to get us working towards our goals both safely and effectively. There is no point getting strong if we are injured. Conversely, if we are injured it makes getting stronger much harder to do. We have to consider both of these factors when constructing a routine, especially one based in bodyweight exercises that are known for their ability to be tough on the connective tissues and
First, organize your goals into categories of push and pull. I already helped out this process significantly by placing exercises on the particular charts.
Secondly, break down the push and pull into categories of horizontal and vertical for each Alternatively, you can do it according to the pushing exercises in shoulder flexion/extension, and pulling exercises in shoulder flexion/extension. Both will produce similar categorizations.
Thirdly, if there is a disparity in goals between any of the categories I would suggest that we either supplement with barbell work in that area (which I will not cover in this book) or train the progressions that I recommend or selecting exercises to shore up those weak points.

Based up our analysis of the types of exercises that bodyweight strength training has to provide us I prefer the push/pull system of classification as it is simple and effective.
The basics of this system can be summarized as:
Likewise, the pushing exercises in shoulder flexion/extension flexion/extension yield similar categorization of pushing and pulling and leads to approximately similar selection of exercises.
Typically, if rings isometrics are the goal we will end up with some sort of handstand pres. (pressing upwards), planche work (horizontal pressing), and dipping work (pressing downwards) while there will be some front lever (horizontal pulling), back lever (more vertical oriented pulling), and manna (hybrid press/pull) or a type of rowing exercise (horizontal rowing)
Its best if the vertical upwards pushing starts out as handstand work. Handstands are critical for the development of body proprioception and control. Progression in this skill signifies the level of ability of the user. Very few people develop strong bodyweight abilities without proper handstand work.
Categorizing our goals into the push and pull categories is important to the exercise selection that we will look at in the next two chapters.
Most information on bodyweight training can be found scattered throughout the web. Fortunately, there are now some resources available on many progressions used in bodyweight strength training.
However, there is virtually no way to ascertain levels of skill and strength progression. Therefore, I have put together some strength and progression charts which I will hope will change the way we think about bodyweight exercises. What I mean by skill and strength progression charts is much like the "skill charts" that you would see in an RPG game. You level your character by training and then use your "skill points" on raising your various stats and skill points on abilities. This is much like the bodyweight skill and strength progressions.
In bodyweight strength training there is a wide range of different pulling, pressing, static strength elements, and handstands that can be learned. Each of these requires specific training and much time and effort to be put into learning them to progression effectively. Likewise with RPGs, once you learn a skill or attack there are certain new progressions that are available for you to start learning.
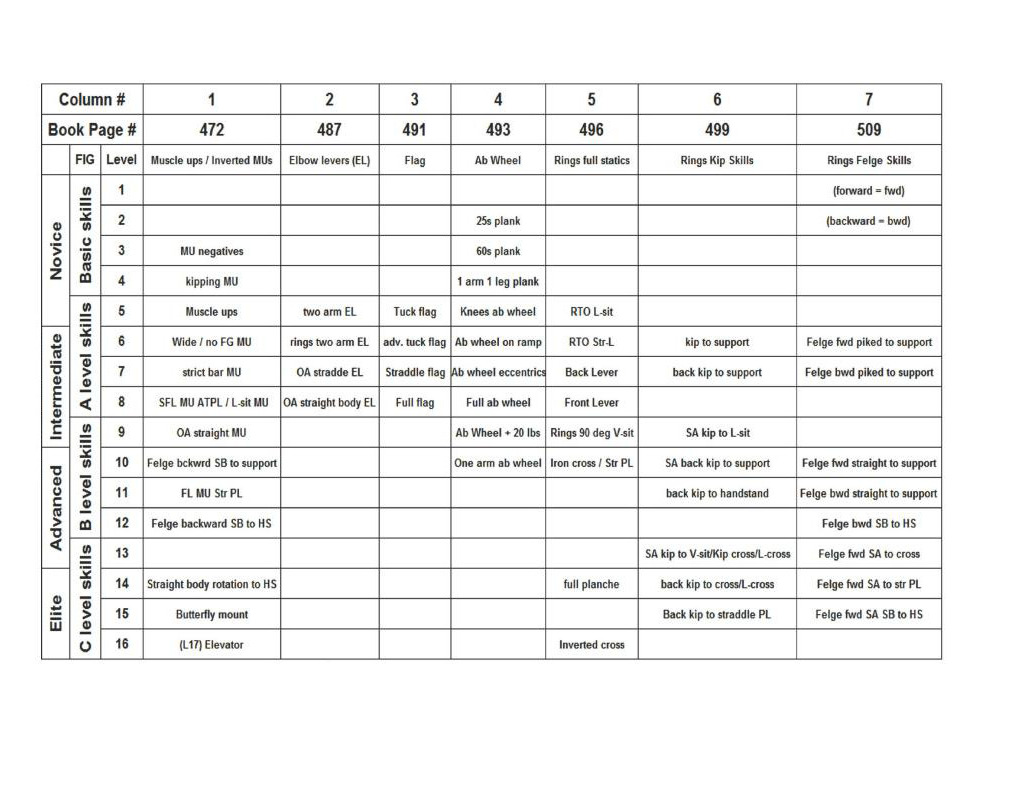
The one thing that is novel about the charts in this book is that many of the elements are based on the Federation International of Gymnastics (FIG) level of difficulty for skills. In the code of points (COP) there is a difficulty based A to F scale. A elements are the easiest, and F elements are the hardest. FIG regulates the COP which standardizes the basic difficulty level of all gymnastics movements — swinging, strength, and dismount elements — allowed on each apparatus.
Obviously, this book will not discuss the merits of swinging elements or dismounts, but it will focus on the various technical and strength progressions that allow gymnasts to develop insane amounts of strength, flexibility, muscle mass, and a pretty good looking body.
The goal here is to categorize and give you, the reader, and idea of where all of the bodyweight strength progressions lie in difficulty. Therefore, you will have a much easier time of choosing particular skill sets and chaining progressions together. Thus, charts will give you an approximate knowledge of where each skill and strength elements lie on the continuum.

I have broken down the skill charts into four specific categories — basic skills, A level skills, B level skills, and C level skill. Each of these levels of skill have four subcategories upon which the difficulty of the exercises increase from level to level. I have denoted in Appendix B the exercise description chapter — which skills are actually in the code of points at certain levels as well.
Additionally, I broke down the charts into specific levels of strength ability that is consistent with the programming that will have to be applied to each category. These categories are novice, intermediate, advanced, and elite level strength
The level of programming will vary between these levels of strength novice, intermediate, advanced, and elite — because we cannot expect to train as someone who is stronger or weaker than us. At different levels of adaptation, respond to stress a bit differently. Specifically, as we increase our strength we tend to need more intensity and volume to stimulate adaptations. Thus, programming will start to become more complex. We will explore these concepts later in this chapter.
The ability to progress consistently is the focus of any sport and any weight lifting program. The same is true for gymnastics and bodyweight strength training. I keep repeating this often because we can learn from the concept that gymnastics and bodyweight training is not so different from other sports and. barbell training.
As we look at the charts and track our abilities it may be noted that we are advanced in one area or lagging in another. This is common. We each have our own strengths and weaknesses depending on our genetics, limb lengths, training schedules, sleep schedules, nutritional factors, stress in our life, etc.
What I would suggest is to focus more on weaknesses and bringing the deficient skills and strength progressions up to the level of our more advanced abilities. Shoring up the our weaknesses will help keep us healthier than if we solely pursued one set of strength or skill progressions. This is especially important if there is a vast difference in pulling versus pushing or a lack of development especially in regards to the
For instance, even if our goal is planche and only planche and we do not care about front lever, back lever, manna, etc. we still have to get strong in the posterior shoulder to attain the necessary muscle mass and strength to achieve the planche progressions. Subsequently, it is necessary to work to shore up our weaknesses as much as possible. This will allow us to facilitate optimal progress and stay uninjured.
I would strongly recommend making a copy of these exercise charts because it will be awkward to lip back and forth in the book to the exercise section located at the end of the book. However, if one not accessible I have tried to provide for this by adding some extra sets of charts in Appendix C.
These copies will be a good comparison to mark down our goals and cross off exercises that we have completed. This will help you keep track of your progress as well.
While those who have been in the gymnastics and bodyweight strength communities may know the common abbreviations and technical terms of the skill and strength progressions on this chart fairly well, most of you will have to refer to the chart and the look at the progression to see what they are.
At this point I think it is a good idea to define the level of "competency" that we will expect to progress on to the next skill or strength level. There are always many questions about:
I think the best way to address this is through an explanation. Normally, in competitive gymnastics a static hold counts if we can hold the skill solidly for 2-3s. However, for our purposes I do not like this amount of time because it is possible to mask a lack of strength with adrenaline. Additionally, if the holds are too short it is hard to get any significant amount of volume to elicit a training effect, so this reasoning is two fold.
Alternatively, I would like to suggest that 6s static holds to count as competent to move up to the next skill level. For example, if we were working the progression of tuck planche, and we could hold the next progression, the advanced tuck planche, 6s then we are ready to move up a skill level
For dynamic movements, I would say 3 repetitions of clean technique should be required to move up 1o the next progression. While it can be argued that you should start moving up after you perform 12 repetitions, I do not agree with this for the simple reason that it is hard to get enough volume to sufficiently force adaptations without being able to do at least sets of 3 repetitions.
As a comparison, we work up to 1 or 2 RM to assess our maximal ability in weight lifting but rarely do we use them as a training stimulus unless we are on an extremely high frequency program. In bodyweight strength training at a level that is below intermediate status we are not going to be working extremely high frequency with the strength progressions because that is the fast track to burnout and overuse injuries. Thus, I am setting a competence level of 3 repetitions before moving up.
Likewise, with eccentrics skills, if we can complete multiple repetitions over 3 seconds then we can consider ourselves competent in the movement. Like the statics/isometrics, this shows good overall control of the movement so long as there is no excessive jerking on the connective tissue that may lead to acute injuries. For example, if we can do a 3s eccentric/negative for the one arm chin-up progression then we may be strong enough to start training them (although I will delineate specific prerequisites that I would like you have before you begin training that movement).
Skills such as handstands tend to rely more on balance than on strength. Many of them have some level of prerequisite strength; however, after that strength is attained they become mostly practiced based to acquire. Like the static holds, a solid hold to be able to progress to the next level should be at about 5-6 seconds to show a level of competency to solidly move up. However, in most of the time based skill exercises it is imperative to actually practice them to be able to hold them for longer periods of time.
For these skills even working "backwards" progressions is very useful in many cases though. The more time we spend in skills like handstands the more we improve. Being an expert in a subject requires 10,000 hours of practice, so it is going to take a lot of work to get to that level of ability.
These generalized assessments of competency will help you evaluate when you should progress or show you what you need to work on more to proceed. We will talk about specific programming options, and what to do if we get stuck between levels later.
The programming needs for the novice are different than than those with intermediate, advanced, or elite strength.
For example, classic barbell beginner programs have a very basic level of complexity. They focus on the major compound lifts such as the squat, deadlift, and bench press. This is ideal for those just starting out because they can progress very quickly, often from session to session. As we improve our abilities in strength and hypertrophy it takes a progressively greater stress to cause similar adaptations to occur. Thus, complexity of programming must increase through changing the structure of the workouts to adjust intensity, volume, repetitions, and frequency.
Regarding the listed progression charts I have decided to categorize them into 4 different levels of ability. This should make it clear that programming adjustments may have to occur at or around each of the different levels. This will be talked about later in the specific programming sections.
I would not say changes must come when transitioning between levels because everyone is different. However, it gives an indicator at the times that training programs may need to be modified if progress starts to plateau for most trainees. There will always be those few who can ignore that who are already strong, and there will be those who will have to start using more complex programming techniques earlier.
The charts are categorized in 16 different levels of strength and skills. When you look at each of the levels they show a similar level of ability across horizontally. Each of these 16 levels are divided into four groups of four. As you can see from the left hand side each quartile is categorized into in basic skills, A level, B level, and C level gymnastics skills.
I have broken these down into 4 distinct categories of programming based primarily on our athletic skill standards.
Gymnasts and gymnastics coaches should note that when looking at the charts the strength movements that are considered advanced level such as iron cross, full planches, etc. are actually considered intermediate level strength moves in gymnastics. Likewise, elite level skills are more advanced
level strength skills. The upper level world class strength transitions are the elite skills which will not be discussed in this book.
The concepts themselves for attaining strength are the same. You will just be taking your gymnasts further along past the abilities on these chars. You should aim for consistent progress based on the programming measures delineated in this book or other resources. The only difference is that there is a. consistently higher level of volume of skill work in gymnastics, so that may take away from specific strength training. However, since gymnastics is a lifetime sport where the strongest gymnasts will have at least 10-15+ years of training under their belt this is fine.
These will be explained more in depth in the programming section.
There are a diverse amount of exercises in bodyweight training that are only really limited by the creativity of the individual. However, there are very few exercises I insist should be in your training program. The ones that are recommended are recommended for important reasons. Let us discuss why.
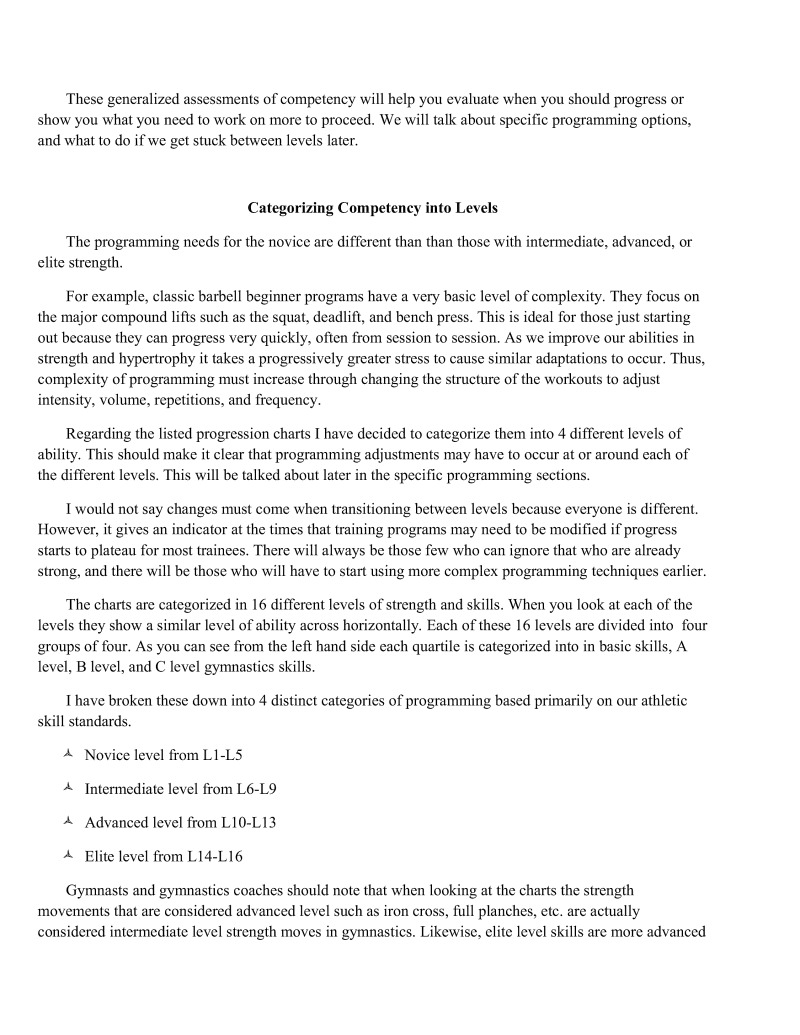
In a perfect world everyone would work both manna and handstands as coupled skills. 1 like this for multiple reasons:
Handstands work the overhead flexion range of motion of the shoulders, and manna works the limit of hyperextension range of motion of the shoulders. By working them in tandem you are likely to progress more rapidly and safely.
Training for the manna progressions also requires that more than adequate flexibility be developed the shoulder girdle and legs.
Both handstand and manna have built in core control and strength work. Thus, less time needs to be spent on core conditioning, and more emphasis can be put in on skill and strength development.
As previously mentioned, developing these skills simultaneously will ensure that imbalances of the shoulder will be less likely to develop.
The alternative is additional scapular retraction work (another horizontal pulling exercise) or an inverted pulling exercise (such as inverted pullups) to keep the pulling and pushing exercises balanced. However, this is extra work compared to the benefits of utilizing this coupled progression.
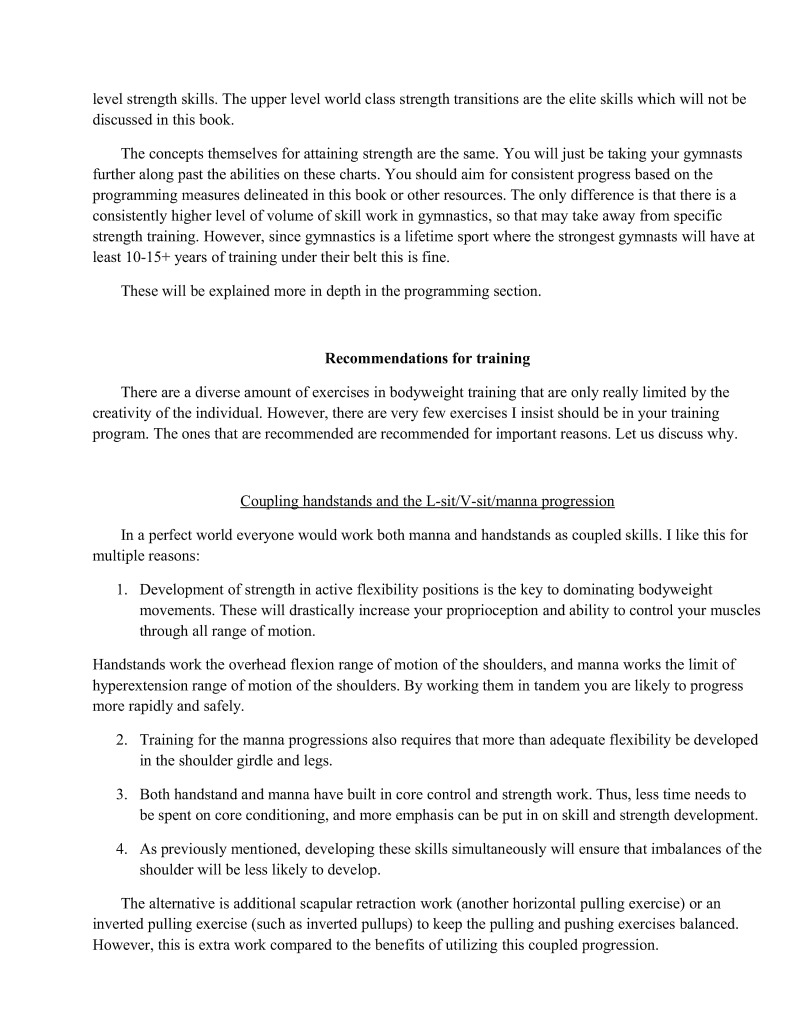
Straight arm press handstands are at the core of gymnastics. They require incredible upper body and core control which will greatly benefit benefit your training both in the intermediate phase as you learn them. Additionally, they will help as you move into the more advanced stages.
Straight arm press handstands from support are actually a very good supplemental exercise for planche training because they require very solid amounts of shoulder girdle strength moving through a large range of motion. They extensively work the scapular stabilizers, especially the upper trapezius, lower trapezius, and serratus anterior when going overhead. While this means nothing to the layperson, the triangle of forces that these three muscles exert on the scapula are key in both overhead pressing and the maintaining proper scapular stability against the thoracic cage.
Likewise, they are an extension of mastering the handstand as you can easily hold handstands once you can control them from a straight arm press. This also applies to the specific bent arm pressing. Once You master straight arm press handstands (straddle press at the very least), most if not all of trainees will be able to do a bent arm press the as well. The same is not true in the opposite direction which is why this skill must be developed first or at last concurrently.
Plus, they look cool.
I do not specifically have any other recommendations that I would say are mandatory like the other three exercises. However, I have some other suggested recommendations.
Handstand pushups, rope climbing (if available), and full back lever development are very important o the process of developing high level strength. The reasoning behind this is because not only help with the development of neuromuscular strength, but also through building up of connective tissue and joint integrity. Thus, they are likely to help significantly in the development of higher upper level skills. Indeed, I have some of these exercises as prerequisites to other higher level strength progressions on the charts and in Appendix B. I only have a small section on rope climbing in Appendix B, but if you have access to a rope you should definitely utilize it
Just remember to organize your workouts so that you can keep your body structurally balanced and injury free. The rest is really up to you and what you want to accomplish. Have fun.
Pull out your sheet with a list of categorized smart goals,
Also, print out progression charts at the end of this chapter, or obtain some from the extras in Appendix C. Two copies will suffice.
First, see if can find the progressions on the chart for all of the goals you have. Make note of them and progressions grouped to the right or left of them. I tried to group skills that have good carryover close together. These can be supplements in progressions along with the main exercises.
Secondly, I assume if you are reading this book that you have some idea of your capabilities. If you have any highlighters I would suggest highlighting where you want to be in one color, and highlighting your current abilities across all of the charts in another color. If you do not know what some exercises are then refer to the exercise section located in Appendix B.
These two steps will give you the baseline of where you are and where you want to be. Thus, we will use the exercises in between to bridge the gap which we will talk about a bit more in the next section.
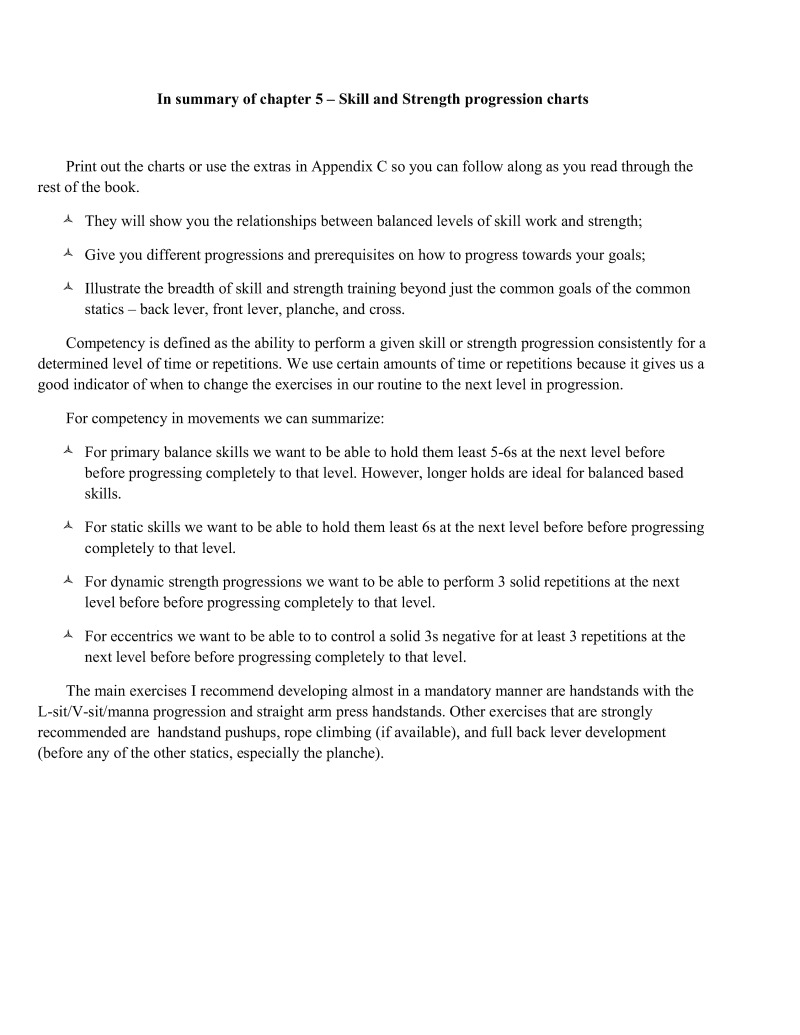
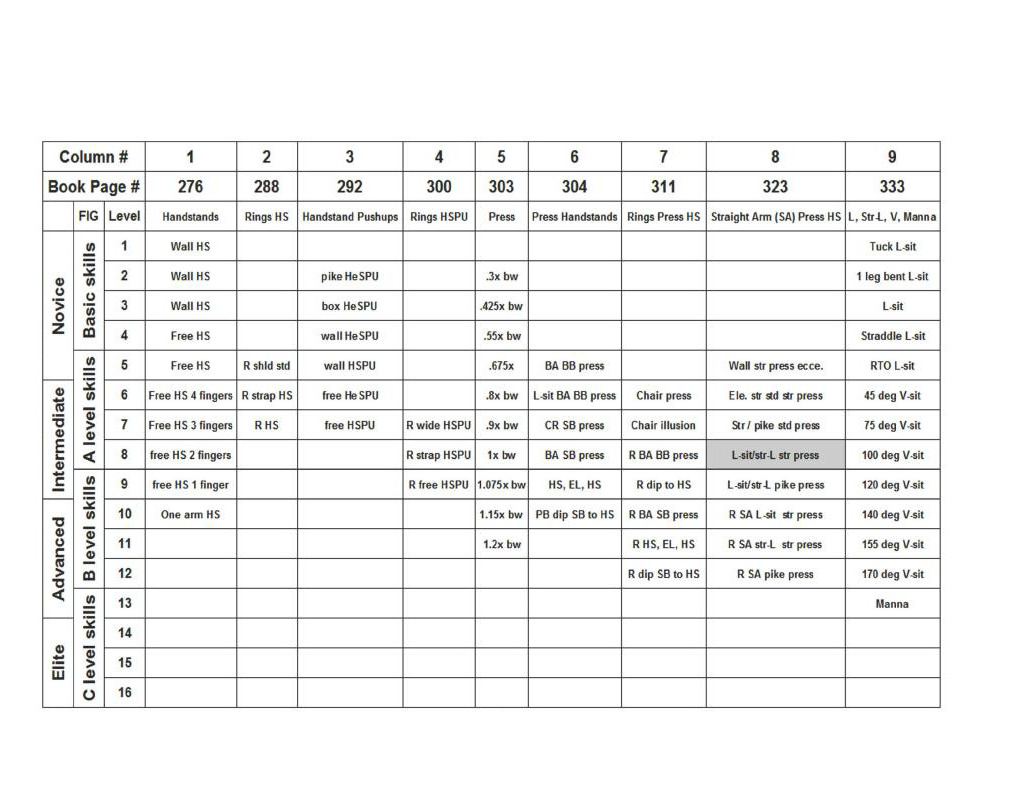
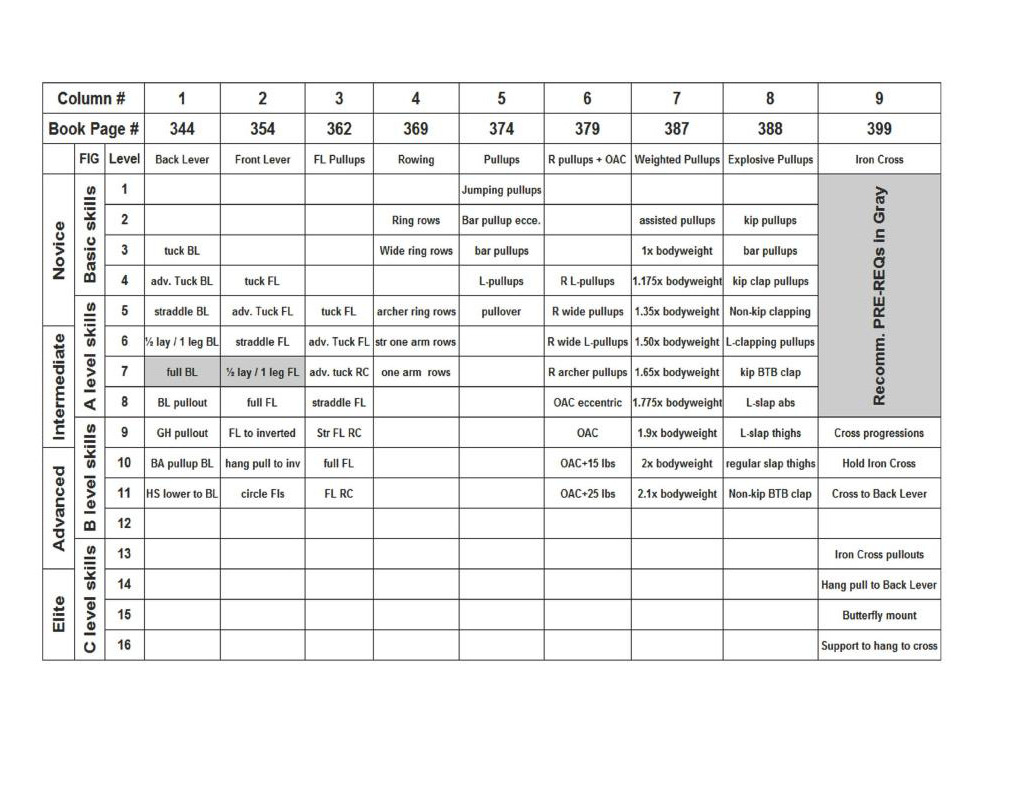
Print out the charts or use the extras in Appendix C so you can follow along as you read through the rest of the book.
For competency in movements we can summarize:
For primary balance skills we want to be able to hold them least 5-6s at the next level before before progressing completely to that level. However, longer holds are ideal for balanced based skills.
For static skills we want to be able to hold them least 6s at the next level before before progressing completely to that level.
For dynamic strength progressions we want to be able to perform 3 solid repetitions at the next level before before progressing completely to that level.
For eccentrics we want to be able to to control a solid 3s negative for at least 3 repetitions at the next level before before progressing completely to that level.
The main exercises I recommend developing almost in a mandatory manner are handstands with the L-sit/V-sit/manna progression and straight arm press handstands. Other exercises that are strongly recommended are handstand pushups, rope climbing (if available), and full back lever development (before any of the other statics, especially the planche).
Building a routine should follow a few simple rules to maximize the amount of training "ability" you have in a single workout. This section aims to answer the question:
To answer this question I am going to outline a general structure of a daily routine and then justify the reasoning. Then we will focus on building a routine on this foundation.
Warmup is first. To adequately get the body into an optimal state for workouts a few key physiological changes must happen. Core temperature needs to be raised so that the chemical reactions in the muscles will take place faster leading to better contractile function of the muscles and activation of the nervous system. Also, heart rate and blood flow should be elevated to provide oxygen and nutrients to the muscles and to export the waste,
Two signs I like to use that show me someone is ready to workout include a light sweat and a slight increase in breathing cadence.
Skill and technique work should always be second. Once your nervous system and muscles are warmed up and primed to go this is the optimal time for the body to learn new skills or movement patterns.
Good skill and technique practice should be emphasized here. If you are practicing poorly with a skill such as the handstand with loose legs that are flopping all over the place, the body memorizes such patterns and will remember them. When you start to practice them correctly it will be that much harder to change your technique because the bad technique is ingrained. If you are too fatigued to practice just stop and rest. Do not give a half effort to practice. This is the easiest way to get hurt and learn poor movements.
Power work, isometrics, eccentrics and other concentric strength work are third. They are here because they all require a very large stimulus from the central nervous system (CNS) to operate effectively. Since we are recruiting maximal or near maximal numbers of muscle fibers, it is important to perform these after low intensity activities — warm up and skill work — to get the full benefit out of them.
For example, if you performed your strength work at the end after your conditioning, the fatigue will limited your ability to lift the same amount of weight as you could have in the beginning. This would lead to less of a stimulus on the nervous system and muscles and therefore less of a strength adaptation. Thus, you want your high quality performance work to be directly after your warm up and skill work.
Endurance (everything else with it) is placed next in the routine. These exercises are mainly aimed at taking advantage of the energy systems of the muscles. Most of these exercises, unless done at extremely high intensity, are not as rough on the nervous system and musculature as the power, strength, eccentrics, etc. This means that you can still have a fairly good conditioning session after strength work whereas it would not work the same in reverse.
Endurance is not discussed in this book; however, if you have dual interests this is the place to include these activities,
Finally, the static flexibility, prehabilitation work, and cool down are at the end. I would do these at the end of every daily routine. They are important to help the body relax after an intense workout and work other aspects of physical ability or injury prevention.
Since muscle length is regulated by the nervous system via gamma afferent fibers in muscle spindles, is much easier to get good stretching work done at the end when we have fatigued the nervous system and muscles from working out. Additionally, the muscles are much more pliable with the increased blood flow. Likewise, mobility work applies on the same principle.
Prehabilitation refers to basically any work that is focused on injury prevention. Rehabilitation work can be done here as well although it depends how much the body part itself it hurting. If you are not using the injured body part in your workout it might be a good idea to work in rehabilitation/prehabilitation here. Alternatively, this can be performed in the warm up or earlier in the workout as well.
For instance, let us talk about if we needed some prehabilitation work for the shoulder. If the shoulders need additional stabilization exercise then it may be a good idea to to exercises such as rotator cuff exercises or turkish get-ups or other such shoulder exercises. Fatiguing our shoulder stabilizers before our power and strength work is not such a great idea. If they are tired performing rotator cuff exercises before the tough compound exercises, it is much easier for them to fail during the compound exercises and for an injury to occur. Thus, in this case, the rotator cuff exercises should be performed at the end of the routine.
Now, let us talk about each of these topics more in depth on how to program properly for bodyweight strength and skill development.
Many athletes have their own warm ups that they do to get themselves ready to exercise. People may also have their own specific warm ups tailored to their specific mobility weaknesses too. It is fully acceptable to continue to do this, but we need to be aware of the demands bodyweight training on the connective tissue. Thus, if you have your own warm up that you usually use I would recommend hybridizing the warm up and skill development into one tailored a bit more towards bodyweight strength training.
As we discussed in the previous section a good warm up gets the blood flowing, the heart rate up, a light sweat on the brow, and an increase in breathing cadence. What better way to do that than with the actual skills that you have recently mastered. The additional benefit is that you will be able to reinforce correct motor patterns for your body.
Skill development for gymnastics can be employed as part of or replacing the warm up. After you master skills such as handstands, and other strength progressions such as pullups, dips, german hangs, etc. they become less intense on your body. Once they become low intensity, you can adequately use them in your warm up.
For example, if you have mastered a freestanding handstand and are starting to work on freestanding handstand pushups, it may be a good idea to throw a lot of handstand work in your warm up to reinforce proper neural patterns for the movement. Dynamic movements can be utilized such as wall handstands and alternating lifting one hand to touch the shoulder each time (called handstand shoulder taps) Handstands or handstand shoulder taps will help warm up the body and train skills at the same
Skills or strength progressions that are 2-3 levels below your current competency level can be considered exercises that are appropriate for warm up or skill work. On the chart this may correspond to one but usually two levels below static progressions that we are currently working in exercises. This gives us a chance to work on some progressions as skill or in our warm up if we decide that the focus of our strength work is going to be working other movements. It will also help maintain those current progressions.
Examples of these might include throwing in some rings support work for warm up as well as some tuck planche or tuck front lever work if we are working the straddle versions in our workout. Another example may be that if we do not have enough time to work handstand pushups we can substitute in an easier variation of handstand pushup progression here to help maintain the neurological strength we have already attained for the movement.
It is important to adequately prepare the muscles for more intense work. Dynamic stretching and mobilization work is useful in the warm up to take the muscles through their entire range of motion. However, unlike static stretching you are not holding the position at the edge of your range of motion.
Static work held too long before strength training can slightly negatively affect the ability to exert maximal force, so it is important to limit trying to lengthen the muscles too much before training. On the other hand, if your poor flexibility is inhibiting you from properly executing skills then spend some time in the warm up to stretch so that you can properly perform the latter exercises.
Now for a little more about skill development. Skill development for bodyweight strength training is much different than barbell work.
It is unlike barbell training where you can begin learning the more complex movements (such as the Olympic lifts — snatch and clean and jerk), as a beginner and reach a decent level of proficiency within a few months. In fact, with barbell work this is preferable because it allows for years upon years of meticulous training to reinforce proper movement patterns. This will allow the user to perform the movement with heavy loads.
Bodyweight skill development follows a different track. The levels of progression are separated by competency in previous skill development in combination with strength development.
For example, a basic skill such as a handstand and its various progressions has many different levels to work through such as:
The complexity of progressions and the varying nature of many peoples' ultimate goals make progressing in pure bodyweight work extremely difficult if you are not under the tutelage of someone who knows what they are doing and can offer correct progressions and tips on what to work on next
Skill development work will play an ultimate role in developing proper strength. It is to be included in every session if possible. As one's individual skill, strength, and work capacity improves exercises that may have been previously classified as "strength" skills may become skill work.
Thus, it is important every 5-6 weeks to reassess your goals exercise selection in the context of what constitutes skill work and strength work as your training progresses. We will talk about how to properly do this later.
The core constituents of the workout with bodyweight training are comprised of isometrics, eccentrics, or regular repetitions comprised of a controlled eccentric and accelerated concentric movement —referred to hereafter as dynamic movements. Organizing these into a coherent order is a fairly easy task.
Note that "dynamic movements" should not be confused with the "dynamic method" popularized by Westside Barbell where weights used at around 60-70% 1 RM are used for speed work
In general, we want to put the eccentrics and isometrics in the beginning of the work leaving the dynamic movements for last.
We can think of building strength as a combination of CNS neuromuscular adaptations and musculoskeletal adaptations. There is a third — cardiovascular / O2 adaptations —but is irrelevant for our purposes here. Our body has two pools of resources from which to draw. Since the neuromuscular controls the musculoskeletal, we want to first execute tasks that use substantial amount of CNS involvement because they also use a lot of musculature, If we reverse the order we get highly degraded movements compared to the maximum potential that we could theoretically attain from the workout. This is akin to endurance before strength because tiring out the cardiovascular and musculoskeletal components will decrease the ability to exert total force in strength work if done after.
Thus, we put the eccentrics and isometrics first because typical loads used are supramaximal (in the case of eccentrics) or near supramaximal loads (in the case of isometrics). Working up near the edge of our strength limit as we learned in the first chapter is tough on the CNS. Since the CNS governs activation and inactivation of the muscles we want to put the toughest amount of work in the beginning to get the most out of it.
Secondarily, most of the dynamic movements we will be working are well below our strength limit which makes them less taxing on the CNS. Remember back to chapter I: the lowest amount of reps that we are going to use for training purposes is about 3 repetitions (3 RM). Most of the work is probably going to be at 5 RM or greater for anyone below intermediate level. This means that our typical dynamic movements is going to much less intense on the CNS than the eccentrics and isometrics. This allows much more volume of the work to be put on the muscles.
We also want to use full body movements before any specific isolation work that may be in line with our goals. Fatiguing the musculature with isolation exercises is not conducive to good execution of the bodyweight progressions because most of them are full body exercises.
My recommendations for barbell work for beginners have always been based on 2 pushing exercises, 2 pulling exercises, and 1-2 legs/posterior chain exercises. This is similar to what I going to outline for bodyweight routines, except we are going to select exercises from each of the categories we have previously determined in both shoulder flexion and extension planes.
For those with no experience with creating your own routine you should start out with 2 pulling and 2 pushing exercises for the upper body.
For those with some experience, 1 like 3 exercises for push and pull starting out. Then reduce the workout volume of 2 exercises for each push and pull while you simultaneously increase the volume of skill work as work capacity increases.
I use this structure for two reasons. First, getting the trainee to work in many planes of motion is going to extensively help with learning to manipulate themselves in space. This is a bit unlike barbell training where you want to stress few fundamental movements. Secondly, distributing the volume over another set of exercises will help because it is harder to keep strict technique over longer workout sessions. With barbell work you can tell when form degrades and make load adjustments; in bodyweight work the body will inadvertently adjust to improper technique which decreases forces applied, often significantly. Once technique becomes more ingrained then this is less of a problem.
For our pushing exercises we want ones that are based in flexion-in-flexion and flexion-in-extension. For beginners, the best exercises to choose are along the lines of handstands, pushup progress planche, and dips.
For our pulling exercises we want ones that are based in extension-in-extension and extension-in- flexion. For beginners, this would be pullups, some sort front lever or back lever work, and inverted rows or inverted pullups.
For legs there are many options to work on such as sprinting, pistols, plyometrics, or other methods such as this. I still recommend weights should be used. but sometimes people have no access to equipment so they have to make do with what they have. I will not cover these topics in the book though.
First, we will talk about prehabilitation or rehabilitation work, We need to be proactive about taking care of our bodies as injuries represent time off from training (as well as pain and frustration in many cases).
If we are working around an injury specifically the rehabilitation work comes at the end of the workout. Alternatively we can group it with the workout. The workout should focus on working around the injury without any pain, and the rehabilitation work should obviously focus on improving the injury condition. We will talk more about these factors and various options we have in the chapter 14.
Specifically in regards to prehabilitation if we have had previous injuries at certain joints or suspect injuries may be developing because of any twinges of pain, or prolonged soreness of muscles, tendons, or joints then some prehabilitation may be useful.
Chronic muscle tightness or deep soreness should be distinguished from the delayed onset muscle soreness (DOMS) that is common when new exercises are introduced. If volume and frequency stay constant, DOMS usually starts to dissipate as it goes on. Problematic muscle groups will usually be tight, warm, and painful to the touch and will not go away like soreness does.
Most of the time rest will cure all ills, but we will want to add in exercise or mobility work to help facilitate healing and keep the rest of our body healthy. With our prehabilitation exercises, we may be
working to correct existing imbalances, or to prevent ones from forming much like what was described earlier with shoulder imbalance
Proper flexibility and mobility work will go a long way to improving upon the effectiveness of the workouts by keeping joints safe. This is needed in both barbell and bodyweight work. This is even more relevant as we get older: we lose a lot of strength and soft tissue extensibility and usually our posture starts to degrade.
The biggest thing to keep is mind is that we want our joints, tendons, and muscles moving well. Good quality body tissues should not hurt when we apply pressure or massage to them. Likewise, if we move them around without putting any tension into the muscles they should be pliable and easy to move, but not tight with adhesions, scar tissue, and trigger points.
Ideally, our joints should feel good when we use them, and the muscles should be soft and pliable. Close your eyes and move your body. You should feel good and unrestricted in movement. If we think back to an athlete like Michael Phelps as he is preparing to swim competitively, he often performs many arm circles and throws his arms back and forth to help loosen up. You can also see that his muscles are soft and pliable as they bounce around. This is ideal. Mobility work of this type is good pre and post workout, albeit not with the ballistics forces.
Additionally, if our flexibility is hindering our development of some skills then we may need to add extra flexibility work into the beginning of the workout instead of just placing it at the end. One of the more effective things I have personally done for my manna progressions is to do my shoulder stretching (german hangs / skin the cats) directly before training manna so as to allow better movement of the shoulder girdle pressing into hyperextension.
German hangs, wall slides and band dislocates are very good shoulder mobility exercises as they will help improve shoulder range of motion in extreme flexion and hyperextension for handstands and manna respectively. Not that this is all of the work that should be done, but they are the more important exercises. for these purposes. We will talk more about specific mobility and flexibility exercises that can be performed in chapter 16.
Thus, mobility and flexibility work may be integrated into warmups and/or as skill work, during workouts, or even post workout.
Generally, we are only going to add static flexibility work into the warmup or workouts if we have a range of motion limitation that is negatively affecting our ability to perform the exercise correctly. For example, this would be the case of the german hangs with the manna
For mobility we are going to end up taking our muscles to the edge of their range of motion and using that to help loosen up tight structures. This will help our joint complexes to operate optimally.
Write down any of the skill work you want to learn. Also, start to think of what type of exercises you want in your routine and how you would order them based on the information above.
Write down any previous injuries you have had or problematic joints, muscles, tendons, etc. that have or may have been bothering you in the past. Also, write down what you have been doing for rehabilitation or prehabilitation to solve these injuries.
We will take into account how to integrate all of these factors into a routine and how to avoid any contraindicated movements while continually working towards our goals.
Assess your soft tissue structures by using your hands to massage in and check for tightness, trigger points, or other restrictions or chronic problems in your musculature, tendons, or around the joints. Write these down too.
In addition, check and evaluate your flexibility and mobility. The main ones we want to check at this point include our wrists, elbows, shoulders, the straddle stretch, and pike stretch.
The basic components of a routine are
The warm up tends to consist of lower intensity exercises to help warm up the body. The goal of this s to raise core temperature and get the nervous system and muscles operating at full capacity. In addition, some degree of prehabilitation, mobility work, or stretching may be integrated if it benefits the ensuing workout.
Skill development can be integrated into the warm up if time is a factor. Skill development tends to focus on lower intensity skills that primarily need a lot of practice to attain.
The main exercises for the workout are the power, eccentrics, isometrics, and dynamic movements. These make up the core of the work we will be doing to work towards our goals.
The cool down period is composed of rehabilitation or prehabilitation work to improve specific injury conditions or to stave off ones from development. Likewise, mobility and flexibility work is often better integrated into a routine here because the body is more responsive after the nervous system and muscles are tired from the workouts.

I like the full body routine structure over body part splits.
Why?
We know that strength has a large component that is neurological. With full body routines we perform more compound exercises and eliminate isolation exercises. This allows us to work more muscles over more gross pattern movements than a split routine which typically has a mixed bag of compound versus isolation exercises. Thus, the net gain of working compound exercises with higher frequency is enhanced such that full body routines performed only 2-3 times a week can be more effective for gaining strength and mass than split routines.
Secondly, we obtain higher frequency with the exercises we want to work. A split routine such as say a biceps/back, triceps/chest, legs split hits all muscles once or maybe twice per week compared to a full body routine which allows thrice or more weekly work with particular muscle groups. As we noted earlier, a large component of strength is practice with the gross movements. The more we work movements we want to work, the faster we will get better at them.
For example, if we used a split routine such as push/pull/legs with 1 rest day in between we would perform each workout approximately 2 times per week. If we use a full body routine, we will get 3 times a week practice with push/pull/legs exercises.
To drive this point home let us look at something like the planche exercise. In the above split routine examine it would be categorized into a pushing exercise. Therefore, you would get practice with it twice a week. However, with the full body routine we are getting practice with that 3 times a week. It does not seem significant, but over the course of a year that is 50 more workouts with the planche with the full body routine than with the split routine!

We can examine the math even more. The person using split routine with 2 pushing workouts per week is down about 50 workouts with planche compared to the full body.
This means that he is about 25 weeks behind training the planche as his counterpart. And 25 weeks / 4 weeks per month is about 6 months behind the trainee using the full body routine.
Let me reiterate this. Over the course of a year, a person with a 2 times a week split routine is almost 6 months behind in planche training as someone who is doing a full body routine 3 times a week!
I do not want to sound too sensational. The training effects from workouts are not linearly additive so the trainee performing the split routine is probably only 3-4 months behind as a more reliable estimate. Even so, an "extra" 3-4 months of training on a planche can be almost another progression level near the beginning stages of the progression. The vast difference in being able to work a strength move even 1 more time a week is extensive given long periods of time.
Now, I do not state any of this to belittle a push/pull system or other various splits. Push/pull, straight arm/bent arm, and upper/lower splits can be used very well with bodyweight routines. These will be discussed some in the subsequent chapters and the sample programming section. My main aim is to get us away from looking at the body part splits as an effective way of training, especially for novice and intermediate level athletes.
Sometimes body part splits are necessary for higher level athletes. Those that have heavy skill work such as in the sport of football where they often run two-a-day practices may need to split up volume in terms of say a push/pull system or upper/lower splits depending on their recovery factors. Sometimes body part splits may need to be used with these athletes. It is all relative to overall workout volume and recovery factors.
In conclusion, isolation work is typically used effectively at the opposite ends of the fitness spectrum: injury and elite athletes.
If you are a beginner or intermediate trainee as predicted by the strength progression charts you should absolutely be utilizing a full body routine with very few except
Let us go over the basics of the the general exercise selection structure we went over before, We are going to construct a routine for the upper body using bodyweight exercises. Lower body exercises can be added at your own discretion,
Compound movements such as dips, handstand pushups, pullups, and others will for the most part be emphasized much more than isolation exercises like triceps extensions and biceps curls. This is not to say

that biceps curls are useless especially if your goal is to obtain 18" biceps. However, they are not particularly useful when you can work multiple muscles at the same time instead of just one.
Studies have shown that full body training is the most effective way to gain strength and muscle mass especially for novices. In addition, studies also show that compound exercises which stimulate many muscles, and often the entire body, work the best. Fortunately, bodyweight movements are all compound exercises.
The structure of theoretical exercise selection also encourages a balanced full body routine of pushing and pulling movements. While pushing and pulling can be split apart to separate routines at more advanced levels of progression they are not needed now.
I am going to assume for the sake of argument when discussing programming that we are going to use full body workouts. In the latter intermediate and advanced levels of programming I will introduce different options in routine structure that can be used.
For the exercise selection i this chapter we are going to focus more on how to select them for our routines.
Now, let us take a look at our list of goals. Recategorize them into the distinct sections we have talked about before namely: (1) skills, (2) pushing — with their subsets, (3) pulling — with their subsets, (4) legs, (5) flexibility/prehab/mobility, and (6) rehabilitation.
One thing to keep in mind is that as you get stronger and more proficient that some exercises they may become skills.
Take 1-2 goals from each of the main workout categories — skills, push, pull, legs — and construct a routine around them. We will prioritize which goals that you are going to work on with your initial routine.
The mobility/flexibility/prehab and rehabilitation goals we will integrate into our routines in both the beginning and the end.
Te beauty of having less goals is that you can be more focused. As we talked about earlier with the planche 3x a week vs 2x a week example, more focused means that we get more practice and training towards them. Therefore, we will achieve them faster. Two exercises directed towards planche work will be more effective than one exercise working towards the planche and one exercise working towards handstand pushups.
On the other hand, the beauty of having a couple more goals is you can be more general and broad in your whole body strength. Although since it is less focused you will build strength towards specific goals slower.

This is why I tend to give the option of 1-2 goals. You can choose to be more focused or you can choose to be a bit more broad. 3 goals tends to be a bit too broad to work towards, and people may become frustrated with the lack of progress.
Exercise selection is simple given the progression charts according to our goals. As you have taken a look at the exercise technique section, we can see that there are progressions to help us advance until we can obtain the goal we set. We will base our primary movements on working up the line of progressions towards the skills we desire. Do not over think this.
First, we are going to narrow our goals down into a series of five categories that we need to work on
Skill goals are primarily those that require lots of practice. Handstands fall into this category along with many other types of balancing type skills. Anything about 2-3 or more levels below your competency level that requires practice to maintain falls into this category too.
I would put the L-it to manna progressions will also fall into this category as most people are working the L-sit or V-sit progression which tends to be below their strength level but above their flexibility level. Depending on the amount of available time within your workouts that you can manage select 24 of these skills.
The pushing and pulling goals are the ones we are working towards that are above our strength level. 1 have categorized these in the progression charts. We tend to want to focus only on 1-2 of them at a time because working more requires a lot of extra work. Most novices will not be able to add the extra volume up front to do this.
From the previous chapters, we can see that we highlighted our goals on the charts. Hopefully we were able to test where we are on certain progressions. Assuming that you reached the competency threshold in certain exercise progressions, that is exactly where you want to start with those particular exercise progressions. These represent the core exercises aimed at achieving our goals,
Mobility and flexibility goals may also be selected too. On a basic level of flexibility for a lot of the handstand variations, we need a compact pike stretch (face to the knees), and a compact straddle stretch (chest to the ground). We also need about 80-90 degree wrist flexibility, and shoulders that operate to the

full edges of their range of motion. Most people will need to work on all of these. More details with be forthcoming in chapter 16
It is possible to avoid most flexibility and mobility requirements altogether. However, the main reason why I suggest being overzealous in this area is that keeping the hips and all of the upper body joints mobile is that it will help to stave off injury.
Additionally, using a lot of the gymnastics progressions that require us to operate near the edge of our range of motion make learning many of the higher level skills much easier. For example, shoulders fully open in handstands, shoulders fully hyperextended in mannas, and the hips flexible for manna and straight arm press handstands, and many other progressions will benefit from good mobility and flexibility Likewise, since mobility is often critical to technique, it will make your technique develop that much faster giving you overall much faster progress.
For prehabilitation or rehabilitation it depends on the context of the injury or potential injury. Are we healthy? If so, then mobility work and proper strength training can serve as "prehabilitation." If were trending towards tissue damage and pain then prehabilitation work to correct imbalances may need to be implemented. For rehabilitation we need work to help rebuild the integrity of the the injured structures. This involves eliminating offending stimuli, allowing the tissues to heal, and correcting any imbalances that may have caused the injuries in the first place.
We will discuss more about this in the section on management of health and injuries. For now, if any exercises chosen elicit pain or aggravate an injury or potential injury, we have to consider that it may be best to avoid this goal or exercise progression for the time being.
Exercise order is not difficult although some considerations need to be taken. The concept of fatigue applies to the workouts themselves just like it applies broadly across a mesocycle.
Depending on the condition of the athlete, the first exercise should be an exercise that relates to the athlete’s primary goal. For example, if I want to learn the planche the most then I will want to have the planche isometric or other related planche work as the first exercise,
Even though we are not performing our sets to technical failure, working out is still difficult enough that our body cannot totally recover from tough sets of strength work. Thus, every subsequent st in a workout will slowly degrade in quality
Anyone who has experience with training can tell you this. With a 3x5 repetitions scheme, the first set is typically able to be accomplished 1-2 repetitions short of failure whereas by the third set we should be struggling with that Sh repetition.
This applies to any exercise that follows the first exercise. So if our second exercise was a front lever, the quality of work slowly decreases as the number of total sets increases over the course of the workout.

This is not something you will notice unless you constantly vary your exercise order, but the percentages of maximal effort possible drop off by a couple percentage points every additional set of exercise you do. So by the time you do 15 total sets of exercise, you may be only operating at 90% of your fresh" capacity level
Thus, our exercises should generally be prioritized in order of the importance of our goals. If we have say 4-5 total goals for our pushing, pulling, and legs respectively, we should prioritize them as such to work towards the goals we want to obtain first.
For example, let us say we have the goals of attaining a planche, front lever, back lever, and say 2x bodyweight deadlift. Most bodyweight trainees will want to attain planche the most, and back lever and front lever tied for say second most, and neglect the legs as the last place goal.
If these were really your goals then you would want to prioritize the planche exercises first, then the front lever and back lever work, and then finish up the workout with the deadlifts. It is that simple.
I, for some reason, you wanted to get back lever slightly more quickly or work the deadlift because you are close to the 2x bodyweight then you can put those exercises closer to the front of your workouts and move planche and front lever to the back. You will notice that the quality of work for the back lever and deadlift will increase, and the quality for the planche and front lever will decrease if you do this.
That is fine if that is what your goals are. It is just the nature of how we workout; we cannot be operating at 100% all of the time during workouts unfortunately.
Thus, prioritize your exercises to what you want to progress with the most. There is slight different speed in progression by prioritizing the exercises like this.
Consolidation of exercises into a routine
We have established the hierarchy of skills and strength progressions already, so putting everything in order should not be difficult.
The warm up and skill development portion will consist of what we need to do to prepare the body for workout.
Remember back to the competency levels and our progression charts. Any exercise that is a couple levels below our current strength level is applicable to be used as warm up or in skill development or warm up. Prehab/mobility exercises may also be put here as well.
The main thing to keep in mind is that our bodies are all different. So if you have tight spots in your back, or your wrists are feeling achy or tight then definitely include some warm up or mobility exercises for those. It is important to get all of the joints that we are using for the workout mobile and ready to exercise.

For the core of the workout with the strength and power development we have already talked about ordering those exercises. If you have no preference on what you want to develop the most then start with explosive exercises and work your way down in the order. If you have a preference/goal for what you want to develop the most then put that first, and then the second exercise second, and so on.
Endurance work, if any, would be slotted into the next section.
Finally, cool-down/flexibility and rehabilitation work is put at the end. If we are working around injuries then this is definitely when you should be adding in work to rehabilitate them unless rest is prescribed by a qualified medical professional. As to what these exercises be depends on specific injuries or tightness that may be hindering progress. It is person specific so I cannot tell you what they should be. We will discuss these topics in more detail later.
Use the list of refined goals you have in conjunction with the skill and progression charts. Select exercises that correspond to your particular goals,
Remember that:

Full body routines are superior to splits
Selecting exercises is important in the context of your overall goals. We want to select exercises that work those goals specifically or build the assisting strength or musculature needed to execute those particular goals.
The goals must be built around the 3 major groupings that make up the exercise routine.
The aim of this selection is basically prepare the body for working out as well as getting the high quality skill work for things that need to be practiced when fresh. We want to loosen up all the muscles and make them pliable and ready to go for our main workout.
This is the heart of the routine and selecting the exercises and setting them up for proper order according to our goals is going to make everything easier. Always do power/strength before any type of endurance work.
This is where we focus on improving other attributes that we need for our routines such as flexibility and other rehabilitation work if we have injuries. Pretty straight forward.
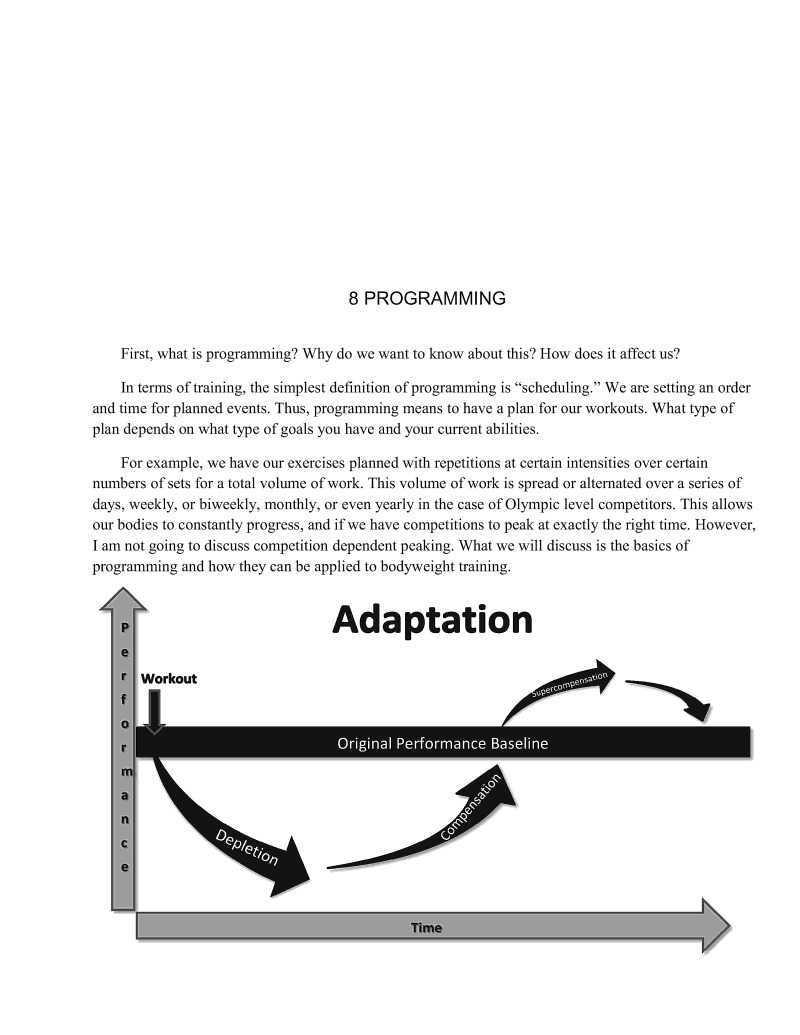
First, what is programming? Why do we want to know about this? How does it affect us?
In terms of training, the simplest definition of programming is "scheduling." We are setting an order and time for planned events. Thus, programming means to have a plan for our workouts. What type of plan depends on what type of goals you have and your current abilities.
For example, we have our exercises planned with repetitions at certain intensities over certain numbers of sets for a total volume of work. This volume of work is spread or alternated over a series of days, weekly, or biweekly, monthly, or even yearly in the case of Olympic level competitors. This allows our bodies to constantly progress, and if we have competitions to peak at exactly the right time. However, I am not going to discuss competition dependent peaking. What we will discuss is the basics of programming and how they can be applied to bodyweight training.

Let us go back to the basics unit of programming, a single workout, and build from there.
The key of any single workout, especially as a novice, is to have a high enough amount of intensity (difficulty of an exercise) and enough volume (total amount of overall workload) to force neural and/or muscular adaptations. Upon the rest following the workout, our bodies should recover such that we will become stronger, more muscular, or both.
There are multiple aspects of modifying workouts. We modulate our intensity by (1) increasing the difficulty of our exercises
cording to the amount of repetitions we can perform. This can be done through increasing the progression, utilizing a weight vest, or other methods. We modulate the total volume of our workouts by three factors namely (2) the amount of repetitions per set, (3) the amount of sets per exercise that we perform, and (4) the total amount of exercises that we perform.
Our bodies rely on homeostasis to regulate themselves. When we put sufficient stressors on them to force a change then our bodies will adapt to this given sufficient recovery afterward. However, since the
body has been forced to adapt to this change, it has already become more resistant to the initial stressing workout.
Therefore, to continually keep getting stronger it is illogical to repeat the same workout over and over again. What i the point of doing a workout repeatedly? If our body already adapted to the stress, is doing the same thing again going to make us stronger? Surely not.
Likewise, if we continually perform the same workout or even perform a workout that causes adaptations, but fail to progress after we have adapted we may undertrain.
One of the premier examples of constant progression via weights for beginners is Starting Strength as
I mentioned earlier. This program works the core compound lifts namely squats, deadlifts, power cleans, press, and bench press for a fixed number of sets and repetitions each workout. The way to continually get better on this program is through linear progression. Linear progression increases the intensity of the exercises relative to the number of repetitions by adding weight. This process of constantly adding weight o the lifts each workout (usually 5 or 10 lbs per lift forces constant adaptations every workout such that both strength and muscle mass can increase drastically. It is one of the most effective ways to progress for beginners.
With bodyweight exercises we cannot effective increase the weight unless we have a weight vest which many people do not have access to. Novice level progressions still occur quickly, but not quickly enough that one can jump up a progression level every workout. For this reason the best way to progress will be through (1) increasing repetitions, or (2) increasing sets, or (3) increasing total volume. However, since our goal is primarily strength increases we have constraints that we need to adhere to such as not changing the speed of repetitions or changing the amount of rest between sets. Also, the main constraint is that we want to stick with exercises in the 3-8 repetition range. Additional constraints may be performing 100 many sets or exercises.
For beginners, the reason that we do not want to increase exercises is due to a variety of reasons. First, since more advanced bodyweight exercises are often vastly different to anything that most people have trained with before. These exercises subject the body to too many movement patterns dulls learning capacity, especially with a lot of the more skill based movements such as handstands
Second, adding additional exercises often adds an additional 2-3 sets or more of an exercise. While it is true that we need additional stressors to elicit continual adaptations, it is unlikely that we need that much additional overall volume. Adding the intensity of additional repetitions and sets by adding an additional exercise may be too much. More is not always better for beginners. Often an increase in one set or multiple repetitions is enough for beginners to make good progress from workout to workout.
Third, spreading out exercises between too many goals often leads to stagnation. Remember, you cannot gain both strength and endurance optimally at the same time because of the adaptations that occur at the different ends of the repetition spectrum. Spreading ourselves out between too many exercises and especially goals (which in the context of adding exercises is often the case) often leads to overall decreases in quality of improvement in the domains we are trying to improve.
After a single workout our capacity to perform additional work will decrease. However, as our bodies heal with proper nutrition and rest, we will supercompensate and come back stronger and better.
The training stimulus must pass a certain threshold to force good adaptations (e.g. do not undertrain), and it must not be too much that it actually causes so much damage that we do not gain any
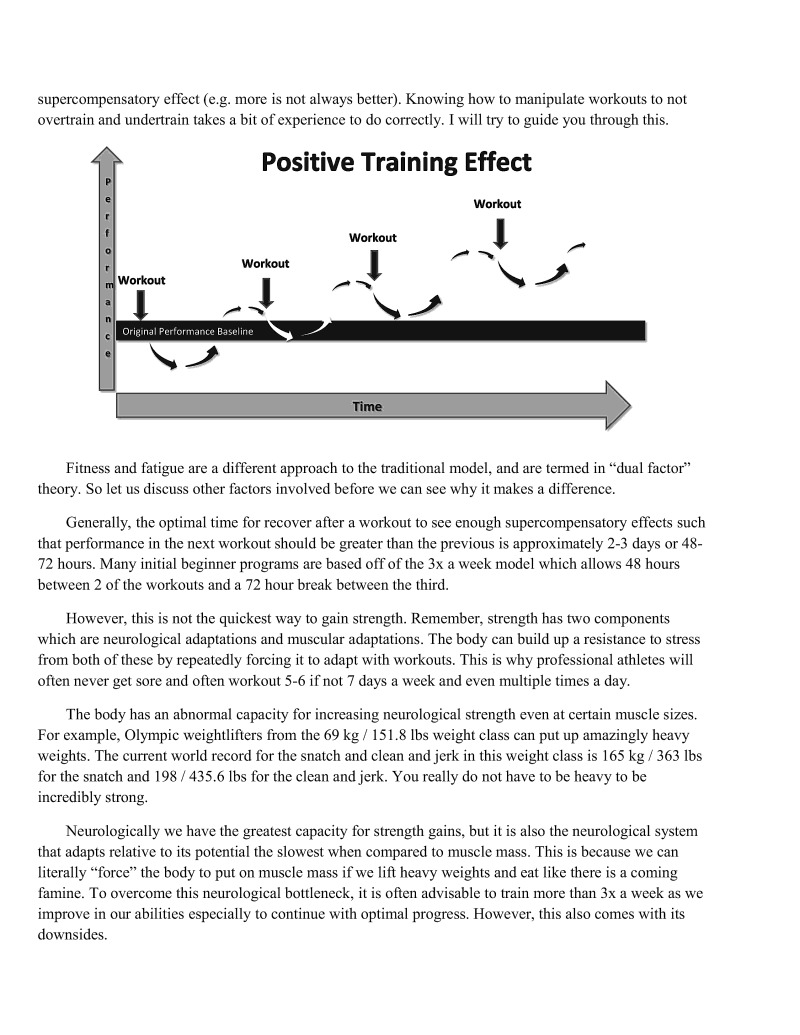
supercompensatory effect (e.g. more is not always better). Knowing how to manipulate workouts to not overtrain and undertrain takes a bit of experience to do correctly. I will try to guide you through this.
Fitness and fatigue are a different approach to the traditional model, and are termed in "dual factor" theory. So let us discuss other factors involved before we can see why it makes a difference.
Generally, the optimal time for recover after a workout to see enough supercompensatory effects such that performance in the next workout should be greater than the previous is approximately 2-3 days or 48- 72 hours. Many initial beginner programs are based off of the 3x a week model which allows 48 hours between 2 of the workouts and a 72 hour break between the third.
However, this is not the quickest way to gain strength. Remember, strength has two components which are neurological adaptations and muscular adaptations. The body can build up a resistance to stress from both of these by repeatedly forcing it to adapt with workouts. This is why professional athletes will often never get sore and often workout 5-6 if not 7 days a week and even multiple times a day.
The body has an abnormal capacity for increasing neurological strength even at certain muscle sizes. For example, Olympic weightlifters from the 69 kg / 151.8 lbs weight class can put up amazingly heavy weights. The current world record for the snatch and clean and jerk in this weight class is 165 kg / 363 Tbs for the snatch and 198 /435.6 lbs for the clean and jerk. You really do not have to be heavy to be incredibly strong.
Neurologically we have the greatest capacity for strength gains, but it is also the neurological system that adapts relative to its potential the slowest when compared to muscle mass. This is because we can literally "force" the body to put on muscle mass if we lift heavy weights and eat like there is a coming famine. To overcome this neurological bottleneck, it is often advisable to train more than 3x a week as we. improve in our abilities especially to continue with optimal progress. However, this also comes with its downsides.
As you can see from the model, when we start increasing our training during the week without allowing adequate recovery we can train "too early." Initially, a workout will produce both a positive effect from the stress that increases as the as the neuromuscular system and the body adjusts to the stress. This is fitness. The same is true of the negative effect which is fatigue.
On some level once we increase the frequency or overall volume load of workouts beyond a certain point, we will reach at stage at which our fatigue has not yet dissipated before we do another workout. Likewise, from there the same thing occurs again the next consecutive workouts.
One of the interesting things about this is that we can still see progress — even significant progress — in strength and/or muscle gain even with accumulating fatigue. However, it is inevitable that we will eventually stall out. Accumulation of fatigue which is equal to gains in fitness is called reaching a plateau in your training. Therefore, this point at which gains stall is good measure of when fatigue has overtaken fitness or supercompensatory adaptations that kept allowing us to constantly progress.
To counteract the fatigue buildup we will do exactly what you would expect to do when fatigued — rest. Rest breaks come in various forms such as actually taking a break from training for a while, or working on skill work, or just deloading total intensity/repetitions/sets/etc. We will discuss this a bit more later though.
Periodization in sports is a way to organize training by progressively alternating various aspects such as frequency, intensity, volume, repetitions, etc. to increase capacity. Thus, periodization is a plan that encompasses multiple workouts over a set amount of time.
In typical Soviet periodization structure there are three components: the microcycle, the mesocycle, and the macrocycle.
The microcycle is typically based around 1 week of training. It is generally organized into a specific attribute that we want to focus on. In the old Soviet model there were generally 4 microcycles that were used: a preparatory phase, hypertrophy phase, strength phase, and a power phase.
A mesocycle is a combination of 4-8 microcycles. The amount of microcycles depended on how many phases there were in a plan. So in the context of the above types of microcycles, in the archetypal Soviet system there was generally 1-2 preparatory phase microcycles, 1 hypertrophy microcycle, 1 strength microcycle, and 1 power microcycle. These microcycles were often follow by a rest or deload week to dissipate fatigue. Therefore, a typical mesocycle was usually 6 weeks long.
A macrocycle is just a combination of mesocycles. Often the macrocycle was planned such that the athlete would finish their final mesocycle close to the competition date. They would still be training hard so they were strong, but it stopped early enough for a deload so they would get enough rest to dissipate extra fatigue. This would allow them to peak during the competition so that they could lift weights well above their previous personal records. This would hopefully allow them to win the competition.

Now how does this structure apply to us?
It is extremely convenient for most people to operate on the weekly microcycle schedule because occupations around the world are based on a week schedule. Thus, any intermediate or advanced programming will generally be for the 7 day week. Secondly, microcycles teach us the valuable lesson which is that we must consider overall volume weekly instead of workout to workout.
Remember that the stronger and/or more muscular we get the more resistant our bodies become to stresses. This makes it harder to force the adaptations we want. Thus, our focus must shift from a workout to workout structure to a more weekly model. It seems counter intuitive until you realize that it is easy to plateau for long periods of time once you get past novice level strength. Many of us know people who go to the gym for years on end yet are still using the same weights.
When we become sufficiently strong it may even shift to a monthly or multi-monthly / yearly structure in the case of Olympic level athletes. This is what "increasing the complexity of programming" means as we start to develop our strength into the intermediate and advanced ranges. However, this takes years of consistent work, so we need not yet worry about that for most of us looking to pursue bodyweight training
Mesocycles will be the main part of our programs. Generally, the mesocycles that I recommend will be anywhere from 4-8 weeks long depending on when we plateau or feel fatigue sufficiently catching up with us. This gives us a good amount of time of consistent work to force adaptations in the body to get stronger. Finally, after the workout weeks we will often have a week of deload to dissipate additional fatigue, allow any aches and pains to go away, and evaluate our goals, plan/program, and retest for our next upcoming mesocycle.
As you can see, rest weeks are extremely critical to success and progress. If you have never properly used deload or rest weeks before you probably have not gotten very far with your training unless you intuitively know how to train effectively.
Al of the information I have talked about is just a quick summary; there are entire books written on periodization. Up until now all of this can be applied to weights as well as bodyweight. So let us start to examine how these concepts, along with the information we learned about the basics of the physiology of strength, and apply it specifically in the context of how to program repetitions, sets, total volume, and frequency for our workouts.
The 3 types of exercises we are going to concern ourselves with here are concentrics (dynamic movements), isometrics, and eccentrics. We already discussed skill work previously in chapter 4, but I will post some reminders later once we start to discuss integrating it into routines.
Concentric exercises as we discuss them in this book are ones that have a quick but controlled eccentric (or muscle lengthening component) and then a quick accelerated concentric (muscle shortening)
component which is the most difficult part of the exercise. For example, a full range of motion pushup would have the eccentric component of lowering yourself to the ground quick but under control, and then explosively pushing out of the bottom of the movement. A similar thing occurs with other pushing movement dips and handstand pushups where you lower eccentrically and then push through the concentric to complete the repetition.
Pulling movements start with the concentric component and end with the eccentric component. For instance, pullups start with the hard part of the movement by concentrically pulling yourself up to the bar, and then eccentrically lowering yourself under control to the bottom of the movement.
In isometric movements the muscles stay the same length during the entire work phase. So for example, the "static" positions in gymnastics are all classified as isometric movements. These are your planches, front levers, back levers, iron crosses, etc.
Pure eccentric movements typically consist of a slow controlled movement as the muscles are lengthening. One example of this is using pullup eccentrics where we can use some assistance such as the legs to get to the top of the pullup position, and then eccentrically lower slowly under control all the way o the bottom.
There are different ways we will express how to quantify the intensity and volume of these different types of exercises since they are all useful in certain instances within our bag of training methods.
Alternatively in weightlifting we can term it by weight X repetitions X sets, so if I was doing weighted dips I could say 190(lbs) x 5 (repetitions) x 3 (sets). This is typically how programming is written down on paper. However, this is counter-intuitive unless you have read a lot on programming texts. It is "common" now to use the typical sets X repetitions or sets X amount of time held so that is what I will go with when talking about this.
A relationship exists along the strength continuum for all of these movements. If we were to compare a concentric contraction to an isometric contraction we would find out that an isometric contraction is anywhere from 100-120% stronger than a concentric contraction. Likewise, when we compare a
concentric contraction to an eccentric contraction we would see that an eccentric contraction can be anywhere from 100-150% stronger than the concentric.
Note that a lot of these percentages vary widely depending on different training factors and specific muscles in the body. Various studies have suggested this. For reference, we are going to assume that isometric contractions are about 100-120% stronger than concentrics, and eccentrics are approximately 120-150% stronger than concentrics because it can lead us to some general conclusions about how much training volume of these exercises is needed as a stimulus to elicit muscular strength and/or hypertrophy adaptations.
First, we will discuss the value of certain repetitions before we talk about how to structure them into sets for exercises.
As stated before I eschew higher repetitions (c.g. >12 RM) very strongly for developing strength because they are not as effective as the 3-8 RM range. Even 8-12 repetitions has some good benefits for hypertrophy that we may use on occasion as well
High repetitions (e.g. >12 RM) are extremely effective for injury prevention because they help to force a lot of blood through the areas which is very good for overall health of the tendons and ligaments. 1 will delve into this topic more extensively in both specific programming at certain levels, and of course in the Part 2 which focuses on the management of injuries and health
I also try to avoid working with the extremely low repetitions such as the 12 RM. This is because often times at this high effort with bodyweight exercises technique tends to break down significantly much like it would with a barbell if you are deadlifting very heavy weights. It is also just not practically useful to get enough volume in this range at this intensity unless you want to spend more than 2 hours working out.
Remember, given dual factor theory (fatigue vs. fitness) we want a bit more than the minimum amount of stimulus to force our body to adapt, but we also do not want so much volume that the damage to our muscles is going to outweigh the supercompensatory effect.
Thus, the repetition range that allows us to work best in the above areas is 3-8 repetitions. That is why we will use this for our typical workout programming.
Now we are going to quantify the amounts of sets and total repetitions to our workouts given the various three types of movement — concentrics (or range of motion exercises), isometrics, and eccentrics — to look at what will constitute a stimulus that provides a training effect. We will discuss them in order.
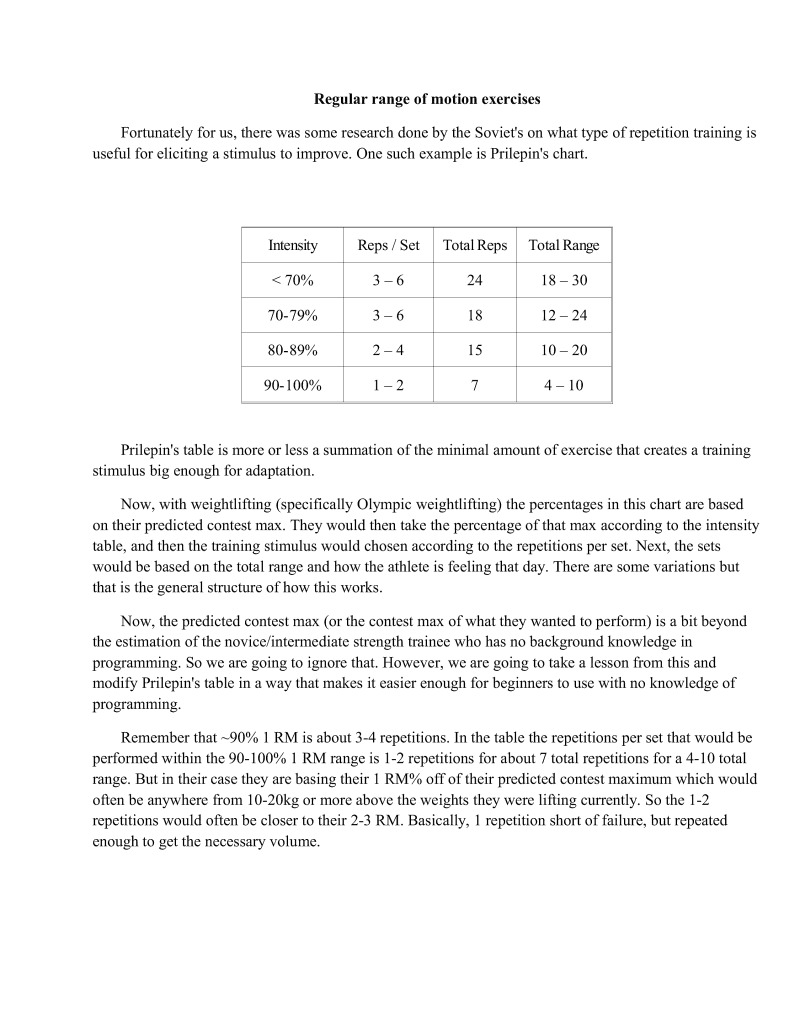
Fortunately for us, there was some research done by the Soviet's on what type of repetition training is useful for eliciting a stimulus to improve. One such example is Prilepin's chart.
| Intensity | Reps / Sets | Total Reps | Total Range |
|---|---|---|---|
| < 70% | 3-6 | 24 | 18-30 |
| 70-79% | 3-6 | 18 | 12-24 |
| 80-89% | 2-4 | 15 | 10-20 |
| 90-100% | 1-2 | 7 | 4-10 |
Prilepin's table is more or less a summation of the minimal amount of exercise that creates a training stimulus big enough for adaptation.
Now, with weightlifting (specifically Olympic weightlifting) the percentages in this chart are based on their predicted contest max. They would then take the percentage of that max according to the intensity table, and then the training stimulus would chosen according to the repetitions per set. Next, the sets would be based on the total range and how the athlete is feeling that day. There are some variations but that is the general structure of how this works.
Now, the predicted contest max (or the contest max of what they wanted to perform) is a bit beyond the estimation of the novice/intermediate strength trainee who has no background knowledge in programming. So we are going to ignore that. However, we are going to take a lesson from this and modify Prilepin's table in a way that makes it easier enough for beginners to use with no knowledge of programming
Remember that ~90% 1 RM is about 34 repetitions. In the table the repetitions per set that would be performed within the 90-100% 1 RM range is 1-2 repetitions for about 7 total repetitions for a 4-10 total range. But i their case they are basing their 1 RM% off of their predicted contest maximum which would often be anywhere from 10-20kg or more above the weights they were lifting currently. So the 1-2 repetitions would often be closer to their 2-3 RM. Basically, I repetition short of failure, but repeated enough to get the necessary volume.
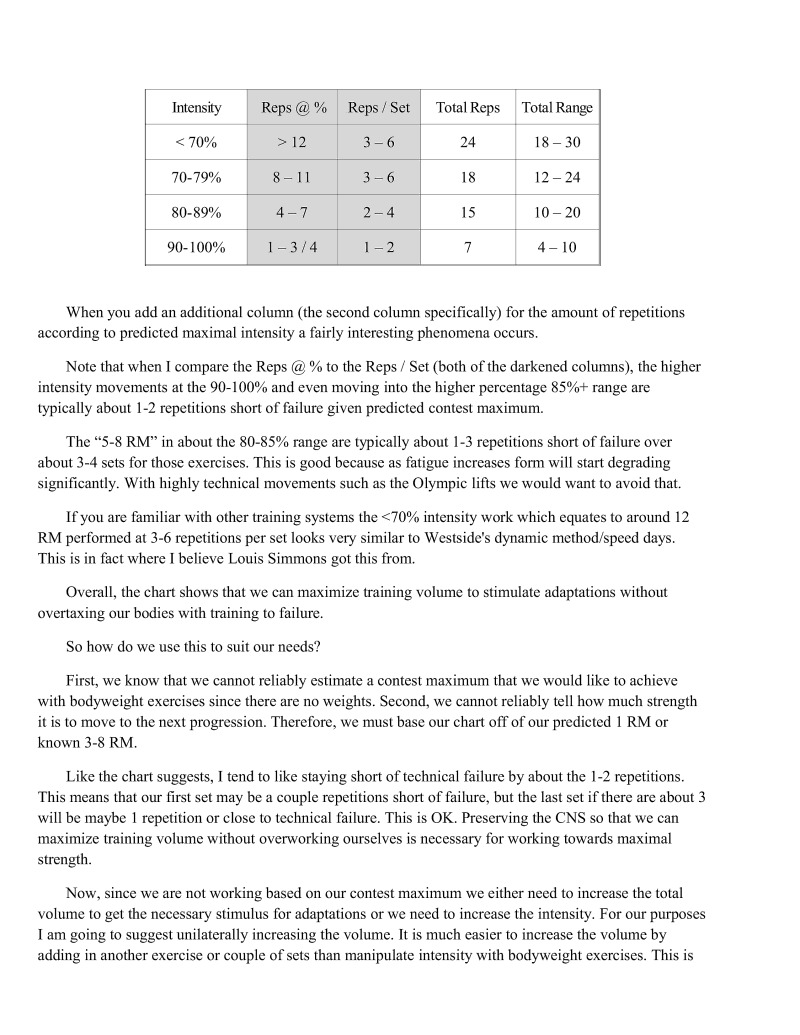
| Intensity | Reps @ % | Reps / Set | Total Reps | Total Range |
|---|---|---|---|---|
| < 70% | > 12 | 3-6 | 24 | 18-30 |
| 70-79% | 8-11 | 3-6 | 18 | 12-24 |
| 80-89% | 4-7 | 2-4 | 15 | 10-20 |
| 90%-100% | 1-3/4 | 1-2 | 7 | 4-10 |
When you add an additional column (the second column specifically) for the amount of repetitions according to predicted maximal intensity a fairly interesting phenomena occurs.
Note that when I compare the Reps @ % to the Reps / Set (both of the darkened columns), the higher intensity movements at the 90-100% and even moving into the higher percentage 85%+ range are typically about 1-2 repetitions short of failure given predicted contest maximum.
The *5-8 RM" in about the 80-85% range are typically about 1-3 repetitions short of failure over about 3-4 sets for those exercises. This is good because as fatigue increases form will start degrading significantly. With highly technical movements such as the Olympic lifts we would want to avoid that.
If you are familiar with other training systems the <70% intensity work which equates to around 12 RM performed at 3-6 repetitions per set looks very similar to Westside's dynamic method/speed days. This is in fact where I believe Louis Simmons got this from.
Overall, the chart shows that we can maximize training volume to stimulate adaptations without overtaxing our bodies with training to failure.
So how do we use this to suit our needs?
First, we know that we cannot reliably estimate a contest maximum that we would like to achieve with bodyweight exercises since there are no weights. Second, we cannot reliably tell how much strength it is to move to the next progression. Therefore, we must base our chart off of our predicted 1 RM or known 3-8 RM.
Like the chart suggests, I tend to like staying short of technical failure by about the 1-2 repetitions. This means that our first set may be a couple repetitions short of failure, but the last set if there are about 3 will be maybe 1 repetition or close to technical failure. This is OK. Preserving the CNS so that we can maximize training volume without overworking ourselves is necessary for working towards maximal strength
Now, since we are not working based on our contest maximum we either need to increase the total volume to get the necessary stimulus for adaptations or we need to increase the intensity. For our purposes T.am going to suggest unilaterally increasing the volume. It is much easier to increase the volume by adding in another exercise or couple of sets than manipulate intensity with bodyweight exercises. This is
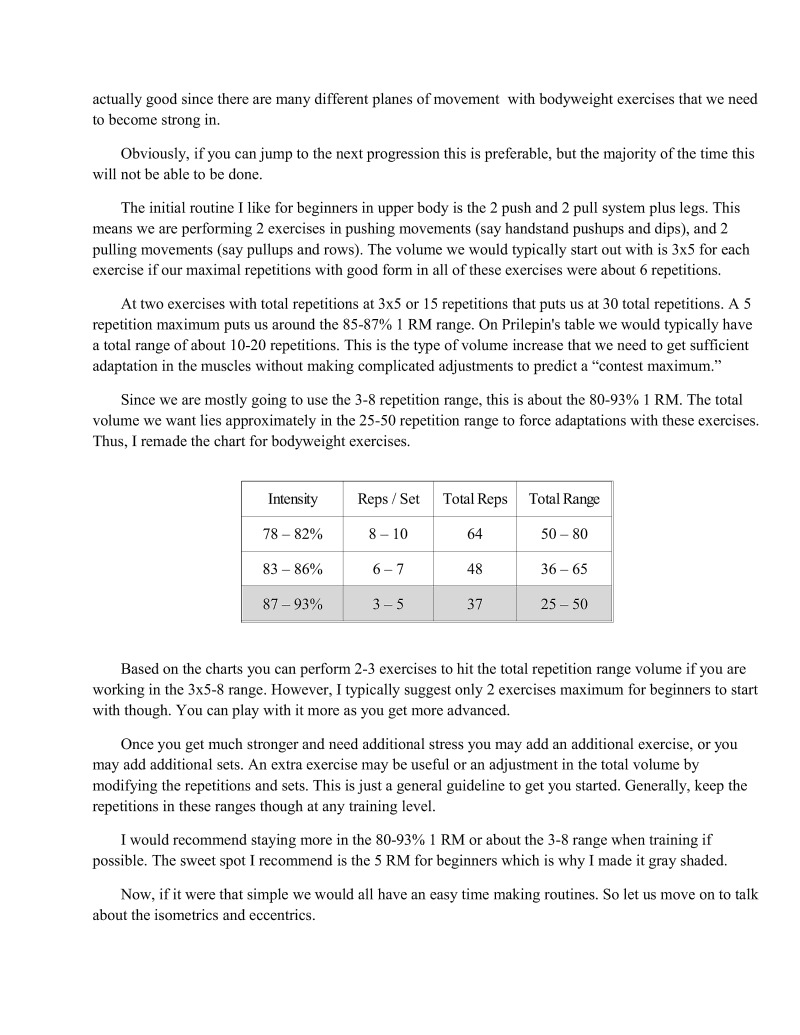
actually good since there are many different planes of movement with bodyweight exercises that we need to become strong in
Obviously, if you can jump to the next progression this is preferable, but the majority of the time this will not be able to be done:
The initial routine I like for beginners in upper body is the 2 push and 2 pull system plus legs. This means we are performing 2 exercises in pushing movements (say handstand pushups and dips), and 2 pulling movements (say pullups and rows). The volume we would typically start out with is 3x5 for each exercise if our maximal repetitions with good form in all of these exercises were about 6 repetitions.
At two exercises with total repetitions at 3x5 or 15 repetitions that puts us at 30 total repetitions. A 5 repetition maximum puts us around the 85-87% 1 RM range. On Prilepin's table we would typically have a total range of about 10-20 repetitions. This is the type of volume increase that we need to get sufficient adaptation in the muscles without making complicated adjustments to predict a "contest maximum."
Since we are mostly going to use the 3-8 repetition range, this is about the 80-93% 1 RM. The total volume we want lies approximately in the 25-50 repetition range to force adaptations with these exercises. Thus, I remade the chart for bodyweight exercises.
| Intensity | Reps / Sets | Total Reps | Total Range |
|---|---|---|---|
| 78-82% | 8-10 | 64 | 50-80 |
| 83-86% | 6-7 | 48 | 36-65 |
| 87-93% | 3-5 | 37 | 25-50 |
Based on the charts you can perform 2-3 exercises to hit the total repetition range volume if you are working in the 3x5-8 range. However, I typically suggest only 2 exercises maximum for beginners to start with though. You can play with it more as you get more advanced.
Once you get much stronger and need additional stress you may add an additional exercise, or you may add additional sets. An extra exercise may be useful or an adjustment in the total volume by modifying the repetitions and sets. This is just a general guideline to get you started. Generally, keep the repetitions in these ranges though at any training level
I would recommend staying more in the 80-93% 1 RM or about the 3-8 range when training if possible. The sweet spot I recommend is the 5 RM for beginners which is why I made it gray shaded.
Now, if it were that simple we would all have an easy time making routines. So let us move on to talk about the isometrics and eccentrics.
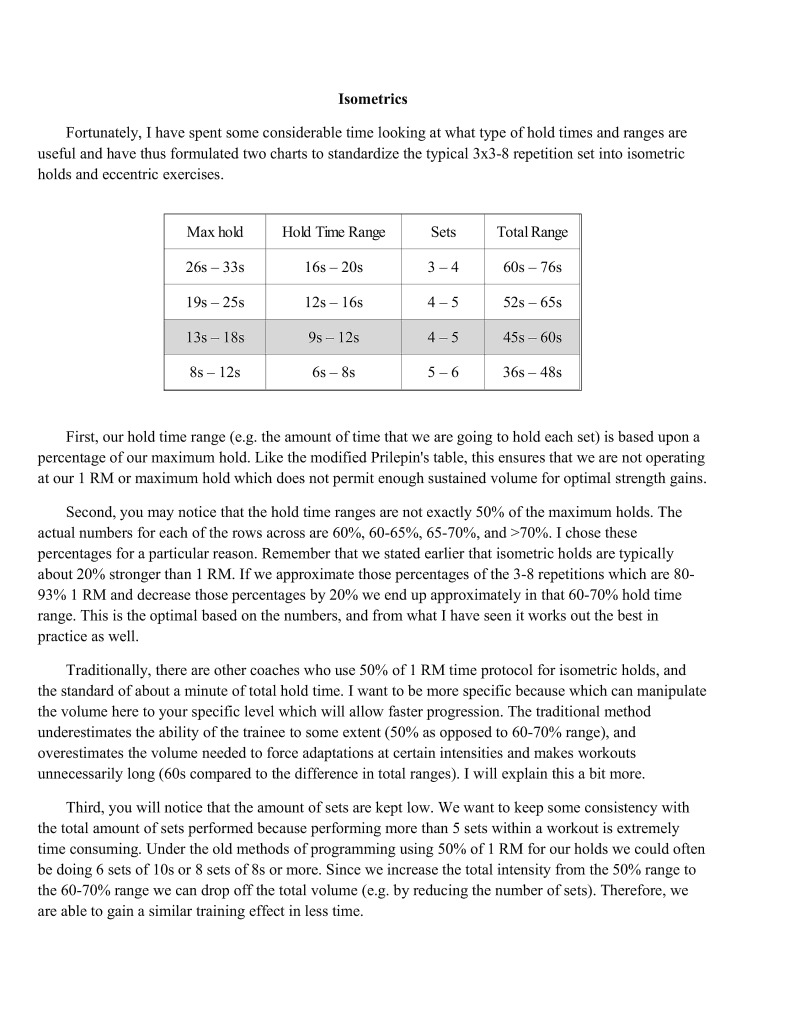
Fortunately, I have spent some considerable time looking at what type of hold times and ranges are useful and have thus formulated two charts to standardize the typical 3x3-8 repetition set into isometric holds and eccentric exercises.
| Max hold | Hold Time Range | Sets | Total Range |
|---|---|---|---|
| 26s-33s | 16s-20s | 3-4 | 60s-76s |
| 19s-25s | 12s-16s | 4-5 | 52s-65s |
| 13s-18s | 9s-12s | 4-5 | 45s-60s |
| 8s-12s | 6s-8s | 5-6 | 36s-48s |
First, our hold time range (c.g. the amount of time that we are going to hold each set) is based upon a percentage of our maximum hold. Like the modified Prilepin's table, this ensures that we are not operating at our 1 RM or maximum hold which does not permit enough sustained volume for optimal strength gain.
Second, you may notice that the hold time ranges are not exactly 50% of the maximum holds. The actual numbers for each of the rows across are 60%, 60-65%, 65-70%, and >70%. I chose these percentages for a particular reason. Remember that we stated earlier that isometric holds are typically about 20% stronger than 1 RM. If we approximate those percentages of the 3-8 repetitions which are 80- 93% 1 RM and decrease those percentages by 20% we end up approximately in that 60-70% hold time range. This is the optimal based on the numbers, and from what I have seen it works out the best in practice as well.
Traditionally, there are other coaches who use 50% of 1 RM time protocol for isometric holds, and the standard of about a minute of total hold time. I want to be more specific because which can manipulate the volume here to your specific level which will allow faster progression. The traditional method underestimates the ability of the trainee to some extent (5% as opposed to 60-70% range), and overestimates the volume needed to force adaptations at certain intensities and makes workouts unnecessarily long (60s compared to the difference in total ranges). I will explain this a bit more
Third, you will notice that the amount of sets are kept low. We want to keep some consistency with the total amount of sets performed because performing more than 5 sets within a workout is extremely time consuming. Under the old methods of programming using 50% of 1 RM for our holds we could often be doing 6 sets of 10s or 8 sets of 8s or more. Since we increase the total intensity from the 50% range to the 60-70% range we can drop off the total volume (c.g. by reducing the number of sets). Therefore, we are able to gain a similar training effect in less time.

I would say that the most important range to be in would be the bottom three rows which are more in tune with the 3-8 RM range that we want. In the skill and progression chart chapter, we quantified 1 repetition to be approximately worth 25 of an isometric hold. This matches up extremely well with the bottom three rows in that the hold range times vary from 6-16s which is exactly double the 3-8 repetitions. At these intensities to get a training effect combined with the other exercises in a workout we are going to do about 4-6 sets of the isometrics in this range.
I prefer that if you are working with 60-70% max hold time that you work in the second to bottom column if your maximal isometric falls within that range. Like the concentrics chart, I have colored it gray. This matches up the best with the total hold time of 9-125. When converted to repetitions, it is about 4.5-6 repetitions for 4-5 total sets which is consistent with about 20-30 total repetitions overall. This allows our isometrics to approximately match up in both stimulus and volume with concentric exercises such as handstand pushups or dips very well
As you can see this chart is fairly easy to use to quantify isometrics to the typical repetitions. This will make your life a whole lot easier and save you time when trying to figure how much and how long You need to do your isometric exercises.
Now, let us discuss the eccentrics chart.
| Max eccentric | Eccentric Time | Sets | Total Range |
|---|---|---|---|
| 15s-20s | 9s-12s | 3-4 | 27s-36s |
| 11s-14s | 7s-9s | 3-4 | 24s-32s |
| 7s-10s | 5s-6s | 4-5 | 20s-26s |
| 5s-6s | 3a-4a | 4-5 | 15s-20s |
As we can see in this chart, the time for each eccentric is constructed on a similar premise to the isometrics chart that we talked about earlier.
The main thing is that the eccentrics total range time is about half of that of isometrics total range. This is due to a couple factors. The first is that eccentrics activate the nervous system more strongly (and more high threshold motor units faster) which leads to significantly greater fatigue. Second, we have to account for the fact that eccentric exercises damage the muscle much more than isometrics and regular repetition exercises. Thus, I have found the good stimulus to be about half of that of isometrics for the total range. Everything else is held fairly consistent.
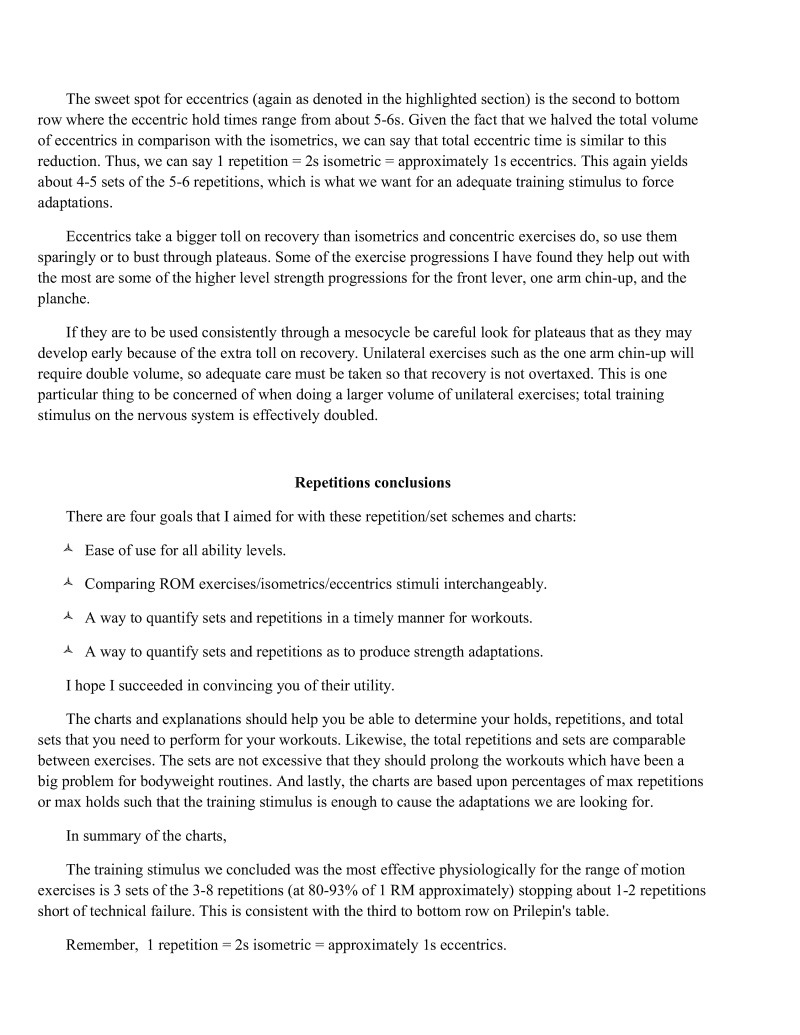
The sweet spot for eccentrics (again as denoted in the highlighted section) is the second to bottom row where the eccentric hold times range from about 5-6s. Given the fact that we halved the total volume of eccentrics in comparison with the isometrics, we can say that total eccentric time is similar to this reduction. Thus, we can say 1 repetition approximately is eccentrics. This again yields about 4-5 sets of the 5-6 repetitions, which is what we want for an adequate training stimulus to force adaptations.
Eccentrics take a bigger toll on recovery than isometrics and concentric exercises do, so use them sparingly or to bust through plateaus. Some of the exercise progressions I have found they help out with the most are some of the higher level strength progressions for the front lever, one arm chin-up, and the planche.
If they are to be used consistently through a mesocycle be careful look for plateaus that as they may develop early because of the extra toll on recovery. Unilateral exercises such as the one arm chin-up will require double volume, so adequate care must be taken so that recovery is not overtaxed. This is one particular thing to be concerned of when doing a larger volume of unilateral exercises; total training stimulus on the nervous system is effectively doubled.
There are four goals that I aimed for with these repetition/set schemes and charts:
I hope I succeeded in convincing you of their utility.
The charts and explanations should help you be able to determine your holds, repetitions, and total sets that you need to perform for your workouts. Likewise, the total repetitions and sets are comparable between exercises. The sets are not excessive that they should prolong the workouts which have been a big problem for bodyweight routines. And lastly, the charts are based upon percentages of max repetitions or max holds such that the training stimulus is enough to cause the adaptations we are looking for.
The training stimulus we concluded was the most effective physiologically for the range of motion exercises is 3 sets of the 3-8 repetitions (at 80-93% of 1 RM approximately) stopping about 1-2 repetitions short of technical failure. This is consistent with the third to bottom row on Prilepin's table.
Remember, 1 repetition = 2s isomeric = approximately 1s eccentrics.
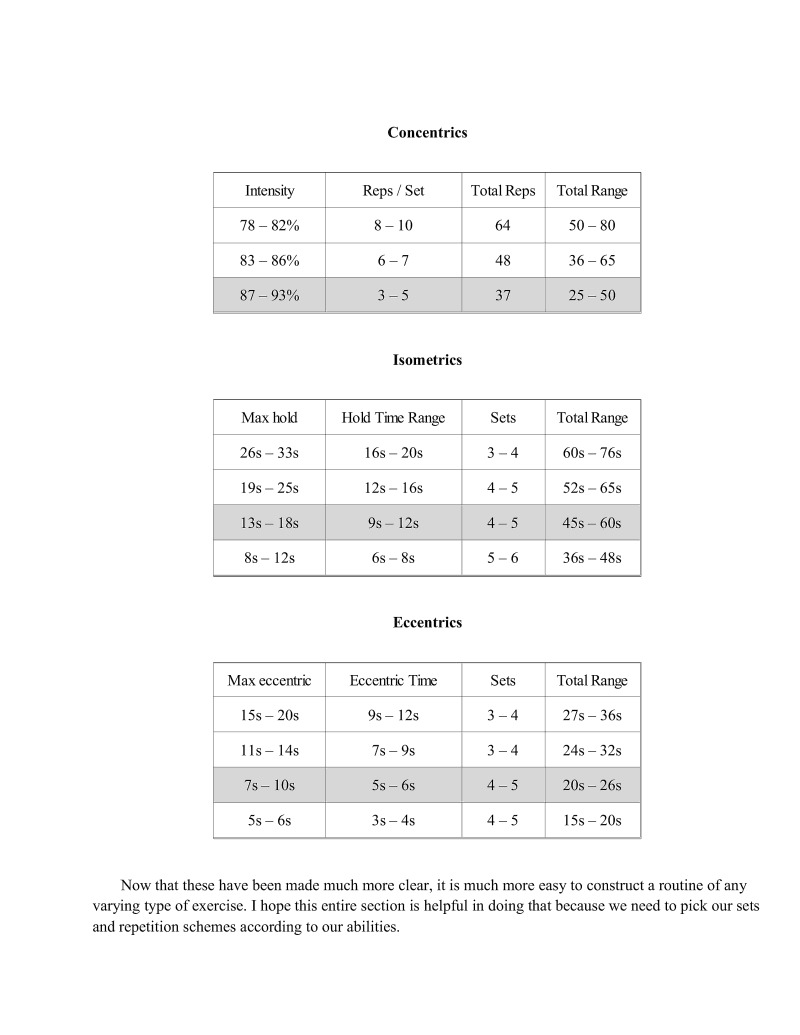
| Intensity | Reps / Sets | Total Reps | Total Range |
|---|---|---|---|
| 78-82% | 8-10 | 64 | 60-80 |
| 83-86% | 6-7 | 48 | 36-65 |
| 87-93% | 3-5 | 37 | 25-50 |
| Max hold | Hold Time Range | Sets | Total Range |
|---|---|---|---|
| 26s-33s | 16s-20s | 3-4 | 60s-76s |
| 19s-25s | 12s-16s | 4-5 | 52s-65s |
| 13s-18s | 9s-12s | 4-5 | 45s-60s |
| 8s-12s | 6s-8s | 5-6 | 36s-48s |
| Max eccentric | Eccentric Time | Sets | Total Range |
|---|---|---|---|
| 15s-20s | 9s-12s | 3-4 | 27s-36s |
| 11s-14s | 7s-9s | 3-4 | 24s-32s |
| 7s-10s | 5s-6s | 4-5 | 20s-26s |
| 5s-6s | 3a-4a | 4-5 | 15s-20s |
Now that these have been made much more clear, it is much more easy to construct a routine of any varying type of exercise. I hope this entire section is helpful in doing that because we need to pick our sets and repetition schemes according to our abilities.
Let us discuss another factor in programming: rest times per sets.
One of the biggest barriers to bodyweight strength training can be the large amount of skill work and rest time between strength sets. This can be mitigated in various ways depending on how much time we have for the total workout.
If we think about the time for warm up and skill work at the beginning, it can be anywhere from about 15-20 minutes depending on how long each of these two phases take. Thus, once we start our sets for strength work we may already consumed a considerable amount of time.
If our goal is pure strength, we are going to want to rest until we are fresh for the next set of exercises. Depending on the person this can be anywhere from about 3-5 minutes and even up to 7 minutes for some people. It takes around 3 minutes to replenish about 90-95% of the ATP stores within the muscle. Therefore, I would not go below 3 minutes per set unless you want to turn your strength work into more hypertrophy specific work.
If we look at a more minimalistic full body routine such as the two push and two pull system with one or two leg exercises for a full body routine, we will end up with about 6 sets total for pushing (two 3x5s), 6 for pulling (two 3x5s), and anywhere from 3-6 depending on one or two leg exercise.
This totals around 15-18 sets for the whole workout. If you are resting 3-5 minutes between these sets You are going to be working out for minimally 153 or maximally 185 which is 45-90 minutes respectively on top of the warm up, skill work, and other components of your workout routine. This may take upwards of two hours if additional flexibility/mobility work and any other prehabilitation work is performed at the end.
For some people this is doable. For others this is absolutely untenable as they have families or full time jobs and cannot devote the time to such a long workout routine.
Thus, for the sake of those who need to condense their workouts to around an hour or less we can move into some different set up structures for the exercises within a workout.
Paired sets of exercises can be implemented in different ways. One way is to pick two exercises that work opposing muscle groups. For example, planche and front lever work as a paired set work pretty well together since they are pushing and pulling exercises respectively.
What we would do with the paired sets is to alternate between exercises of each of them. First, we execute our hold for the planche. Then instead of resting the typical 3-5 minutes between sets, we can halve the rest time because we are doing an opposing exercise that allows the muscles to recover during that period of time. If we typically used a 5 minute rest interval, then a pair set of exercise would look like this:
Thus, what happens is that we are able to execute all say 3 sets of both planche and front lever generally within the amount of time that it would take us to normally do all of the sets of planche. 3 sets of planche * 5 min rest = ~15 minutes to do planche and then another 15 for the front lever. If we use the paired sets then we do 1 set of planche * 2.5 min rest + I set of front lever * 2.5 min rest then do 3 rounds which equates to approximately 17.5 minutes.
Using this paired structure is one of the best ways to save time if you are busy. If we have leg exercises within this period of time we can actually do some triple sets of exercises instead which allows condensing of the training period further. However, if there is an even amount of exercises that we are trying to condense then doing 3 couplets of 2 exercises is the same as 2 couplets of 3 exercises. This system does tax the body a bit more, and adding more exercises to rotate through does decrease overall intensity and thus adaptations caused. Therefore, it is best to stick with 2 exercises if you want to pair them.
One other alternative that is available is a push/pull system or a upper/lower system. These are technically body splits, but applicable if time is in dire g. I tend not to recommend these unless someone is also involved with another sport or has significant skill work such that they need the extra rest from performing 3x a week exercises. With the type of splits described above, you will typically only be working the exercises 2x a week. I will talk more about these in the next chapter on programming and advancing.
One alternative I would like you to consider is routines with little or no isometric work. Personally, I tend to prefer more movement based routines over strict isometric work. You do not have to work the isometrics to obtain the isometric skills, but it will be faster if you do. I have built up to crosses, straddle planche, full front lever, etc. without the use of much isometric work during training.
Some of the benefits for this style of training may include better overall and more balanced strength development in all ranges of motion. This contributes to faster leaning. For example, I have a good ability to navigate unexpected movements which occur in parkour or other disciplines such as martial arts. If you have a sport or hobby where you are often called on to do unexpected movements or to adapt to the situation, then the elimination of isometrics from the routine may be beneficial in some cases.
Additionally, studies have indicated that isometric movements only confer strength within 30 degrees of the range of motion being worked. For the shoulder, which is the lynchpin of upper body strength, 30 degrees is nothing compared to the overall 300+ degrees of rotary movement is possesses. This is another reason why I use isometrics sparingly,
The way you would program a routine based on elimination of isometrics is simple. Instead of the addition of isometric work such as planche, front lever, back lever, etc. to your program, you would substitute in extra concentric exercises. For instance, to replace the planche we could use a horizontal pushing exercise such as a planche pushup progression, other rings pushup variations, or some other variation of movement like dips and HSPUs. The front lever can be replaced by front lever progression pullups, rowing movements, or even barbell and dumbbell work with bent over rows or one arm dumbbell rows.
As you can see eliminating the planche isometric does not mean you have to eliminate planche focused work such as planche progression pushups. The same is true for front lever, back lever, etc.
It is something to think about, but I suspect that almost 100% of trainees reading this book are looking into bodyweight strength training because of the isometrics like the planche, front lever, etc. In this case, I would recommend keeping the isometrics in your routines.
Along those lines I would like to make another point clear. Isometrics may or may not lead to faster gains. If you have never worked with isometrics or cccentries before they will lead to some very fast adaptations within a 1-2 month period of starting. This lends credence to the "fast gains" theory. Most of the strength is via neurological adaptation with some smaller portion due to hypertrophy. The reason behind this is that we get faster adaptations when we switch up our exercise structure
Hypertrophy is gained via 3 different pathways in the body: stimulus of the high threshold motor units, hypertrophy derived from hypoxic conditions, and damage related muscle induced adaptations,
Full range of motion concentric exercises tend to have a mix of all of the types of hypertrophy. Isometrics tend to be more polarized to the HTMU and hypoxic condition hypertrophy. Eccentrics have even greater HTMU than isometrics, and their hypertrophy is mostly from the repaired damage.
Our bodies adapt to the stresses we put on them, so this evidence in the support of the idea that "the best routine to do is the routine that you are not doing." However, I would only suggest this if your goal is purely hypertrophy. Strength is best obtained from working compound movements repeatedly. Good amounts of hypertrophy can be gained from proper strength work. In fact, for beginners this is all the more reason to have a focused routine.
One way to integrate isometrics effectively into a routine to avoid plateauing is in a ratio of 2-3 10 1 mesocycles where you perform them versus in those where you do not perform them. This equates to the approximate period where you may hit a plateau with statics; thus, you eliminate them for a cycle before coming back to them. When you come back to them you will initially be slightly weaker because you have not worked them for 4-8 weeks, but the gains come back fast and the adaptations from movements should help you bust through a plateau quickly.
Additionally, different isometrics respond slightly different with supplemental work. For example, the back lever can be obtained with just working the isometric progressions. On the other hand, the front lever responds a bit better to a combination of statics, concentric movements like front lever pullups, and a mix of eccentrics, and perhaps some specific rotator cuff work

Planche work definitely requires assistance exercises beyond the isometrics to move to the higher progressions such as straddle planche. Straight arm press handstands work very well as supplemental planche work, and they help significantly with handstand skill work as well. HSPUs and dips can help, but it varies from person to person. Planche progression pushups a good go-to as well.
Therefore, the focus of training can vary depending on the particular isometric that is being worked on. I will provide you with some more of this isometric specific information in Appendix B. You can think about whether you may need supplemental work from there.
Routines, sequences, and combinations are actually an interesting way to work the muscles. You will be moving in and out of a lot of different types of skills consecutively using muscles in ways you usually do not with typical exercises. This is one of the big benefits of routines, sequences, and combinations which make them highly underrated. Transitions from exercises to exercise can be considered very difficult and thus beneficial for gaining great concentric range of motion strength.
I typically like routines, sequences, and combinations for more advanced strength work. As I highlighted earlier in the book, strength is mostly neurological. Therefore, it is best to train movement patterns in typical repetition exercises first to build the requisite neuromuscular and musculoskeletal strength. Training multiple exercises moving through different transitions is great, but it does not have the focused movement patterns that the exercises have. You can liken this a barbell complex or quick circuit of different strength exercises; it works better once you are already fairly strong.
Combinations or routines can consist from any type of exercise strung together in a series. They are usually performed on rings or parallettes. I am not going to go into specific routines because there are literally thousands of different variations that can performed. However, I have listed some typical combinations of movement strength skills in the progression charts from the FIG COP as well as some variations of other movement combinations such as handstands — elbow lever — handstand. I will also be discussing some concepts in Appendix A on sample programming
These are actually a very good way to do some quick work if you do not have time to do regular exercises. You can just throw together a sequence of 5-6 skills and do it about 5-6 times. This will give you a decent training session, and it can be more fun if you are tired of the "grind" of doing similar exercises over and over again
I will talk about these sequences more in the intermediate and advanced programming in the next section.
The grease the groove (GTG) method is an interesting method that is typically applied outside of a workout. This method utilizes very high frequency. You will perform sets of a particular exercise multiple times throughout the day almost everyday during the week. This primes the nervous system to gain fast adaptations in strength or endurance. First, let us look at the typical implementation and then its different qualities.
One way to perform GTG is to do 6-10 submaximal sets or more interspersed throughout the day. Typically, you will do about 60-80% of your maximal amount of repetitions. We will use dips as an example. If your maximum is 4 dips, then you will want to perform about 2-3 dips for one set each. You will then do this 6-10 times during the day every hour or two. This leads to performing up to about 30 dips during the day whereas if you were to perform dips during the workout you may be only able to do up to 4-5 sets of 3 before you are too tired to do more.
The interesting about this protocol is that it can take you from low numbers of dips to a large number ly quickly. If we continue with the 4 dips example, it may take a few weeks for us to get good enough at them to perform up to 10 or more. Staying submaximal with the sets will help to keep away from overworking your body, but you get a lot of practice with it which makes you strong at the movement very quickly.
The limitations of this method is that typically this is the only pushing type of exercise you will be able to perform each day. You should eliminate all other pushing exercises from your workouts (and only do pulling and legs). Otherwise, it is very easy to burn out with this method.
If you need to gain some strength or endurance quickly for a particular exercise, then this protocol may work well for you. Many people have used this effectively for PT conditioning tests in the military for their pushups and situps. Likewise, it has been used successfully to obtain dips or pullups very quickly after gaining the ability to do a few concentrics.
Some notable statics that it works on are back lever and front lever. However, it does not work on planche. So do not attempt it on that exercise. The planche has smaller muscles, so you will burn out before you are able to increase your abilities substantially.
I like this method for building up about 8-10 repetitions. Then work on strength or specific endurance to differentiate towards your goals.
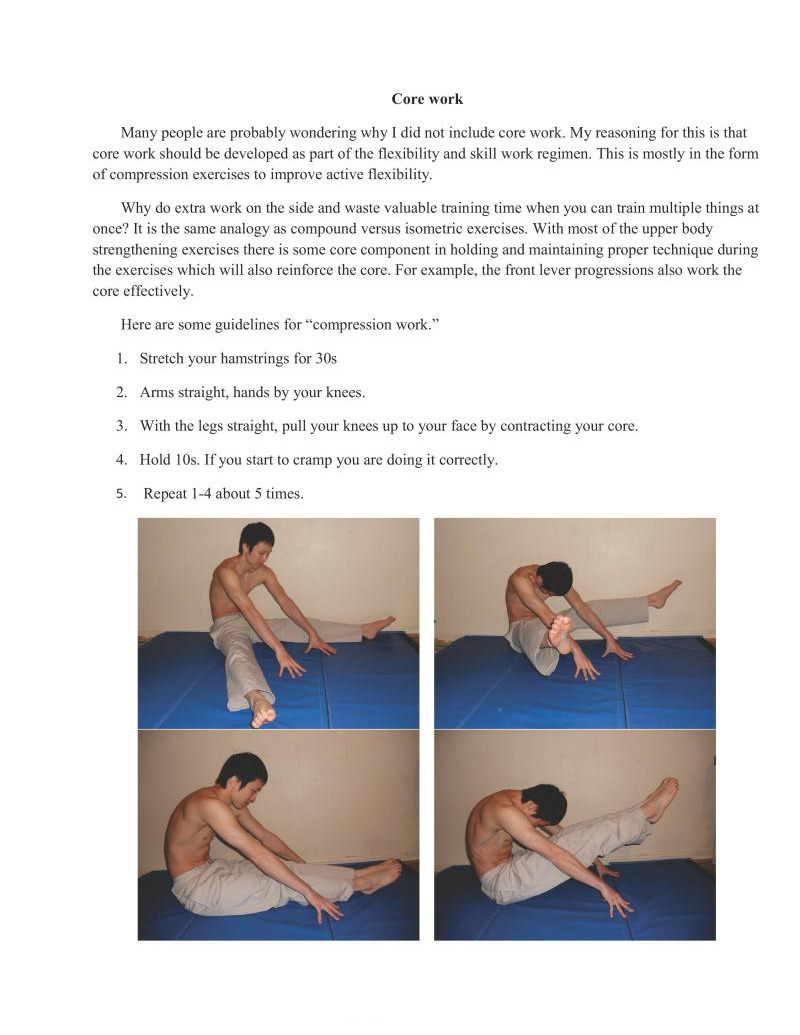
Many people are probably wondering why I did not include core work. My reasoning for this is that core work should be developed as part of the flexibility and skill work regimen. This is mostly in the form of compression exercises to improve active flexibility.
Why do extra work on the side and waste valuable training time when you can train multiple things at once? It is the same analogy as compound versus isometric exercises. With most of the upper body strengthening exercises there is some core component in holding and maintaining proper technique during the exercises which will also reinforce the core. For example, the front lever progressions also work the core effectively.
Here are some guidelines for "compression work."
I would add compression work to the end of the workout when you do flexibility work. Alternatively, you may add them into the beginning where you are working on your L-sit/straddle-L/Manna work. Both work well from my experience.
Cramping is common; if this occurs use massage to loosen up the muscles and try again. It will go away if you keep working it repeatedly over many sessions.
If you can get your knees to you face for most of the sets, move your hands closer to your toes.
I am going to assume that most of you are either using weights for lower body in which you are getting adequate lower back work. If you are not, I would recommend bodyweight work such as glute- ham raises, reverse hyperextensions, or other such bodyweight exercises.
For novices, I think that it is never a good idea to terminate the workout except with extenuating circumstances such as sickness. The other exception I would make is if you are extremely sleep deprived for multiple days in a row.
Even if you are having a bad day and feel terrible going into the workout, as a novice sometimes you have the capacity to actually perform greater than what you think your capabilities are. You may even set personal records. Pushing yourself through workouts also helps to build consistency and work ethic. Building these habits and the surprises that you may experience when your body can go above and beyond your expectations are definitely worth experiencing.
As you progress towards a higher level of ability, the accumulated fatigue from stress or other factors may affect your decision to terminate a workout early or entirely. I think that if you are in the intermediate range, and your workout is going poorly for whatever reason then you have the option to terminate the workout. Sometimes it is better for the psyche and the body to finish the workout and get all of the stress out. Sometimes it is better to just stop what you are doing and call it quits for the day if the quality of technique is terrible.
Here is a good way to determine if a workout is such poor quality that it may be a good idea to terminate it. If the quality of skill work is very bad, I would at least attempt an exercise or two working out for the intermediate level. If the quality is still pretty bad, it may just be a good idea to call it quits for the day and go do something relaxing. Beyond these two factors it is a judgment call.
If you are in the range of advanced level strength you have more leeway. By now you should know how your body responds to working out when tired to fresh. You have more experience to discern if you will do poorly with certain skills or exercises perhaps even before you workout. If this it the case and you feel it necessary to terminate a workout before even starting then that is your call. I defer to your judgment
This is along the lines of instinctive or autoregulatory training. It can be used well if you can adapt your workouts, but you need experience to use it effectively. Some people have the ability to do this without any training, but they are few and far between. This is why I recommend that novices work through the fatigue, and why I give more leeway to intermediate, advanced, and elite trainees.
Exams, families, babies, and life in general can throw curve balls at us, and we need to have a plan to be aware of whether we can shorten or terminate workouts. 1 do not mean for these as be-all end-all suggestions. Nevertheless, I think it provides a good guideline for how to rely on your expertise as a trainee to make some judgment calls in how you can approach training if you workout is not going as well as expected.
Remember, we are training for a lot of different reasons, and I hope you enjoy it. It should not become a chore.
Now pull back out your pieces of paper.
Look at the exercises that you have listed as the core of your routine, and begin to think about the types of repetition/set schemes you can use on them.
If you have time now and are fresh it may be a good idea to do a quick warm up and then some maximal repetition and isometric hold testing to determine your maxes and/or competency level for each.
This should allow you to easily figure out the repetition/set structure for each of these exercises that you will start with in your first cycle.
If you already have a routine you should know your current abilities. You may want to wait until the end of your current cycle to begin testing and implementing these protocols. However, if your current routine sets and repetitions are ineffective or can be modified to be better with the charts then do it
We learned that workouts are then stimuli upon which we subject our bodies to force changes. This can come in the form of any of the intraworkout variables by modulating intensity, repetitions, sets and/or total exercises. These single workouts can be constructed into an overall plan called a mesocycle over which progressive training is applied. In the dual factor model, we see that we can think of workouts as units where we can plan them to produce adaptations over a longer term to allow fitness to appear and fatigue to dissipate. This allows the body to supercompensate from one workout or multiple workouts with proper deloading.
Next, we learned about the three different types of exercises — full range of motion concentrics, isometrics, and eccentric exercises. We discussed how they affect the body physiologically, and I proposed that we can use Prilepin's table as a general resource to quantify the amount of sets and repetitions per exercise to elicit adaptive changes in the body. Likewise, I proposed new charts for isometrics and eccentrics that I hope will be useful in constructing a routine.
We expanded our knowledge in how to set up rest time between sets, and how to modify our workout structure if we are time pressed and cannot have the amount of time between sets that we need for strength development
I suggested that isometrics may not be the best plan for developing overall strength in relation to some non-static oriented goals, but they can be extremely useful in particular goals such as hypertrophy.
Core work should be incorporated into active flexibility work and as part of the strength development as a subset of maintaining proper technique.
Finally, we looked at different reasons for terminating workouts and concluded that novices should generally try to complete workouts, while intermediates and advanced strength trainees will tend to have more judgment calls based on whether they should eliminate or terminate workouts because they know their body better.
I talked about how to structure mesocycles in the previous chapter. Now we are going to more in depth on the whens and the whys to provide you with a more solid basis on how to manipulate them to your specific level.
This section is mainly going to be divided into two parts. The first part will focus on intra-mesocycle related factors which will talk about programming and loading from workout to workout and week to week. The second part will focus on intermesocycle factors namely deloading, working restructuring, and maximal strength testing. These will be discussed on the basis of each level of ability.
We have not talked about individual strength ceilings before. The "ceiling" is mainly determined by your genetics. As you start to increase strength, a more long term approach towards working out must be adapted because stress from singular workouts (and eventually weekly, monthly, and sometimes yearly cycles) may fail to elicit gains in strength.
For those worried about hitting the ceiling do not be afraid; most elite athletes in any type of sport hit their ceilings after they have been training all of their lives well into their 30s. Even if you are past the age of 40, the human body still has a great capacity to adapt and get stronger with consistently productive training for at least 10-15 years of solid training. Basically, if you are not an elite gymnast or weightlifter or have played professional sports you probably have not begun to even come near your training ceiling. Therefore, do not be worried.
I am mostly going to talk about factors in terms of daily, weekly, and monthly cycles as it pertains to bodyweight strength progressions. Most of us are not at the level of ability where we need to program our workouts on a multi-monthly or yearly cycle. That type of planning/programming is for elite athletes who are competing on a national or Olympic level
Intra-mesocycle factors deal with structuring weekly workouts in terms of ability level. Earlier 1 specified four distinct levels of ability with the progression charts. I will talk about each of the factors you may need to take into account at each of these levels of ability.
I am going to eliminate elite level programming from the discussion. Once you are this strong, you will have a fairly good knowledge about how to apply these concepts when working upper level strength skills. At this level, strength consists more of working on specific weaknesses, and working combinations or sequences of strength skills. Transitional movements become important as moving in and out of strength skills requires phenomenal body control and works muscles in ways that they are not usually worked.
The novice level (L1-L5) covers most of the basic bodyweight exercises from basic wall handstands, pushups, dips, handstand pushups, to pullups, ring rowing, muscle ups, and some of the basic progressions of the isometric holds.
Most people wanting to learn bodyweight exercises will start in this range. This is the population for whom this book is being written. This is where the disconnect between the progressions and the performance is. I want to provide a logical approach of bodyweight training to take you from a low level of ability to elite strength.
The people who will not will tend to have athletic backgrounds or have pursued other strength and conditioning endeavors before pursuing bodyweight training. However, it is likely that these people may still need to train some of the skills such as handstands and the isometric positions even if they have the requisite strength. This is because these skills require lots of practice.
I would expect that most trainees working on lower level progressions (L1-L3) would be those who are currently losing a lot of weight or more women. This is fine; everyone starts somewhere. Do not be discouraged. learning and accomplishing these exercises is going to build a strong foundation on which to build on for moving up to higher level skills. You will be surprised what you will be able to accomplish given proper focus on improving and refining your workouts
As I briefly mentioned before, people within the novice level on the strength and skill competency charts have the ability to do "linear progression." When we say someone should be doing "linear progression" in a barbell program, we want them to add weight to their lifts every workout. In the context of bodyweight strength training, this will mean that we either add additional repetitions to exercises every workout, or we want to progress to the next level of progression.
A repetition scheme that selects exercises for 3x5 starting out may become 3x6 the next workout and then 3x7 the next and so on. After 3x8-10 is reached, it is a good idea to move up to the next progression if the person can do at least 3-4 quality repetitions at the next progression. This is how you use the competency level" system.
These types of novice routines should focus on utilizing a 3x a week full body program. This gives a day of rest between each workouts for the body to recover, and it also provides two days off after every three workouts. Therefore, this routine structure will operate on a M/W/F schedule or a Tu/Th/Sat. Other variations of days of the week can also be used.
Progression of repetitions in each successive workout can be accomplished easily for most beginners. We can sense when we are going to close to failure. Therefore, if you have increased your repetitions for the workout, and can complete ach set without going to failure this represents a successful workout. If You can perform a set with extra repetitions left in the bank, you may progress multiple repetitions if that s possible. That would be great. It is that simple.
Testing of isometrics/statics and moving up to the next progression requires a bit of extra work. I propose two different ways of doing this.
The first option we have is to use the second day of the two consecutive rest days (so Sun on the M/W/F schedule) as a testing day. During this testing day we would first warm up properly and then chose the exercises that we want to progress with to perform some maximal testing. If we have enough repetitions/hold time/etc. to move up via the numbers set in the competency charts — 3 repetitions, 65 isometric holds, 3s eccentrics — then we can potentially move up to the next level.
The second option is using the first day of the weekly cycle (so Mon on the M/W/F). We will schedule it to perform maximal testing before moving into the workouts. This requires a bit of extra time for the total workout, but the benefit is that you do not have to use an extra day to do exercises. The strength testing is the same as described in the previous paragraph.
Either works fine. I would schedule it depending on your preference. If you are interested in getting the most out of your workouts I would probably recommended testing on one of your off days.
In summary, what you want to do for each workout i to either increase the repetitions or to increase the progression. Usually, if you are able to increase the progression you will not be able to do it every workout, Therefore, this is why you are going to use one day every week to test if you are ready to move
up or not. Generally, if you are hitting the 8-10 or more repetition range you may be able to move up. The same is true with isometrics starting to get into the range of 25-30s holds.
At novice level, joint and connective tissue preparation and mobility are the main factors that must be taken into account aside from focusing on linear progression.
Thus, I would not recommend any types of eccentrics exercises as they can be tough on the joints and connective tissues. There are a few exceptions at this level where they are effective. For example, using eccentrics to help gain the strength for pullups or dips is fine. Other than that I would avoid eccentric exercises at this point in time. Proper range of motion concentrics and isometrics should make up the majority of the full exercises.
Additionally, a lot of work on joint flexibility and mobility should be undertaken. As you view the charts you will notice that the L-sit progression starts to require increasing degrees of compression (hamstrings/hips flexibility) to move from the L-sit into the V-sit progressions. Likewise, other skill based strength movements that will be critical to the development of strength such as the straight arm press handstands require significant amounts of compression. To improve mobility we should aim to get the chest to the knees in the pike and straddle positions, and the hands to the floor when standing and bending over.
The key areas to focus on to mobilize and strengthen will be the shoulders, elbows, wrists, and thoracic spine. 1 will talk about these topics further in the Part II which is the management of health and injuries.
Ending a mesocycle is based on two different factors. I will leave the choice up to you ag:
Since linear progression can often be continued for many consecutive months, one scenario for ending a mesocycle is to terminate it when you hit a plateau phase in your training. In terms of novice bodyweight scheduling that would be after a week has gone by without progression or increase in repetitions in all exercises. On the other hand, the alternative is to end the cycle after about 4-8 weeks to have a rest week to recover.
I would recommend termination of the cycle within 4-8 weeks if the joints or connective tissue is starting to get sore or overused. It is never a good idea to train our bodies into oblivion. Our joints and connective tissue can be the limiting factor in the beginning rather than actual nervous system fatigue or muscle recovery. However, if you can continue on and keep making progress then by all means do that if possible.
The intermediate level (L6-L9) consists of developing the strength and body awareness to execute some of the commonly desired gymnastics progressions. Namely, we are working on solid handstands and progressing towards one arms, rings handstand work, freestanding handstand pushups, straight arm pres handstands, full back and front levers, straddle planche, slightly past vertical V-sit, and lots of other cool multi-plane pulling/pressing strength.
The main key at this phase of progression is consistency. People often want to progress the fastest and find the best routine which makes them start over thinking everything (c.g. "paralysis by analysis"). A lack of consistency would be defined as sporadically performing workouts only one or two times a week or skipping weeks entircly. If that is the case, it is likely that you will not progress well in this stage of training. Indeed, many people I know are stuck on this stage of strength development for 5+ years. Similarly, you see the same results from people going to the commercial gyms.
Do not get caught up in focusing on minute details that may or may not make your programming better. Programming is not that complex for this stage of development. It should not be approached by thinking that you need to change a lot of exercises up from cycle to cycle.
At intermediate level, we have a solid base of strength and conditioning of approximately 12-18 months. For heavier trainees (175 lbs) it may take a big longer such as 15-24 months to get to this level.
At this point it is your decision on whether to add an extra day of workouts or not. My general recommendations for adding an extra day/session of workouts is 1 per each year of consistent strength and conditioning. This is on the safe side of things. Certainly extra workouts can be added earlier, but you run the risk of burning out and overtraining.
If an extra day of workouts is added the schedule it may look like M/Tu/Th/F or Tu/We/Sat/Sun. The other alternative is to add an extra exercise for each of push and pull to the M/W/F schedule. If you are transitioning to a 4x a week schedule instead of 3x a week, I would drop down to 2 exercises per push and pull for each workout for at least a cycle. Build volume up accordingly as you get stronger and conditioning increases.
If you are moving up to an extra workout day in your schedule make sure to track how you feel for the first couple weeks or so for the signs of overreaching/overtraining (such as loss of appetite, sleep quality deteriorating, motivation decreasing, etc.). If so, it would be a good idea to drop back down to M/W/F until a better base of strength and conditioning can be built.
Progress is going to be expected more along the lines of every few workouts or weekly. If the M/W/F scheduling is being used then I would definitely suggest that the second day in the two consecutive rest days (Sun) be used as a testing day each week to determine weekly progress.
Likewise, the M/Tu/Th/F system has the option of utilizing the Sun or doing extra volume on the Mon of the first workout of the week to decide on any progression increases or jumps in repetition numbers.
Quality of work is more important than quantity. More is not always better, especially in the case of bodyweight work where significant energy must be expended into the skills to not only learn them correctly but also perform them correctly. Form deteriorates much more easily with bodyweight work than barbells.
If you are thinking about adding more exercises consider how your body is reacting first:
If there are other factors that are causing problems such as lack of sleep or outside stressors then it may not be a good idea. If you are struggling with soreness of any kind whether it be muscle or especially joint then it may not be a good idea.
If you are making good progress then why change what works for now?
Clearly, undertraining is not good, but overdoing it can be much more frusirating and confusing. It is always a good idea to push your limits once in a while to see where they are at. This will give you an idea what you are capable of at that particular point in time; however, you have to realize that you will likely need to back off after you push past your limits 50 you can properly recover without developing overuse injuries. When in doubt, take a couple of extra rest days and then see how you feel.
From here as you start to achieve your goals, you need to progressively implement harder exercises.
As stated before, I recommend full body routines for beginners and intermediates. Likewise, for all beginners I recommend full body routines regardless of total volume given by other activities or other sports that one is doing.
However, when we start to move into intermediate strength range I need to talk about splits in the context of progression. This is because many people learning bodyweight work on the side are training other sports or combining it with weightlifting. Therefore, they cannot allocate all of their training resources to solely bodyweight training.
I will talk about this more in depth in the cross training chapter, but I will introduce most of the concepts on how to structure workouts here.
There are three different workout structures I like if you are going to split up exercises. You can choose for yourself what you like the most.
You may notice that there is no isometrics/movement day. This is because there are not enough static exercises to perform full routines necessary to stimulate adaptations. You can try this if you want, but it is at your own risk of not progressing effectively.
Push/pull is pretty self explanatory and will encompass both legs and upper body into two splits routines. A common solution is to do 2 push and 2 pull days a week for 4 days of total volume. However, since the volume is split up between four days instead of going full body 3-4x a week that means the overall stress on the body is less and more work can be devoted to other sports.
This also works well in integration of bodyweight exercises with weighted because you can always substitute any type of push exercises such as bench and press for any of the bodyweight push exercises like handstand pushups, planche progressions, and dips. The same goes with pulling exercises.
Squatting movements typically align with pushing. Deadlifts and the Olympic lifts fall under pulling for the most part. Remember, pulling exercises move the weight closer to your center of mass. Pushing exercises move the weight away from your center of mass.
Upper/lower splits tend to work well if your other sport(s) or activities have a lot of lower body work or running. You can adequately section off the lower body lifting onto days where there is no sporting activities to limit fatigue and increase recovery.
Straight arm/bent arm is more of an exclusively upper body split where you work on more of the static movements and handstands on the straight arm days. On the bent arm days you work more of the full range of motion movements. This gives a balanced range to the strength that will be developed and also gives a variety of exercises to work on if you like variety and hate doing the same routine over and over
Overall, full body work is going to tend to be the best most of the time, but different circumstances in life may require that you use type of split. Therefore,if you need to use one these are some of the options with their different pros and cons. Heavier athletes may need to use a split because their recovery is reduced because they are moving heavier weights (their bodyweight) each session compared to lighter trainees.
Programming according to different split days such as light/medium/heavy days and low/medium/high volume days will be discussed in the advanced section.
The full range of motion concentrics and the isometrics are still at your disposal.
However, the eccentrics start to tend to be more useful, especially for a lot of the different pulling exercises. In particular, they work very well with the back lever, front lever, one arm chin-up, and pr handstand variations.
I assume by this point you have worked your flexibility and mobility drills such that your compression (hamstring / hips) is becoming very good or near the maximum levels. This is where your chest can touch your knees in pike and to the ground in the straddle position, and your hands can be flat on the floor when standing with straight legs. If this is not the case, it is something that is extremely important to work on.
If the above flexibility/mobility has been taken care of then joint and connective tissue preparation plays a higher role now since we are starting to move into the strength based moves that are tougher on the joints. For example, the main techniques that most people want to start to progress towards which are near the top of this level or into the next level range are the "B" skills which are the iron cross and one arm chin-up which can be devastating on the shoulder and elbows if the body is not adequately prepared.
I have highlighted in gray color on the charts certain exercise progressions which help build up connective tissue strength at the shoulders and elbows. By following some of those specific progressions, these exercises should adequately prepare the body to start attempting the one arm chin and iron cross dons in the future. There are other preparation things that can be done which will be talked about later in the prehabilitation section.
Progression at this stage should generally happen from every other workout to weekly. You should at least be able to progress in either repetitions in progressions every couple workouts or every week or two.
However, do not be surprised if the results are not coming as usual, especially as you get to some of the higher levels within this structure such as L8 or L9. If you find that you can keep progressing for § weeks or longer then feel free to as long as you are making good progress and are pain free.
If there is absolutely no progress over the course of at least 4 weeks I would recommend terminating a cycle, Remember that fatigue tends to mask fitness, so proper and adequate stimulus must be applied over a longer period of time. If we prematurely terminate workouts at the 2-3 weeks, we may do so before having adequately applied a good amount of accumulated stimuli to force the body to adapt.
Thus, if no progress is attained at the 4 week mark I would terminate a mesocycle. You may find that even though there was no progress during the cycle after the recovery week is initiated you will come back stronger. All in all, that is not a failed cycle if you end up with progress.
If, however, there was no improvement whatsoever then additional volume or intensity should be applied next cycle to force adaptations. This can be in the form of adding an additional workout, adding an additional exercises, increasing the sets, manipulate exercises with a weight vest to increase intensity, or many other options. If this occurs more than 2 mesocycles in a row, then look at the advanced section for additional options for programming.
Again, I would recommend terminating a mesocycle if the joints or connective tissue is starting to get sore or overused. It is never a good idea to train our bodies into oblivion. Our joints and connective tissue are often a more limiting factor in the beginning rather than actual nervous system fatigue or muscle recovery. The rest week or two may be required to perform more types of prehabilitation work aimed at healing the connective tissues and joints before another cycle as prescribed.
The advanced level (L10-L13) takes us through the iron cross, the planche, the manna. Also, it takes us through developing a lot of the combinations on rings/parallettes/floor such as straight body press to handstands
Unless you have freaky good genetics or great sense for intuitive training, consistency is likely not enough at this point to progress far in this category. Training may require some of the more advanced concepts such as periodization and its derivatives that will be described shortly. These will help bridge the £ap to get you to the next level.
The core concepts such as exercise selection and frequency are similar, but we may start manipulating volume and intensity by changing around the sets and repetition structure on various days. Consistency must be coupled with this to produce the results we are looking for as missing workouts puts a weak link in our planning and will most likely throw off the results we are looking for.
Advanced level typically requires about 24-42 months to reach depending on your genetics, dedication, training schedule, and other recovery factors such as sleep and nutrition. The typical time 1 would say that it takes most people to reach this point with consistent training is about 30-36 months or 2.5-3 years. For heavier trainees (=175 lbs) it may take 36-54 months to get to this level. If it takes longer, you may be starting from a lower level of strength than I have predicted (which would be around the L4-5 level for most).
As I stated in the intermediate weekly scheduling, I tend to recommend only adding one extra training day per year training. Thus, if we started out with 3 training days and have already added a fourth I would wait until at least 24-30 months to play around with adding in a another training day to bring the total to 5. Remember the factors that I discussed in the previous section about progress and recovery factors. If you are not getting enough sleep, quality foods, or otherwise have outside stressors it may not be a good idea 10 add in more workout days.
With the 5 days of training I like the M/Tu/W/F/Sat or Tu/W/Th/Sat/Sun ~ basically the 3/1/2/1 schedule where the "1" is the rest days. The 5/2 schedule where you workout M-F with Sat and Sun off can work as well, but from my experience it is slightly less effective,
I also would not recommend going any more than 5 days of training for the rest of your training career because it is easy to burn out with high frequency. However, I know some people like playing around with much higher frequency routines because of the potential for achieving high degrees of strength much quicker. If you want to play around with this type of higher frequency work which may start including two-a-days be careful. If this is the case, I would tend to recommend shorter cycles (2-4 weeks instead of the typical 4-8 weeks) and/or significantly reducing the volume per workout.
If you are at this level of strength or beyond and are interested in experimenting more with 6+ training days then I would suggest utilizing the 5 spread days a week such as a 3/1/2/1 schedule with "1" as the rest days (e.g. training days of M/Tu/W/F/Sat) first. After you have adapted to that schedule, you will double up on Sat so you have AM and PM workouts. Training throughout the week without at least 2 rest days is extremely taxing on the body. For the 2-a-days the volume should be split between the AM/PM workout to start instead of actual adding in another whole workout. It can then be ramped up from there as needed. Like I said though be very careful with this type of experimentation. Training is a journey not a rush.
You can sill progress well using the 3 day a week training schedule. However, the 4 day a week training schedule or 5 day a week training schedule are valid options. I will talk about these each in tur.
I am sure that most of you have heard about utilizing light/medium/heavy days in various training programs, or speed-strength/limit-strength or power/dynamic method with max strength from Westside Barbell's conjugate method. Basically, all of these methods are ways to change training intensity and volume through modulation of repetitions and sets on different training days to provide various stimuli to the body.
When we reach this level of strength, applying a constant stimuli (c.g. similar/same workouts even with improvement in progression or repetitions) fail to produce a stimulus. Progression tends to taper off from workout to workout to weekly progress. However, once we get into the upper advanced range, progress will be weekly to biweekly or even slightly longer. You may not see gains until after a whole cycle is completed and you recover fully from the fatigue after the deload.
Varying the amounts of sets/repetitions (and therefore intensity and volume) has differential effects on the body. Training the tougher progressions (closer to 1 RM) takes more of a toll on the nervous system to produce benefits. Dropping the intensity and working more power or dynamic effort progressions tends to work more of the muscular component while not as heavily stimulating the nervous system. Therefore, alternating between these two can allow us to keep up the overall training volume for gaining strength without overtaxing a particular part of the neuromuscular system. Hence why the more light/heavy alternating workout days tend to work effectively.
The conjugate method in particular takes this one step further and focuses on supplemental work that I rotated so constant progress can be achieved. This model has achieved great success in powerlifting, so I figured I should at least mention it so you can check it out if you want to.
However, the method that | am going to explain here which I think works the most effectively in bodyweight training is daily undulated periodization (DUP). This method is not for beginners as I underestimates their ability to progress through linear progression. It is also not for elite athletes as they conjugate method or concurrent models may be better. Progress on DUP is unquestionably good for trainees in the advanced strength range. Plus, it is very easy to implement and for our purposes that makes it a very good choice.
On a basic level, DUP alternates repetitions and sets from workout to workout. On a traditional DUP model, in a 3 workout a day schedule your workouts will start from less intense and become more intense
at the end of the week. This is similar to the traditional periodization model where you move from less intense phases to more intense phases (introductory — hypertrophy — strength — power). However, the training is varied from workout to workout instead of in weekly microcycles.
For example, on Monday you may use exercises with a 3x8-10 repetition scheme, Wednesday may use exercises with a 3-5x3 repetition scheme, and Friday may use exercises with a 5-8x3 repetition scheme. As the week goes on you start from less intense exercise by starting with higher repetitions at easier progressions and then move towards lower repetitions at harder progressions with more sets. These tend to work with exercises where you can add weight such as barbells; however, now that you have been working out enough to know your abilities you can seamlessly drop between two competency levels if you need to modulate the intensity level
For instance, on Monday since you may not be able to do 8 repetitions of full front lever pullup, so you may drop down to 8 repetitions for straddle front lever pullup. Likewise, on Wednesday you may not be able to do 5 repetitions of the full front lever pullup, so you have to drop down to the straddle front fever pullup again with some added weight to increase the difficulty. However, on Friday you may be able to execute the 3 repetitions of the full front lever pullup, so you can do the 4x3 full front lever pullups that day. Therefore, this weekly DUP would look something like this:
Four days a week workouts are a bit odd. The traditional DUP model utilizes 3 days a week structure as described above. With 4 days you can alternate something along the lines of light/heavy with doing 3x8-10 the first day followed with a 5x5 the second, the latter two workouts go to 3x6-8 and 6x3 respectively. Therefore, it would look something like:
Likewise, the 3/1/2/1 plan or 5/2 plan can go with something along the lines of 3x8/3x5/5x3/3x8/5x3. It depends a bit on personal preference and the exercises chosen. If you have no access to a weighted vest or ankle weights it may be harder to modulate intensity, so you may have to rely on the limitations of the exercises themselves to determine the repetitions.
The top repetition range is about 8-10 for the high repetition days, and 5-7 for the medium repetition days, and 3-4 for the low repetition days. The main thing to keep in mind is that because we have increased overall stimuli via increased frequency (e.g. more days per week or more exercises), we can alternate the emphasis on the neuromuscular system or musculoskeletal system respectively to allow us to operate at this volume without accumulating too much fatigue.
You should experiment with what types of repetitions work best for you because some trainees might do better alternating between the 8-10 repetitions and then the 5-7 repetitions and not using the 3-4 at all. Some trainees may need the 8-10 and only 3-4 repetitions. The more genetically gifted trainees tend to work best with the lower repetition ranges so 5-7 and 3-4
after you have trained for some amount of time you tend to have a better idea of what types of repetitions your body works best at so choose those accordingly. If you are just starting, you may use a standard template such as 3x10, 3x7, 5x3 and then modify from there as necessary.
Alternatively, we can operate on the same concept as light or heavy days. Since we know we may need to apply additional stress on the body to force adaptations, we can use the concept of heavy/medium/light volume days. Typically, we are going to do say 2-3 pushing exercises. When we first start out 3 exercises may be more than adequate to progress with our pushing exercises. But as our strength and conditioning improves, it becomes inadequate.
The concept of heavy days is to provide an overload stimulus much like the lower repetition days with the more difficult exercises. During a heavy push day we may want to do something along the lines of 4 pushing exercises. This can be followed up with a light day if there are 2 consecutive workout days where we would only do 2 exercises for pushing.
As you can sce, the concepts of varying the repetitions to make high/medium/low repetition days is very similar to the concept of alternating light/medium/heavy days. Both can be utilized by themselves or in combinations. Typically, with the lower repetition days you will want to use a light amount of exercises since the intensity is high with lower repetitions. And vice versa.
When combining the two protocols, a typical light/high intensity day at advanced level would consist of 2 pushing exercises (light) with 3 sets of 5 repetitions (higher intensity) for each. Then a heavy/low intensity day would consist of 4 pushing exercises (heavy) with 3 sets of 8-10 repetitions (low intensity).
If you are at this level I would suggest playing around with some of these concepts over a few 6 week cycles followed by a rest break and see what works best for you. If you are confused and do not know. what to pick, I know for a fact that repetition DUP work M/W/E by itself works well for the iron cross progressions. This means it also works for all of the exercises at the cross level of the ability as well.
Remember, we have 3 different variations of workout days — 3, 4 and 5 workouts per week. We have 3 different variations of amounts of repetitions with high/medium/low repetitions. And we have 3 different amounts exercise days with heavy/medium/low exercises. There are a lot of possible combinations that can be useful depending on your individual schedules and goals.
I would suggest starting with DUP via the high/medium/low repetition days OR the heavy/medium/light exercise scheduling. Generally, only one needs to be used to start making consistent progress again from the intermediate level. If after a mesocycle you do not notice any improvement then it may be a good idea to combine the two. However, this will probably only be when you are at elite strength range.
If you still have no idea what I am talking about I have provided some examples in Appendix A on sample programming.
All of the regular types of exercises apply: concentrics, isometrics, and eccentrics. Remember to use the charts in structuring the workouts because 2 eccentrics = 15 eccentrics = 1 repetition. Thus, according to our abilities we can choose our exercise to hit the repetition range that we want for that particular workout day.
Constructing the routine from exercises and then planning a repetition scheme according to the type of days takes a little getting used to. However, it only needs to be calculated once to get a handle on how 10 do it. For example, say we want 10 repetitions for an isometric hold. That is going to be an isometric hold that is 10* 25 = 20s hold. So we are going to pick the appropriate isometric hold that we can do 20 according to our max hold times. It may have to be straddle planche or straddle front lever instead of the full variation. As we move up towards a higher intensity day such as a 5x3 block where we are doing the 3 repetitions or 3*2s = 6s holds, we will pick the appropriate planche or front lever progression that we can do all of the holds with 6s at.
Another potential solution is combining exercises for the advanced group. This is a good solution for isometrics that need to be made more difficult. For example, say we were working up to the full planche but could not hold it for the adequate 6-8s needed to advance to the next level. To counter this problem, we could start out our set with a maximum hold of say 2-3s of the full planche, and then as we fatigue quickly open up the legs to move into a straddle planche position. Then we can hold for another period of time to get additional volume. This provides an intermediary step of a strong stimulus plus the follow up completion of the set which helps to bridge the gap between each of the higher levels of the planche progressions. Additionally, moving from various other exercises into the isometric such as a dip to planche isometric may work just as well to provide an intermediary step. Many of the press handstand ons are based on this concept.
These type of exercises should only be used by advanced trainees because they do not work well when the exercise technique is poor. This is because the ability to change from a good body position such as a straddle planche to a good body position of the advanced tuck planche requires a lot of precision. Notably, novice and intermediate trainees often lack good shoulder and core stabilization when moving between these positions which precludes them from good quality holds. Therefore, it is best not to utilize these types of exercises for these populations.
I do not like recommending isolation exercises, but they can be used more effectively when you arc at advanced strength level such as for targeting weak links. In particular, trainees at this particular level may know their weak links, or they have inklings of what the weak links in their bodies may be according to their abilities. For example, I know that my lats are much more developed than my pecs and biceps for pulling movements. I know this because of multiple factors — I feel them activating and contracting more during pulling exercises, and they have greater hypertrophy and strength than the aforementioned muscles.
Thus, I can use biceps curls if I need to add isolation work to specifically bring up my biceps weakness. This would be a good reason to target these specific weak links.
Likewise, lowering the stress on the connective tissues from the compound movements, and targeting the weak link that may be prone to injury is another good reason to use isolation exercises. For instance, biceps curls may be required if the elbows start to get significantly sore during back lever work. We would perform the biceps curls and simultaneously eliminate that back lever work for a period of time. These are the types of situations where isolation exercises can be most effective. However, do not go overboard as most of the benefits will still come from doing the compound exercises.
Of course, if one of your goals is hypertrophy feel free to add in some isolation work on top of the compound movements. Though be sure to remember that more is not always better
Like I discussed in the previous chapter, routines tend to become more useful at advanced strength levels than at novice and intermediate levels. Smaller sequences of skills tend to be more effective at lower levels. It is your choice whether to use them or not at any particular level though
Routines are an excellent alternative of practicing a lot of different types of skills and strength moves that you may have already mastered but you have not used in a while. Combining some of these mastered strength moves and skills with current strength moves you are working on can create some interesting combinations/sequences/routines that will work the muscles in many different ways than usual. This is one of the big reasons on how high level strength is developed especially moving into elite levels. At advanced and elite level strength, the focus starts to shift from obtaining some of the higher level isometric holds to moving between these skills. The transitions between these types of isometric holds such as from the front lever to cross may be actually harder than the isometric holds themselves — front lever is an A rated skill, iron cross is a B rated skill, and front lever to iron cross is called a Pineda which is a D level skill. Indeed, many high level gymnasts stop doing specific strength work and focus solely on the strength skills in their routines to provide stimulus for adaptation.
Now, I would not remove all dedicated strength work depending on your goals. But routines and sequences can be used successfully to work on all around movement strength. Routines/combinations/sequences can be fun to do and film as well.
Do not be afraid to play around with these types of movements once you can perform a lot of the higher level isometrics especially on rings. You may find that you like performing these types of routines more than strict training of particular movements. Remember, there is some trade off between working specific movements in a dedicated fashion to gain strength versus routines much like there is some trade off between doing the full range of motion concentrics versus the isometrics. If that is a trade off that you are willing to make for the sake of variety, or your goals, or for fun by all means go for it
Progression at this stage should and can happen weekly. You should see the ability to add repetitions or increase the progression difficulty at the very least every two weeks. If not, then some factors are likely off with your training.
As you get higher up in the advanced range you may not notice progress until the end of a mesocycle and after the rest week. However, this is very rare if you are using DUP correctly. Like the intermediate level do not be surprised about this; by now you should have learned patience in progressing with these types of skills. The strength gains required to jump from level to level at this point will take a while as well,
We have similar indications for terminating a cycle. For instance, if there is absolutely no progress over the course of at least 4 weeks I would recommend terminating a cycle. This is because if we prematurely terminate a cycle before about the 3 week mark, it may be before we can adequately apply enough of an accumulated stimulus to force the body to adapt, Thus, if no progress is attained over about the 4 week mark I would terminate a mesocycle. You may find that even though there was no progress during the cycle after the recovery week is initiated you will come back stronger. Overall, that is not a failed cycle. If, however, there was no improvement whatsoever then additional volume or intensity should be applied to force adaptations in the next cycle. If this occurs for more than 2 cycles without visible progress then it would be a good idea to try the combination light/heavy exercise with high/low repetitions respectively or look very closely as specific recovery factors namely stress, nutrition, and sleep.
Again, I would recommend terminating a mesocycle if the joints or connective tissue is starting to get sore or overused. It is never a good idea to train our bodies into oblivion. Our joints and connective tissue are often the limiting factor in the beginning rather than actual nervous system fatigue or muscle recovery in these cases. The rest week or two may be required to perform more types of prehabilitation work aimed at healing the connective tissues and joints before another cycle is prescribed.
There are three main factors that we are going to discuss in this section which are deloading, maximal strength testing, and workout restructuring. None are actually specific to novice/intermediate/advanced levels, so we will look at them individually.
Deloading is an art. Unless you have a great coach, it often takes a lot of experience to deload well such that you supercompensate fully but do not lose some of the adaptations that you developed from the previous mesocycle because of the increased amounts of rest.
I will try to-give you a general basis for deloading, but depending on other recovery factors such as time availability, sleep, nutrition, etc. then you may need to vary some of the protocols to adapt to all these different situations.
Overall, complete and full rest is not as productive during a recovery week as still performing some type of exercise. I will present a couple alteratives that tend to work well.
If it was a particular brutal cycle on the body it may be worth it to eliminate all of the isometrics and exercises and exclusively focusing on the skill work and prehabilitative exercises.
For instances, this type of deloading would focus work on handstands and ring supports, and improving shoulder, wrist, back, hip and ankle mobility and health.
What I typically recommend is to only train maybe one or two days during that week and only do one exercise from each of the pushing/pulling/legs at likely only one or two sets. This keeps us from any type of strength decrements, but the volume is low cnough that we can recover well
The rest of the time is best spent on the soft tissue massage, mobility work, any prehabilitation, and any rehabilitation work that needs to be done. Most of all rest weeks are for the body to recover, and for you to work on any of these weaknesses that we often neglect during training.
I talked about maximal strength testing in the novice and intermediate sections previously. The concepts I stated there will apply here too, except you only strength test at the end of the week after a deload period. Subsequently, if you ended your cycle on Monday then you would test on the next Sunday. The next day after which is Monday would be the start of the next cycle.
Maximal strength testing for the concentric exercises, isometrics, and eccentrics will give you a general idea of how much you have improved after most of the supercompensation from the previous cycle takes place from allow the fatigue to dissipate and the fitness to manifest itself.
This testing after the supercompensation gives us quality numbers from which to base our progressions and hold times for the next cycle.
To perform maximal strength testing you would start with a typical warm up to get the blood moving. Next, warm up with about 5-8 repetitions of a lower progression of the skill or strength progression that you are testing. Then do a couple repetitions or short hold of the progression that you are maximally testing. Finally, after about 3-4 minutes rest you can maximally test the exercise or isometric in ques
From there you want to organize your exercises according to the strength and progression charts.
This process is relatively simple. It is most applicable in more advanced training when you may not sec any strength gains for most of the cycle but will typically see a lot better results after the supercompensation period takes place.
Working restructuring occurs when you complete your goals or have reevaluated to add or subtract certain exercises.
There is no hard or fast rule for switching between goals, but I should remind you again that the key to strength is building it from movements that are repeated in a progressive manner. If you have workout
ADD and frequently switch up your routines you may build muscle and strength, but you may find that high level strength is elusive,
This is how to restructure. When you complete a goal such as a full back lever you have two options. You can keep it in your workout once a week to maintain, or you can move on to more progressive goals such as front lever and other pulling exercises. The great thing about the push/pull system is that there is at least some overlap between all of the different goals in each category. This means that even if you drop goals that you have completed from your routine you will likely be able to do them at a later point without any practice.
If the goals are approximately 2 levels below your current strength competency then you can even throw them into your warm up as they will not negatively affect your workouts
I do not recommend switching goals every mesocycle. If you have multiple long term goals it is in general best to stick with a goal over at least 2-3 mesocycles to see significant improvement — if not being able to reach the goal — before you decide that you may want to put it on hold for a time. Remember, being consistent is the best way to progress.
However, if you really feel that you need to go in a different direction with your exercises then you can always evaluate and possible substitute the exercise(s) in or out of your routine.
I hesitate to suggest A/B routines (or two different workouts with different exercises) or push/pull splits or upper/lower because you do not get that same amount of frequency with the skills that you do with a full body. But if you want to add in more of a variety that is your choice. However, expect that gains towards working towards your goals may slow down.
Elite strength programming depends on the individual more than it does the programming. But this should not deter you for aiming your goals this far.
For example, some women may never reach higher level rings strength skills even with perfect training for decades. Although you can argue that women have not traditionally trained strength, so it may not necessarily be the case that women cannot achieve strength moves such as the inverted cross. After all, in women's Olympic weightlifting the competitors are putting up nearly 2x bodyweight snatches and 2.5x bodyweight clean and jerks. Lillian Leitzel, in 1918, was said to have performed 27 dynamic one arm chin-ups which through some analysis points to ~6 regular one arm chin-ups These types of strength feats are incredible and dare I say elite. So who knows the true capabilities that women have.
However, we have to talk about genetic limitations. Some guys have poor genetics where it will take 10 years to reach a high level. Maybe longer in some cases. Most may not even stick it out that long if that is the case. Some guys with crazy good genetics can reach this level of ability in 2 years or less. I have had athletes walk into the gymnastics gym with very little formal weight training or gymnastics and be able to perform an iron cross or front lever.
If you are one of the people reaching this point after a solid decade of dedicated training you still have some potential for greater strength gains although it may start to plateau out faster. That is just the luck of the draw. At this point I would ride out as much as the DUP and/or heavy/medium/light days can give you in terms of gains. Then I would start looking into some more specialized work via either the conjugate method or concurrent methods of periodization. Supplemental isolation or specific strength work may be necessary as well
I am sure if anyone is at this level with at least this much time spent on training then they should be smart enough to look to eke out every bit from their nutritional and sleep as well. If not, that may be a good place to optimize to continue to increase your strength.
On the other hand, there are those progressing past or up to this point in under 5 years. If so, be glad you have good genetics. You may not have used any type of periodization or format training to get this far. I so, DUP and the programming mentioned above will help you get started once you stall out from whatever training plan you are exccuting.
The FIG COP contains an amazing number of strength moves on rings that I have not referenced in the skill and strength progression charts. Moves such as the maltese, victorian, and other strength combinations that you may only see in the Olympics are on your doorstep to be taken given enough dedication and time. I hope if you are at this point and progressing towards these types of skills to take someone under your wing and teach them. This is how knowledge is most effectively passed on.
I am quite confident based on all of the people I have coached of various body types, backgrounds, ete. that at least L9-10 on the strength and skill progression charts is attainable for everyone given enough time training. Planche may not be attainable for everyone, but I am confident with proper sleep, nutrition,
training, and other factors that everyone can accomplish a full back lever, full front lever, straddle planche, and possibly one arm chins and iron crosses.
Obviously, those with higher bodyweight are at a disadvantage, but it is certainly doable. One of the famed strongmen of the early 1900, Bert Assirati, was able to obtain 3 one arm chins and iron cross at 266 lbs. He clearly had good genetics on his side, but even so with dedicated training and 99% of the people with significantly lower bodyweight than his should be able to attain the same skills. This is why I never say never for one arm chins and crosses even for those trainees who are 200 lbs. It may take a while, but it is certainly possible.
In the end, my conclusion is this. Train hard. Train consistently. Deload properly. Get your sleep, nutrition, and stress in order. Do not use "genetics" as an excuse to not have fun or to not attain your goals. Most people will never even know if their "genetics" are good or not because they fail to be dedicated to training for more than a couple years. Do not worry about things you cannot control.
One final thing. It must be noted that for the high end advanced and elite strength that any type of workout you plan you should follow it This means that any of the heavy and intense days must be heavy and intense, and any light or low volume day needs to be kept light and low volume. Since you need to put high end stress on the body to keep adaptations coming, there is less and less margin for error in programming. Likewise, recovery factors must be dialed in: sleep, nutrition, and stress. This is not to say you should ignore these even when at novice and intermediate level either — you should have them dialed in at all times for maximal progress
This is why there is the saying "train hard, rest harder." You must never forget that training require rest for the adaptations to show themselves. Recovery reveals adaptations. Without both a good training regimen and a good recovery schedule at some point you will fail to progress.
One of the better lessons is taken from the Bulgarian system of Olympic Weightlifting. They would train multiple times a day at high intensity. However, the training was interspersed with pure recovery factors ~ eating, mobility work, napping, sleeping
This can be distilled into the saying Train. Eat. Sleep Repeat. The core concepts which underlic training are universal, and if you try to sidestep them at the highest levels you will fail to improve.
Structuring a routine needs not always encompass everything. Let us say for example that I have many different goals in regards to upper body pushing. I want to obtain a bodyweight press, 1.5 bodyweight bench press, weighted dip with an extra 25% bodyweight, planche, freestanding handstand pushup, etc.
Now, there are only so many goals that you can work at one time without spreading yourself too thin that you will not make good progress. As I have talked about before, I like the system of 2 pushing, 2 pulling, and 2 legs goals and then subsequently structuring a routine towards those goals by selecting
exercises for each of those goals. I have also stated that if you are better conditioned maybe you will do 7- 9 exercises working towards those goals rather than the traditional 6. The routine would be performed at a frequency of about 3x per week with less or additional frequency depending upon the user's conditioning base, other athletic and sporting activities, etc.
Take this example from about § years ago. I worked handstand pushups and planche work for 6 months in row with proper rest breaks every 6-8 weeks. Of course I had other types of pressing goals, but those two exercises were my main focus for strength at the time. When I went to test other exercises 1 found that the second time I tried weighted dips I was able to work myself up to 90 lbs / 40kg for 5 repetitions. And later when I tried pressing for the first time after more strength work I was able to do a bodyweight press.
As you can sce, many of the various forms of pressing type exercises overlap even fairly significantly. Therefore, you absolutely do not have to try to fitin or work everything at once. Working everything at once willlikely even be more detrimental to your training
What you really want to do is make everything simple on yourself. Pick out a small subset of goals that you want to work on at once. Work those goals religiously for a whole cycle. You should see very good consistent progress towards those goals.
If at the end of the cycle you want to switch up your goals and thus switch up your exercises you can feel free to do that. If you want to strength test other movements that also works too. You do not necessarily have to strength test only the movements that you were working on during the cycle.
Adjustments can be made during the deload week if you want to change your focus. That is the time 1o focus on different aspects of your development if you want to consider changing them.
In terms of programming, this is a generalized model that can be followed:
EliteFTS has a good article published a couple years back which simply outlines various types of periodization. If you are curious about a more detailed overview, pros, cons, and types of methods or progressions, you can read that article here:
In conclusion, do make things too complicated. The reason I like selecting a few goals and building a routine around a few goals is that it is simple and easy to do. Likewise, the reason why I recommend that the level of complexity in programming only be advanced when absolutely necessary is because you do not need these complexities to make progress.
Once people start thinking about "well, maybe I should do this..." or "maybe it would work better if I changed this around..." for more than 3-4 times, they have probably already thought about it too much. It is true that programming does take a lot of practice to do well; however, overthinking programming will also have you spend a lot of time on trying to make your routine "perfect" that will likely not actually help all that much overall.
Additionally, the other reason why you want to keep it simple is that introducing too many factors at once hurts your ability to analyze your routines and modify them for the next cycle. For example, if we only change a few variables we can more accurately pinpoint if we made good improvements that those changes were major contributors to those improvements. However, if we change multiple variables up at once, how are we going to know what actually helped improve our abilities?
Even more complicated is the scenario that if we made absolutely no progress, what were the variables that were impeding our progress and what were the variables that were helping our progress?
Therefore, if anything, you want to keep anything you do as simple as possible. Make very few changes in total programming from cycle to cycle so you can see what affects your progress much more easily. This allows you to become a better programmer much faster, and it will also help you overall in progressing in your abilities faster as well.
Now that we have the whole core of our workouts planned out we can start to evaluate what factors need to be evaluated during the mesocycle and then after the mesocycle.
I would bookmark this page or make a note of it on your papers or workout log. You should come back to this section to help you reevaluate your goals, exercises, and progress after every week if you are a novice or intermediate, and every few weeks or month if you are advanced.
This material is dense for most people reading it the first time, so I would recommend rereading chapters 8 and 9 specifically if you have the time to. Knowing these concepts and then learning to apply them will make your workouts much better, and your progress will be significantly affected for the better.
In this chapter we took a look specifically at the different levels of strength programming during and after mesocycles are finished.
We noted how the weekly scheduling of workouts via frequency, overall volume via amounts of exercises, intensity, repetitions, and sets all affect how we progress at these various levels.
In general, we noted that novices tend to require less advanced programming and tend to progress the fastest while moving forwards to intermediate and advanced will require more progressive loading or complexity in programming to progress effectively.
We talked about the different factors related to exercise choice and when to terminate cycles.
We discussed deloading, maximal strength testing, workout restructuring, elite strength and how to apply these various concepts to the rest week and then integrating them to move on into another mesocycle of workouts. Deloading is very important for allowing supercompensations to occur, and to allow a rest break for additional maximal strength testing. Maximal strength testing is used for testing various progressions that we want to advance with in the next cycle. Workout restructuring can be used if you want to focus on different goals or implement different exercises to work towards the same goals. Finally, elite strength is something that takes a lot of time to attain given different inherent and environmental factors.
Finally, in the additional considerations section we discussed various forms of programming and restructuring according to level of ability and modification of routines with consideration of goals. We concluded that programming must conform to the level. However, complexity of the programming needs to be specifically kept simple to become a better programmer and to make optimal improvements.

Overreaching itself is not a bad thing. If you keep training when overreaching then it may turned into overtraining which includes regression of abilities, disrupted sleep, decreased appetite, etc. which leads to overtraining. However, short term overreaching can be planned to induce supercompensation and is actually a good thing.
Think back to the fatigue and fitness model. As our fitness improves it becomes substantially harder to progress because our bodies adapt to the training stimuli. Therefore, as we advance into the intermediate/advanced training stages, we need to think about our mesocycles in terms of several week or two week blocks.
As the complexity of the routine rises, we start to vary them with light/medium/heavy days and low/medium/high repetitions days. This allows us to emphasize training more towards the neuromuscular or musculoskeletal systems in our bodies. Additionally, the cumulative fatigue of several workouts or consecutive days training to depress the body's physiological abilities such that the overall training forces an adaptation. These two reasons help lead to progress.
This is the core of the "dual factor" theory and how we can use planned overreaching to progress. We want to combine several workouts together usually weekly or biweekly to depress the body's abilities to allow progression. For clite athletes it may be monthly or yearly depending on if they are in season or trying to peak for certain competitions such as the Olympics.
For our purposes this is why we are planning on a weekly cycle. Planned overreaching is executed well with at least a couple rest days or light days so that the body can recover from the total volume of the week,
Thus, with overreaching we start want to think longer term. A decrease in abilities during a week in an intermediate or advance training cycle is not always bad as long as there is sufficient rest at the end of the week to recover so that you can supercompensate and adjust for the next couple weeks of the mesocycle.
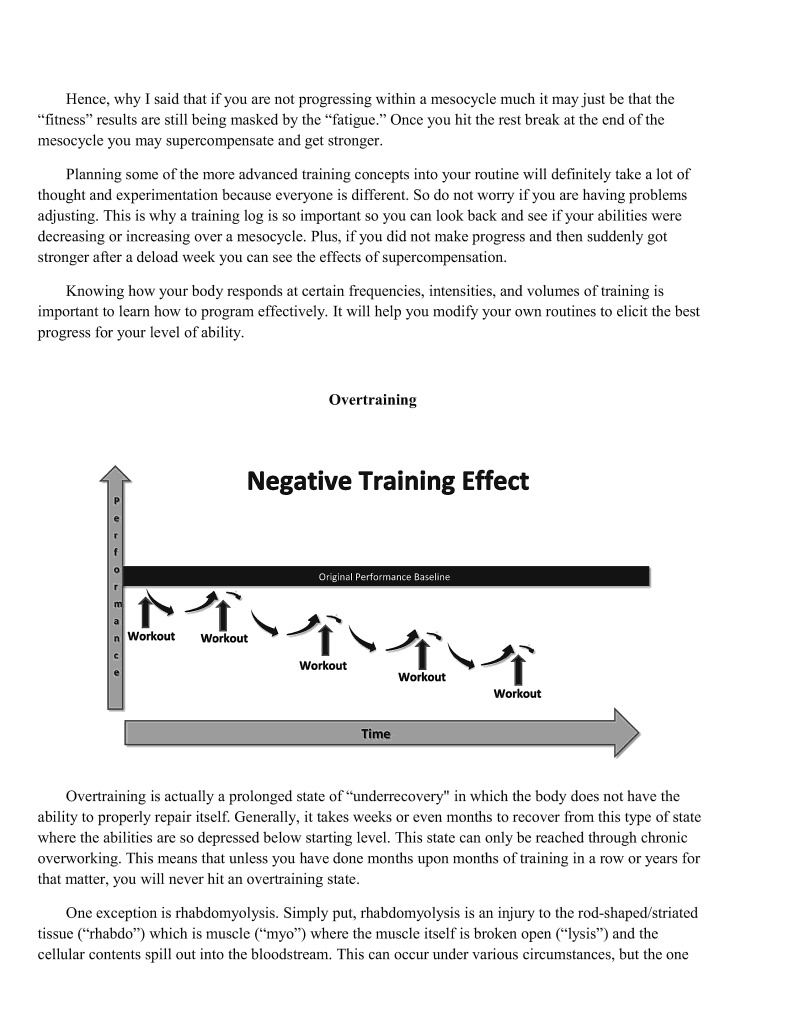
Hence, why I said that if you are not progressing within a mesocycle much it may just be that the "fitness" results are still being masked by the "fatigue." Once you hit the rest break at the end of the mesocycle you may supercompensate and get stronger.
Planning some of the more advanced training concepts into your routine will definitely take a lot of thought and experimentation because everyone is different. So do not worry if you are having problems adjusting. This is why a training log is so important so you can look back and see if your abilities were decreasing or increasing over a mesocycle. Plus, if you did not make progress and then suddenly got stronger after a deload week you can see the effects of supercompensation.
Knowing how your body responds at certain frequencies, intensities, and volumes of training is important to learn how to program effectively. It will help you modify your own routines to elicit the best progress for your level of ability.
Overtraining is actually a prolonged state of "underrecovery" in which the body does not have the ability to properly repair itself. Generally, it takes weeks or even months to recover from this type of state where the abilities are so depressed below starting level. This state can only be reached through chronic overworking. This means that unless you have done months upon months of training in a row or years for that matter, you will never hit an overtraining state.
One exception is rhabdomyolysis. Simply put, rhabdomyolysis is an injury to the rod-shaped/striated tissue ("rhabdo") which is muscle ("myo") where the muscle itself is broken open ("lysis") and the cellular contents spill out into the bloodstream. This can occur under various circumstances, but the one
we are most concerned with is the exercised induced variety. When an exercise has excessive volume or eccentrics in it (CrossFit in particular), the muscle fibers themselves can actually be destroyed. This is not actually "overtraining" as it appears in the literature, but it can lead to a state where the abilities of the athlete are decreased substantially — strength and conditioning loss in those with rhabdomyolysis single workout or series of workouts. However, we are going to ignore this case since it does not represent true overtraining.
Depending on the relative intensity of the exercise you are doing, you may never even it an overtraining state even if you are training for years on end. With proper deloading, overtraining will likely never occur which is only why I am briefly touching on this subject.
If your abilities are increasing each workout, you are not overtraining or overreaching. On the other hand, you could be performing more or less than your body can handle. Thus, experimenting with the volume, intensity or frequency of workouts to increase the gains or recovery is possible.
If you are plateauing or regressing and you have not taken a break from working out in a while then it may be time for a deload depending on where you are in a mesocycle. This is likely due to some form of overreaching or undertraining. I would always rest first for a week just to see if that helps, but if it does. not then it is likely undertraining.
Similarly, examine your sleep schedule, diet and stressors in your life and make sure they are consistent. These all affect recovery substantially, so it might not be that you are training too much. It may be the fact that your body's ability to recover from that training normally is blunted - ¢.¢. underrecovery." Anything that puts back water into your body's pool ~ sleep, proper nutrition, destressing, massages, etc. can help to mitigate overtraining.
The two most prominent symptoms of overtraining are decreased appetite and decrease in quality of sleep. If you have recently increased volume or executed workouts with higher intensity and this is the case, then it may be a good idea to remove the extra stressors until you have adequately adapted to the training to add additional volume. If you are experiencing some of those symptoms it may be due to overworking yourself or underrecovery. Do not be afraid to take an extra rest day or two if you need to. Missing one workout will not kill you; wasting your time in a chronic plateau or regression from an overtrained state will. When in doubt take a couple rest days.
Basically, overtraining is not something that you should be worrying about. As long as you have your goals and are progressing towards your goals you are fine. If you are not, then you need to evaluate your training, sleep, diet, or other factors to see if you are doing too much work or blunting your recovery. If you need advice from plateauing or regression, do not hesitate to ask someone with experience on how to break through that. Also, do not be afraid to take a couple days here and there for rest.

For beginners overreaching will tend to be when progress stalls from workout to workout. At this juncture, deloads and moving back into constant progression in advised.
For intermediates and beyond where progress is more week to week or longer, planned overreaching can and should be used to apply adequate stress to the body to force strength and muscle mass adaptations.
Overtraining, in general, is not something to be worried about unless your abilities are constantly regressing in which case it may be a good idea to take significant time off to recover.
It would be a huge error on my part if I did not address these factors. Not everyone reading this book is going to be solely bodyweight training as their main form of strength work. Many people have other goals and sports aside from bodyweight training and are mostly doing it for the pure enjoyment or desire 1o obtain some of the skills
That said, the context I am going to refer to the term "cross training" as participating seriously in other sports or activities that may interfere with workouts. It may be other sports specific skill work, or strength and conditioning work, or whatever else that people do for goals that may interfere with bodyweight training.
The main concept to keep in mind is that you cannot combine another sport's strength and conditioning program and a bodyweight program into one and expect to have good results. The mere fact that we split time between activities will cause us slower gains in each. Combing the two together may easily result in overtraining. Therefore, if you have significant aspirations in other sports, it may be a good idea to take a long look at bodyweight training with your coach to determine if it may negatively impact your performance in the other sport(s). Sometimes it will. Sometimes it will not. Occasionally, with sports such as wrestling or martial arts there are exceptions where bodyweight strength training may be the best way to train to improve ability.
That said, properly run strength and conditioning for other sports may start interfering with workouts. How do we work around this?
If you are serious about your sports, above all else specific sports training comes first. You need to be working on the skills that your sport requires to optimally improve within that sport or activity. If bodyweight specific skill training such as handstands interferes with training time for the other sports then it may need to be eliminated. If your desire is to be good at your sport then you need to be training the skills for that sport when you are fresh, and thus they will take priority of any type of bodyweight training.
Likewise, sports specific strength and conditioning takes precedence over that of bodyweight training. It depends on the sport and quality of the coach how often they will make you workout with weights or if they even use weights at all. It i likely that if you are in a high school or college level sport the coaches will be "their-way-or-the-highway" so there may be no possibilities to compromise at all.
Sometimes you can fit a bodyweight workout or two here and there and sometimes you cannot. I will try to provide some background information on potentially bodyweight workouts into other sports work.
If you are practicing another sport 5 times a week or more it would probably not be prudent to add in any extensive bodyweight strength and conditioning workouts. However, skill based training may still apply such as working on handstands if you desire to work on bodyweight skills
I there is no specific strength and conditioning work then it may be useful to add in bodyweight training. However, as stated before it may be a good idea to consult the coach if you are serious about Your sport to see if there is other potential strength and conditioning that he or she may recommend.
Basically, what I am saying is that when in doubt you should error on the side of eliminating extracurricular workouts. Remember, more is not always better. If you have the time to do such things and are not overtraining or burning out as you can see through the quality of your performances in your sport then maybe you can integrate some bodyweight training into your workout regime.
In some cases, bodyweight training can be extremely effective for different activities such as rock climbing or wrestling so it all depends on the sport and your coach.
Be smart. You cannot do too many things at once. You have to prioritize what you want to do in life otherwise you will become good at nothing.
Parkour is very near and dear to my heart. However, I have very little experience with martial arts, MMA, wrestling, or other sports / athletics in which bodyweight strength training would be used as a method to improve their abilities. Even so, given the nature of structured strength and conditioning, I can discuss how these concepts will apply to Parkour and make similar analogies about how various schedules can be used by practitioners of other sports and/or disciplines.
Parkour, like many other disciplines, consists of three distinet parts. There is a fear / mental component. There is a skill based component where the practitioner needs to lear all of the specific skills related such as vaults, precisions, wall run technique, etc Finally, there is a physical preparation part which typically includes strength and conditioning based on increasing the users abilities towards that discipline. There are many parallels between this and other athletic activities.
Now, bodyweight strength training distinctly falls underneath the umbrella of strength and conditioning to be used to safely and methodically to increase physical abilities. This is consistent with every other major level of organized athletics. Gymnastics do not just practice their skills they perform
large amounts of strength and conditioning. Track and field athletes do not just run they spend time in the weight room improving their strength or explosiveness. Swimmers do not only swim — they spend time in the weight room to improve their power.
This is the fallacy of the recreational athlete who wants to improve. They do not believe in structured strength and conditioning and just practice their given activity. Physical preparation via strength and conditioning is often a separate but integrated part of training. Most sports or disciplines use the weight room; however, bodyweight strength training can be used effectively as well. To be good at [your activity]
You cannot just practice [your activity] and expect to improve optimally.
Across various disciplines there is an interesting phenomena with novice and intermediate athletes. To get anywhere near "optimal" progress about 50% of the time must be spent practicing your sport specific skills and about 50% of the time should be spent on physical preparation via strength and conditioning, mobility work, injury proofing, etc. Thus, this is not just to improve physical ability, but also 1o help prevent against injuries whether catastrophic or overuse.
Therefore, for an emerging discipline such as Parkour, the amount of time split across weekly activities should be split approximately 50/50 for the novice and intermediate practitioner. For example, a sample weekly structure of a split between parkour based skill work and strength work may look like this:
For most beginner and intermediate athletes of any sport I typically like 2-3x a week full body routines depending on how much skill work there is to accomplish per each session. I also typically like 2 full rest days per week. So a modification for the above schedule may put the Wednesday skill work and put it on Saturday instead. This is often a better choice for those who are still in school.
For other sports such as gymnastics the strength and conditioning work will usually go before or at the end of entire practices. Practices may be 4-5x a week: for up to 4-5 hours each. 2-3 hours may be spent on just skill work for events while the rest of the time is spent on flexibility and mobility training addition to the strength and conditioning at the end.
I am not privy to other sports' typical methods of strength and conditioning. However, these are the two typical structures that can be used and modified depending on the volume of skill work and need for physical preparation and mobility.
Strength is the foundation of athletic development. Therefore, strength for these athletes is the most important attribute to develop at novice and intermediate levels because it allows other various attributes to develop optimally. For instance, strength translates very well into other physical attributes that we need to develop for sports: cardiovascular endurance, stamina, flexibility, power, speed, agility, coordination, balance, and accuracy.
This is true even in endurance related sports. Elite marathoners run 4:30 miles 26 times in a row. You cannot run that fast if you do not have a large amount of strength endurance. Even the mile and 1500m world record holder Hicham El Guerrouj had strength and power work in his workout regimen at least 3-4 times a weck even as he was running upwards of 8-9 times for each of those.
My main point is that if you want to get better in your sport you cannot ignore good physical preparation. Weight training is a way to gain physical preparation. However, now that bodyweight strength training has been more fleshed out I think it is a very good alternative to weight training especially in some select sports and/or disciplines.
Should you or should you not do extra cardio? Should or should you not include other exercises or sports that are like cardio such as pick up games of basketball, football, etc.?
Recently, there have been some discussions about cardiovascular work as it applies to clite level gymnasts. The Chinese, Bulgarian, and German gymnastics teams are consistently putting out high level strength gymnasts, especially on rings. We will talk about why cardiovaseular running is used for them, and whether or not the concept applies to us.
Let me use an analogy.
An "acrobic base" which can be derived from below anacrobic threshold running (similar but not as slow as LSD running — long slow distance) is similar to the gas tank in your car. The bigger your aerobic base the more possible "fuel" you have to use. Providing you continually fill it up with high quality gas which is akin to high quality food.
An aerobic base can be built any number of ways through running, cycling, swimming, etc. The somewhat non-specific — you have the bigger gas tank — but the method of training tailors the body structure (e.g. the car's tires, height of the chassis, etc.) to the specific sport, aerobic base
An Indy car would not work as well on an off road race just like an aerobic base built from cycling does not apply over to running as much. Lance Armstrong’s foray into marathon running should show you that there is little crossover. Thus, there is very little transfer from one sport to another even between those
which build aerobic bases. You cannot take someone who is suited for cycling and have them do extremely well in running or vice versa.
What exactly does an aerobic base do?
Clyde Hart, the coach for Baylor's track team and coach of the world record holder Michael Johnson in the 400m event uses a series of tempo runs for his 400m athletes. These tempo runs aim at building an aerobic base for the athlete earlier in the season and slowly progress to more intense intervals in race season. For example, a tempo interval program for a 400m runner may be something akin to §x200m with 1 min rest at a certain tempo such as 285 across which decreases the farther you go into a season.
Remember, a 400m sprint is very glycolytic in energy distribution, but it also has a large oxidative component. For those untrained and even the elite athletes will hit "the wall" where muscular glycogen in the muscles being used during the run. Muscular glycogen is almost depleted at around 300m into the run, A similar thing occurs in marathon running around mile 20-21 where total body glycogen runs out. A significantly greater aerobic base (¢.g. more gas in the gas tank) through the ability to burn more fatty acids helps to prevent the glycogen system from running out too fast.
That is to say that the greater your aerobic base, the faster you can run at your top speed without depleting significant amounts of glycogen. That extra glycogen can then be used nearer to the end of the race to significantly improve your speed down the stretch and subsequently your overall time. Elite endurance athletes can push their lactic acid threshold up near 85-95% of their top speed. For reference, lactic acid threshold is your ability to maintain activity at a percentage of your overall ability. On the other hand, untrained athletes tend to have a lactic acid threshold around 60%. Hence, why you typically see aerobic work pandered around 50-70% of maximal heart rate or maximal ability.
This is why fighters and multi-round event athletes do significantly better with their "wind" (c.g. aerobic base) when they run significantly.
The studies state that 400m sprint for men is about 60/40 anacrobic/aerobic and 50/50 anaerobic/aerobic for females. For males the 800m is 40/60 anacrobic/acrobic. The world record times for the 400m and 800m arc 43s and 1:41 respectively. This means that we can approximate a 50/50 anaerobic/acrobic split which is around 725 (43s + 101s /2) for males. Traditional energy pathway statements say that the glycolytic pathway is used as the predominant pathway for up to 5 minutes. This is clearly not the case at high intensity.
The main conclusion we can get from this is that aerobic base needs to be built for athletes whose sports have interval type activities or that go longer than about 30s which is where the glycolytic wall seems to be.
400m is a particularly interesting case because it requires a semi-hybrid of pure sprinting work and a semi-form of endurance work. Likewise, 800m runners require a lot of sprinting work too, but more of an emphasis on aerobic base. 1500m is a bit more biased towards endurance. Beyond that is pretty much all aerobic base and specialization as evidenced by Gebrselassie's dominance of 5000m all the way to marathon events.
So let us step back and apply this to gymnastics.
Gymnastic routines typically take between about 20-90 or so seconds each. The longest routine that a gymnast would perform is about 755 which is the maximum amount of time allowed for a floor exercise routine. This falls in the range where building a semi-acrobic base is effective (¢.g. > 30s of work which is the 300m mark in a 400m run). So already we know that building some sort of minimal aerobic base will benefit gymnastics training.
Most gymnasts will be in the gym about 5-6 days a week, and even in the compulsories they may be spending upwards of 4.5 hours or more in the gym. Elite athletes will likely be spending 7-8 hours or more. Hence, gymnastics is like a full time job. Thus, since gymnasts need a lot of energy to perform a lot of skill work and the volume of strength and conditioning, you can see how an aerobic base will be helpful especially for recovery from these factors.
Metabolically, most of the aerobic adaptations are occurring in the legs. However, the development of the endurance adaptations can be offset by the presence of lower body strength work and plyometrics in athletes to a certain extent. This is similar the structure of the strength and conditioning programs of 400m runners. I would say this is the reason why the Chinese require that their gymnasts squat at least 2x their bodyweight. This means that there is likely some slightly negative effect on their ability to exert maximal forces for tumbling passes, but it is made up in the fact that the additional aerobic bases now allow them to tumble for 5-6 passes well without dropping from fatigue.
There are less overall aerobic adaptations occurring in the upper body for obvious reasons. Though the increase in ability of the cardiovaseular and pulmonary systems to pump blood for recovery to the upper body does enhance both short term metabolic and overall recovery to the upper body in some fashion. This again allows additional help to allow both skill work volume to increase, strength and conditioning to occur without significant overreaching.
I think the Chinese with their state run program likely have continued some variation of the Russian periodized models for development of strength. Although it cannot be ignored that they have significant amounts of athletes to throw "into the meat grinder." Whatever the case, struetured strength and conditioning is very important to the development of elite ability in any sport. If the Chinese changed their methods 20 years ago smartly you are secing the emergence 10-15 years later with their super strength athletes on rings such as Chen Yibing and Yan Mingyong.
As Talluded to in the introduction of this book, gymnastics programs in the US do not have properly structured strength and conditioning programs. Rather the majority of gyms think you need specific exercise endurance and have their athletes do hundreds of pushups which does not work as effectively as real structured strength and conditioning protocol.
Therefore, my main conclusion is that you do not necessarily need running, but it may help. It helps the national gymnastics team because it enhances their recovery. That is to say it enhances their recovery from being full time athletes where they are doing skill work and strength work for 7-8 hours for 5-6 days aweek
For bodyweight trainees looking to obtain strength moves if you have a more advanced level of strength and regularly train lots of skill work it will probably be effective in enhancing your recovery. Some light cardiovascular work such as 10-20 minutes of steady state running work 2-3 times a week would likely be effective.
For those of us who just do this for fun to obtain cool skills it is up to you whether you do it or not. T do ot think there is going to be any significant benefit to doing it until your strength starts to get more advanced where the volume load of your skill work and strength work starts to become greater. This is where you may need the additional recovery factors.
Atanovice ability level you likely will not see much of an effect, but as long as you keep the intensity low it probably will not hurt
Along those lines I think the best way to quantify what is going to be more along the lines of active recovery work in which it would be beneficial to do is if it leaves you feeling better than when you started. So take that into account if you are going to plan on doing these types of activities on the side.
Basically, the type of work that is being proposed is where you run about 10-20 minutes at sub lactate level threshold which it is say you are comfortable talking while running.
If you have the time and enjoy running then go for it. It is another option which may benefit your workouts. But it is not significantly necessary that I would say you must do it.
For clite level gymnasts whose goal it is not to have strength and skills but to apply them in the context of a routine then extra recovery ability to facilitate practice is a good thing.
Clearly, I believe that if your ultimate goal is strength and aesthetics then most if not all of your training time should be focused on that. Doing any significant amount of aerobic work may ultimately detract from reaching your potential. However, you can argue that almost no one reaches their true potential which requires more than 10-15+ years of solid training. Therefore, a bit of extra recovery may not be 5o bad overall especially if your focus is on strength/aesthetics and longevity.
It is something to think about.
In this chapter we looked at how cross training and cardio apply to bodyweight strength training workouts
We determined that cross training is highly variable depending on the sport, coach, and level of strength and conditioning program that is implemented. If you are interested in learning bodyweight strength progressions and skills I would definitely discuss these types of things with your coach first Additionally, we should tend to error on the side of less rather than more.
We discussed the idea of strength and conditioning as a fundamental aspect of many various sports. Specifically, it is important for not only improving effectively but to also help to fireproof yourself against injuries.
As far as cardio applies it can be beneficial done ata low level of intensity for clite athletes. As it applics to us there may be some benefit, but I will leave that up to you to decide whether you want to do it because you enjoy it or want to extract every last bit out of your performance.
Injuries are a particularly hard topic to address since there is really no one-size-fits-all prescription to nurse someone back to health from an injury. Everyone responds different to treatments and has different recovery factors to take into account (differing diets, sleep schedule, training schedule, etc.).
As such, please note that the content of this chapter is general. Things that may be effective for some people may be marginally effective for someone else. It could be essentially useless to others and even detrimental to certain populations still
This is why it is extremely important to get individualized care for your specific injury. This means going to see your orthopedic doctor and potentially a physical therapist for certain issues. These people can examine you and take a look at your case and specifically prescribe rehabilitative or prehabilitative work that will help you back to full health,
However, this chapter and the subsequent one focuses on specific things we can be aware of and do to help stave off injuries and promote healing processes. Do not take anything I say here as absolute truth; if you or your professional medical care providers find something that works better for getting you back to 100% then by all means that should be chosen over the general advice of this chapter.
Any information located in this chapter should be read for general information purposes only. None of this
information should be misconstrued as medical advice. You should always consult your physician or physical therapist before accepting or using any information located herein.
I would expect that everyone reading this has heard of the saying, "No pain, no gain." This ubiquitous in the athletic world as is pushing through pain. Some coaches, usually at the high school level and below, actually believe this saying. Let us discuss why this is incorrect.
Pain is your body telling you something is wrong or adversely affecting your body.
There are different types of "pain" you could say. Some are acceptable and some are not.
The pain you get when you exercise extensively and during the exercise your muscles start to "burn" is not a pain that is adversely affecting your body (except for rare situations where this becomes excessive and continues to be pushed through). This is a metabolic type of "burn" in the muscles where there is muscular acidic build up. Metabolically, this stress on the muscles helps to force anacrobic adaptations in the muscles which may be the goal of that particular training.
On the other hand, delayed onset muscle soreness generally occurs approximately 24 hours after exercise and can last up to 48-72 hours. In some pretty extreme cases, usually a trained athlete coming back from a layoff, it can last up to a week.
Generally, you only get it when you (1) try new exercises, (2) increase volume or frequency, or (3) perform excessive amounts of eccentric exercises.
However, when examining soreness and its relation to progress, it is actually not necessary. The body is able to progress both in strength and hypertrophy or any other aspect without having to go through the pain (or pleasure) of soreness. As long as you are increasing your strength, gaining muscle mass, or meeting any of your goals do not worry about soreness. If, however, you are not progressing, the time to modify your routine, or make a strategic change of some sort. Soreness need not be involved with any of these events as it’s not an accurate indicator of an effective workout.
Laying out some guidelines for training with soreness is a good idea because people new to training often do not realize the difference between pain and soreness and when or when not to exercise because of . Here are the guidelines that I use effectively:
Whether you se it as positive or negative, soreness really is not something to worry about. Generally, itwill be more of a hindrance 1o training than anything so if you plan to do a workout hat is higher in volume than you usually do or has a lot of eccentric movements, plan on being sore. But do not make it a priority. Stay in line with your goals and aiming for progres: soreness.
There are many types of different symptoms of detrimental pain that may be from a variety of Sources: burning, scaring, piercing, sharp, dull, aching, throbbing, pins and needles, tingling, numbness, tightness, pressure and pulling
Different issues may be present depending on the source of tissue, but no mater the source we need to remember one important rule about these types of pain:
Never exercise through pain!
Remember, pain is your body telling you that there is something wrong. You should never work through pain because it is likely that you will be further damaging tissues which may significantly prolong recovery. One more workout or exercise pushing through pain can mean one more week or one more. month of rehabilitation from injury. It is just not worth it.
Chronic pain is a different story though, and that needs to be addressed differently.
Now, let us step back for a second and examine why we get injured. There are multiple ways these things occur. Knowing how injuries develop will allow us to look back at our own training and our bodies to possibly figure out why such problems are cropping up. Unfortunately, this type of analysis does not allow us to all instantly become medical professionals, but it can give us a direction of what may help alleviate and correct our injuries. Additionally, it may allow us to explain to a medical professional things we notice in our training that may have caused potential injury scenarios which can help significantly in diagnosis and treatment,
There are two major things we need to consider when we evaluate injury conditions.
That probably seems to be the most repeated and overused phrase in regards to training, nutrition, and life in general. It is repeated often because it is true, especially in regards to injuries.
This is a big problem I have seen online when people are discussing how to rehabilitate from certain injuries. People with "similar" experiences often like to chime in on what their injury was and how they were able to resolve the issue. They are not you. Different injuries may present the same symptoms on a
person, and what may help one injury may not help another. To explain this further we are going to look at a few examples.
Say we have six different people perform the same exercise such as a planche. Even though everyone is doing the same isometric hold, the sites of potential injury differ by a wide margin.
For example, one person may start to get some wrist pain issues that could potentially be tendonitis. Another may develop elbow overuse complications. Still another of those five people could run into pain in the front/anterior of the shoulder and another could run into pain in the back/posterior of the shoulder. Another person may get a muscle strain in the biceps, while the fifth and final person may have a problem with middle of the back pain.
Knowing how and why an injury develops in a person before the injury happens is nearly impossible to tell. The one factor that shows the most significant promise to predict injuries is imbalances. This main factor that we need to keep an eye on. We can look at the factors involved with exccuting a routine — intelligent volume, intensity, and frequency, proper technique, and balance between pushing and pulling — and they still may not tell us what has a high potential for injury. However, knowing these factors can blunt some of the potential for injury to aceur or depending on some of these factors we may be able to predict where someone is injured. For instance, someone may get back a back injury if they perform deadlifts with improper form.
This is precisely why stretching before or after workouts does not prevent injuries according to the scientific lterature. This is why I do not prescribe stretching for injury prevention. However, stretching post injuries is an effective intervention if there are imbalances.
Out of these many factors, there are some that we can control and others we cannot.
Some of the factors we can control to an extent are rooted in recovery like sleep, nutrition, habits, and activities oflife. Muscle imbalances can be fixed through the addition of appropriate exercises. We need to take into account activities that may cause overuse or imbalance when we train.
One such instance would be those who are in manual labor occupations being predisposed to overuse injuries expecially if they use se their bodies for a lot of heavy lifting. A carpenter who relies on his arms for his job may not want to train excessively with a lot of the tough upper bodyweight strength skills. He has increased propensity for injury just due to overall volume of his work. Getting injured may severely affect job performance.
The other factors are out of our reach to be able to control. Some people have poor genetics which predispose them to certain injuries within the tissue. For example, those with a lot of ligamental laxity have greatly increased injury risk because they are more prone to have a joint sublux or dislocate even at Tower forces on the joint. These are the most dangerous cases. While these may people need to be cautious, strength training is actually indicated for these people because strength and muscle mass will help stabilize the joints structures more. They just may need to be more careful performing exercises.
Other people may have certain anthropometry — length of body segments — which may predispose them to be good at some exercises. For example, short arms allow one to perform iron cross easier due to ess torque at the shoulders. The less fortunate have anthropometries that predispose them to be more likely injured with some exercises. For example, longer arms putting a lot more torque on the joints in iron cross. Increased torque puts a lot more strain on the connective tissues of the wrist and shoulder, especially when the muscles start to fatigue at the end of sets. Thus, we need to be aware that if something is off or does not feel right we may need to stop a set before an injury happens.
If someone is starting to get pain or become injured at a certain spot we can take an integrated look back over their nutrition, daily activities, sleep, anthropometry, genetics / family history, etc. and see if we can see any patterns that may have induced that injury.
In addition, now that we know where certain injuries tend to manifest we can be more proactive with our prehabilitation or rehabilitation work to make sure that this spot stays injury free. Indeed, the very fact that an injury has occurred means it is already predisposed to injury in the future. This is because of the weakening of the tissues via formation of scar tissue. Sear tissue is weaker than healthy tissue because it is more haphazardly structured and sometimes may be less like the actual tissue that it is replacing.
We will reexamine the shoulder since it is the lynchpin for upper body strength and is one of the more complex joints in the body. We can easily show that the place of pain in the shoulder is not always the cause of pain. This is why in some cases we get injuries that reoccur frequently even though we have. rehabilitated the area of the perceived injury.
For example, not all shoulder injuries are rotator cuff problems, and rotator cuff problems do not fix all shoulder injuries. This is one of the common fallacies I see when people are trying to "fix" injuries with the shoulders or help keep the shoulders healthy.
The "shoulder" has the most range of motion in the body and has many separate articulations and joint movements: the (sternoclavicular (SC) joint, the acromioclavicular (AC) joint, the glenohumeral (GH) joint, and scapulothoracic movement. In addition, it has muscles connecting to it from all over the body often crossing multiple joints.
For instance, the triceps brachii, biceps brachii, coracobrachialis all cross the arm (forearm in the case of the biceps) and have different connections to portions of the scapula. Pectoralis major, pectoralis minor, and subclavius, have connections from the frontanterior ribs to the humerus, seapula, and clavicle respectively. The serratus anterior has lateral thoracic rib connections to the scapula.
In the posterior (back) we have a latissimus dorsi attachment that crosses from the lumbar (low back) and mid-thoracic area across the whole seapular complex to the humerus. We have levator scapula, upper, mid, and lower trapezius connections to various parts of the scapula, and thomboid major and thomboid minor that also attach near the spine of the scapula.
We even have the inferior omohyoid (a throat muscle) which has an attachment on the scapula. We have our teres major muscle that cross from the seapula to the humerus, and finally we have our rotator cuff muscles (teres minor, infraspinatus, supraspinatus, and subscapularis) which cross the glenohumeral joint from scapula to humerus as well. This is not to mention the various ligaments, joint capsule structures, and cartilage involved with proper movement of the shoulder joint, and the blood vessels and nerves that criss-cross and interweave between, through, and under the muscles, ligaments, tendons, and joints.
So we have many of muscles and tendons coming from all different places that interweave with the network of blood vessels, nerves, ligaments, connective tissues, and joint capsules that are all involved in proper movement of the multiple joint articulations that make up shoulder movement. This is why "rotator cuff rehab" is not the answer to most shoulder problems. In some cases, exercise is even a contraindication — will actually negatively affect rehabilitation. For a shoulder injury, a medical professional will perform a variety of tests on structures and muscle function in the shoulder before prescribing anything, much less exercise in most cases.
The major piece of information to be taken from this section is that the site of the pain is not always the site of the injury.
Unfortunately, muscle and joint mechanics cannot be extensively discussed here because there are volumes of books on how all of these types of things relate to injuries. Instead, here are a few general rules.
There are four main factors that contribute to the integrity of the sues of the human body:
These four factors can be broken down into two separate categoris: neurological factors and musculoskeletal factors (much like strength training).
Posture and biomechanics represent the neural control of the central nervous system in its interaction with the environment. Posture itself is primarily a static element and biomechanics are the dynamic clement of movement. We receive feedback from our somatosensory system from these pathways in two
ways. Proprioceptive feedback is from static elements, and kinesthetic feedback is from moving elements. Each of these neural elements exerts influence on musculoskeletal structures
Because biomechanics require constant recalculations of the nervous system as the environment changes, using exercises are often the best way to reteach the body how to move and work correctly. Indeed, resistance exercise is an effective way to strengthen the muscles too.
This is not to say that posture is irrelevant; rather, proper posture provides a platform for optimal ability of the musculoskeletal structures to apply and dissipate force when called on during movement. For instance, hunched forward shoulders or "caveman posture" which is prevalent with desk jobs and computers puts the shoulder in an unstable position by changing the length and tension relationships of the muscles. With this come all kinds of problems: increased propensity for impingement (due to decreased space under the acromion), anterior instability (due to posterior shoulder weakness), increased stress on the AC joint, and many other potential injury conditions. Not only that, but posture also affects your thoughts and decision making.
To correct these possible problems, prehabilitation and rehabilitative protocol must focus on both re- teaching proper posture and biomechanics. These are things that must constantly be focused on.
Our bodies are trained to become efficient in things we do constantly. If we teach it to do wrong things which lead to injuries, poor posture, and poor movements, then we become efficient at those wrong things. Subsequently, re-teaching our bodies may require more than simply a few weeks or months of constant diligence to correct.
Do not think of this as a chore, but something else you can do to improve your health and performance. This is just like we do when we instill good habits to train well, eat well, and sleep well.
The two musculoskeletal elements each have their different properties as well.
Mobility is comprised of the musculotendinous relationship to the bones and connective tissue. Through various receptors kinesthetic feedback is provided to the central nervous system via muscle spindles which regulate muscle length, and control system for the muscle spindles via gamma motor neurons. Muscle spindles are located in the muscles themselves
Muscle length-tension relationships are also comprised of the musculotendinous relationship to the bones and connective tissue. However, it has its own set of kinesthetic feedback to the central nervous system via the golgi tendon organs which regulate muscle tension/force. Golgi tendon organs are located at the muscle-tendon junction.
Both of these feedback systems are essential for helping to regulate our posture and biomechanics from the forces/torques of gravity, the environment, and our actions. There are receptors in our skin and joints that provide feedback as well.
If we distill an injury condition down to its basic constituents we can say that:
As stated there are two conditions upon which this occurs:
Obviously, the first scenario is the worst because these people tend to have major imbalances or instabilities within their body. The aforementioned people with ligament laxity who are double jointed or who dislocate their shoulders doing normal everyday tasks.
As previously discussed, overreaching and overtraining syndromes occur when training volume exceeds capacity of recovery factors of the body.
Muscle strains are the most common examples of acute injuries from exercise.
Muscle strains usually occur when the muscles are fatigued, typically at or near the end of workout. More specifically, strains occur when a muscle is eccentrically loaded (Iengthening) under fatigue because it requires energy to slow down the muscle lengthening. If the energy is not there, the muscle lengthens beyond its ability to contract against the force against it and the muscle strain occurs.
Other types of acute injuries on tissue structures are rarer. Such things would be ligament or tendon tears and muscle cramping can sometimes fall into this category, though it depends on the type.
Generally, when these types of injuries are catastrophic enough — tendon and ligament tears — you will want to see a medical professional about them to check out the extent of the damage and review your ns are as far as recovery goes.
For strains and other muscle injuries your mileage may vary. The general best bet is to rest, RICE, and do mobility work if you are not going to see a medical professional. Avoid anything painful
For those where normal forces are enough to overcome your body's tissues and cause injury you should definitely talk to a medical professional about this. Strengthening or surgery are the most common options. Since your body is like it is you will likely have to be strengthening your entire life to avoid anything significant injuries from occurring. Think of this not a curse but motivation to become strong.
The most common chronic injury we will run into is tendonitis. When tendonitis becomes "acute" this simply means most medical professionals are recognizing that pain and dysfunction have become significant enough to diagnose,
A typical case of tendonitis commonly happens with the flexor tendons which connect at the medial epicondyle of the humerus. This condition is known as golfer's elbow or medial epicondylitis and has a high frequency among golfers (go figure) as well as those who do a lot of pulling movements such as in rock climbing. More relevant to us, medial epicondylitis rears its ugly head in a lot of pulling-type bodyweight movements, especially when training for the one-arm chin-up and iron cross.
Chronic tendonitis/tendinosis typically results from overworking through the pain of tendonitis for more than a couple months. There are numerous degenerative physiological changes that occur within the tendon itself and the surrounding tissue when you continually work through the pain.
There are three main phases in healing which are inflammatory phase, proliferation phase, and remodeling phase. The body initiates an inflammatory phase when tissue is damaged. This is normal; it occurs when there is microtrauma in muscles and that is how we get hypertrophy. However, when there is too much stress the body cannot get out of the inflammatory phase and therefore cannot initiate a healing response where the tissues can proliferate and remodel to heal the damage.
Inflammation in and of itsel is not negative; in fact, we need a certain amount of inflammation to facilitate the healing process. When we get chronic suppression of immune response to inflammation, the tissues start to degrade and weaken further because they cannot get repaired correctly.
To compound on this, the body also senses (via the somatosensory system) that the area is in pain and thus starts to shut down muscular involvement in the area in an attempt to discourage us from using that area. That is why all of the muscles in the area, most notably the forearm flexors, start to get extremely tight, lose strength, and as it progresses they atrophy.
So here we have suppression of healing along with muscles in the area tightening and locking up. This combination exerts constant tension on the tendon and becomes a huge problem.
When muscles are relaxed, blood flow is able to work itself into the area for healing; however, when there is constant tension on the muscles and tendons they start to get hypoxic and will not heal correctly. In some cases they will even cramp up.
This may lead to the development of tender spots (localized aras of tenderness in the muscles) or trigger points (points in the muscle which produce radiating pain in certain distributions). Hypoxic conditions are often associated with stiffness especially after periods of immobility such as getting up in the morning, so this is why chronic tendonitis exhibits this type of pattern.
Overall, the area loses quality and becomes painful, tight, and stff, especially in the tendon. You start 10 lose range of motion because of the tight muscles which may start pinching nerves causing numbness and your ability to exhibit strength decreases.
Looking back over the four areas discussed earlier (posture, biomechanics, mobility, and muscle length-tension relationships), we can see how this disrupts multiple aspects of the neuromuscular system and the musculoskeletal system.
Rehabilitation for chronic injuries is therefore focused on multiple angles of attack and can be often not as straight forward as rehabilitation from acute injuries. The best case scenario is to never let it get that far if possible. However, once it is that far many things need to be addressed.
Typical rehabilitation depends highly on the quality of the tissues. For instance, remember back to the example of Olympic swimmers warming up for their events. They shake their muscles which are loose and pretty pliable. That is how your muscle tissue should be at all times if not being contracted.
If you palpate your muscle tissue and it is tight, painful, and it does not move well when you massage it then that is what you want to focus on correcting. Stretching will help through lengthening the muscle and help reduce the tension (which can be one of the causes of tendonitis), but using other types of work such as massage will help regain that desired looseness and pliability.
To be considered "fully healed", you must (1) feel no pain through full range of motion, (2) be able to exercise like you want to without limitation, and (3) have tissue that’s loose and pliable.

In this chapter we looked at the distinction between pain and soreness and how to identify between each. We also concluded that we should never under any circumstances be working through pain unless supervised under a medical professional.
Additionally, we learned about the four factors that affeet injuries which are posture, biomechanics, mobility, and muscle tension relationships. All of these play a role as risk factors in injuries and improving many of these factors will help us to stave off injuries in general.
Likewise, we also looked at the factors that make up how acute and chronic injuries develop, and some general solutions to each of those.
Each type of injury is different and different things may help one injury to the next. We will ematically look at how to evaluate these issues.
If the injury is single event (e.g. acute onset) and catastrophic in nature where you know there is damage, such as an ankle sprain, and there is very significant swelling/edema then you should definitely schedule an appointment with a medical professional immediately. RICE, anti-inflammatory medication, massage, etc. can all help, but you really need professional attention for these sorts of problems to rule out damage such as fractures, torn tendons, etc.
If it is more chronic onset and you were foolish enough to push through (heck, we all are at some point) then you need to rest. Fairly often, rest heals all pains completely before they become too problematic. While resting, incorporate painless mobility work to keep blood flowing and maintain range of motion. Supplement that with massage, assuming it is not painful, again to keep blood flowing and Toosen up tight tissues.
If the pain is persistent even after a week of rest then there is an issue present that nceds to be dealt with specifically.
It takes a lot of honesty with self to answer this question aceurately. It is common among athletes to have a monstrous work ethic and that tends to come with some stubbornness. Suppress that stubbornness and be lucid.
Tell yoursel, "Hey, if something hurts during this exercise, and I have done this exercise a lot this week or month then maybe something is being overworked by this exercise."
Accept that there is a strong possibility of an overuse injury. Do not let it get to you. Realize that as long as you rest and take the proper steps to fixing it, it will heal a lot sooner than what it seems like. Relax and do non-painful mobility work and massage instead.
Is it more neurological in nature where there is tingling, numbness, or a radiating type of pain? If so, it is time to see an orthopedic doctor or physical therapist. You do not want to mess around with this type of pain, especially if there are sensory and motor issues involved. Get yourself to a medical professional as soon as possible.
What type of tissue is the pain located in? The muscle? The tendon? The bone?
If it is located within or on a joint or bone it would be a good idea to see a medical professional for the same reason as the neurological symptoms. When this type of pain arises it is likely more serious, such as ligament or cartilage damage. These are things you should be discussing with your orthopedic doctor.
However, if it seems to be more muscular or tendinous then there is more we can do on our own to help fix the issue. However, do not rule out sceing a professional as they likely know more about rehabilitation of such injuries than you do yourself.
Is it inflamed, painful, tight, stiff, or otherwise poor quality?
If so, the source of injury may be affecting the quality of tissues in the surrounding area which can definitely become problematic. In some of these cases, simply loosening the surrounding area can actually improve the injured area.
Again, doing non-painful mobility work and soft tissue massage with the area and the surrounding tissues may help.
However, if it is a more complex joint such as the shoulder, the area that is painful may not actually be the source or cause of the injury. For example, muscular weakness in the back of the scapula is very common and can lead to shoulder pain. When you start to use the shoulder a lot, the other muscles try to take up the slack from the muscles that are weak or inactive. Thus, the actual tissue that gets injured is the one being overused when the true root of the problem is the weak or inactive muscle. This is why rehabilitation work to a specific area will usually fix the injury by strengthening the muscle/tendon involved, but the injury often comes back when the rehabilitative work stops or does not progress properly.
Likewise, the lower body is intimately connected. Issues in the feet can cause lower back pain, and issues in the back can cause foot pain. Often times people with knee pain will have range of motion and strength issues at the hips and ankles. Be cognizant of these types of things.
Any type of repeating injury or nagging injury is almost always because of a problem in a different area. Chronic low back pain that does not address proper gluteal and hamstring flexibility will often stick around for a long time. Patellar tendonitis rehabilitation that does not focus on correcting the biomechanical patterns of lack of range of motion and strength in the ankles and hips will continue to be a nuisance.
For an injury in the shoulder where your rotator cuff or muscles around the glenohumeral joint may be having issues, do not be so sure that those muscles are the ones that are the ones causing the problem. The problem may often lie in other muscles surrounding the scapula such as the latissimus dorsi, thomboids, lower/middle/upper traps, serratus anterior, pectorals, efe.
This is why for shoulder pain I typically recommend getting it checked out by a physical therapist: most people have no clue about properly evaluating muscular imbalances, weaknesses, or overuse in the shoulder. Remember, the site of the pain is not always the cause of the injury.
If you know there are some imbalances that need to be corrected that may be a good place to start, Which leads us to...
This is an innately tough question. Building routines off of the full body, push/pull methodology tends to be more fairly straight forward in fleshing out possible imbalances.
Muscle imbalances are typically insidious and can show up anywhere in the body. It is common to see an anterior/pushing imbalance often from beach muscle work only — bench, curls, and abs! If your pushing work (e.g., dips, handstands, handstand pushups, planche, pushups) exceeds your pulling work (2. pullups, inverted pullups, rowing type exercises, front lever, back lever) then there may be an imbalance that develops.
When we use our muscles to put out force, the body also has to reciprocate by using the antagonistic muscles in an eccentric motion to help "balance" the joint lest it get pulled out of its socket and incur catastrophic injury. For the shoulder as it comes overhead it must roll anterior and superior and glide posterior and inferior respectively. As such, if we train with excessive volume on one side and never strengthen the muscles of the opposite side then they will end up lengthened and weak while the other side is tight and overused.
This problem is two-fold: we can end up with an injury in the back or posterior shoulder along with problems in the front of the body. If the injury occurs on the side of the body that the exercise is working, especially in the muscles and tendons that are being worked, it is likely overuse. However, if it occurs on the opposite side of the body it is probably a muscular imbalance or postural issue.
Unknowingly, this happens to many people as a product of modern living. As humans, our eyes look forward and so the things we to in our daily lives are always in front of us. Without an awarcness and corrective procedures against it it is easy to develop poor posture: head forward, shoulders hunched forward, pelvis tipped forward, and a rounded back. Sitting and slouching do nothing to help fight thi process, nor does training beach muscles or even planche without a proper balance of exercises.
When poor posture develops this puts us into two of the four problematic categories, namely problematic posture and muscle length-tension relationships. When this happens, it is easier for the biomechanics of movement to be thrown off.
For example, when doing a planche our strong anterior deltoids are contracting extremely hard which pulls our humerus forwards and upwards in the glenohumeral joint. Normally this is fine. However, if the posterior muscles of our shoulder are weak, it can start pulling our joint too much forward and too much upwards which causes rubbing and impingement upon soft tissue structures. On top of that, we have not sufficiently exercised the posterior part of our shoulders. Thus, when they are being used eccentrically, they will become excessively fatigued and start to be susceptible to a strain and extreme tightness.
Our bodies are smarter than us. In cases like these it senses that we are on the brink of injury and it starts to lock down the muscles of the shoulder and decrease force output capabilities much like it would do in the case of pain. The posterior part of the shoulder, especially the rotator cuff, may become extremely tight and painful. Our motion and force output capabilities become limited. We have an injury and do not even know what caused it.
This is why, when looking to evaluate the injury conditions, we want to look at those four factors: posture, biomechanics, mobility, and muscle length-tension relationships. These things will indicate to us if there is an injury condition in the area and set the stage for what approach needs to be taken to correct the problem.
NOTE: Consult your physician or physical therapist before doing any specific rehabilitation on yourself.
Again, a diagnosis from a qualified professional is extremely important. The last thing you want i to rest three weeks and have it tum into a nagging injury that lasts three months or even three years, which i not uncommon. If pain is persistent over a week get it checked out by an orthopedic doctor.
From this point on we want to start with 40% of the volume and intensity that was being implemented prior to the injury then add about 20% a week until we have gotten back to full workout load. This means that we get about to full workout load in the fourth week which gives time for the injured issues to be strengthened without the risk of having the injury flare up again.
If there is a relapse, then decrease the load volume back to somewhere between 20-40% depending on how the injury affects the exercise and instead add about 10-15% per week.
Now, if the injury has relapsed for the second or third time (or even more) and you still have not gotten it checked out by a medical professional then it is definitely time to go see one.
It is clear at this point that you will need someone who can holistically evaluate your movement mechanies to see if the problem is beyond what the pain is telling you. There is no shame in admitting that you cannot rehabilitate yourself and consult someone in the medical field who went through years of schooling and tens of thousands of hours evaluating and rehabilitating injuries.
You will typically be best served looking for a well-qualified orthopedic doctor, physical therapist, or chiropractor that really listens to your situation and fits with your personality. While there are some massage therapists and personal trainers who do know a lot about injuries, they seem to be more of an exception. I recommend trying to find ones that work with athletes. If you are having trouble, it may be a good idea to call up your local university and see which physicians and therapists they use.
Different individuals will also have their different specialties, especially with orthopedic doctors. Some work specifically with lower body, some with upper body. There are shoulder specialists, knee specialists, and so forth.
Above all else, it is not what field he or she is in, but if he or she works with athletes and has a good reputation. "The cream of the crop rises to the top." Generally, these will be the people who work with sports teams for universities or high schools and have extensive knowledge of orthopedic injuries and your treatment options depending on the severity of the injury.
Acute or chronic, propensity for overuse, pain location, tissue quality, posture and positioning, and biomechanics all play critical roles in the development of an injury. Even if you have a good idea of what it is, it is almost always a good idea to have a qualified medical professional have it checked out for you.
Finally, we looked gencrally at an evaluation of the circumstances surrounding an injury. We saw that the preferred approach that is best is it see a medical professional for a diagnosis. Once we have a diagnosis, we can more thoroughly address the cause which makes for a faster rehabilitation.
If such solution are unavailable, it may be necessary to go with the wait-and-see approach although it is not preferred.
The previous chapter extensively covered general information about injuries and how to deal with them. The focus of this chapter is programming around certain injury conditions while we continue to rehabilitate them on the side. Also, we will talk about how to program when coming back from an injury.
Working around injuries presents some difficulty since we never want to exercise through pain. We have to plan our workouts extensively to avoid certain injured muscles, connective tissues, and/or joints. However, the most important thing is that we continue to rehabilitate injuries even as we work around them
Intra-limb and opposite limb exercise are tools for keeping strength specific to the joint that has been injured while continuing exercise with the unaffected limbs and other areas. This will help promote circulation to facilitate healing and retain the habit of continuing to workout.
A right side shoulder injury will be the model used here to help demonstrate some of the approaches available. We will assume moving it too much hurts or we have doctor’s orders to rest and avoid exercise on this injured body par.
The number one reason our muscles start to atrophy is immobility. Atrophy duc to immobility occurs very rapidly, even as soon as a week or two after having to restrict a joint due to injury. For instance, anyone with a cast for a broken bone has seen how quickly the atrophy starts to set in.
As such, the first thing we want to look at i if we can use the rest of the arm for exercise. We can counteract some of the effects of atrophy with exercise distal to the injury site. In this right shoulder case, we would want to start utilizing isolation exercises for the elbows, wrists, and fingers.
If doctor’s orders have been given, it would be a good idea to talk to him or her and ask if arm or forearm exercise is contraindicated during the period of immobility for the shoulder. If the exercise is cleared, it is time to get busy.
This is a great time to use specific isolation exercises for the arms such as biceps curls or triceps extensions. Forearm exercises would also be a great idea to work with to keep up strength in that arm while the shoulder is immobile. Some of the exercises do utilize a bit of shoulder muscles for stabilization, soif that aggravates the site of injury then avoid them. Grip work is often a good choice as well
Additionally, the use of the arm and forearm muscles sends neurological output to the arm as a whole. This is important because of the radiating effect of neuromuscular impulses will stave off atrophy. Activity from the motor neurons themselves are very important to the health of the muscle. In fact, if one were to cut through a motor nerve or sever the spinal cord, related muscles will start atrophying within a couple days.
If light exercise or mobility work (non-painful of course) is indicated for the affected joint, we should to do as much as possible without aggravating the area. It will stimulate additional blood flow to speed healing and prevent muscle atrophy while maintaining the very important range of motion.
There are almost always ways to continue training the injured limbs in question without compromising the injury. If, however, nearly al types of movements hurt at an injured joint then that is a big red flag. Get checked out by a medical professional.
Do note that essentially any exercises you can do without pain are fine to do. A common example is a stark difference from pushes to pulls. Pushups (or another pushing exercise) may cause very intense pain while rows (or another pulling exercise) do not bother you at all. Avoid the painful pushing but continue with the pulling.
If you are cleared by a physical therapist or doctor to do rehabilitation work but it is painful ask them. There are select instances where working through pain is useful. For example, if you had an ankle sprain, we definitely want to begin stretching out the ankle to prevent less of range of motion while the ankle is still in the inflammatory phase. It depends how bad the swelling is as to when begin stretching protocol. However, generally speaking we will start stretching even if it is painful.
In these specific cases, we may prescribe stretching or mobility work and tell you to do as much as possible if and only if the pain does not get worse. Like using cardiovaseular activities for recovery, we always want to end feeling better than when we started or at least as good. This should make logical sense given how easy it is to make an injury condition worse.
Referring again to the proposed right shoulder injury, one of the things that helps retain strength in the injured arm is doing strength work with the uninjured arm.
The nervous system is very adaptive. One of ts interesting adaptations is the phenomena of cross education. Cross education occurs when a unilaterally trained a skill or strength movement with the opposite limb, some strength benefit is conferred to the opposing limb even if the opposite imb has not

practiced the skill or performed any strength work at all. Therefore, if we do unilateral work with the left arm during this time, there are some conferred benefits to the right arm.
An example of this for skill work would be throwing a ball or dribbling with a basketball with the left am. Then we would practice throwing or dribbling a basketball with the right arm. To conclude the experiment we would retest the left arm and you should be able to dribble better or throw a ball farther without having practice with that arm at al.
The studies show that the transfer of strength from cross education is somewhere around 5-10% to the opposite limb. While this is not much, it is sill very beneficial especially if our injury sets us back for any Tonger than two weeks because of the potential atrophy and rapid decrease in neurological strength we tend to see during periods of prolonged rest. Retaining strength and stability is vastly important because weakness prolong injury recovery as well. The more intact the system stays, the quicker the recovery will be.
We do have to take care that we do not develop any imbalances between the uninjured and injured Timb 0 we will tend to keep the volume of the work on the lower side but the intensity fairly high, much like typical strength work
After utilizing all options we have with the injured limb and its opposite, we still need to continue work with the rest of the body.
Some types of exercises that utilize the full body such as squats and deadlifts may interfere with proper healing or involve the injured side in a way that would be detrimental to recovery . Therefore, we are going to want to avoid those for the time being.
This is also a great chance to work on specific weaknesses. For example, if you know you have tight hamstrings or a tight back, use the injury recovery time as a chance to work on these mobility limitations. Once recovery is finished, an even more complete athicte has been developed. This is especially important if flexibility and mobility are lagging behind in certain skills such as press handstands or V-sit/manna type work,
For the legs it may be better to focus more on light intensity exercises to help get the heart rate up and speed blood flow which will accelerate healing. Likewise, it may not be a bad idea to pursue balance and agility type work alongside everything clse.
Really take advantage of this time; whatever we can identify as a weakness in regions other than the injury should be focused on as long as it does not impede the injury recovery process.
In a similar vein, it is also possible to work more strength oriented work, again assuming it does not affect recovery. For instance, injuries in the lower body may allow us to focus a lot of work on handstands or rings strength work
The possibilities are limitless. You just have to identify weaknesses or goals that you want to work on while recovering and then be creative with your exercises. Sometimes that is when you have the most fun
too — when you think outside the box. Do not let injuries get you down. Use them as a learning experience and to work on your weaknesses so you can come back stronger and better than ever.
NOTE: Consult your physician or physical therapist before doing any specific rehabilitation on yourself.
The exercise(s) chosen is/are dependent on the particular injury condition and the physiological parameters that we are trying to affect. However, any exercise must fulfill two conditions.
The first and most important parameter is that any exercise chosen must not be painful. Again, pain is the body's way of telling us that something detrimental is occurring in our bodies. Thus, we are not ready to execute that particular exercise. Exceptions may apply to strengthening or range of motion exercises that may cause pain to rehabilitate certain conditions (usually this occurs as a result of rehabilitation from a catastrophic injury), but this should only be preseribed by a qualified medical professional.
Note that the "pain" from stretching is generally acceptable as that discomfort is inherent in completely healthy stretching. Encouraging the maintenance of range of motion is extremely important but be sure the pain is not from a true injury. It can be very hard for some people to differentiate the types of pain or discomfort. All in all, the best option in that casc is to consult a medical professional about your particular issue.
The second condition that we look for is that the exercises themselves are performed with a full range of motion and controlled with good form. While this should always be reinforced, now more than ever is the time to be absolutely sure there is no deviation from accurate technique and control.
Rehabilitation is not useful if the wrong structures are being rehabilitated. Additionally, strengthening anarea in a limited range of motion is not conducive to regaining full operating capacity of the structures we are working to heal.
During the concentric phase of the movements we are looking for a smooth, well-controlled motion. Therefore, do not worry about acceleration through the movement like most regular strength training. Our biggest focus will be on a slow ccceniric phase of the movements as it is the most important factor in rehabilitation exercise
More intense injuries like tendonitis and muscle strains tend to respond exceptionally well from properly used slow eccentric exercises during rehabilitation. Even semi-injury conditions such as chronically sore muscles or injuries where there may be control, balance, to proprioceptive issues also tend to respond well to the use of negatives.
As of this book’s writing, the theories as to why this happens are not very well hashed out, Thus, T willtry (0 discuss them here as thoroughly as possible as to give you the reasoning behind utilzing eccentrics or emphasizing the eccentric phase during rehabilitation exer
The primary component of exercise-induced muscle damage comes from the eccentric phase. When under load, the myosin heads that bind to the actin have to release in controlled fashion to keep tension on the muscle as it lengthens. In concentric exercise the myosin heads only need to grab and pull depending on the force load.
The popping sarcomere theory attempts to explain the damage that a muscle undergoes during eccentric exercise. As the muscles tire, the myosin cannot release in controlled fashion. Multiple bands of actin and myosin are in a single sarcomere, the smallest unit of a muscle. Thus, as control of myosin detachment in a sarcomere decreases, the sarcomeres themselves will eventually distend and pop causing microdamage to the musculature at this level. This type of microtrauma causes delayed onset muscle soreness via the inflammation and repair to the muscles. The inflammation also heightens of the sensitivity of C and Ad pain fibers from the inflammatory processes.
To counteract this, the muscles then undergo some adaptive changes.
Firstly, when the body senses that there is a lot of eccentric damage it starts adding sarcomeres to the muscle to help try to mitigate that damage. This way, if the exercise is performed again it will have more available units to fire as the muscle fatigues so less popping occurs. Basically, the same amount of work will be distributed over more nits and will decrease workload per unit. This will avoid significant damage to the muscle. Athletes who take a break off exercise for a while who push themselves when they come back can have wicked DOMS for 7-10 days or even develop rhabdomyolysis. This is what the body wants to avoid. The addition of sarcomeres is especially useful for rehabilitation of strains because it increases resistance to damage, especially the macrodamage to the muscles when a strain occurs.
Secondly, the eceentric motion requires the most control. When this control system starts to become compromised due to pain or injury, we find that when performing a negative there is an interrupted, jerking-type motion instead of a smooth movement.
The jerky movements leads to unstable movements, especially when repeated a lot, and thus may represent a significant factor in the development of some injury conditions like tendonitis. As you know, creasing the jerking of a movement increases the impulse forces on a muscle, tendon, or other body tissues which can lead to more damage. Thus, restoring the smooth movement through controlled eccentric training will help take the strain off of the jerking movements. This will allow better and faster healing to occur.
In particular, pain is a big inhibitor of muscle function. If you punch someone in the arm and then make them try to lift weights even if you did not do any significant damage to the muscle they will still be able to lift less. Why? When the body senses a noxious stimulus, it will feedback to the motor cortex to inhibit force production. The body knows that if large forces are used in a painful area, the more likely it s to receive additional damage. Thus, it inhibits motor drive. The body already has natural inhibiters on the
muscle via golgi tendon organs. I am not particularly sure if the body is suppressing cortical drive through the golgi tendon organs or at the level of the brain or spinal cord —all I know is that it occurs.
A third factor is the standard adaptive muscular changes from strength and hypertrophy work. Time under tension, fast twitch activation and fatigue, acelusion, ecceniric damage, and metabolite accumulation all driven by progressive overload will produce strength and growth. Fighting the inherent atrophy from injuries is critical.
To top all of that off, there is also plenty of benefit from simply improved circulation and encouragement of blood flow from the high repetitions and the consequent nutrient avalability, prevalence of healing factors, and clearing of waste.
The culmination of all of these factors will help speed the recovery and performance maintenance processes, but understand that there are still physiological limitations of time when it comes to healing.
If you have suffered a catastrophic injury, the amount of time that it takes to recover can be estimated by the number of letters in the name of the tissue that is injured. This is fairly easy to remember and gives a good approximation. For example, a torn ligament that has been repaired will take approximately eight months (ligament = § letters) to rehabilitate properly. The other tissues are cartilage (9), bone (4), muscle (6), and tendon (6). Since these figures are used for catastrophic injuries, understand that strengthening the tissues to properly rehabilitate enough to workout again for most any other type of injury will take fraction of that time,
In my opinion, if after one week of pain that does not start improving, i i professional to get a diagnosis. If the injury relapses a second or third time then you should immediately see a medical professional. Injuries that are non-catastrophic will generally not take longer than 3 months to rehabilitate. Therefore, if you are struggling with injuries longer than a month to heal up completely it is simply a waste of your training time and health to be dealing with these when you can likely have them resolved much quicker with professional help.
As briefly discussed earlier, high repetitions tend to be good because of the increased blood flow and other physiological parameters that are increased that will help speed up the healing process. Start off with the 20-30 range and if there is any doubt, err on the side of 25-30 repetitions.
All repetitions are performed with a constant speed concentric taking about 1-3 seconds on average with a slow, controlled eccentric phase taking anywhere from 3-10 seconds. The length of the eccentric: phase typically depends on how poor the control of the limb is: the poorer the control, the longer we want to take for the eccentric phase,
Generally, you would start with 1-2 sets and then bump up to 2-4 sets as you improve. This depends on the actual amount of exercises that you are doing for rehab as well. Overall volume for rehab depends
on alot of various factors such as how the injury is responding to exercise, how fast it is recovering, and how it is feeling specifically that day.
For tendon specific injuries the repetitions will increase to 30-50 repetitions for around 100-200 repetitions total at about 40% 1 RM. For cartilage type injuries you will actually want a 20% 1 RM load for thousands of repetitions if possible. For example, this is why you will see athletes coming off of knee surgery (in the NFL) riding the cycle on the sideline for long periods of time. Injured cartilage takes a relatively long time to heal, and thus we want to use very low intensity at very high repetitions to increase blood flow and nutrients to that area.
If there is any pain during any part of the rehabilitation process that is generally a reason to back down the weight or volume. When in doubt, stop the session completely. "No pain, no gain" is a poor motto in rehabilitation.
Choose isolation work if compounds are too painful, but if not then work with low intensity compound exercises. If the injury is catastrophic then default to isolation exercises because the weights and forces can be modulated to suit the injury much better than compound exercises. It is always favorable to be conservative and start on the low end.
The goal i to get back to the exercises from the original workout plan, so add them in after the injuries start showing some sign of improvement. The next goal is to work back up to full intensity with those exercises with the following approach.
Start with 40% of the volume previously used and add about 20% a week until returned to the original full workout load. This sets the stage to take about four weeks before working with full intensity again which gives time for the injured issues to be strengthened without the possibility of us overusing it again If there is a relapse, drop the volume 20-40% depending on how the injury takes it and come back by adding about 10-15% per week instead.
Taking a month to get back into full workload is going to be typical of a fairly minimal to moderate injury which would be around a grade I strain or have had tendonitis for 2-3 months. This would also correspond to having had some other type of overuse or pain for about a month. The month of decrease in volume and allowing proper recovery will help calm the tissues down from being aggravated. Scale from there accordingly.
For low grade injuries, it will take a quarter to a half of the time that the injury has been around. So if the injury has lasted for four months it will likely take about four to cight weeks to get it back to full health depending on your individual recovery factors (diet, sleep, stress, ability to rehab without pain, how your body is responding, etc.).
This is an extremely conservative protocol, but it is much wiser to spend a little extra time now rather than have a continually re-occurring injury. When in doubt it is always best to start conservative and then increase the volume if need be. If you start with too much and reinjure yourself it will take that much Tonger to rehab and you will be even more prone to injury. It is just not worth it. Take things slow and consult a trained medical professional if possible.
In this chapter we learned about how to effectively and safely program around injuries using the various methods of intra-limb exercises, opposite limb exercises, and working out in unaffected areas. Intra-limb exercises that avoid the injury help to keep up the strength/mobility of the uninjured tissues, opposite limb exercises help out by the theory of cross education, and other affected areas will also help with blood flow and overall well being.
Likewise, we learned the physiology on certain programming protocols for general rehabilitation of injuries. We learned that typically light, controlled, eccentric exercises work the best for most types of injury conditions. We also identified why higher repetitions tend to work the best.
The most important thing we learned though is that we should always be doing rehabilitation for our specific injuries and not just try to skirt around them by programming other types of exercises to compensate.
This chapter specifically and this book in general are not meant to diagnose any injury. If you have an injury and are unsure, the best suggestion is to make an appointment with your doctor, physical therapist, or chiropractor and figure out what you are dealing with. At that point this chapter will be more useful.
Remember to keep in mind that these injuries will be discussed because they are common, but pain in the areas described does not immediately imply a specific injury even if it is a common injury. Take caution since exercises or rehabilitation techniques used for injuries which have not been diagnosed properly may actually worsen them. Have a qualified medical professional diagnose the condition.
Essentially, tendonitis is an overuse injury. There are many possible ways for it to develop such as muscle imbalances, scar tissue, general overuse, and/or under-recovery. Tendonitis develops because our connective tissues adapt and recor ‘Thus, heavy loads that can be handled by the muscles may not be able to be handled by connective tissues as you get stronger. Over time this has negative consequences, one of which is tendonitis.
struct slower than our muscles.
Tendonitis is characterized by three general stages.
The first stage is characterized by the *-itis" or inflammation. In this case the overuse is acute and generally within a week of it starting to hurt. Depending on the amount of aggravation caused, ¢.g., how. much the pain is ignored and worked through, this stage may last up to three to four weeks. If the aggravation is continued beyond this then the injury progresses to stage two,
The second stage is characterized by chronic degeneration where inflammation goes away and the pain tends to intensify. While this usually occurs most significantly during exercise, pain can be present even while not exercising.
The third stage is tendinopathy in which the tendon itself is weakened to the extent that it may rupture. Pain tends to be extremely bad and may be present all the time in the form at some level.
First stage: The two things to look for that place the injury in this stage is that the injury only hurts during exercise and it noticeably improves with rest.
Second stage: This stage is marked by changes in the signs and symptoms of the exercise. Generally, the affected tendon and surrounding musculature will be tight and stiff especially after periods of activity like waking up in the morning. Pain during exercise is variable, but it may hurt even while not excrcising. Sometimes the pain will start to go away after the muscle and tendons get warmed up for exercise which makes you think you can do more. However, excessive exercise should be avoided.
Third stage: At this stage, the pain has developed to be really bad and you should be discussing it with your doctor or physical therapist.
Typical Site:
The typical sites where tendonitis develops with bodyweight exercise are:
Medial epicondylitis (inner elbow — Golfer’s elbow) which arises from excessive high intensity pulling exercises.
Triceps tendonitis (elbow) which arises from excessive high intensity pushing exercises.
Biceps tendonitis (elbow) which arise from excessive high intensity pulling exercises or shoulder compensations.
Wist tendonitis (wrist) which arises from overuse at the computer or in excess flexion/extension of the wrist. Knowing how to distinguish this between some other wrist injuries is discussed later.
Stay away from painful exercises
Pain is your body telling you that something is wrong. Listen to your body. Continual aggravation of the injury will make it worse and significantly hinder your training.
One to two weeks of total rest should clear up mild forms of tendonitis because the initial inflammation will promote healing. Realize that this does not mean you have to cease workouts altogether but just the exercises of the injured body part. Non-painful mobility work should be executed during this time.
If the rest is successful, work your way back into exercise by starting with 40% volume and adding 10% more each week as it’s very easy to aggravate again. If you feel any twinges of pain or aggravation, immediately back off for the day. It is better to be conservative than to have a chronic condition.
Unfortunately, chronic tendonosis may not respond favorably to pure rest. If your tendonitis does not clear up after two weeks of total rest then you probably have a chronic condition. This needs to be treated different than just mild tendonitis: rehabilitation exercises are needed to stimulate the inflammatory process (along with massage) to promote healing. Any other exercises that use this affected area should be eliminated.
The purpose behind massage is to promote blood flow to the area for healing as all tissues need to have nutrients delivered and waste products cleared from the area. Massage also helps improve tissue quality through helping to release and reorganize the tissue via the body’s natural inflammatory processes
plus break up any scar tissues or adhesions that may be limiting proper movement of the affected and surrounding area
Cross friction massage and myofascial release should be concentrated first and foremost toward the tendon and secondly to the immediate local area within one inch of affected location. Start out very lightly as the tendon may be sensitive. Soft tissue work that is too aggressive may further aggravate the injury.
To ensure the surrounding musculature is operating correctly and not causing excess strain to the affected area, continue to apply cross friction and myofascial release to the whole area in between both joints that surround it. For example, with medial epicondylitis, massage all of the muscles between the shoulder and wrist; with patellar tendonitis, massage all of the muscles between the ankle and hip. If it is an option, using alterative manual massage techniques may help. Graston technique, ART / trigger points, foam rolling, and golf or tennis ball rolling are all great methods to work with.
Note: If one has been through physical therapy and the therapist did not use significant amounts of manual massage therapy then his or her ability as a therapist is questionable in my opinion. Besides rest and ice, which most doctors and physical therapists recommend, the number one thing that will help the most is massage and/or self-massage.
Like massage, icing helps limit some pain and excessive inflammation (which is characterized by edema) especially when done immediately after exercise or prehabilitation work. Additionally, after being iced the body tries to warm up the area and thus promotes blood flow to the area.
Two approaches to icing are generally accepted. Either ice for sessions of 10 to 15 minutes and complete two to five sessions per day or simply ice every other hour on the hour. Direct ice massage on the skin tends to work the best, but avoid getting frostbite.
Alternatively, heat can be beneficial in certain situations. It usually helps most for non-acute overuse injuries afler a week or two of acknowledging the condition and starting to work towards fixing it: at that point the body has had some time to heal
If ice does not help your condition then do not use it. There is no reason to use ice if it does not help.
Chronic cases tend to respond a bit better with heal. If ice is doing nothing and you suspect a chronic case of tendonitis (it has been around longer than multiple months) then heat is a viable option.
Stretching is aimed at the agonist muscles (c.g. the muscles that connect to the tendon in question) because they are usually tight and short from overuse which may contribute to excessive strain on the tendon. On top of that, when there is distinct overuse on one side then there is usually an existing muscle imbalance. Both of these tend to put more stress on the joints and supporting structures such as the tendons and ligaments. Therefore, correcting the imbalance and loosening tight muscles should help get the tissue to function properly.
As a small side benefit, the eccentric nature of stretching creates a gently stimulate the body’s natural inflammatory process for healing.
ceptable microtears which will
Focus the stretching on the agonist muscles connected to the tendon and focus the strengthening for the antagonistic muscles on the opposite side. For example, with medial epicondylitis at the elbow, stretch the forearm flexors and do strengthening work for the forearm extensors. For patellar tendonitis, stretch the quads and strengthen the hamstrings,
This protocol is mostly for chronic tendinosis cases that are not alleviated with solely rest. Eccentric exercises help because they induce small amounts of microtearing which is part of the inflammatory process to promote healing. Bear in mind that sometimes the musculature at that joint will become unable to properly execute a movement because of compensation for the pain. If this is the case, the training of eccentric exercises also helps reeducate the nervous system to fire correctly again
Start with a very light weight and work on the eccentric portion of the lift slowly and assuredly. The eccentric movement should take five to seven seconds.
After it starts improving significantly you can add in the concentric portion. Be careful not to overdo it as it is very easy to aggravate. For something like medial epicondylitis you should choose something to strengthen everything in the forearm such as rice bucket exercises
uch as
It tends to be best to start with very light weights at 40% of 1 RM and open chain exerc eccentric flexion wrist curls (medial epicondylitis) or eccentric leg extensions (patellar tendonitis). You can use the other am/leg to help the other arm/leg up for the concentric phase. This approach makes it easy to load the joint with light weights (dumbbells, ankle weights, etc.) and make very small increases in weight to continue a safe progression.
As you progress, you can move on to more closed chain exercises such as the eccentric of walking down stairs slowly or negative pullups. Close chain exercises tend to use a larger portion of bodyweight, S0 progressing to them too soon may be detrimental to the healing process if they are too difficult and aggravate the injury.
Eccentric exercises that are any more than slightly painful will probably be detrimental. As a golden rule, there should not be any pain at all, but if all exercises are painful then make a reasonable, safe attempt to do the least painful and stop if the pain gets worse.
Cortisone shots may be a helpful option as it has shown improvement in conditions such as lateral epicondylitis. Repeated use of corticosteroids may lead to detrimental effects, so make sure that cortisone shots are being accompanied by proper rehabilitation work to get the best out of your healing
Next, many of these other modalities are highly dependent on the person to whether they will help or not. If you the above options and physical therapy have been exhausted then it may be a good idea to try some of the modalities below in conjunction with the above protocols if you want to avoid surgery.
Rescarch on joint, tendon, and cartilage health supplements varies. Anecdotally, it seems to vary from person to person.
First and foremost, I recommend pursuing physical therapy first as that is a better use of money. But if you want to try various other methods such as
supplements then feel free. Typical supplement purported to help tendonitis, cartilage, and joint issues are:
Glucosamine and chondrotin sulfate (together at a 3:2 ratio respectively), Methylsulfonylmethane (MSM), cissus, S-adenosylmethionine (SAMe). Universal’s Animal Flex has gotten a lot of praise from bodybuilding forums (so take that for what it is worth). Fish oil does a whole host of good things and will be talked about a bit later.
The results from dry needling, ultrasound, and electrical stimulation are variable.
Other modalities that have some scientific evidence backing them are low level laser therapy, platelet tich plasma (PRP), autologous blood injection, and prolotherapy.
I have seen some good testimonials with the LLLT, PRP, prolotherapy because help with natural inflammatory healing process. Therefore, I would recommend checking out those options first especially before any potential surgery.
Surgery is the last ditch option because of the potential for infections and the often sub-par ability of humans to do what the body should naturally do itself.
This is my new stance on this subject.
NSAIDs while great for pain relief often help slow the healing rates of issues that you are trying to fix with rehabilitate. For example, typical NSAIDs prescribed for pain and inflammation are over the counter drugs such as aspirin and ibuprofen. Things you may typically get with a prescription are stronger such as naproxen.
The mechanism of typical NSAIDs is to inhibit the cyclooxygenase pathway of inflammation. This is great because it eliminates the pain by inhibiting the PGE substrates that aggravate the delta and C sensory fibers within the area. However, this is bad because it also the prostacylins and HHTS which are responsible for drawing in white blood cells and platelets that help clean up the damaged tissues, and release growth factors to move on to the proliferation phase of healing.
In regards to Tylenol/Acetaminophen, it is not the same as the other NSAIDs, but it is in fact actually not and anti-inflammatory agent. It reduces pain specifically through the CNS and not at the inflammatory process level. Thus, if you are having trouble with pain, it would be recommended to take this over any of the NSAIDs because of healing rates.
This also applies in reverse though. If you suffer a traumatic injury to the ankle such as a sprain and it is inflamed and swelling up, then we would want to avoid acetaminophen in this case. It is not going to help with what we nced which is the anti-inflammatory factors. We would want to do the RICE protocol, NSAIDs, massage, mobility work, etc. in these cases.
I would try to avoid using NSAIDs for anything related to pain where tissues need to heal. The cyclooxygenase pathway is a critical step of that inflammatory phase that is needed for any sort of tissue regeneration whether it be muscle, tendons, ligaments, bones, etc. If it hurts bad then use different anti- pain medications like Tylenol. It’s only when the inflammation gets so out of control such as with lots of swelling or fever where NSAIDs start to become more useful.
Warmness of the skin area is a good indicator of acceptable levels of inflammation (as prostagladins of the eyclooxygenase are fever inducing). When there starts to be a lot of redness and swelling symptoms it may be time to help cut down on excessive inflammation with NSAIDs. For example, a couple days after workout the muscles are usually warmer because of the inflammation and healing process that is is unlikely unless there is severe DOMS or thabdomyolysis that any NSAIDs may be needed for
It can be argued that any time there is pain then there will be excessive inflammation. Therefore, NSAIDs would actually help healing rates. My stance on this is that if they are helping then continue with it. If they are not helping then do not continue with it. Aliernatively, if you are healing without them then do not bother with them. There is no reason to throw comp
Fish oil is also a good anti-inflammatory if needed, and of course eating right is going to help the most.
These are things are probably not told to you by your doctor or any other healtheare professional (heck, I didn’t even know about NSAIDs vs Tylenol until I was taught that in class a few weeks ago). Keep this type of stuff in mind.
Integration with regular workouts is the same. Perform you workouts in the structure suggested in chapter 14. Remember, the concepts of intralimb, opposite limb, and other body part exercise. If the workouts require use of the injured limb and does not aggravate it, then make sure the tissue is sufficiently warmed up before doing anything.
Proper structuring of the modalities listed above is important. Here is a general guideline of how you can structure a rehabilitative session.
So for example with something like medial epicondylitis I would perform for the tendon specifically:
Additionally, for muscle strengthening/stretching we would want to perform:
So for example with something like medial epicondylitis I would do:
Obviously, you would not split these two things up into specific sessions. You would combine the sessions to work on all of the warm up, eccentrics, massage, stretching, and modalities each in order to minimize rehabilitation time.
Remember, having an injury or something you need to add in prehabilitative work does not mean that you should rest everything and neglect other training. If you have medial epicondylitis (elbow tendonitis) for example you can still do legs and core work as well as to other skill work for your sport and corrective nature things such as flexibility/mobility.
One of the big things with tendonitis at "stability" joints such as the elbows is that there tends to be a oss of mobility or strength in the wrists and shoulders. This may add more stress on the elbows. The same thing occurs with tendonitis at the knees and losses of mobility or strength at the ankles and hips. Thus, if you have tendonitis at the elbows or knees you should work on improving the flexibility and mobility of the two joints surrounding it
Here is a general rule to distinguish chronic tendonosis from tendonitis:
All of these types of symptoms may indicate that the condition has progressed from tendonitis to tendonosis. Therefore, be wary about working through pain. Also, try to figure out what exercises were the offending culprits and eliminate them for now.
As we discussed a bit before chronic tendonitis (tendonosis in reality) tends to persist even with rest. With this in mind we need to make alterations to rehabilitative processes.
Since there is no inflammation present in chronic tendonosis we need to create some to initiating the healing process and improve blood flow. Thus, eccentric exercise becomes the most important part of our rehab routine. In addition, ice tends to not help as much for chronic cases; thus, we want to use heat instead.
In tendonosis there is chronic degeneration of the tendon. Thus, we do not want to massage the tendon itself so much (you can but it needs to be lightly). We want to focus more on releasing the tension on the tendon by hitting trigger points or tight areas in the surrounding musculature. ART, myofascial or cross friction techniques work well for this.
Additionally, mobility to get blood flowing and any fairly non-painful movement is good. Thus, a rehab program for a chronic case would look more like this.
Tee can also be substituted in if it helps more than the heat, but like I said heat tends to be better for those chronic cases that are not healing with rest.
As the condition improves, we want to start to work slowly from the isolationist high repetition exercises into lighter compound movements. From there, you can slowly work back into heavy exercise. The general rule for how fast to go with a chronic case is to take a week for each month you have had that problem. So if you have had this problem for longer than a year expect that it may take upwards of 10-12 weeks to completely rehabilitate yourself back into the heavy weights or high volume that you were used to before you were injured.
Muscle strains, pulls, tears, and ruptures are all different names that describe the same injury conditions. The only difference is in the degree of injury sustained. For example, we tend to think of a strain or pull as less serious than a tear or rupture. To keep it simple, 1 am going to refer to them all as strains from now on.
In this article we will discuss how these injuries arise, how to identify them, and how to rehabilitate them.
A strain occurs when the amount of force put on a muscle is greater than the ability of the muscle to generate an opposing force. This most often occurs during high speed movement; however, it can aceur during sustained contractions. It most often occurs near the end of workouts when muscles are fatigued and cannot generate as much force is in the beginning of a workout.
This means that strains have a higher frequency of occurring:
Now you may have heard that muscle damage, especially factors related to the damage such as delayed onset muscle soreness, is caused by eccentric muscle contraction. This is true. The same thing occurs with strains. They always occur during the eccentric contraction of the muscle.
Even in cases where a strain occurs during a *concentric’ contraction are actually during an eccentric right at the time when the concentric motion is switching to the eccentric contraction.
For instance, if you are one who tends to arch/crane your neck by looking up instead of keeping head neutral during deadlifts, squats, and pullups, the impingement of the nerves that come out from the cervical plexus may inhibit force output during the movement. Thus, as the movements move into the eccentric phase, the body may not have enough museular force to exert to slow the movement down and the muscles may strain. This is one of the major reasons for correctly executed these techniques as well as the fact that craning the neck often gives people pain and tight muscles as well as headaches.
Hamstring strains occur when the knee is moving forwards or the foot is receiving the ground as the hamstring is lengthening. Back strains occur during deadlifts as the back is rounding and the spinal erectors are lengthening. Biceps strains occur as you are coming down from the top of a pullup.
Therefore, knowing the factors that increase propensity for strains is important. Thus, if you are getting older, having poor technique, poor flexibility and mobility, tight muscles, or are weak and do intense workouts you may be more susceptible to strains and need to be more careful with operating at higher intensities.
Obviously, if you have previous medical issues or strains you will know that you need to be proactive. If you are doing intense workouts at high speeds, save the static stretching for afterward unless you have flexibility detriments that need to be addressed prior to workouts to ensure safety during the workout.
As we discussed strains always occur during eccentric loading of the muscles.
This means that during sprinting in the hamstrings they will tend to occur during the phase where the foot is starting to receive the ground as that is where the muscle is at its longest. Groin strains (at least adductor magnus) tend to be similar. The other half of groin strains — the hip flexor strains, adductors longus and brevis and pectineus — occur on the opposite side of the stride where the foot is starting to leave the ground to come forward.
In kicking sports strains will tend to occur after kicking the ball extremely hard as the leg travels up and forward in front of you.
Strains during lifting such as the back tend to occur when technique breaks down because of fatigue and the muscles lose their isometric contraction such as during squats and deadlifts when the back starts rounding. Likewise, in the upper body they will occur on the descent of pullups for the biceps, the descent of the dips for the triceps, and lowering the weight halfheartedly or jerky.
This is why it is important to keep strict form especially when you are getting fatigued because that is when they are most likely to occur.
When a strain occurs you can recognize them through the fact that they:
Strains are graded on a 1-3 scale.
Grade 1 tears consist of minor tearing of the muscle. There is no bruising and little to no swelling, but the pain is present in the soft tissue. The amount of pain is often variable to how the person perceives it. It is possible that there is no pain on concentric movements and only eccentrics. There is unlikely to be major pain with some light pressure to the area, but there may be some discomfort or minor pain. This is what most often occurs with people who workout.
Grade 2 tears are partial tears of the muscle. There is likely to be some swelling. Bruising is still variable but most likely will occur as the tissues are damaged/ruptured enough that there will be blood leaking out. Both concentric and eccentric movements will hurt, and putting pressure on the area will cause pain. Since the muscle has a large injury it will resultin limited range of motion. Often the muscles will start to get tight to help protect the rest of the injured tissues.
Grade 3 tears are complete ruptures of muscle or close to it. There will be swelling and bruising. There is also likely to be a divot/gap left by the muscle where it tore in two. It is important that if this occurs to throw RICE it right away — rest, ice, compression, and elevation — and to get to the emergency room ASAP to get it checked out
I would also advise going to the ER in the case of a grade 2 partial tear as well, but it may not be necessary depending on the circumstances. In any case, this article is mostly directed at grade 1 and low grade 2 strain prehabilitation and rehabilitation.
If you are weak you need to get stronger. If you have very tight muscles it is imperative to increase mobility in those muscles through static stretching and/or proprioceptive neuromuscular facilitative stretching after your workouts. If you're getting up in age, you definitely need proper warmups before workouts. Save your static stretching for after workouts except for where you need it to maintain proper technique.

And, most importantly, always maintain proper technique. If you are doing timed workouts it is important to always emphasize technique over getting a faster time. Constantly drilling technique is the key to success in every sport and athletic endeavor. You are not doing yourself any favors by short cutting yourself to look or feel better, and you increase your injury risk. It is a lose-lose situation.
The acute phase in all injuries is characterized by tissue damage that elicits an inflammatory response in the muscle. Swelling and bruising may or may not be present. If they are it is all the more necessary to take the proper steps to encourage healing of the tissues.
In general, PRICEM - protection, rest, ice, compression, elevation, and mobility — is prescribed. The the ICE part will be critical to reduction of swelling and inflammation within the first 048 hours. Afterward, compression will be the biggest factor in reduction of inflammation so it would be wise to ry. Obviously, you will want to protect it from more damage, so if it hurts to walk try to stay off of . inves ive material to limit swelling if necess
n some compres
Also, within this first period reduction in inflammation is critical to speed the body’s recovery processes. Inflammation is a natural process which helps stimulate healing through increase of blood flow to the area but blocking the blood flow out of the area as well as increasing the amount of immune response to the area. This is great when we are sick to promote recovery; however, in injuries to our bodies the inflammation is overkill and actually prolongs it. Thus, we want to reduce it a fair amount.
If the pain does not significantly reduce within about a week, I would schedule an appointment with a doctor to have it looked at. This may indicate a more serious type of strain.
This is the M part of the PRICEM.
First, strains should never be stretched because that is typically how they were injured in the first place. However, it is important to keep the body part moving as much as possible without causing pain. This is because of the inflammation and the scar tg that is about to be formed. In add: traumatic injury the muscles tend to tighten up and lock down to prevent further damage. These factor will impede the healing processes.
n, in any
If there is excessive swelling use your hands to push the swelling up towards the heart, This will help clear it out and speed up healing.
Massage in this phase should focus on light/superficial massage to the surface of the skin moving swelling and inflammation out towards the heart. Do not push into the tissue hard or do anything that causes significant pain as you will be interrupting the healing process. But light soft tissue work is good to stimulate the blood flow and help organize regrowth.
Most doctors for grade 1 or 11 strains will slap you with a prescription of NSAIDs and possibly a couple other drugs (to counteract the affects of strong NSAIDs) and tell you to RICE or rest.
This is not bad because it works, but my preference is with the strong anti-inflammatory effects of fish oil. Fish oil not only had great side effects such as better overall health through improvement of cardiovaseular risk factors and improvement of depression, schizophrenia, etc. Since most of us have problems with inflammation in the modem age (from eating too many refined carbohydrates, and grain fed meat), reduction in inflammation is extremely positive on healing rates.
Also, eliminate processed food out of your diet and make sure you get a lot of sleep because our bodies heal the fastest during rest.
The water soluble vitamins such as the B-complex vitamins help promote healing as they are needed for tissue regeneration and repair. However, if you are already eating a well balanced diet of meats, fruits, and vegetables you are already getting enough of these vitamins.
In acute phase damage inflammatory processes tend to cause a lot of oxidative damage. Thus, taking increasing dosage of vitamin C which is an anti-oxidant is good. Increasing A and E which are also anti- oxidants are good 100, but not too much because they are fat soluble. The same is true of other supplements such as Coenzyme CoQ10 (ubiquinol) or acetyl-L carnitine.
Fish oil i vastly more important than these though so if you are going to spend money on anything let it be the fish oil.
Usually these phases are separated. However, repair and remodeling do occur simultaneously if the muscle is taken carc of properly. Thus, I am grouping everything together.
The body in this stage is basically repairing what damage it can, breaking down what it cannot repair forming scar tissue and laying down new tissues.
This phase begins within about 48-96 hours after injury; however, we are going to take a bit morc conservative measures. Basically, once the tissue starts to feel better with your movement that you are doing everyday from the acute phase, and the swelling is reduced we can consider ourselves in this phase.
This is important again to help keep excessive inflammatory processes down. Vitamin C and B complexes in large amounts as well as enough of vitamins A, E, and other anti-oxidants are great.
Since the swelling is reduced and the anti-inflammatory fish oil should keep it in check, we can move towards heating up the muscles.
The benefits of heating is that it helps increase blood flow to the muscles. Heat will also loosen up the tightened muscles to allow improved movement capabilities. Keep up the paines movement.
The massage is to be maintained, but the main focus of it now is to loosen up the tight muscles. Add in very light stretching work after to help increase the range of motion. This is in addition to the already frequent painless movement
The massage plus stretching here can be deeper, but still not harder to cause pain. You can start to hit those deeper tissues and stimulate blood flow to them as well as help reorganize the tissues more correctly.
Programming in this phase may follow these steps:
Like in tendonitis we first want to start with very light weights 1o give us a good degree of control over the movement to make sure we do not restrain the muscle. Remember, we are only a couple days or weeks out from major damage to the muscles, so it will be very easy to reaggravate it.
If it is possible to do some isolation work with the muscle without causing significant pai aggravation then this is a good option. Keep the weight very low and only do a few sets of 15-25 reps. Now is not the time to be aggressive with the weight increases. If there is any type of twinge back off immediately. We want to work higher repetitions to build endurance because the tissue will be extremely vulnerable when fatigued.
or
Likewise, with an injury that cannot be isolation such as a lower back strain, isometrics can be supplemented instead. For example, non-weighted squats or back extensions or very light deadlifts/good mornings can work. For back strains specifically I like reverse hyperextensions. Be very careful though.
At this phase we are looking to exercise, and then allow the body total healing over the next 24-48 hours. So only reintegrate exercise to 2-3x a week, and keep the progressions small. Being extra cautious will save you more time than having to come back from a restrain which can often be worse than the first one since the tissues are already more vulnerable to take more damage.
Slowly progress your way from isometric exercises by increasing the intensity. Once you have strengthened the area sufficiently, work your way back into light compound exercises. From there, progress the intensity in your compound exercises. From there, it is just a slow progression working your way back to full workouts.
Like we discussed earlier strains are more likely to reappear in those with previous strains. Thus, it is important to do a few things to prevent another strain.
Improving mobility and flexibility is a major factor. This work should be integrated into your warmup and your cool down. Add in some soft tissue work such as foam rolling, and self massage. Do dynamic and static stretches when appropriate. Add in mobility work.
The second is to make the muscle more resistant to damage. As you know, eccentric movement is when the majority of damage occurs during exercise. However, the muscles themselves gain a resistance to the damage with repetitive eccentric work. The model by which this occurs is the "popping sarcomere theory" which we covered in a previous chapter.
To sum it up, during eccentric exercise individual sarcomeres distend during the lengthening of the muscle which accrues as damage (excess sarcomeric distension in a localized area is a strain). The body responds to this micro damage by adding additional sarcomeres to the muscle during inflammatory phase healing process. Subsequently, the muscle becomes more resistant to damage because of its ability to take damage.
This means that the major aspect of prehabilitative work should focus on slow eccentric exercise which we already deseribed in the previous section. This is especially true with explosive movements, Thus, for a sprinter with a hamstring or groin strain we want to focus on eccentric hamstring curls for a 6-
10s negative phase for higher repetitions. Then we will decrease the repetitions as we progress.
From then on progress in our prehabilitative work to a 6-10 second count eccentric on the eccentric portion of compound lifts such as deadlifts, good mornings, hyperextensions, Romanian deadlifts, etc. As we stated earlier, do not be too aggressive with the weight and be careful to maintain strict technique.
All in all strains are not that complicated to deal with if they are grade I or low grade II. Higher grade 11 should be treated exactly like these except the acute, repair and remodeling phases will take much longer. Grade III tears you should discuss with a qualified medical professional
The hard part is making yourself take care of your body through the protocols mentioned above. Be disciplined. Do not take your body for granted. Think of it as a learning experience that you care not repeat. Do proper mobility, prehabilitative, rehabilitative work, and focus on your technique.
All of the things I have stated in this article area critical for speeding the healing processes. However, there are natural limits to your healing ‘you strained yourself bad enough. Of course, healing can be improved by sleeping more, eating quality foods, etc. as well as the RICE, massage, fish oil, etc. Be sure to take care of your body, and it will respond in kind.
s going to take some tim
Tension headaches or pain near the base of the skull during exercise tend to occur for a couple of reasons,
If the headache occurs during exercise and/or only occurs during or shortly after exercise then it is likely that there may be some improper form or tensing the muscles too much during the movements
For example, many people get headaches during squats, deadlifts, and pullups. This is because they are really straining to keep the back straight an are by extension arching the neck strongly, or craning the neck trying to get the chin to the bar. For bodyweight movements these may occur during pullups, dips, handstand pushups, or anywhere that the head is excessively hyperextended during any type of movement. This shortens the muscles at the base of the skull and may cause them to cramp giving you tension headaches. Also, the tight muscles may cut off blood flow to the brain which may also give you a headache.
These types of excessive movement are also important to eliminate because they decrease force output. When you arch your neck or crane it you are decreasing the space between the vertebrac that the nerves to your muscles come out of to go to your limbs. When you compress nerves the body will think it is being injured and will decrease force outputs to the muscles to avoid them from being impinged too strongly. Thus, your force output will decrease. Proper form is not just to help from being injured — it also allows us to express our power and strength optimally to get a better training stimulus,
Besides focusing on fixing the technique, there are multiple modalities that can be used to help get the body back to normal. Heat and neck massage to loosen up the muscles in the neck area tends to work very well. Similarly, mobility work by taking the neck through non-painful range of motion before exercise and after exercise is effective. If you find particularly tight muscles or areas then more static type of stretching may be recommended. A combination of those four modalities will fix most of these types of problems if this is the actual issue.
Remember, the main thing is that you should make sure that during the exercise you are keeping the head neutral and not straining the neck muscles too much.
If you are worried that it could be symptomatic of something more insidious you should get it checked out by a doctor.
This injury tends to manifest as pain along the sternum or the chest area where the ribs/costal cartilages connect into the middle of the chest. If there is pain decper in the chest have it checked out by a doctor.
This injury tends to occur in people who have not used rings before or are starting bodyweight training at a basic level of ability. It will happen when there is intense use of the pectoral muscles. For example, exercises such as rings tum out support work, rings pushups, rings dips, or any other type of pressing that uses the chest a lot may begin to hurt along the sternal area. Back lever and front lever have been known to aggravate this condition occasionally.
Since the origin of the pectorals is on the sternum and partially on the costal cartilages, if you have not used your chest in resistance training much before the connective tissues are not as strong. Thus, when you do a deep movement where you really stretch out the pectorals like dips, the origin of the muscle on the costal cartilages can start to pull them away from the costal facets on the sternum.
Obviously, this creates inflammation and in general can lead to some popping and hurting. The main thing to do for this injury is to rest and let it heal,
Ice if it helps. Otherwise, once it starts feeling better use heat to stimulate more blood flow to encourage faster healing from the body since the area does not get a lot of blood flow as it is bone/cartilage in that area.
Keep the muscles working through full but non-weight bearing and non-painful range of motion so that the muscles do not tighten up on you. The muscle movement will also help stimulate blood flow to the area as well.
Anti-inflammatories/NSAIDs can be used to help deerease inflammation and allow healing to occur may help if it is particularly bad. Fish oil is always good. Massage to the area to increase blood flow will help as well.
Usually if you do not keep aggravating it, you should be able to get back to exercising within a week or two.
Just avoid the exercise that aggravates it for a while, and focus on other exercises that are less intense of the chest. Then work your way back inta these slowly so you do not reaggravate the condition. Be very careful as it is easy to aggravate repeatedly.
Pain in this area can be for a variety of reasons. Generally, as I stated in previous chapters I would recommend getting any type of pain with the scapulas/shoulder area checked out by a physical therapist or qualified professional. If you have chronic issues with the thoracic spine, scapula and ribs, because the issues are not always where the pain is located. However, let us discuss some general concepts and take a Took at what particular things can be tried if you decide against professional help.
If the pain is in the neck or thoracic spine area within about an inch and you have trouble moving in one or more directions then this tends to be indicative of a vertebral facet or rib issue where it lips out or subluxes slightly. Sleeping awkwardly or moving quickly can make this occur. I would not be worried about these unless it persists for more than a day or two without improving. Usually, they will spontancously resolve as long as you stretch out tight muscles and keep moving. However, if it does not resolve in a couple days or it gets worse then I would highly suggest getting to a chiropractor or physical therapist ASAP to pop it back in place. If you do not and it stays there and the tissues start to get used to it then getting it to stay in place after manipulation may require multiple visits to a professional rather than just one or two. Not exactly what you are looking for when trainine.
Issues that are in the muscle bellies around the scapula(s) can be there for a variety of reasons. There are some great mobilization techniques you can do with a lacrosse ball or tennis ball by rolling around on the tight or sore areas to help loosen them up. Foam rolling and other stretching exercises to all of the muscles in the arm and around the scapulas including the chest, anterior and posterior shoulders, back and lats are probably good to try as well. If this resolves the issue then that is great. If it does not resolve the issue or it is chronic then there is likely something else that is wrong. I would suggest getting it checked out by a professional if that is the case.
If the issue is bilateral then that tends to indicate more of a postural or structural issue. If the issue is unilateral then it depends on a few factors including technique, possibly overuse, dominant vs. non- dominant sides, scoliosis, etc. These are not hard and fast rules so self diagnosis is not really recommended.
Again, if pain is sticking around and not receding after a week then it is a good idea to get it checked out by a professional. Why let nagging issues bother you for a long amount of time and hinder your training?
Generally speaking, low back issues will probably not happen to you while performing bodyweight exercises. However, it is possible that they can result from rounding the back too much during stretching. Likewise, if you are training the lower body like I suggest with squats, deadlifts, and other good compound exercises, you may run into some trouble with the low back at one point or another. Therefore, I will include cover this topic.
Lower back pain and injuries are common among weightlifters and even non-weightlifters. Shoes and sitting as well as very poor posture and biomechanics may exert have chronic detrimental cffects on our bodies. Combine this with poor technique, especially in lifting objects off the ground or during working out, and you have a recipe for injury, pain, and inflammation.
This short section is not going to be an end all article on how 1o solve lower back pain and injury. Rather, there arc categories of lower back injuries that all need different attention depending on what has been injured. From there we can determine what the best course of action that needs to be taken for each individual because everyone is a bit different.
Flexion based injuries from lower back rounding tend to fall in 3 different categories.
These are the three generalized categories. We will learn how to identify which one you may have, and then how to obtain professional treatment if required or rehabilitate it yourself.
Other types of injuries are not very common and if obtained from lifting in particular may represent some inherent structural deficiency or faulty connective tissue usually due to genetics or improper nutrition.
If you suspect you have an injury that does not fall into any of the three categorics above see a medical professional immediately. Also, if you have an injury which presents debilitating pain or presents possible insidious neurological symptoms such as sensory or motor deficits see a medical professional immediately. Motor deficits are critical enough that you may want to g0 to the ER ASAP.
Bulging and hemiated discs will manifest pain on, in, or around the spine itself. If you can sense the pain in the direct center of the back, it will be one of these problems
If the bulging or herniation is low enough on the spine it may also impinging on some of the nerve roots coming out to the sides. This tends to manifest itself as radiating pain out of the side or lower extremities. These are called radiculopathies (from the "nerve roots" and and the "radiating pain" caused by the impingement/pinching of these nerve roots). We will discuss arm radiculopathies later in this chapter.
The most common case with radiating pain is sciatica. In this case, a bulging or hemiated disc in the low lumbar region (aka "around or just above the butt crack") will impinge on the nerve roots for the sensory and motor nerves of the legs. Sciatica in particular is usually manifested as radiating pain into the buttock region and may continue down farther into the leg even as far as the foot.
For cases like this is it best to go to an orthopedic doctor to be assessed as to the extent of the damage. This may require an MRI as that will show what is going on in there. From there proper treatment can be determined.
often you will be referred to physical therapy for conservative care before any surgery or steroid injections. A good physical therapist should be able to help you work your way back toward working out again.
Do not aggravate this condition with significant activity otherwise it may lead to permanent injuries.
In the meantime, in almost all cases there will be inflammation accompanying the pain. Decreasing inflammation and proper mobility work to decrease the amount of inflammation and pain will help case the symptoms.
If you are eating large amounts of carbohydrates it may be a good idea to eat more protein and fat as carbohydrates are pro-inflammatory. Also, supplementing fish oil is a good idea as well.
For exercise, everyone is individually different with lower back pain. Thus, some exercise may worsen the pain or not help; however, some may help and work effectively. Play around with them and find out which ones work best. Here is a list of exercises to get you started:
In particular, reverse hyperextensions exercises as a strengthening tool tend to be extremely good for rebuilding strength and hypertrophy. About 95% of the people who I have seen have used these to reprep themselves for going back to the classic compound exercises like squats and deadlifts have succeeded.
If any of the above exercises hurt, drop it immediately. Do not come back to it for at least 2-3 days. After that try again as it may help more at the different stage of recovery than initially. The same is true with helpful exercises if they suddenly become bad then drop them for a couple days and come back to them later to see if they help.
The primary thing you will have to focus on the road to recovery is regaining mobility and strength in the ankles and hips, and improving core strength and stability in the arches, knees and especially lower back i this case.
During improper lifting or bending, one side of the muscles may fail a bit earlier than the other. This is common as we all have a dominant side. In this instance if the muscles do not strain or the weight is not immediately deloaded, the SI joint may slip or become rotated causing pain. This also may occur if you take a significant impact more on one leg than the other such as a uneven landing in gymnastics, parkour, martial arts, etc. Likewise, if significant eternal forces are generated through one leg or on one leg this can occur as well.
SI joint problems tend to manifest pain right above the butt crack and an inch or two to the right or left depending on which one has slipped or rotated. It is a very similar pain to the lower L4-L5 and L5-S1 disc issues like discussed above, and a slipped SI joint can manifest in sciatica and radiculopathies as well.
If you run your hands down your sides starting at the ribs, the first bony protrusion you will encounter is the iliac crest. This is at the level of the L4-LS disc. If you follow the iliac crest backward with your hands as it slopes downward you will encounter your SI joint where the pelvis meets the sacral vertebrac. The SI joint is about 3-4 inches long so the pain may be anywhere along it. If the pain is located there you may have an SI joint issue.
A slipped SI joint will also manifest in one leg being functionally shorter than the other. If when you locate your iliac crest if one side is higher than the other this will indicate an SI joint slip. However, a rotated ST joint may not manifest in a leg length discrepancy, so this is not always an indicator of a problem
Thus, if your pain is (1) 1-2 inches off center from the spine, (2) is an 1-2 inches lower than the iliac crest level, and (3) feels in the bony region of the pelvis it may be likely have you have an SI joint issue. Same with the functional leg length."
See a chiropractor or physical therapist. Competent health professionals in these two areas should be able to fix your dysfunction by popping you back into place or resetting the pelvis.
It is important that you limit pain and inflammation again with fish oil and rest. Do not aggravate this condition.
Since the SI joint may be rotated and slipped, some muscles will be shorter or longer than usual. When this occurs with injuries, the tendency of the body is to lock down the muscles to prevent further injury. This is not good especially if you can get to a chiropractor or PT quickly. So what we want to do is keep the muscles loose with massage and possibly some heat. However, heat should not be placed on the SIjoint - just the lower back and possibly the hip muscles as well).
You may be able to check yourself with the long sit test. When supine or on your back, your legs will be uneven lying (c.g. pelvis oriented upwards). When you sit up with the legs straight (long sit) they will be even because the slip does not manifest when the pelvis is oriented forwards. If you find this is the case, definitely see a professional immediately. Also, even if this does not work but you still suspect something I would see a professional anyway.
It is possible to reset the pelvis by yourself and/or another person, but if you are not confident do not try these yourself and get yourself to a quality health professional
One of the manipulations you can do is with a doorway . Another is squeezing a semi-hard object between the knees. I am not going to provide pictures or describe how to do these in this book, but there are some manipulations you can try yourself located on youtube.
Strained and pulled muscles will be located to either side of the spine in the muscle belly of the tissues. Strains will usually occur during lifting and in the spinal erectors — iliocostalis, longissimus, and spinalis — although they can occur in muscles such as the quadratus lumborum or others.
If your lower back pain is below the ribs and above the SI joint in the muscles, then it is likely you have a muscle strain.
In the case of muscles strains or pulls unless it is extremely bad where your tissues are tuming black and blue and you absolutely need pain killers, you probably do not need to a see a doctor. This is because you will most likely just get a prescription for pain killers and be told to rest.
However, if you are that worried about your injury then do not hesitate to see a doctor. Better safe than sorry.

We have already talked about muscle strains, their etiology, and rehabilitation earlier in this book! See that section which is located earlier in this chapter.
Generally speaking, if the "injury" i muscle bellies and not in the SI area, then it is probably a muscle strain.
more than about 2" off of the spine and located within the
Likewise, if the pain is located in, on, or around the spine within about 2 and you have radiating pain then it may be a spinal injury such as a bulging or hemiated disc.
Alternatively, if the injury is much lower in between the level of the iliac crest and the "butt crack" and slightly offset then you may have an SI issue. Like the spinal issues, this may manifest in alternated limb length and/or radiculopathies.
If you are concerned about your injury it would be best to see a medical professional. Depending on the type of injury, the professional you would want to go see may differ. Thus, if you strongly suspect a certain injury, it may be in your best interest to try to get to the professional recommended.
Impingement occurs underneath the acromion. What happens in this abnormal condition is that the Soft issues — muscle, bursas, fascia, etc. — are compressed by the greater tubercle of the humerus against the acromion on the scapula. The pain for this pathology is more superficial (e.g. not located deep inside the glenohumeral joint) and is usually located in the front/side of the shoulder under the outermost bony structure which is the acromion.
This dysfunction typically occurs when shoulder mechanics are thrown off or there is improper lifting. In flexion (arm moving forwards overhead) and abduction (arm moving sideways overhead) the scapula is supposed to rotate upwards and the humerus is supposed to externally rotate to clear the greater tubercle from impacting the acromion.
In certain exercises such as sumo deadlift high pulls or upright rows where the humerus is internally rotated moving upwards it creates ideal conditions for impingement. Likewise, if muscles are tight or bound down that do not allow the scapula to rotate upwards properly then impingement can also occur.
If impingement is suspected rest, non-painful mobility, and ice tend to be the most helpful modalities for this pathology. If it is particularly bad fish oil and anti-inflammatories such as NSATDs may help.
This type of injury is usually caused by predisposing genetics factors in combination with certain risky" exercises and poor technique. The genetic factors are not something you should worry about (e.g. oddly shaped acromion processes). However, the factor that can be control is some of the more risky exercises and poor technique.
Any type of overhead pressing especially with handstand pushups should be take care of to use proper technique. The more flared the elbows are the riskier the movement is to create some type of impingement force on the shoulders.
Likewise, other wide grip or behind the neck exercises such as: wide grip pullups, behind the neck pullups, behind the neck presses, and the iron cross are much more risky for this type of issue to occur. Flared elbows elbows or wide grip tend to place the shoulder in a more vulnerable position because of potential mobility issues and for some like wide grip pullups and crosses the distraction forces on the joint tend to fatigue the rotator cuff muscles much more quickly which allow the humerus to ride up and impinge itself.
Similarly, any type of pulling or pressing exercise that utilize intemal rotation of the humerus in abduction are not good as well. This is not indicative of many exercises in bodyweight except maybe something along the lines of back lever pullups which is why they are not a valid progression that T discuss even though they are seen in certain youtube videos.
The most famous barbell exercise(s) where this occurs which I have already mentioned are with sumo deadlift high pulls and upright rows. I would avoid these exercises in general if you want to avoid shoulder issues.
Acromioclavicular joint issues tend occur more with an impact injuries. These are hopefully not issues that you should incur from bodyweight training. However, for those with loose AC joints or those with previous AC joint injuries that may become aggravated this will be a good section.
The AC joint connects scapular to the rest of the body through the clavicle. The joint is supposed to be relatively immobile, but it does have a small bit of movement which allows the scapula to elevate and twist to allow the arm to move overhead. Once it gets excessive movement via sprain or tearing of the ligaments, it is very easy to get arthritis in the joint since we use the shoulders a lot and there is not a large amount of blood supply to the area the cartilage can degenerate.
What you want to do with AC joint type of issue is rest. Massage the muscles around the area to inerease blood flow for healing and keep the muscles from tightening up. Use fish oil or NSAIDs for anti- inflammatory. Ice if it helps.
Once it start feeling better improve range of motion with non-painful movement, and start strengthening rotator cuff muscles to make the shoulder more stable.
Then work slowly back into compound movements.
Usually each of these steps will take 2-4 weeks each depending on the grade of tearing. It can take more or less depending on how your body recovers. The most important factors for healing in general will be eating correctly and sleeping a lot
If you have a loose AC joint like I do you will notice that your rotator cuff muscles will tend to tighten up because of the relative instability across multiple joints. Make sure you continually stretch them 50 you maintain your range of motion.
One important thing to note is that this must be pain or inflammation at the AC joint. There are a couple of other issue which may seen like the AC joint but are not. For example, pain or swelling either underneath the AC joint or posterior to the AC joint may seem like an AC joint issue but may really be another whole issue altogether. A lot of structures run through the area underneath the AC joint including the brachial plexus and various muscles such as the supraspinatus and other muscles.
This means that if the issue is not directly at the AC joint and under it you may be dealing with something else altogether. If this is the case, it would likely be best to see a professional about it especially if you have sort of radiating pain which will be discussed in the next section.
Radiculopathies dot not describe a particular condition. They do describe a set of conditions where the nerves are typically impinged or inflamed. This may cause weakness, numbness, or difficulty controlling specific muscles.
To be honest with you, this onal about because this is something you usually want to talk to a profe messing around yourself with the nervous system can be a bad idea. I am not even distinguishing between neurits type of peripheral symptoms and true radiculopathies. If you have any questions whatsoever then see a professional.
The interesting thing about these types of issues is that they can occur at any level of the nervous system. The nerve issues can come from the spinal cord, the nerve root as it exits through the vertebrae, the thoracic outlet, all of the splits around the brachial plexus, and anywhere along the named nerves branches that descend into the arm/forearm/hand.
Therefore, an issue that crops up as pain in the hand may have been caused by issues up at the neck, orit could be more why I suggest professionals deal with these issues — al such as at the wrist. This you likely do not know how to figure out at what level they are at or the solutions that are used to correct these issues.
If the prescription of the doctor is to rest and let it heal or you are waiting for physical therapy, there are a couple things that can be done in the meantime that may help. However, remember that you should be dropping offending exercises as they can make it worse.
Nerve glides are great exercises to help mobilize the nerves and stretch them. Like muscles, they can get tight and bound down by scar tissue. Therefore, exercises to mobilize them and improve vascular flow will help improve these issues.
Note that if you have an issue with one of the nerves, it must reproduce your symptoms.
The brachial plexus contains C5-T1 nerve roots that differentiate into five named nerves that supply motor function and sensation down into the arm. Of the five named nerves, two stop up near the shoulder and arm: the axillary and musculocutancous respectively. Three main nerves, radial, ulnar, and median, supply motor and sensation down in the arm. These three will be the main ones focused on because they are longer and thus have the most potential for injury.
Repetitive trauma or workout out where the tissues become tight can create scar tissue and adhesions which can bind down the nerve. When we move, the adhesions or sear tissue do not allow the nerve to move freely and thus create symptoms of pain, numbness, tingling, or coldness in the fingers.

Some studies have shown that nerve gliding and flossing helped to avoid surgery when nerve gliding is added to the therapy program.
It is very important not to over-stretch the nerve during any of these exercises. You want to go to the, point where you may feel the symptoms and then back off. It is best to perform these when you have free time to relax and are in a quict area so you can pay attention to the sensations that you will be experiencing during these exercises. Feeling tension is good but do not stretch to the point that you feel pain or numbness. You may feel tension from the neck all the way to the hand or only parts of this pathway. There is also some evidence that you may feel it in the chest, back or even down into the legs. Nerve gliding on the sciatic nerve can cause some symptoms into the arms as well.
With gliding we are going to focus on:
With flossing we are going to focus on:
There are a couple different methods of teaching nerve gliding exercises. I am going to provide a couple pictures of the ending positions, but if you feel tension and/or symptoms before they are complete then back off and do the gliding or flossing there.
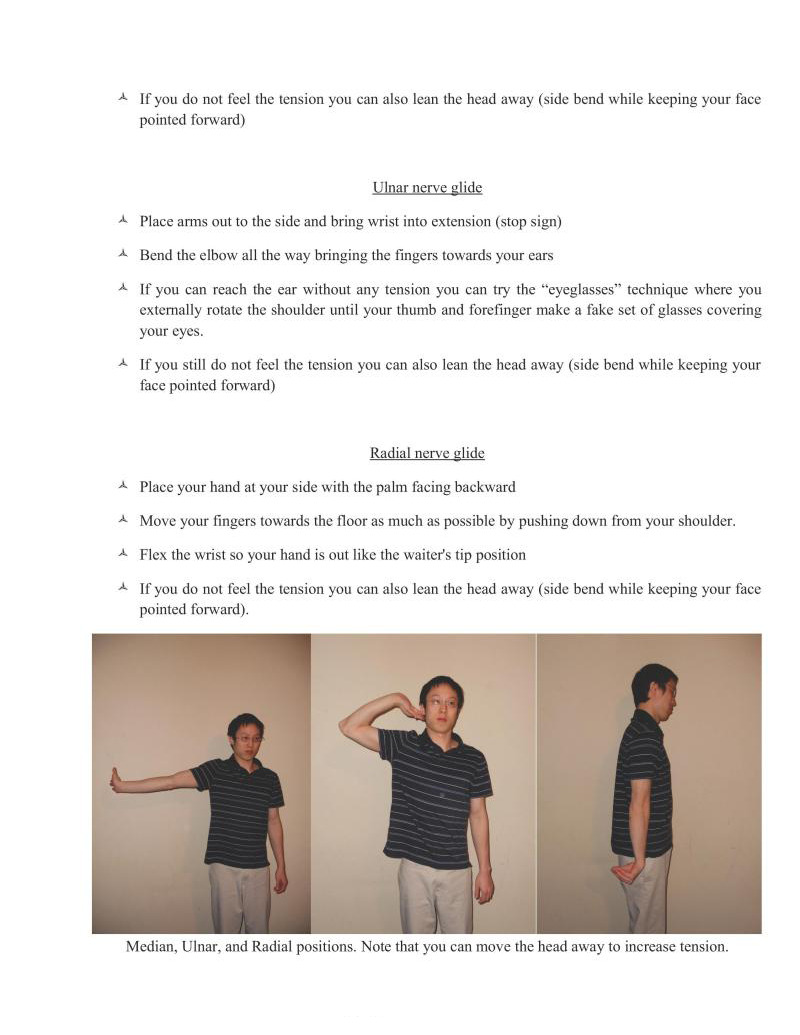
A Place arms out to the side and bring wrist into extension (stop sign)
Median, Ulnar, and Radal positions. Note that you can move the head away to increase tension.
Perform these for a couple of sets of 10-15 repetitions.
Remember that you should only feel tension when you are doing this. If you feel symptoms, you need 10 back off so that you only feel tension. Perform them when you are relaxed in a quict environment and only do them slowly.
Only do these once per day until you can see how your body responds the next day to them. If they are helping, then maybe start adding a second session per day. Build up to 3-5x per day as necessary.
Remember, the goal is to end better than when you started. If you are feeling more pain or numbness and tingling then you have overdone it.
Additionally, any type of stretching, massage, and mobilization work anywhere from the spine down to the point where the radicular issues start is a good idea. Starting to look at posture is a good idea as well,
Carpal tnnel syndrome as its a common problem most people have some knowledge about. Therefore, we are going to examine it as an example.
Carpal tunnel is one of the most common misdiagnosed problems today. There are many things that can cause pain, tingling, numbness, etc. down into the wrist and hand area
For example, tight muscles that can impinge nerves and refer issues down the wrist area are the pectoralis minor, latissimus dorsi, subscapularis, and pronator teres. Other muscles in the neck, arm, and forearm may do so as well not just these four so it may be useful to just target everything and see what helps the mos
Likewise, rounded forward shoulders can cause some issues because of improper tensioning and imbalance of multiple muscle groups around the shoulder which can affect the brachial plexus. One of the biggest spots to hit is improving thoracic spinal posture through foam rolling, lacrosse balls, etc.
Other specific modalities that can be used in combination to help loosen up areas are heat — massage —» stretching to the flexors of the wrist. In that order. Aim to increase mobility in the wrist in that area. 1- 3x a day for 3-5x a week (10-15 mins for heat, 10-15 for massage, 5-10 for stretching).
Muscle imbalances in the wrist can also contribute to the development of this issue so strengthening the wrist extensors may help in combination with loosening up the wrist flexors.
S0 is you can see a lot of issues need to be evaluated in each individual case which is why it is a great idea to see a doctor or physical therapist about this first. But in the meantime while you wait there are some things that can be done that may help start (o resolve or at least make it so the injury does not progress further.
The wrists are vital because they will be supporting your entire bodyweight during many of the exercises. Thus, if do not have a sports background where you put significant amounts of weight on your wrists, then be easier to overuse the wrists or get wrist pai
If you are starting to have wrist pain there is a three step process that you should use to get yourself back on track.
Perform this phase until after it stops hurting to full range of motion. Some of the mobility work I like will be discussed more in Chapter 16.
Rice bucket (opening and closing fingers, rotating the wrists) and seated flexion/extension are two particular exercises that are effective. Wrist pushups are fine as well. Wrist curls are alright as well.
Additionally, extensor specific work is usually recommended because flexors are usually too strong. Do not do compound exercises yet unless they do not hurt.
Use neutral wrist position techniques such as support holds.
Each phase make take a few days to weeks depending on the extent of injury. Discomfort is your guide — do not go into pain threshold. Going to pain threshold and slightly overdoing it may set you back significantly.
The prehabilitation with mobility and flexibility section in the next chapter talks about some of the useful exercises for phases 1 and 2 if need any ideas.
If wrist pain persists and does not gt better after 1-2 weeks I would get it checked out by a medical professional. Traditional overuse taken care of correctly should at the very least start resolve by this period in time. There are many different pathologies where if cartilage is disrupted or the bones of the wrist get subluxed that you cannot fix by yourself. Therefore, persistent wrist pain is best checked out by a professional.
Joint cracking & popping.
The theory on how joints pop and crack is due to cavitation. When the joint is "cracked" the volume within the joint capsule is increased through stretching. When this occurs, the pressure drops within the synovial fluid which causes the small amounts of air dissolved within the fluid to come together and form bubbles. They then collapse on themselves. The formation of these bubbles and collapse via cavitation causes the popping/cracking sound.
There are various studies on the subject.
Of note is a 50 year case study of a doctor documenting himself after cracking his knuckles everyday. The doctor did not end up with arthritis.
One of the studies above showed that the forces involved with the joint manipulation may have forces that exceed the force needed for articular damage. However, as a whole the evidence points to no increases in arthritis.
Another study indicated that knuckle cracking correlates with joint swelling and grip strength loss; however, other traits such as manual labor, biting of the nails, smoking, and drinking alcohol also did as well. So there may be potential confounding factors. None of the other studies concluded this. There may be some logic to this in that people with certain personality traits, overall bad habits, and lots of stress may be predisposed to poorer recovery or ligamental laxity. I do not think this is something to worry about though.
The swelling and loss of grip strength is particularly interesting though. Everyone has different genes for how tight the articular capsules of their joints and ligaments are. If you have joints that are particularly lax (meaning "double jointed" in layman terms), it may not be a good idea to crack your knuckles. This can also vary depending on gender. Females that are pregnant will have more of the hormone relaxin flowing in their body (o get ready to give birth). Thus, ligamental laxity may increase. Therefore, it may not be a good idea to erack the knuckles if you are pregnant.
Lax joints are associated with increases in orthopedic injuries and lower strength. Since the joints themselves are a bit more unstable because of the loosene e tissue, the body cannot is of the conne generate as much force lest it injure itself. Therefore, potentially increasing this joint laxity may be a problem.
This is common in sports with excessive flexibility work such as rhythmic gymnastics where the articular joint capsules can be stretched out significantly. As a precautionary measure if you have looser joints I would avoid cracking them just in case it may present problems down the line. This is especially true if you notice that your joints are being "stretched out" so that they can move further and further each time you crack them.
Obviously, laxity in joints can be compensated with proper strength work to an extent. Therefore, if you are double joint or have general looseness, it may be a good idea to do structured strength work just because it will help protect you against injury.
Finally, erepitus can be present where there is degeneration in the joint, and it cracks inadvertently. If you suspect you have something similar, it is obviously best not to crack them.
In general, it is easy to loosen something. However, it is hard to try to tighten something. Therefore, if you are worried than do not do it. However, I have seen no significant evidence that says cracking negatively affects joints in the long term
The common answer to joint clicking is that if it is painless it is finc. I agree with this assessment especially if you have always had it
For example, people with more lax joints as described above may have always had issues with clicking albeit not painful clicking. This is fine. The general solution with lax joints and clicking in the knees, hips, elbows, and shoulders is proper strength work. Keeping the joints strong and balanced with proper biomechanical movement will stave off potential injuries.
However, if you have not always had joint clicking, and it is acute onset from particular sports, weightlifting, or other activities I would reexamine the activity to ensure that the clicking may not devolve into something insidious
In most cases, injuries can be boiled down to issues of
When these aspecis are compromised especially the limbs — ankles, knees, hips, wrists, elbows, shoulders — there is potential for clicking and popping to begin and potentially become malicious.
We will look at the knee for an example since it is the most common source of clicking (shoulder coming in at a close second). The knee is special because it has two extra pieces of articular cartilage, the menisci, in between the femur and tibia. Thus, impinging of this tissue during movement makes clicking is fairly common occurrence if something is off with biomechanics. Clicking is not always insidious though, so do not be afraid if you have always had it.
In most cases the neural factors of posture and movement biomechanics contribute heavily to the deficiencies that develop in mobilty and many muscle imbalances that rise. It st development of such imbalances or limitations in mobility that have the potential to cause clicking within the knee to devolve into painful wear on the cartilage.
For example, one of the common semi-pathologies that develops in a culture with desk jobs and sitting is the imbalance of quadriceps dominance and hamstring weakness.
Such imbalances give rise to problems with the articulation of the joint itself. When synovial joints move against each other they must simultaneously glide and roll to function correctly.
When mobility is limited by tight muscles and there are imbalances within antagonistic muscles, the biomechanics of the movement are altered.
Particularly with the knee if the hamstring do not engage correctly during walking or squatting motions, there is likely an excessive anterior glide of the femur on the tibia. This places a much larger torque on the patellofemoral complex. This is bad for multiple reasons:
Excessive anterior gliding of the femur may start to impinge the anterior portions of both the medial and lateral menisci which cause clicking. This wears down the meniseus and articular cartilage faster contributing to osteoarthriis.
Excessive anterior gliding of the femur puts more strain on the ligaments of the knee.
The increased torque on the patellofemoral complex causes the quads to become much more active thus aggravating the imbalance of the quadriceps: ing strength ratio.
The increased torque on the patellofemoral complex may lead to maltracking.
These problems are not just manifestations of the whole knee complex. Weakness and decreased mobility at the ankles and hips may also contribute to dysfunctions at the knee. Same with the shoulder, elbows, and wrists.
This is why teaching proper posture and biomechanics while improving mobility and imbalances is so important. For example, we can use box squatting — focusing on sitting back properly to engage the hamstrings and glutes — to help negate quad dominance. This occurs because sitting back shifls the weight distribution of the squat towards the heels will keep the shins upright thus decreasing the torque on the patellofemoral complex and the engagement of the hamstrings will help negate excessive anterior gliding of the femur. This should make the knee joint function properly, and it teaches proper human movement.
Earlier 1 listed the shoulder as the second most common site of clicking. While it does not have two extra picces of cartilage as the knee, it has the most mobility and range of motion as any of the joints in the body. Thus, it is very easily destabilized by problems with posture, biomechanics, mobility, and muscle imbalances.
Clicking with limited mobility in the shoulder can be eliminated in some cases if tight muscles are the issue. For example, if the clicking feels more "anterior" in the shoulder that can mean that the muscles on the front of the shoulder or the joint capsule itself is tight. Thus, stretching the muscles and joint capsule on the front of the shoulder may help to eliminate the clicking altogether. This is because stretching will help decrease the limitation on posterior glide of the humerus on the labrum (c.g. the anterior tightness is keeping it forward and not letting it go posterior) which will make it move better. This is one of the big things to note especially if your shoulders are particular immobile and you start to develop clicking sounds. Stretching may help solve the problem altogether.
In conclusion, if you know you are having recent onset clicking issues as well as problems with posture, biomechanics, mobility and muscle imbalances you may have an insidious onset of clicking that may devolve into worse problems.
In many condition significant and even eliminating cartilage clicking. This may be the case even in people that have had clicking all their lives from loose joints.
ses correct the imbalances with proper strength and mobility work should improve the
If you have tissue that is rubbing and snapping over tissue. This signifies an injury condition.
This occurs where tissues are not moving where they are supposed to be such as IT band snapping syndrome and triceps snapping syndrome. There arc other similar problems like nerve and tendon snapping/popping that may occur in different parts of the body.
In all of these cases, there is likely some problems related to posture, biomechanical, mobility and muscle imbalances. This is not unlike the clicking scenario.
The "quick" fix to eliminate the pain and snapping quickly is to loose up the tissues with soft tissue massage and anti-inflammatory drugs. However, to eliminate the problem entirely all of the factors that contribute to their development from the four atributes (posture, biomechanics, mobility and muscle imbalances) must be examined and corrected.
If connective tissue that was holding say the triceps tendon in place is gone from an accident then correcting the four factors may not help. This may be something you have to talk to your doctor about to consider if it needs surgery.
Likewise, crunching tends to represent an injury condition as well where the articular cartilage is not working properly or there is already damage where it is mashing into each other. It is best to get this checked out by a doctor.
If you have no idea how to correctly evaluate yourself and perform correct soft tissue work then go see a health professional.
Joint eracking and popping does not cause increased incidence of arthrits.
If you have lax joints, however, you may want to avoid this just in case it may present problems later due to potential destabilization of the joint. Focus on increasing strength of the muscle/tendons that connect there. This is especially true if you notice the laxity is increasing over time.
Clicking without pain is in general fine, especially if it has been there all of the time.
Sometimes insidious onset of clicking may devolve into potential problems later on. Correct assessment of posture, biomechanics, mobility and muscle imbalances should be initiated through proper strength, mobility, and soft tissue work.
Snapping and crunching signifies injury conditions. Like clicking proper care must be undertaken by 2 a doctor of physical therap
Most of the cramping you may experience will be during active flexibility exercises such as compression exercises.
For example, the active straddle compression or L-sit work may cause cramping in the quadriceps, hip flexors, or abdominal muscles. Likewise, upper level progressions of the V-sit and manna may cause cramping in the triceps as well as the aforementioned areas.
When muscles are moved into a short range of motion and contracted (active insufficiency), they are ely to cramp. A sustained muscle contraction cuts off oxygen availability and the muscles cramp due to lack of ATP. Since ATP is used to release myosin heads from actin, and used to pump caleium back into the sarcoplasmic reticulum it creates sustained intense contractions. Also, since there are a lot of actin- myosin overlapping in a highly contracted muscle it will increase the propensity for more of the heads to grab on and contract. People that are inflexible usually have tight musculature and lots of scar tissue already and are thus "predisposed" to poorer blood flow and easier cramping.
Foam rolling, massage, and static stretching are musts. However, this phenomena goes away if you continue practicing just like soreness tends to go away if you continually exercise. Thus, cramping is fairly normal to occur in the beginning, but will get better and go away through time so persevere.
If you are experiencing cramping not during exercise then this may be a different issue altogether and you should check other factors to make sure you are getting properly hydrated and enough nutrients or vitamins such as magnesium, sodium, and potassium in your diet
In particular, magnesium is a key player in muscle relaxation so it is important to get enough of it since the modern diet is deficient in this particular mineral.
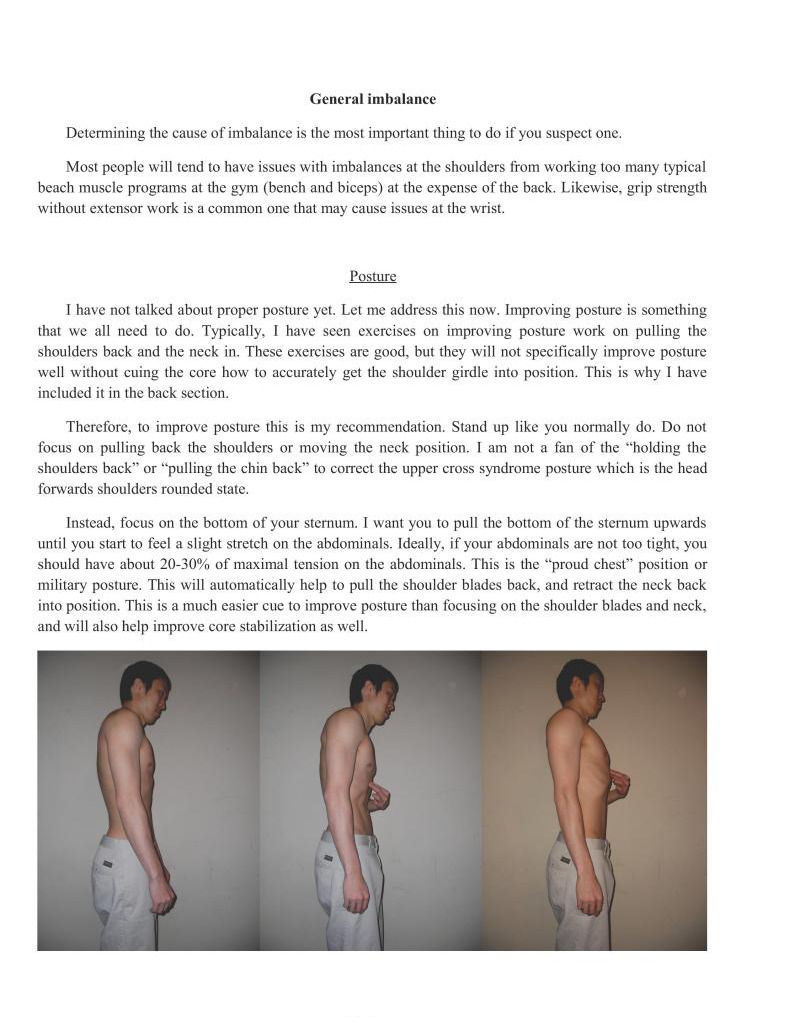
Determining the cause of imbalance is the most important thing to do if you suspect one.
Most people will tend to have issues with imbalances a the shoulders from working too many typical beach muscle programs at the gym (bench and biceps) at the expense of the back. Likewise, grip strength without extensor work is a common one that may cause issues at the wr
I have not talked about proper posture yet. Let me address this now. Improving posture is something that we all need to do. Typically, I have seen exercises on improving posture work on pulling the shoulders back and the neck in. These exercises are good, but they will not specifically improve posture well without cuing the core how to accurately get the shoulder girdle into position. This is why I have included it in the back section.
Therefore, to improve posture this is my recommendation. Stand up like you normally do. Do not focus on pulling back the shoulders or moving the neck position. I am not a fan of the "holding the shoulders back" or "pulling the chin back" to correct the upper cross syndrome posture which is the head forwards shoulders rounded state.
Instead, focus on the bottom of your sternum. I want you to pull the bottom of the sternum upwards until you start to feel a slight stretch on the abdominals. Ideally, if your abdominals are not too tight, you should have about 20-30% of maximal tension on the abdominals. This is the "proud chest" position or military posture. This will automatically help to pull the shoulder blades back, and retract the neck back into position. This is a much easier cue to improve posture than focusing on the shoulder blades and neck, and will also help improve core stabilization as well,
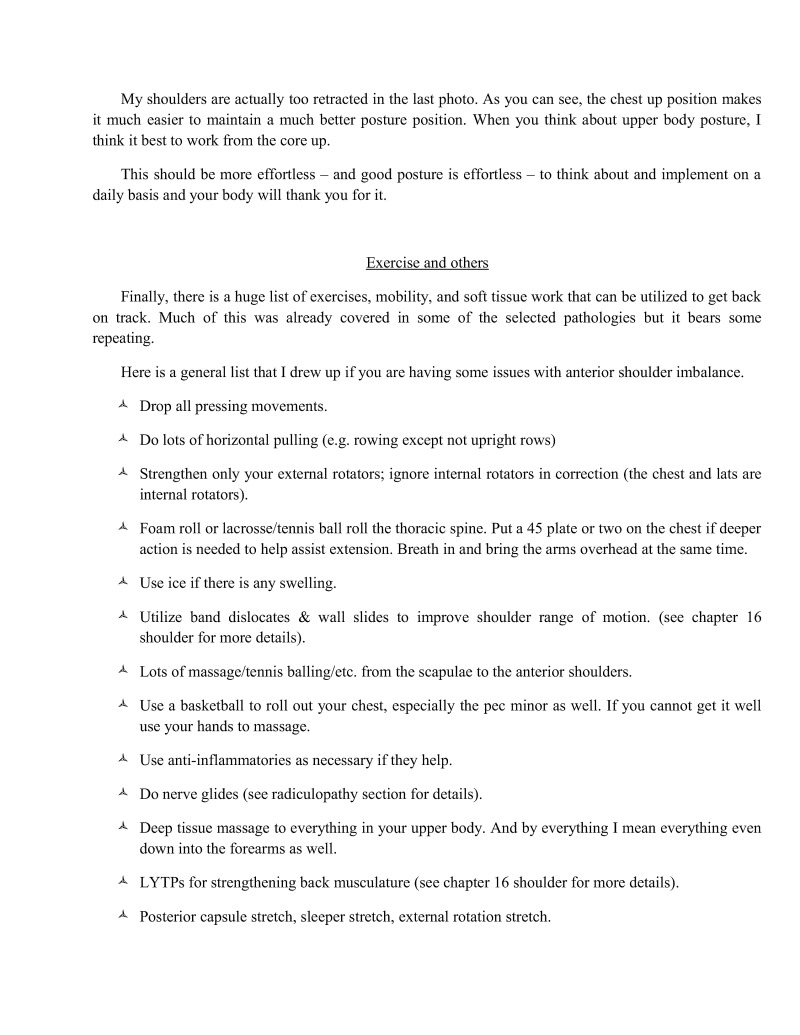
My shoulders are actually too retracted in the last photo. As you can see, the chest up position makes it much easier to maintain a much better posture position. When you think about upper body posture, I think it best to work from the core up.
This should be more effortless — and good posture is effortless — to talk about and implement on a daily basis and your body will thank you for it
Finally, there is a huge list of exercises, mobility, and soft tissue work that can be utilized to get back on track. Much of this was already covered in some of the selected pathologies but it bears some repeating.
Here is a general list that I drew up if you are having some issues with anterior shoulder imbalance.
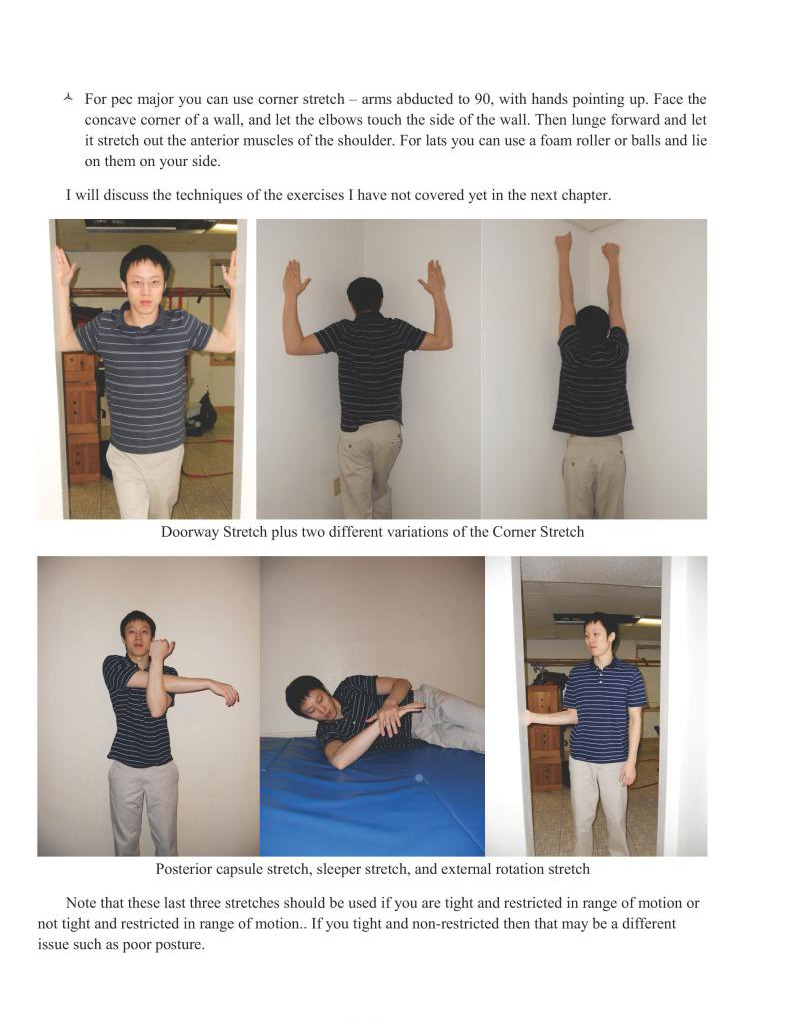
Note that these last three stretches should be used if you are tight and restricted in range of motion or not tight and restricted in range of motion... If you tight and non-restricted then that may be a different issue such as poor posture.

This chapter talked about some selected common injuries that may develop when training for bodyweight movements or skills.
Remember, this book/chapter is not meant to diagnose any injuries. If you have an injury and are unsure I would suggest again that you make an appointment with your doctor, physical therapist, or chiropractor and figure out what you are dealing with. Once you figure that out, then this chapter may be more useful to you.
Remember to keep this in mind because I will be talking about these types of injuries like they are common. If you have pain in the areas I describe just because they are common does not mean you have that specific injury. Using certain exercises or rehabilitation techniques for injuries which have not been diagnosed may actually make them worse. Again, if you have any sort of pain get it checked out by a qualified medical professional so you can know what you are dealing with.
The contents in this chapter is meant to be informative and any use of corrective measures should be done at your own risk.
Prehabilitation is an extension of rehabilitation. Typically, prehabilitation is referred to "pre-" rehabilitation" or doing rehabilitative work before you acquire an injury. However, the way I think it is best thought of in the context of pre-injury or post-injury rehabilitation state: there is the awareness of discomfort in certain muscles, connective tissues, or joints but there is no presence of pain or actual injury.
In my opinion, it is more natural to think of it like this because we will pass through a similar stage whether we acquire an injury or not. Thus, we look at and identify whatever is the cause of a pre-injury or post-injury state such as imbalances, weaknesses, overuse, or other factors. After we analyze this, we need to be proactive in either correcting those imbalances, strengthening, or resting to bring the tissues and joints back into a more healthy and normal state.
Therefore, prehabilitation is used for two distinct reasons.
The firstis the extension of rhabilitation where one previously had an injury such as tendonitis. In this example, the tendonitis is currently rehabbed to the point that there is no more pain, but excessive volume or intensity on the area may reinjure it. The area is vulnerable to injury. The area may need to be programmed around for general training
The second is the state of pre-injury. It is better to catch the injury before it devolves into pain, muscle atrophy, and other negative consequences and work on it before to restore the tissues to a normal state. Typically as stated before the ues are tending to be "underrecovered" or "overworked" such that there is discomfort without pain or there may be twinges of pain. This is where we want to back off and reassess what we are doing 50 as to correct this.
There are five main areas of the body that I am going to discuss in regards to upper body training. These are the hips, spine, shoulders, elbows, and wrists. These joints and the surrounding musculature are the main areas in bodyweight exercises that we need to take care of to make sure nothing happens to them. These will also be discussed in the next section on mobility and flexibility.
Prehabilitation is often about correcting imbalances or improving dysfunction tissues which is why a Tot of what is going to be talked about in this chapter is based behind the previous chapters on injuries.
This is the main time I like isotonic (same rate of movement) exercises in conjunction with eccentrics (muscle lengthening) as the main types of movements for prehabilitation. Isolation type exercises may be used specifically to work on imbalances or target tissues that may need extra work.
Typically, this type of work will be an extension of rehabbing back from injuries which means you can use the same exercises that you were given by your doctor or physical therapist. However, if you are approaching this from the pre-injury state of things that is good. We never want to have a full blown injury as pre- rehabilitation work is much easier to to than post- rehabilitation.
I am going to talk about mobility and flexibility as a whole next, and then we will focus in on general solutions as each of these things are interrelated with each other.
The definition of mobility is the ability to move freely. We can use flexibility training to increase our mobility, and we can use other techniques such as massage or full range of motion exercise to help break up soft tissue adhesions or increase range of motion as well
As such, mobility can be thought of as a bridge between prehabilitation and normal quality of movement that we would be using to performing our strength movement.
Our goal is to get the range of motion (flexibility). Then be able to move within that range of motion (mobility). Then be able to improve strength or endurance within that movement (isolation — compounds) to work back into full strength work.
Flexibility work itself is an important part of bodyweight strength training especially in some of the variations of skills such as the straight arm press handstands and L-sit/V-sit/manna variations. However, like I have talked about before in the core work section, the thing we are all working towards is what we like to call "active flexibility."
Active flexibility takes advantage of using the muscles in the active insufficiency (or shortened range of motion) where we are operating at the limits of our flexibility. This requires a great amount of strength and control. This type of strength work which is mostly for the shoulders and hips must be developed in conjunction with mobility and flexibility work as well.
We do not want to work these things for the sake of working them. We always need to have a goal or overarching theme behind why we want to have that extra range of motion or mobility.
There are two prevailing popular methods of thought out there in regards to common injuries. The first 1am sure that everyone know is "no pain no gain." While this applics great to aspects of training such as metabolic conditioning, it does not scale well with injuries. The other line of thought is rest, rest, and more rest. While rest is good it depends on what kind of rest is implemented. Often the truth is somewhere between each of these two lines of thought.
So why are mobility and flexibility so important?
1 think the most underused example is the use of mobility in the context of how good it is for our joints. Take for instance the fact that hip replacement is becoming extremely common in the United States. Joint replacements occur because our joints become "unhealthy" from lack of movement. Thus, they start to develop arthritis and other painful maladics.
The main oceupational thing that has become prevalent with people working jobs in the US is desk work. That i to say that people are sitting down 8+ hours per day and not moving their hips at al.
Anyone can tell you that what happens when you break a bone and you are put in a cast that your muscles start to atrophy, joints start to become stiff, and your connective tissues become weaker. The same thing occurs with self imposed semi-restrictions such as with padded shoes (akin to soft casts), and restrictions just imposed by working such as sitting.
Movement in general is good for our joints, connective tissues, and muscles which is why in previous chapters I rarely recommended straight up rest for an injury. Doctor who recommend straight up rest are incorrect as well. The only time "rest" should be indicated is if someone does not know specifically how to rehabilitate something or they are overactive and overcager with their training and will do more damage than good. We always want to be moving our injuries —albeit non-painfully — because that helps to start to loosen up tight muscles, get the blood flowing to the area, etc.
When you stub your toe or hurt your finger the first thing you do is move and take it to its full range of motion as possible. As long as it does not hurt more the movement and other rubbing that we do helps o tell our nervous systems that everything is relatively fine and it does not need to impose any restrictions on movement or dial up our pain sensations to prohibit us from potentially damaging the tissues more.
However, we are taught that we generally should not be moving other injuries and it is definitely detrimental to our overall health. Do not get me wrong there is some times where movement restriction is necessary such as after surgery where delicate tissues need to heal. Likewise, if the pain is made worse by movement and a doctor should be checking you out then this may be another instance where pure rest indicated. These are cases are more rare and you will tend to know when these cases present themselves because you will probably be going to the emergency room or doctor immediately.
Regardless, if I were to put a number on it I would say that movement and/or exercise in general should be used in healing about 90-95% of injuries. Ice, heat, anti-inflammatories, ultrasound, e-stim, etc.
are all well and good, but most of the time they are not needed (or can be used in the context of helping speeding healing in some cases).
Tdo not think I have to elaborate on why pushing through pain is a bad idea. Our bodies have pain to tell us when we are damaging things. If you want to make an injury worse the best thing to do is push through pain. There are some exceptions, but generally they should only be done under a qualified medical professional or physical therapist during rehabilitation.
If you are having issues is pain soft tissue work and non-painful mobility work is extremely important. One of the major factors in eliminating pain is the gate control theory of pain. The gate control theory of pain shows us how to help dull down the pain so the body can heal itself better.
Al of the fibers under *gate control" are sensory afferents from the skin, muscles, ligaments, and joints. The large fibers specifically are the ones that travel fastest — alpha and beta fibers (Ia and II, and Ib respectively) — in humans these are golgi tendon organs and muscle spindles. The small fibers tend to be smaller afferents responsible for nociceptive (pain) input including Adelta and C fibers.
The theory goes that stimulation of the large alpha and beta fibers can interfere and help dull the body’s sense of pain from the smaller delta and C fibers. What stimulates alpha and beta fibers? That’s right: soft tissue work and movement.
Many people have probably experienced this phenomena but did not know it. Have you ever injured yourself during exercise? For instance, possibly a skinned shin during a deadlift or clean and jerk? Or you were running and hit a limb or toe on something but it did not hurt? Or been so hyped up for something that you did not feel the pain such as in a fight or flight situation?
Since there is so much feedback from the faster fibers from movement and/or exercise or total body sympathetic response it literally drowns out the pain fiber sensations that are sent to the brain. And you do not feel any pain.
The gate control theory of pain has been expounded upon in the recent decade to give way to the neuromatrix theory of pain. Basically, since all pain is in the brain, a theory must be able to explain phantom pain. Therefore, it must take into account how we perceive a nociceptive (pain) stimulus and how it may relate to cases where there is pain but no nociceptive input but pain is present.
The neuromatrix theory of pain focuses on somatosensory input (which includes all of the gate control theory above), the limbic system (emotion, behavior, memory, and smell), and thalamocortical systems (processing of these inputs).
Thus, if pain especially chronic type of pain, is imprinted strongly enough on our system (c.g. a neurosignature), a stimulus that does not cause pain may be interpreted in the brain as pain. This would cause phantom pain, or pain where there is no tissue damages. This is typical of extensive chronic pain which we will discuss a bit later.
How much is too much?
Generally, movement is good as long as the pain, inflammation, swelling, are improving or at least staying neutral. Most of the time if you are focused on movement or mobilizing a joint you should end up feeling better than when you started
This is important for any stretching, mobility, or prehabilitation work as well.
Acute injuries are a difficult topic to discuss directly which is why you should always talk to your physical therapist about rehabilitation progression and planning.
It is important not to progress too fast as it lear that injured tissues are vulnerable to reinjury more than healthy tissues. However, it is important not to baby injuries such that they lead to functional impairments to compensations that interfere with normal activities or sports,
Any questions during the rehabilitative phase should be addressed to the appropriate health care professional. If they cannot answer your questions then you may want to search for a new one. Although it depends" may not be the answer you're looking for which is often the case, but most health professionals if they are good should be able to give you a decent time frame or progressive plan or alternatives if you ask.
Chronic pain also presents an interesting case. After about 3-4+ months most of the damage from injuries are healed. While there may be some restrictions in movement via things such as scar tissue, if there is chronic pain present without damage to the soft tissues why is it still there?
The answer lics in our nervous systems. Our brains can interpret stimuli any way it wants and there are a lot of disorders such as aphasias where our brains incorrectly process what we hear and how we understand and speak out our response. The same is true of chronic pain after injuries.
When it all comes down to it and we have chronic pain after 6 months and it continues we can almost always know that our brains are interpreting almost any sensation or movement that gives feedback to the nervous system as pain.
There are many keys to rehabbing chronic pain, but I think the best approach is the graded response which can be approached from two direetions. First, the *fear" response (or phobia) psychology where people are gradually introduced to things they fear such as spiders and is continually progressed such that they eventually see that they really have nothing to fear of that. This can be introduced with proper
gradation in movements starting from simple movements building up to more complex or greater movements.
The second approach is through somatosensory experience. If we take people through a variety of sensory experiences even near painful and demonstrate that on normal tissues the same near pain or pain response is not normal we can start to get the brain to realize that it is incorrectly interpreting these responses. After all, if someone thinks that even placing a hand on a painful area is going to hurt are they not going to tense up all their muscles and have a fear avoidance reaction of trying to move out of the way at all costs? The key is to introduce the sensory experiences gradually just like with exercise such that we limit the fear/pain/sympathetic responses and help restore proper activity within the nervous system.
I think that both of these techniques (and there are probably others that I do not have time to cover) are very useful in understanding that our bodies are not just based on musculoskeletal factors. We need to understand that movements and developing mobility is actually a combination of neuromuscular and musculoskeletal factors including even some primary neurological factors as well
After all we know that some people even with hours of stretching can never get any flexibility. Why?
Muscle spindles (gamma motor neurons) govem a muscle’s length. The nervous system controls these fibers. When they are "tightly wound" the muscle does not respond very well to length increases and stays tight,
This can happen for a variety of reasons but the most eluting is when you have spinal cord injury or stroke. When upper cerebral control is cut off from the spinal cord, the inhibion that the cerebral cortex puts on these gamma motor neurons is lost. Thus, they become overactive and the muscles tend to get extremely tight and hypertonic. You can this in the synergistic patterns where the a lot of the flexors tighten up and the arms, legs, and body start to move into the fetal position as they all sart to contract.
I made this point just to say that flexibility and mobility are not just about lengthening the muscles and connective tissues. We have to take into account how the nervous system responds to these exercises.
What to do?
Tough question.
Gate control theory tends to be variable, and delving into the neuromatrix theory of pain is a complex process. Sometimes the feedback from the muscle movement activates pain sensations when it should not with chronic pain. Sometimes it helps. If movement has pain, but does not increase it then it is generally best to move even if there is pain. It will get better as the body relearns how to sort out the sensations coming from its fibers,
Conditioning or graded response will also work. You have to take these things slowly and introduce the movement back. Preferably as stated before the small amounts of movements and mobility work will only have lower levels of pain or stiffness. However, as the body begins to lean again how to differentiate between them you can increase the movement,
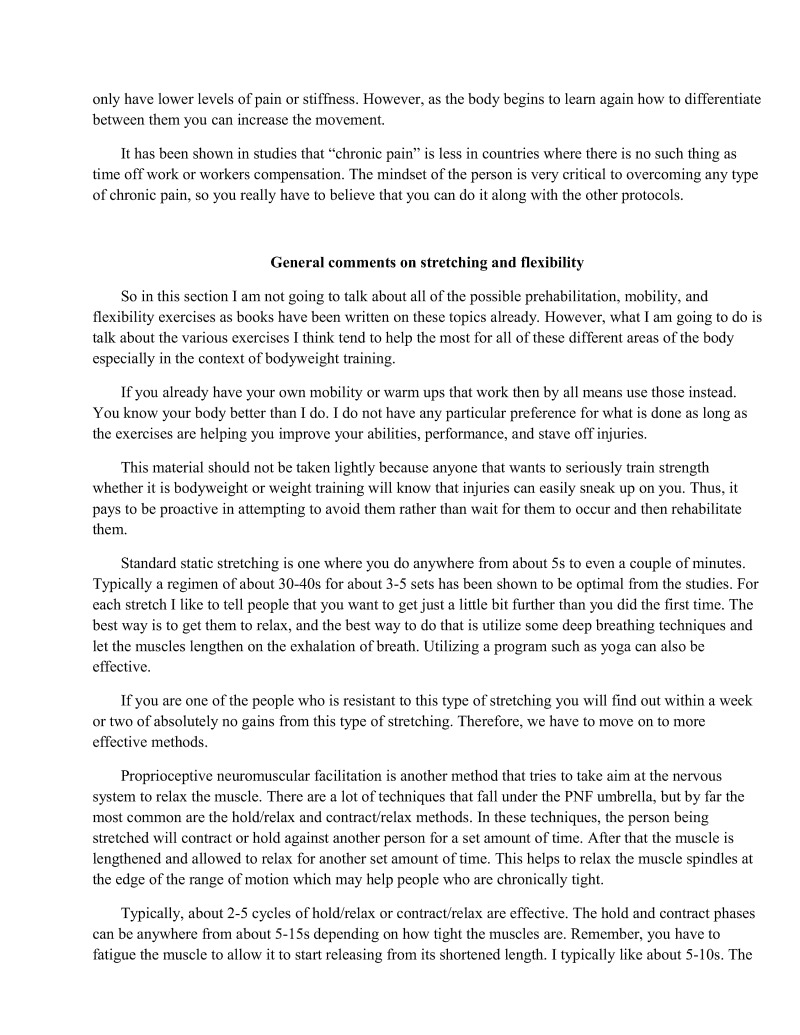
It has been shown in studies that "chronic pain" is less in countries where there is no such thing as time off work or workers compensation. The mindset of the person is very critical to overcoming any type of chronic pain, so you really have to believe that you can do it along with the other protocols.
So in this section I am not going to talk about all of the possible prehabilitation, mobility, and flexibility exercises as books have been written on these topics already. However, what I am going to to is talk about the various exercises I think tend to help the most for all of these different areas of the body especially in the context of bodyweight training.
If you already have your own mobility or warm ups that work then by all means use those instead. You know your body better than I do. I do not have any particular preference for what is done as long as the exercises are helping you improve your abilities, performance, and stave off injuries,
This material should not be taken lightly because anyone that wants to seriously train strength whether it is bodyweight or weight training will know that injuries can easily sneak up on you. Thus, it pays to be proactive in attempting to avoid them rather than wait for them to occur and then rehabilitate: them.
Standard static stretching is one where you do anywhere from about is to even a couple of minutes. Typically a regimen of about 30-40s for about 3-5 sets has been shown to be optimal from the studies. For ach stretch I like to tell people that you want to get just a little bit further than you did the first time. The best way is to get them to relax, and the best way to do that is utilize some deep breathing techniques and let the muscles lengthen on the exhalation of breath. Utilizing a program such as yoga can also be effective.
I you are one of the people who is resistant to this type of stretching you will find out within a week or two of absolutely no gains from this type of stretching. Thercfore, we have to move on to more effective methods.
Proprioceptive neuromuscular facilitation is another method that tries to take aim at the nervous system to relax the muscle. There are a lot of techniques that fall under the PNF umbrella, but by far the most common are the hold/relax and contract/relax methods. In these techniques, the person being stretehed will contract or hold against another person for a set amount of time. After that the muscle is lengthened and allowed to relax for another set amount of time. This helps to relax the muscle spindles at the edge of the range of motion which may help people who are chronically tigh.
Typically, about 2-5 cycles of hold/relax or contract/relax are effective. The hold and contract phases can be anywhere from about 5-15s depending on how tight the muscles are. Remember, you have to fatigue the muscle to allow it to start releasing from its shortened length. I typically like about 5-10s. The
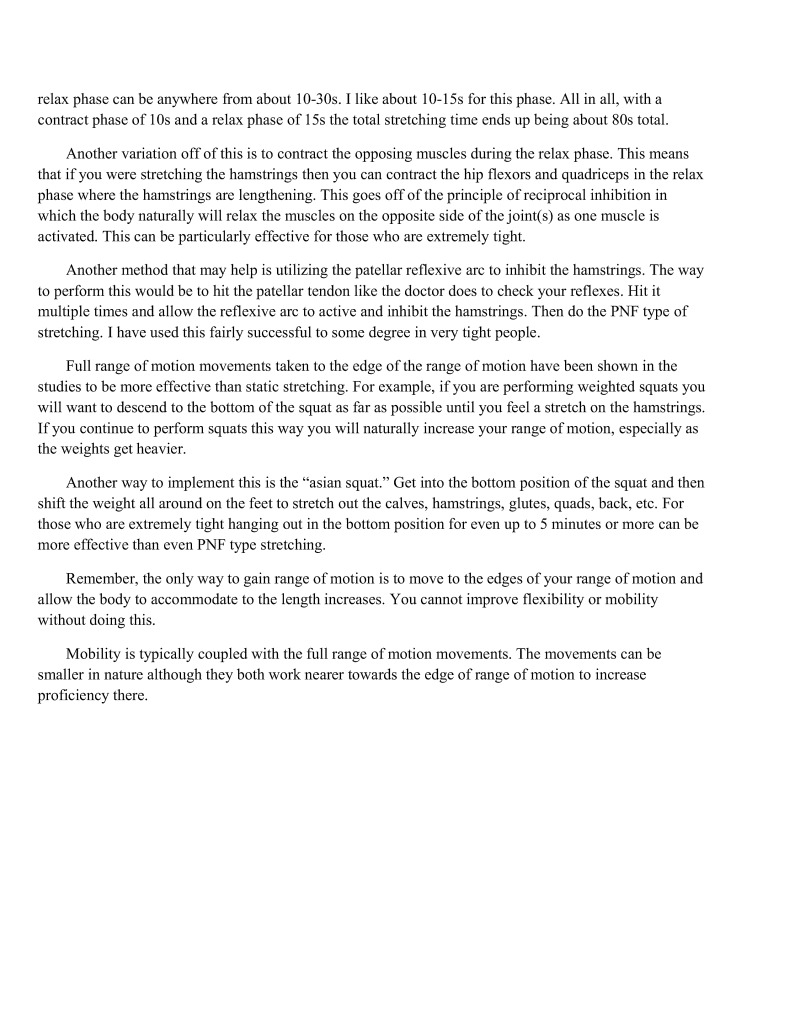
relax phase can be anywhere from about 10-30s. I like about 10-13s for this phase. All in all, with a contract phase of 10s and a relax phase of 155 the total stretching time ends up being about 80s total.
Another variation off of this is to contract the opposing muscles during the relax phase. This means that if you were stretching the hamstrings then you can contract the hip flexors and quadriceps in the relax phase where the hamstrings are lengthening. This goes off of the principle of reciprocal inhibition in which the body naturally will relax the muscles on the opposite side of the joint(s) as one muscle is activated. This can be particularly effective for those who are extremely tight,
Another method that may help is tilizing the patellar reflexive arc to inhibit the hamstrings. The way to perform this would be to hit the patellar tendon like the doctor does to check your reflexes. Hit it multiple times and allow the reflexive arc to active and inhibit the hamstrings. Then do the PNF type of stretching. I have used this fairly successful to some degree in very tight people.
Full range of motion movements taken to the edge of the range of motion have been shown in the studies to be more effective than static stretching. For example, if you are performing weighted squats you will want to descend to the bottom of the squat as far as possible until you feel a stretch on the hamstrings If you continue to perform squats this way you will naturally increase your range of motion, especially as the weights get heavier.
Another way to implement this is the "asian squat." Get into the bottom position of the squat and then shift the weight all around on the feet to stretch out the calves, hamstrings, glutes, quads, back, ctc. For those who are extremely tight hanging out in the bottom position for even up to 5 minutes or more can be more effective than even PNF type stretching.
Remember, the only way to gain range of motion is to move to the edges of your range of motion and allow the body to accommodate to the length increases. You cannot improve flexibility or mobility without doing this.
Mobility is typically coupled with the full range of motion movements. The movements can be smaller in nature although they both work nearer towards the edge of range of motion to increase proficiency there,
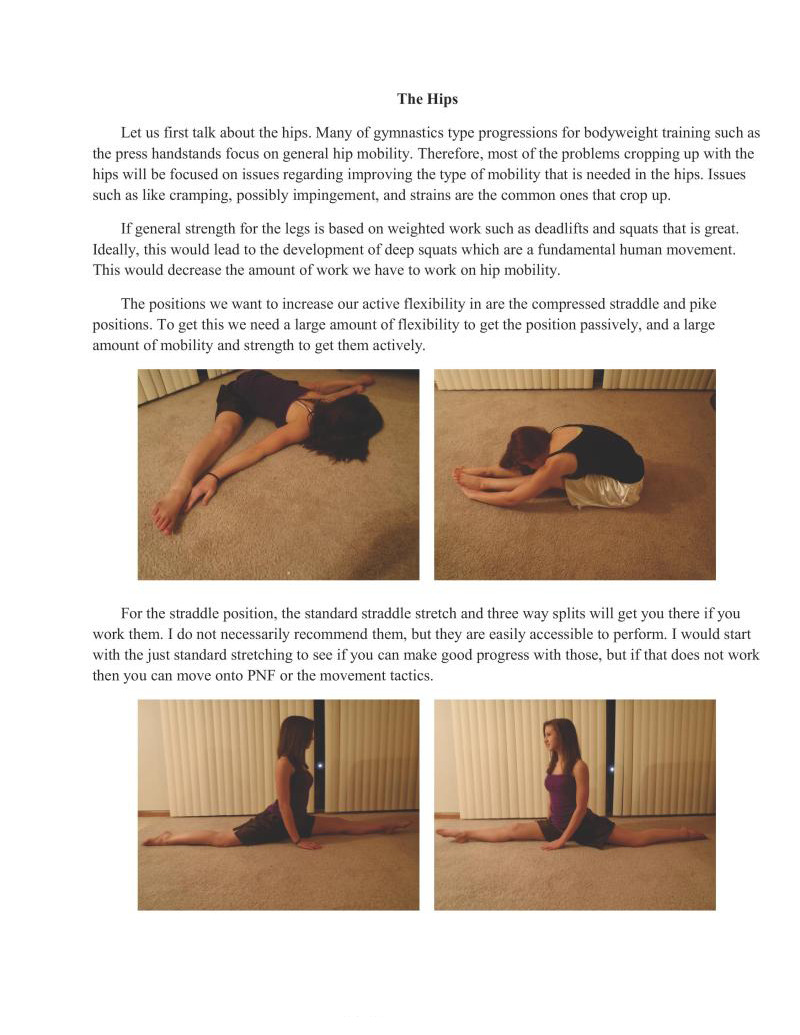
Let us first talk about the hips. Many of gymnastics type progressions for bodyweight training such as the press handstands focus on general hip mobility. Therefore, most of the problems cropping up with the hips will be focused on issues regarding improving the type of mobility that is needed in the hips. Issues such as like cramping, possibly impingement, and strains are the common ones that crop up.
If general strength for the legs is based on weighted work such as deadlifts and squats that i great. Ideally, this would lead to the development of deep squats which are a fundamental human movement. This would decrease the amount of work we have to work on hip mobility.
The positions we want to increase our active flexibility in are the compressed straddle and pike positions. To get this we need a large amount of flexibility to get the position passively, and a large amount of mobility and strength to get them actively.
For the straddle position, the standard straddle stretch and three way splits will get you there if you work them. I do not necessarily recommend them, but they are easily accessible to perform. I would start with the just standard stretching to see if you can make good progress with those, but if that does not work then you can move onto PNF or the movement tactics.
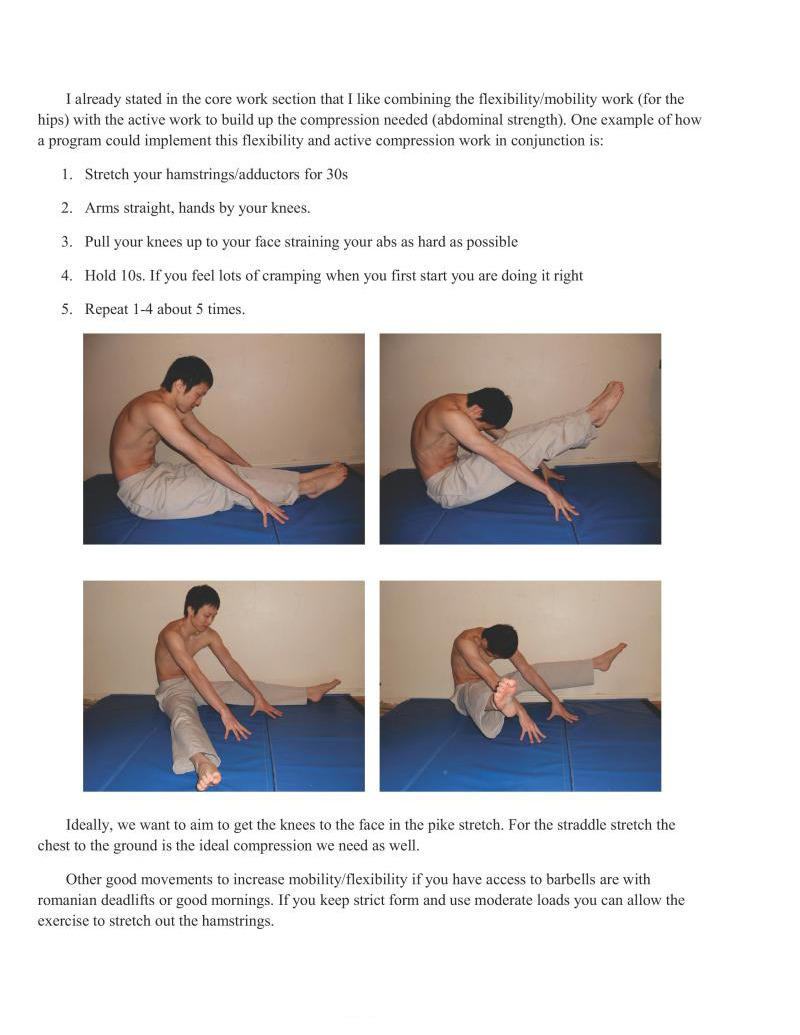
Talready stated in the core work section that I like combining the flexibility/mobility work (for the hips) with the active work to build up the compression needed (abdominal strength). One example of how a program could implement this flexibility and active compression work in conjunction is:
Ideally, we want to aim to get the knees to the face in the pike stretch. For the straddle stretch the chest to the ground is the ideal compression we need as well
Other good movements to increase mobility/flexibility if you have access to barbells are with romanian deadlifts or good mornings. If you keep strict form and use moderate loads you can allow the exercise to stretch out the hamstrings
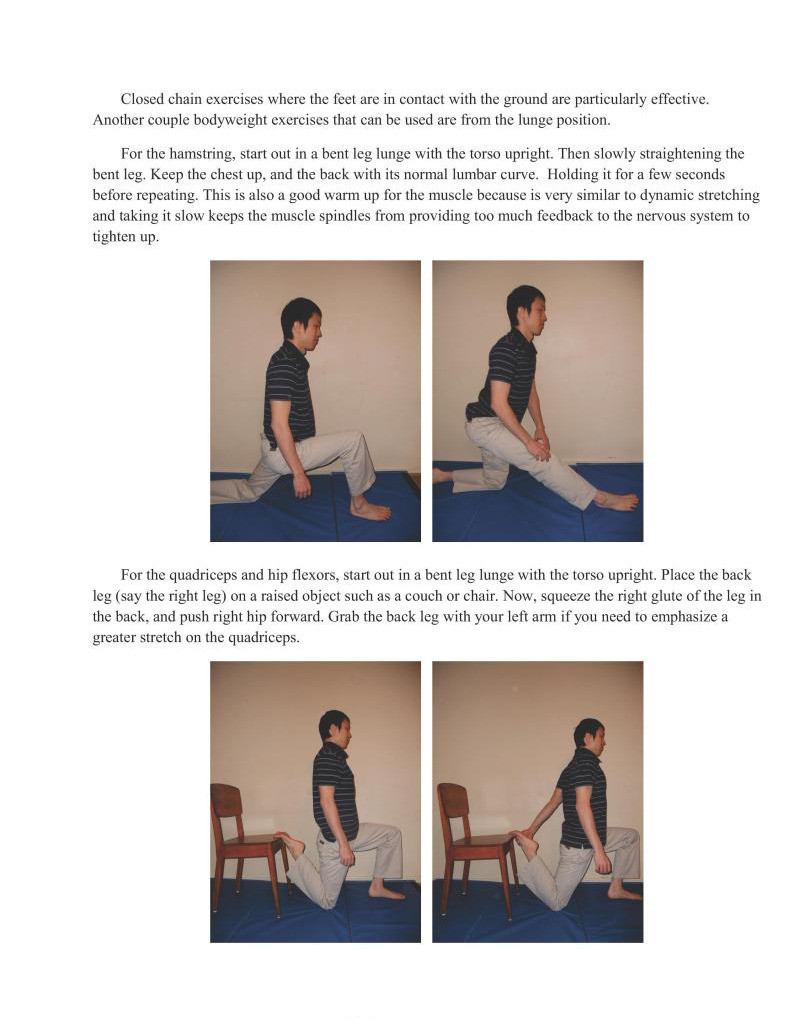
Closed chain exercises where the feet are in contact with the ground are particularly effective. Another couple bodyweight exercises that can be used are from the lunge position.
For the hamstring, start out in a bent leg lunge with the torso upright. Then slowly straightening the bent leg. Keep the chest up, and the back with its normal lumbar curve. Holding it for a few seconds before repeating. This is also a good warm up for the muscle because is very similar to dynamic stretching and taking it slow keeps the muscle spindles from providing too much feedback to the nervous system to tighten up.
For the quadriceps and hip flexors, start out in a bent leg lunge with the torso upright. Place the back leg (say the right leg) on a raised object such as a couch or chair. Now, squeeze the right glute of the leg in the back, and push right hip forward. Grab the back leg with your left arm if you need to emphasize a greater stretch on the quadriceps.
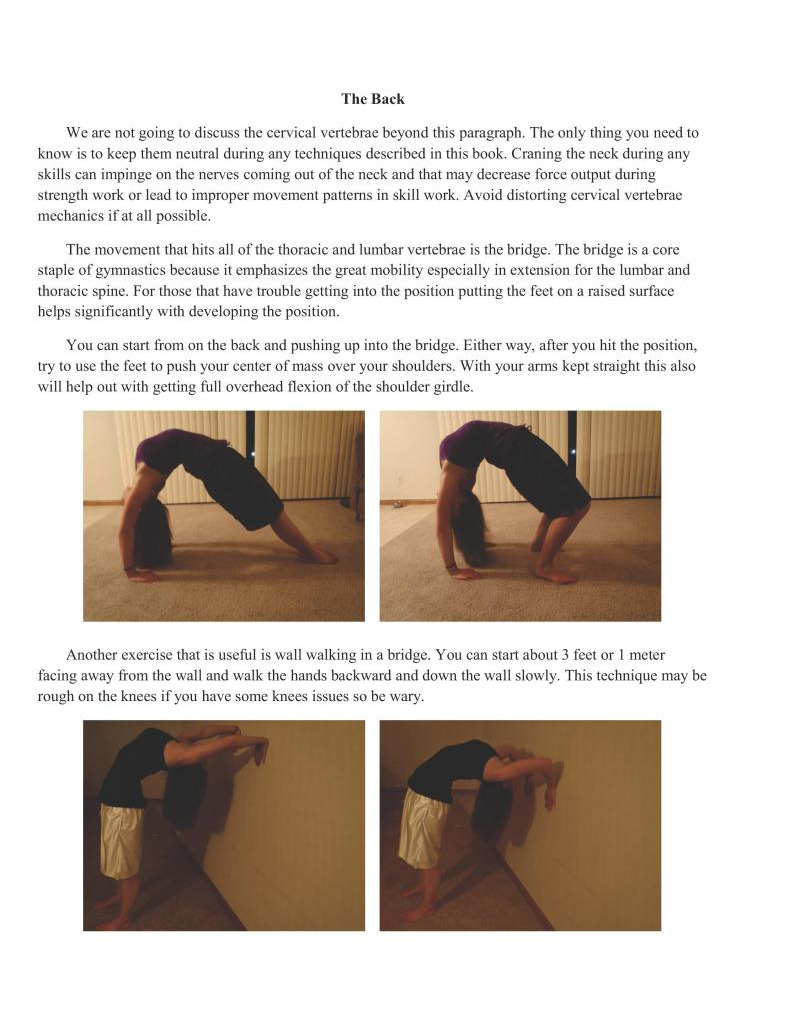
We are not going to discuss the cervical vertebrae beyond this paragraph. The only thing you need to know is to keep them neutral during any techniques described in this book. Craning the neck during any skills can impinge on the nerves coming out of the neck and that may decrease force output during strength work or lead to improper movement pattens in skill work. Avoid distorting cervical vertebrac mechanics if at al possible.
The movement that hits all of the thoracic and lumbar vertebrac is the bridge. The bridge is a core staple of gymnastics because it emphasizes the great mobility especially in extension for the lumbar and thoracic spine. For those that have trouble getting into the position putting the feet on a raised surface helps significantly with developing the position.
You can start from on the back and pushing up into the bridge. Either way, after you hit the position, ry to use the feet to push your center of mass over your shoulders. With your arms kept straight this also will help out with getting full overhead flexion of the shoulder girdle.
Another exercise that is useful is wall walking in a bridge. You can start about 3 feet or 1 meter facing away from the wall and walk the hands backward and down the wall slowly. This technique may be rough on the knees if you have some knees issues so be wary.
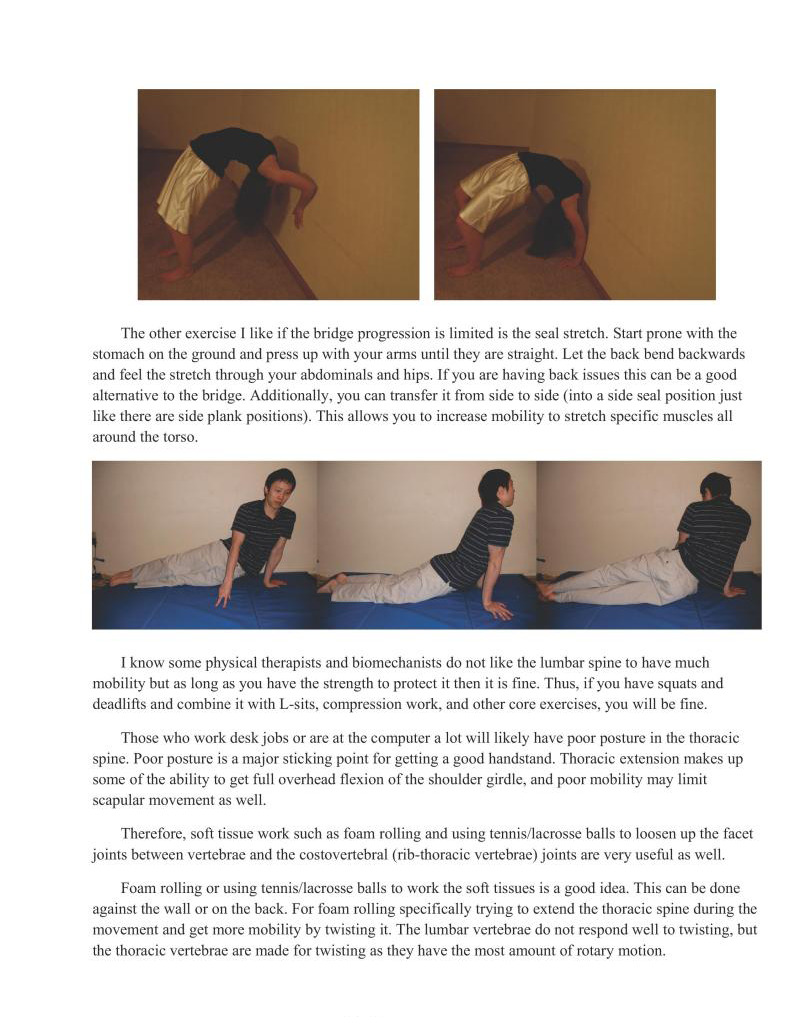
The other exercise | like if the bridge progression is limited is the seal stretch. Start prone with the stomach on the ground and press up with your arms until they are straight. Let the back bend backwards and feel the stretch through your abdominals and hips. If you are having back issues this can be a good aliemative to the bridge. Additionally, you can transfer it from side to side (into a side seal position just like there are side plank positions). This allows you to increase mobity to stretch specific muscles all around the torso.
I know some physical therapists and biomechanists do not like the lumbar spine to have much mobility but as long as you have the strength to protect it then it is fine. Thus, if you have squats and deadlifts and combine it with L-sits, compression work, and other core exercises, you will be fine.
Those who work desk jobs or are at the computer a lot will likely have poor posture in the thoracic spine. Poor posture is a major sticking point for getting a good handstand. Thoracic extension makes up some of the ability to get full overhead flexion of the shoulder girdle, and poor mobility may limit scapular movement as well.
Therefore, soft tissue work such as foam rolling and using tennis/lacrosse balls to loosen up the facet joints between vertebrae and the costovertebral (rib-thoracic vertebrae) joints are very useful as well
Foam rolling or using tennis/lacrosse balls to work the soft tissues is a good idea. This can be done against the wall or on the back. For foam rolling specifically trying to extend the thoracic spine during the movement and get more mobility by twisting it. The lumbar vertebrae do not respond well to twisting, but the thoracic vertebrae are made for twisting as they have the most amount of rotary motion.
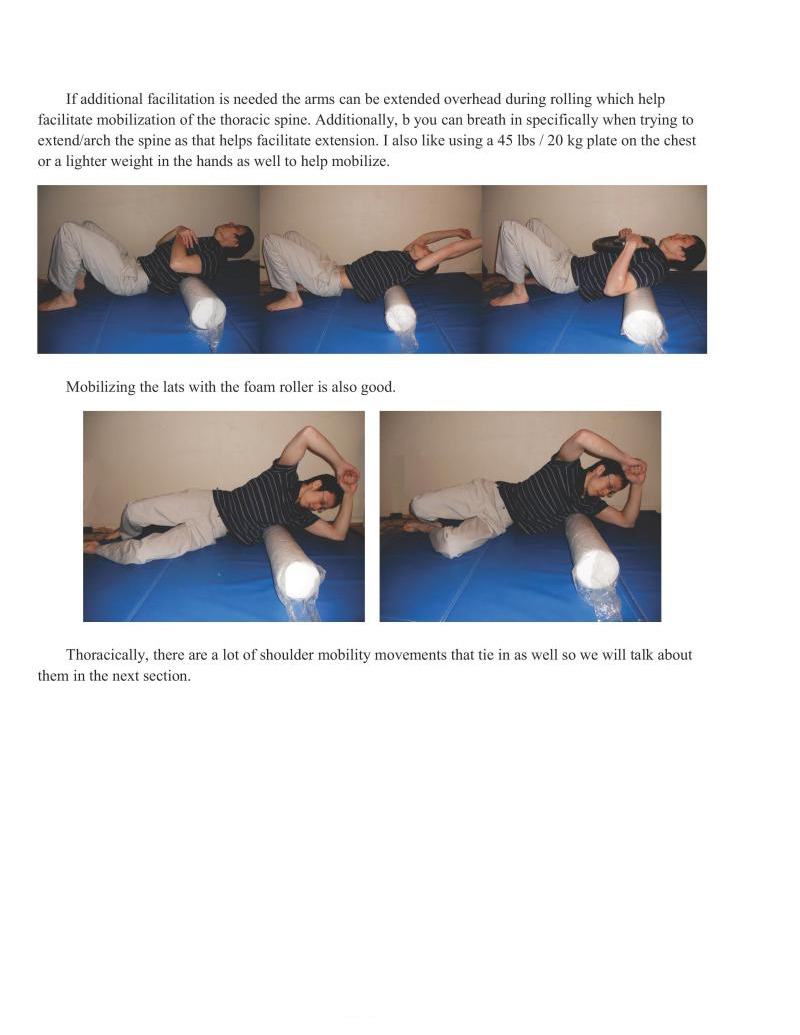
If additional facilitation is needed the arms can be extended overhead during rolling which help facilitate mobilization of the thoracic spine. Additionally, b you can breath in specifically when trying to extend/arch the spine as that helps facilitate extension. I also like using a 45 lbs / 20 kg plate on the chest ora lighter weight in the hands as well to help mobilize.
Mobilizing the
Thoracically, there are a lot of shoulder mobility movements that tie in as well so we will talk about them in the next section.
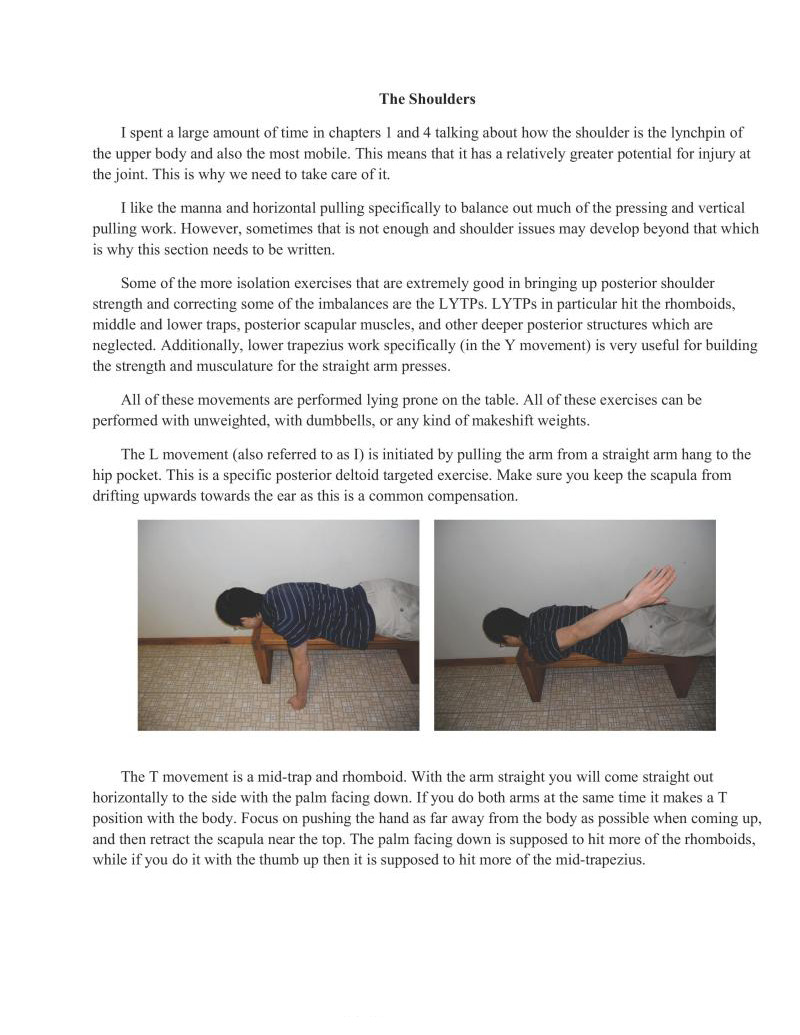
I spent a large amount of time in chapters 1 and 4 talking about how the shoulder is the lynchpin of the upper body and also the most mobile. This means that it has a relatively greater potential for injury at the joint. This is why we need to take care of it.
Take the manna and horizontal pulling specifically to balance out much of the pressing and vertical pulling work. However, sometimes that is not enough and shoulder issues may develop beyond that which is why this section needs to be written.
Some of the more isolation exercises that are extremely good in bringing up posterior shoulder strength and correcting some of the imbalances are the LYTPs. LYTPs in particular hit the thomboids, middle and lower traps, posterior scapular muscles, and other deeper posterior structures which are neglected. Additionally, lower trapezius work specifically (in the Y movement) is very useful for building
the strength and musculature for the straight arm presses.
All of these movements are performed lying prone on the table. Al of these exercises can be performed with unweighted, with dumbbells, or any kind of makeshift weights.
The L movement (also referred to as 1) is initiated by pulling the arm from a straight arm hang to the hip pocket. This is a specific posterior deltoid targeted exercise. Make sure you keep the scapula from drifting upwards towards the car as this is a common compensation.
The I movement is a mid-trap and rhomboid. With the arm straight you will come straight out horizontally to the side with the palm facing down. If you do both arms at the same time it makes a T position with the body. Focus on pushing the hand as far away from the body as possible when coming up, and then retract the scapula near the top. The palm facing down is supposed to hit more of the thomboids, while if you do it with the thumb up then it is supposed to hit more of the mid-trapezius.
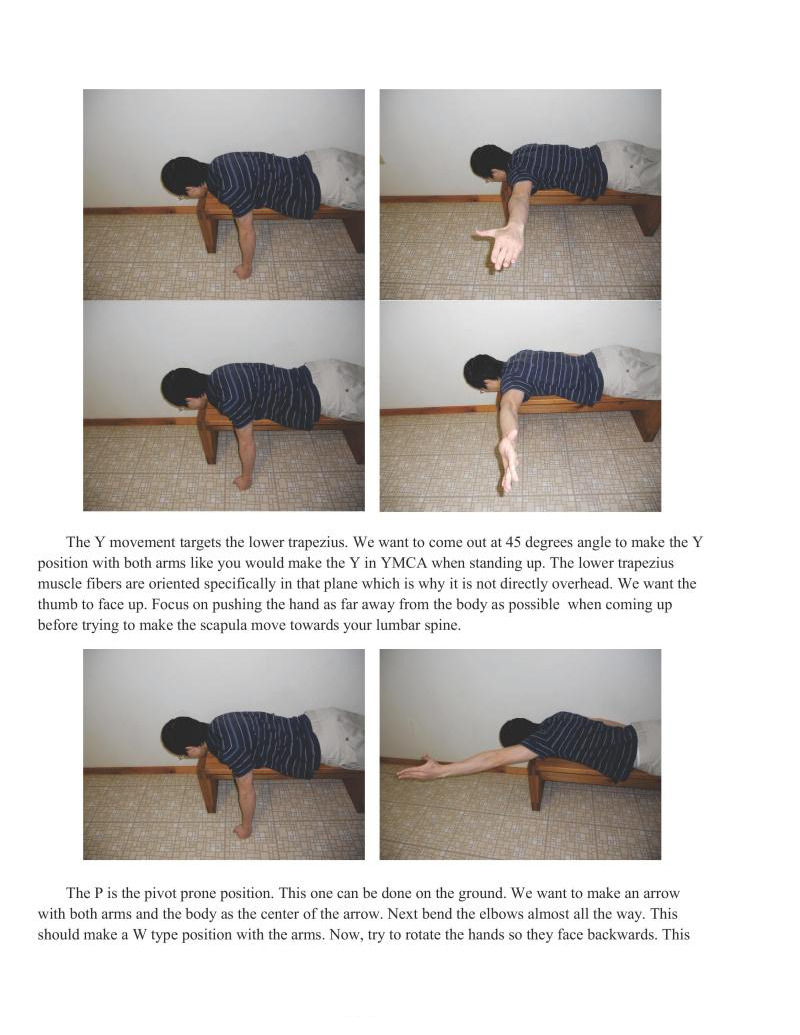
The Y movement targets the lower trapezius. We want to come out at 45 degrees angle to make the Y position with both arms like you would make the Y in YMCA when standing up. The lower trapezius muscle fibers are oriented specifically in that plane which is why it is not directly overhead. We want the thumb to face up. Focus on pushing the hand as far away from the body as possible when coming up before trying to make the scapula move towards your lumbar spine.
The P is the pivot prone position. This one can be done on the ground. We want to make an arrow with both arms and the body as the center of the arrow. Next bend the elbows almost all the way. This should make a W type position with the arms. Now, try to rotate the hands so they face backwards. This
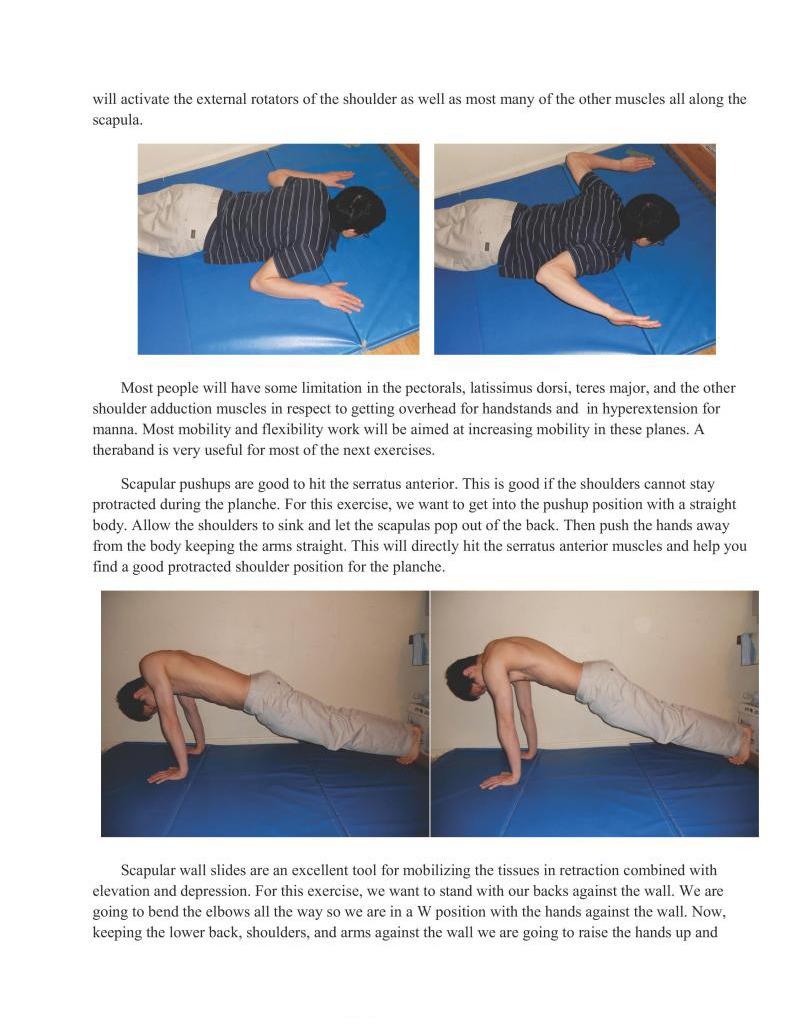
will activate the external rotators of the shoulder is well as most many of the other muscles all along the scapula
Most people will have some limitation in the pectorals, latissimus dorsi, teres major, and the oth shoulder adduction muscles in respect to getting overhead for handstands and. in hyperextension for manna. Most mobility and flexibility work will be aimed at increasing mobility in these planes. A theraband is very useful for most of the next exercises.
Scapular pushups are good to hit the serratus anterior. This is good if the shoulders cannot stay protracted during the planche. For this exercise, we want to get into the pushup position with a straight body. Allow the shoulders to sink and let the scapulas pop out of the back. Then push the hands away from the body keeping the arms straight, This will directly hit the serratus anterior muscles and help you find a good protracted shoulder position for the planche.
Scapular wall slides are an excellent tool for mobilizing the tissues in retraction combined with
elevation and depression. For this exercise, we want to stand with our backs against the wall. We are going to bend the elbows all the way so we are in a W position with the hands against the wall. Now, keeping the lower back, shoulders, and arms against the wall we are going to raisc the hands up and
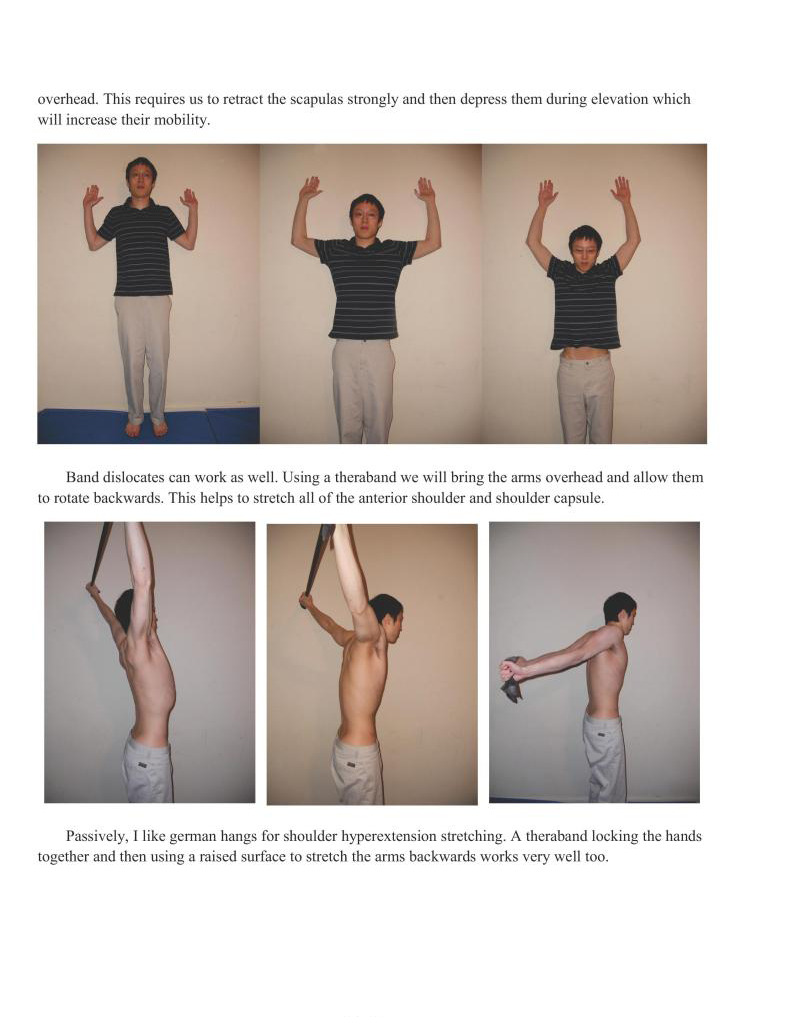
overhead. This requires us to retract the scapulas strongly and then depress them during elevation which will increase their mobility.
Band dislocates can work as well. Using a theraband we will bring the arms overhead and allow them to rotate backwards. This helps to stretch all of the anterior shoulder and shoulder capsule.
Passively, I like german hangs for shoulder hyperextension stretching. A theraband locking the hands together and then using a raised surface to stretch the arms backwards works very well too.
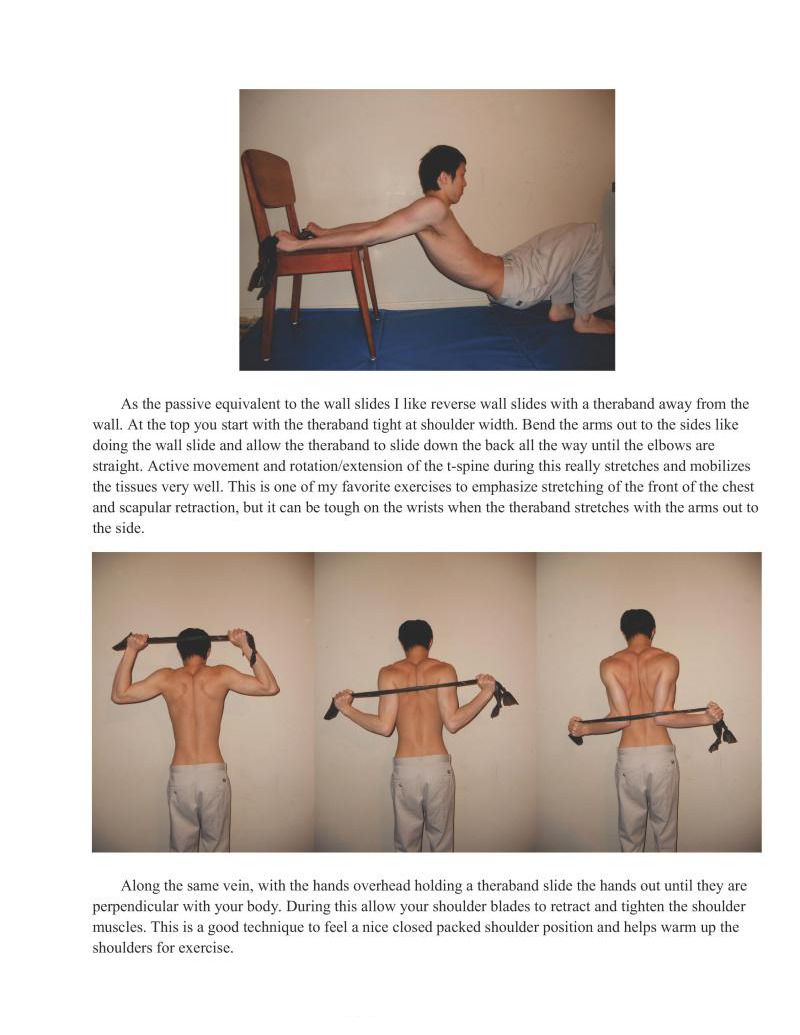
As the passive equivalent to the wall slides 1 like reverse wall slides with a theraband away from the wall. At the top you start with the theraband tight at shoulder width. Bend the arms out to the sides like doing the wall slide and allow the theraband to slide down the back all the way until the elbows are straight. Active movement and rotation/extension of the t-spine during this really stretches and mobilizes the tissues very well. This is one of my favorite exercises to emphasize stretching of the front of the chest and scapular retraction, but it can be tough on the wrists when the theraband stretches with the arms out to the side.
Along the same vein, with the hands overhead holding a theraband slide the hands out until they are perpendicular with your body. During this allow your shoulder blades to retract and tighten the shoulder muscles. This is a good technique to feel a nice closed packed shoulder position and helps warm up the shoulders for exercise.
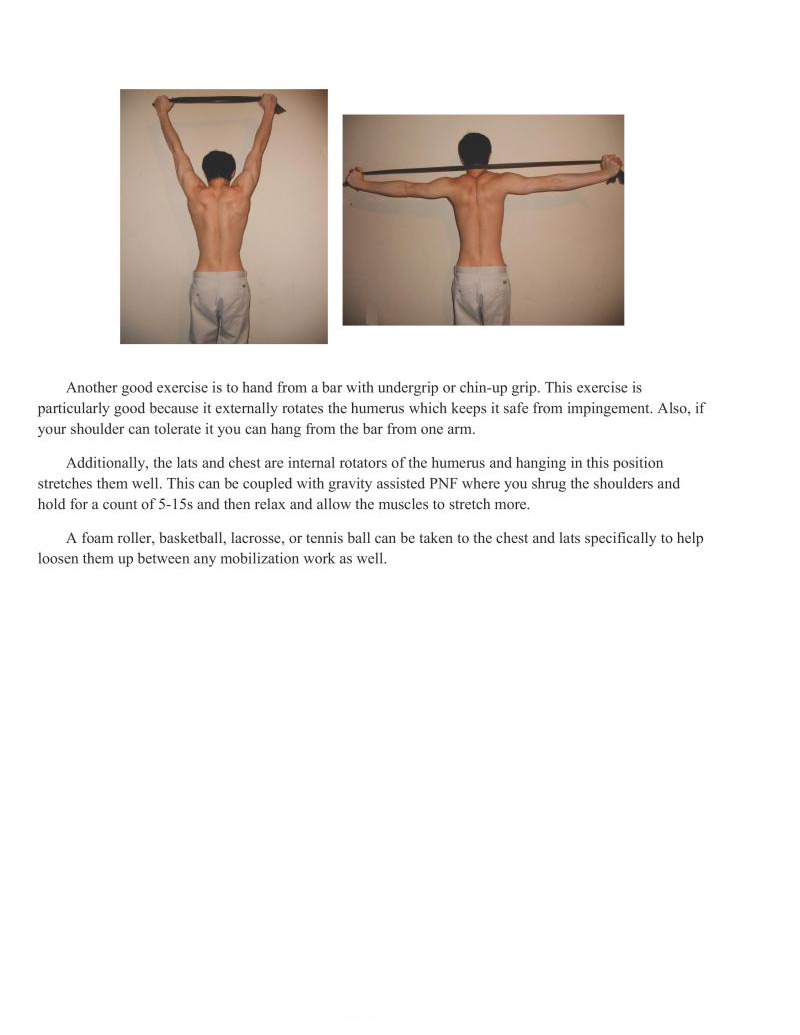
Another good exercise is to hand from a bar with undergrip or chin-up grip. This exercise is particularly good because it extemally rotates the humerus which keeps it safe from impingement. Also, if your shoulder can tolerate it you can hang from the bar from one arm.
Additionally, the lats and chest are intemal rotators of the humerus and hanging in this position stretches them well. This can be coupled with gravity assisted PNF where you shrug the shoulders and hold for a count of 5-15 and then relax and allow the muscles to stretch more.
A foam roller, basketball, lacrosse, or tennis ball can be taken to the chest and lats specifically to help loosen them up between any mobilization work as well.
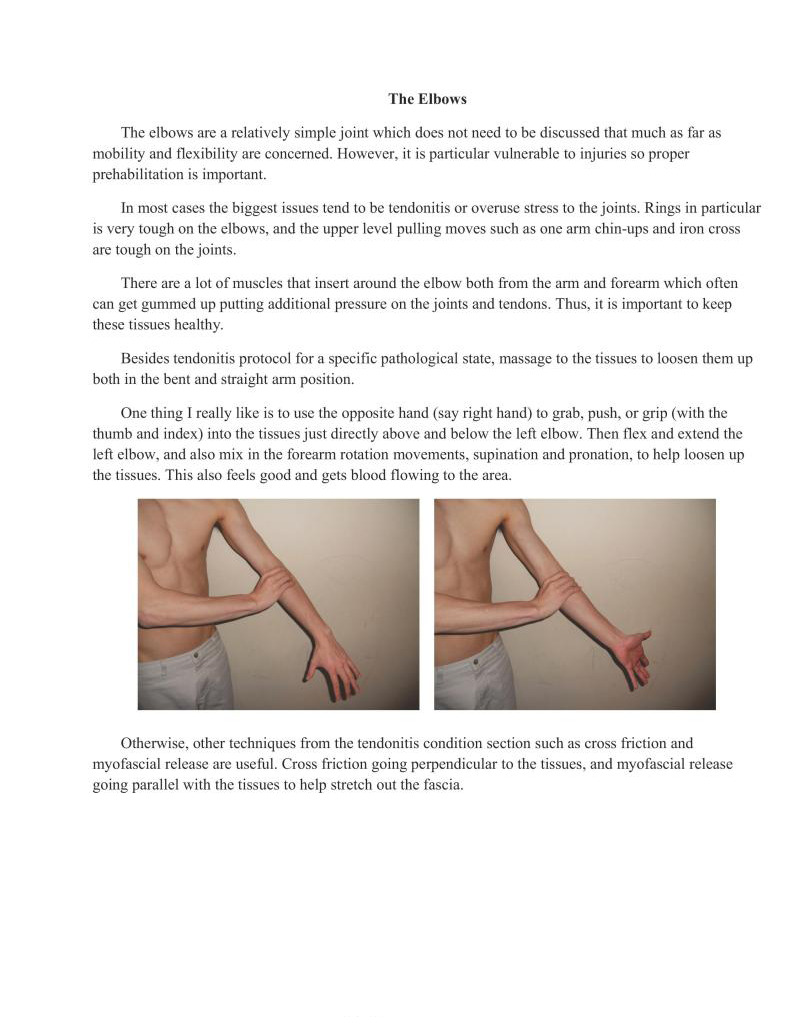
The elbows are a relatively simple joint which does not need to be discussed that much as far as mobility and flexibility are concerned. However, it is particular vulnerable to injuries so proper prehabilitation is important.
In most cases the biggest issues tend to be tendonitis or overuse stress to the joints. Rings in particular s very tough on the elbows, and the upper level pulling moves such as one arm chin-ups and ron cross are tough on the joints.
There are a lot of muscles that insert around the elbow both from the arm and forearm which often can get gummed up putting additional pressure on the joints and tendons. Thus, it is important to keep these tissues healthy.
Besides tendonitis protocol for a specific pathological state, massage to the tissues to loosen them up both in the bent and straight arm position.
One thing I really like is to use the opposite hand (say right hand) to grab, push, or grip (with the thumb and index) into the tissues just directly above and below the left elbow. Then flex and extend the left elbow, and also mix in the forearm rotation movements, supination and pronation, to help loosen up the tissues. This also feels good and gets blood flowing to the area.
Otherwise, other techniques from the tendonitis condition section such as cross friction and myofascial release are useful. Cross friction going perpendicular to the tissues, and myofascial release going parallel with the tissues to help streteh out the fascia.
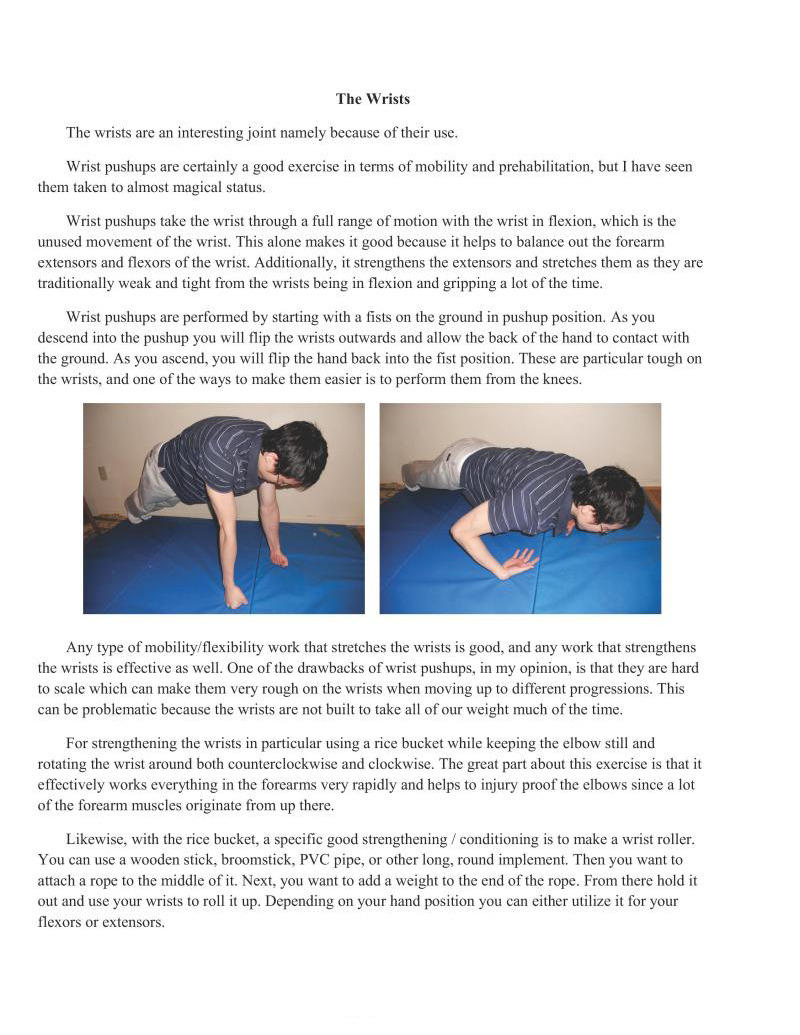
The wrists are an interesting joint namely because of their use.
Wrist pushups are certainly a good exercise in terms of mobility and prehabilitation, but I have seen them taken to almost magical status.
Wrist pushups take the wrist through a full range of motion with the wrist in flexion, which is the unused movement of the wrist. This alone makes it good because it helps to balance out the forearm extensors and flexors of the wrist. Additionally, it strengthens the extensors and stretches them as they are traditionally weak and tight from the wrists being in flexion and gripping a lot of the time.
Wrist pushups are performed by starting with a fists on the ground in pushup position. As you descend into the pushup you will lip the wrists outwards and allow the back of the hand to contact with the ground. As you ascend, you will flip the hand back into the fist position. These are particular tough on the wrists, and one of the ways to make them easier is to perform them from the knees.
Any type of mobility/flexibility work that stretches the wrists is good, and any work that strengthens the wrists is effective as well. One of the drawbacks of wrist pushups, in my opinion, is that they are hard 10 scale which can make them very rough on the wrists when moving up to different progressions. This can be problematic because the wrists are not built to take all of our weight much of the time.
For strengthening the wrists in particular using a rice bucket while keeping the elbow still and rotating the wrist around both counterclockwise and clockwise. The great part about this exercise is that it
effectively works everything in the forearms very rapidly and helps to injury proof the elbows since a lot of the forearm muscles originate from up there.
ikewise, with the rice bucket, a specific good strengthening / conditioning is to make a wrist roller. You can use a wooden stick, broomstick, PVC pipe, or other long, round implement. Then you want to attach a rope to the middle of it. Next, you want to add a weight to the end of the rope. From there hold it out and use your wrists to roll it up. Depending on your hand position you can either utilize it for your flexors or extensors.
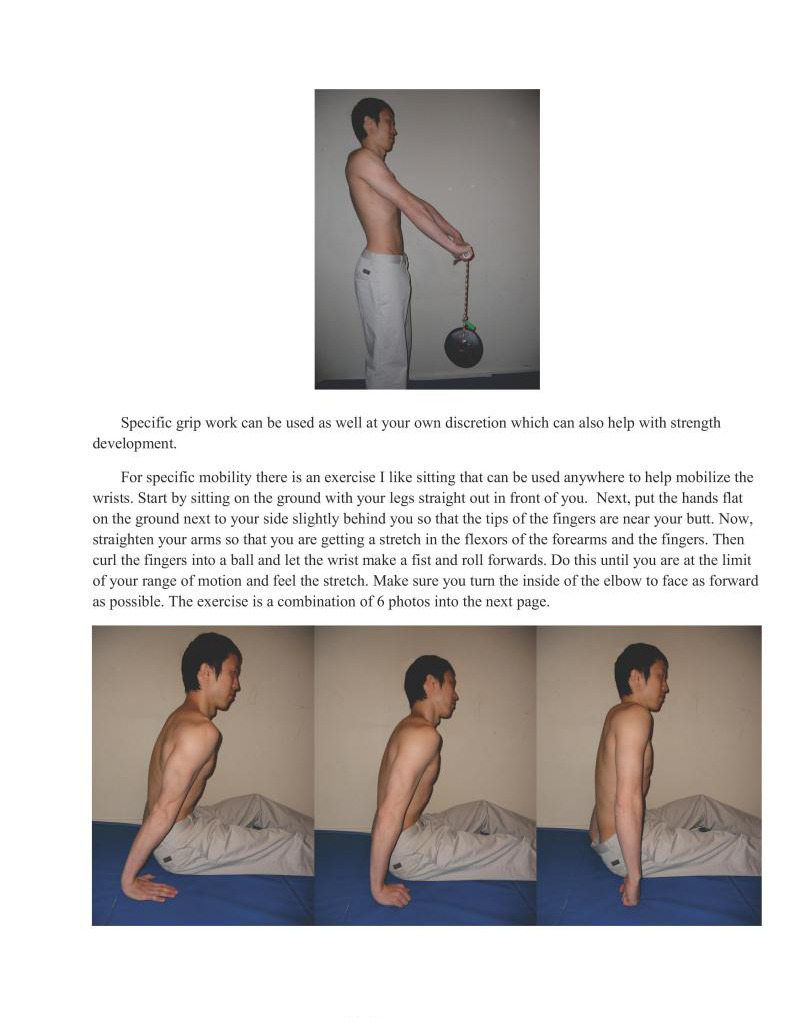
Specific grip work can be used as well at your own discretion which can also help with strength development.
For specific mobility there is an exercise I like sitting that can be used anywhere to help mobilize the wrists. Start by sitting on the ground with your legs straight out in front of you. Next, put the hands flat on the ground next to your side slightly behind you so that the tips of the fingers are near your butt. Now, straighten your arms so that you are getting a stretch in the flexors of the forearms and the fingers. Then curl the fingers into a ball and let the wrist make a fist and roll forwards. Do this until you are at the limit of your range of motion and feel the stretch. Make sure you turn the inside of the elbow to face as forward as possible. The exercise is a combination of 6 photos into the next page.
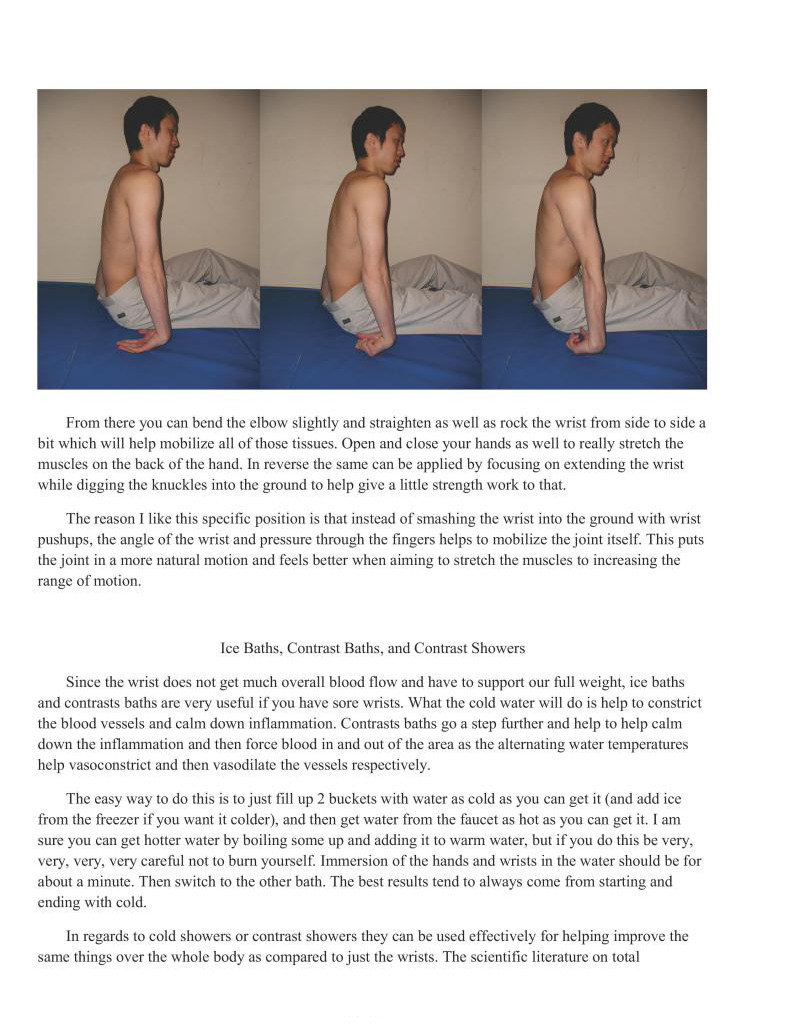
From there you can bend the elbow slightly and straighten as well as rock the wrist from side to side a bit which will help mobilize all of those tissues. Open and close your hands as well to really stretch the muscles on the back of the hand. In reverse the same can be applied by focusing on extending the wrist while digging the knuckles into the ground to help give a little strength work to that
The reason I like this specific position is that instead of smashing the wrist into the ground with wrist pushups, the angle of the wrist and pressure through the fingers helps to mobilize the joint itself. This puts the joint in a more natural motion and feels better when aiming to stretch the muscles to increasing the range of motion.
Since the wrist does not get much overall blood flow and have to support our full weight, ice baths and contrasts baths are very useful if you have sore wrists. What the cold water will do is help to constrict the blood vessels and calm down inflammation. Contrasts baths go a step further and help to help calm down the inflammation and then force blood in and out of the area as the alternating water temperatures help vasoconstrict and then vasodilate the vessels respectively.
The easy way to do this is to just fill up 2 buckets with water as cold as you can get it (and add ice from the freezer if you want it colder), and then get water from the faucet as hot as you can getit. | am sure you can get hotter water by boiling some up and adding it to warm water, but if you do this be very, very, very, very careful not to burn yourself, Immersion of the hands and wrists in the water should be for about a minute. Then switch to the other bath, The best results tend to always come from starting and ending with cold.
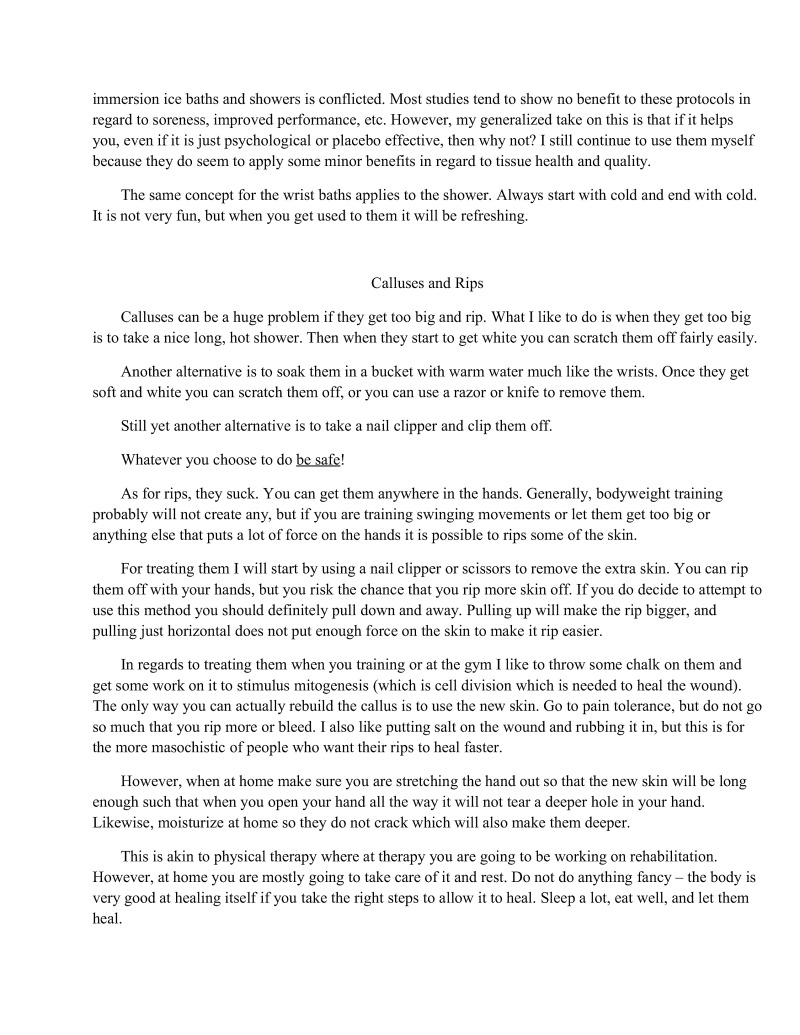
In regards to cold showers or contrast showers they can be used effectively for helping improve the same things over the whole body as compared to just the wrists. The seientific literature on total immersion ice baths and showers is conflicted. Most studies tend to show no benefit to these protocols in regard to soreness, improved performance, etc. However, my generalized take on this is that if it helps you, even if it is just psychological or placebo effective, then why not? I still continue to use them myself because they do seem to apply some minor benefits in regard to tissue health and quality.
The same concept for the wrist baths applies to the shower. Always start with cold and end with cold. It is not very fun, but when you get used to them it will be refreshing.
Calluses can be a huge problem if they get too big and rip. What I like to do is when they get too big is 10 take a nice long, hot shower. Then when they start to get white you can scratch them off fairly easily.
Another alternative is to soak them in a bucket with warm water much like the wrists. Once they get Soft and white you can scratch them off, or you can use a razor or knife to remove them.
Still yet another alternative is to take a nail clipper and clip them off. Whatever you choose to do b safe!
As for rips, they suck. You can get them anywhere in the hands. Generally, bodyweight training probably will not create any, but if you are training swinging movements or let them get too big or anything else that puts a lot of force on the hands it is possible to rips some of the skin.
For treating them I will start by using a nail clipper or scissors to remove the extra skin. You can rip them off with your hands, but you risk the chance that you rip more skin off. If you do decide to attempt to use this method you should definitely pull down and away. Pulling up will make the rip bigger, and pulling just horizontal does not put enough force on the skin to make it ip easier.
In regards to treating them when you training or at the gym 1 like to throw some chalk on them and get some work on it to stimulus mitogenesis (which is cell division which is needed to heal the wound). The only way you can actually rebuild the callus is to use the new skin. Go to pain tolerance, but do not go so much that you rip more or bleed. I also like putting salt on the wound and rubbing it in, but this is for the more masochistic of people who want their rips to heal faster.
However, when at home make sure you are stretching the hand out so that the new skin will be long enough such that when you open your hand all the way it will not tear a deeper hole in your hand. Likewise, moisturize at home so they do not crack which will also make them deeper.
This is akin to physical therapy where at therapy you are going to be working on rehabilitation. However, at home you are mostly going to take care of it and rest. Do not do anything fancy — the body is very good at healing itself if you take the right steps to allow it to heal. Sleep a lot, eat well, and let them heal
In this chapter we discussed how prehabilitation, mobility, and flexibility all related to each other in the context of keeping our bodies healthy.
We looked at some of the specifics on mobility and flexibility as to how they related to injury and pain. Applying techniques that utilize both the musculoskeletal and neuromuscular aspects represent the best way to overall target. everyone as some techniques do not work well for others. Acute and chronic pain will differ in the way it is treated.
Then we looked at some of the specific prehabilitation, mobility, and flexibility exercises and techniques that can be used in the five key areas utilized extensively in this book namely the hips, back, shoulders, elbows, and wrists.
We also discussed some of the finer points of contrast baths and showers, and we also looked at some information about rips and calluses.
I think that injuries are best thought of in a chronological based context. What exactly are we aiming for at certain points in the injury?
Thus, we have this hicrarchy that we can use when we look at any particular injury to see what we need to focus on at that py
in time.
Determine cause of injury.
Eliminate any offending stimuli be them movement, particular exercises (pathomechanics), or other acute/chronic injury stimuli
If the pathology is known, rehabilitation must be integrated with tissue remodeling phases dependent on diagnosed pathology.
Critical points in tissue inflammatory phase:
Critical point of tissue proliferation and remodeling:
Tissue healing rates vary depending on what tissue is injured. For example, skin injuries typically heal up in a few weeks. If you had a cartilage injury or shoulder labrum repair, the proliferation and remodeling phase may last well into 3-4 months down the line. Functional activities such as throwing will not be prescribed before that amount of time with patients in physical therapy.
Thus, it is very important to understand what is actually injured, and what type of protocol is needed to treat that specific injury. In every chapter of the health and injury management section I have been advocating getting injuries diagnosed so at least you know what it is even if you do not go to physical therapy for it, This is precisely the reason why.
All of the information in the previous chapters is highly generalized. For example, information in the tendonitis artiele may not apply specifically to everyone. People may have tendonitis without any extremely tight muscles. Ice may help better than heat. Maybe neither modality will help at all. Massage may or may not be uscful.
If you do utilize the general information contained within the previous chapters you need to listen to your body.
If so, modify prehabilitation and rehabilitation as necessary.
In conclusion, use your critical thinking abilities. Do not just do something because I said it or someone else suggested something. When in doubt, see a medical professional.
Here is a chart on what particularly works well for exercise regarding injury conditions. It is created from my physical therapy notes.
As you can see, there is a bit of difference in regards to the muscular recommendations from earlier in the book. This is because there is some conflicting evidence in the literature on what actually works the best for what in particular. For example, some studies have noted that for strength beginners tend to respond best to around 60% 1 RM instead of the typical 80-90% RM which falls around the 4-8 repetition range.
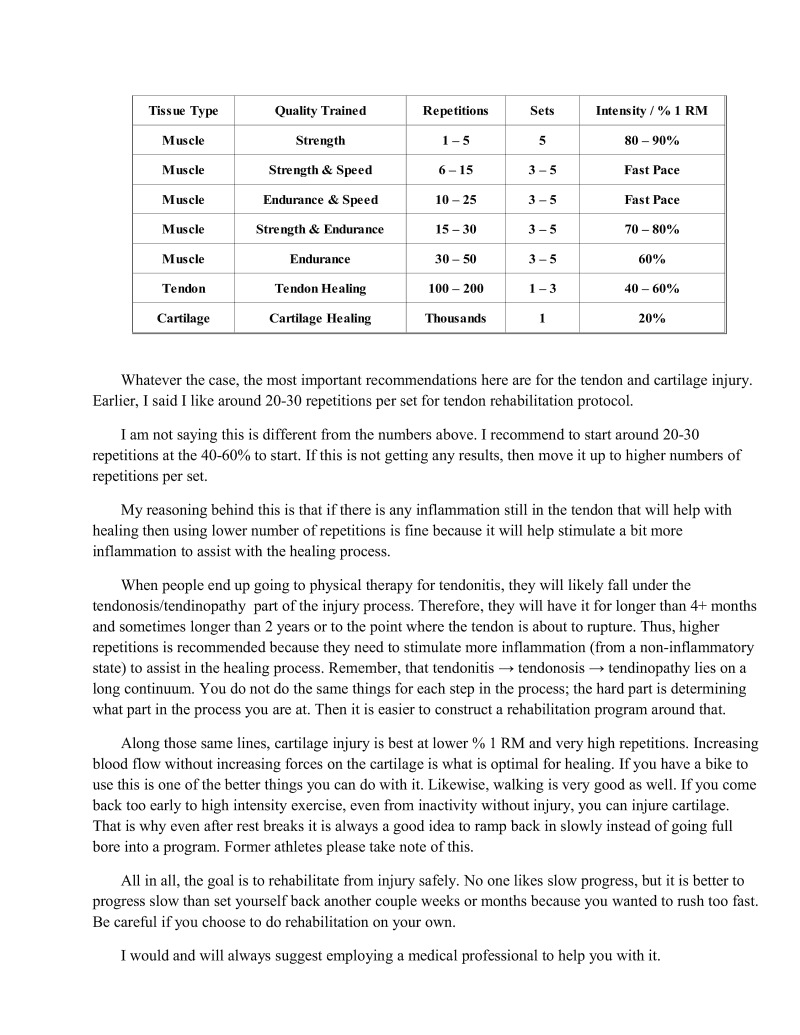
Whatever the case, the most important recommendations here are for the tendon and cartilage injury. Earlier, I said I like around 20-30 repetitions per set for tendon rehabilitation protocol.
I am not saying this is different from the numbers above. I recommend to start around 20-30 repetitions at the 40-60% to start. If this is not getting any results, then move it up to higher numbers of repetitions per set.
My reasoning behind this is that if there is any inflammation still in the tendon that will help with healing then using lower number of repetitions is fine because it will help stimulate a bit more flammation to assist with the healing process.
When people end up going to physical therapy for tendonitis, they will likely fall under the tendonosis/tendinopathy part of the injury process. Therefore, they will have it for longer than 4+ months and sometimes longer than 2 years or to the point where the tendon is about to rupture. Thus, higher repetitions is recommended because they need to stimulate more inflammation (from a non-inflammatory state) to assist i the healing process. Remember, that tendonitis — tendonosis — tendinopathy lies on a Tong continuurn. You do not do the same things for each step in the process; the hard part is determining what part in the process you are at. Then it is easier to construct a rehabilitation program around that.
Along those same lines, cartilage injury is best at lower % 1 RM and very high repetitions. Increasing blood flow without increasing forces on the cartilage is what is optimal for healing. If you have a bike to use this is one of the better things you can do with it. Likewise, walking is very good as well. If you come back too early to high intensity exercise, even from inactivity without injury, you can injure cartilage. That is why even after rest breaks it is always a good idea to ramp back in slowly instead of going full bore into a program. Former athletes please take note of this.
All in all, the goal is to rehabilitate from injury safely. No one likes slow progress, but it is better to progress slow than set yourself back another couple weeks or months because you wanted to rush too fast. Be careful if you choose to do rehabilitation on your own.
I would and will always suggest employing a medical professional to help you with it.
In prior chapters, I have stated two generalizations about pain:
Never work through pain.
Pain can be used as an indicator during rehabilitation when knowing something is too much.
These are definitely true most of the time. However, when we are dealing with more severe injuries these statements have limitations. I assume that most people will not be rehabilitating any type of catastrophic injury by themselves like a meniscus tear, or shoulder labrum tear (c.g. SLAP lesion), or any other potential injuries like that. However, I am going to talk about it for the sake of it being critical information about rehabilitation in general.
Connective tissue that is ruptured and repaired such as tendons, cartilage, ligaments, etc. have much longer healing times than skin, muscle tissue, etc. because of increased vascularization in the latter tissues. Therefore, even if there is no pain present in these types of tissues, there may be potential range of motion or strength restrictions that doctors and physical therapists may place on the patients. Hence, limiting range of motion or strength is obviously a good idea — you do not want to be creating and/or exacerbating the inflammatory healing process of these tissues when they are weak
As I stated near the end of chapter 14, sometimes it may take upwards of 2 months before active range of motion is allowed, and 34 months before any significant functional activities are performed with particular cartilage injuries because of the slow healing rates.
Thus, pain is good as a general guide for most non-significant injuries. However, once you have a catastrophic injury or a surgery, things may change. Likewise, during physical therapy regaining range of motion, strength, or functional mobility may cause pain. In general, it is not good to work through pain; however, sometimes it is necessary during a physician or physical therapist supervised rehabilitation process.
I just want to get this important information out there. If you are having any potential issues always consult your physician or physical therapist about why you may or may not be performing certain things at different points in your rehabilitation. They should be able to tell you and justify it with a physiological rationale. If they cannot then that may be a problem.
Generally speaking, there is a hierarchy that we want to climb as we rehabilitate from an injury:
After an acute or chronic injury, we want to assure that there is stability there. That is to say we want to make sure the joint or tissues are protected. For example, if we had a fracture we want to ensure stability of that bone so it can heal correctly. Hence, we put it in a cast. Another example would be with a severe sprain. Sometimes we need to wear a boot if it is at the ankle, a knee sleeve if it is as at the knee, or asoft aircast if it is at the wrist.
As soon as the injured tissues are healed enough, the next thing we wan to do is initiate exercise to increase range of motion. If we run with a sprained ankle example, this is where we will start inserting stretching exerises for range of motion and mobility exercises taking the foot through non-painful ranges of motion.
After increasing the passive range of motion, the next concept to look at is to strengthen it through that range of motion in a controlled fashion. This is where the controlled concentrics with slow eccentrics comes in. We are aiming to foster stability (through the strength or endurance training) in movement.
Typically, we will start out with high repetitions of around at least 20-30 if not more to ensure that the weight is light cnough that it does not cause any damage, and to ensure we work all of the particular muscles we are aiming for in an endurance fashion. We aim for endurance at this point because endurance training is critical to prevent injury when the particular area is fatigued. This is why rotator cuff exercises are generally always higher repet the end of training. We never want them to fatigue to the point where they will give out on us.
jon exercises since they are easily injured if something goes wrong near
Finally, we have explosive movements which are what we should be strive for athletically.
Lam sure most of you have heard of the stability and mobility continuum where alternating segments of the body seem to have been " for one or the other. For instance:
As you can see, the feet, knees, lumbar spine, cervical spine, scapula, elbows, and palms all tend to be built for stability. This means that if they gain too much range of motion without enough strength and stability bad things start to happen. The most prevalent sources of pain when there is excessive range of motion or weakness tend to occur at the knees and low back. However, other detrimental effects on certain structures are seen when they become weak or with poor posture such as in the feet (fla feet, etc.) or cervical spine (neck pain, radiculopathies, etc.) or scapula (the shoulder cannot move correctly). Since all of these intertwine with the mobility segments, we see a lot of interaction between the two which I will talk about next.
The joints that tend to be built for mobility are the toes, ankles, hips, thoracic spine, shoulder/glenohumeral joint, wrists, and fingers. Obviously, most of these are relatively straight forward as can be seen in many fundamental movements such as running, squatting, and reaching tasks.
The only real confusing one for most people to understand is the T-spine. Although the T-spine does not have very great extension, it does have a fair amount of range of motion to bend forward and rotate from side to side. Most of the problems creep up when the T-spine becomes immobilized due to poor posture, tight muscles, or other pathological issues. When one "segment" has decreased mobility, the body compensates by obtaining mobility from other segments.
Usually with a restricted T-spine you will see that the lumbar spine tends to take up a lot of the. mobility slack. This is one of the things that contributes a lot to the development of low back pain due to increased range of motion without increased strength to stabilize. Likewise, a restricted T-spine will not allow the seapula to move along the ribs well which will also restrict shoulder range of motion overhead and alter glenohumeral mechanics possibly causing shoulder pain. Additionally, a restricted T-spine will also contribute to a shoulders forward and head forward posture.
Therefore, it is important to know why we are developing range of motion in certain places, and why we are trying to develop strength in others. In some cases, we want to do both. More range of motion makes something less stable if not strengthened, so strengthening will help prevent injury.
This is why low back pain rehabilitation may focus on improving core activation and strength. However, a competent physical therapist will also look at issues regarding the thoracic spine, hips, and if indicate other more distal joints away from the back. In some cases, foot issues can cause low back pain. Upper cervical issues in other cases may cause widespread issues all along the body because the body will compensate to keep the eyes and equilibrium of the body level
Either way, do not just stretch or strengthen blindly. If you have no reason to gain range of motion then simply do not stretch; just maintain mobility at that particular joint. Bodyweight movements in particular require a large amount of range of motion at the hips, T-spine, shoulders, and wrists. Therefore, when coming back from injuries it is important to focus on these areas in particular.
Strength tends to always be a good thing if imbalances are not created. Thus, strength is a quality we will almost always want to develop across the whole body at every joint. This is true of not just bodyweight exercises but all movements and across all disciplines. Typically, the strong athlete is the better athlete (though there are exceptions).
Remember how it is possible if you stretch excessively that you will be sore the next day?
This brings me to the statement that I think people tend to forget: stretching is eccentric exercise!
When we lengthen a muscle, the muscle spindles in our muscles tell the body that the length is getting too long and will be dangerous. Thus, the motor neurons in the spine will be told to contract the muscle to try to stop the lengthening of the muscle. Yes, this contraction is indeed a contractile form of exercise albeit an involuntary one.
Regardless, as we stretch out the muscle more we lengthen it against contraction — it is just like eccentric exercise. Lengthening a muscle it repeatedly against contractions will induce microtearing of the muscle. This is why we get the soreness both from eccentric exercise and from stretching.
The main point I am trying to make with this is that if you have an injury and you cannot workout that stretching is useful in rehabilitation in both correcting imbalances and protecting and strengthening muscles against atrophy.
From my experience, when stretching is combined with a good sleep schedule and diet, you will likely not lose any of the muscle gains you have acquired if you are on an off week or are rehabilitating from injury. It is definitely a very useful concept to keep in mind, especially if you need to work on your
Having goals for injuries is important. All physical therapist must have functional goals for their patients. It is required for insurance reimbursement and to justify what type of treatment is given. For our purposes, it gives us a time line on which we can base our rehabilitation on.
The thing about injury goals is that it is often harder to know how long it may take an injury to heal or even know how it may respond to treatment. Additionally, you may not know enough about an injury to even know how to rehabilitate it. This is why I recommend professional help almost always.

However, if you are into self treatment goals arc definitely important. Like your workouts you should know that if you are not progressing from rehabilitation session to rehabilitation session or week to week then there is something wrong. This is where the goals become important — they allow us to think about and identify what may or may not be working at getting us to our goal. They keep our motivation up. We may have (o refine and modify things in our prehabilitation and rehabilitation programs to constantly make progress.
In this sense, rehabilitation is just a lower level extension of programming for regular strength and conditioning. It is not all that different from regular training. The key learning the concepts and knowing your options if you are plateauing
In this chapter we discussed the phases and important concepts of the chronological treatment of injury. In particular, there are different phases to work on different concepts such as protection from atrophy, range of motion, strength, etc. during the inflammatory, proliferation, and remodeling phases.
We also learned more on the particular loading, repetitions, sets, and volume of rehabilitating from specific injuries. Each injury needs to be taken in particular context of its severity and interference with normal function.
We looked at pain and its application during the rehabilitation phase. While we know that generally we should not work through pain, it depends a lot on the particular injury. Thus, if we have any doubt about rehabilitation we should consult a professional.
We examined the concepts of range of motion and strength and their relation to stability and mobility in various joints of the body and how it applies to rehabilitation. In particular, we concluded that strength without imbalance is very good, and that we should only increase range of motion as much as we need for particular movements or holds.
We learned that stretching is eccentric exercise. This is a very important concept in rehabilitation that many people overlook. It is useful for deterrence of atrophy and critical for helping correct tension balances during rehabilitation
Finally, we noted that injury goals are important. Make them.

I am going to briefly address most of these topics because they are very important to training but not the main focus of this book.
Sleep is extremely important for recovery. You may have heard that our muscles grow when we rest. This i true.
Depending on your body this may be anywhere from 6 to 9 hours a night. Most people would do well with about 7.5 to 9 hours. Sleep cycles are typically 1.5 hours in length, so it is best to plan your sleep towards those times if possible. When you wake up in the middle of a sleep cycle you are extremely fatigued and cannot think clearly. We have all experienced this. Thus, it is best to try to avoid that.
Now that we have cleared that up here are techniques and tips on various topics that may help improve sleep.
For those that use the computer a lot especially at night F.lux is a great program that can help. It changes the screen to emit more red light after sundown which helps to normalize our circadian rhythms. Ideally, you want to be off of electronic devices at least 1-2 hours before sleep, but if you cannot then Flux will help out.
Here is a list of modifications that you can make to your room to improve sleeping:
Elimination of electronic devices / outlets / plugins near the body.
Pitch black room
Cool, dry room (60-65 or so degrees is good if possible)
Ear plugs and facemask
Sleeping before 10 PM
The best scenario is if you can get to bed early enough that you wake up without an alarm.
There are also some exercises that can be done before sleeping or during the day that can help improve sleeping as well.
Alternatively, supplements can be used to help improve sleep. However, I would only use these as a last resort unless you are already performing much of the above.
I know sleep can be a troublesome issue for people. One last tip I will give you is more of a psychological conditioning tip — only use the bedroom for sleep or sex. It can be difficult to fall asleep if you are in your room a lot and conditioned to watch TV or study.
To put it simply I like the Paleolithic diet.
Despite what you may have heard about the Paleo diet, it is neither low carbohydrate or high carbohydrate. It can be either depending on how many carbohydrates you eat from fruits and vegetables.
The plant to animal ratios of our ancestors and studies on hunter gatherers suggest the percentage of calories obtained from animal products was highly variable. For instance, the Gwi people of southern Africa ate as little as 25% of calories from animal products, and the Alaskan Nunamiut ate as high as 99% of their calories from animal products. Typical averages of animal calories to plant calories ratios are about 64-68% of animal calories and 32-36% of plant calories.
As you will note, this leaves no room for vegetarians.
Typical hunter gatherer carbohydrate sources ranged from about 22-40% of total energy intake. On a 2,000 calorie dict, this is 440 - 800 calorics from carbohydrates which is 110-200g of carbohydrates a day. It is even noted in populations where if they did not have any type of starch sources such as potatoes that even if they had meats they would say they were starving. As you can see, traditionally there is actually no such thing as a low carbohydrate Paleo diet.
Instead, the Paleo diet focuses specifically on inclusion of high quality and nutrient rich foods upon which we evolved: fruits, vegetables, nuts, seeds, meat, birds, fish, cggs. High quality of foods means we will get all of the vitamins and nutrients that we need, but the relatively low nutrient density will help keep us lean
As athletes, we are going to want to aim for 1g/lbs or 2g/kg protein each day for the body, especially if we want to add muscle.
Now, i you have weight gain (for muscle) or weight loss goals including excreise there may need to be some modifications.
The biggest concepts that most trainees need to lear can be summed up in 4 axiomatic statements:
All weight loss, weight gain, increases in muscle mass, losing fat mass, etc. can be summed up by these statements. They also dispel a lot of myths in regards to the topics above. Abs are really made in the kitchen, although exercise can help.
Additionally, I have come up with 3 of my own general rules in regards to Paleo eating

Generally speaking, low carbohydrate and ketogenic diets are useful for correcting metabolic derangement and helping to reverse disease processes that are brought on by the "big four" factors that foster the diseases of civilization: (1) refined carbohydrates, in particular, fructose; (2) grains; (3) trans fats; and (4) omega 3:6 imbalances. Al of these are prevalent in processed foods
Athletes, especially endurance athletes, need higher amounts of carbohydrates to function well at their particular sports or disciplines.
Finally, no thriving population in our history has done well without enough carbohydrates. Carbohydrates from natural sources such as sweet potatoes.
I personally do not eschew rice, potatoes, or some of the other food stuffs that are not technically Paleo. however, they have been used extensively by hunter-gatherer groups for tens of thousands of years. Therefore, I believe they are fine. I also do not eschew dairy either unless you are allergic. Dairy is very useful for muscle gaining.
I know people love their grains but consider this: is there any nutrients or vitamins that are found in grains that are not found in more abundance in fiuits, vegetables, and meats? If actually look at the nutrition data you will se that the answer is a resounding no.
If you want to read more on this topic check out Robb Walf's The Paleo Solution or Mark Sisson's The Primal Blueprint.
On the Paleo dict, if you are obese you will naturally lose weight. If you are slightly overweight then Paleo will likely help you lose some weight, but may not get you to where you want to be. I would suggest eating until you are satisfied not full. This will ikely get you the results that you want.
Since it is fairly popular, here is the second way you can lose weight: calories in < calories out.
If you are going to use this approach you will need to do two things. First, is chart your food intake for the week (using a food calculator like fitday), and see if you gain or lose any weight. Divide by the number of days to get your approximate calories burned per week
Second, you want to eat in a caloric deficit of approximately 500 +/- 200 calories. If you are already not eating a lot, you do not want to go below about 1500 calories for men and 1300 calories for women because the body will enter starvation mode.
The reasoning for a slower form of weight loss is that changes to the body need to be gradual. If you deprive the body of nutrients, it will shut down thyroid hormone production which regulates metabolic: rate. Therefore, if you starve yourself your body will become more resistant to losing weight than if you just aim for a small caloric deficit,
Gaining weight is simple. Eat. A lot.
For gaining weight in the context of muscle there are two things that need to be present
There are a few myths regarding being overweight/obese and losing fat and gaining muscle. I will dispel these now.
The general rule of thumb is that extra "fat" within the body is an energy source. Therefore, if you a overweight/obese and lifting weights BUT eating in a caloric deficit then your body can call on the fat mass as the extra energy to build muscle. Obviously, as your body composition improves the ability of the body to do this decreases. However, this is one of the extraordinary things that can happen with lifting weights and why it is far superior to cardio or higher repetitions for fat loss. Basically, what I described in the above section on weight loss.
Now, there are two ways to approach gaining weight. One is the "clean" way eating healthy foods and the other is the "dirty" way which can be done by eating anything and everything. These two are referred 1o as clean and dirty bulking respectively.
Obviously, as your guide in this matter I would prefer that you approach it from the clean way which s to eat massive amounts of real foods (whole milk is especially good). However, if you do not care and just want to get bigger fast food is an easy way to provide lots of calories. It is up to you.
If you are not allergic to milk I would suggest adding in whole milk to Paleo (even though milk is not Paleo) to get sufficient calories to encourage muscle gain.
Metabolic flexibility is an interesting concept that has interesting parallels to injuries. Metabolic flexibility is defined as the ability or capacity of our bodies to adapt to different fuel sources given their relative availability.
Type 2 diabetes is a great example. Diabetes lies on a continuum from health fasting glucose to pre- diabetes to full blown diabetes. The only difference is the numbers that you get back from the test that arbitrary classify glucose numbers as normal, pre-diabetic, or diabetic. For example, as is stated on diabetes.org: "Normal fasting blood glucose is below 100 mg/d. A person with pre-diabetes has a fasting blood glucose level between 100 and 125 mg/dl. If the blood glucose level rises to 126 mg/dl or above, a person has diabetes." after a certain point, the body gets to the point where not enough insulin can be secreted to keep up with the glucose levels and therefore insulin injections are needed.
Now, what does this have to do with both nutrition and injuries?
In a diseased state, the body literally becomes intolerant of glucose. It cannot use the glucose because of the lack of insulin. Glucose becomes toxic to the body. It can be deposited into nerve cells where it is converted to sorbitol which impairs sensation. It can cause significant damage to arteries via AGEs — advanced glycation end products — contributing to heart disease. It can contribute to eye conditions such as glaucoma. It can lead to chronic kidney discase and renal failure. There are many other examples.
Glucose, like exercise, without insulin (or recovery factors in the case of exercise) can start to cause the body to dysfunction. Thus, exercise, like glucose, can start to harm the body through overuse injuries.
Now, the interesting concept is the relationship of metabolic lexibility to the recovery process. As you may know, if you eat correctly you can actually improve your blood glucose levels and in some cases actually reverse both pre-diabetes and diabetes. Low carbohydrates and ketogenic diets are effective at
this. I prefer low carbohydrate or ketogenic Paleo if this the case. The same is true in rehabilitation — if you eliminate the offending stimuli and start to rehabilitate you can improve your injury condition.
In the analogy, eliminating carbohydrates, especially refined carbohydrates, when you are less metabolically flexible is akin to eliminating the offending exercises or stimuli that are causing your chronic training injuries. Likewise, providing proper nutrition, such as Paleo where we focus on increasing food quality and nutrient availability, is similar to focusing on specific modalities and rehabilitation protocols aimed towards rehabbing our particular injuries.
Now, the analogy never stops. Even though you can reverse diabetes to some extent, if you have had it for a long time you may never become insulin independent again. The same i true with injuries. If you have sustained a catastrophic injury or large enough tissue damage, then the body may not be able to heal completely. Scar issues and collagen repair is laid down instead of the original tissues.
However, on the opposite side of the spectrum we know that eating healthy and performing exercise are keys to living a healthy and productive life. On a cellular level the same thing applies. We know that by having good nutrition we are going to be able to keep our glucose in a normal, healthy range. Likewise,
we know that exercise improves our bodies in many different attributes: the immune system, neuromuscularly, musculoskeletally, cardiovascularly, etc. Our ability to be strong and productive like exercise is the same as being metabolically flexibly. It is a sign of health. Therefore, strive to be healthy and improve your performance.
Thus is important consider your health from all aspects. The big four factors that contribute to performance are sleep, nutrition, training, and stress. Focusing on these factors is important to both health and performance. If you notice that one or more of these factors are deteriorating you should strive to fix them immediately.
Workout nutrition is not a complicated topic.
Eating before workouts within about 1-2 hours may affect the quality. However, from my ancedotal observations it really depends on the person. Try it out both ways. I personally prefer fasted.
I you are trying to gain weight, I would suggest having a liquid drink that you take pre-, peri-, and post-workout. However, the most important times for nutrition are peri- and post workout.
In regards to eating after a workout instead of supplementing, it does matter slightly. Liquid nutrition obviously gets to the muscles faster so if you can do that it is preferable. But if you cannot then it is nothing to worry that much about.
Chocolate whole milk is my preference for workout nutrition. It has whey, casein, and carbohydrates for energy. And supplementing vitamin D if you are taking any during this time is good as well.
Supplements are supplements. They are only there to supplement a good diet.
Supplements beneficial for overall health — fish oil, Vitamin D. Note if you are geting outside for vitamin D then you may not need to supplement.
Supplements beneficial for mass gain — creatine, BCAAs, whey & casein (though I prefer milk), glutamine, camitine, eating a lot of food, sleeping well. If you are taking protein and creatine remember to drink a lot of water.
Supplements beneficial for losing weight - proper weight training, eating well, and sleep. There are no shorteuts! Vitamin D and fish oil may actually help significantly though.
For eliminating colds and other upper respiratory tract infections such as the flu - 10,000 - 30,000 IU of Vitamin D. Vitamin C DOES NOT HELP.
There i some degree of controversy over if you should work out when sick. If so, should you be modifying your workouts depending on the degree of illness. We will discuss these concepts.
When we workout the stress of the workouts tend to create the microtears in our muscles. These microtears from the stress are a normal process of damage and repair. The body uses inflammation to signal and start to repair the damage caused by working out. An inflammation cascade is initiated and maintained by the immune system until all tissues are repaired and strengthened against the stress that was placed on the body.
In addition, stress from activity especially sustained activity elevates cortisol levels. Cortisol helps mobilize the body's supply of fat and glucose to provide fuel for the muscle, but it is an anti-inflammatory and immunosuppressive. For example, cortisone is a derivative of the same class of drugs, the glucocorticoids, and is used therapeutically to reduce pain and inflammation in specific areas of the body.
Our immune system is the way that our body fights infections and other pathogens that make us sick. So you can see how diverting the immune system away from fighting infections towards repairing muscles may be problematic. I have seen it many a time where someone is sick and decides to workout. Then they get even sicker. Similarly, you can even almost be over an illness and workout a couple of days after it has gone away and then it will come back
This is similar to antibiotics. When doctors preseribe antibiotics they tell you to continue to take them for the whole amount of weeks and not to stop even if you feel better. Likewise, even if you do not feel sick anymore the body is still fighting the last remnants of infection within your body. So when you subject it to heavy stress from working out or trying to come too quickly to exercise it may depress the immune system such that the infection comes back. Sometimes more strongly than the first time
In my opinion, you should treat it just like an injury. Thus, my preference tends to be to advocate relaxation and rest during sickness. Let your body do its business and come back to hard workouts once you are healed.
The higher the intensity of the workout, the more probably it is for higher relcases of stress hormones and damage to the muscles.
Thus, resistance training or sprinting or high intensity interval training or circuit training in general will be poor choices to do while sick. Resistance training can be fine if there is less muscle damage such as working in lower repetition ranges for strength or working in some of the higher repetitions for
endurance as long as the volume is not too high. It is the moderately-heavy weight at moderate repetitions (e.g. the bodybuilding repetitions of 6-12) that tend to do the most muscle damage.
There is the common saying that you can workout if its just head cold, but do not workout if the infection is in the throat/chest or lower.
I find this to be true as long as intensity is kept low. Chest illnesses such as pneumonia, bronchitis.cte. tend to a bit more potent than head colds. However, the caveat is that lying down and totally resting does actually foster these illnesses a bit. Immobility in hospitals is why you see many nosocomial infections (illnesses you gt from being in a hospital usually on bed rest).
Thus, lying around doing nothing for the entire duration may not actually be as beneficial when sick than at least some type of movement aside from working out. Getting up and moving around to get blood flowing and doing some deep breathing to help mobilize sccretions especially if you are coughing a lot is agood idea.
I would also like to add a stipulation which is that if you have a fever you should not be working out at all. Let your body devote all of its resources to fighting the illness especially when it is most vulnerable.
Generally, if you do decide to workout then keep the workout light. Perhaps a warm-up and see how you feel or a light run may work well. If you tend to overdo it once you get started it may be better to avoid working out altogether until your sickness is over.
Any exercise that you do should leave you feeling better than you started. If you start to feel worse then it may be time to give it up for the day and rest. Remember, our muscles and bodies recover when we rest, and it is exactly the same for illnesses.
In this chapter we learned that sleep and nutrition all have big effects on the body. Thus, we need to make sure we are doing all we can to help our training by sleeping and eating correctly. I listed various tips that help improve sleep, and recommend the Paleo diet for nutrition.
In regards to workout nutrition and supplementation you can approach it from various angles depending on your goals, I am still a fan of real foods as whole milk is superior or equal to most supplements for muscle mass gain.
In general, I am not a big fan of supplementation but I deem vitamin D and fish oil important.
Finally, we learned that working out when sick is discouraged: however, if you are going to do it then keep it light.

The first thing to note is that these are example programs. Depending on your individual goals, recovery factors, and other activities they may or may not integrate smoothly. They arc here to give you a sample of what your routines may look like. I would not suggest that you actually use them as your routine. However, you can modify them to fit your goals if that is what you want to do.
However, what I do not want to see is someone using any of these programs blindly because they think that how I would program is superior or because they thought it was what I would recommend. I do have some personal preference on what particular exercises work well coupled with each other which I will talk about. But by no means is anything I recommend mandatory. Although remember that I do highly recommended certain progressions to help keep structural balance and good strength and technical development — handstand holds, the L-sit/V-si/manna progressions, and straight arm press handstands.
I realize that not everyone has developed their strength and flexibility to be uniform with all levels on the strength and progression charts. That is the norm. It is very common for people to be coming in with a flexibility deficit or a skill deficit (especially in the context of handstands) despite having the strength to execute some of the higher level strength moves. This will be the case for most people with a weight ing or who participate in other sports at a competitive level.
The point I want to emphasize here is that where you are lacking is often a place where you can make the most progress given a comparable amount of time put in on all aspects of development. Working your strengths is good but bringing up strength, flexibility, to skills to be uniform between push and pull exercises is important to stay injury free. If you have ambitions with developing a lot of higher level straight arm work, the skill and strength-skill movements like handstands and straight arm press handstands will pay dividends later in training and you will be glad that you have invested the time and effort now.
You may also find that given your own abilities and individual anthropometry that you may progress with certain techniques or exercises much quicker than others. You can approach this from multiple ways
in your programming by decreasing the overall volume of these exercises or playing to your strengths. But do not neglect keeping yourself structurally balanced as I stated in the previous paragraph.
I am going to introduce sample programming for every two levels: L1-2, 13-4, L5-6, etc. up to L11- 12 to show how programming evolves in the context of the frequency, warm ups, skill work, exercises, volume and repetition schemes, prehabilitation, mobility, and flexibility. I am stopping at L11-12 because that represents close to the end of advanced strength. By then you should have a very good idea of how to implement your own program effectively as you will have the experience of programming for a couple years.
Correcting existing injuries may be integrated into program by examining how to do so by reading chapters 12-18.
Much of this material is going to be a rehash of the material earlier in the book. The focus now will not be reminding you of what I have already said but to show you how to integrate the material into your decision making for selecting proper frequency, exercises, volume, and repetition schemes for your workouts. Think of the earlier chapters as puzzle picces and this chapter as starting to fit those pieces together to see the whole picture.
Constructing a universal warm-up is a bit difficult since everyone has different needs. However, there. are some common threads that we need to focus on to progress effectively with skills such as handstands and manna.
A quick, short circuit of movements that focus on full range of movement to warm up the joints is the most useful. 1 also prefer to complete the warm-up with a movement that gets the blood flowing and core temperature up. Then skill work is ready to occur.
First, we want to start out with some joint mobilization work especially for the wrists and the shoulders which are the two joints in the upper body that will experience a lot of the stress for bodyweight movements. If you are stiff in the back, elbows, etc. it may be a good idea to add in additional joint mobility work before is tarting as well
I recommend a combination of wrist circles (15x each way) and wrist stretching all ways on the floor (both flexed and extended). For the shoulders, use a band or stick to do shoulder dislocates to help mobilize the scapulae and all muscles around the glenohumeral joint. If you have other methods of mobility or dynamic flexibility work you employ feel free to use them instead. This should take about 60- 90 seconds.
Secondly, we need to warm up the elbows especially in the straight arm position. One of the hallmarks of bodyweight exercises when progressing into more advanced strength skills is the integrity of the elbows, especially in the straight arm position. Avoiding excessive hyperextension by strengthening the biceps is the key.
For this I suggest 1-3 sets of purely straight arm locked support work. If you are strong enough to do aminute hold that is enough. Start to progress towards turning the palms forward during the hold (c.g what gymnasts call "rings turned out" or RTO for short). As you start turning the rings out and performing longer holds there will be a lot work for the biceps to stay active. This is good for elbow health along with adequately warming up the majority of the shoulder muscles and biceps.
If you cannot hold a straight arm position at all start on parallettes or parallel bars.
If you cannot yet hold a straight arm support on the rings, use a theraband to help you hold the rings together or get someone Lo spot assist you until you can hold it. This may be the case for most beginners as the instability can be challenging.
If you just started training holding a non-RTO support hold, then jump up with straight arms and try to accumulate between 60-90 seconds total hold time.
If you are a bit beyond that stage, try to use as few sets as possible to reach the 60s.
Once you start trying to turn the rings out, be consistent — do not let them come back in.
Once you have worked your way up to 60-90s with RTO (where the rings are in line with your body) then set your rings a bit wider — this will make it substantially harder
The marker to stop is when you start shaking significantly or start feeling significant pressure in the biceps. Remember, this is a warm-up and taxing yourself now will hinder the workout. Do, however, bear in mind that adding this skill to the warm up will help you progress in strength much more quickly because rings proficiency is built by accumulating a lot of time on the rings themselves.
Once the ring supports are complete we want to dynamically stretch the shoulders with some german hangs or "skin the cats." If you are new and your rings are set low you may just let yourself into the position and stretch for 5-10 seconds. If you are more experienced then feel free to pull out in a tuck or pike position to inverted hang and then back again.
The goal here is to take the shoulder to the edge of its range of motion in extension. This also helps with flexion too because german hangs stretch the chest and lats as well as the anterior shoulder girdle. Also, we do not want to let it stretch statically for about more than 15s as much longer may decrease some strength/power output in the latter workouts. This should take approximately a minute for 3-4 short stretches.
Finally, we will finish up with some burpees. You can choose a different method if you prefer, but they're great at waking up your cardiovascular system if you do a set of 15 or 20 in a row. This should take approximately a minute. Again, remember not to tax yourselfas this is just a warm-up, so scale down the amount you do if necessary.
In summary, it should take a total of five minutes for:
After this you should be ready to begin skill work or tougher exercises to warm up.
A five minute warm up is on the shorter side of a recommended warm-up. Typically, 5-15 minutes total is a smart range to be in; any shorter and you likely are not adequately warmed up and any longer will probably be more intense than necessary for a warm-up. If you are older or already have an established warm up routine feel free to use that.
Remember that the warm-up can be modified as you get stronger. For example, as you get stronger, dips and pullups become much more second-nature and much less intense for you and so you can start to throw them into your warm-up.
As I stated earlier we tend to want to mobilize the joints for the first few minutes, but after that we can aim for exercises that are about 2-3 levels below our current level on the progression charts. Thus, if you are working straddle planche as one of your main exercises you can add in some tuck planche pushups to help prepare the muscles for more intense exercise later.
Skill work is highly variable. Handstands and various skills such as elbow levers and even L-sits are mostly focused towards spending significant amounts of time in those movements or positions to accumulate a lot of practice and refine the body positions. Typically, most of these skills tend to focus more on balance, but they will have variable components of strength required. often, strength will make them easier as well as you get stronger.
You may be working above or below your strength level on skill work. This is not uncommon as there are strong people coming into bodyweight training looking to obtain some of the impressive static positions that are more skill-based. On the other hand, with good technique even relatively weak people can obtain a good handstand. The skill and strength progression chart levels in types of skills may not necessarily correlate to level of strength. This is often scen as handstand ability may lag behind actual strength for many athletes who start to train bodyweight exercises.
In general, strength will help improve your potential for skill work significantly. Thus, you will find that as you get stronger your skill work will tend to improve with it given you still apply the dedicated work.
The three main "skill work" categories I like to classify are handstands, L-sit progressions up to around V-sit, and the one- and two-arm elbow lever skills. There are others if you want to pursue other types of hand balancing, parkour, breakdancing, capoeira, or other disciplines. I am not including these in this book, but they can be well-integrated into a routine.
The key behind all skill work is the fact that the more you practice at something the faster you will get better at it. However, too much practice with skills even as simple as handstands can impair recovery. There needs to be balance (no pun intended) to facilitate optimal improvement
How we hit this balance is a tough question to consider. For most people, simply getting upside down ina handstand is a hard feat. For those more experienced who can hold a freestanding handstand longer than a minute, 10 minutes of total work would not be a stretch of the imagination.
I think the best way to approach skill work is like the warm up. It should not leave you excessively tired or swealy to start performing your strength workouts. This may be only 20 seconds inverted for new. people but maybe even 15-20 minutes for more experienced people trying to lear advanced skills like one am handstand. You are aiming to get the greatest quality of work without fatiguing yourself such that your technique is going to deteriorate.
I hope that gives you a better idea of the times you are aiming at. It does not have be a set time such as five minutes upside down six-seven days a week. I would play it more by feel. Aim for quality work and quit if the skill work is deteriorating or you are having a bad day. There is no shame in knowing that you cannot do something every day; we all have off days where nothing goes right.
Do as much quality work as you can per day (as time and fatigue allow) and you will improve splendidly. Practice does not make perfect. Perfect practice makes perfect.
Atlevels one and two, the general goal(s) is/are to develop basic strength, prepare the joints for upcoming levels of ability, and gain mobility especially in the shoulder girdle, back, and hips. If you are at level coming in then I generally expect that you are fairly new to exercising or are female since females typically have less base strength overall than males due to lower levels of testosterone.
Upper level goals such as back levers, front levers, planches, etc. should not be worried about at this point. It is much more important to develop strct strength in the basics and utilize more types of high repetition work to prepare the joints in combination with the mobility work.
This is why on the strength and skill progression charts I tried to keep the exercises and next progressions minimized at this particular level.
The main exercises that are going to be focused on are wall handstands, lower L-sit progressions, pushups, dips, pullups, rows, and starting some basic headstand pushup development as you get stronger.
The following is an example of a basic routine focused on improving the strength in the categories of vertical pushing, horizontal pushing, vertical pulling, and horizontal pulling. This facilitates balance between the muscles of the shoulder girdle and focuses on improving strength all around.
A full body routine works best. 2-4x per week training.
Sets and repetitions here will be focused on increasing repetitions to about eight to ten and then going to a harder variation starting with five repetitions again and working your way back up. 3-5 sets per exercise is preferred.
Repetition range within the 5-§ range typically is best for hypertrophy. I like 5 for beginners as specifically a good mix of strength and hypertrophy. As you progress with the exercises on the charts you can work your way up to around 8-10 and then reset back down to 5 or a bit lower to work on a tougher progression.
At level three and four, the general idea is to start to integrate some of the basic static holds into the routine.
At this point in the game skill, a workout is mainly going to be focused on improving wall and freestanding handstands, L-sits, and possibly starting to work into elbow levers if that is a goal. Other types of skills from other activities may be integrated in here as well.
As you get into the L3-4 range, the set of exercises tends to branch out into a varied set of movements I denoted by the exercises listed in the charts. These are:
From here I would say where you want to go depends substantially on your short and long term goals. I know that many people probably have many, if not all, of the movements listed above as part of the skills they want to learn. However, trying to do all of them at once does not particularly work well in most cases.
Remember, you mainly want to focus on about two pushing and two pulling goals respectively and build a routine around those.
As such, it is best to select an overarching "theme" for your training. As I talked about before, many people want to obtain the static holds as their primary goal. If that is the case, I would build a routine primarily around those skills.
On the other hand, if the goal is to get strong in movements or for a sport then a routine may be more biased towards getting strong at movements first and then adding in static positions later as you improve in strength at many different ranges of motions.
Remember that there is no right or wrong answer here. But you get better at what you train so you need to prioritize what you want to learn.
If your overarching goal is statics I would suggest a routine focusing on:
If your overarching goal is to gain strength I would suggest a routine mostly working on:
A full-body routine works best with 2-4x per week training.
Typically, I would recommend only doing two exercises for push and two for pull, but three may be fine at this point if progress can still be made without overdoing t.
A 2:4X per week statics full-body routine could be structured like this:
Refer to the isometric charts depending on your maximal holds to get how many Y sets of X second holds you need.
Like the previous training section, we will aim for 3 sets of 5-8 repetitions for the movement-based exercises. The focus is to move up the repetitions per workout and then move to a harder progression.
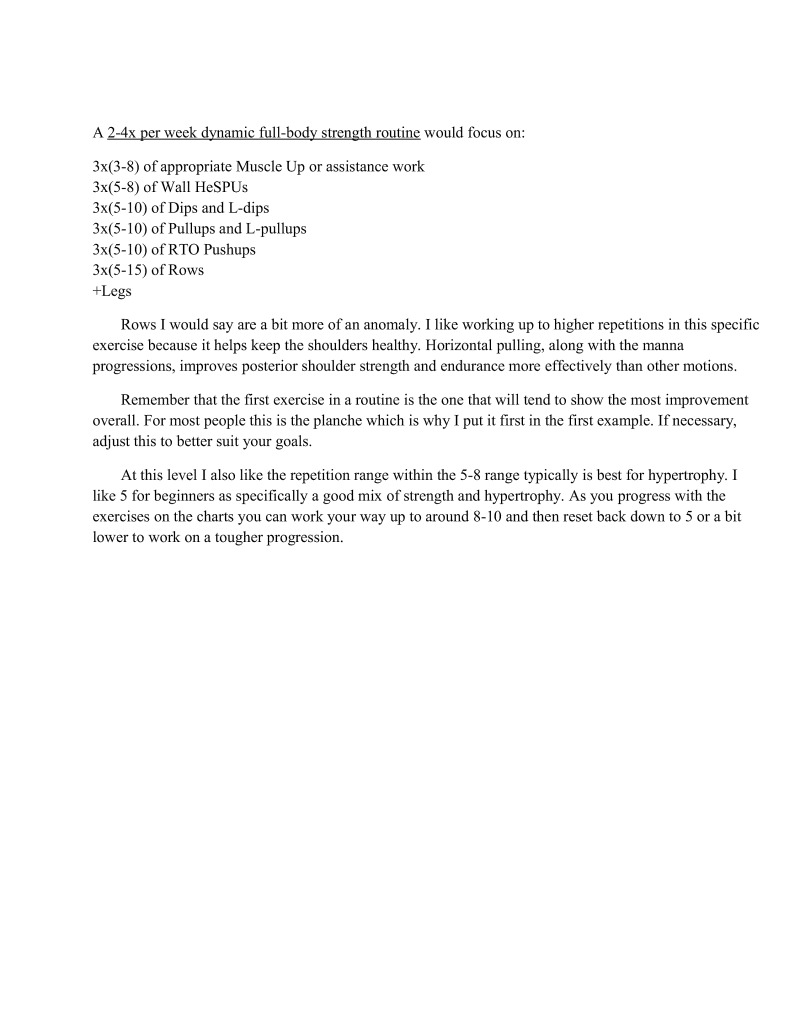
A 2:4x per week dynamic full-body strength routine would focus on:
Rows I would say are a bit more of an anomaly. I like working up to higher repetitions in this specific exercise because it helps keep the shoulders healthy. Horizontal pulling, along with the manna progressions, improves posterior shoulder strength and endurance more effectively than other motions.
Remember that the first exercise in a routine is the one that will tend to show the most improvement overall. For most people this is the planche which is why I put it first in the first example. If necessary, adjust this to better suit your goals.
At this level I also like the repetition range within the 5-§ range typically is best for hypertrophy. T like 5 for beginners as specifically a good mix of strength and hypertrophy. As you progress with the
exercises on the charts you can work your way up to around 8-10 and then reset back down to 5 or a bit lower to work on a tougher progre:
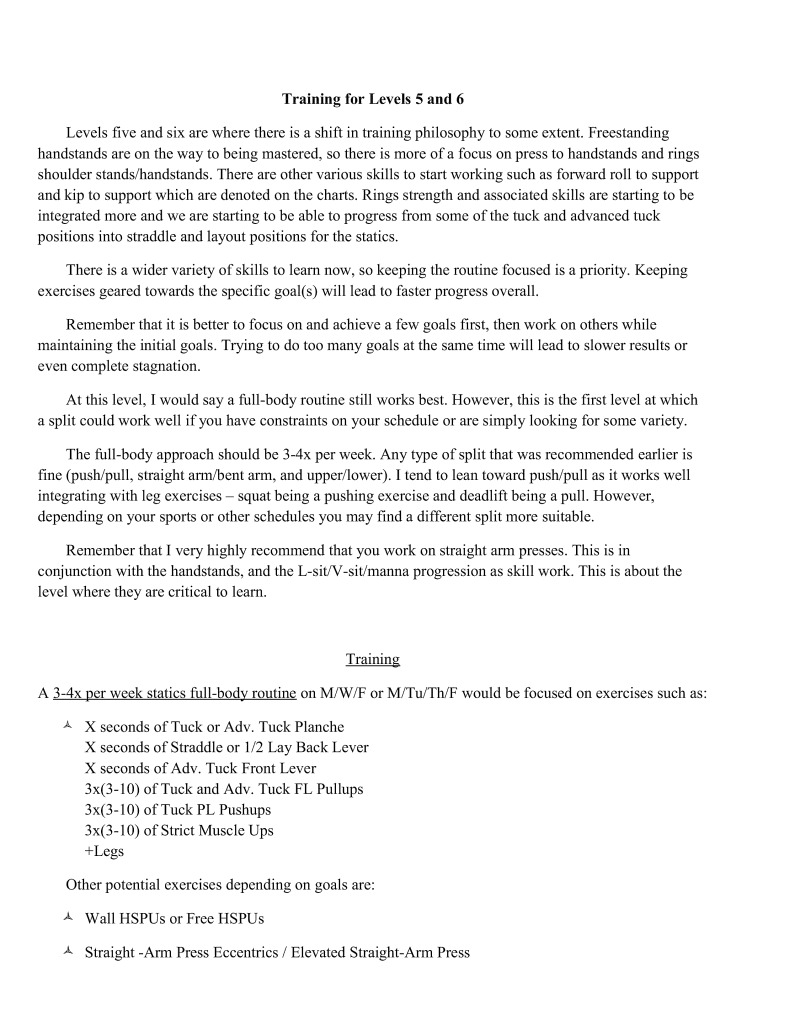
Levels five and six are where there is a shiftin training philosophy to some extent. Freestanding handstands are on the way to being mastered, so there is more of a focus on press to handstands and rings shoulder stands/handstands. There arc other various skills to start working such as forward roll to support and kip to support which are denoted on the charts. Rings strength and associated skills are starting to be integrated more and we are starting to be able to progress from some of the tuck and advanced tuck positions into straddle and layout positions for the statics.
There is a wider variety of skills to learn now, so keeping the routine focused is a priority. Keeping exercises geared towards the specific goal(s) will lead to faster progress overall.
Remember that it is better to focus on and achieve a few goals first, then work on others while maintaining the initial goals. Trying to do too many goals at the same time will lead to slower results or even complete stagnation.
At this level, I would say a full-body routine still works best. However, this is the first level at which asplit could work well if you have constraints on your schedule or are simply looking for some variety.
The full-body approach should be 3-4x per week. Any type of split that was recommended earlier is fine (push/pull, straight arm/bent arm, and upper/lower). I tend to lean toward push/pull as it works well integrating with leg exercises — squat being a pushing exercise and deadlift being a pull. However, depending on your sports or other schedules you may find a different split more suitable.
Remember that I very highly recommend that you work on straight arm presses. This is in conjunction with the handstands, and the L-sit/V-si/manna progression as skill work. This is about the Tevel where they are critical to learn.
A 3-4x per week statics full-body routine on M/W/F or M/Tu/Th/F would be focused on exercises such as:
Other potential exercises depending on goals are:
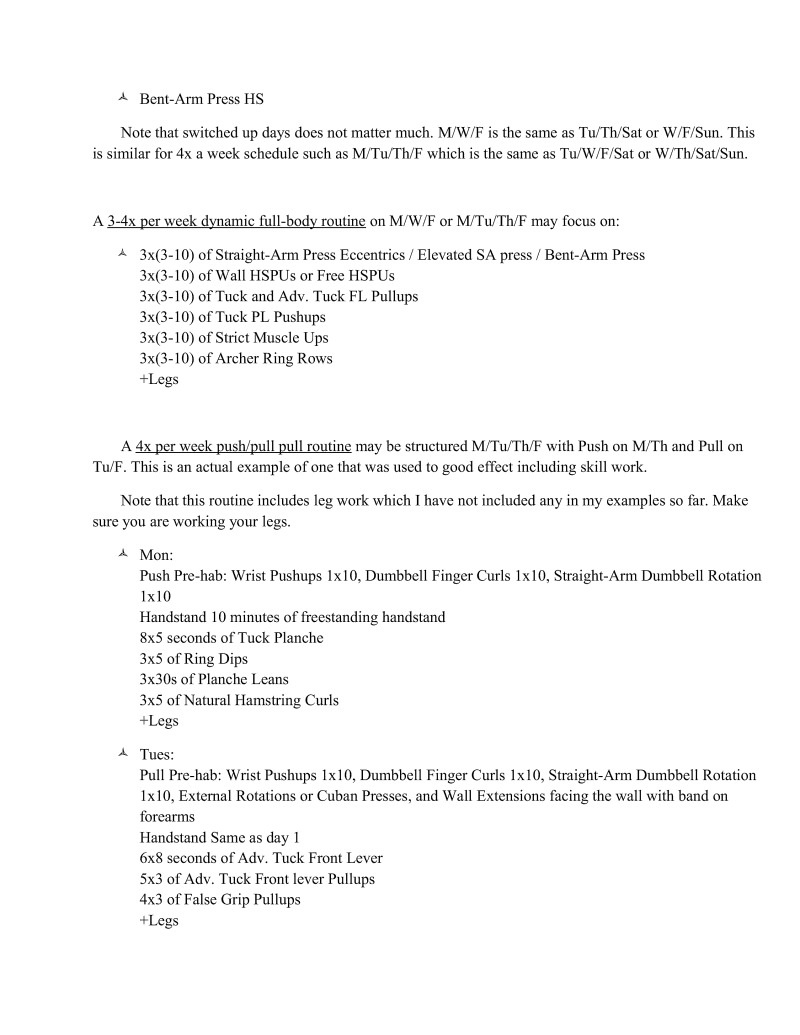
Note that switched up days does not matter much. M/W/F is the same as Tu/Th/Sat or W/F/Sun. This is similar for 4x a week schedule such as M/Tu/Th/F which is the same as Tu/W/F/Sat or W/Th/Sat/Sun.
A 3-4x per week dynamic full-body routine on M/W/F or M/Tu/Th/F may focus on:
A 4x per week push/pull pull routine may be structured M/Tu/Th/F with Push on M/Th and Pull on Tu/F. This is an actual example of one that was used to good effeet including skill work.
Note that this routine includes leg work which I have not included any in my examples so far. Make sure you are working your legs.
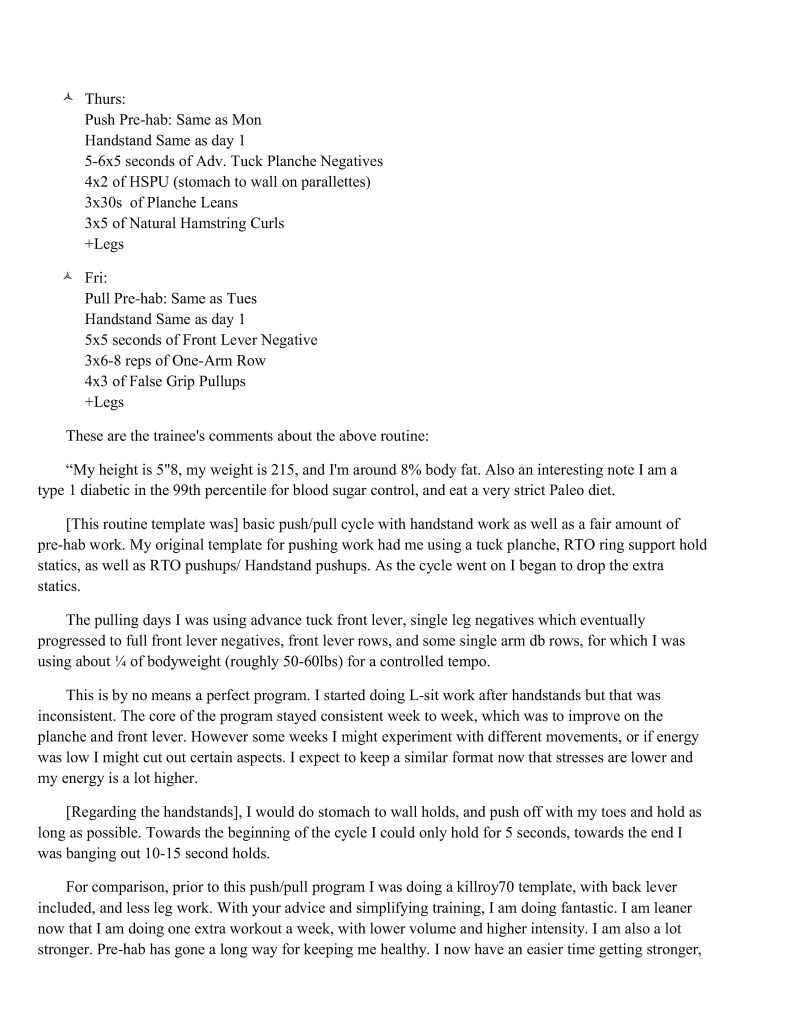
These are the trainee's comments about the above routine:
My height is 5"8, my weight is 215, and I'm around 8% body fat. Also an interesting note I am a type 1 diabetic in the 99th percentile for blood sugar control, and eat a very strict Paleo dict.
[This routine template was] basic push/pull cycle with handstand work as well as a fair amount of pre-hab work. My original template for pushing work had me using a tuck planche, RTO ring support hold statics, as well as RTO pushups/ Handstand pushups. As the cycle went on I began to drop the extra
The pulling days I was using advance tuck front lever, single leg negatives which eventually progressed to full front lever negatives, front lever rows, and some single arm db rows, for which I was using about % of bodyweight (roughly 50-601bs) for a controlled tempo.
This is by no means a perfect program. I started doing L-sit work after handstands but that was inconsistent. The core of the program stayed consistent week to week, which was to improve on the planche and front lever. However some weeks I might experiment with different movements, or if energy was low I might cut out certain aspects. I expect to keep a similar format now that stresses are lower and my energy is a lot higher.
[Regarding the handstands], I would do stomach to wall holds, and push off with my toes and hold as long as possible. Towards the beginning of the cycle I could only hold for 5 seconds, towards the end I was banging out 10-15 second holds.
For comparison, prior to this push/pull program I was doing a killroy70 template, with back lever included, and less leg work. With your advice and simplifying training, I am doing fantastic. I am leaner now that I am doing one extra workout a week, with lower volume and higher intensity. I am also a lot stronger. Pre-hab has gone a long way for keeping me healthy. I now have an easier time getting stronger,
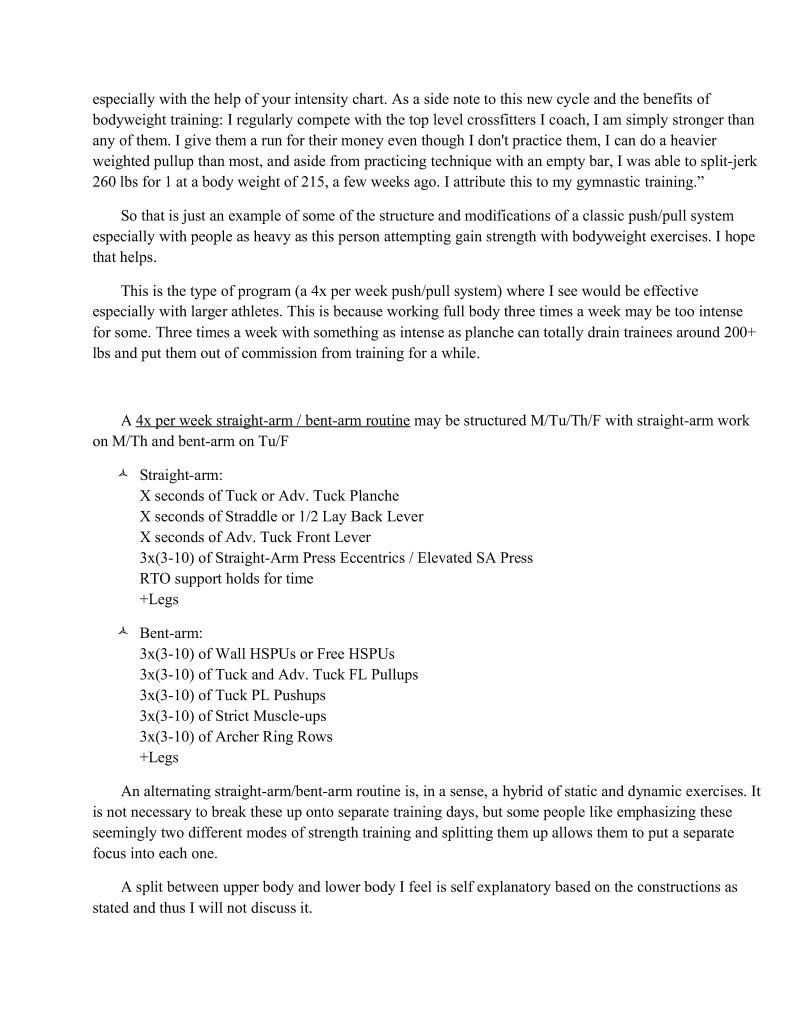
especially with the help of your intensity chart. As a side note to this new cycle and the benefits of bodyweight training: I regularly compete with the top level crossfitters I coach, I am simply stronger than any of them. I give them a run for their money even though I don't practice them, I can do a heavier weighted pullup than most, and aside from practicing technique with an empty bar, I was able to split-jerk 260 lbs for 1 ata body weight of 215, a few weeks ago. I attribute this to my gymnastic training."
So that is just an example of some of the structure and modifications of a classic push/pull system especially with people as heavy as this person attempting gain strength with bodyweight exercises. I hope that helps.
This is the type of program (a 4x per week push/pull system) where I see would be effective especially with larger athletes. This is because working full body three times a week may be too intense for some. Three times a week with something as intense as planche can totally drain trainees around 200+ lbs and put them out of commission from training for a while.
A 4x per week straight-arm / bent-arm routine may be structured M/Tu/Th/F with straight-arm work on M/Th and bent-arm on Tu/F
An alternating straight-arm/bent-arm routine is, in a sense, a hybrid of static and dynamic exercises. It s not necessary to break these up onto separate training days, but some people like emphasizing these seemingly two different modes of strength training and splitting them up allows them to put a separate focus into each one.
A split between upper body and lower body I feel is self explanatory based on the constructions as stated and thus I will not discuss it.
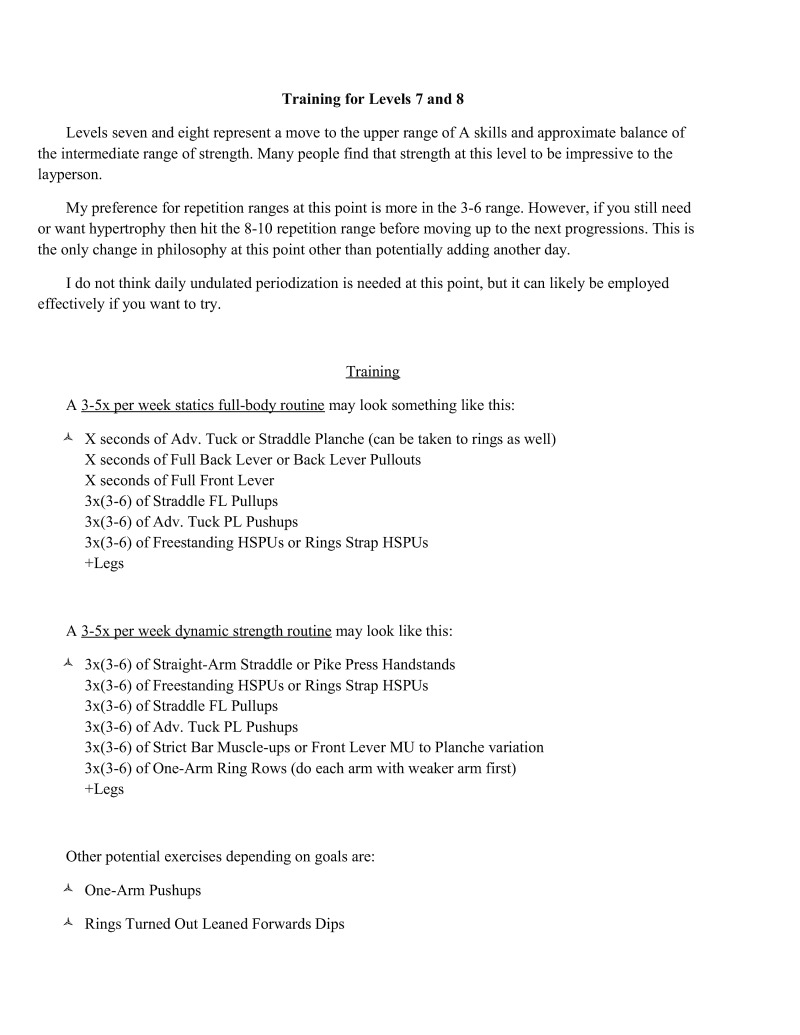
Levels seven and eight represent a move to the upper range of A skills and approximate balance of the intermediate range of strength. Many people find that strength at this level to be impressive to the layperson.
My preference for repetition ranges at this point is more in the 3-6 range. However, if you still need or want hypertrophy then hit the 8-10 repetition range before moving up to the next progressions. This is the only change in philosophy at this point other than potentially adding another day.
I do not think daily undulated periodization is needed at this point, but it can likely be employed effectively if you want to try.
A 3-5x per week statics full-body routine may look something like this
A 3-5x per week dynamic strength routine may look like this:
Other potential exercises depending on goals are:
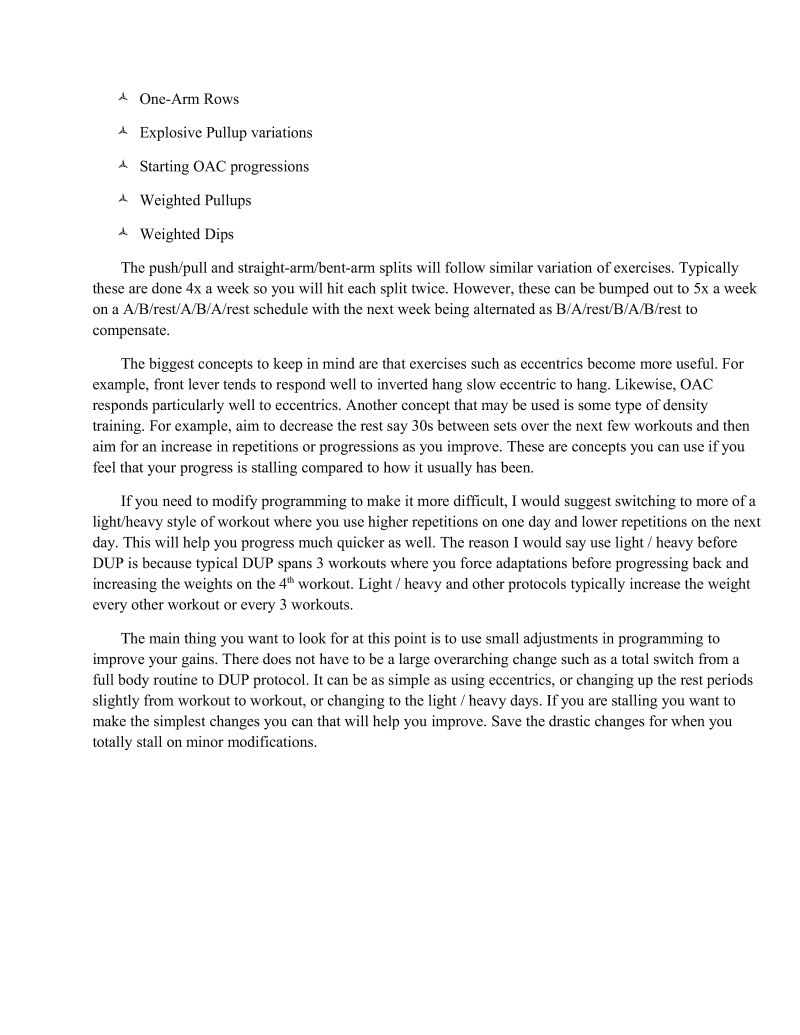
The push/pull and straight-arm/bent-arm splits will follow similar variation of exercises. Typically these are done 4x a week so you will hit each split twice. However, these can be bumped out to 5x a week on a A/B/rest/A/B/A/rest schedule with the next week being alternated as B/A/rest/B/A/B/rest to compensate.
The biggest concepts to keep in mind are that exercises such as eccentrics become more useful, For example, front lever tends to respond well to inverted hang slow eccentric to hang. Likewise, OAC responds particularly well to eccentrics. Another concept that may be used is some type of density training. For example, aim to decrease the rest say 30s between sets over the next few workouts and then aim for an increase in repetitions or progressions as you improve, These are concepts you can use if you feel that your progress is stalling compared to how it usually has been.
If you need to modify programming to make it more difficult, 1 would suggest switching to more of a light/heavy style of workout where you use higher repetitions on one day and lower repetitions on the next day. This will help you progress much quicker as well. The reason I would say use light / heavy before DUP is because typical DUP spans 3 workouts where you force adaptations before progressing back and increasing the weights on the 4* workout. Light / heavy and other protocols typically increase the weight every other workout or every 3 workouts.
The main thing you want to look for at this point is to use small adjustments in programming to improve your gains. There does not have to be a large overarching change such as a total switch from a full body routine to DUP protocol. It can be as simple as using eccentrics, or changing up the rest periods slightly from workout to workout, or changing to the light / heavy days. If you are stalling you want to make the simplest changes you can that will help you improve. Save the drastic changes for when you totally stall on minor modifications.
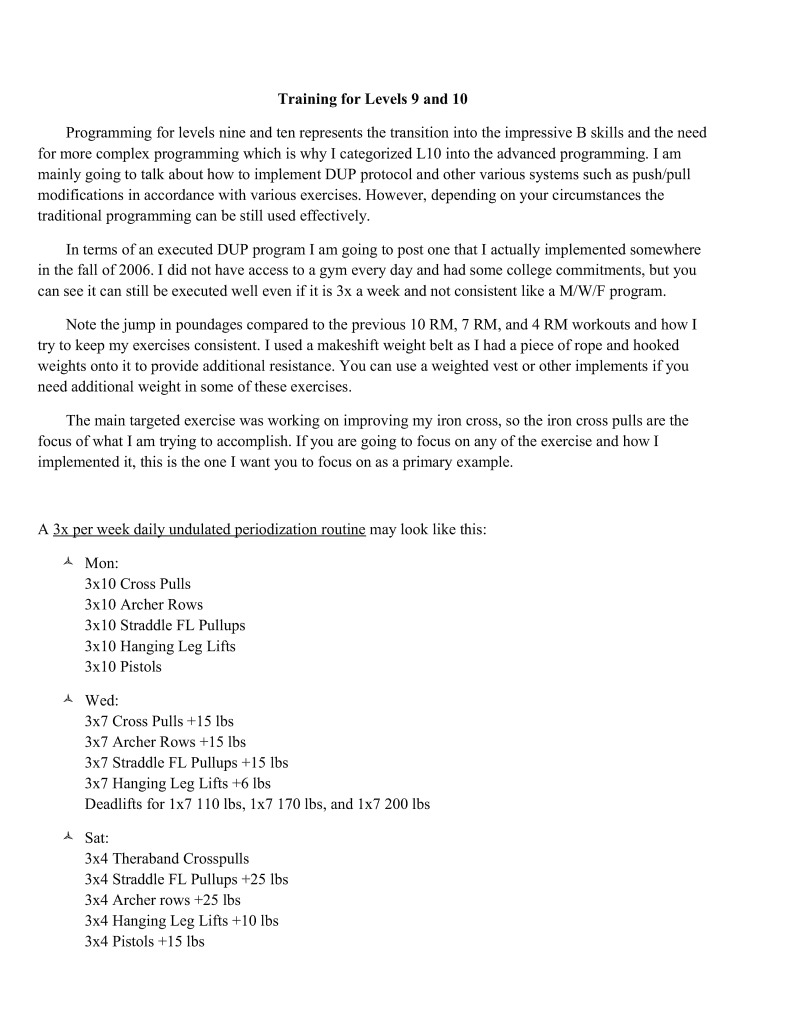
Programming for levels nine and ten represents the transition into the impressive B skills and the need for more complex programming which is why I categorized L10 into the advanced programming. I am mainly going to talk about how to implement DUP protocol and other various systems such as push/pull modifications in accordance with various exercises. However, depending on your circumstances the traditional programming can be still used effectively.
In terms of an executed DUP program I am going to post one that I actually implemented somewhere in the fall of 2006, I did not have access to a gym every day and had some college commitments, but you can see it can still be executed well even if itis 3x a week and not consistent like a M/W/F program.
Note the jump in poundages compared to the previous 10 RM, 7 RM, and 4 RM workouts and how I try to keep my exercises consistent. I used a makeshift weight belt as I had a piece of rope and hooked weights onto it to provide additional resistance. You can use a weighted vest or other implements if you need additional weight in some of these exercises.
The main targeted exercise was working on improving my iron cross, so the iron cross pulls are the focus of what I am trying to accomplish. If you are going to focus on any of the exercise and how I implemented it this is the one I want you to focus on as a primary example,
A 3x per week daily undulated periodization routine may look like this:
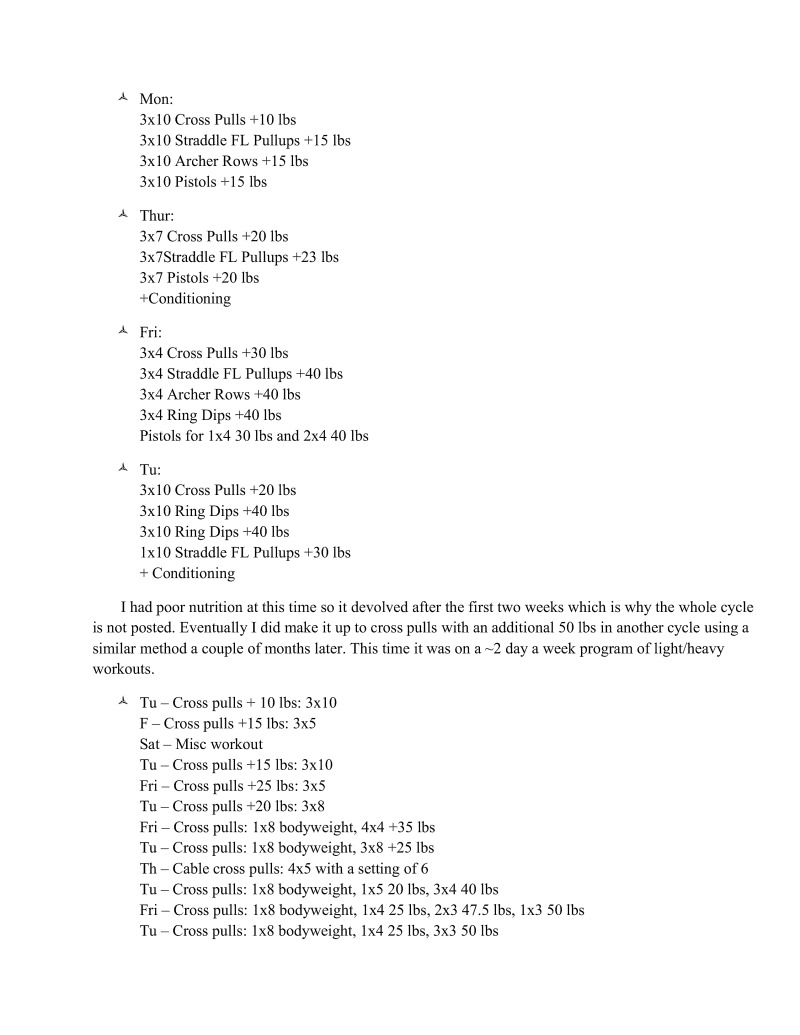
I had poor nutrition at this time so it devolved after the first two weeks which is why the whole cycle is not posted. Eventually I did make it up to cross pulls with an additional 50 lbs in another cycle using a similar method a couple of months later. This time it was on a ~2 day a week program of light/heavy workouts.
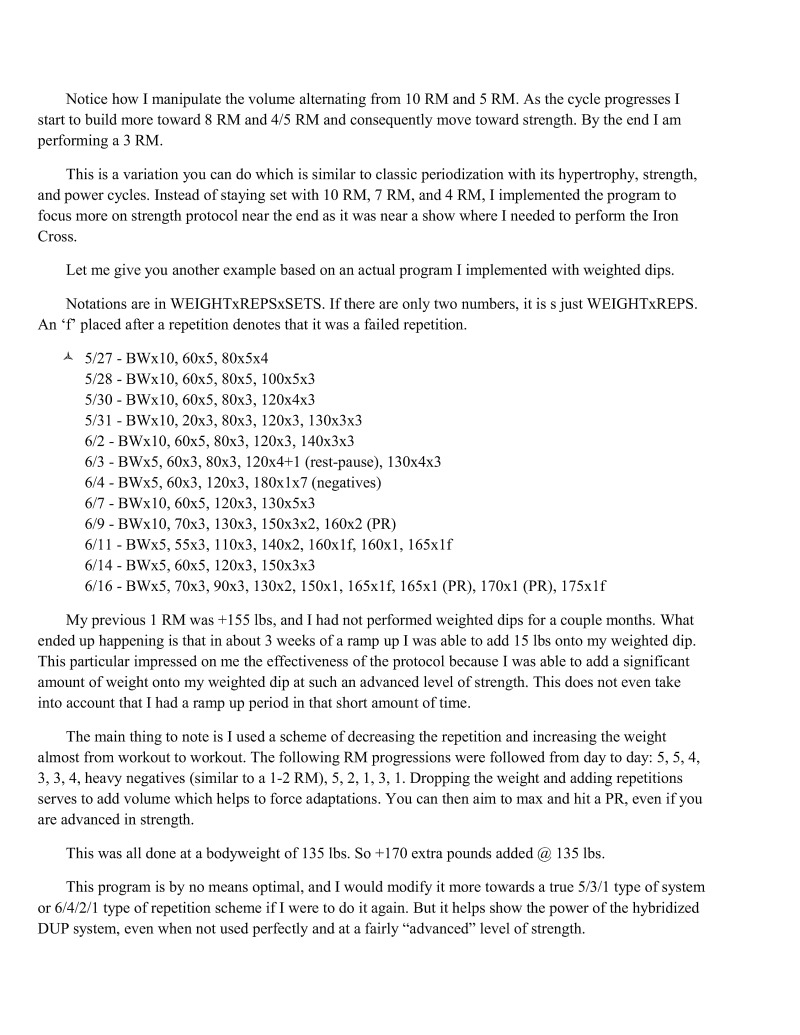
Notice how I manipulate the volume alternating from 10 RM and 5 RM. As the cycle progresses I start to build more toward 8 RM and 4/5 RM and consequently move toward strength. By the end I am performing a 3 RM.
This is a variation you can do which is similar to classic periodization with its hypertrophy, strength, and power cycles. Instead of staying set with 10 RM, 7 RM, and 4 RM, I implemented the program to focus more on strength protocol near the end as it was near a show where I needed to perform the Tron Cross.
Let me give you another example based on an actual program I implemented with weighted dips.
Notations are in WEIGHTXREPSXSETS. If there are only two numbers, it is is just WEIGHTXREPS. An *f placed after a repetition denotes that it was a failed repetition.
My previous 1 RM was +155 lbs, and I had not performed weighted dips for a couple months. What ended up happening is that in about 3 weeks of a ramp up I was able to add 15 lbs onto my weighted dip. This particular impressed on me the effectiveness of the protocol because I was able to add a significant amount of weight onto my weighted dip at such an advanced level of strength. This does not even take into account that I had a ramp up period in that short amount of time.
The main thing to note is I used a scheme of decreasing the repetition and increasing the weight almost from workout to workout. The following RM progressions were followed from day to day: 5, 5, 4, 3,3, 4, heavy negatives (similar to a 1-2 RM), 5,2, 1,3, 1. Dropping the weight and adding repetitions serves to add volume which helps to force adaptations. You can then aim to max and hit a PR, even if you are advanced in strength.
This was all done at a bodyweight of 135 lbs. So +170 extra pounds added @ 135 lbs.
This program is by no means optimal, and I would modify it more towards a true 5/3/1 type of system or 6/4/2/1 type of repetition scheme if I were to do it again. But it helps show the power of the hybridized DUP system, even when not used perfectly and at a fairly "advanced" level of strength.
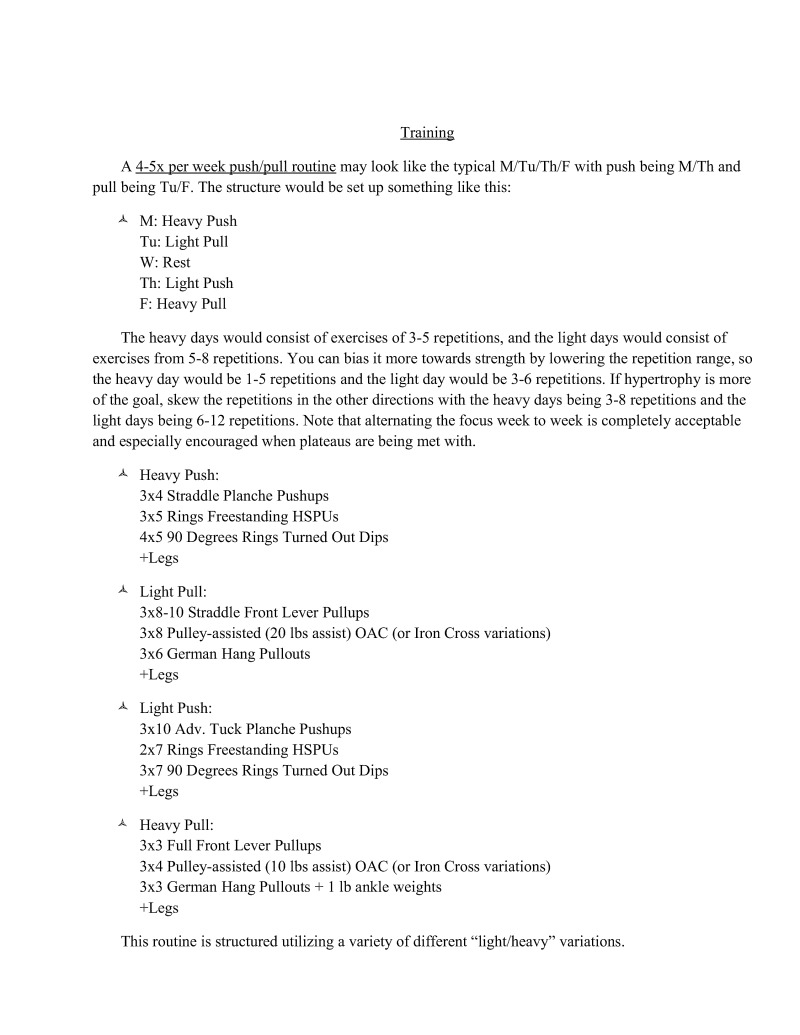
A 4-5x per week push/pull routine may look like the typical M/Tu/Th/F with push being M/Th and pull being Tu/F. The structure would be set up something like this:
The heavy days would consist of exercises of 3-5 repetitions, and the light days would consist of exercises from 5-8 repetitions. You can bias it more towards strength by lowering the repetition range, so the heavy day would be 1-5 repetitions and the light day would be 3-6 repetitions. If hypertrophy is more of the goal, skew the repetitions in the other dircctions with the heavy days being 3-8 repetitions and the light days being 6-12 repetitions. Note that alternating the focus week to week is completely acceptable and especially encouraged when plateaus are being met with.
This routine is structured utilizing a variety of different "light/heavy" variations.
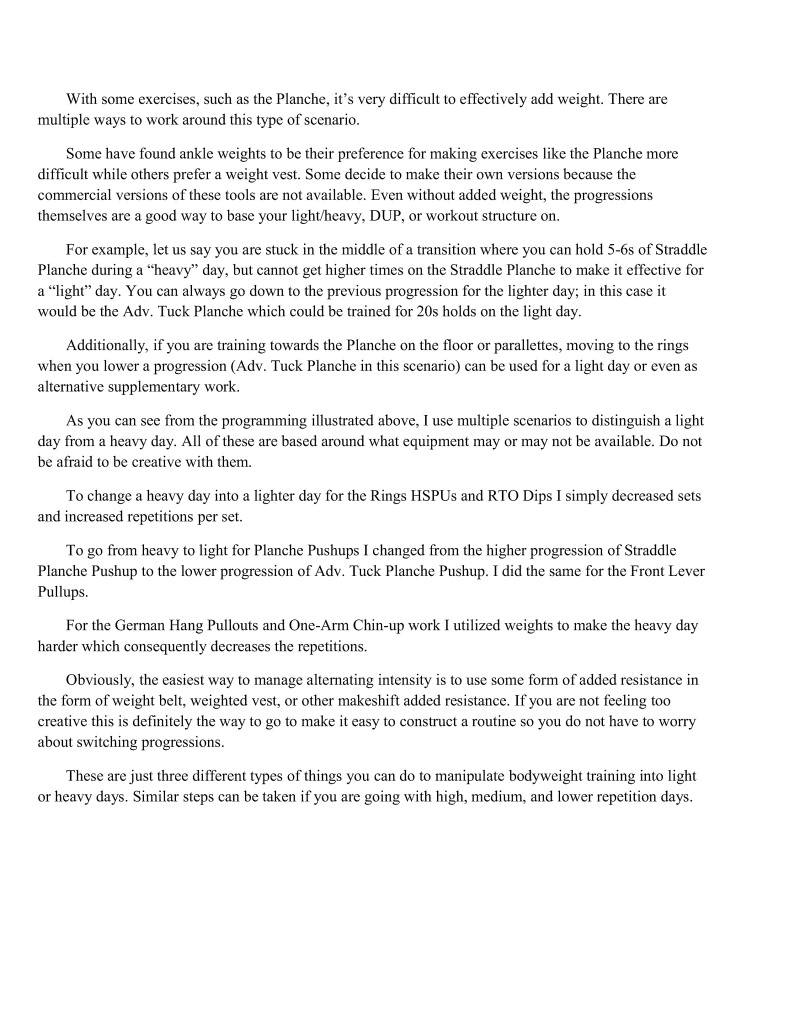
With some exercises, such as the Planche, it's very difficult to effectively add weight. There are multiple ways to work around this type of scenario.
Some have found ankle weights to be their preference for making exercises like the Planche more difficult while others prefer a weight vest. Some decide to make their own versions because the commercial versions of these tools are not available. Even without added weight, the progressions themselves are a good way to base your light/heavy, DUP, or workout structure on.
For example, let us say you are stuck in the middle of a transition where you can hold 5-6s of Straddle Planche during a "heavy" day, but cannot get higher times on the Straddle Planche to make it effective for a*light" day. You can always go down to the previous progression for the lighter day; in this case it would be the Adv. Tuck Planche which could be trained for 20s holds on the light day.
Additionally, if you are training towards the Planche on the floor or parallettes, moving to the rings when you lower a progression (Adv. Tuck Planche in this scenario) can be used for a light day or even as alternative supplementary work.
As you can see from the programming illustrated above, I use multiple scenarios to distinguish a light day from a heavy day. All of these are based around what equipment may or may not be available. Do not be afraid to be creative with them.
To change a heavy day into a lighter day for the Rings HSPUs and RTO Dips I simply decreased sets and increased repetitions per set
To go from heavy to light for Planche Pushups I changed from the higher progression of Straddle Planche Pushup to the lower progression of Adv. Tuck Planche Pushup. I did the same for the Front Lever Pullups,
For the German Hang Pullouts and One-Arm Chin-up work I utilized weights to make the heavy day harder which consequently decreases the repefitions.
Obviously, the easiest way to manage alternating intensity is to use some form of added resistance in the form of weight belt, weighted vest, or other makeshift added resistance. If you are not feeling too creative this is definitely the way to go to make it easy to construt a routine so you do not have to worry about switching progressions.
These are just three different types of things you can do to manipulate bodyweight training into light or heavy days. Similar steps can be taken if you are going with high, medium, and lower repetition days.
At levels 11 and 12, strength gains may seem far and few between. At this point, gains tend to appear at best once a week, but usually once every few weeks. Do not be upset if it takes an entire cycle to see even a small improvement in strength,
An increase in complexity of programming is needed and will be needed after this level of ability if you want to continually progress.
I feel that training here becomes a bit more instinctive. As the trainee, you have developed a ridiculous amount of strength, awareness, growth, and overall knowledge of yourself and what tends to work better according to you as a person.
The term auto-regulation and the style of training it implies is how you will train from here on out. As I discussed in the programming chapters, you want to have quality workouts. You know how your body handles stress and you will know if you can do more or know if your body cannot handle more on a given day. At this level it is acceptable and necessary to add or subtract exercises or sets mid-workout as you feel fit.
One of the things I like in particular at this level of training is a light/heavy or DUP-type taper. For example, you may start with a repetition scheme 12/6 for light/heavy respectively. Every week you change the repetitions of the light and heavy workouts until you "taper" to hit a | RM at the end of the cycle.
So week 1 may be 12 RM/6 RM, week 2 may be 10 RM/5 RM, week 3 may be § RM/4 RM, week 4 may be 6 RM/3 RM, then week 5 may finish out with a4 RM and a 1 or 2 RM to set a PR. Sets may be held constant at 3 sets or increased as you move towards the heavier days if you can handle the volume. You may base set numbers around predicted maxes according to the adapted Prilepin's table.
I am going to use the previous program from the level 9-10 without making significant changes to the exercises to reflect L11-12 section to simplify it and show you how it can be modified to fit in this context.
Let us say we want something around 10 RM and 6 RM for the first week, 7 RM and 4 RM for the second week, and 5 RM and 2-3 RM for the last week.
A 4x per week hybridized DUP program on a push/pull system may look like this:
Week 1:
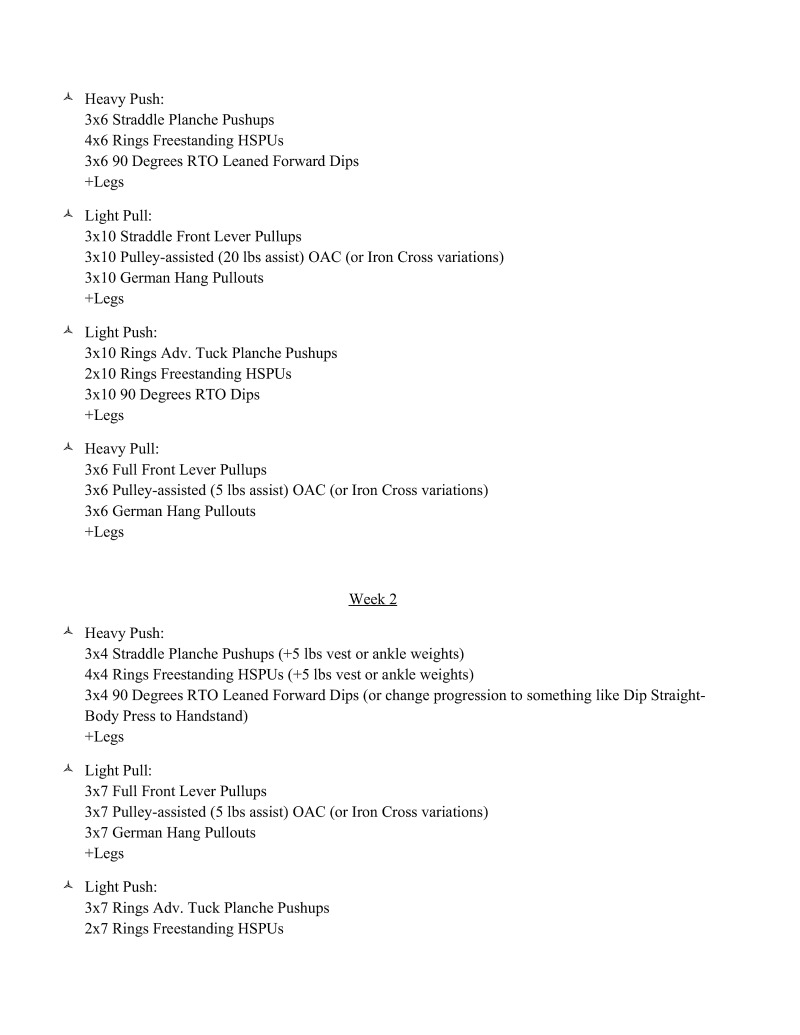
Week 2:
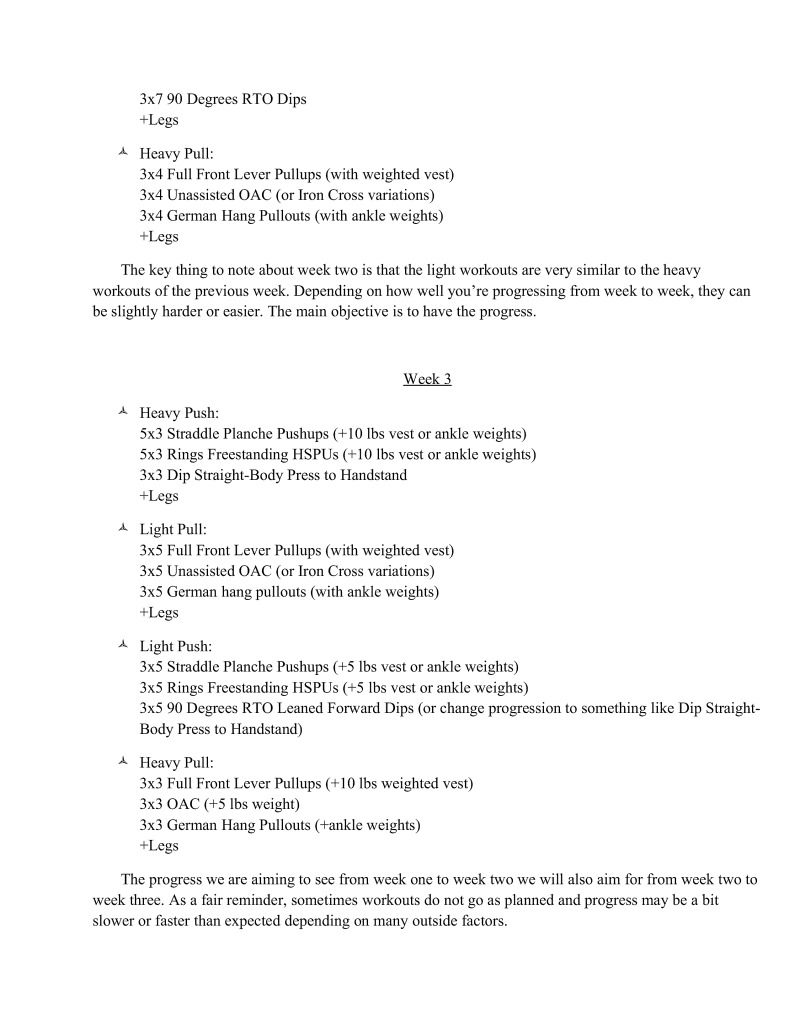
The key thing to note about week two is that the light workouts are very similar to the heavy workouts of the previous week. Depending on how well you're progressing from week to week, they can be slightly harder or easier. The main objective is to have the progress
Week 3
The progress we are aiming to see from week one to week two we will also aim for from week two to week three. As a fair reminder, sometimes workouts do not go as planned and progress may be a bit slower or faster than expected depending on many outside factors.
It is very hard to know if programs will work at higher levels without much experience. However, if you have come this far, you have likely acquired enough experience as a base to be able to get a "feel" for how a workout will go.
If the repetitions or exercises need to be modified to make things easier or harder mid-workout, at this point you can trust yourself to make a wise decision.
Additionally, even though you may program something like this and expeet to see gains from week to week, if your body is not responding as well as you hoped you may have to increase or decrease the difficulty or repetitions as necessary. This may have to be executed on the fly or from week to week. Just make sure to keep your light days light and your heavy days heavy. Thatis the most important part of periodization.
It is also very important to dial in sleep, nutrition, and stress along with the training at this point in time. You will not get very far without having these factors in order.
I think the main concept that needs to be kept in mind at this level is that as the stimulus to force adaptations increases and our training increases to match it, we need to keep in mind that it is very easy to start doing too much rather than too little. This is partially solved by the fact that we have proper deload weeks, but we need to think about the fact that if we have been training for years there may be accumulated fatigue that we are not even aware of.
I have had to recently take an extended break off from training after training consecutively with rest breaks for almost 3-4 years. I was around the ability of level 11 and 12 in most categories when I was forced to take the break away from training. However, for the next about 2 months off from training my body was actually still experiencing changes with increased hypertrophy as I "recovered" more. I had not even been aware of this as I had been making good progress beforehand.
So what I am saying is that if you have been training for a long time and are at this level that even if you are still progressing effectively there may be the possibility of taking more extended deload periods which extend for 2-3 weeks. You do not have to take full rest off during these times. Relax and learn a new sport, Or take off and enjoy some time with your family. Go for a fun. There are a lot of fun things you can do besides training that can help to refresh both your mind and body.
When you come back from the rest break if you have been training consistently for years there will be very little overall drop off. The overall total fatigue will be dissipated, and you will be able to get back into training fresh and ready to go. Having this "fresh" type of experience will be conducive to working hard in your training again and being able to progress much more effectively.
I sometimes think that as we get 50 strong and our abilities skyrocket that we often lose sight of many of the other qualities that are important to training effectively. Life is not just a game to see who can do the best. We should really have a love for what we are doing, and sometimes loving what we are doing means we need to take time away from it to appreciate how much we love it. A new perspective often fosters sucess

As far as routines go they are easy to construct. For example, you can use a routine to work on sequences of skills, or you can use them to help drastically shorten workouts by combining a ot of skills You have been working on already.
A basic level routine on rings may look like this
As you get more advanced, routines can be anything you want them to be. For example, if you wanted to work on front and back lever first before above the rings skills a routine may look something like this:
Basically, you can make up anything that you want to do based on your creativity.
Typically, you will want to combine a series of skill and strength moves alternating if you want to work on transition type movements. However if you are going for pure strength you can work specifically on strength moves all in a row in shorter sequences. If you want to do this, it helps if you work alternating movements of pull and push. For example:
One previous sequence that I had fun doing once I leaned how to do freestanding rings handstand pushups was to do as many rings handstand pushups as possible then if that number was 4 then I would perform:
Overall, it was good at aiming to hit all of the shoulder girdle in both pushing and pulling exercises in all of the planes of movement. I even had some fun playing with it in reverse, but it was difficult estimating how many free handstand pushups I could do at the end.
The kipping and felge skills are meant to be transitioned into and out of in gymnastics routines. It Tooks cool when you can chain them with strength moves. Be creative with your routines. Share them with cach other as well.
Another fun game that I used to play with some of my friends was parallettes add on. So basically what we did was we started out with a skill such as an L-sit. Then the next person would do an L-sit and then add a skill such as a press handstand. Then the next person would perform the L-sit, press handstand, and then add 2 skill onto that. This would go on and on until someone eventually failed.
Training does not have to be boring If you are getting tired of doing singular movements working towards strength then feel free to mix it up. Make it fun to work on these skills and strength movements. After all, that is why we are training. Not just to do impressive stuff but because we also love it
I am excluding further specific information on programming here because I feel that past level 12, people have diverse sets of goals for what they want to achieve and the experience to make it happen.
If you have further questions, ask those who are more experienced than you. The Inernet is a great resource, and I think it is underutilized as an effective tool for learning. I am almost always open to helping trainees if they want to post on our forums at eatmoveimprove.com.
Additionally, note that I did not really discuss any of the special techniques you can do to make workouts shorter such as pairing exercises or the various different types of split routines. This may be implemented according to your various disciplines or preferences
One of the few things that were suggested to me when The Fundamentals of Bodyweight Strength Training was initially posted on eatmoveimprove.com was the possibility of adapting Wendler's popular 5/3/1 program for bodyweight training.
The great thing about Wendler's 5/3/1 is that it is basically a program to increase your maxes and it only takes a short amount of time each day to perform and light overall volume during the week. With the stagnation that athletes or post-novice weightlifters normally face, having a program that was geared towards progress with an attitude of ‘get in and get out fast’ is particularly appealing.
For those of unfamiliar with the 5/3/1 program, it can be quickly deseribed as a strength program that has 4 main lifts spread over 4 days. The beauty of the program is that it uses submaximal weights — often far below 1 RM — to build up virtual max weight to high levels. It works and it works well.
I have struggled a bit with how to implement a similar type of program for bodyweight strength training. Some of the people in the comments section of The Fundamentals of Bodyweight Strengih Training said that perhaps instead of adding additional repetitions for the last set of each workout, it could be programmed to add extra time to static holds.
The thing I do not like about using statics to mimic increasingly weighted barbell work is that the statics do not function as well in this context. They become metabolic much faster than weights do because the isometric hold occludes blood flow. Typical range of motion exercises have the eccentric phase of exercise where blood can be pumped back into the muscle to clear metabolites. However, given the fact that we do have an isometric "Prilepin" table, this approach can be properly adapted if people are willing to put some time into crunching the numbers. I do not expect as good results though.
The problem with implementing a repetition-type system with bodyweight exercises is that it’s very difficult to tell how much improvement has been made from workout to workout. However, I believe the solution lies in the skill and strength progression charts more than the isometric movements,
There are enough exercises with direct progressions that allow you to "check your ego at the door" and start extremely light. For example, with the handstand pushups we have:
If you are moving into the B level skill range (which would warrant intermediate programming), you will likely be better off starting with some of the lower progressions such as Wall HeSPU.
The core formatting would be as follows:
One the few problems I can foresee for this type of programming is having a hard time knowing approximately what your max is for all of these different exercises since there are a lot. However, the fact that you are nearing intermediate strength means that you have a good idea when "failure" is going to occur within about four or five reps.
Although this does not exactly follow the repetition maximum diagrams, stopping short of failure by as many repetitions is relatively light on the body.
This type of program has by no means been tested. You would have to play around with it a bit to get it to work properly, but that is the fun part about this program. If you're a little bit off do not worry because the first couple sets are a relatively low intensity compared to the progression used in the third set.

After you can perform at least seven repetitions on all sets from all of the weeks, move up a progression. Seven is an arbitrary number here, but a 7 RM does signify that you are around 80% of your 1 RM capability which means you can likely progress to the next variation without much difficulty.
The assistance work then becomes sets of static isometrics for Back Lever, Front Lever, Planche, Iron Cross if you are training it, and any remaining skills you want to work on.
My recommendation is to work with a static variation or other exercise that works the opposing muscle groups compared to the one given
For example, if we are using a pressing exercise — Handstand Pushups in this case — then you would want to pair it with a pulling-based static such as Front Lever, Back Lever, or Iron Cross work. Alternatively, you can pair it with pulling-based movements such as Front Lever Pullup progressions.
The specific choices are up to you.
If the joints and connective tissues start to feel stressed, I would back off of the difficulty of the exercises and start with higher volume work such as 12-20 repetitions, potentially near the beginning the workout as the warm-up.
I would do general ankle and foot mobility and stretching as these would likely be needed for other aspects of sport or strength.
I will not name a specific number of degrees that I think mobility or flexibility should be increased to for each specific joint. I feel this is a bit counterproductive since not everyone will be as flexible as the next person. However, you should be able to move into any of the typical stretching exercises such as splits, German Hangs, wrist pushups, etc. fairly comfortably.
In particular, if we take an exercise such as the German Hang which is stretching our shoulders far into hyperextension we want to be able to hang comfortably in that position for at least 20-30s. Whether this is at a 160 degree angle beyond neutral or 120 degree angle they are both fine. What matters is we have access to a good range of motion comfortably that we can apply force in. When we have this we are both mobile and stable; therefore, we can develop strength effectively and keep our bodies healthy.
If your joints are getting sore or have trouble moving throughout the full range of motion or have trouble applying strength near the end of the ranges of motion, that is definitely something you are going o want to work on.
This is done at the end is because the tissues are adequately warmed up from the workouts and so stretching and mobility work will be very productive. Do not ignore this work as staying healthy is one of the long-term components of progress. You cannot beat up your body without taking care of it and expect to become strong.
I think it would be a good idea to summarize how to progress from a general perspective because programming is complex. This will keep it simple for some of you new to programming.
If you cannot do one of the options you will move down to the next option until you use one that works.
This structure for new people should be able to progress you through at least level 9-10 on the charts. By then you should know how to build routines much better.
Chapters eight and nine on programming can be daunting for people new to learning how to construct workouts. I hope some of these examples on how to apply those concepts in a structured manner were helpful.
The bodyweight training community is vibrant and willing to help each other eritique their routines. If you have any additional questions ask people who are more experienced than you, or visit any of the many sites on the internet that have a significant amount of bodyweight practitioners.
The only recommended equipment in this volume are a st of rings and paralletes. I tried to keep the excreises as low tech as possible since not everyone has the facilities or equipment to perform the progressions.
Some of the illustrated techniques may use a set of parallel bars or a singular bar such as a high bar. Any of the high bar movements can generally be substituted on the rings. Likewise, most of the parallel bar techniques can be substituted on the parallettes.
There are various rings sellers available online. Some of these are EXF Rings, Rogue Rings, Xtreme Rings, etc.. I believe Rogue also sells some high quality parallettes as well. There are also gymnastics suppliers that sell different equipment as well. There are also various guides on how to do it yourself with PVC pipe. One such example is here
http://www.instructables.com/id/How-to-make-PVC-gymnastic-fitness-rings/
The same is true with PVC parallettes:
http://celtickane.com/projects/homemade-parallettes/
Note that I only referenced two websites that have instructions on how to make this type of cquipment. There are other ways to make them which can be googled or seen on videos on youtube. The most common search term to bring up the guides is "do it yourself" before PVC rings or PVC paralletes.
Rings can be mounted on a tree outside or inside in various places. I have scen them successfully used on a doorway pullup bar. Some people have put into their ceiling hanging them from cross beams. The good thing about parallettes is that they can be used anywhere. Also, a wall may be useful for some of the progressions.
Whatever you choose to use make sure that you are safe using the equipment. That is first and foremost. Do not do anything dangerous.
Volumes could be writien on many of the singular techniques such as handstands. Important information regarding these techniques will be condensed so that one will not be required to read essays for every single technique but will still understand the important points. Unfortunately, some of the finer details are beyond the scope of this particular book.
Proper technique for the handstand is not preached solely for aesthetic appeal. It, more importantly, makes the handstand significantly easier by stacking all the joints on top of one another, dropping the need for excessive muscular contraction. For example, if the shoulders close and the lower back arches, the forces on the shoulders and abdominals increase, which makes the handstand more difficult. In addition, performing a handstand correctly improves body awareness and positioning for all other statics that are learned in gymnastics.
Handstands are the fundamental position in gymnastics much like the squat is for human movement. If our air squat is not up to par, it is unlikely that we will be able to correctly execute other techniques such as weighted back squats, front squats, overhead squats, and the Olympic lifts. Without a solid foundation in the squat all of the other core exercises will fail to develop correctly. Likewise, proper handstands have this same effect on many of the other positions and techniques in gymnastics.
The handstand is the one skill that should be trained every day for anyone with a commitment to bodyweight skill proficienc s. Variations such as the wall handstand make it very easy to get quality work in without jeopardizing rest and recovery. Constant practice and refinement of handstand technique will yield consistent rewards for those planning on sustained bodyweight work in their future.
Note that performance on skill-based movements will typically fall into a bell curve based on tency and progression. For example, when we start practicing handstands we will normally fail all the time. Then as we improve we may start getting 2-3s holds here and there. Further improvement leads 10 consistent 2-3s holds with occasional longer holds of 9-10s. From this we can conclude two things:
We do not want to focus on the outliers. The key for practicing skills is to make them consistent. We want to raise the consistency of our holds so that we can consistently perform the skill all of the time. For example, in a sample size of ten handstand holds we may get 0s once, 2s once, 4-5s six times, 8s once and 10s once. Our main goal is to focus in on obtaining that 4-3sec range and improving that.
Consistency in performing skills is the key to developing greater static and dynamic kinesthesia (o movement). As humans we like to focus on our best (and videotape it) and push the worst out of our mind. Instead, we should focus on being consistent and we will progress much faster.
This focus on consistency means that we need to be intentional about all our attempts at skill work. If we are tired and losing consistency in holds we should take a break. We should not keep trying to do our handstands in an attempt to get that one good long hold. That is not want we want. We want quality work all of the time.
Additionally, from the handstand position it is imperative that we minimize the roll out or pirouette fall from the handstands. Falling over in any handstand position reinforces bad habits. It tells the body that, "Hey, when I hit this point where I feel like I cannot keep siable I need to bail out." The correct way to go about it is to fight for every inch and every position, especially when we are leaning. Clearly, we want to emphasize form, but if we do not learn how to fight for the handstand position we (1) do not build the strength-stability in the muscles to fight for it, and (2) we teach our body that bad habit to get out as soon as things go wrong.
In summary, we want to:
Psychologically, if you are having issues with maintaining proper focus or your frustration is getting to you making your quality of holds go down, it is a good idea to step back and take a rest breath. Do a couple of deep breaths in through the nose and out through the mouth to help calm yourself down. Then visualize the movement in your mind before going back to it.
This can be used for any type of skill work not just handstands. Always remember that perfect practice makes perfect, and the only way to get perfect practice is to focus on quality in every single repetitions that you attempt.

Handstands are a critical component of bodyweight training. In particular, handstands lay the foundation upon which all gymnastics moves are based. It is important to properly develop this movement, which is why it is first in the skill category. Similarly, wall handstands are a category all to themselves for the first four difficulty levels. This is also why in-depth articles have extensively examined handstand technique development, such as Valentin Uzunov's in "The Handstand: a four stage training model". (Available in Gym Coach: Vol 2, August 2008 http://www.thegympress.net/journal/archive.html)
We will briefly go over all of the fundamental aspects of the handstand. Wall handstands should be performed with the following technique notes in mind:
What all of these body cues summarize is the position that we want to be in for handstand: a straight line — no bending anywhere in the body.
Since the body is going to be a rigid line like a plank of wood, we only want small movements to control it in the air. The forearms, through the hands on the floor, will perform all of these small movements. To allow the greatest amount of control, fingers should be spread out as far as possible and pressure exerted through the fingertips to maintain balance.
I will address hand position against the floor in the grip section.
As we can imagine, using only the wrists to control the handstand will be initially difficult. New people learning the handstand will want to use their shoulders and hips to change body shape to balance the handstand. This is to compensate for lack of the forearm control required to perform good handstand technique. Resist this temptation because it will instill bad habis that can be very hard to break. A proper handstand held for more than a minute should leave the forcarms exhausted, and the rest of the body should be relatively fresh and unused except maybe some slight burning in the shoulders.
Beginners want 1o have the tips of the toes touch the wall and nothing else. With hands as close to the wall as possible, any straying from the proper, straight body is easily identifiable. If we arch, our stomachs consequentially hit the wall or we are forced to come down with a forward roll or pirouctte.
Once we become proficient at wall handstands, we will advance through barely pushing our toes off the wall. Use wrists to correct the overbalance by digging down with the fingers to avoid from tipping over. Avoid arching the lower back to compensate when pushing the toes off. All adjustments should be done with the wrists,
As we improve, we will balance away from the wall for longer and longer periods. Once we are able to do this for at least 15-20s, we should split our workout: kick up to freestanding handstands while we continue to work wall handstands. After we can consistently exceed 30s wall handstand holds with proper balance and straight body then it is time to solely work on our freestanding kick to handstand.
These two techniques are the basic way to bail from the handstand. If you are working against the wall you should lean to roll out as it correlates a bit better to maintaining body positions. Pirouetting too early can develop some bad habits, so I am not doing to describe it here.
Rolling out of a handstand is an extension of the forward roll on the ground. If you are not proficient in the forward roll you should first practice them on a soft mat or on grass. In the forward roll you want to apply pressure through your hands such that when you tuck your chin to your chest you will be able to put your weight on the back of your neck and roll smoothly out of the movement.
Likewise, from the handstand position you are going to want to bend the arms slowly so that you lower towards the ground in a controlled fashion. From there you are going to tuck your chin to your check and curl your body into the fetal position and let gravity move you through the roll
If you are unsure of how to do this proficiently to too scared when attempting to use it from a handstand position you have two options. The first option, which is preferred, is to ask for help from a spotter. The spotter can hold your ankles up and help you execute the roll in slow motion so you get the hang of it. The other option is to go against our earlier advice, and learn how to pirouette out by twisting the body.

The lunge to kick up is very misunderstood. It can be practiced against the wall at first, with your back to the wall, to get a sense of how much force is needed. However, we need to make it as consistent as possible. Mechanically, there is a set of instructions that people new to kicking up should follow to help with this.
First we want to take the handstand position upright. We do this because it is easier transfer from a position we are already in rather than to kick up with a super-out-of-control body and attempt to move into the correct position. Thus, we start out with arms overhead, shoulders in the ears, chest up, shoulders tight, legs together, and tight through the core.
During the kick up motion we are only going to change one part of this set up: the lunging leg. The lunging leg is the hinge upon which the straight body will rotate thus not compromising the straight body, arms overhead position we so painstakingly set up.
The lunging leg should be placed approximately half of your height in front of you, and then weight is shified onto that leg as your body starts tilting over. Your hands lead the way. The key for the lunging leg is that your knee should be kept as straight as possible to keep tension in the hamstrings. Once the hands hit the ground, dig in with your fingertips to stabilize the handstand as it is coming up. The tension in the hamstrings can now be utilized to use that leg to kick up and bring it up to the other leg,
Once the legs come together we have the perfect straight body position. If anything came out of alignment, like the legs spreading apart, the handstand body shape is lost and compensation is required. This is not ideal, but it happens when learing. Grab a camera or a person who knows the movement to get the outside perspective on what you are doing wrong.
If you can execute the lunge to handstand correctly you ar in good shape. From there it is just modulating the force necessary to hit the correct position through the kick up and the pressure from the fingertips. Again, you may find it useful to use a wall at irst to figure out how much you power should be in your kick,
Once you get good at kicking up, you should feel like you can lock into a perfect handstand at the top of the movement and not wobble at all. Congratulations.
Note that the back to the wall handstand is a technique that can be used initially to teach the handstand. This is especially helpful if there is a general lack of strength or lack of technique that may cause bailing out of handstand with the stomach to the wall to be dangerous or not feasible. I would highly encourage that if this technique were used, one should phase it out as soon as possible. But if it needs to be used in the beginning then it is not incorrect to highly detrimental. Just remember that it is just a starting position and we want to eventually move on from there to focus on more productive tasks. So, focus on getting the body straight and learning correct technique so that we can move on.
There are a couple of different ways to grip the ground. One of the traditional ways is to use a flat hand against the ground. I am against this because the contact should generally be with the fingertips and back of the palm to allow balance of the handstand.
The alteratives are the full arched hand and the cambered hand.
The full arched hand (or dome hand) puts just the fingertips and back of the hand in contact with the ground. This allows for full balance of the handstand much easier.
The cambered hand is a bit different. It is utilized a lot in the hand balancing world because it helps to tighten up the muscles of the forearm much better giving more control. The cambered hand is performed by leaving the entire palm in contact with the ground. Once the whole palm is in contact, you will want to curl your fingertips such that there is only a dome made from the fingertips. This gives 3 points of contact to the ground which are the fingertips, the top of the palm, and the back of the palm.
This additional control may help those of you who are having problems with the balance of the skill. Although getting used to the new position may take a bit of more practice to get right.
This movement is not on the charts, but is included here for completeness. While it has its uses, the same body positions can be built more thoroughly doing a correct wall handstand.
Body positioning is the same except two key points. Firstly, the arms are bent, neglecting strengthening the straight-arm position. Shoulder strength and stability through straight-arm training is extremely ritical. Avoiding this element in the handstand, one of the most fundamental holds, will hold you back in bodyweight work. Secondly, using your head to help with balance neglects training the balance through the forearms needed for solid handstands. Eliminating the head from the equation right away does not cost us any potential benefits that cannot be achieved through proper wall handstands. The perfct straight body can be maintained in both positions, and so this movement is not needed.
I also like to exclude it because many people do not have the neck strength to handle it and may put their heads in awkward positions, leaving them susceptible to neck injuries. This is something we want to avoid at all costs.
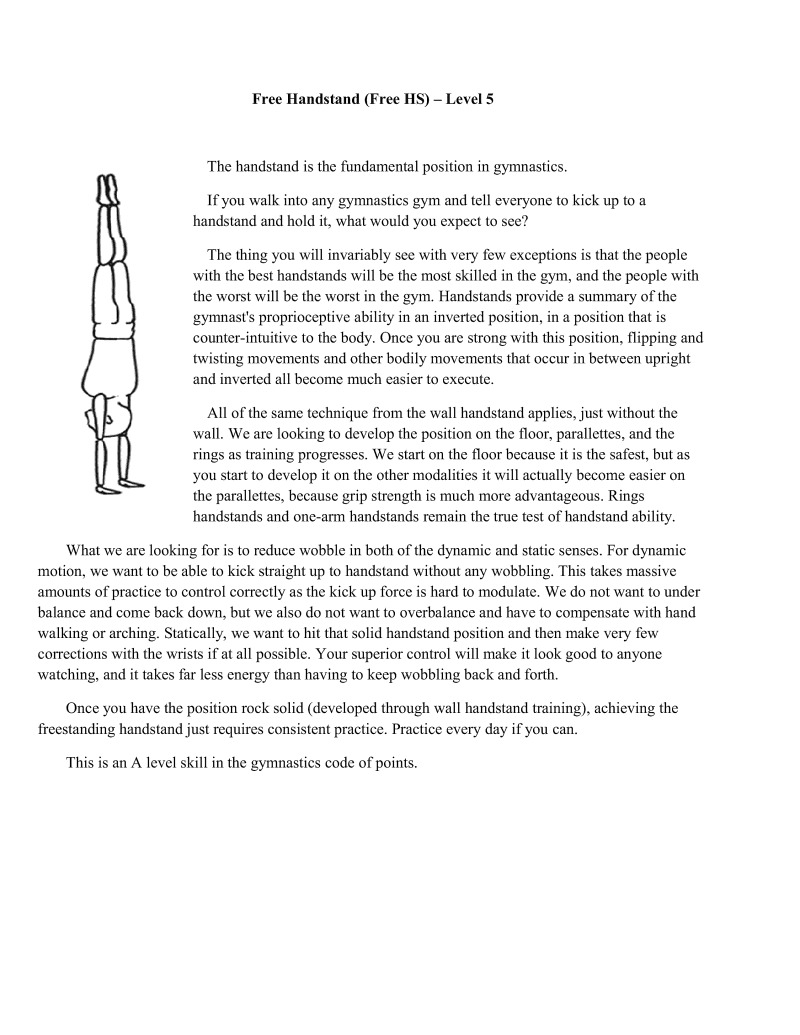
The handstand is the fundamental position in gymnastics.
If you walk into any gymnastics gym and tell everyone to kick up to a handstand and hold it, what would you expect to see?
The thing you will invariably see with very few exceptions is that the people with the best handstands will be the most skilled in the gym, and the people with the worst will be the worst in the gym. Handstands provide a summary of the gymnast's proprioceptive ability in an inverted position, in a position that is counter-intuitive to the body. Once you are strong with this position, flipping and twisting movements and other bodily movements that occur in between upright and inverted all become much easier to execute.
Al of the same technique from the wall handstand applics, just without the wall. We are looking to develop the position on the floor, parallettes, and the rings as training progresses. We start on the floor because it is the safest, but as youstart to develop it on the other modalities it will actually become easier on the parallettes, because grip strength is much more advantageous. Rings handstands and one-arm handstands remain the true test of handstand ability.
What we are looking for is to reduce wobble in both of the dynamic and static senses. For dynamic motion, we want to be able to kick straight up to handstand without any wobbling. This takes massive amounts of practice to control correctly as the kick up force is hard to modulate. We do not want to under balance and come back down, but we also do not want to overbalance and have to compensate with hand alking or arching. Statically, we want to hit that solid handstand position and then make very few corrections with the wrists if at all possible. Your superior control will make it look good to anyone watching, and it takes far less energy than having to keep wobbling back and forth.
Once you have the position rock solid (developed through wall handstand training), achieving the freestanding handstand just requires consistent practice. Practice every day if you can.
This is an A level skill in the gymnastics code of points.
For those on the road to one-arm handstand, your first steps begin here.
Using the wall to assist with one-arm handstands rarely works. For some reason, people like to take pictures of their one-arm handstands against the wall. While it makes a cute photo, using the wall does not help much with the skill set required for a true one-armed handstand. Yes, building up the required strength and conditioning, especially in the shoulders and the wrists, which take the brunt of the pressures, can be done using the wall. However, they to not help with the balance that is the foundation upon which the one-arm handstand is built.
To start learning the one-arm handstand I would suggest a few requirements. A solid, straight-body handstand is highly recommended. The variation that is going to be mainly used to develop a one-arm handstand is a freestanding straddled handstand with a slow, progressive weight shift to one side. We use the straddled handstand because straddling the legs lowers your center of gravity, making the skill much easier to perform. With the legs spread, leverage to the left and right is increased, making it harder for you to sway either way and consequentially keeping you more stable. As you become more experienced you can close the legs for a harder challenge,
The straddle handstand requires that you have a solid handstand because the core is more apt to be unstable in this position, and you need the tight body position to learn the correct balance at the wrists. Specifically, finding the correct center of balance in the hands is critical to learning this skill. We reduce help in the straddled handstand by slowly removing fingers from the skill. First to go is the pinky. Follow that with the ring finger and continue until the thumb (and therefore the entire hand) is no longer helping.
Since the balance at the wrists is critical to learning the skill, increased grip strength will significantly speed up its development. The balance of the one-arm handstand is somewhere near the joint of the ring finger (depending on a one’s anthropometry), so strengthening the whole grip is fine but you will see more results from specifically strengthening the last three fingers of each hand.
Going back to our freestanding handstand, I would strongly suggest that this skill is practiced either on hand balancing implements or on a hard floor. It is much easier to hold control with fingertips that are being pressed into a solid floor, or hands that are squeezing very strongly on implements or parallettes.
The key for this move is exactly like the freestanding handstand, except after you balance in the straddle handstand you are going to really lock the shoulder in the active position (shoulder carmuf) and slowly shift your weight onto one-arm. Since you are shifting your weight, the weight on the other arm decreases and causes most people to come up on the fingertips of that hand. This is absolutely fine and will be used to slowly decrease the amount of hand used.
If you feel yourself wobbling through the rest of your body as you transition and weight shifts to a one-arm hold, then keep practicing. Remember, the critical component of learning to one-arm handstand is balancing the move directly through the wrists. If your body is wobbling back and forth through the core or legs then you are not going to correctly learn the balance for the technique; effectively making it harder and longer to acquire than need be.
We notice as we lean over that the center of gravity in the hand is going to shift over as well. As mentioned, the center of balance is going to be somewhere near the first ring finger joint. Thus, this natural progression of weight shifting in the planted hand is natural so it would be a good idea to get used o this feeling (and remember you can supplement with specific grip work as well). The ring and the pinky finger are going to be straining a lot to put force through to keep balance centered in that small area, so it is important to take care of your joints. If you start practicing this movement and get significant joint soreness it is important to realize this is natural, and that if the soreness is lasting you should take a break for a couple days to let the tissues heal. Not doing so may lead to overuse injuries.
This skill was not included in the chart, but if it was categorized it would be in this position.
This is more of a dynamic and intermediate balance skill. The goal of this exercise is to balance from side to side and release the opposing hand at each juncture. This can serve as both an excellent conditioning exercise and to get 2 good feel of dynamic stability in one-arm positions while maintaining adequate body tension.
These can be performed against the wall to conditioning for handstands, but proper care must be taken to not break form and close the shoulder angle or arch the back.
I would not say these are a critical component of learning how to do a one-arm handstand. However, they are a very good supplement in learning dynamic awareness, especially if you need to improve handstand body position mechanics or want to do handstand walking for distance in the future.
Handstand walking can be implemented as a good supplement to developing the one arm handstand. T did not recommend handstand walking at all before this point because maintaining the correct tight body technique is critical for learning this skill. However, now that you have been able to advance this far with solid handstand technique you should be ready to execute handstand walking without arching the handstand. This dynamic stability will help in your weight shift, which will ultimately help your one arm handstand.
This is also another variation on the way to work towards one-arm handstand. In this technique we progressively move the hands closer together and start biasing weight onto one-arm. Eventually, this technique yields a handstand with one-arm on top of the other which can then be lifted off slowly to do a one-arm handstand. This is not as measurable as the other variation, so it is not as effective to us in training. This technique can be included as a supplement.
The next phase is reducing the support on the non-planted hand. For the three-finger support most people are going to want to take off the ring finger from support and balance solely on the middle, index, and thumb.
There is not much difference from the four-finger phase to the three finger phase except more weight is distributed to the planted hand. Again, if you feel the core or legs losing tension and wobbling you need to practice holding your body tight.
Keeping the arm fully extended and shoulder girdle tight along with the rest of the body should allow You to keep your focus on weight being shifted to the planted hand. Most often bad form in this position is due to looseness in the legs, core, or shoulders. Do not let these affect your body position and you will easily progress through this.
Free Handstand 2 Fingers for One-Arm Support (Free HS 2 fingers) — Level 8
This is the next step in the transition towards the one-arm handstand. Usually the index and thumb are used or alternatively the index and middle finger are used. Either way is fine, and if you find that another combination of two fingers works then that is acceptable as well. There is going to be very little weight on these two fingers at this point, so most of the weight and balance will be on the side that is bearing more of the load.
Again, there is not much change here except for more lean. As you start leaning more you will find that the strength requirement increases holding the active shoulder position and maintaining balance. To reiterate, wrists can be helped with specific grip work. The shoulders are often not conditioned to handle one-arm constant holds. If this becomes a problem, conditioning such as the handstand shoulder taps may be a good option. However, most of the work to adapt to this skill should be done through the skill tself.
When you reach this stage, you are a single step away from the one-arm handstand. At this point most people use their index finger on the other hand for balance. Since a single finger can apply very litile balance in the forward / backward plane we will see that the planted hand is already doing most of the work. The single finger at this point is mostly just giving you a slight bit of lateral (left / right) stability. When the pinky on the primary hand is not strong enough to handle the balance yet or there is too much overcompensation, this extra finger is the difference between enough training volume and coming down 100 s00n.
After you reach this point, body positions are firmly ingrained into your body. Frequency and volume of practice is the name of the game from here on out.
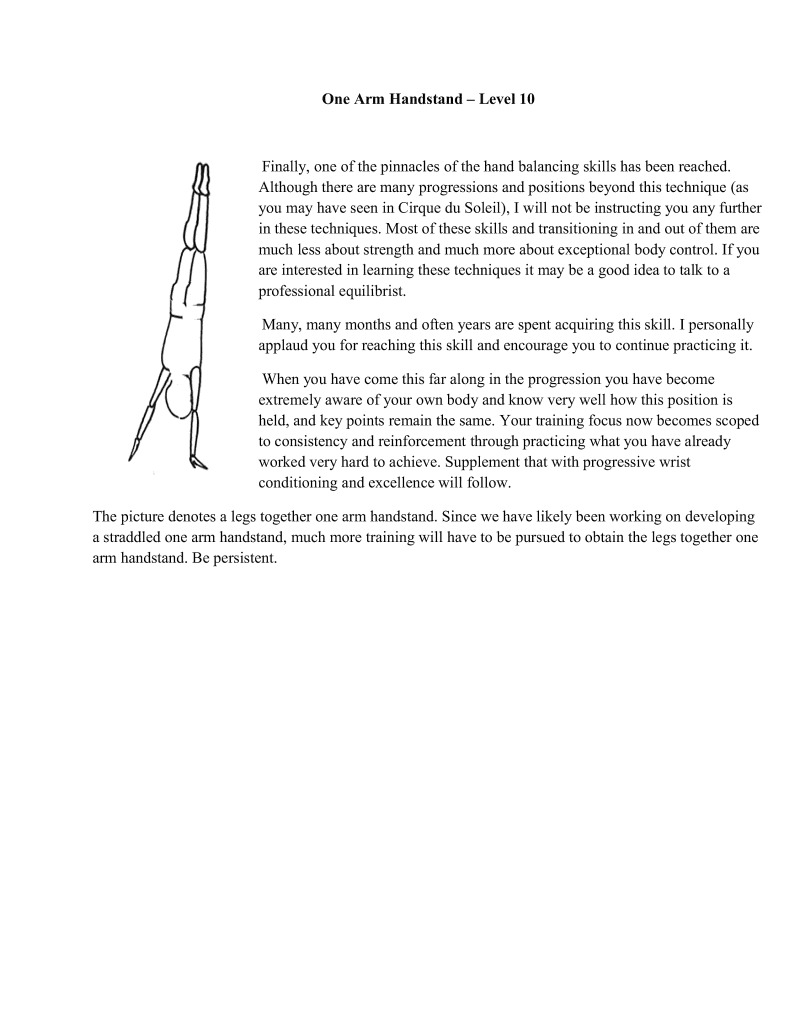
Finally, one of the pinnacles of the hand balancing skills has been reached. Although there are many progressions and positions beyond this technique (as you may have seen in Cirque du Soleil), I will not be instructing you any further in these techniques. Most of these skills and transitioning in and out of them are much less about strength and much more about exceptional body control. If you are interested in learning these techniques it may be a good idea to talk to a professional equilibri
Many, many months and often years are spent acquiring this skill. 1 personally applaud you for reaching this skill and encourage you to continue practicing it
When you have come this far along in the progression you have become extremely aware of your own body and know very well how this position is held, and key points remain the same. Your training focus now becomes scoped to consistency and reinforcement through practicing what you have already worked very hard to achieve. Supplement that with progressive wrist conditioning and excellence will follow.
The picture denotes a legs together one arm handstand. Since we have likely been working on developing a straddled one arm handstand, much more training will have to be pursued to obtain the legs together one arm handstand. Be persistent.
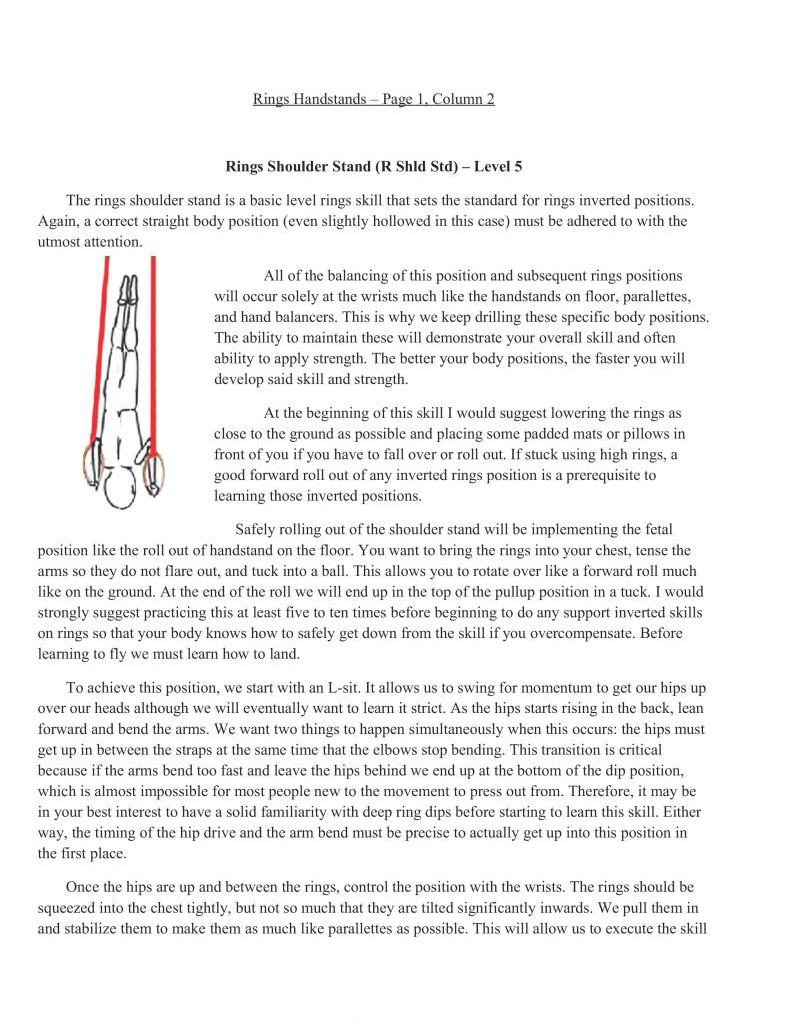
The rings shoulder stand is a basic level rings skill that sets the standard for rings inverted positions. Again, a correct straight body position (even slightly hollowed in this case) must be adhered to with the utmost attention.
All of the balancing of this position and subsequent rings positions will occur solely at the wrists much like the handstands on floor, parallettes, and hand balancers. This is why we keep drilling these specific body positions. The ability to maintain these will demonstrate your overall skill and often ability to apply strength. The better your body positions, the faster you will develop said skill and strength.
A the beginning of this skill I would suggest lowering the rings as close to the ground as possible and placing some padded mats or pillows in
front of you if you have to fall over or roll out. If stuck using high rings, a good forward roll out of any inverted rings position is a prerequisite to learning those inverted positions.
Safely rolling out of the shoulder stand will be implementing the fetal position like the roll out of handstand on the floor. You want to bring the rings into your chest, tense the arms so they do not flare out, and tuck into a ball. This allows you to rotate over like a forward roll much like on the ground. At the end of the roll we will end up in the top of the pullup position in a tuck. I would strongly suggest practicing this at least five to ten times before beginning to do any support inverted skills on rings is that your body knows how to safely get down from the skill if you overcompensate. Before learning to fly we must learn how to land,
To achieve this position, we start with an L-sit. It allows us to swing for momentum to get our hips up over our heads although we will eventually want to learn it strict. As the hips starts rising in the back, lean forward and bend the arms. We want two things to happen simultaneously when this occurs: the hips must getup in between the straps at the same time that the elbows stop bending. This transition is critical because if the arms bend too fast and leave the hips behind we end up at the bottom of the dip position, which is almost impossible for most people new to the movement to press out from. Thercfore, it may be in your best interest to have a solid familiarity with deep ring dips before starting to learn this skill. Either way, the timing of the hip drive and the arm bend must be precise to actually get up into this position in the first place,
Once the hips are up and between the rings, control the position with the wrists. The rings should be squeezed into the chest tightly, but not so much that they are tilted significantly inwards. We pull them in and stabilize them to make them as much like paralletres as possible. This will allow us to execute the skill
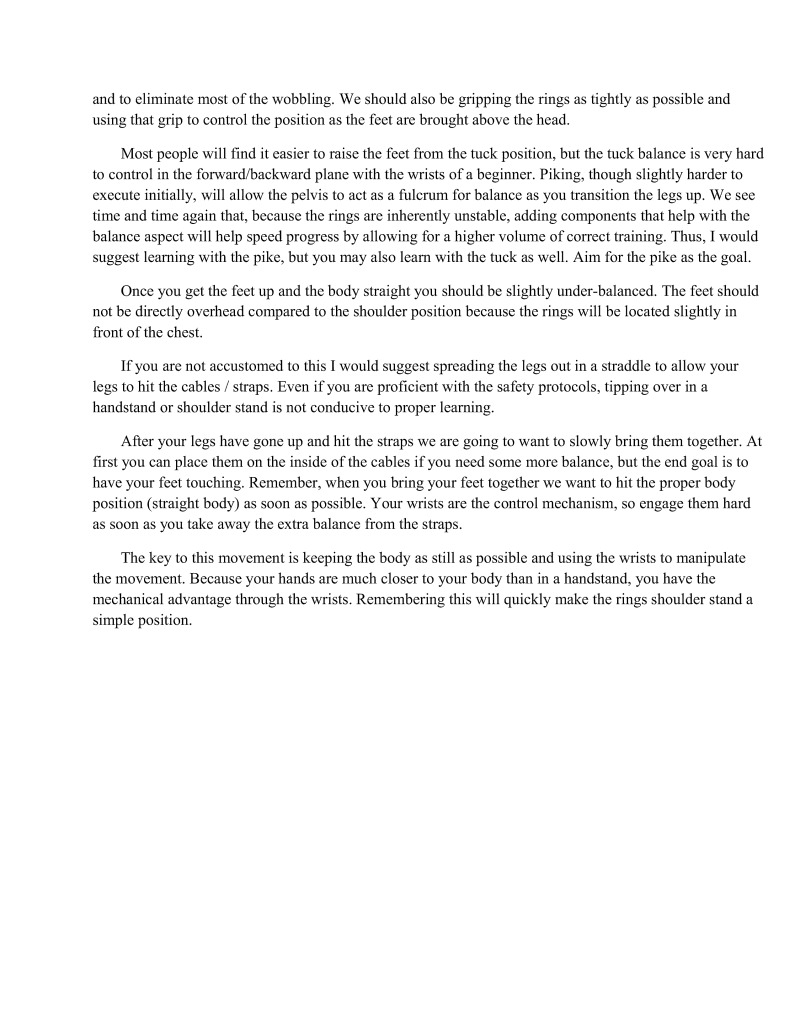
and to eliminate most of the wobbling. We should also be gripping the rings as tightly as possible and using that grip to control the position as the feet are brought above the head.
Most people will find it easier to raise the feet from the tuck position, but the tuck balance is very hard to control in the forward/backward plane with the wrists of a beginner. Piking, though slightly harder to execute initially, will allow the pelvis to act as a fulcrum for balance as you transition the legs up. We see time and time again that, because the rings are inherently unstable, adding components that help with the balance aspect will help speed progress by allowing for a higher volume of correct training. Thus, I would suggest learning with the pike, but you may also learn with the tuck as well. Aim for the pike as the goal.
Once you get the feet up and the body straight you should be slightly under-balanced. The feet should not be directly overhead compared to the shoulder position because the rings will be located slightly in front of the chest
If you are not aceustomed to this I would suggest spreading the legs out in a straddle to allow your legs to hit the cables / straps. Even if you are proficient with the safety protocols, tipping over in a handstand or shoulder stand is not conducive to proper learning
after your legs have gone up and hit the straps we are going to want to slowly bring them together. At first you can place them on the inside of the cables if you need some more balance, but the end goal is to have your feet touching. Remember, when you bring your feet together we want to hit the proper body position (straight body) as soon as possible. Your wrists are the control mechanism, so engage them hard as soon as you take away the extra balance from the straps.
The key to this movement is keeping the body as still as possible and using the wrists to manipulate the movement. Because your hands are much closer to your body than in a handstand, you have the mechanical advantage through the wrists. Remembering this will quickly make the rings shoulder stand a simple position,
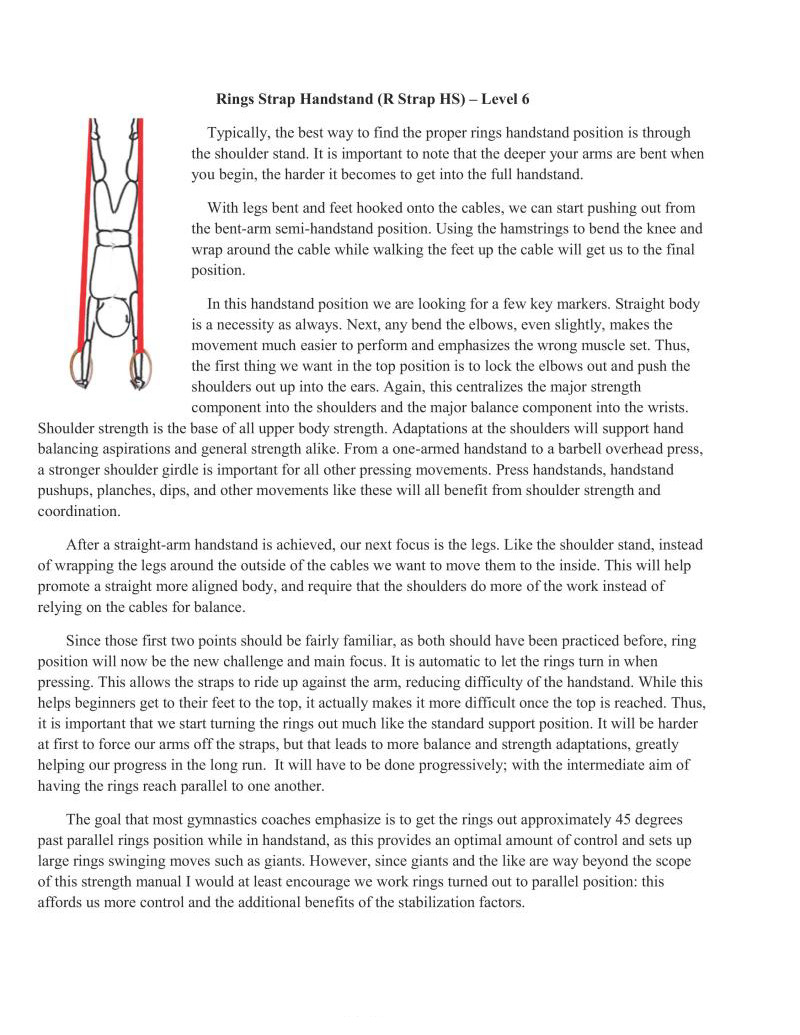
Typically, the best way to find the proper rings handstand position is through the shoulder stand. It is important to note that the deeper your arms are bent when you begin, the harder it becomes to get into the full handstand,
With legs bent and feet hooked onto the cables, we can start pushing out from the bent-arm semi-handstand position. Using the hamstrings to bend the knee and wrap around the cable while walking the feet up the cable will get us to the final position.
In this handstand position we are looking for a few key markers. Straight body is a necessity as always. Next, any bend the elbows, even slightly, makes the movement much easier to perform and emphasizes the wrong muscle set. Thus, the first thing we want in the top position is to lock the elbows out and push the shoulders out up into the cars. Again, this centralizes the major strength component into the shoulders and the major balance component into the wrists. Shoulder strength is the base of all upper body strength. Adaptations at the shoulders will support hand balancing aspirations and general strength alike. From a one-armed handstand to a barbell overhead press, a stronger shoulder girdle is important for all other pressing movements. Press handstands, handstand pushups, planches, dips, and other movements like these will all benefit from shoulder strength and coordination.
After a straight-arm handstand is achieved, our next focus is the legs. Like the shoulder stand, instead of wrapping the legs around the outside of the cables we want to move them to the inside. This will help promote a straight more aligned body, and require that the shoulders do more of the work instead of relying on the cables for balance.
Since those first two points should be fairly familiar, as both should have been practiced before, ring position will now be the new challenge and main focus. It is automatic to let the rings turn in when pressing. This allows the straps to ride up against the arm, reducing difficulty of the handstand. While this helps beginners get to their feet to the top, it actually makes it more difficult once the top is reached. Thus, it is important that we start tuming the rings out much like the standard support position. It will be harder at first to force our arms off the straps, but that leads to more balance and strength adaptations, greatly helping our progress in the long run. It will have to be done progressively; with the intermediate aim of having the rings reach parallel to one another.
The goal that most gymnastics coaches emphasize is to get the rings out approximately 43 degrees past parallel rings position while in handstand, as this provides an optimal amount of control and sets up large rings swinging moves such as giants. However, since giants and the like are way beyond the scope of this strength manual I would at least encourage we work rings turned out to parallel position: this affords us more control and the additional benefits of the stabilization factors.
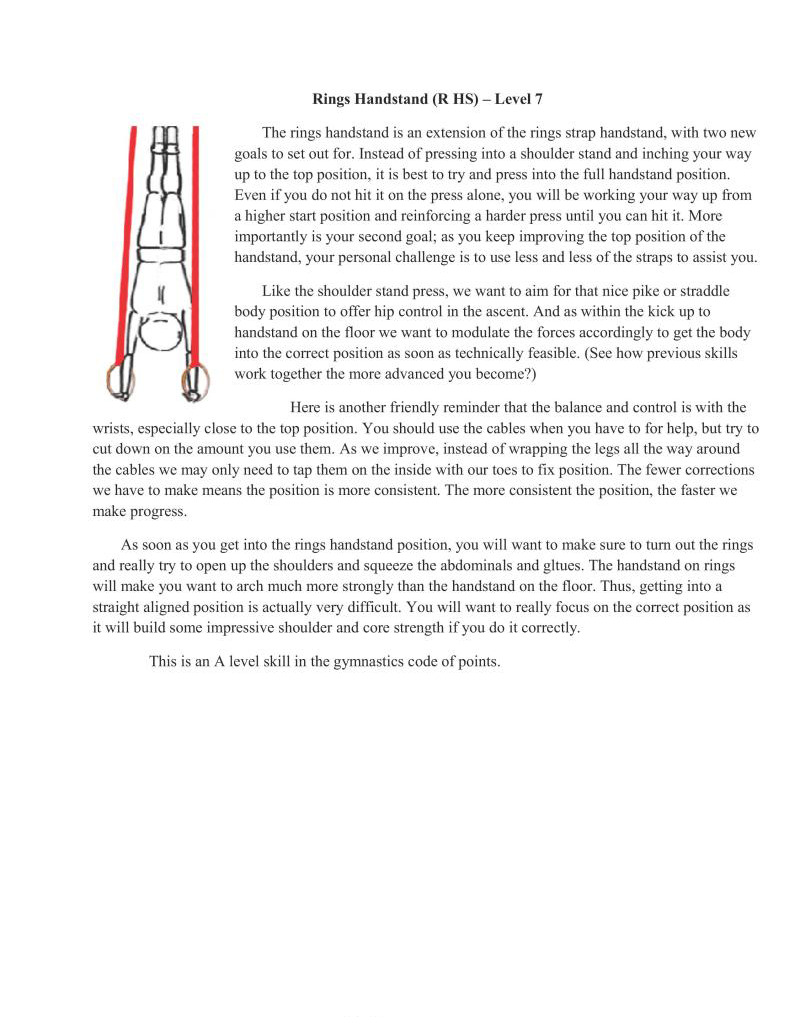
The rings handstand is an extension of the rings strap handstand, with two new goals to set out for. Instead of pressing into a shoulder stand and inching your way up to the top position, it is best to try and press into the full handstand position. Even if you do not hit it on the press alone, you will be working your way up from a higher start position and reinforcing a harder press until you can hit it. More importantly is your second goal; as you keep improving the top position of the handstand, your personal challenge is to use less and less of the straps to as you.
I Like the shoulder stand press, we want to aim for that nice pike or straddle body position to offer hip control in the ascent. And as within the kick up to handstand on the floor we want to modulate the forces accordingly to get the body into the correct position as soon as technically feasible. (See how previous skills work together the more advanced you become?)
Here is another friendly reminder that the balance and control is with the wrists, especially close to the top position. You should use the cables when you have to for help, but try to cut down on the amount you use them. As we improve, instead of wrapping the legs all the way around the cables we may only need to tap them on the inside with our toes to fix position. The fewer corrections tent the position, the faster we make progrss
we have to make means the position is more consistent. The more con:
As s00n as you get into the rings handstand position, you will want to make sure to tum out the rings and really try to open up the shoulders and squeeze the abdominals and gltues. The handstand on rings will make you want to arch much more strongly than the handstand on the floor. Thus, getting straight aligned position is actually very difficult. You will want to really focus on the correct position as it will build some impressive shoulder and core strength if you do it correctly.
This is an A level skill in the gymnastics code of points.
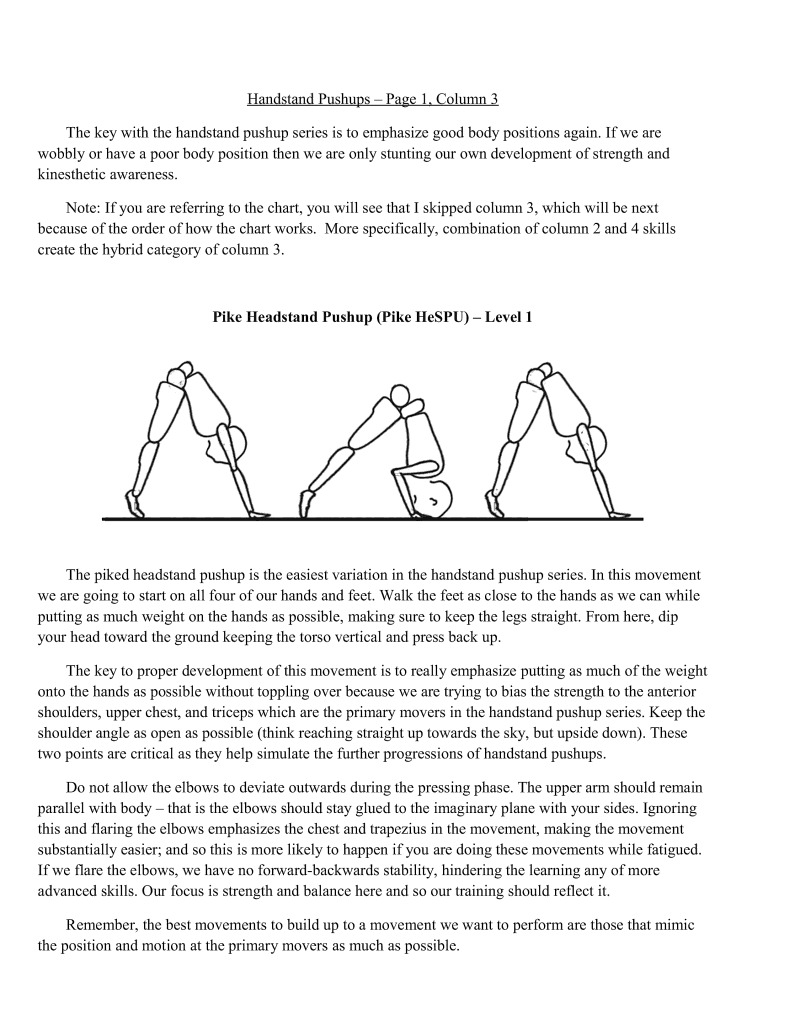
The key with the handstand pushup series is to emphasize good body positions again. If we are wobbly or have a poor body position then we are only stunting our own development of strength and kinesthetic awareness
Note: If you are referring to the chart, you will see that I skipped column 3, which will be next because of the order of how the chart works. More specifically, combination of column 2 and 4 skills create the hybrid category of column 3.
The piked headstand pushup is the easiest variation in the handstand pushup series. In this movement we are going to start on all four of our hands and feet. Walk the feet as close to the hands as we can while putting as much weight on the hands as possible, making sure to keep the legs straight. From here, dip your head toward the ground keeping the torso vertical and press back up
The key to proper development of this movement is to really emphasize putting as much of the weight onto the hands as possible without toppling over because we are trying to bias the strength to the anterior shoulders, upper chest, and triceps which are the primary movers in the handstand pushup series. Keep the shoulder angle as open as possible (think reaching straight up towards the sky, but upside down). These two points are critical as they help simulate the further progressions of handstand pushups.
Do not allow the elbows to deviate outwards during the pressing phase. The upper arm should remain parallel with body — that is the elbows should stay glued to the imaginary plane with your sides. Ignoring this and flaring the elbows emphasizes the chest and trapezius in the movement, making the movement substantially easier; and so this is more likely to happen if you are doing these movements while fatigued. If we flare the elbows, we have no forward-backwards stability, hindering the learning any of more advanced skills. Our focus is strength and balance here and so our training should reflect it
Remember, the best movements to build up to 2 movement we want to perform are those that mimic the position and motion at the primary movers as much as possible.
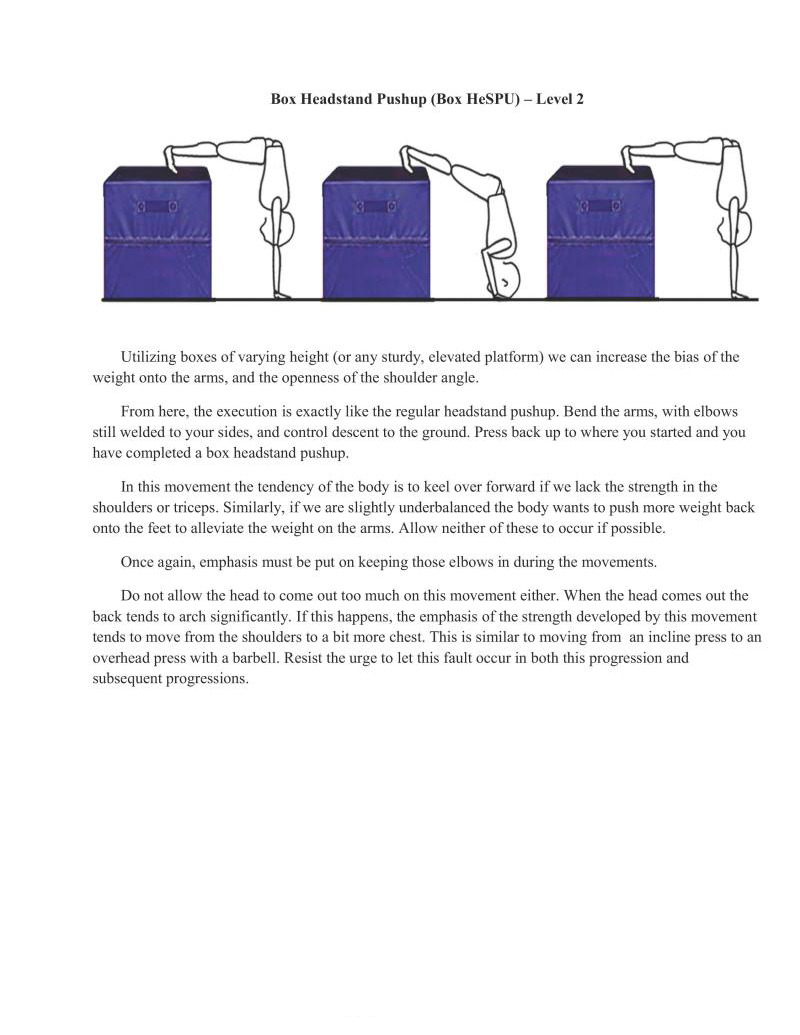
Utilizing boxes of varying height (or any sturdy, elevated platform) we can increase the bias of the weight onto the arms, and the openness of the shoulder angle.
From here, the execution is exactly like the regular headstand pushup. Bend the arms, with elbows. still welded to your sides, and control descent to the ground. Press back up to where you started and you have completed a box headstand pushup.
In this movement the tendency of the body is to kel over forward if we lack the strength in the shoulders or triceps. Similarly, if we are slightly underbalanced the body wants to push more weight back onto the feet to alleviate the weight on the arms. Allow neither of these to occur if possible.
Once again, emphasis must be put on keeping those elbows in during the movements.
Do not allow the head to come out too much on this movement either. When the head comes out the back tends to arch significantly. If this happens, the emphasis of the strength developed by this movement tends to move from the shoulders to a bit more chest. This is similar to moving from an incline press to an overhead press with a barbell. Resist the urge to let this fault occur in both this progression and subsequent progressions.
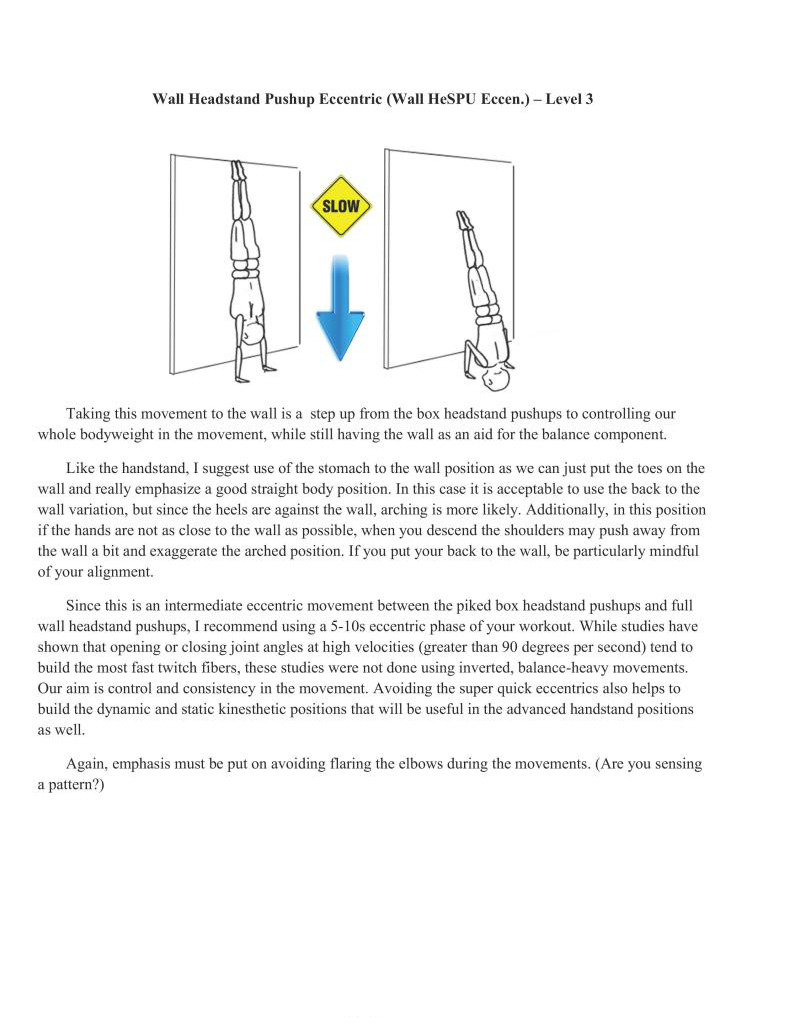
Taking this movement to the wall is a step up from the box headstand pushups to controlling our whole bodyweight in the movement, while still having the wall as an aid for the balance component.
Like the handstand, I suggest use of the stomach to the wall position as we can just put the toes on the wall and really emphasize a good straight body position. In this case it is acceptable to use the back to the
wall variation, but since the heels are against the wall, arching is more likely. Additionally, in this position if the hands are not as close to the wall as possible, when you descend the shoulders may push away from the wall a bit and exaggerate the arched position. If you put your back to the wall, be particularly mindful of your alignment.
Since this is an intermediate eccentric movement between the piked box headstand pushups and full wall headstand pushups, I recommend using a 5-10s eccentric phase of your workout, While studies have shown that opening or closing joint angles at high velocities (greater than 90 degrees per second) tend to build the most fast twitch fibers, these studies were not done using inverted, balance-heavy movements Our aim is control and consistency in the movement. Avoiding the super quick eccentrics also helps to build the dynamic and static kinesthetic positions that will be useful in the advanced handstand positions as well.
Again, emphasis must be put on avoiding flaring the elbows during the movements. (Are you sensing a pattern?)
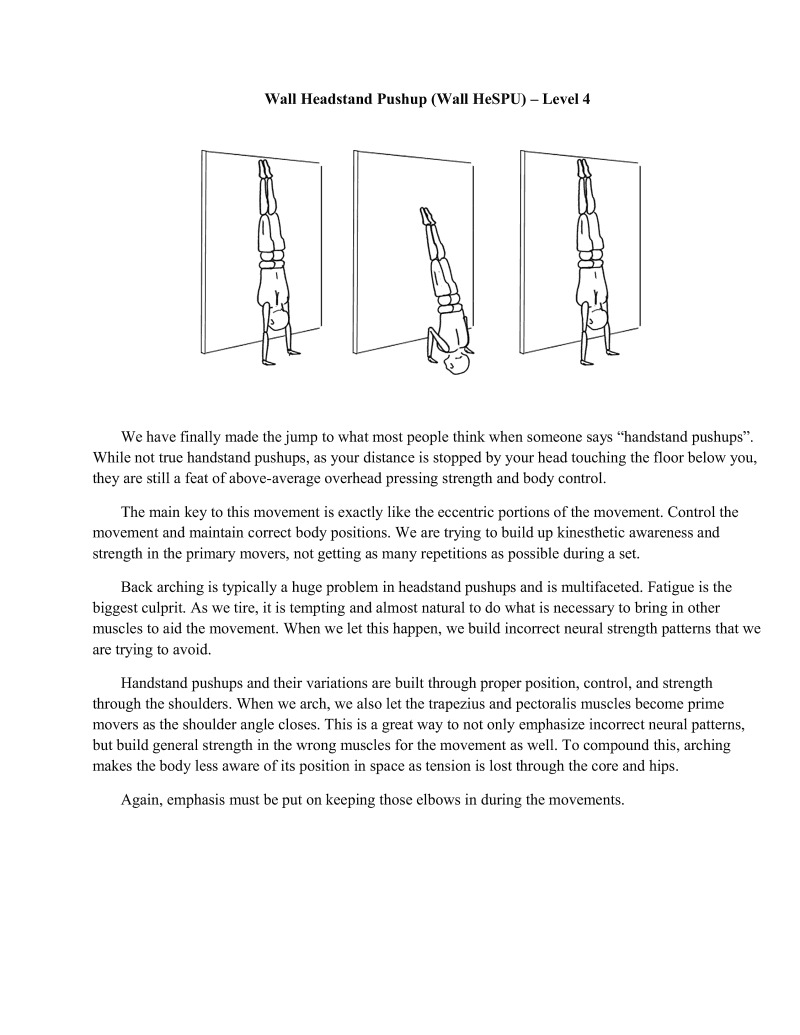
We have finally made the jump to what most people think when someone says "handstand pushups". While not true handstand pushups, as your distance is stopped by your head touching the floor below you, they are still a feat of above-average overhead pressing strength and body control.
The main key to this movement is exactly like the eccentric portions of the movement. Control the movement and maintain correct body positions. We are trying to build up kinesthetic awareness and strength in the primary movers, not getting as many repetitions as possible during a set.
Back arching is typically a huge problem in headstand pushups and is multifaceted. Fatigue is the biggest culprit. As we tire, it is tempting and almost natural to do what is necessary to bring in other muscles to aid the movement. When we let this happen, we build incorrect neural strength patterns that we are trying to avoid.
Handstand pushups and their variations are built through proper position, control, and strength through the shoulders. When we arch, we also let the trapezius and pectoralis muscles become prime movers as the shoulder angle closes. This is a great way to not only emphasize incorrect neural patterns, but build general strength in the wrong muscles for the movement as well. To compound this, arching makes the body less aware of its position in space as tension is lost through the core and hips.
Again, emphasis must be put on keeping those elbows in during the movements.
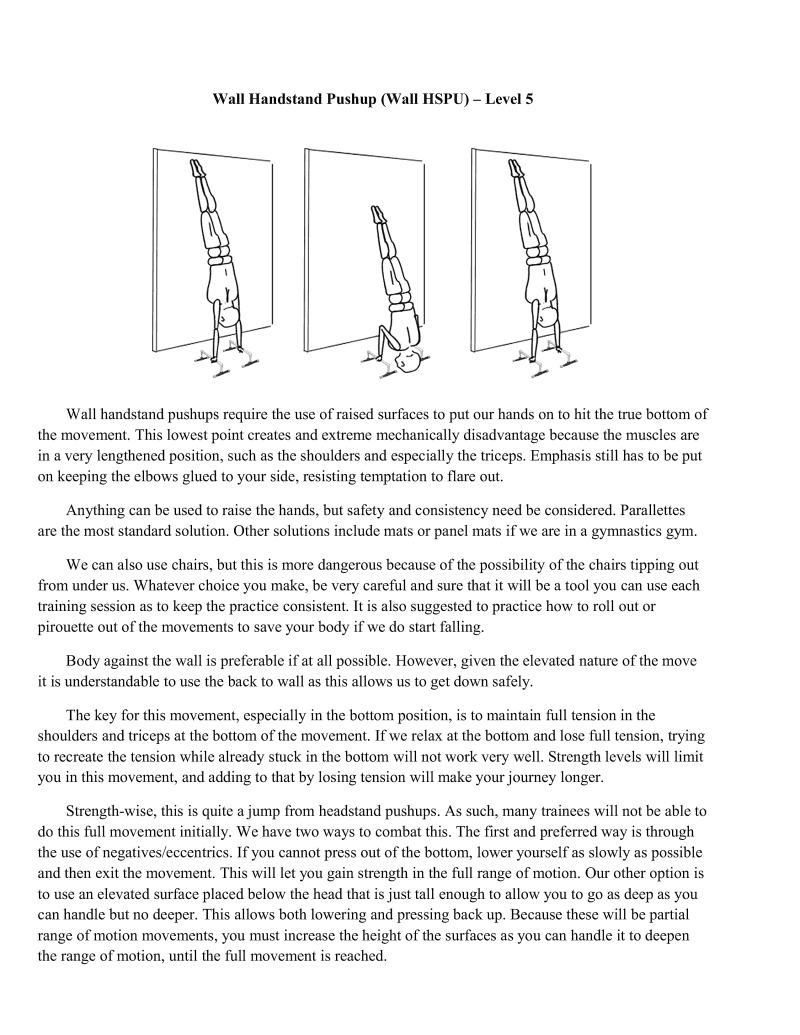
Wall handstand pushups require the use of raised surfaces to put our hands on to hit the true bottom of the movement. This lowest point creates and extreme mechanically disadvantage because the muscles are in a very lengthened position, such as the shoulders and especially the triceps. Emphasis still has to be put on keeping the elbows glued to your side, resisting temptation to flare out.
Anything can be used to raise the hands, but safety and consistency need be considered. Parallettes are the most standard solution. Other solutions include mats or panel mats if we are in a gymnastics gym.
We can also use chairs, but this is more dangerous because of the possibility of the chairs tipping out from under us. Whatever choice you make, be very careful and sure that it will be a tool you can use each training session as to keep the practice consistent. It is also suggested to practice how to roll out or pirouete out of the movements to save your body if we do start falling.
Body against the wall is preferable if at all possible. However, given the elevated nature of the move it is understandable to use the back to wall as this allows us to get down safely.
The key for this movement, especially in the bottom position, is to maintain full tension in the shoulders and triceps at the bottom of the movement. If we relax at the bottom and lose full tension, trying 10 recreate the tension while already stuck in the bottom will not work very well. Strength levels will limit You in this movement, and adding to that by losing tension will make your journey longer.
Strength-wise, this is quite a jump from headstand pushups. As such, many trainees will not be able to do this full movement initially. We have two ways to combat this. The first and preferred way is through the use of negatives/eccentrics. If you cannot press out of the bottom, lower yourself as slowly as possible and then exit the movement. This will let you gain strength in the full range of motion. Our other option is to use an elevated surface placed below the head that is just tall enough to allow you to go as deep as you can handle but no deeper. This allows both lowering and pressing back up. Because these will be pa range of motion movements, you must increase the height of the surfaces as you can handle it to decpen the range of motion, until the full movement is reached.
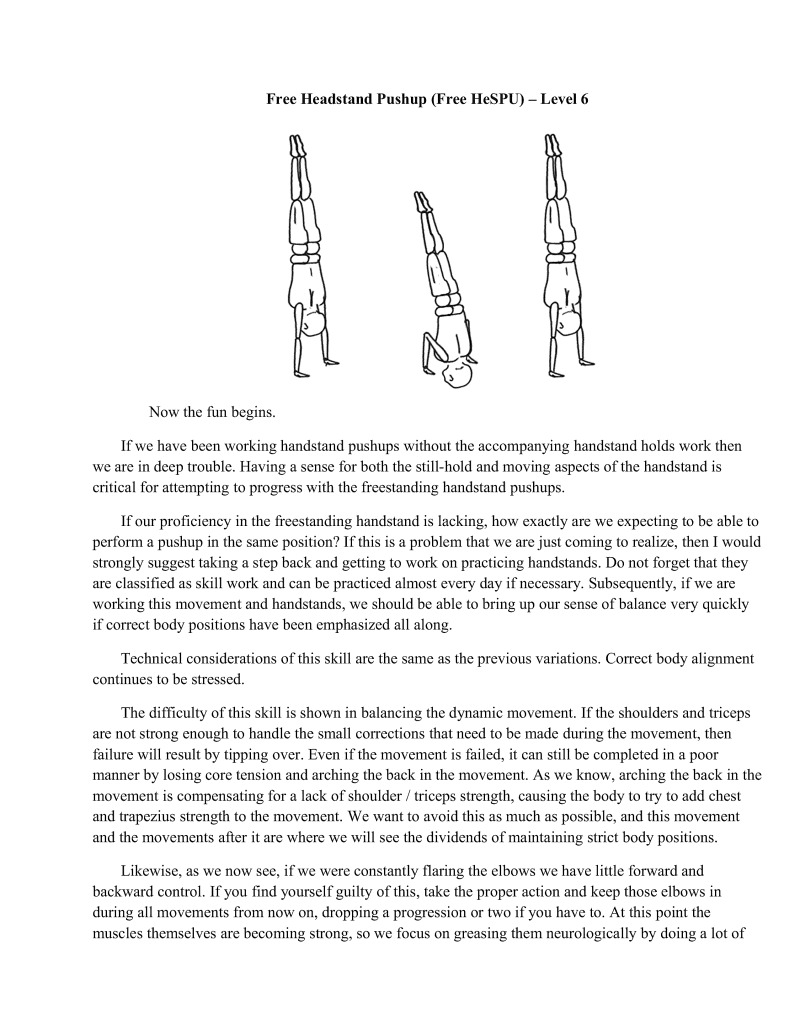
Now the fun begins.
If we have been working handstand pushups without the accompanying handstand holds work then we are in deep trouble. Having a sense for both the still-hold and moving aspects of the handstand is critical for attempting to progress with the freestanding handstand pushups.
If our proficiency in the freestanding handstand is lacking, how exactly are we expecting to be able to perform a pushup in the same position? If this is a problem that we are just coming to realize, then I would strongly suggest taking a step back and getting to work on practicing handstands. Do not forget that they are classified as skill work and can be practiced almost every day if necessary. Subsequently, if we are working this movement and handstands, we should be able to bring up our sense of balance very quickly if correct body positions have been emphasized all along.
Technical considerations of this skill are the same as the previous variations. Correct body alignment continues to be stressed.
The difficulty of this skill is shown in balancing the dynamic movement. If the shoulders and triceps are not strong enough to handle the small corrections that need to be made during the movement, then failure will result by tipping over. Even if the movement is failed, it can still be completed in a poor manner by losing core tension and arching the back in the movement. As we know, arching the back in the movement is compensating for a lack of shoulder / triceps strength, causing the body to try to add chest and trapezius strength to the movement. We want to avoid this as much as possible, and this movement and the movements after it are where we will see the dividends of maintaining strict body positions.
Likewise, as we now see, if we were constantly flaring the elbows we have little forward and backward control. If you find yourself guilty of this, take the proper action and keep those elbows in during all movements from now on, dropping a progression or two if you have to. At this point the muscles themselves are becoming strong, so we focus on greasing them neurologically by doing a lot of

the new correct technique. Though, due to the increased difficulty, strength gains with proper form may take a bit longer.
Allowing weight to be put on the head when we touch the ground is unwanted. This lets us stabilize the headstand position before pushing out. We absolutely do not want to do this because it ignores the need for control deep down near the bottom of the movement. Eliminating that balance will blunt progressions of other higher-level strength skills later on.
Aim to avoid putting any weight on the head in the bottom of the position besides brushing it on the ground. Maintain correct arm, elbow, and body position and given the strength and balance this movement will come. Then we can impress our friends with a nice clean handstand pushup instead of looking like we are flailing around everywhere.
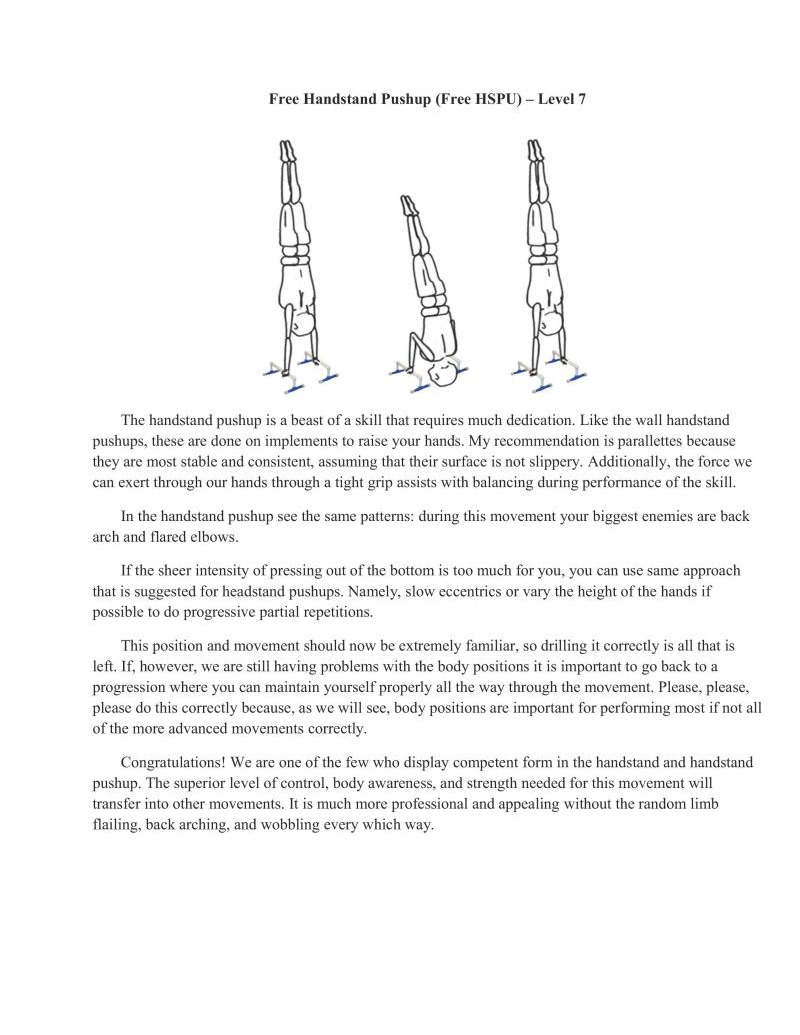
The handstand pushup I that requires much dedication. Like the wall handstand pushups, these are done on implements to raise your hands. My recommendation is paralleties because they are most stable and consistent, assuming that their surface is not slippery. Additionally, the force we can exert through our hands through a tight grip assists with balancing during performance of the skill.
In the handstand pushup see the same pattens: during this movement your biggest enemies are back arch and flared elbows.
I the sheer intensity of pressing out of the bottom is too much for you, you can use same approach that is suggested for headstand pushups. Namely, slow eccentrics or vary the height of the hands if possible to do progressive partial repetitions.
This position and movement should now be extremely familiar, so drilling it correctly is all that is left. If, however, we are still having problems with the body positions it is important to go back to a progression where you can maintain yourself properly all the way through the movement. Please. please, please do this corretly because, as we will see, body positions are important for performing most if not all of the more advanced movements correctly.
Congratulations! We are ane of the few who display competent form in the handstand and handstand pushup. The superior level of control, body awareness, and strength needed for this movement will transfer into other movements. It is much more professional and appealing without the random limb flailing, back arching, and wobbling every which way.
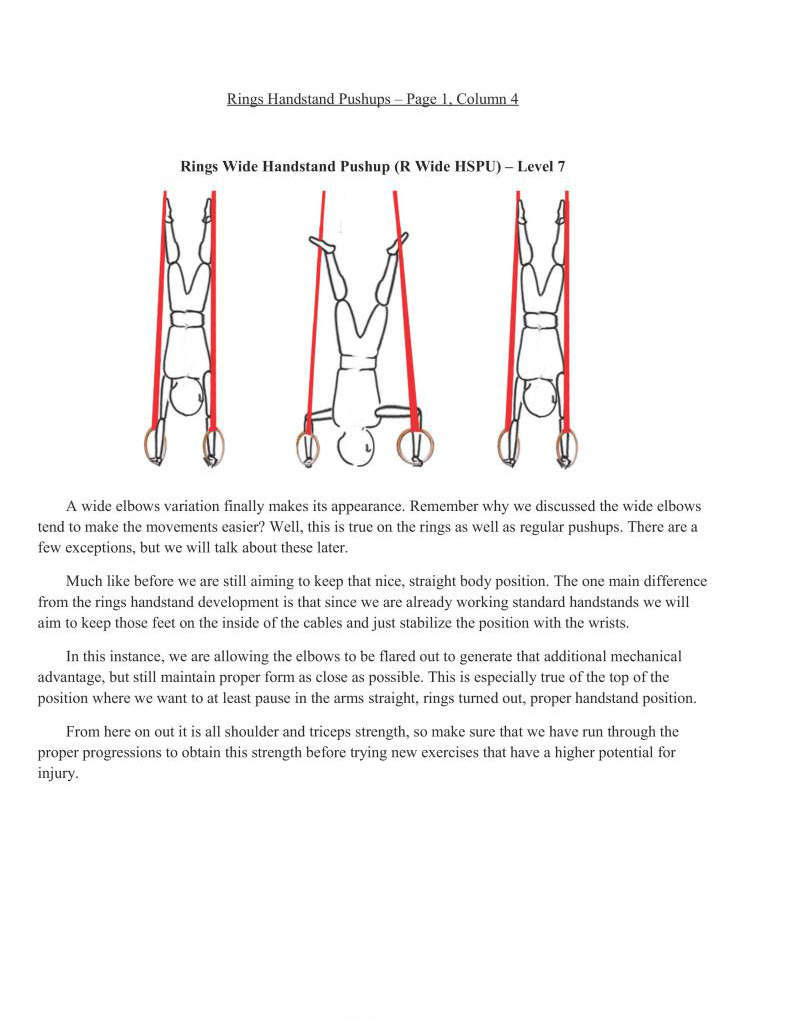
A wide elbows variation finally makes its appearance. Remember why we discussed the wide elbows
tend to make the movements easier? Well, this is true on the rings as well as regular pushups. There are a few exceptions, but we will talk about these later.
Much like before we are still aiming to keep that nice, straight body position. The one main difference from the rings handstand development is that since we are already working standard handstands we will aim to keep those feet on the inside of the cables and just stabilize the position with the wrists.
In this instance, we are allowing the elbows to be flared out to generate that additional mechanical advantage, but still maintain proper form as close as possible. This is especially true of the top of the position where we want to at least pause in the arms straight, rings turned out, proper handstand position.
From here on out it is all shoulder and triceps strength, so make sure that we have run through the proper progressions to obtain this strength before trying new exercises that have a higher potential for injury.
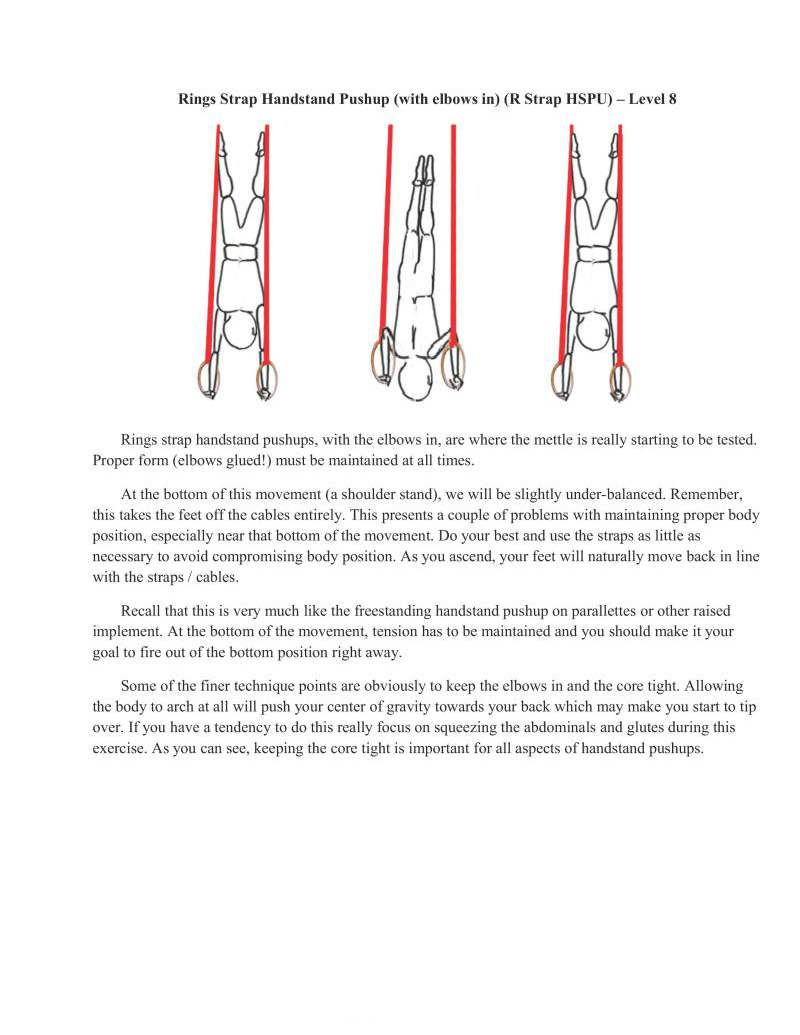
Rings strap handstand pushups, with the elbows in, are where the mettle is really starting to be tested.
Proper form (elbows glued!) must be maintained at all times.
At the bottom of this movement (a shoulder stand), we will be slightly under-balanced. Remember, this takes the feet off the cables entirely. This presents a couple of problems with maintaining proper body position, especially near that bottom of the movement, Do your best and use the straps as litrle as necessary to avoid compromising body position. As you ascend, your feet will naturally move back in line with the straps / cables.
Recall that this is very much like the freestanding handstand pushup on parallettes or other raised implement. At the bottom of the movement, tension has to be maintained and you should make it your goal to fire out of the bottom position right away.
Some of the finer technique points are obviously to keep the elbows in and the core tight. Allowing the body to arch at all will push your center of gravity towards your back which may make you start to tip over. If you have a tendency to do this really focus on squeezing the abdominals and glutes during this excreise. As you can see, keeping the core tight is important for all aspects of handstand pushups.
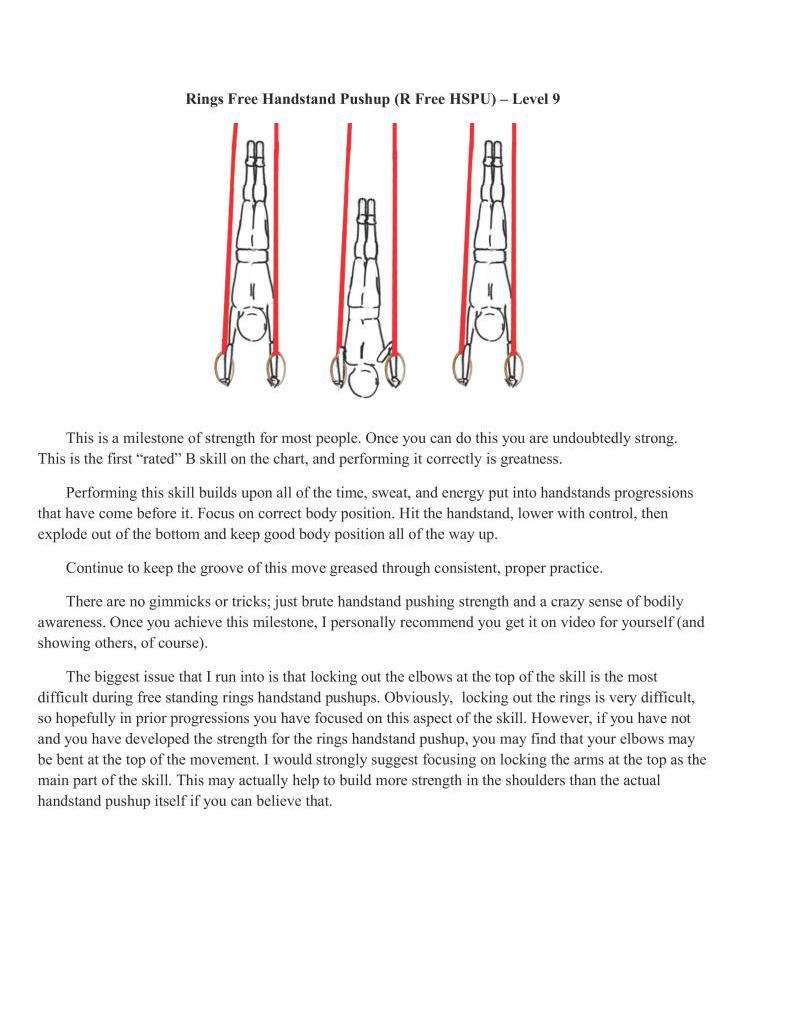
This is a milestone of strength for most people. Once you can do this you are undoubtedly strong. This is the first "rated" B skill on the chart, and performing it correctly is greatness.
Performing this skill builds upon all of the time, sweat, and energy put into handstands progressions that have come before it. Focus on correct body position. Hit the handstand, lower with control, then explode out of the bottom and keep good body position all of the way up.
Continue to keep the groove of this move greased through consistent, proper practice.
There are no gimmicks or tricks; just brute handstand pushing strength and a crazy sense of bodily awareness. Once you achieve this milestone, I personally recommend you get it on video for yourself (and showing others, of course).
The biggest issue that I run into is that locking out the elbows at the top of the skill is the most difficult during free standing rings handstand pushups. Obviously, locking out the rings is very difficult, so hopefully in prior progressions you have focused on this aspect of the skill. However, if you have not and you have developed the strength for the rings handstand pushup, you may find that your elbows may be bent at the top of the movement. I would strongly suggest focusing on locking the arms at the top as the main part of the skill. This may actually help to build more strength in the shoulders than the actual handstand pushup itself if you can believe that.
1 put the press right afer the handstand pushups categories because it strongly relates to these types of skills.
A true freestanding handstand pushup will typically be about 85-95% of a bodyweight press. This is because the weight of the arms is not factored into the weight of the handstand pushup
Both sets of skills require good core strength and control, but they are a bit different. Obviously, pushing the bodyweight in an inverted position is not exactly like pushing your bodyweight overhead.
1 think the main thing to keep in mind is that you will get better at what you practice the most. There is some good translation from both skills because they involve pressing weight over your head. But there are no hard-set numbers that correlate from one to another.
This strength "connection" was just to give you an idea of what you may expect in regards to pres strength if you were to train both simultaneously. Individual anthropometry plays a role as well. For example, those with longer bodies may have a harder time controlling a freestanding handstand pushup.
The most important factor in how good you are at an exercise is how much you practice the exercise in question. In this respect, you will be better at what you do more. But if you need some supplementary work for one skill or the other these two progressions relate to each other fairly well.

Bent arm press handstands are a series of skills that everyone seems to want to learn. Just like the other handstand work (and all movements, really), proper care must be taken to learn and continually reinforce good technique.
A proficient handstand is required before beginning to learn this movement. If we cannot hold the handstand, how exactly will we make it up to the ending position — a handstand — without falling over?
That said, we are learning this position from either a bent arm straddle or a bent arm pike position. Tucking is not preferred. It makes the beginning of the movement slightly easier, but once the legs are starting to be extended it is much more unstable than straight legs throughout, In the context of progression and consistency. ignoring straight legs now will only mean trying to learn them later when the intensity is already higher on its own. Typically it ends in having to switch to a lower progression anyway, 50 bite the bullet and put the work in from the start.
Wrist control will always be crucial in any handbalancing feat, and these movements are no exception. Firmly plant the hands on the floor with fingers extended, ready to give feedback and control.
Initially, balancing the skill will be difficult, and it is likely that forward rolling out of the skill will happen. Our aim is to completely avoid this, but be prepared for it to happen if you significantly lose your balance forwards
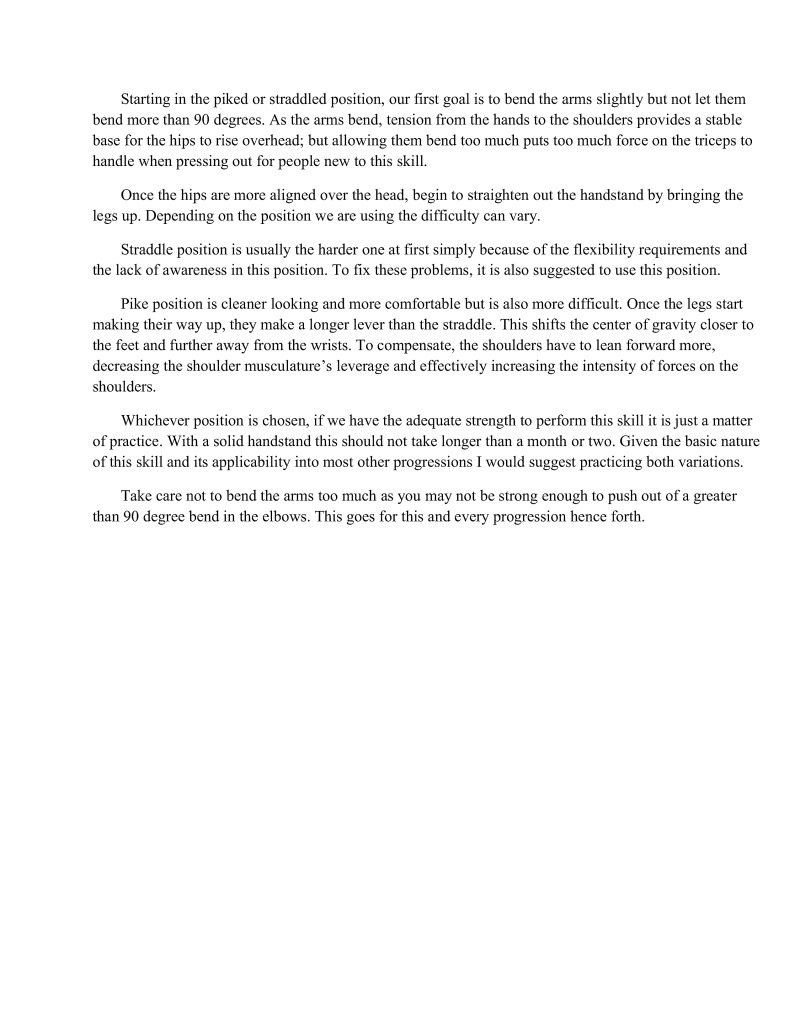
Starting in the piked or straddled position, our first goal is to bend the arms slightly but not let them bend more than 90 degrees. As the arms bend, tension from the hands to the shoulders provides a stable base for the hips to rise overhead; but allowing them bend too much puts too much force on the triceps to handle when pressing out for people new to this skill,
Once the hips are more aligned over the head, begin to straighten out the handstand by bringing the legs up. Depending on the position we are using the difficulty can vary.
Straddle position is usually the harder one at first simply because of the flexibility requirements and the lack of awareness in this position. To fix these problems, it is also suggested to use this position.
Pike position is cleaner looking and more comfortable but is also more difficult. Once the legs start making their way up, they make a longer lever than the straddle. This shifts the center of gravity closer to the feet and further away from the wrists. To compensate, the shoulders have to lean forward more, decreasing the shoulder musculature’s leverage and effectively increasing the intensity of forces on the shoulders
Whichever position is chosen, if we have the adequate strength to perform this skill it is just a matter of practice. With a solid handstand this should not take longer than a month or two. Given the basic naturc of this skill and its applicability into most other progressions I would suggest practicing both variations.
Take care not to bend the arms too much as you may not be strong enough to push out of a greater than 90 degree bend in the elbows. This goes for this and every progression hence forth.
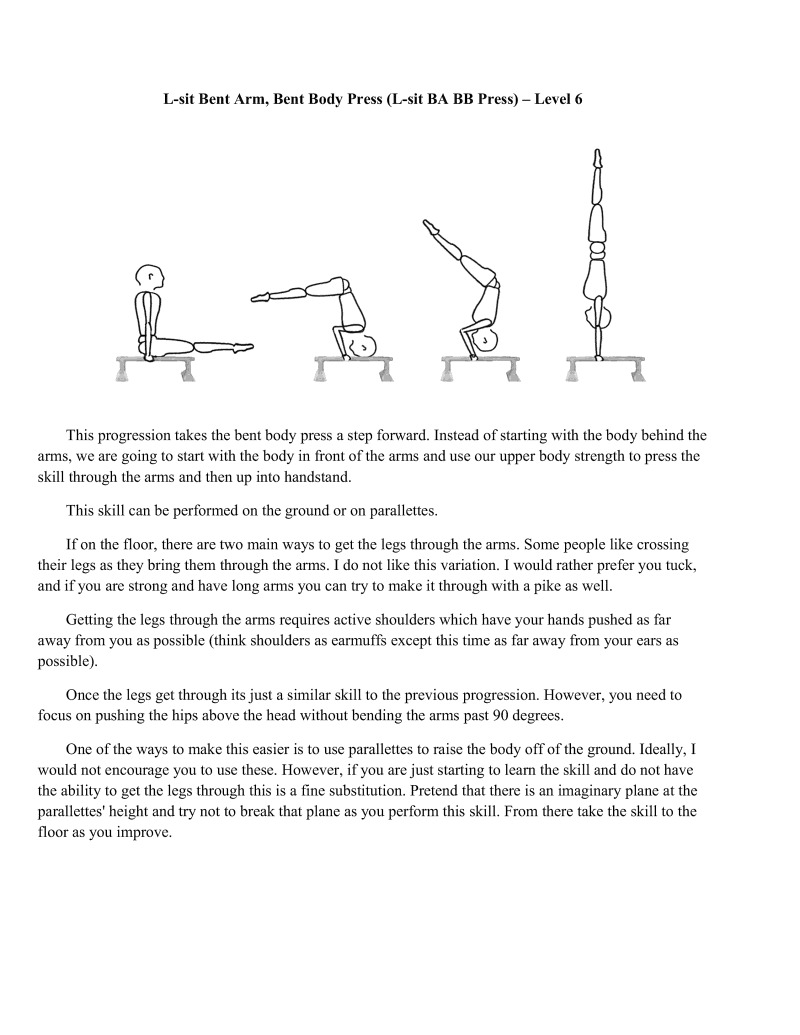
This progression takes the bent body press a step forward. Instead of starting with the body behind the arms, we are going to start with the body in front of the arms and use our upper body strength to press the skill through the arms and then up into handstand.
This skill can be performed on the ground or on paralletics.
If on the floor, there are two main ways to get the legs through the arms. Some people like crossing their legs as they bring them through the arms. I do not like this variation. I would rather prefer you tuck, and if you are strong and have long arms you can try to make it through with a pike as well.
Getting the legs through the arms requires active shoulders which have your hands pushed as far away from you as possible (think shoulders as carmuffs except this time as far away from your ears as possible).
Once the legs get through its just a similar skill to the previous progression. However, you need to focus on pushing the hips above the head without bending the arms past 90 degrees.
One of the ways to make this easier is to use parallettes to raise the body off of the ground. Ideally, I would not encourage you to use these. However, if you are just starting to learn the skill and do not have the ability to get the legs through this is a fine substitution. Pretend that there is an imaginary plane at the parallettes' height and try not to break that plane as you perform this skill. From there take the skill to the floor as you improve.
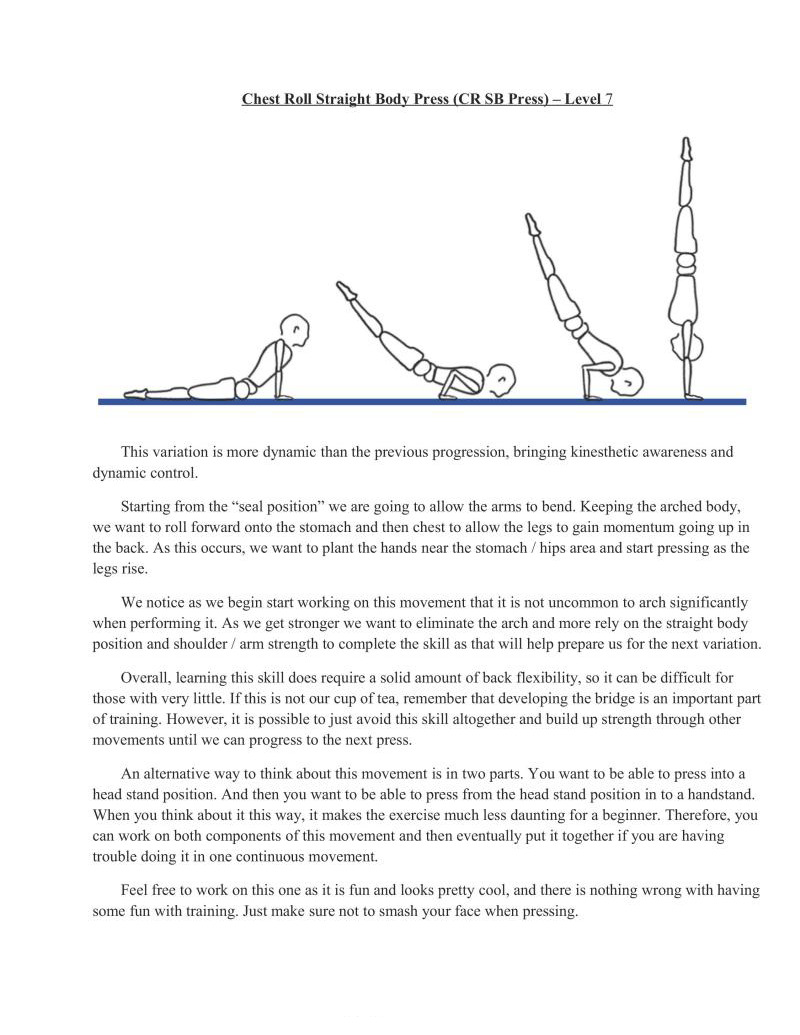
This variation is more dynamic than the previous progression, bringing kinesthetic awareness and dynamic control.
Starting from the "seal position" we are going to allow the arms to bend. Keeping the arched body, we want to roll forward onto the stomach and then chest to allow the legs to gain momentum going up in the back. As this occurs, we want to plant the hands near the stomach / hips area and start pressing as the legs rise.
We notice as we begin start working on this movement that it is not uncommon to arch significantly when performing it. As we gt stronger we want to eliminate the arch and more rely on the straight body position and shoulder / arm strength to complete the skill as that will help prepare us for the next variation.
Overall, learning this skill does require a solid amount of back flexibility, so it can be difficult for those with very little. If this is not our cup of tea, remember that developing the bridge is an important part of training. However, it is possible to just avoid this skill altogether and build up strength through other movements until we can progress to the next press,
An alternative way to think about this movement is in two parts. You want to be able to press into a head stand position. And then you want to be able to press from the head stand position in to a handstand. When you think about it this way, it makes the exercise much less daunting for a beginner. Therefore, you can work on both components of this movement and then eventually put it together if you are having trouble doing it in one continuous movement.
Feel free to work on this one as it is fun and looks pretty cool, and there is nothing wrong with having some fun with training. Just make sure not to smash your face when pres
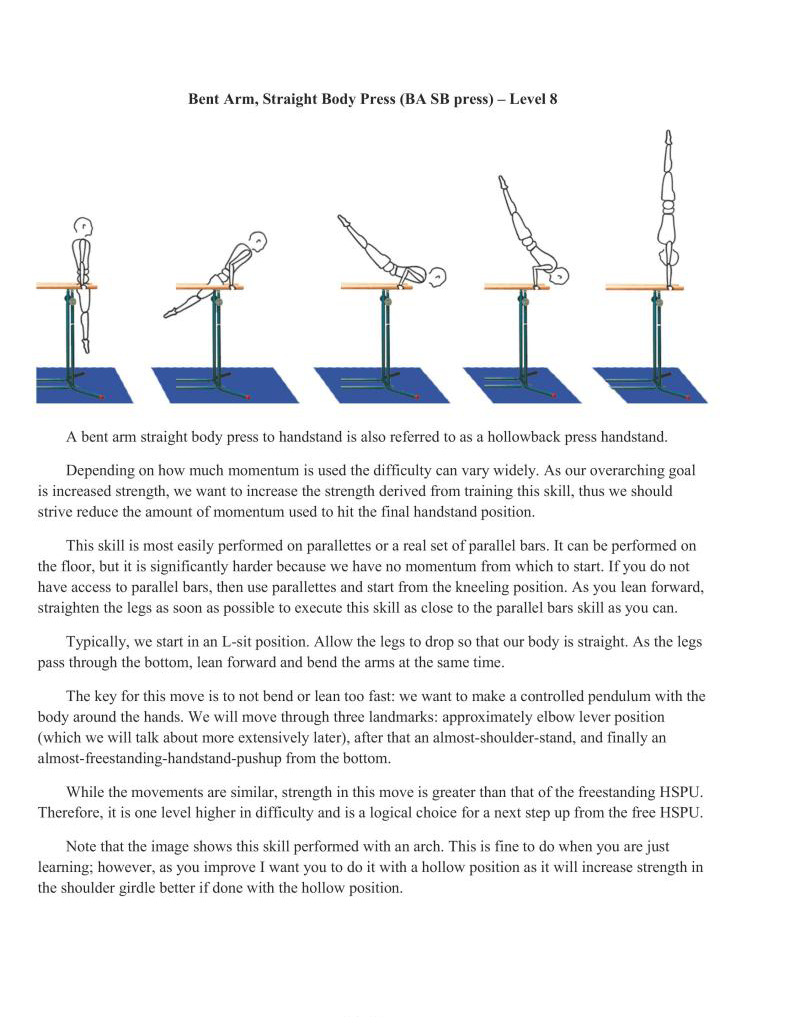
A bent arm straight body press to handstand is also referred to as a hollowback press handstand.
Depending on how much momentum is used the difficulty can vary widely. As our overarching goal is increased strength, we want to increase the strength derived from training this skill, thus we should strive reduce the amount of momentum used to hit the final handstand position,
This skill is most easily performed on parallettes or a real set of parallel bars. It can be performed on the floor, but it is significantly harder because we have no momentum from which to start. If you do not have access to parallel bars, then use parallettes and start from the kneeling position. As you lean forward, straighten the legs as soon as possible to execute this skill as close to the parallel bars skill as you can.
Typically, we start in an L-sit position. Allow the legs to drop so that our body is straight. As the legs pass through the bottom, lean forward and bend the arms at the same time.
The key for this move is to not bend or lean too fast: we want to make a controlled pendulum with the body around the hands. We will move through three landmarks: approximately elbow lever position (which we will talk about more extensively later), after that an almost-shoulder-stand, and finally an almos-freestanding-handstand-pushup from the bottom.
While the movements are similar, strength in this move is greater than that of the freestanding HSPU. Therefore, it is one level higher in difficulty and is a logical choice for a next step up from the free HSPU.
Note that the image shows this skill performed with an arch. This is fine to do when you are just learning; however, as you improve I want you to do it with a hollow position as it will increase strength in the shoulder girdle better if done with the hollow position.
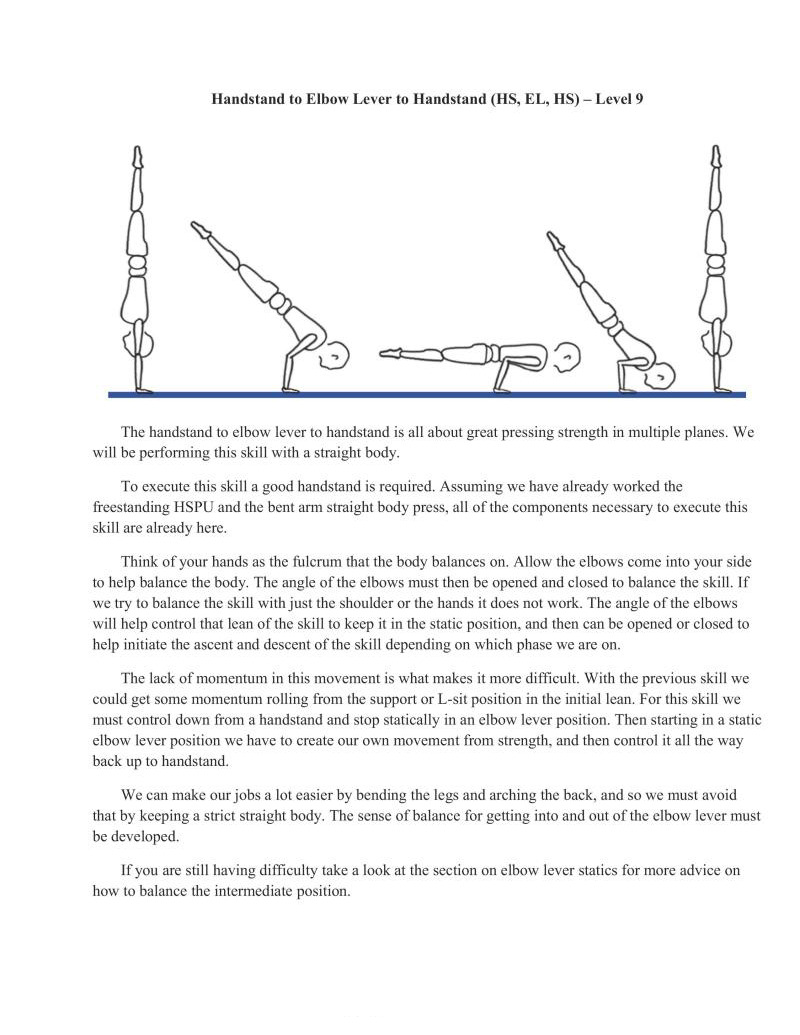
The handstand to elbow lever to handstand is all about great pressing strength in multiple planes. We will be performing this skill with a straight body.
To execute this skill a good handstand is required. Assuming we have already worked the freestanding HSPU and the bent arm straight body press, all of the components necessary to execute this skill are already here.
Think of your hands as the fulerum that the body balances on. Allow the elbows come into your side 10 help balance the body. The angle of the elbows must then be opened and closed to balance the skill. If we try to balance the skill with just the shoulder or the hands it does not work. The angle of the elbows will help control that lean of the skill to keep it in the static position, and then can be opened or closed to help initiate the ascent and descent of the skill depending on which phase we are on.
The lack of momentum in this movement is what makes it more difficult. With the previous skill we could get some momentum rolling from the support or L-sit position in the initial lean. For this skill we must control down from a handstand and stop statically in an elbow lever position. Then starting in a static elbow lever position we have to create our own movement from strength, and then control it all the way back up to handstand.
We can make our jobs a lot easier by bending the legs and arching the back, and so we must avoid that by keeping a strict straight body. The sense of balance for getting into and out of the elbow lever must be developed.
If you are still having difficulty take a look at the section on elbow lever statics for more advice on how to balance the intermediate position.

This feat of strength tests the body through the full range of pushing movements. This move requires a set of parallel bars as we need to be the bottom of a full dip to get the whole strength benefit of this
progression. From the bottom of the dip position we want to keep the body straight (do not arch!) and lean forward and press into a handstand.
Alternatively, this skill can be performed with parallettes, if you start from the third frame in this sequence. This is not preferred since you do not get the full range of motion to build strength, but starting from a static position in the third frame is sufficiently difficult to challenge your strength.
The movement should be initiated by leaning the body forward while straightening the arms so that the shoulders "slide" along the rails. This will help place the hands closer to the hips, which is needed to get the rest of the body leaning forward to push out of the deep dip position into the ascent.
As the body approaches parallel with the bars, we will be in a deep semi-elbow lever position. Do not stop in this position, as it is much more difficult than a regular elbow lever. We want to keep leaning forward and opening the elbow angle so that the feet keep rising until we hit close to a shoulder stand on the parallel bars. From there, it is just the bottom part of the freestanding handstand pushup.
The first phase—the dip to approximate shoulder stand—is the hardest. Handstand pushups are typically comfortable for trainees at this level and are less of a problem. Do note, though, that it will be slightly more difficult because we taxing ourselves in the first phase, before the handstand pushup.
Form should be solid as stone. From there it is developing the strength and figuring out how to manipulate that elbow angle to allow us to change the angle of the body to set us up for the press.
The rings bent arm presses will come after the chair handstands. I would actually have given them their own category, but there was not enough room to keep the charts down to fewer pages. Therefore, 1 am placing chair handstands in this category.
The "upper" level chair handstand, the illusion, actually requires a lot of the stability and strength that fends a bit of help towards learning the rings bent arm press handstands. That is why I put it in this place on the charts. These are a good segue into rings handstands and they are cool to learn.
Obviously, other work on rings may be more useful such as getting up in the handstands and performing rings handstand pushups. However, typically I think that these are best learned concurrently. The rings bent arm presses specifically benefit from learning:
A Straight and Bent Arm Press Handstands on PB/FX
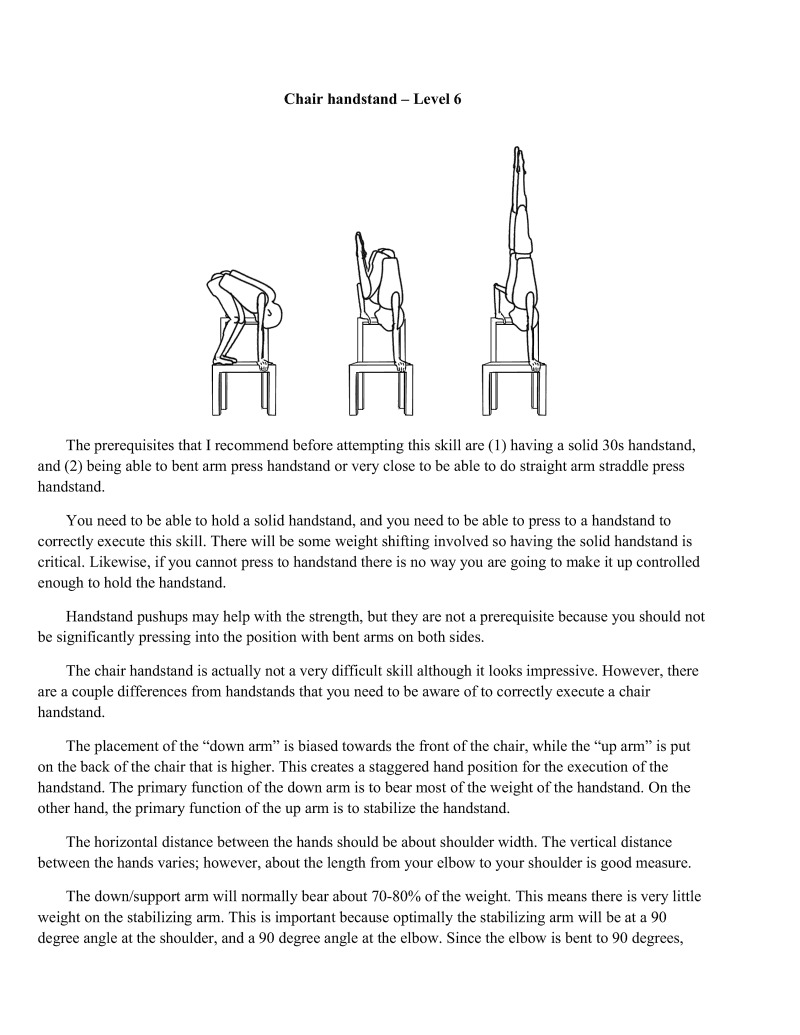
The prerequisites that I recommend before attempting this skill are (1) having a solid 30s handstand, and (2) being able to bent arm press handstand or very close to be able to do straight arm straddle press handstand.
You need to be able to hold a solid handstand, and you need to be able to press to a handstand to correctly execute this skill. There will be some weight shifting involved so having the solid handstand is critical. Likewise, if you cannot press to handstand there is no way you are going to make it up controlled enough to hold the handstand.
Handstand pushups may help with the strength, but they are not a prerequisite because you should not be significantly pressing into the position with bent arms on both sides.
The chair handstand is actually not a very difficult skill although it looks impressive. However, there are a couple differences from handstands that you need to be aware of to correctly execute a chair handstand.
The placement of the "down arm’ up arm" is put on the back of the chair that is higher. This creates a staggered hand position for the execution of the handstand. The primary function of the down arm is to bear most of the weight of the handstand. On the other hand, the primary function of the up arm is to stabilize the handstand.
ased towards the front of the chair, while the
The horizontal distance between the hands should be about shoulder width. The vertical distance between the hands varies; however, about the length from your elbow to your shoulder is good measure.
The down/support arm will normally bear about 70-80% of the weight. This means there is very little weight on the stabilizing arm. This is important because optimally the stabilizing arm will be at a 90 degree angle at the shoulder, and a 90 degree angle at the elbow. Since the elbow is bent to 90 degrees,
unless you are exceptionally strong you cannot put that much weight on that arm. Therefore, the weight distribution will be biased more towards the down arm.
I would start learning these against the wall because the potential for falling out of the chair press is high. If you have already practiced against the wall and are ready to take it away from the wall, make sure there is a softer surface in front of you if you start to fall over forwards. Additionally, make sure you have practiced your piroutres.
First, get on the chair. Now find the correct hand placements as described above. The first thing you will do is to raise your butt up in the air. Then start leaning forwards
The chair press handstand, like the other press handstands, can be thought of as a two step process. The goal of the initial part of the press is to get the hips directly overhead. The second step of the chair press is to slowly extend the legs overhead while keeping the shoulders, core, and hips stable so you do not fall forward or backward.
The "down" arm should be kept as straight as possible when the press begins. This is why it is useful to already have a straight arm press. If you start bending the arm more than about 20-30 degrees, your body will start rotating and fail the press. The "up" arm can support some weight, but since it is bent you do not have a lot of leverage and likely will not have enough strength to support any significant weight on that arm.
Continue to lean forward and put weight on the down arm. Aim to push the down arm hand upwards and backwards over your head. This will help counteract the force as you lean forward and lift your hips up.
You may have your legs in either a tuck or straddle position when you attempt this press. It matters very little. Most people like doing it in tuck, but straddle makes it slightly easier especially if you have been practicing straddle presses. The only thing you need to be aware of if you use the straddle is that your feet may hit the back rest of the chair.
Now that you have gotten your hips above your head, slowly extend the legs overhead. If you try to do this too quickly, you will likely arch and lose your balance. Most of the time you will lose your balance falling over; thus, this is why I recommend that you lean to do this against the wall first. When you are learning it free away from the wall, knowing how to pirouette out of a handstand is effective for coming down. You absolutely do not want to fall straight over and land on the floor on your back.
after you have reached the handstand, make sure you keep the body tight. Since you may not be used to the weight shift of about 70-80% of the weight onto the planted down arm, any potential core or leg movements may destabilize your press. You will control the press from falling over with your planted arm applying force to keep you from falling over, and you will control the coming back down from the up arm placed on the back rest. This semi-torquing movement may be hard to handle at first and you may start to twist. However, after you get the hang of it then it will go away.
Make sure that the elbow of the planted arm does not flare outwards. You want to keep it in line with the body both as you are pressing and in the handstand. This may be one of the issues that you may run into if you keep twisting and are not sure why.
Coming down out of the chair press is exactly like going up. First, you want to bring the legs down slowly until you are in the straddled or tucked position with the hips up. Then you want to use your arms 10 slowly bend and support your weight. Then bring the hips down from overhead. Ideally, you will be able to come down without wobbling and without slamming your feet down into the chair or falling over.
After you have completed this skill, start thinking about holding it longer periods of time to improve stability just like the handstand.
Eventually, you can practice it from it from a seated sideways position on the chair. This is a lot like the L-sit press handstand variation. The tough part about this skillis getting the butt up from the scat all the way overhead. Work on your pressing abilities to obtain this skill.
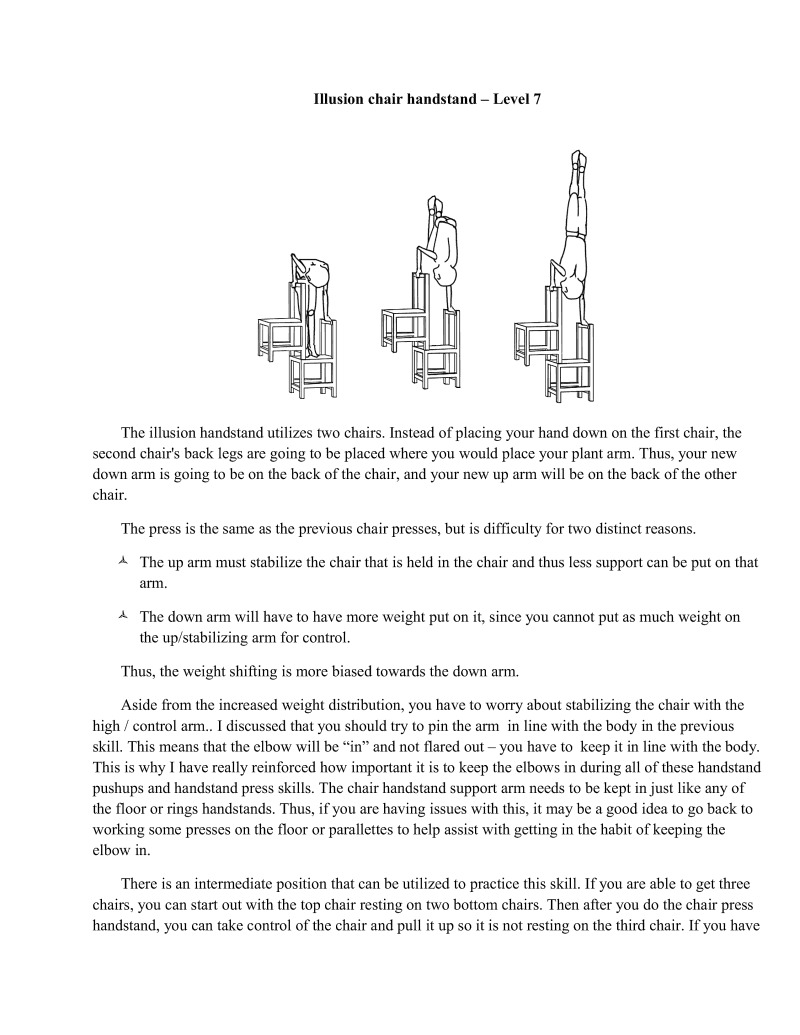
The illusion handstand utilizes two chairs. Instead of placing your hand down on the first chair, the second chair's back legs are going to be placed where you would place your plant arm. Thus, your new down arm is going to be on the back of the chair, and your new up arm will be on the back of the other chair.
The press is the same as the previous chair presses, but is difficulty for two distinct reasons,
Thus, the weight shifting is more biased towards the down arm.
Aside from the increased weight distribution, you have to worry about stabilizing the chair with the high / control arm. I discussed that you should try to pin the arm in line with the body in the previous skill. This means that the elbow will be "in" and not flared out — you have to keep it in line with the body. This is why I have really reinforced how important it is to keep the elbows in during all of these handstand pushups and handstand press skills. The chair handstand support arm needs to be kept in just like any of the floor or rings handstands. Thus, if you are having issues with this, it may be a good idea to go back to working some presses on the floor or parallettes to help assist with getting in the habit of keeping the elbow in.
There is an intermediate position that can be utilized to practice this skill. If you are able to get three chairs, you can start out with the top chair resting on two bottom chairs. Then after you do the chair press handstand, you can take control of the chair and pull it up so it is not resting on the third chair. If you have

someone around, they can pull out third chair. This is where the name "illusion" comes from because the third chair was actually needless.
As always, this skill can be practiced against the wall as well if you are uncomfortable with falling over. As you are stacking a chair on top of another chair, the height of the stack is higher. Therefore, if you do start to fall over it is farther to fall. Thus, practicing against the wall or having a soft surface to fall over onto may be helpful at least from a psychological standpoint.
After this skill is obtained, there are some things you can do to make it more difficult such as straightening out the supporting arm. Alternatively, if you actually do have access to chairs that can stack you can go higher. Check out some of the cirus chairs routines on youtube for more ideas.
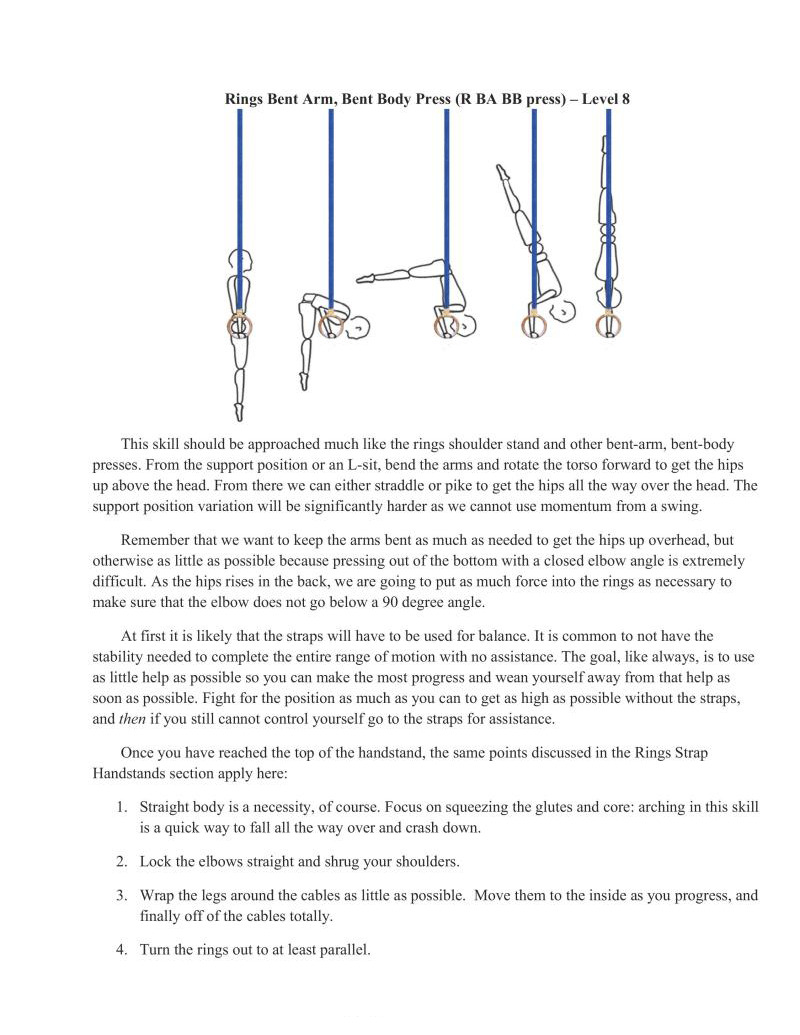
This skill should be approached much like the rings shoulder stand and other bent-arm, bent-body presses. From the support position or an L-sit, bend the arms and rotate the torso forward to get the hips up above the head. From there we can either straddle or pike to get the hips all the way over the head. The support position variation will be significantly harder as we cannot use momentum from a swing.
Remember that we want to keep the arms bent as much as needed to get the hips up overhead, but otherwise as little as possible because pressing out of the bottom with a closed elbow angle is extremely difficult. As the hips rises in the back, we are going to put as much force into the rings as necessary to make sure that the elbow does not go below a 90 degree angle.
At first it is likely that the straps will have to be used for balance. It is common to not have the stability needed to complete the entire range of motion with no assistance. The goal, like always, is to use le help as possible so you can make the most progress and wean yourself away from that help as soon as possible. Fight for the position ou can to get as high as possible without the straps, and then if you still cannot control yourself go to the straps for assistance.
much as
Once you have reached the top of the handstand, the same points discussed in the Rings Strap Handstands section apply here:
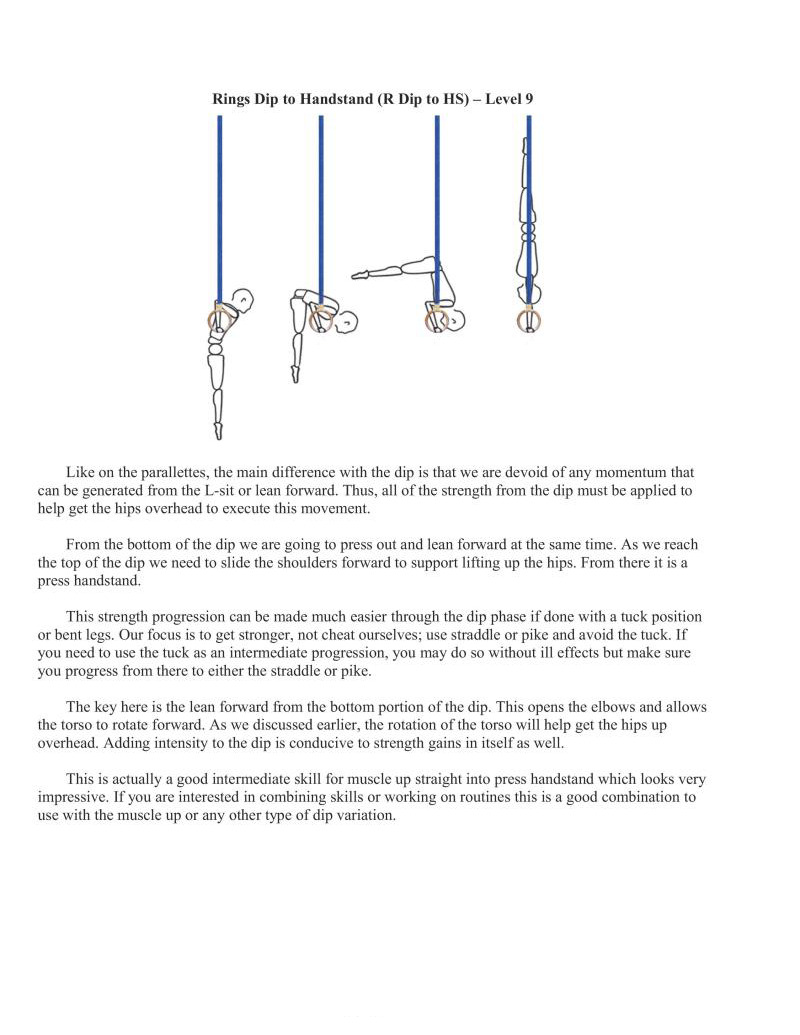
on the parallettes, the main difference with the dip is that we are devoid of any momentum that can be generated from the L-sit or lean forward. Thus, all of the strength from the dip must be applied to help get the hips overhead to execute this movement.
From the bottom of the dip we are going to press out and lean forward at the same time. As we reach the top of the dip we need to slide the shoulders forward to support lfting up the hips. From there it is a press handstand.
This strength progression can be made much easier through the dip phase if done with a tuck position or bent legs. Our focus is to get stronger, not cheat ourselves; use straddle or pike and avoid the tuck. If you need to use the tuck as an intermediate progression, you may do so without ill effects but make sure You progress from there to either the straddle or pike.
The key here is the lean forward from the bottom portion of the dip. This opens the elbows and allows the torso to rotate forward. As we discussed earlier, the rotation of the torso will help get the hips up overhead. Adding intensity to the dip is conducive to strength gains in itself as well,
This is actually a good intermediate skill for muscle up straight into press handstand which looks very impressive. If you are interested in combining skills or working on routines this is a good combination to use with the muscle up or any other type of dip variation.
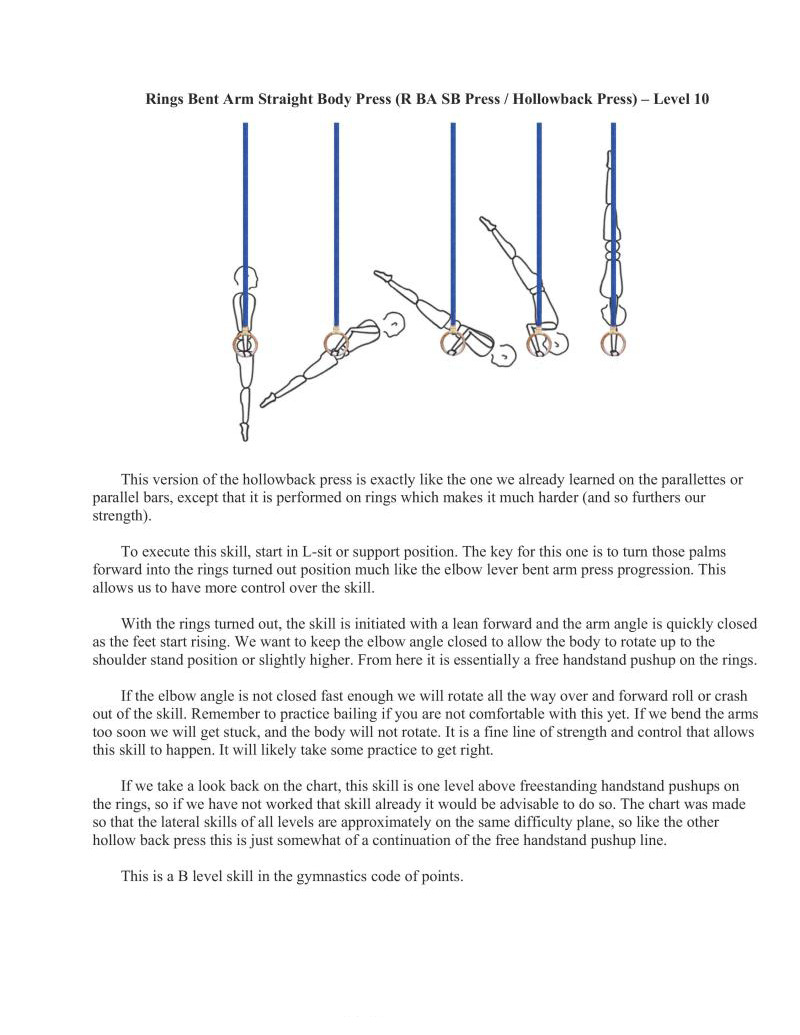
This version of the hollowback press is exactly like the one we already learned on the paralleties or parallel bars, except tht it is performed on rings which makes it much harder (and so furthers our strength).
To execute this sk, start in L-sit or support position. The key for this one is to tum those palms forward into the rings turned out position much like the elbow lever bent arm press progression. This allows us to have more control over the skill.
With the rings turned out, the skill is initiated with a lean forward and the arm angle is quickly closed as the feet start rising. We want to keep the elbow angle closed to allow the body to rotate up to the shoulder stand position or slightly higher. From here it is essentially a free handstand pushup on the rings.
If the elbow angle is not closed fast enough we will rotate all the way over and forward roll or crash out of the skill. Remember to practice bailing if you are not comfortable with this yet. If we bend the arms 100 s00n we will get stuck, and the body will not rotate. It is a fine line of strength and control that allows this skill to happen. It will likely take some practice to get right.
If we take a look back on the chart, this skill is one level above freestanding handstand pushups on the rings, so if we have not worked that skill already it would be advisable to do so. The chart was made so that the lateral skills of all levels are approximately on the same difficulty plane, so like the other hollow back press this is just somewhat of a continuation of the free handstand pushup line.
This is a B level skill in the gymnastics code of points.
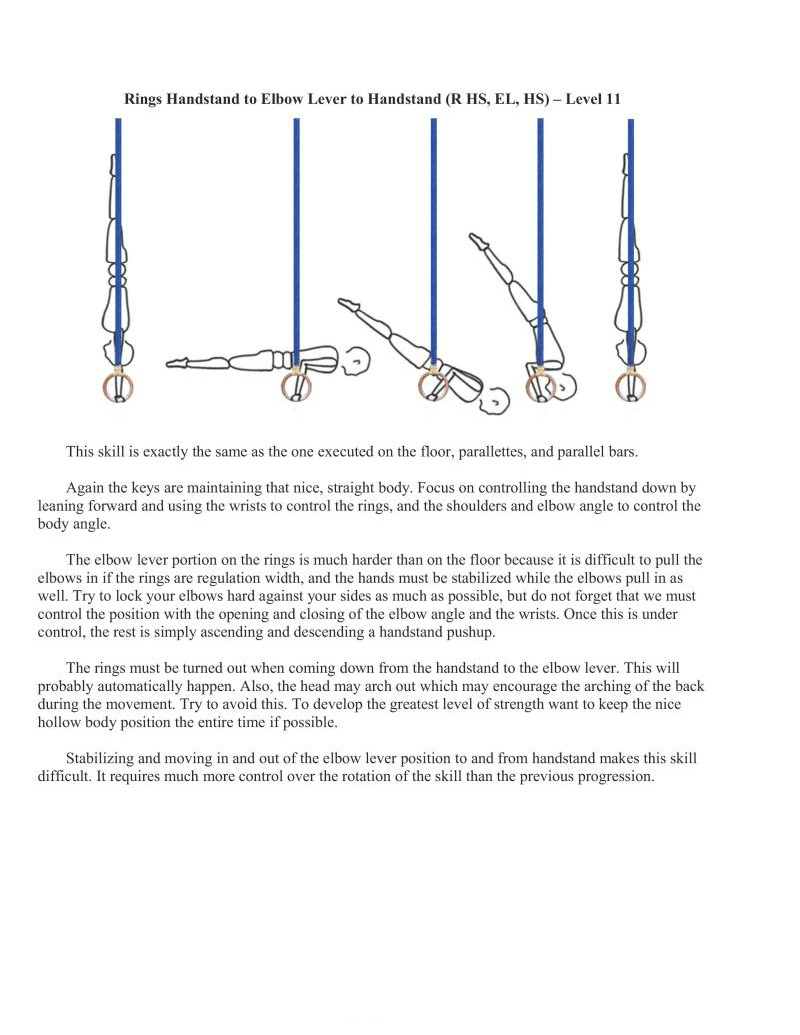
This skill is exactly the same as the one executed on the floor, parallettes, and parallel bars.
Again the keys are maintaining that nice, straight body. Focus on controlling the handstand down by leaning forward and using the wrists to control the rings, and the shoulders and elbow angle to control the body angle.
The elbow lever portion on the rings is much harder than on the floor because it is difficult to pull the elbows in if the rings are regulation width, and the hands must be stabilized while the elbows pull in as well. Try to lock your elbows hard against your sides as much as possible, but do not forget that we must control the position with the opening and closing of the elbow angle and the wrists. Once this is under control, the rest is simply ascending and descending a handstand pushup.
The rings must be turned out when coming down from the handstand to the elbow lever. This will probably automatically happen. Also, the head may arch out which may encourage the arching of the back during the movement. Try to avoid this. To develop the greatest level of strength want to keep the nice hollow body position the entire time if possible.
Stabilizing and moving in and out of the elbow lever position to and from handstand makes difficult. It requires much more control over the rotation of the skill than the previous progression.

Exactly the same as the previous variation on dip straight body to handstand except on the rings. Like the previous two skills the rings must be turned out to control this skill in the ascent phase.
At the bottom of the dip with the rings turned out, the skill is initiated by pushing the shoulders forward so that the hands will center ncar the stomach / hips. As the body approaches parallel with the bars, we will be in a deep semi-elbow lever position. This is a hybrid between a planche pushup and a maltese pushup.
We want to keep leaning forward and opening the elbow angle so that the feet keep rising until we hit close to a shoulder stand on the rings. From there i i just the bottom part of the freestanding handstand pushup.
The most difficult phase is at the bottom of the skill, but make sure to keep good form. From there just develop the strength and figure out how manipulate that elbow angle to appropriately allow us to bring the body overhead. When this skill becomes comfortable you have become a master of bent arm press handstands and completed quite the milestone. Congratulations!
Now to add a weight vest...
The straight-arm press handstand variations are extremely underutilized in non-gymnastics scenarios. Everyone wants to obtain cool skills like handstand pushups and static holds like the planche, but very few have the dedication to commit to achieving both the strength and flexibility for this skill set progression.
It is unfortunate that this is the case because the strength and control that we can gain from the variety of straight-arm presses actually help significantly with the development of other straight-arm pressing skills such as the planche.
Thus, if we have any aspirations for planche skills and even most of the other bent arm pressing skills, I would strongly advise developing this set of progressions for pressing first. Learning to control the body from just the shoulders will be so important that we will see benefits from these progressions not only in all of our pressing skills, but most of the pulling skills that require straight arm stabilization such as back levers, front levers, and even the iron cross.

This is the first progression in the series of progressions that will significantly help our active flexibility and shoulder strength.
Wall straddle press handstand eccentrics can be either executed on the floor to with parallettes against the wall. To make it easier, the hands can be moved farther away from the wall at a more oblique angle, Conversely. to progress the intensity the hands can be moved closer.
In this exercise, we start with our backs against the wall in a handstand. Before we start we must make sure we are keeping core tension not arching. From there, to initiate the movement, we will straddle our legs as far as possible.
In the second phase of the movement, we are going to slowly rotate the hips so that our feet start dropping towards the ground, and our groin moves toward our abdominal region. We want to keep the back straight against the wall. If it comes off we will likely fall off of the wall and the exercise will be over. This phase of the movement continues, slowly, until the feet touch the ground.
There are two parts of this movement that require great active flexibility: the straddle within the logs, and the closing of the hips within the groin. Also, keeping that back against the wall takes a lot of core control and shoulder strength.
The difficulty of this skill lies in the need for great active flexibility and its control, while simultaneously having to drive the shoulders hard into the wall to keep the back in position.
We can progress two ways to improve the quality of our repetitions.
These two transitions need to be worked thoroughly before progressing to the next.
Even though it seems like an easy movement, there will likely be cramping for most trainees. And as simple as it is, this is an exercise that requires such a high degree of concentration, strength, and control that will make most people break into a heavy sweat after performing just a couple of reps. This is all for a basic gymnastics skill with a Level of 5. This is probably the hardest level 5 skill on the progression charts, but also it is one of the most critical to develop for straight-arm strength.
Even a "small" 5-10 degree bend in the elbows will make the movement about 10-30% easier. Resist the urge. This is why gymnastics coaches do not tcach any bent arm pressing until straight-arm pressing is learned, since reinforeing bent arms during a press is a bad habit that is hard to eliminate,
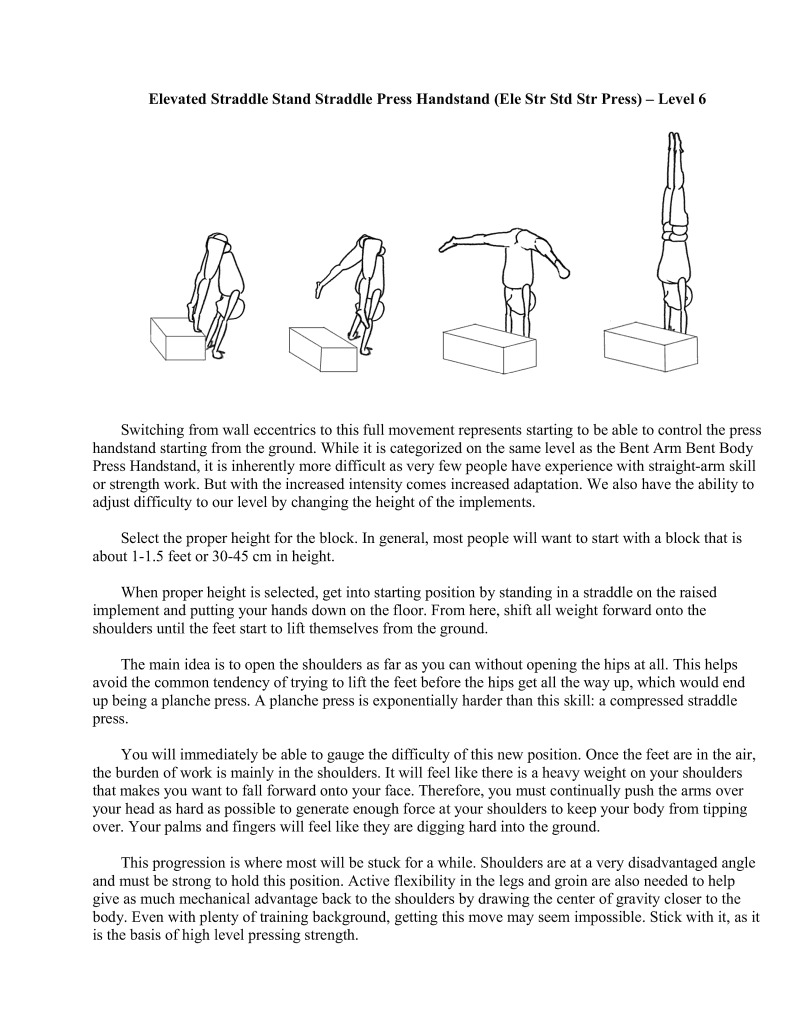
Switching from wall eccentrics to this full movement represents starting to be able to control the press handstand starting from the ground. While it is categorized on the same level as the Bent Arm Bent Body Press Handstand, it is inherently more difficult as very few people have experience with straight-arm skill or strength work. But with the increased intensity comes increased adaptation. We also have the ability to adjust difficulty to our level by changing the height of the implements.
Select the proper height for the block. In general, most people will want to start with a block that is about 1-1.5 feet or 30-45 cm in height.
When proper height is selected, get into starting position by standing in a straddle on the raised implement and putting your hands down on the floor. From here, shift all weight forward onto the shoulders until the feet start to lift themselves from the ground.
The main idea is to open the shoulders as far as you can without opening the hips at all. This helps avoid the common tendency of trying to lift the fet before the hips get all the way up, which would end up being a planche press. A planche press is exponentially harder than this skill: a compressed straddle press.
You will immediately be able to gauge the difficulty of this new position. Once the feet are in the air, the burden of work is mainly in the shoulders. It will feel like there is a heavy weight on your shoulders that makes you want to fall forward onto your face. Therefore, you must continually push the arms over your head as hard as possible to generate enough force at your shoulders to keep your body from tipping over. Your palms and fingers will feel like they are digging hard into the ground
This progression is where most will be stuck for a while. Shoulders are at a very disadvantaged angle and must be strong to hold this position. Active flexibility in the legs and groin are also needed to help give as much mechanical advantage back to the shoulders by drawing the center of gravity closer to the body. Even with plenty of training background, getting this move may seem impossible. Stick with it, as it is the basis of high level pressing strength.
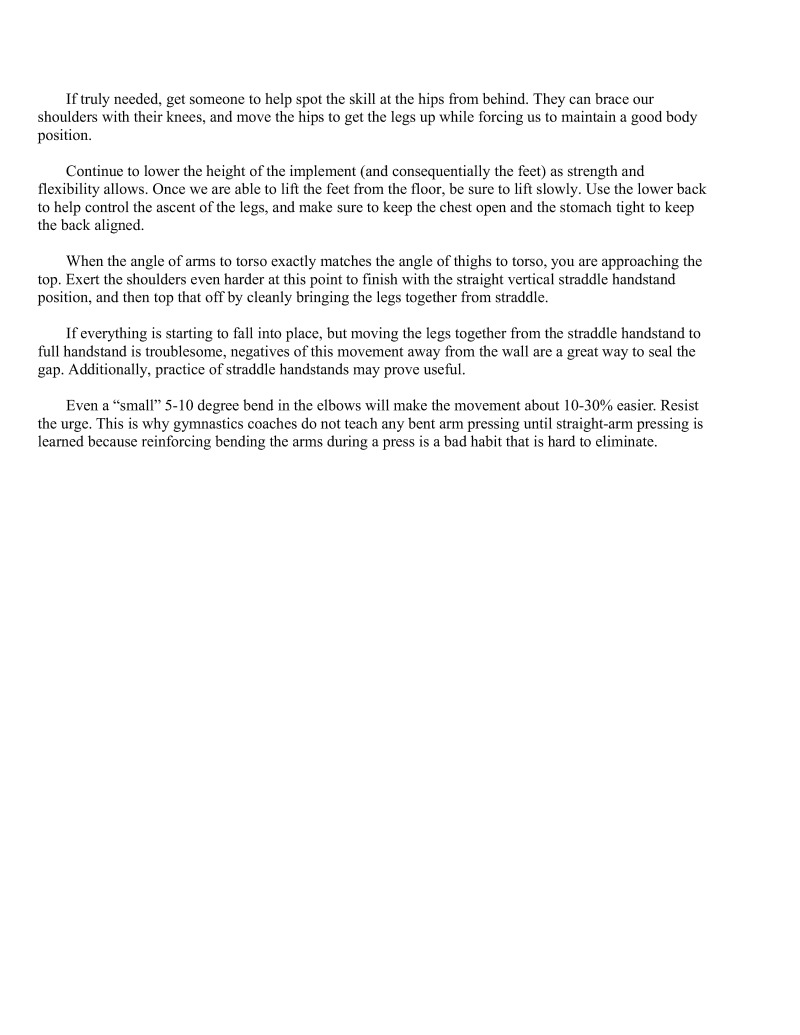
If truly needed, get someone to help spot the skill at the hips from behind. They can brace our shoulders with their knees, and move the hips to get the legs up while forcing us to maintain a good body position.
Continue to lower the height of the implement (and consequentially the feet) as strength and flexibility allows. Once we are able to lift the feet from the floor, be sure to lft slowly. Use the lower back to help control the ascent of the legs, and make sure to keep the chest open and the stomach tight to keep the back aligned
When the angle of arms to torso exactly matches the angle of thighs to torso, you are approaching the top. Exert the shoulders even harder at this point to finish with the straight vertical straddle handstand position, and then top that off by cleanly bringing the legs together from straddle.
If everything is starting to fall into place, but moving the legs together from the straddle handstand to full handstand is troublesome, negatives of this movement away from the wall are a great way to seal the gap. Additionally, practice of straddle handstands may prove uscful.
Even a "small" 5-10 degree bend in the elbows will make the movement about 10-30% easier. Resist the urge. This is why gymnastics coaches do not teach any bent arm pressing until straight-arm pressing is learned because reinforcing bending the arms during a press is a bad habit that is hard to eliminate.
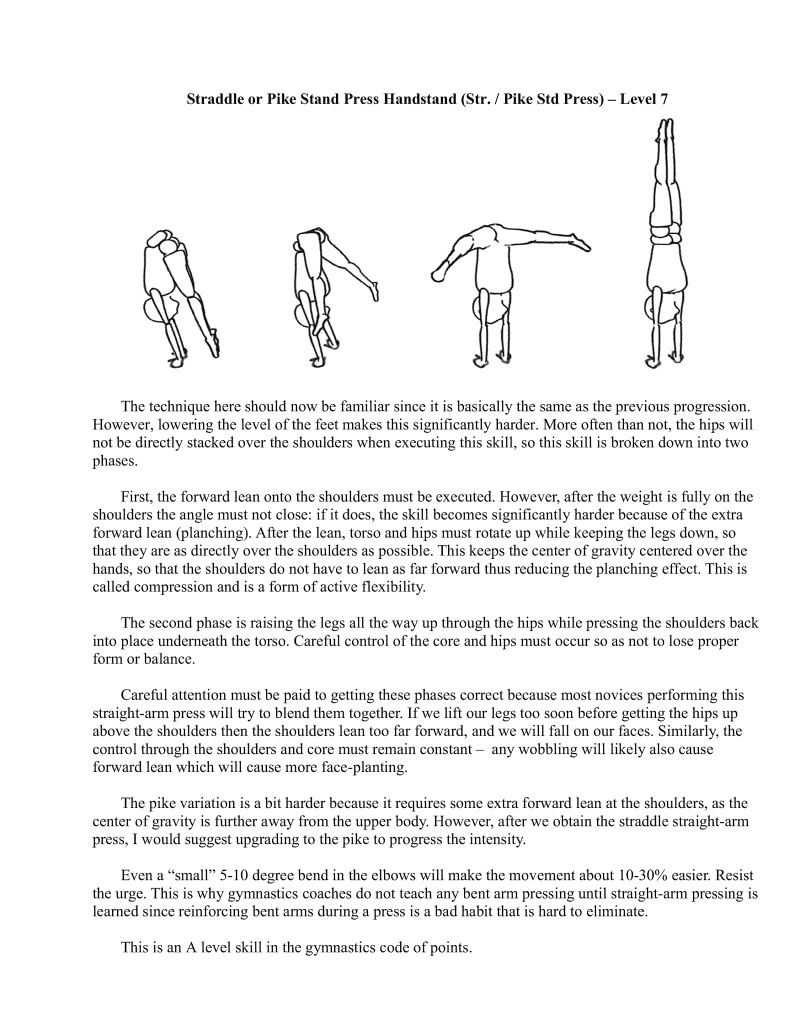
The technique here should now be familiar since it is basically the same as the previous progression.
However, lowering the level of the feet makes this significantly harder. More often than not, the hips will not be directly stacked over the shoulders when executing this skill, so this skill is broken down into two phases.
First, the forward lean onto the shoulders must be executed. However, after the weight is fully on the shoulders the angle must not close: if it does, the skill becomes significantly harder because of the extra forward lean (planching). After the lean, torso and hips must rotate up while keeping the legs down, so that they are as directly over the shoulders as possible. This keeps the center of gravity centered over the hands, so that the shoulders do not have to lean as far forward thus reducing the planching effect. This is called compression and is a form of active flexibility.
The second phase is raising the legs all the way up through the hips while pressing the shoulders back into place underneath the torso. Careful control of the core and hips must occur so as not to lose proper form or balance.
Careful attention must be paid to getting these phases correct because most novices performing this straight-arm press will try to blend them together. If we lift our legs too soon before getting the hips up above the shoulders then the shoulders lean too far forward, and we will fall on our faces. Similarly, the control through the shoulders and core must remain constant — any wobbling will likely also cause forward lean which will cause more face-planting.
The pike variation is a bit harder because it requires some extra forward lean at the shoulders, as the center of graviy is further away from the upper body. However, after we obiain the straddle straight-arm press, | would suggest upgrading to the pike to progress the intensity.
Even a "small" 5-10 degree bend in the elbows will make the movement about 10-30% easicr. R the urge. This is why gymnastics coaches do not teach any bent arm pressing until straight-arm pressing is learned since reinforcing bent arms during a press is a bad habit that is hard to el
This is an A level skill in the gymnastics code of points.
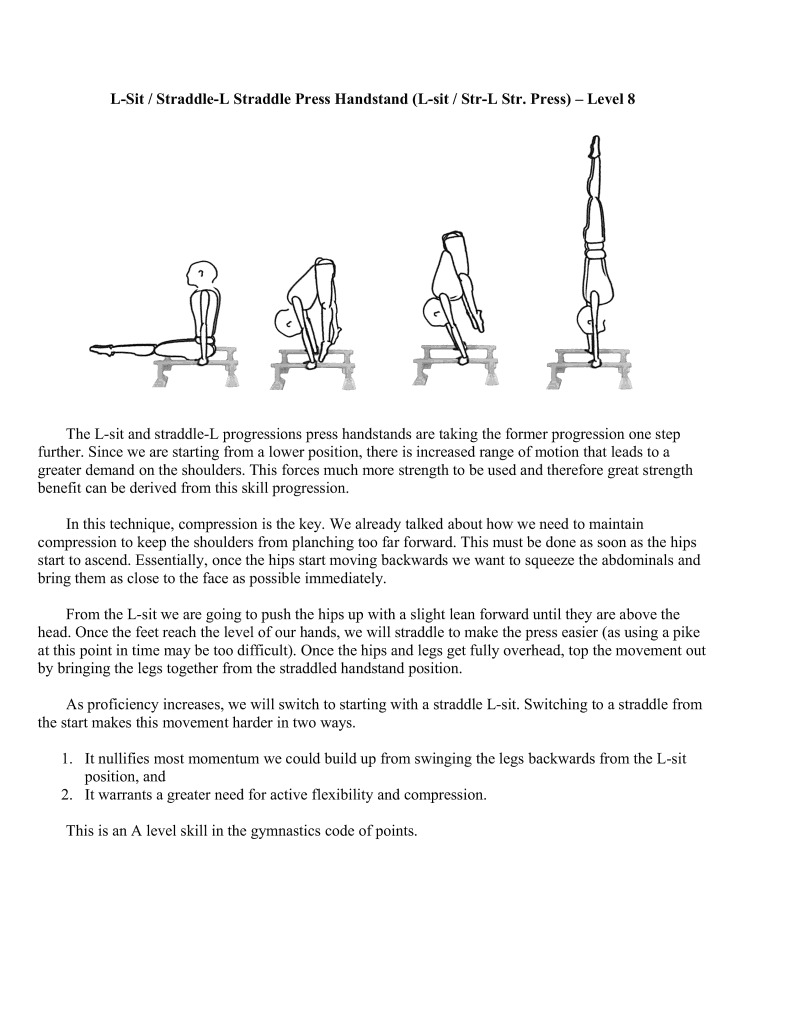
The L-Sit and straddle-L progressions press handstands are taking the former progression one step further. Since we are starting from a lower position, there is increased range of motion that leads to greater demand on the shoulders. This forces much more strength to be used and therefore great strength benefit can be derived from this skill progression.
In this technique, compression is the key. We already talked about how we need to maintain compression to keep the shoulders from planching too far forward. This must be done as soon as the hips start to ascend. Essentially, once the hips start moving backwards we want to squeeze the abdominals and bring them as close to the face as possible immediately.
From the L-sit we are going to push the hips up with a slight lean forward until they are above the head. Once the feet reach the level of our hands, we will straddle to make the press easier (as using a pike at this point in time may be too difficult). Once the hips and legs get fully overhead, top the movement out by bringing the legs together from the siraddled handstand position.
As proficiency increases, we will switch to starting with a straddle L-sit. Switching to a straddle from the start makes this movement harder in two ways.
This is an A level skill in the gymnastics code of points.
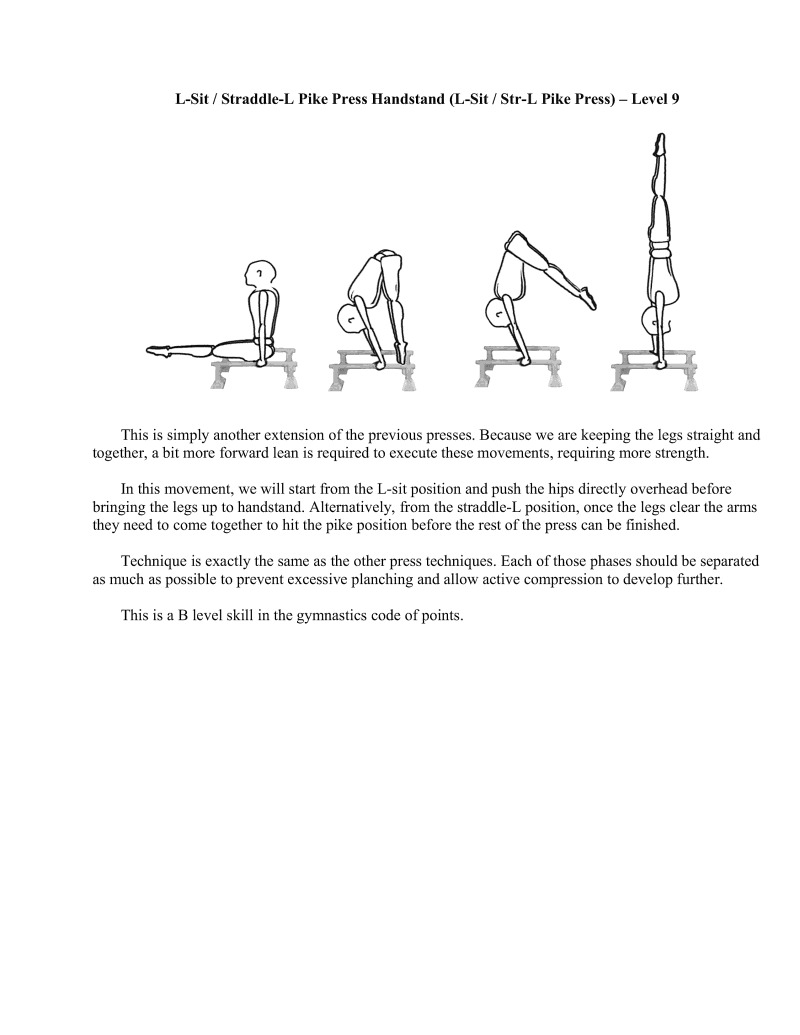
This is simply another extension of the previous presses. Because we are keeping the legs straight and together, a bit more forward lean is required to execute these movements, requiring more strength.
In this movement, we will start from the L-sit position and push the hips directly overhead before bringing the legs up to handstand. Alternatively, from the straddle-L position, once the legs they need to come together to hit the pike position before the rest of the press can be finished.
Technique is exactly the same as the other press techniques. Each of those phases should be separated as much as possible to prevent excessive planching and allow active compression to develop further.
This is a B level skill in the gymnastics code of points.
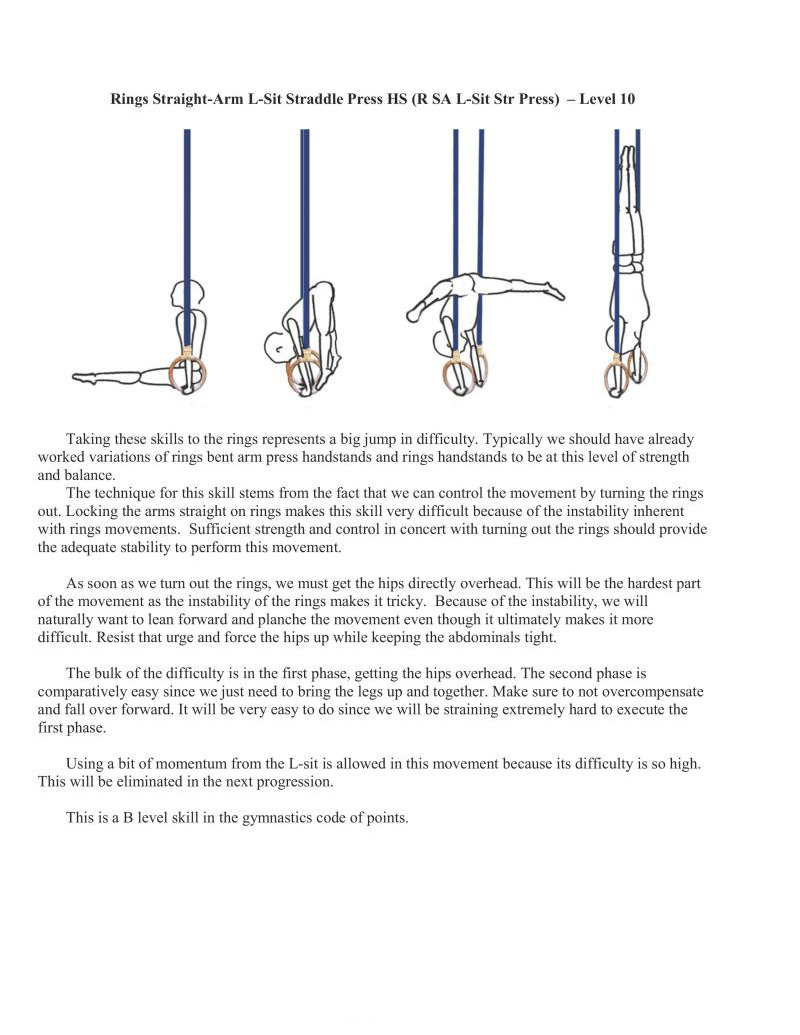
Taking these skills to the rings represents a big jump in difficulty. Typically we should have already worked variations of rings bent arm press handstands and rings handstands to be at this level of strength and balance.
The technique for this skill stems from the fact that we can control the movement by tuming the rings out. Locking the arms straight on rings makes this skill very difficult because of the instability inherent with rings movements. Sufficient strength and control in concert with turning out the rings should provide the adequate stability to perform this movement.
As soon as we turn out the rings, we must get the hips dircctly overhead. This will be the hardest part of the movement as the instability of the rings makes it tricky. Because of the instability, we will naturally want to lean forward and planche the movement even though it ultimately makes it more difficult. Resist that urge and force the hips up while keeping the abdominals tigh.
The bulk of the difficulty is in the first phase, getting the hips overhead. The second phase is comparatively easy since we just need to bring the legs up and together. Make sure to not overcompensate and fall over forward. It will be very easy to do since we will be straining extremely hard to execute the first phase.
Using a bit of momentum from the L-sit is allowed in this movement because its difficulty is so high. This will be eliminated in the next progression.
This is a B level skill in the gymnastics code of points.
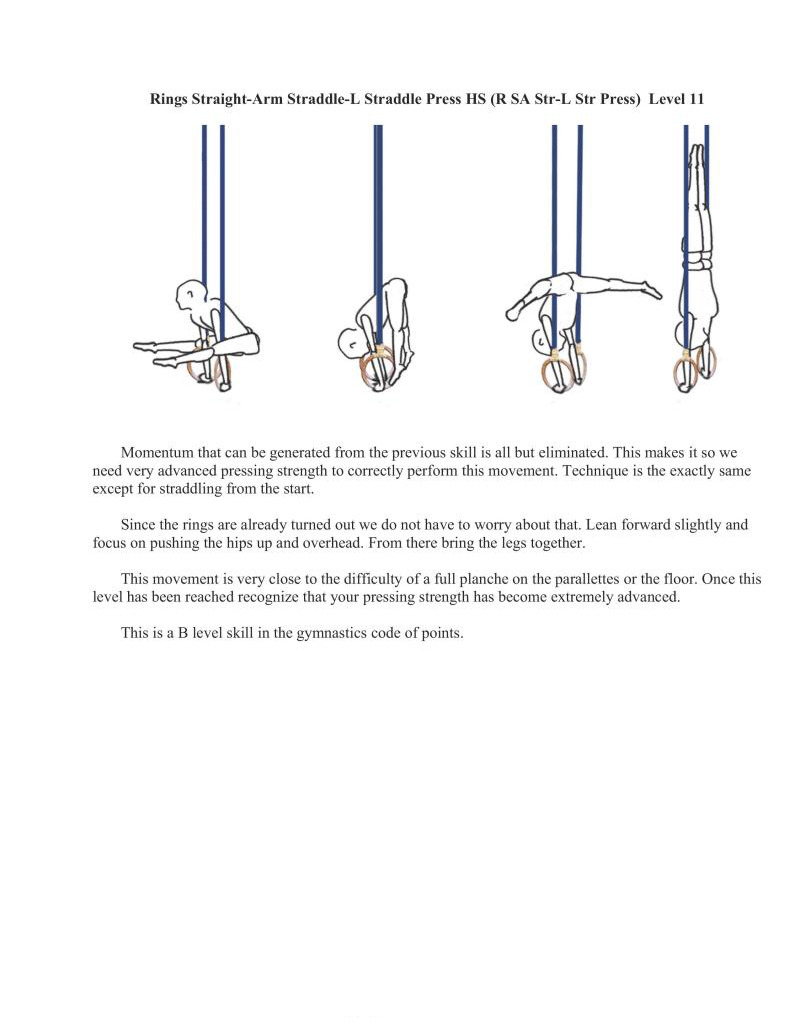
Momentum that can be generated from the previous skill is all but eliminated. This makes it 50 we need very advanced pressing strength to correctly perform this movement, Technique is the exactly same except for straddling from the start
Since the rings are already turned out we do not have to worry about that. Lean forward slightly and focus on pushing the hips up and overhead. From there bring the legs together.
This movement is very close to the difficulty of a full planche on the parallettes or the floor. Once this level has been reached recognize that your pressing strength has become extremely advanced
This is a B level skill in the gymnastics code of points.
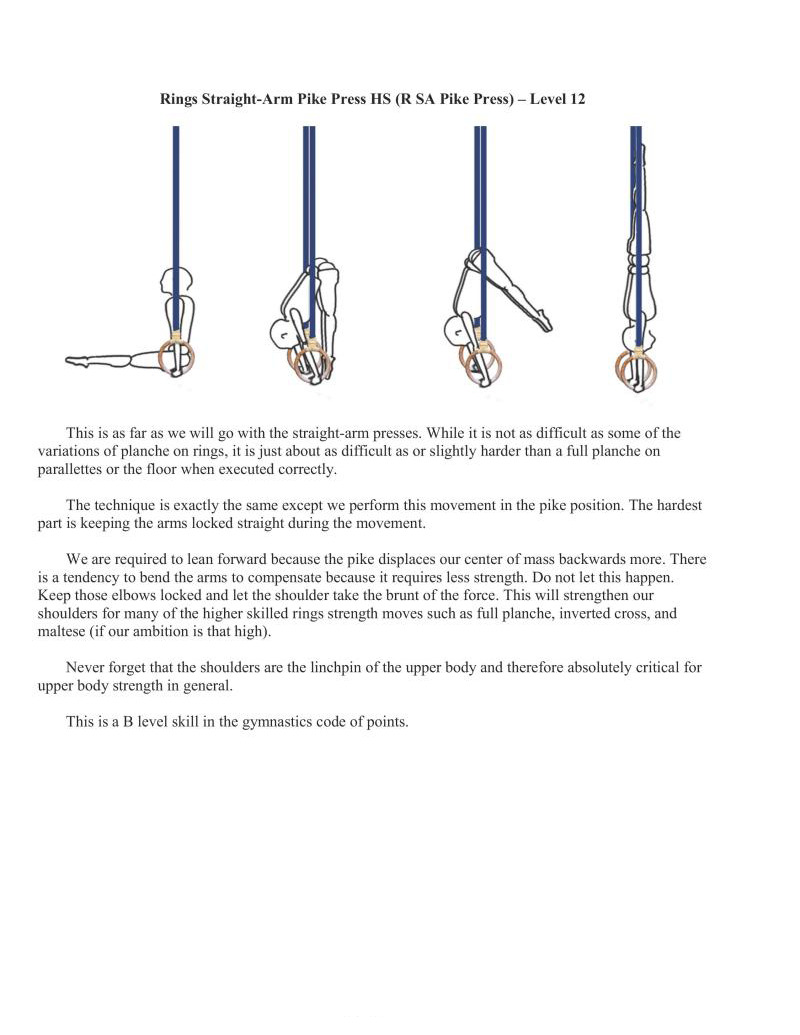
This is as far as we will go with the straight-arm presses. While it is not as difficult as some of the variations of planche on rings, it is just about as difficult as or slightly harder than a full planche on parallettes or the floor when executed correctly.
The technique is exactly the same except we perform this movement in the pike position. The hardest part is keeping the arms locked straight during the movement.
We are required to lean forward because the pike displaces our center of mass backwards more. There i a tendency to bend the arms to compensate because it requires less strength. Do not let this happen. Keep those elbows locked and let the shoulder take the brunt of the force. This will strengthen our shoulders for many of the higher skilled rings strength moves such as full planche, inverted cross, and maltese (if our ambition is that high).
Never forget that the shoulders are the linchpin of the upper body and thercfore absolutely critical for upper body strength in general.
This isa B level skill in the gymnastics code of points.
Experience with training the V-sit and Manna has shown that there are approximately four different phases and within each we should focus on different concepts. I will group these skills into phases for cach step in the progression, to avoid vague advice such as, "You just need to go higher".
If you are following along with the chart, I marked varying angles fairly arbitrarily just because it will give us a decent measure of where we are on the A-C range in our development. This is helpful since the Vesit has an A Level and the manna has a C Level in the gymnastics Code of Points. In doing so I tried to keep the difficulty on the progression charts true to their gymnastics origins while simultaneously presenting indicators for progress between each phase. This applies to all exercises I listed, not just this specific progression.
We notice on the chart that there is actually a big variation in the angles per level. Near the beginning there is a big jump up to 100 degrees and then it keeps on slowly decreasing from there. This is because as the angle decreases, the torque increases exponentially (especially with other skills like this, such as iron cross and planche). Since the muscles move outside of the optimal range of motion the force output of the muscles in that range decrease. This makes it so that every increase in about 30 degrees approximately doubles the difficulty in execution.
It is my sincere hope that anyone who wants to begin serious bodyweight strength training at least attempt to learn the V-sit and manna progression because not only are the skills pleasing to the eye, they are also excellent for working the muscles in the posterior shoulder and scapular areas which are needed for shoulder health.
Because gymnastics based bodyweight strength training is a very "hands in front of the body" endeavor, it lends itself to build muscular imbalances in the front of the body that often lead to the caveman look. Upper crossed syndrome — shoulders hunched forwards, neck craned out - not only looks bad but it also leads to increased potential for injury, something that we are trying to avoid.
Training this serics of progressions will help keep those shoulders healthy and lead towards a longer training career, and more impressive feats including these feats themselves. Good luck.
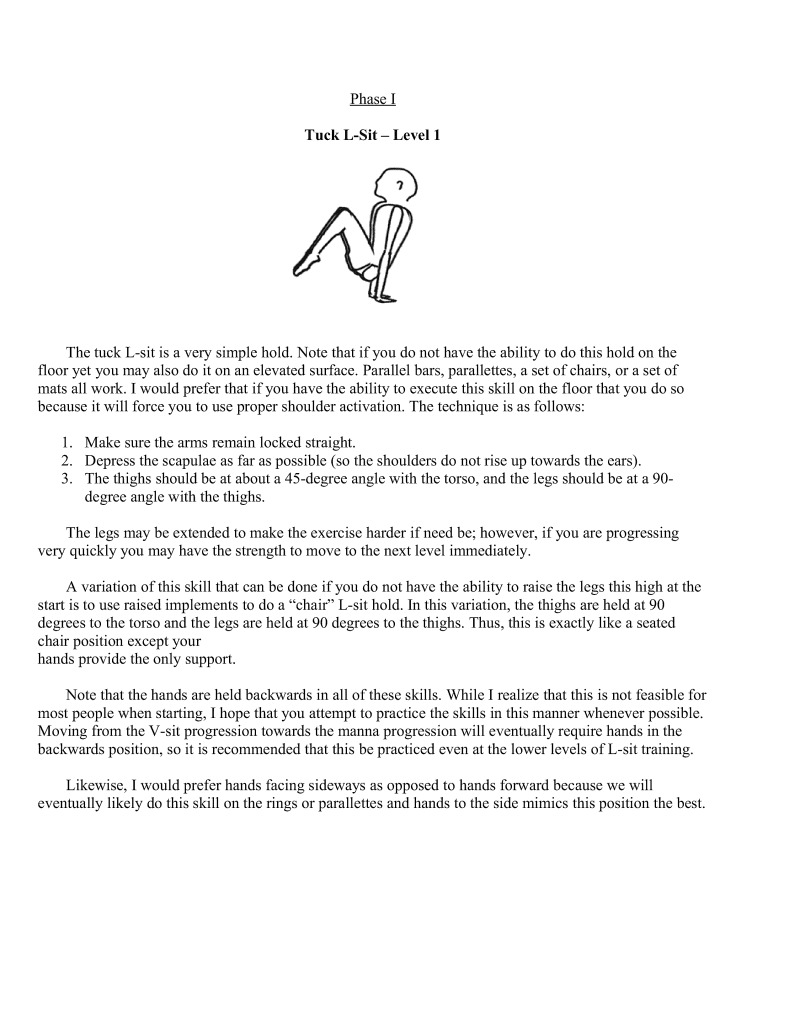
The tuck L-sit is a very simple hold. Note that if you do not have the ability to do this hold on the floor yet you may also do it on an elevated surface. Parallel bars, parallettes, a set of chairs, or a set of mats all work. I would prefer that if you have the ability to execute this skill on the floor that you do so because it will force you to use proper shoulder activation. The technique is as follows:
The legs may be extended to make the exercise harder if need be; however, if you are progressing very quickly you may have the strength to move to the next level immediately.
A variation of this skill that can be done if you do not have the ability to raise the legs this high at the start i 1o use raised implements to do a "chair" L-sit hold. In this variation, the thighs are held at 90 degrees to the torso and the legs are held at 90 degrees to the thighs. Thus, this is exactly like a seated chair position except your hands provide the only support.
Note that the hands are held backwards in all of these skills. While I realize that this is not feasible for most people when starting, I hope that you attempt to practice the skills in this manner whenever possible. Moving from the V-sit progression towards the manna progression will eventually require hands in the backwards position, so it is recommended that this be practiced even at the lower levels of L-sit raining.
Likewise, I would prefer hands facing sideways as opposed to hands forward because we will eventually likely do this skill on the rings or paralleties and hands to the side mimics this position the best.
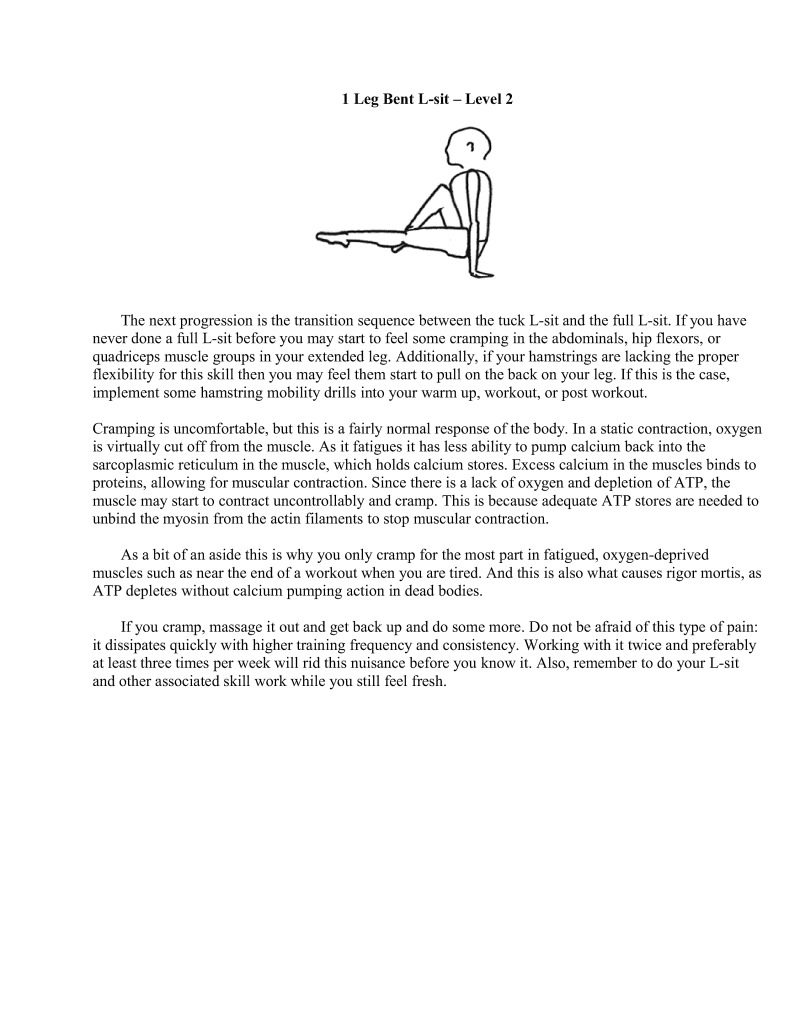
The next progression is the transition sequence between the tuck L-sit and the full L-sit. If you have never done a full L-sit before you may start to feel some cramping in the abdominals, hip flexors, or quadriceps muscle groups in your extended leg. Additionally, if your hamstrings are lacking the proper flexibility for this skill then you may feel them start to pull on the back on your leg. If this is the case, implement some hamstring mobility drills into your warm up, workout, or post workout.
Cramping is uncomfortable, but this is a fairly normal response of the body. In a static contraction, oxygen is virtually cut off from the muscle. As it fatigues it has less ability to pump calcium back into the sarcoplasmic reticulum in the muscle, which holds calcium stores. Excess calcium in the muscles binds to proteins, allowing for muscular contraction. Since there is a lack of oxygen and depletion of ATP, the muscle may start to contract uncontrollably and cramp. This is because adequate ATP stores are needed to unbind the myosin from the actin filaments to stop museular contraction.
As abit of an aside this is why you only cramp for the most part in fatigued, oxygen-deprived muscles such as near the end of a workout when you are tired. And this is also what causes rigor mortis, as ATP depletes without caleium pumping action in dead bodies.
If you cramp, massage it out and get back up and do some more. Do not be afraid of this type of pain: it dissipates quickly with higher training frequency and consistency. Working with it twice and preferably at least three times per week will rid this nuisance before you know it. Also, remember to do your L-sit and other associated skill work while you still feel fresh.
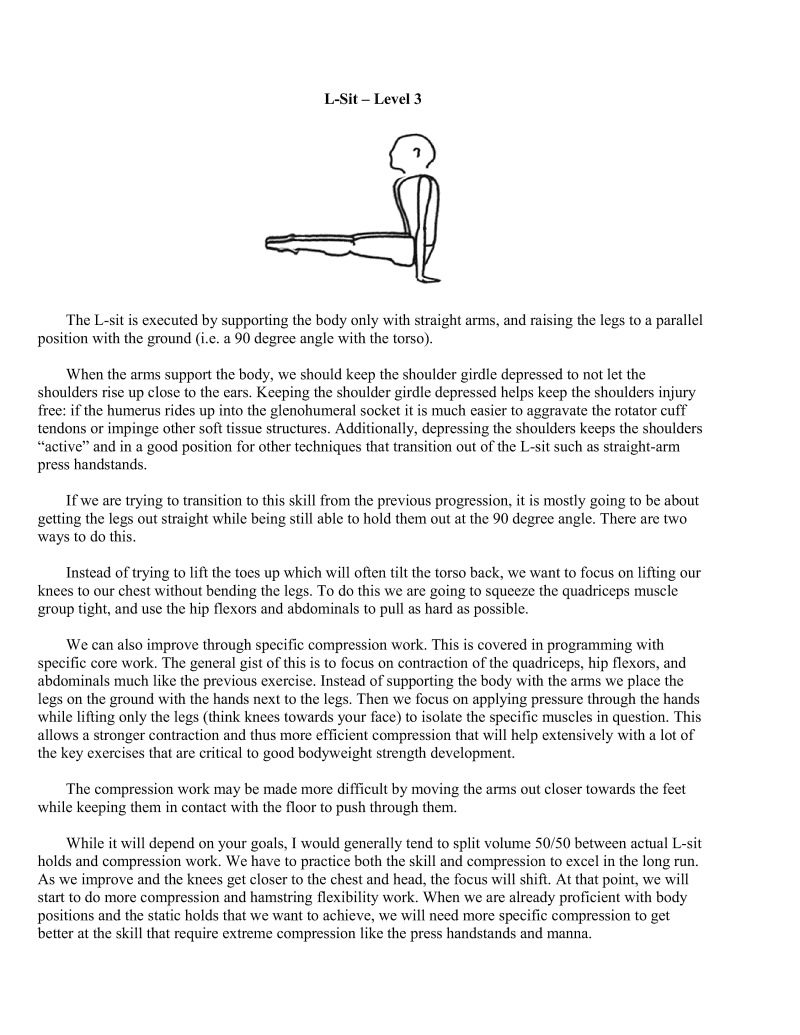
The L-sit is executed by supporting the body only with straight arms, and raising the legs to a parallel position with the ground (i.c. a 90 degree angle with the torso).
When the arms support the body, we should keep the shoulder girdle depressed to not let the shoulders rise up close to the cars. Keeping the shoulder girdle depressed helps keep the shoulders injury free: if the humerus rides up into the glenohumeral socket it is much casicr to aggravate the rotator cuff tendons or impinge other soft issue structures. Additionally, depressing the shoulders keeps the shoulders active" and in a good position for other techniques that transition out of the L-sit such is straight-arm press handstands.
If we are trying to transition to this skill from the previous progression, it is mostly going to be about getting the legs out straight while being still able to hold them out at the 90 degree angle. There are two ways 10 do this.
Instead of trying to lift the toes up which will often ilt the torso back, we want to focus on lifting our knees to our chest without bending the legs. To do this we are going to squeeze the quadriceps muscle group tight, and use the hip flexors and abdominals to pull as hard as possible.
We can also improve through specific compression work. This is covered in programming with specific core work. The general gist of this is to focus on contraction of the quadriceps, hip flexors, and abdominals much like the previous exercise. Instead of supporting the body with the arms we place the legs on the ground with the hands next to the legs. Then we focus on applying pressure through the hands while lifting only the legs (think knces towards your face) to isolate the specific muscles in question. This allows a stronger contraction and thus more efficient compression that will help extensively with a lot of the key exercises that are critical to good bodyweight strength development.
The compression work may be made more difficult by moving the arms out closer towards the feet while keeping them in contact with the floor to push through them.
While it will depend on your goals, I would generally tend to split volume 50/50 between actual L-sit holds and compression work. We have to practice both the skill and compression to excel in the long run. As we improve and the knees get closer to the chest and head, the focus will shift. At that point, we will start to do more compression and hamstring flexibility work. When we are already proficient with body positions and the static holds that we want to achieve, we will need more specific compression to get better at the skill that require extreme compression like the press handstands and manna,
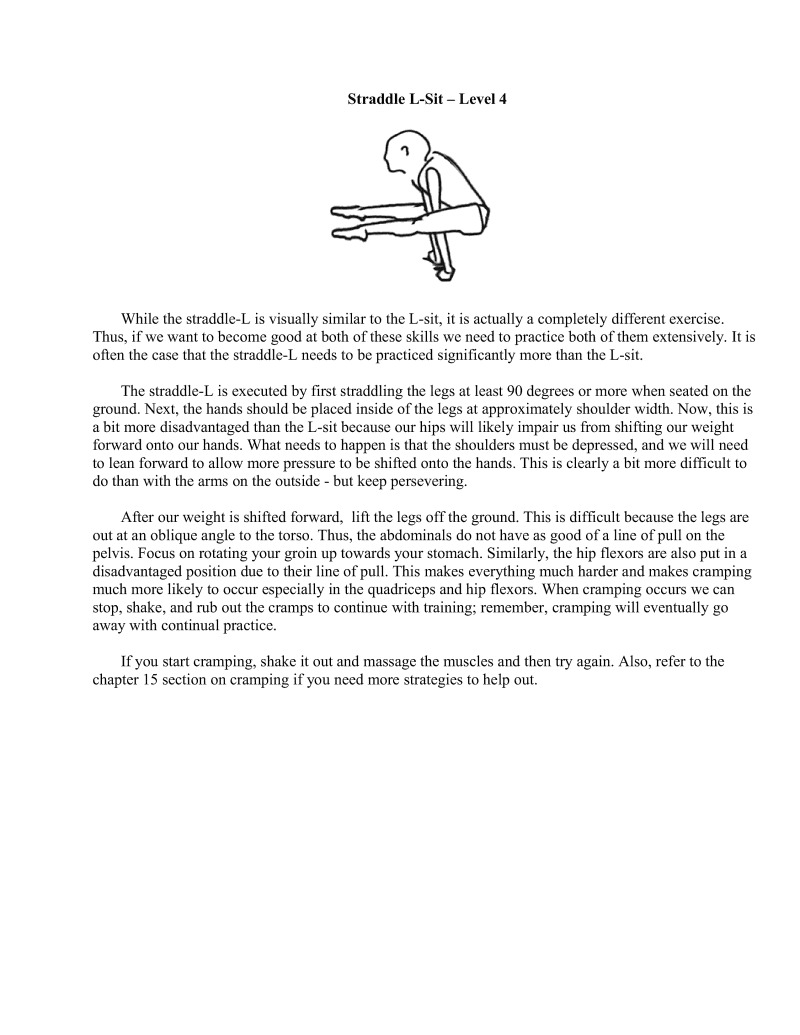
While the straddle-L is visually similar to the L-sit, it is actually a completely different exercise. Thus, if we want to become good at both of these skills we need to practice both of them extensively. It is often the case that the straddle-L needs to be practiced significantly more than the L-sit.
The straddle-L is executed by first straddling the legs at least 90 degrees or more when seated on the ground. Next, the hands should be placed inside of the legs at approximately shoulder width. Now, this is a bit more disadvantaged than the L-sit because our hips will likely impair us from shifting our weight forward onto our hands. What nceds to happen is that the shoulders must be depressed, and we will need to lean forward to allow more pressure to be shifted onto the hands. This is clearly a bit more difficult to do than with the arms on the outside - but keep persevering.
after our weight is shified forward, lift the legs off the ground. This is difficult because the legs are outat an oblique angle to the torso. Thus, the abdominals do not have as good of a line of pull on the pelvis. Focus on rotating your groin up towards your stomach. Similarly, the hip flexors are also put in a disadvantaged position due to their line of pull. This makes everything much harder and makes cramping much more likely to occur especially in the quadriceps and hip flexors. When cramping occurs we can stop, shake, and rub out the cramps to continue with training; remember, cramping will eventually go away with continual practice.
If you start cramping, shake it out and massage the muscles and then try again. Also, refer to the chapter 15 section on cramping if you need more strategies to help out.
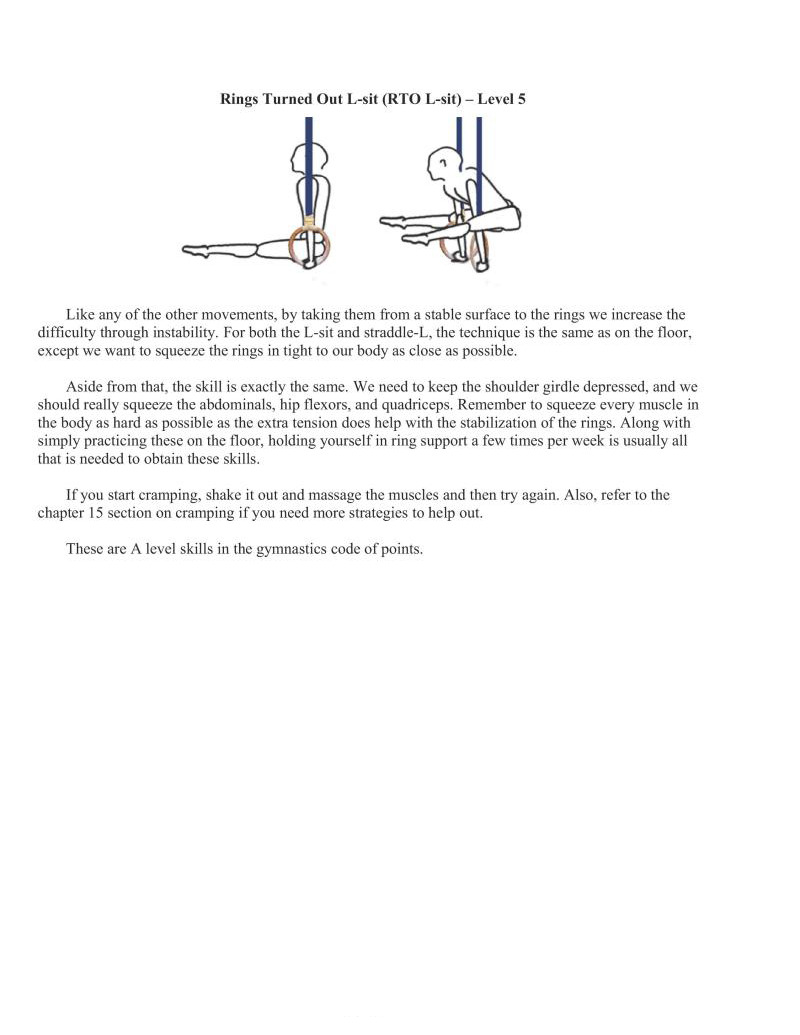
Like any of the other movements, by taking them from a stable surface to the rings we increase the difficulty through instability. For both the L-sit and straddle-L, the technique is the same as on the floor, except we want to squeeze the rings in tight to our body is close as possible.
Aside from that, the skill is exactly the same. We need to keep the shoulder girdle depressed, and we should really squeeze the abdominals, hip flexors, and quadriceps. Remember to squeeze every muscle in the body as hard as possible as the extra tension does help with the stabilization of the rings. Along with simply practicing these on the floor, holding yourself in ring support a few times per week is usually all that is needed to obtain these skills.
If you start cramping, shake it out and massage the muscles and then try again. Also, refer to the chapter 15 section on cramping if you need more strategies to help out.
These are A level skills in the gymnastics code of points.
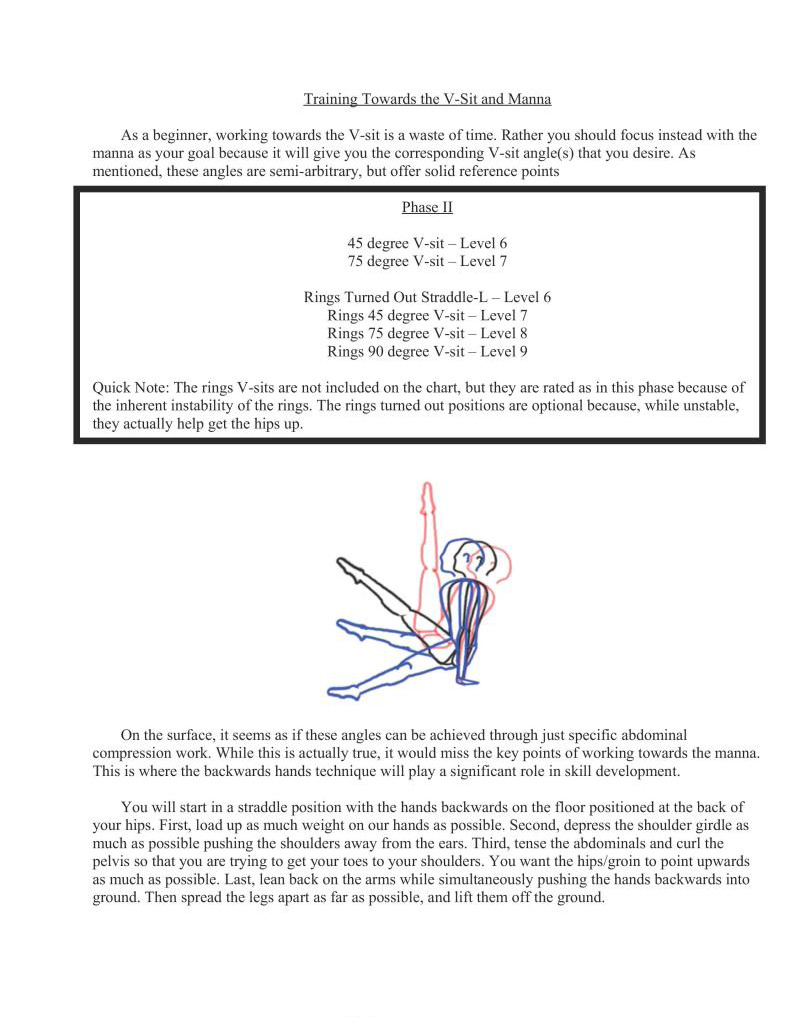
As a beginner, working towards the V-sit is a waste of time. Rather you should focus instead with the manna as your goal because it will give you the corresponding V-sit angle(s) that you desire. As mentioned, these angles are semi-arbitrary, but offer solid reference points
Quick Note: The rings V-sits are not included on the chart, but they are rated as in this phase because of the inherent instability of the rings. The rings turned out positions are optional because, while unstable, they actually help get the hips up.
On the surface, it seems as if these angles can be achieved through just specific abdominal compression work. While this is actually true, it would miss the key points of working towards the manna.
This is where the backwards hands technique will play a significant role in skill development. You will start in a straddle position with the hands backwards on the floor positioned at the back of your hips. First, load up as much weight on our hands as possible. Second, depress the shoulder girdle as much as possible pushing the shoulders away from the ears. Third, tense the abdominals and curl the pelvis so that you are trying to get your toes to your shoulders. You want the hips/groin to point upwards as much as possible, Last, lean back on the arms while simultaneously pushing the hands backwards into ground. Then spread the legs apart as far as possible, and lift them off the ground.

We want to get as proficient as possible with this vital position. Depressing the shoulder girdle consistently and rounding the back and pelvis are the main focus as this position will be critical all the way up to the mannaiitself.
After this position has been established and reinforced, the progression of the manna is all about pushing the hips forward. We have two mental cues used to achieve this.
Depending on your compression abilities, you might be able to lft the legs up into the V-sit to 45 or 75 degrees right away. Do not practice this now in favor of learning how to progress into the next phase. Instead, couple compression work with the above hips forward training.
Thus, we can think of this phase in terms of terms of two important concepts. We want to focus on this hold to reinforce the hip push, and we want to better improve our core compression. Each of those factors is critical not only to the development of the V-sit and manna but to extremely good core strength and control.
Supplementary work will work wonders since this is such an inherently difficult progression. These are two recommended supplements to keep in mind when training manna
German Hang / Skin the Cat - an excellent shoulder stretching exercise that puts the shoulder into extreme hyperextension. Ultimately, the manna requires excellent shoulder mobility in that range. German hangs work well especially right before any manna training attempts because stretching out the opposing muscles (namely the pectorals, latissimus dorsi, and anterior deltoids) statically for a period of 30+ seconds helps to inhibit the force generation in those muscles. I have personally experienced that it is possible to get a 10-15 degree greater angle of improvement in the next attempt after German Hang.
Hamstrings Stretching - In the manna we are pushing up into a compressed straddle position, stretching in the straddle position is preferable. Any hamstring stretching will help. Once we advance to of manna training by pushing the hips forward more significantly, the inhibition (looseness) gs will allow a much needed deeper compression by letting the quadriceps, hip flexors, and abdominals pull the knees closer to the face with less self-resistance. This allows us a higher angle to be achieved, and actually improves the balance of the skill. Compression moves the center of mass closer to the hands allowing the torque generated on the arms and shoulders to lessen.
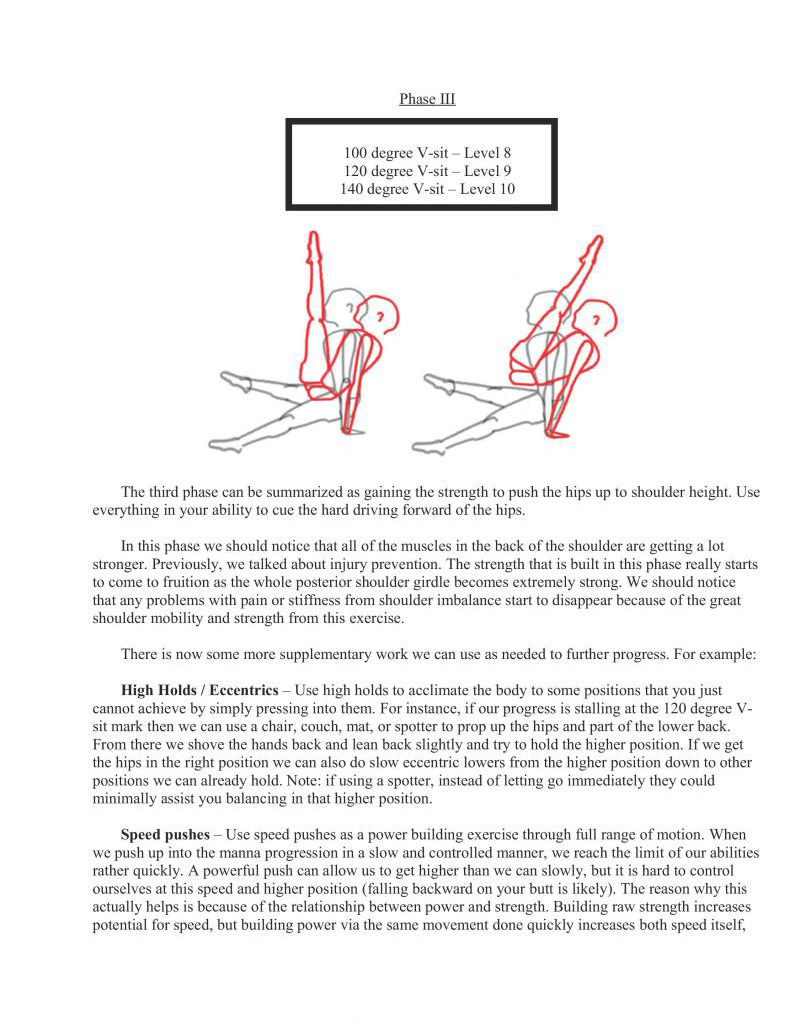
Phase III
The third phase can be summarized as gaining the strength to push the hips up to shoulder height. Use everything in your ability to cue the hard driving forward of the hips.
In this phase we should notice that all of the muscles in the back of the shoulder are getting a lot stronger. Previously, we talked about injury prevention. The strength that is built in this phase really to come to fruition as the whole posterior shoulder girdle becomes extremely strong. We should notice
that any problems with pain or stiffness from shoulder imbalance start to disappear because of the great shoulder mobility and strength from this exercise.
There is now some more supplementary work we can use as needed to further progress. For example:
High Holds / Eccentrics — Use high holds to acclimate the body to some positions that you just cannot achicve by simply pressing into them. For instance, if our progress is stalling at the 120 degree V- sit mark then we can use a chair, couch, mat, or spotter to prop up the hips and part of the lower back. From there we shove the hands back and lean back slightly and try to hold the higher position. If we get the hips in the right position we can also do slow eccentric lowers from the higher position down to other positions we can already hold. Note: if using a spotter, instead of letting go immediately they could minimally assist you balancing in that higher position.
Speed pushes — Use speed pushes as a power building exercise through full range of motion. When we push up into the manna progression in a slow and controlled manner, we reach the limit of our abilities rather quickly. A powerful push can allow us to get higher than we can slowly, but it is hard to control ourselves at this speed and higher position (falling backward on your butt is likely). The reason why this actually helps is because of the relationship between power and strength. Building raw strength increases potential for speed, but building power via the same movement done quickly increases both speed itself,

and strength as well. However, doing quick movements avoids building the static stability and sacrifices total volume through less time spent being held in the position.
Thus a combination of presses, high holds, and speed pushes best contributes to success with achieving manna.
Presses into the top holds and high holds should compose most of the training volume. With most end range of motion skills, the best way to b g in that end range of motion. There are three reasons for this

Getting the hips up above shoulder height, the last phase of the manna, is by far the most difficult,
At this point, with the high holds approach we may actually be able to hold the manna. Similarly, if we are a gymnast or other athlete it may be possible to swing to manna or kick up to the manna position and hold it. At the same time, it is likely compression and hamstring flexibility has progressed as far as it needs to and also merely needs be maintained. If this is the case, you will merely need to maintain flexibility and compression from this point on.
We still may need to keep working on the press into manna as the strength built from this technique will assist in injury prevention, continue to improve strength in extension, reinforce proper fundamental positions, and help with working progressions beyond this.
Speed pushes and regular, slow, controlled pushes should make up the majority of the work at this point. If there is a little more way to go, you can use someone to help the hips get that last litte bit, or do eccentrics from the high holds.
Getting the last 25 degrees will probably be the most frustrating work you will do compared to all of the other holds. Keep plugging away: if you obtain it you will have one of the most rare static strength skills in the world (and healthy shoulders).
This is a C level skill in the gymnastics code of points.
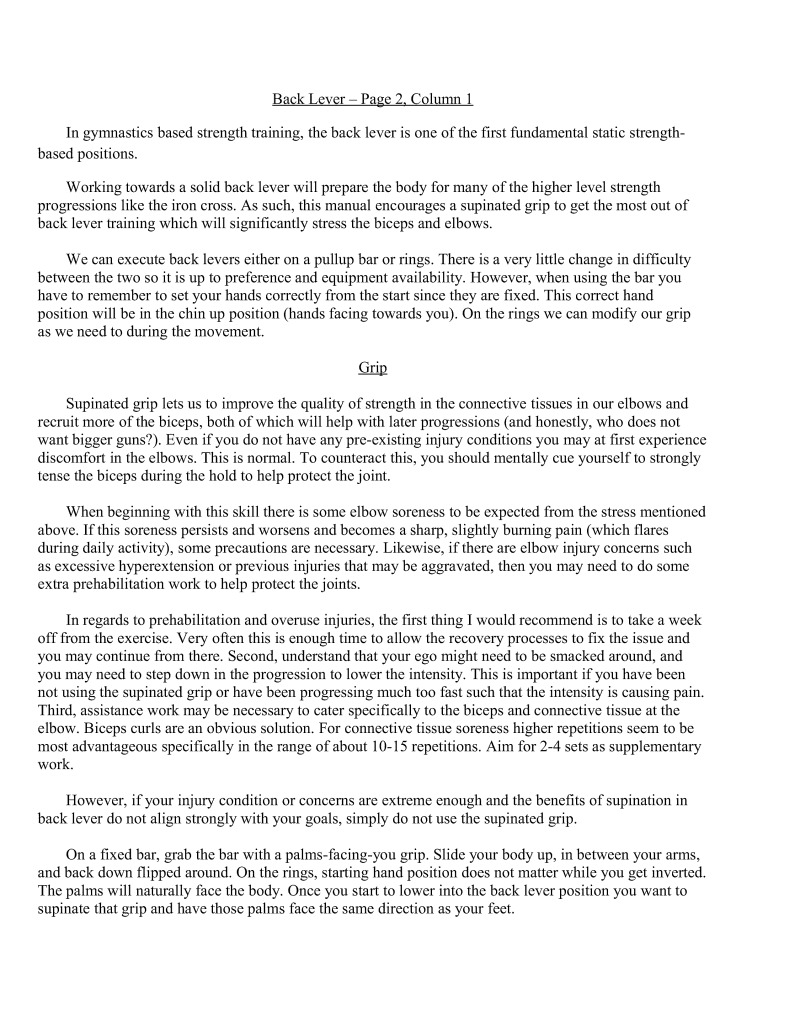
In gymnastics based strength training, the back lever is one of the first fundamental static strength- based positions.
Working towards a solid back lever will prepare the body for many of the higher level strength progressions like the iron cross. As such, this manual encourages a supinated grip to get the most out of back lever training which will significantly stress the biceps and elbows.
We can execute back levers either on a pullup bar or rings. There is a very little change in difficulty between the two so it is up to preference and equipment availability. However, when using the bar you have to remember to set your hands correctly from the start since they are fixed. This correct hand position will be in the chin up position (hands facing towards you). On the rings we can modify our grip as we need to during the movement.
Supinated grip lets us to improve the quality of strength in the connective tissues in our elbows and recruit more of the biceps, both of which will help with later progressions (and honestly, who does not want bigger guns?). Even if you do not have any pre-existing injury conditions you may at first experience discomfort in the elbows. This is normal. To counteract this, you should mentally cue yourself to strongly tense the biceps during the hold to help protect the joint.
When beginning with this skill there is some elbow soreness to be expected from the stress mentioned above. If this soreness persists and worsens and becomes a sharp, slightly burning pain (which flares during daily activity), some precautions are necessary. Likewise, if there are elbow injury concerns such as excessive hyperextension or previous injuries that may be aggravated, then you may need to do some extra prehabilitation work to help protet the joints.
In regards to prehabilitation and overuse injuries, the first thing I would recommend is to take a week off from the exercise. Very often this is enough time to allow the recovery processes to fix the issue and You may continue from there. Second, understand that your ego might need to be smacked around, and You may need to step down in the progression to lower the intensity. This is important if you have been not using the supinated grip or have been progressing much too fast such that the intensity is causing pain. Third, assistance work may be necessary to cater specifically to the biceps and connective tissue at the elbow. Biceps curls are an obvious solution. For connetive tissue soreness higher repetitions seem to be most advantageous specifically in the range of about 10-15 repetitions. Aim for 2-4 sets as supplementary work.
However, if your injury condition or concerns arc extreme enough and the benefits of supination in back lever do not align strongly with your goals, simply do not use the supinated grip.
On a fixed bar, grab the bar with a palms-facing-you rip. Slide your body up, in between your arms, and back down flipped around. On the rings, starting hand position does not matter while you get inverted. The palms will naturally face the body. Once you start to lower into the back lever position you want to supinate that grip and have those palms face the same direction as your feet.
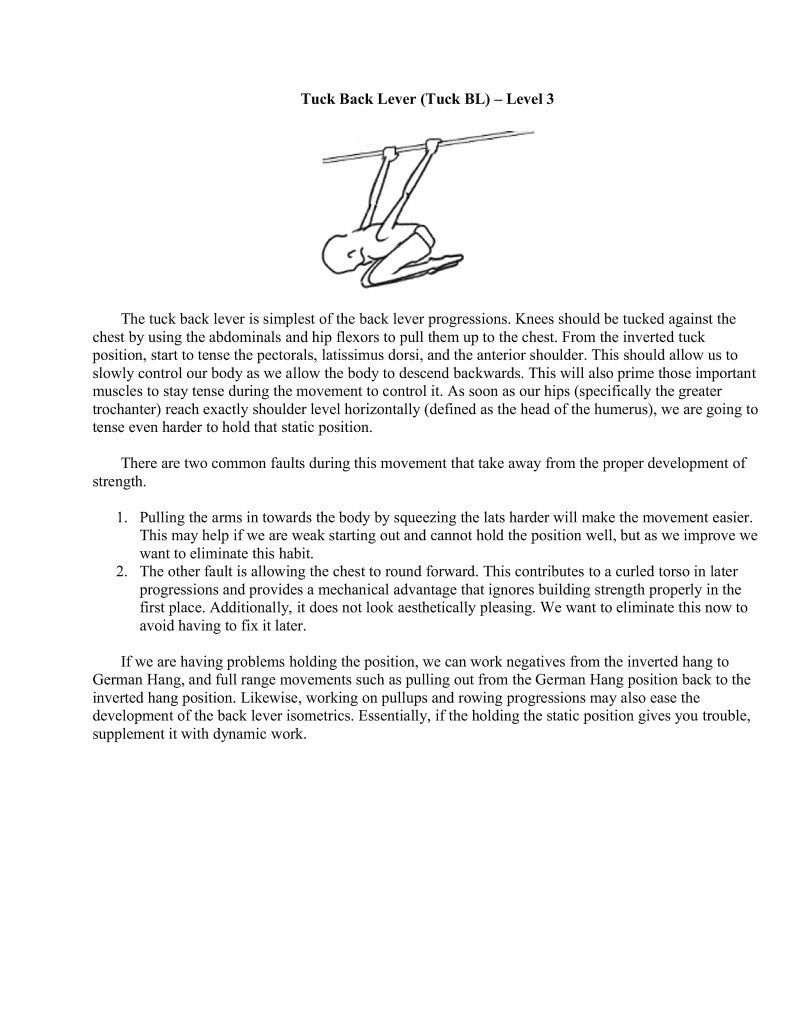
The tuck back lever is simplest of the back lever progressions. Knees should be tucked against the chest by using the abdominals and hip flexors to pull them up to the chest. From the inverted tuck position, start to tense the pectorals, latissimus dorsi, and the anterior shoulder. This should allow us to slowly control our body as we allow the body to descend backwards. This will also prime those important muscles to stay tense during the movement to control it. As soon as our hips (specifically the greater trochanter) reach exactly shoulder level horizontally (defined as the head of the humerus), we are going to tense even harder to hold that static position.
There are two common faults during this movement that take away from the proper development of strength
If we are having problems holding the position, we can work negatives from the inverted hang to German Hang, and full range movements such as pulling out from the German Hang position back to the inverted hang position. Likewise, working on pullups and rowing progressions may also case the development of the back lever isometrics. Essentially, if the holding the static position gives you trouble, supplement it with dynamic work.

The advanced tuck back lever is a continuation of the advanced tuck. This is performed by contracting the back muscles to straighten out the rounded torso. In the tuck, we just pulled the knees to the chest and let our backs round. In the advanced tuck, we are going to straighten out the core of our body so we can see a straight line from our shoulder (humeral head) through the body to the hips (greater trochanter).
Since we are straightening out the torso we increase the difficulty by pushing our center of mass slightly farther away from the shoulders, inereasing the torque at that joint.
If this progression gets easy to hold, open the hip angle by moving the knees farther away from the chest. We want to work up to hip and knee angles of 90 degrees each.
The technique to perform this skill is the same as the tuck back lever. Remember, we need to focus on keeping a supinated grip, a proud chest, and not squeezing our hands closer to each other.
The increased torque at the shoulder will also put more torque at the elbow. Thus, the increased stress may lead to soreness. Fixing the issue is the same as previously prescribed for the Tuck Back Lever.
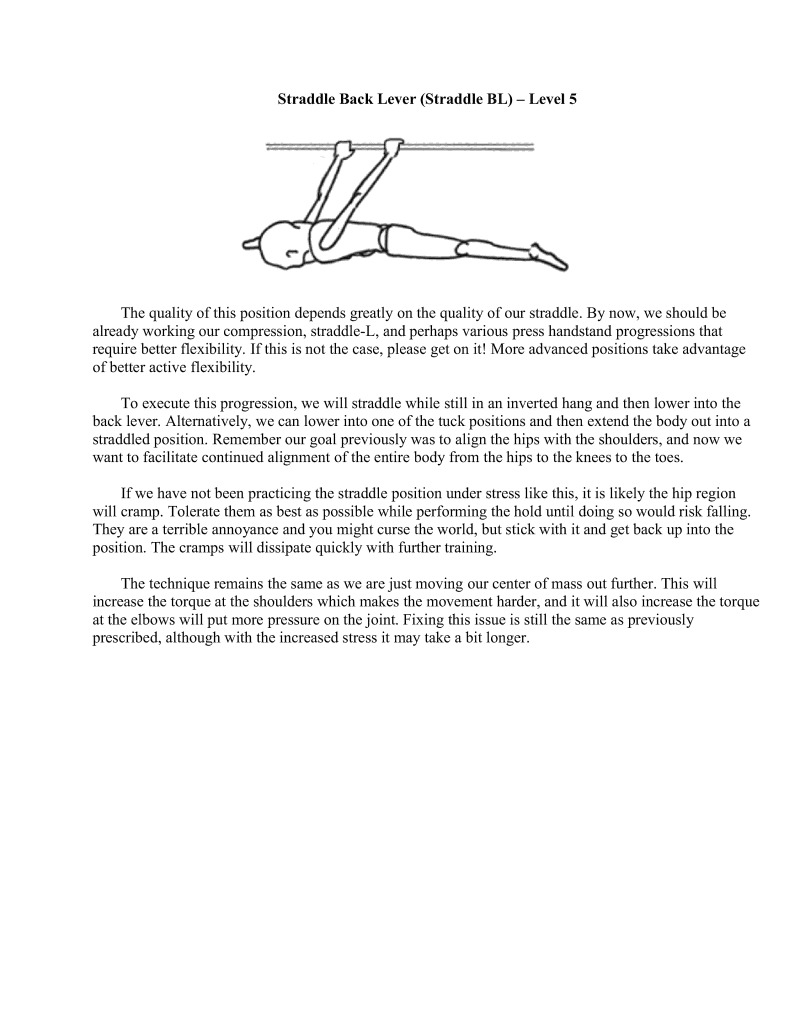
The quality of this position depends greatly on the quality of our straddle. By now, we should be already working our compression, straddle-L, and perhaps various press handstand progressions that require better flexibility. If this is not the case, please get on it! More advanced positions take advantage of better active flexibility.
To execute this progression, we will straddle while still in an inverted hang and then lower into the back lever. Alternatively, e can lower into one of the tuck positions and then extend the body out into a straddled position. Remember our goal previously was to align the hips with the shoulders, and now we want to facilitate continued alignment of the entire body from the hips to the knees to the toes.
If we have not been practicing the straddle position under stress like this, it is likely the hip region will cramp. Tolerate them as best as possible while performing the hold until doing so would risk falling. They are a terrible annoyance and you might curse the world, but stick with it and get back up into the position. The cramps will dissipate quickly with further training.
The technique remains the same as we are just moving our center of mass out further. This will increase the torque at the shoulders which makes the movement harder, and it will also increase the torque at the elbows will put more pressure on the joint. Fixing this issue is still the same as previously prescribed, although with the increased stress it may take a bit longer.
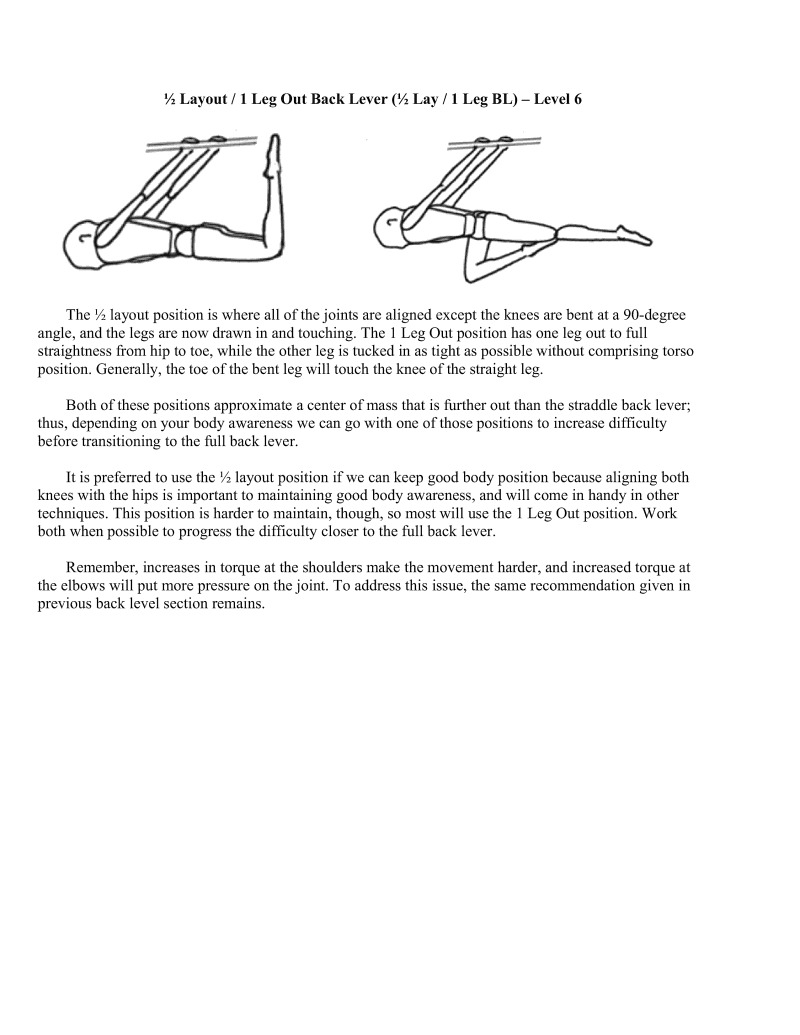
½ Layout/ 1 Leg Out Back Lever (½ Lay / 1 Leg BL) - Level 6
The ½ layout position is where all of the joints are aligned except the knees are bent at a 90-degree angle, and the legs are now drawn in and touching. The 1 Leg Out position has one leg out to full straightness from hip to toe, while the other leg is tucked in as tight as possible without comprising torso position. Generally, the toe of the bent leg will touch the knee of the straight leg.
Both of these positions approximate a center of mass that is further out than the straddle back lever; thus, depending on your body awareness we can go with one of those positions to increase difficulty before transitioning to the full back lever.
techniques. This position is harder to maintain, though, so most will use the 1 Leg Out position. Work both when possible to progress the difficulty closer to the full back lever.
Remember, increases in torque at the shoulders make the movement harder, and increased torque at the elbows will put more pressure on the joint. To address this issue, the same recommendation given in previous back level section remains.
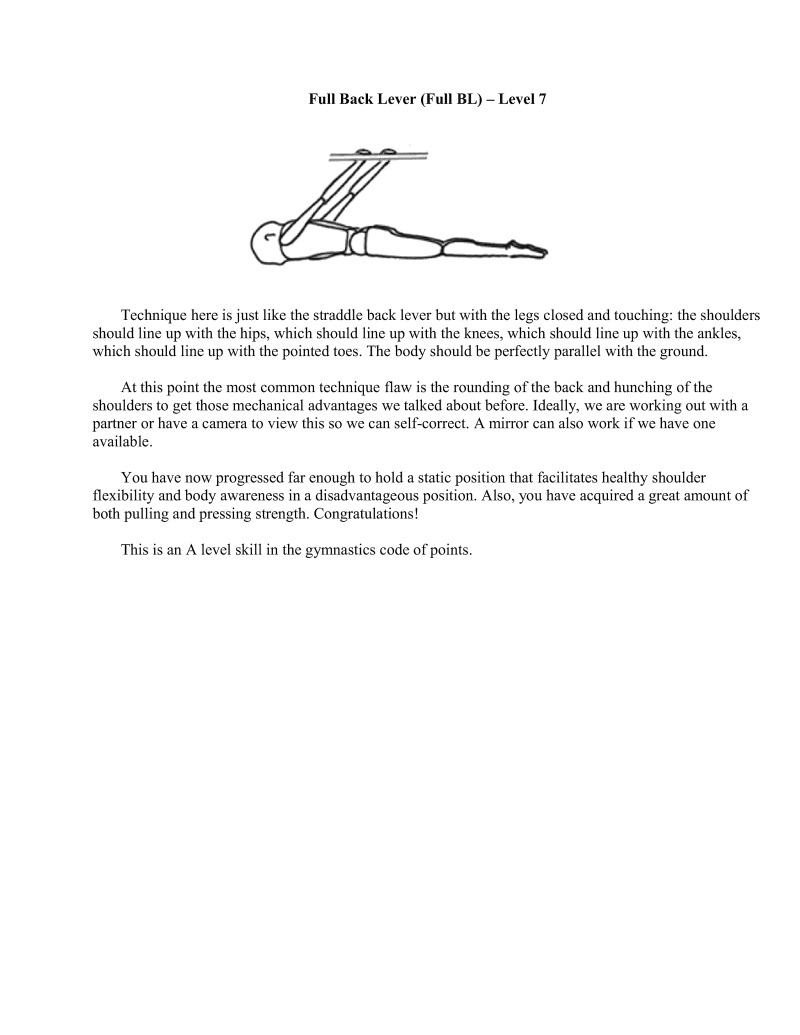
Technique here is just like the straddle back lever but with the legs closed and touching: the shoulders should line up with the hips, which should line up with the knees, which should line up with the ankles, which should line up with the pointed toes. The body should be perfectly parallel with the ground.
At this point the most common technique flaw is the rounding of the back and hunching of the shoulders to get those mechanical advantages we talked about before. Ideally, we are working out with a partner or have a camera to view this so we can self-correct. A mirror can also work if we have one available.
You have now progressed far enough to hold a static position that facilitates healthy shoulder flexibility and body awareness in a disadvantageous position. Also, you have acquired a great amount of both pulling and pressing strength. Congratulations!
This is an A level skill in the gymnastics code of points.
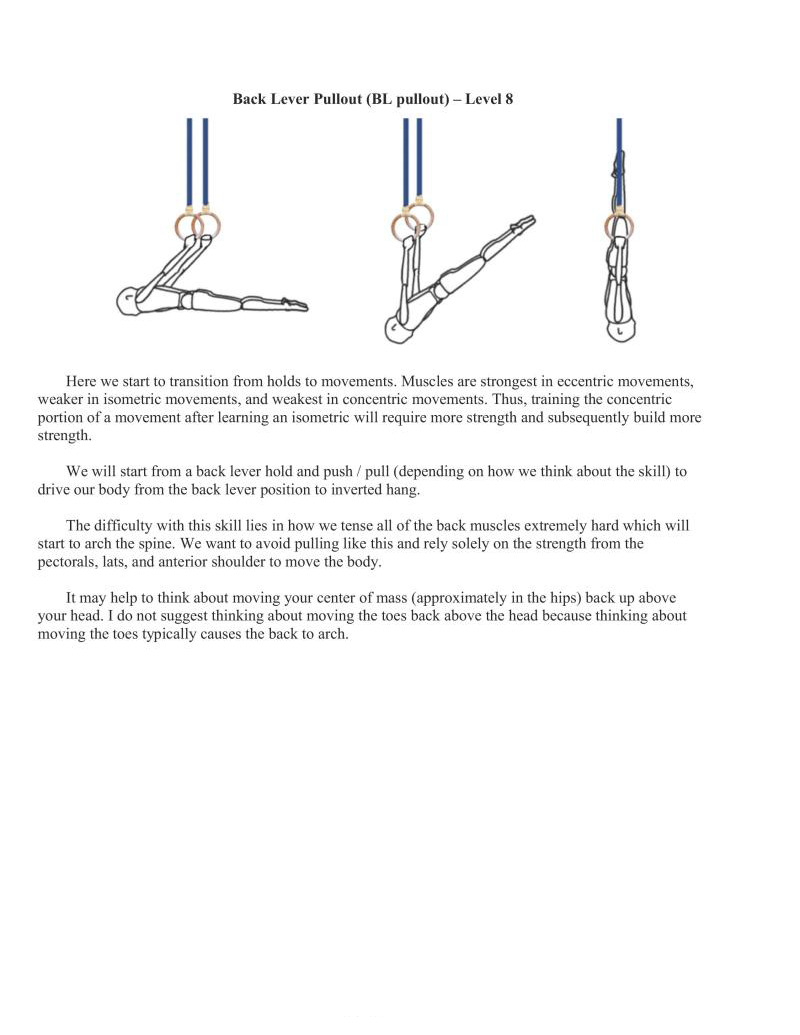
Here we start to transition from holds to movements. Muscles are strongest in eccentric movements, weaker in isometric movements, and weakest in concentric movements. Thus, training the concentric. portion of a movement after learning an isometric will require more strength and subsequently build more strength,
We will start from a back lever hold and push / pull (depending on how we think about the skill) to drive our body from the back lever position to inverted hang.
The difficulty with this skill lies in how we tense all of the back muscles extremely hard which will start to arch the spine. We want to avoid pulling like this and rely solely on the strength from the pectorals, lats, and anterior shoulder to move the body.
It may help to think about moving your center of mass (approximately in the hips) back up above your head. I do not suggest thinking about moving the toes back above the head because thinking about moving the toes typically causes the back to arch.
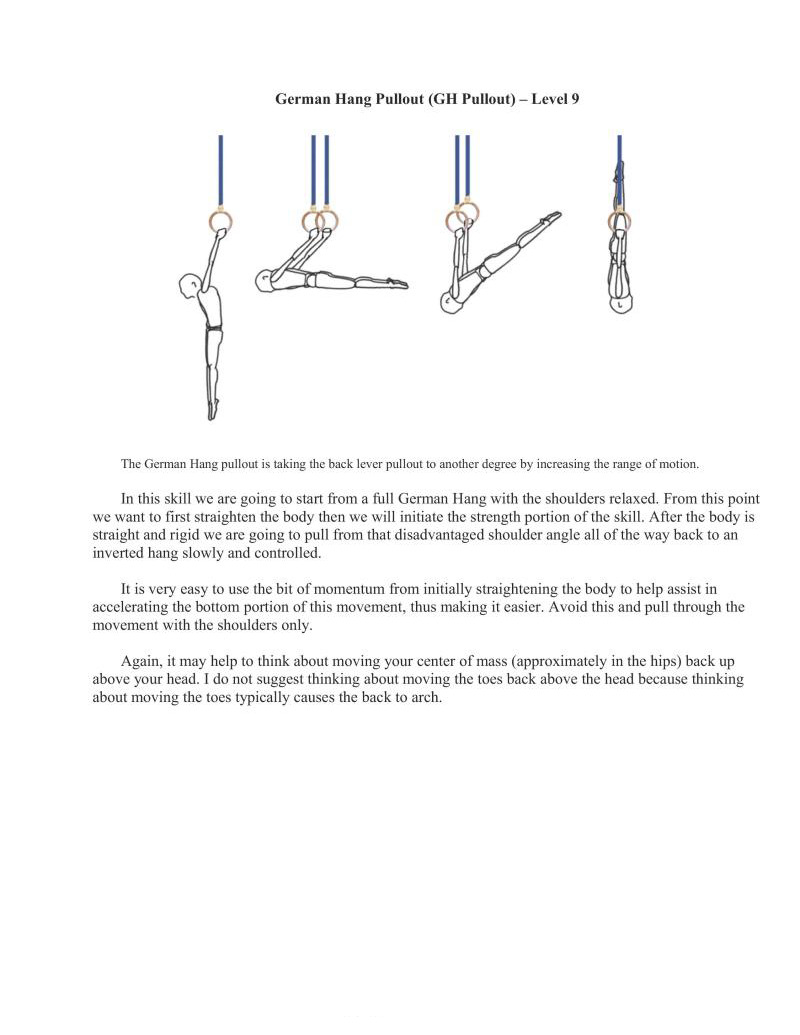
The German Hang pullout is taking the back lever pullout to another degree by increasing the range of motion.
In this skill we are going to start from a full German Hang with the shoulders relaxed. From this point we want to first straighten the body then we will initiate the strength portion of the skill. After the body is straight and rigid we are going to pull from that disadvantaged shoulder angle all of the way back to an inverted hang slowly and controlled.
It is very easy to use the bit of momentum from initially straightening the body to help assist in accelerating the bottom portion of this movement, thus making it easier. Avoid this and pull through the movement with the shoulders only.
Again, it may help to think about moving your center of mass (approximately in the hips) back up above your head. I do not suggest thinking about moving the toes back above the head because thinking about moving the toes typically causes the back to arch.
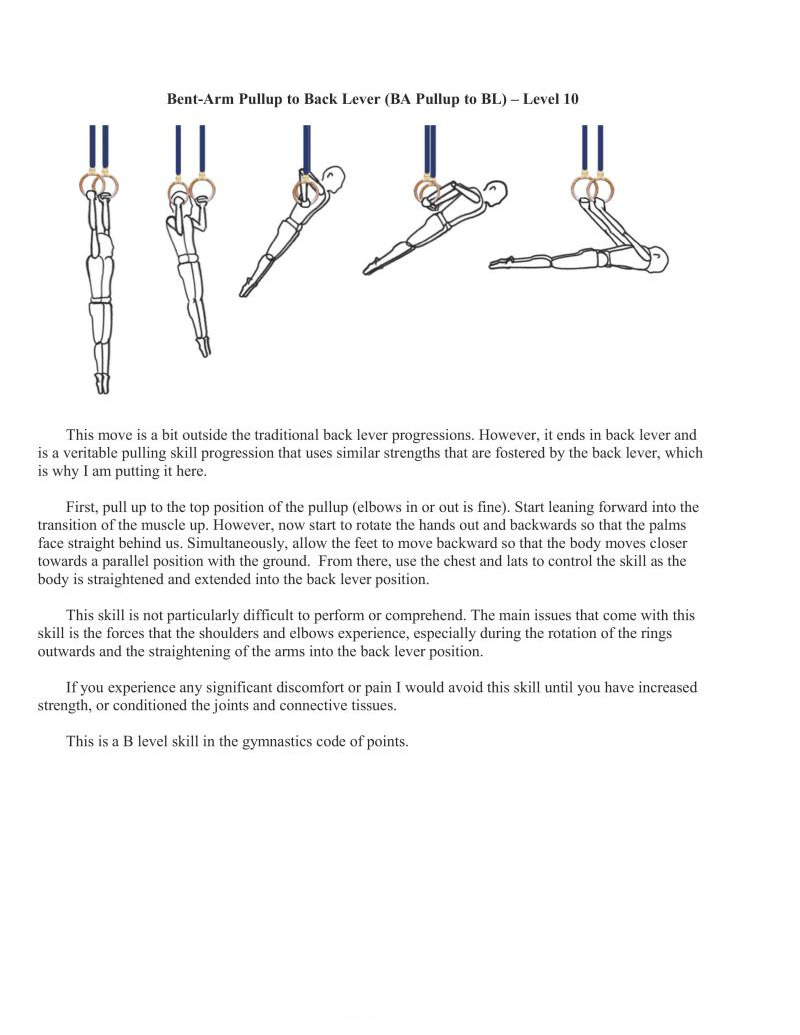
This move is a bit outside the traditional back lever progressions. However, it ends in back lever and is a veritable pulling skill progression that uses similar strengths that are fostered by the back lever, which is why Iam putting it here.
irst, pull up to the top position of the pullup (elbows in or out is fine). Start leaning forward into the transition of the muscle up. However, now start to rotate the hands out and backwards so that the palms face straight behind us. simultaneously, allow the feet to move backward so that the body moves closer towards a parallel position with the ground. From there, use the chest and lats to control the skill as the body is straightened and extended into the back lever position.
This skill is not particularly difficult to perform or comprehend. The main issues that come with this skill i the forces that the shoulders and elbows expericnce, especially during the rotation of the rings outwards and the straightening of the arms into the back lever postion.
If you experience any significant discomfort or pain I would avoid this skill until you have increased strength, or conditioned the joints and connective tissues.
This is a B level skill in the gymnastics code of points.

The handstand lower to back lever is an interesting skill. It is a dual pushing/pulling skill, so T hesitated to put it into this category, but it fits here with the back lever progressions.
The handstand lower to back lever starts in a rings handstand. As you start to lower, push the shoulders forwards. We will reach a semi-elbow lever position on the rings. From there we will lower with bent arms with the body parallel to the ground at rings height. Then we will slowly extend the arms straight until we hit the back lever position. Essentially, this skill lowers to elbow lever then straight through a bent arm maliese position (straight body level with the rings) down into the back lever.
Like the above skill, one thing that may cause problems is the "fall." If you are not strong enough to lower slowly under control then the body will jerk when you get into the back lever position. Thus, this movement can be tough on the shoulders and elbows. If this is the case it may be a good idea to back off and focus on more on strength work, and use the aforementioned assistance devices or spoter.
This is a B level skill in the gymnastics code of points.
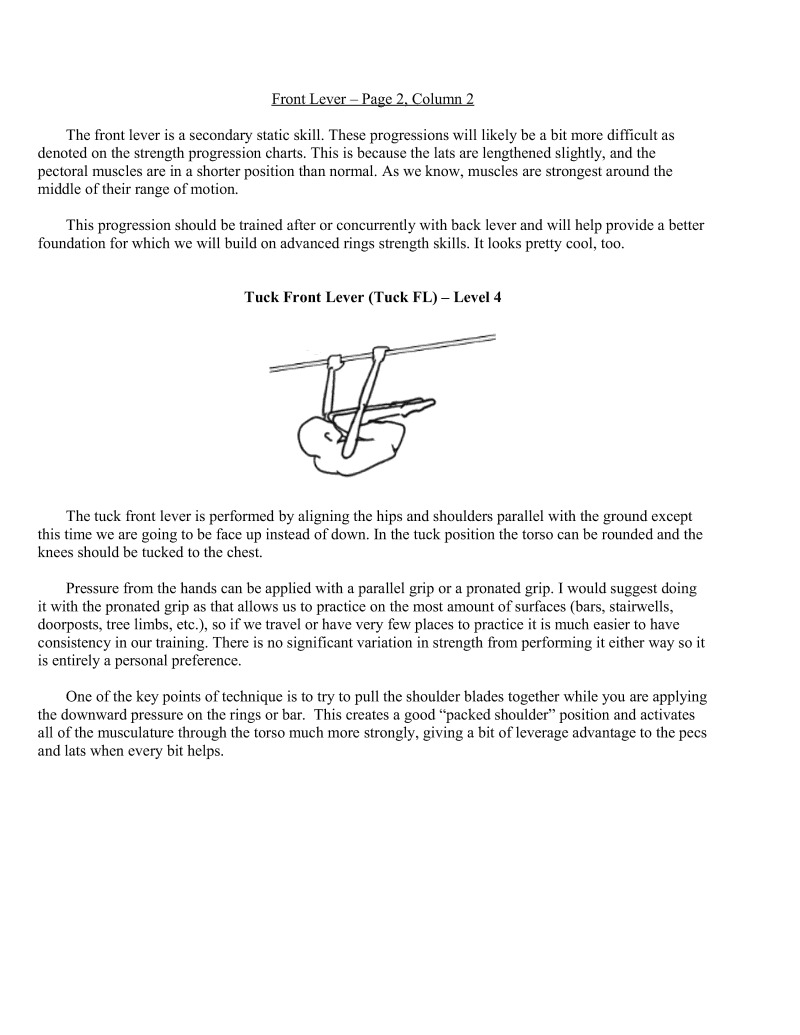
The front lever is a secondary static skill. These progressions will likely be a bit more difficult as denoted on the strength progression charts. This is because the lats are lengthened slightly, and the pectoral muscles are in a shorter position than normal. As we know, muscles are strongest around the middle of their range of motion.
This progression should be trained after or concurrently with back lever and will help prosle a better foundation for which we will build on advanced rings strength skills. It looks pretty cool, too.
The tuck front lever is performed by aligning the hips and shoulders parallel with the ground except me we are going to be face up instead of down. In the tuck position the torso can be rounded and the knees should be tucked to the chest,
Pressure from the hands can be applied with a parallel grip or a pronated grip. I would suggest doing it with the pronated grip as that allows us to practice on the most amount of surfaces (bars, stairwells, doorposts, tree limbs, etc.), so if we travel or have very few places to practice it is much easier to have consistency in our training. There is no significant variation in strength from performing it either way so it is entirely a personal preference.
One of the key points of technique is to try to pull the shoulder blades together while you are applying the downward pressure on the rings or bar. This creates a good "packed shoulder" position and activates all of the musculature through the torso much more strongly. giving a bit of leverage advantage to the pecs and lats when every bit helps.
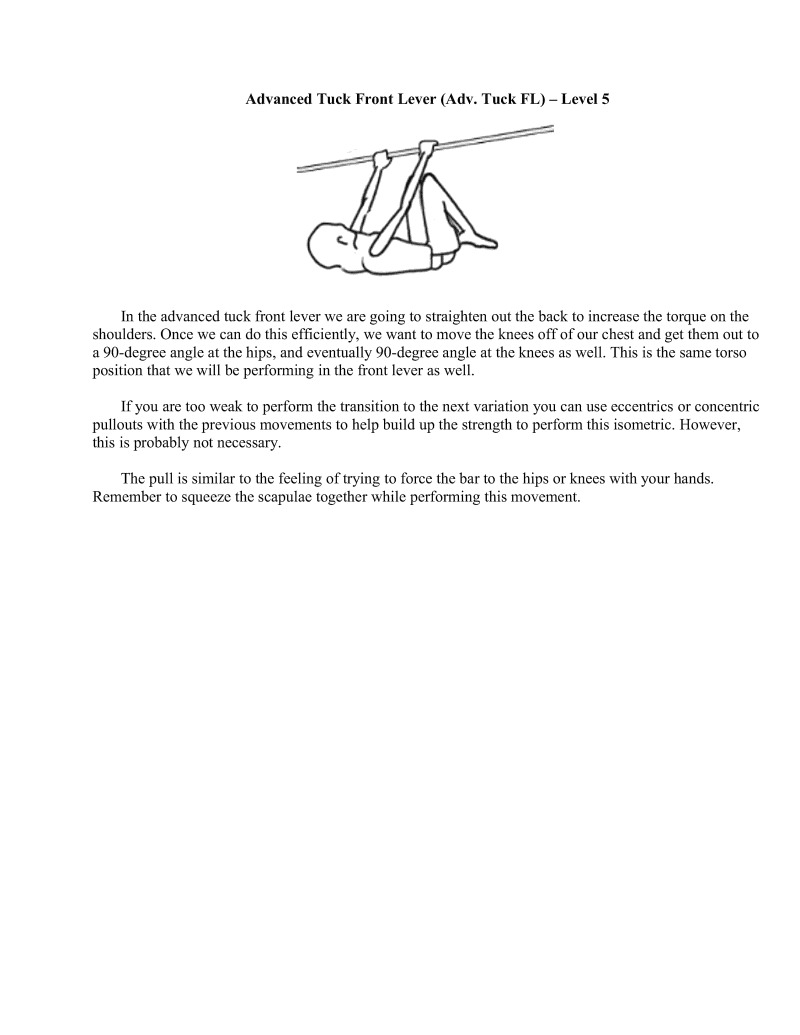
In the advanced tuck front lever we are going to straighten out the back to increase the torque on the shoulders. Once we can do this efficiently, we want to move the knees off of our chest and get them out to 90-degree angle at the hips, and eventually 90-degree angle at the knees as well. This i the same torso position that we will be performing in the front lever as well.
If you are too weak to perform the transition to the next variation you can use eccentrics or concentric. pullouts with the previous movements to help build up the strength to perform this isometric. However, this is probably not necessary.
The pull is similar to the feling of trying to force the bar to the hips or knees with your hands. Remember to squeeze the scapulae together while performing this movement.
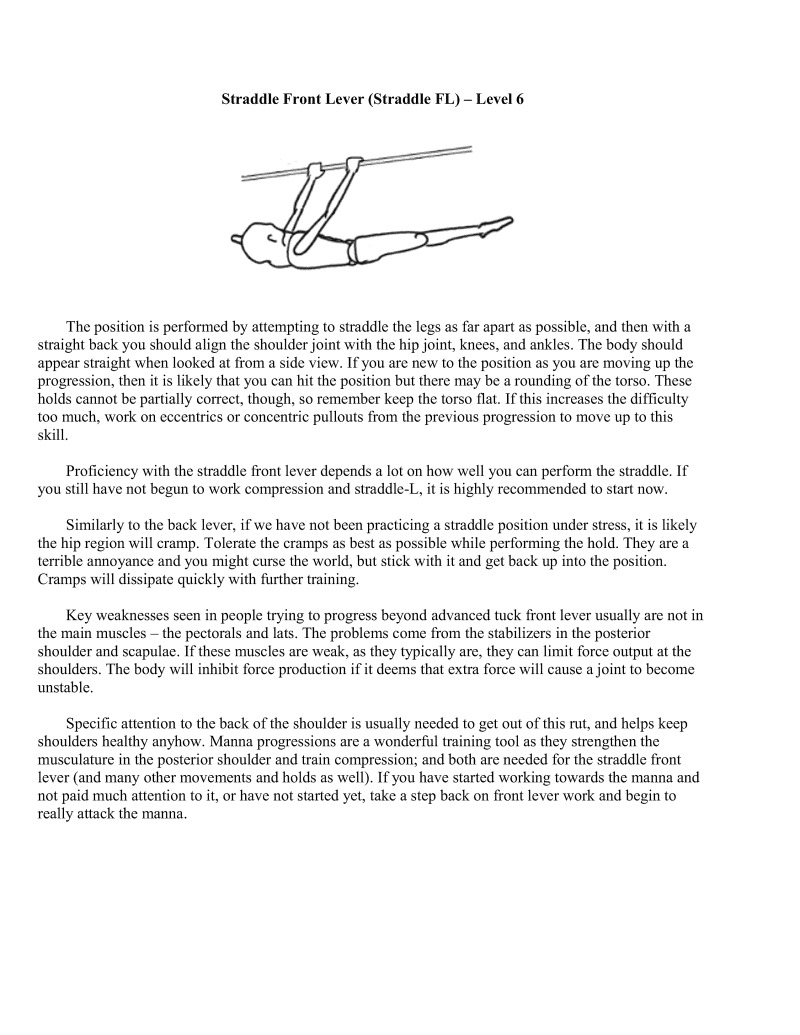
The position is performed by attempting to straddle the legs as far apart as possible, and then with a straight back you should align the shoulder joint with the hip joint, knees, and ankles. The body should appear straight when looked at from a side view. If you are new to the position as you are moving up the progression, then it is likely that you can hit the position but there may be a rounding of the torso. These holds cannot be partially correct, though, so remember keep the torso flat. If this increases the difficulty 100 much, work on eccentrics or concentric pullouts from the previous progression to move up to this skill
Proficiency with the straddle front lever depends a lot on how well you can perform the straddle. If you still have not begun to work compression and straddle-L. it is highly recommended to start now.
Similarly to the back lever, if we have not been practicing a straddle position under stress, it is likely the hip region will cramp. Tolerate the cramps as best as possible while performing the hold. They are a terrible annoyance and you might curse the world, but stick with it and get back up into the position. Cramps will dissipate quickly with further training.
Key weaknesses seen in people trying to progress beyond advanced tuck front lever usually are not in the main muscles — the pectorals and lats. The problems come from the stabilizers in the posterior shoulder and scapulae. If these muscles are weak, as they typically are, they can limit force output at the shoulders. The body wi t force production if it deems that extra force will cause a joint to become unstable.
Specific attention to the back of the shoulder is usually needed to get out of ths rut, and helps keep shoulders healthy anyhow. Manna progressions are a wonderful training tool as they strengthen the musculature in the posterior shoulder and train compression; and both are needed for the straddle front lever (and many other movements and holds as well). If you have started working towards the manna and not paid much attention to it, or have not started yet, take a step back on front lever work and begin to really attack the manna.
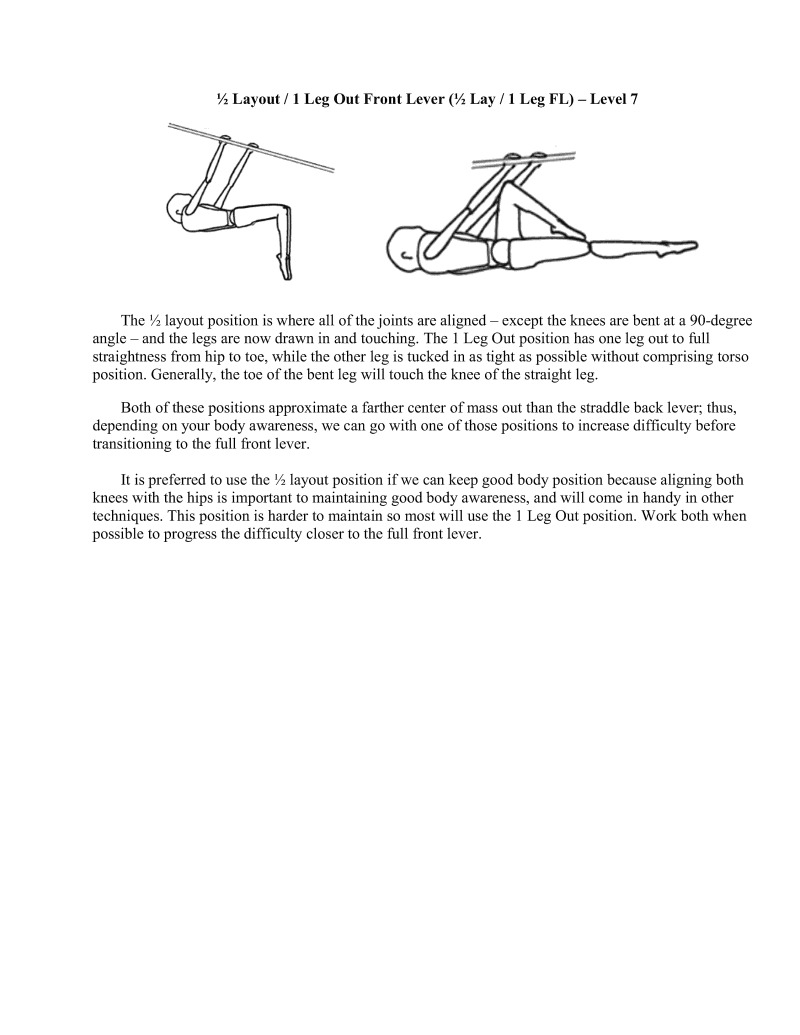
The ½ layout position is where all of the joints are aligned — except the knees are bent at a 90-degree angle —and the legs are now drawn in and touching. The 1 Leg Out position has one leg out to full straightness from hip to toe, while the other leg is tucked in as tight as possible without comprising torso position. Generally, the toe of the bent leg will touch the knee of the straigh leg.
Both of these positions approximate a farther center of mass out than the straddle back lever; thus, depending on your body awareness, we can go with one of those positions to increase difficulty before transitioning to the full front lever.
It is preferred to use the % layout position if we can keep good body position because aligning both knees with the hips is important to maintaining good body awareness, and will come in handy in other techniques. This position is harder to maintain so most will use the 1 Leg Out position. Work both when possible to progress the difficulty closer to the full front lever.
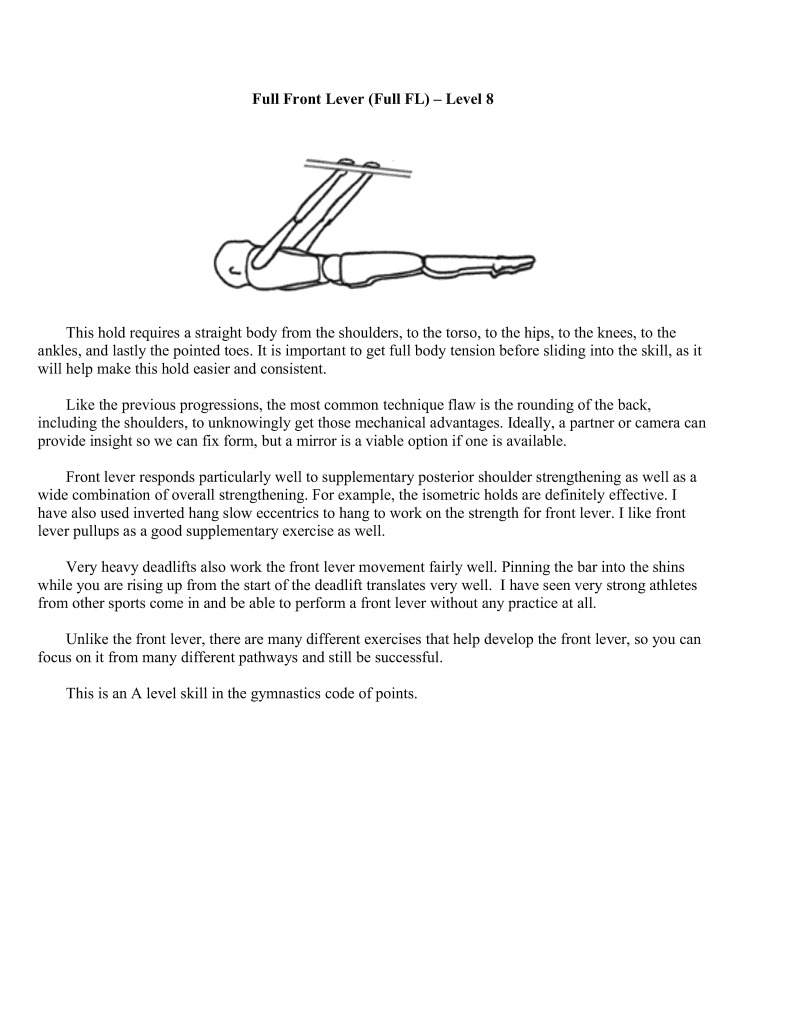
This hold requires a straight body from the shoulders, to the torso, to the hips, to the knees, to the ankles, and lastly the pointed toes. It is important to get full body tension before sliding into the skill, as it will help make this hold easier and consistent.
Like the previous progressions, the most common technique flaw is the rounding of the back, including the shoulders, to unknowingly get those mechanical advantages. Ideally, a partner or camera can provide insight so we can fix form, but a mirror is a viable option if one is available.
Front lever responds particularly well to supplementary posterior shoulder strengthening as well as a wide combination of overall strengthening. For example, the isometric holds are definitely effective. T have also used inverted hang slow eccentrics to hang to work on the strength for front lever. I like front lever pullups as a good supplementary exercise as well.
Very heavy deadlifts also work the front lever movement fairly well. Pinning the bar into the shins while you are rising up from the start of the deadlift translates very well. 1 have scen very strong athletes from other sports come in and be able to perform a front lever without any practice at all
Unlike the front lever, there are many different exercises that help develop the front lever, so you can focus on it from many different pathways and still be successful.
This is an A level skill in the gymnastics code of points.
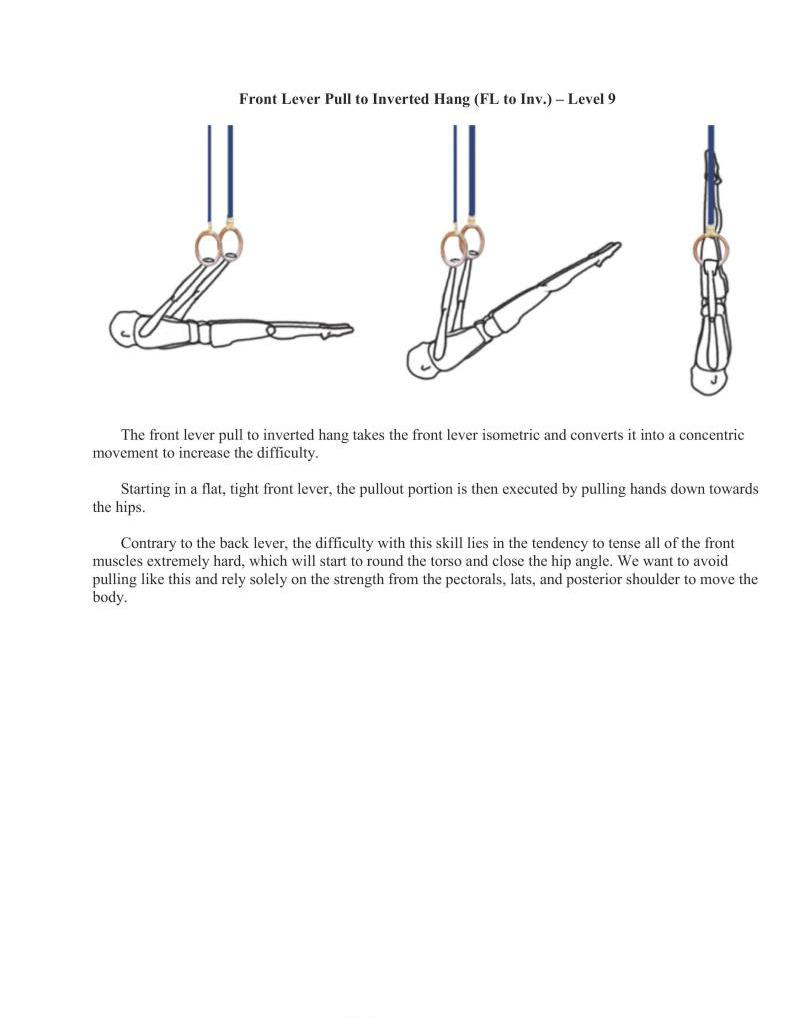
The front lever pull to inverted hang takes the front lever isometric and converts it into a concentric movement to increase the difficulty.
Starting in a flat, tight front lever, the pullout portion is then executed by pulling hands down towards the hips.
Contrary to the back lever, the difficulty with this skill lies in the tendency to tense all of the front muscles extremely hard, which will start to round the torso and close the hip angle. We want to avoid pulling like this and rely solely on the strength from the pectorals, lats, and posterior shoulder to move the body.

Starting from a hang and pulling out to an inverted hang increases the pull range of motion to increase the difficulty.
We will start relaxed in the straight body vertical position. First, engage the shoulders by pulling them into the active position (shoulder into the socket), and then initiate the pull. You should now be rigid as you pull the hands to the hips in a slow and controlled manner. This will be difficult because the shoulder muscles are lengthened towards near the end of their range of motion.
It is very tempting to use the bit of momentum from the initiation of movement to help assist in accelerating out of the bottom. Again, avoid this and initiate and pull the movement with the shoulder muscles only.
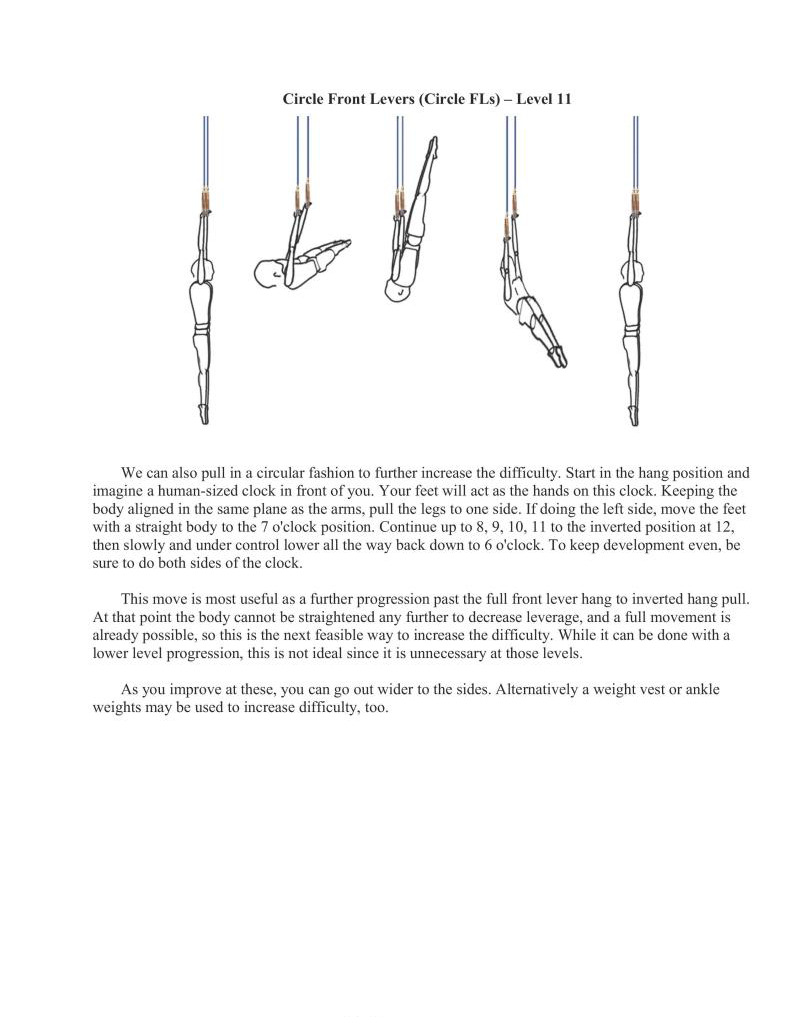
We can also pull in a circular fashion to further increase the difficulty. Start in the hang position and imagine a human-sized clock in front of you. Your feet will act as the hands on this clock. Keeping the body aligned in the same plane as the arms, pull the legs to one side. If doing the left side, move the feet with a straight body to the 7 o'clock position. Continue up to 8, 9, 10, 11 to the inverted position at 12,
then slowly and under control lower all the way back down to 6 o'clock. To keep development even, be sure to do both sides of the clock.
This move is most useful as a further progression past the full front lever hang to inverted hang pull. At that point the body cannot be straightened any further to decrease leverage, and a full movement is already possible, so this is the next feasible way to increase the difficulty. While it can be done with a lower level progression, this is not ideal since it is unnecessary at those levels.
As you improve at these, you can go out wider to the sides. Alternatively a weight vest or ankle weights may be used to increase difficulty, too.
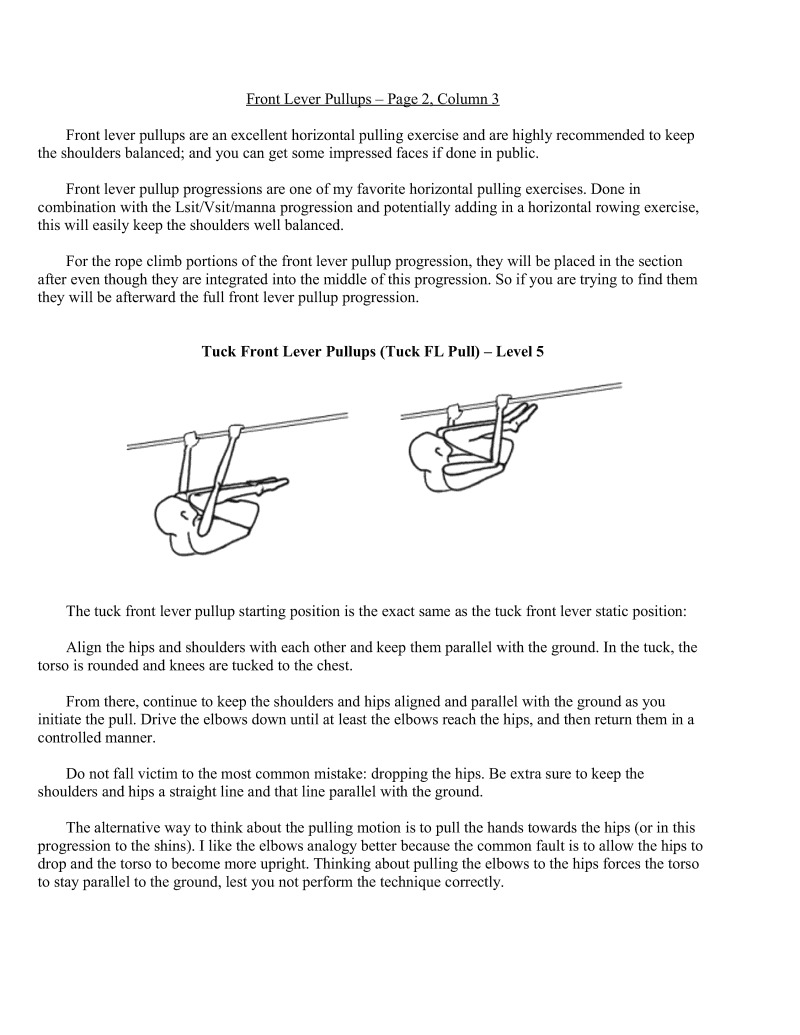
Front lever pullups are an excellent horizontal pulling exercise and are highly recommended to keep the shoulders balanced; and you can get some impressed faces if done in public.
Front lever pullup progressions are one of my favorite horizontal pulling exercises. Done in combination with the Lsit/Vsit/manna progression and potentially adding in a horizontal rowing exercise, easily keep the shoulders well balanced.
For the rope elimb portions of the front lever pullup progression, they will be placed in the section after even though they are integrated into the middle of this progression. So if you are trying to find them they will be afterward the full front lever pullup progression.
The tuck front lever pullup starting position is the exact same as the tuck front lever static position.
Align the hips and shoulders with each other and keep them parallel with the ground. In the tuck, the torso is rounded and knees are tucked to the chest.
From there, continue to keep the shoulders and hips aligned and parallel with the ground as you ate the pull. Drive the elbows down until at least the elbows reach the hips, and then return them in a controlled manner.
Do not fall victim to the most common mistake: dropping the hips. Be extra sure to keep the shoulders and hips a straight line and that line parallel with the ground.
The alternative way to think about the pulling motion is to pull the hands towards the hips (or in this progression to the shins). like the elbows analogy better because the common fault is to allow the hips to drop and the torso to become more upright. Thinking about pulling the elbows to the hips forces the torso 1o stay parallel to the ground, lest you not perform the technique correctly.
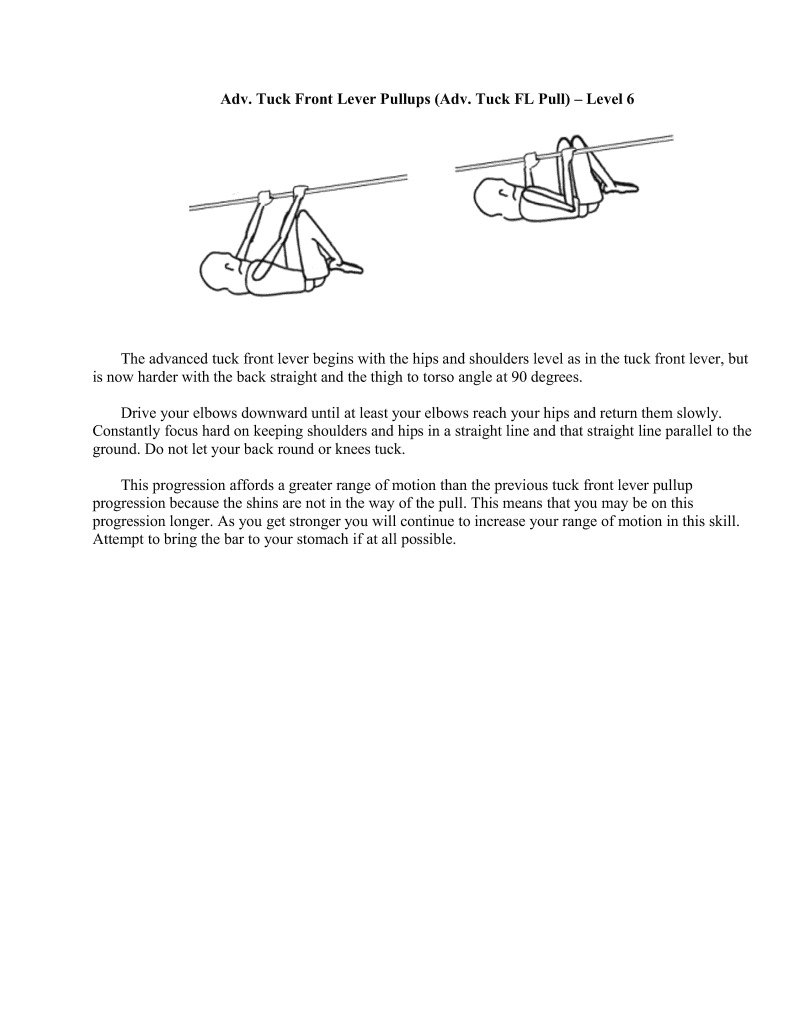
The advanced tuck front lever begins with the hips and shoulders level as in the tuck front lever, but is now harder with the back straight and the thigh to torso angle at 90 degrees.
Drive your elbows downward until at least your elbows reach your hips and return them slowly. Constantly focus hard on keeping shoulders and hips in a straight line and that straight line parallel to the ground. Do not let your back round or knees tuck.
This progression affords a greater range of motion than the previous tuck front lever pullup progression because the shins are not in the way of the pull. This means that you may be on this progression longer. As you get stronger you will continue to increase your range of motion in t Attempt to bring the bar to your stomach if at all possible.
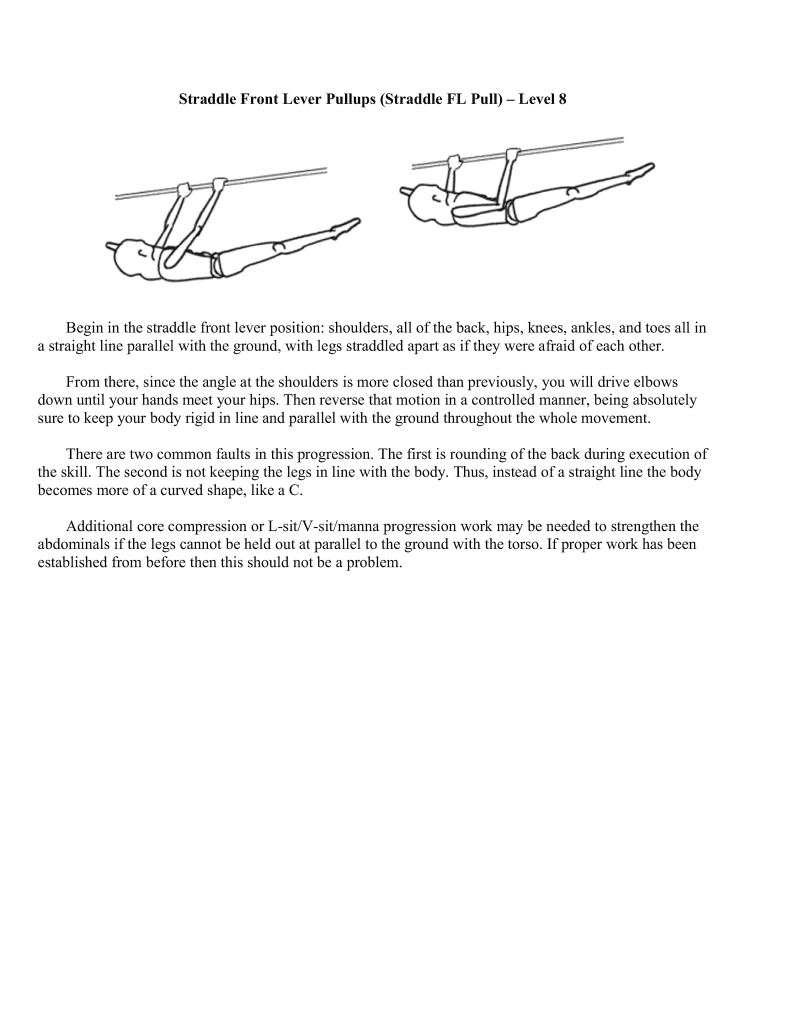
Begin in the straddle front lever position: shoulders, all of the back, hips, knees, ankles, and toes all in a straight line parallel with the ground, with legs straddled apart as if they were afraid of each other.
From there, since the angle at the shoulders is more closed than previously, you will drive elbows down until your hands meet your hips. Then reverse that motion in a controlled manner, being absolutely sure to keep your body rigid in line and parallel with the ground throughout the whole movement.
There are two common faults in this progression. The first is rounding of the back during execution of the skill. The second is not keeping the legs in line with the body. Thus, instead of a straight line the body becomes more of a curved shape, like a C.
Additional core compression or L-sit/V-sit/manna progression work may be needed to strengthen the abdominals if the legs cannot be held out at parallel to the ground with the torso. If proper work has been established from before then this should not be a problem.
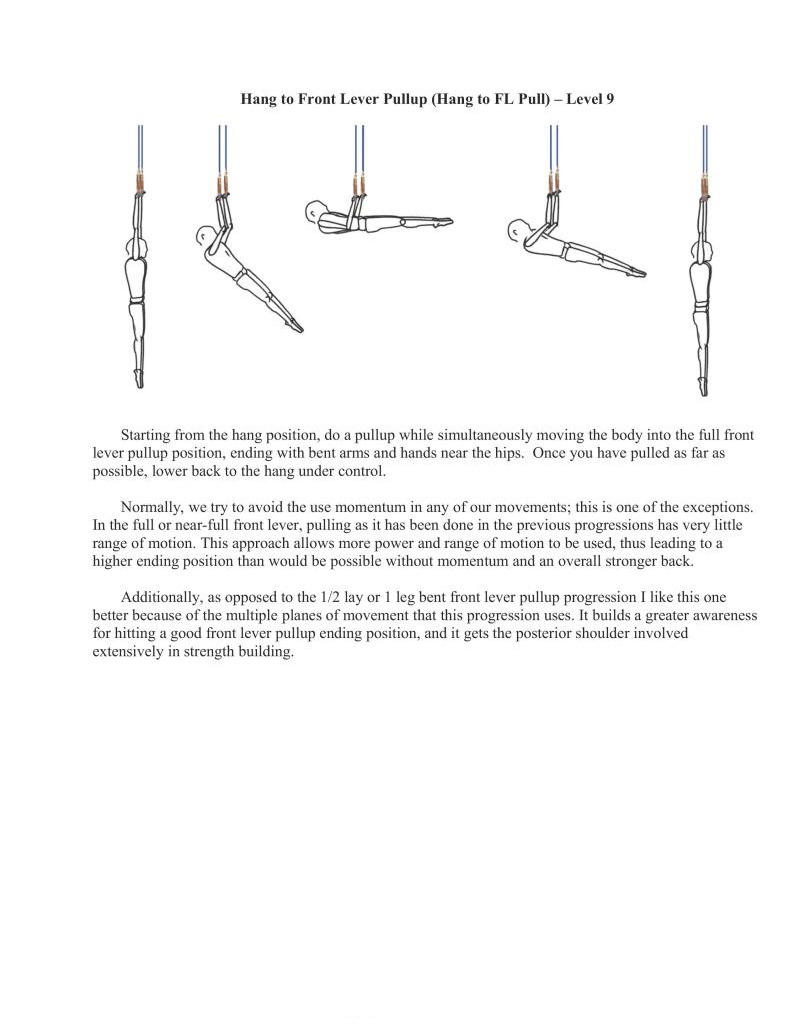
Starting from the hang position, do a pullup while simultaneously moving the body into the full front lever pullup position, ending with bent arms and hands near the hips. Once you have pulled as far as possible, lower back to the hang under control.
Normally, we try to avoid the use momentum in any of our movements; this is one of the exceptions. In the full or near-full front lever, pulling as it has been done in the previous progressions has very little range of motion. This approach allows more power and range of motion to be used, thus leading to a higher ending position than would be possible without momentum and an overall stronger back.
Additionally, as opposed to the 1/2 lay or 1 leg bent front lever pullup progression I like this one better because of the multiple planes of movement that this progression uses. It builds a greater awaren for hitting a good front lever pullup ending position, and it gets the posterior shoulder involved extensively in strength building.
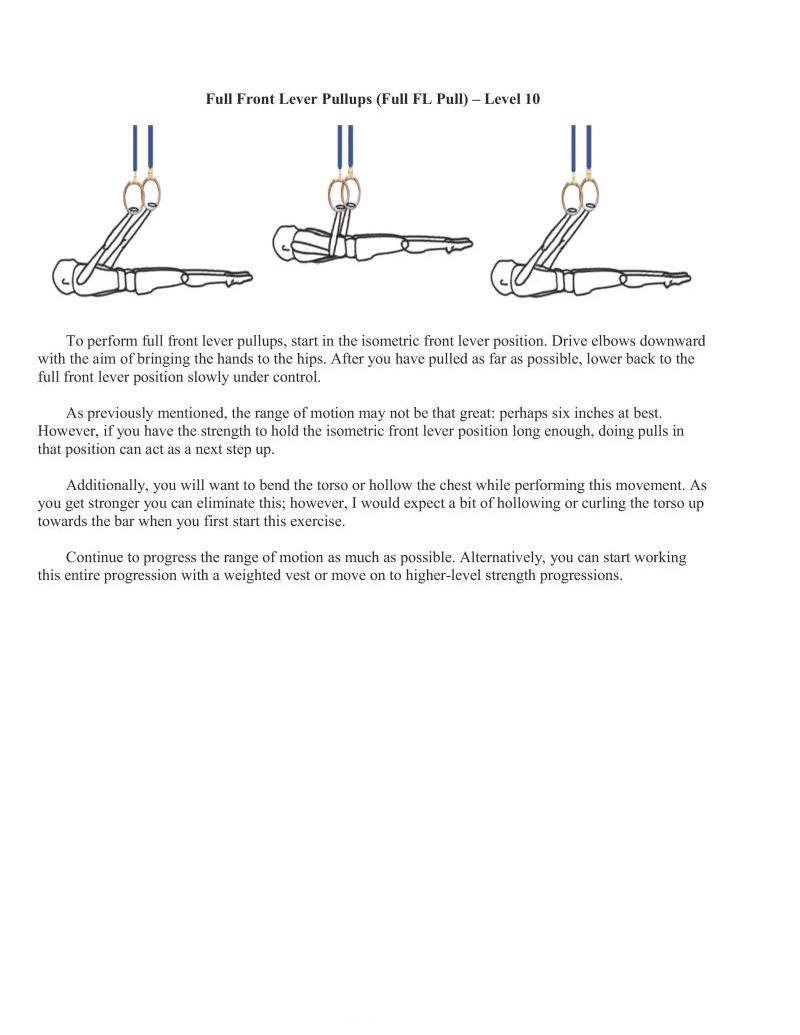
To perform ful front lever pullups, start in the isometric front lever position. Drive elbows downward with the aim of bringing the hands to the hips. After you have pulled as far as possible, lower back to the full front lever position slowly under control.
As previously mentioned, the range of motion may not be that great: perhaps six inches at best, However, if you have the strength to hold the isometric front lever position long enough, doing pulls in that position can actas a next step up.
Additionally, you will want to bend the torso or hollow the chest while performing this movement. As You get stronger you can eliminate this: however, I would expect a bit of hollowing or curling the torso up towards the bar when you first start this exercise.
Continue to progress the range of motion as much as possible. Alternatively, you can start working this entire progression with a weighted vest or move on to higher-level strength progressions.
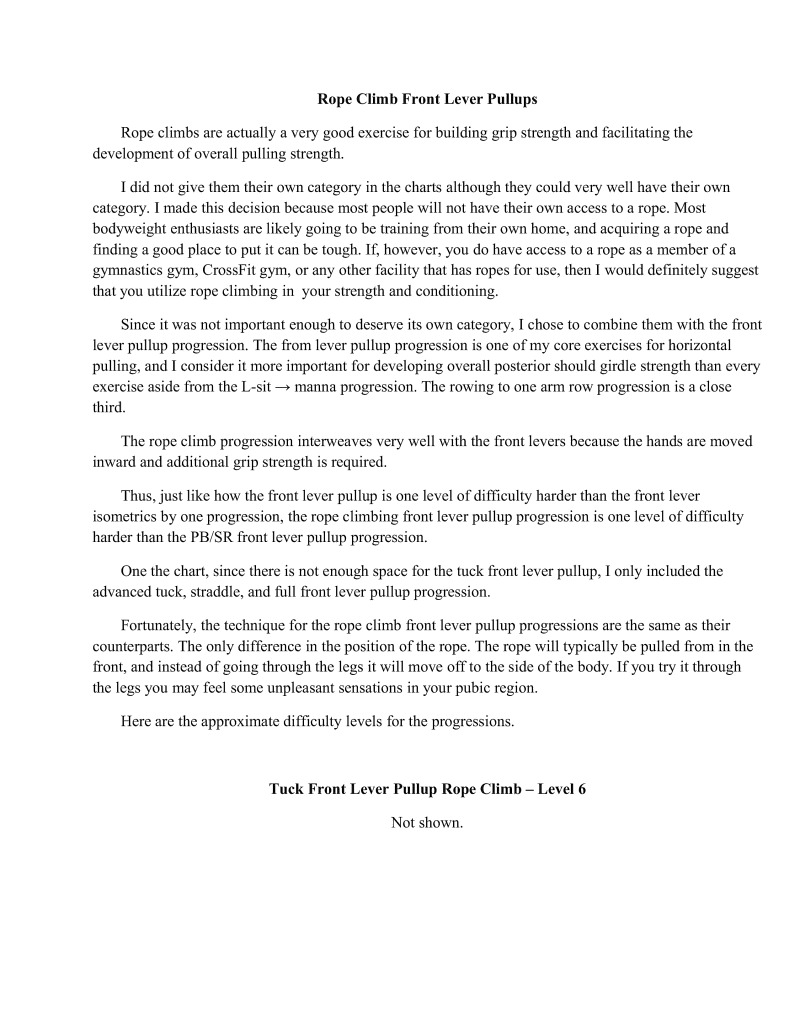
Rope climbs are actually a very good exercise for building grip strength and facilitating the development of overall pulling strength.
I did not give them their own category in the charts although they could very well have their own category. I made this decision because most people will not have their own access to a rope. Most bodyweight enthusiasts are likely going to be training from their own home, and acquiring a rope and finding a good place to put it can be tough. If, however, you do have access to a rope as a member of a gymnastics gym, CrossFit gym, or any other facility that has ropes for use, then I would definitely suggest that you utilize rope climbing inyour strength and conditioning.
Since it was not important enough to deserve its own category, I chose to combine them with the front lever pullup progression. The from lever pullup progression is one of my core exercises for horizontal pulling, and I consider it more important for developing overall posterior should girdle strength than every exercise aside from the L-sit — manna progression. The rowing to one arm row progression is a close third.
The rope climb progression interweaves very well with the front levers because the hands are moved inward and additional grip strength is required.
Thus, just like how the front lever pullup is one level of difficulty harder than the front lever isometrics by one progression, the rope climbing front lever pullup progression is one level of difficulty harder than the PB/SR front lever pullup progres.
One the chart, since there is not enough space for the tuck front lever pullup, I only included the advanced tuck, straddle, and full front lever pullup progression.
Fortunately, the technique for the rope climb front lever pullup progressions ar the same as their counterparts. The only difference in the position of the rope. The rope will typically be pulled from in the front, and instead of going through the legs it will move off to the side of the body. If you try it through the legs you may feel some unpleasant sensations in your pubie region.
Here are the appronate difficulty levels for the progress
Not shown
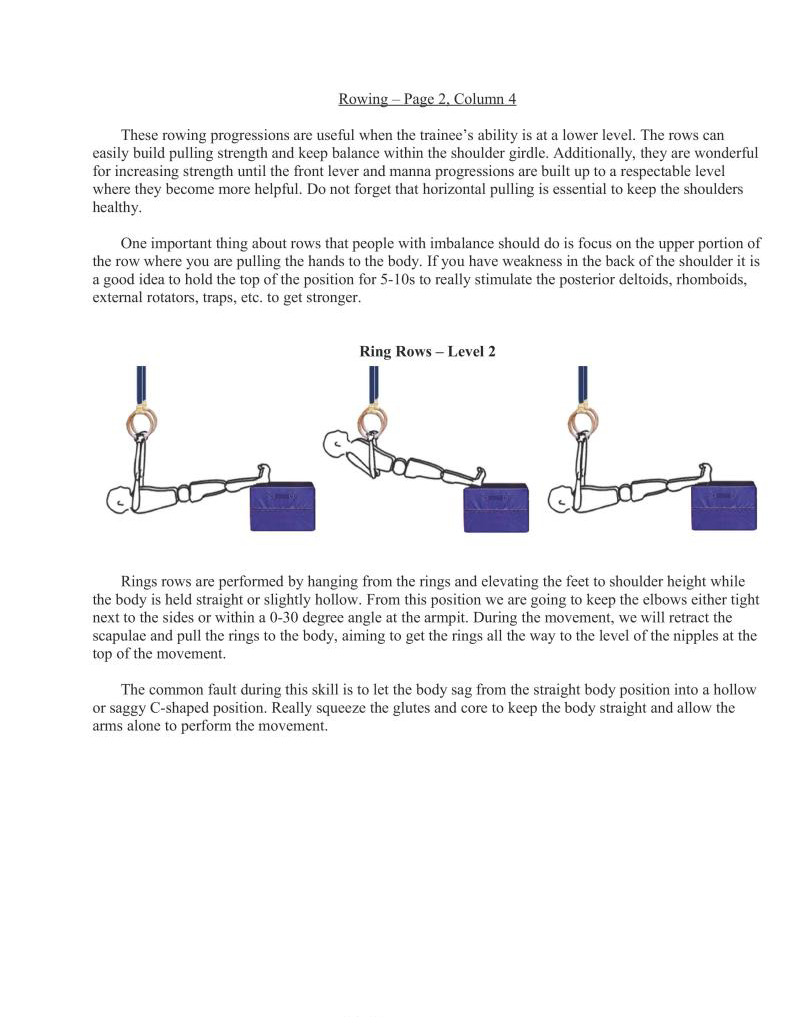
These rowing progressions are useful when the trainee’s ability is at a lower level. The rows can easily build pulling strength and keep balance within the shoulder girdle. Additionally, they are wonderful for increasing strength until the front lever and manna progressions are built up to a respectable level where they become more helpful. Do not forget that horizontal pulling is essential to keep the shoulders healthy.
One important thing about rows that people with imbalance should do is focus on the upper portion of the row where you are pulling the hands to the body. If you have weakness in the back of the shoulder it is a good idea to hold the top of the position for 5-10s to really stimulate the posterior deltoids, homboids, external rotators, traps, efc. to get stronger.
Rings rows are performed by hanging from the rings and elevating the feet to shoulder height while the body is held straight or slightly hollow. From this position we are going to keep the elbows either tight next to the sides or within a 0-30 degree angle at the armpit. During the movement, we will retract the scapulae and pull the rings to the body, aiming to get the rings all the way to the level of the nipples at the top of the movement.
The common fault during this skill is to let the body sag from the straight body position into a hollow or saggy C-shaped position. Really squeeze the glutes and core to keep the body straight and allow the arms alone to perform the movement.
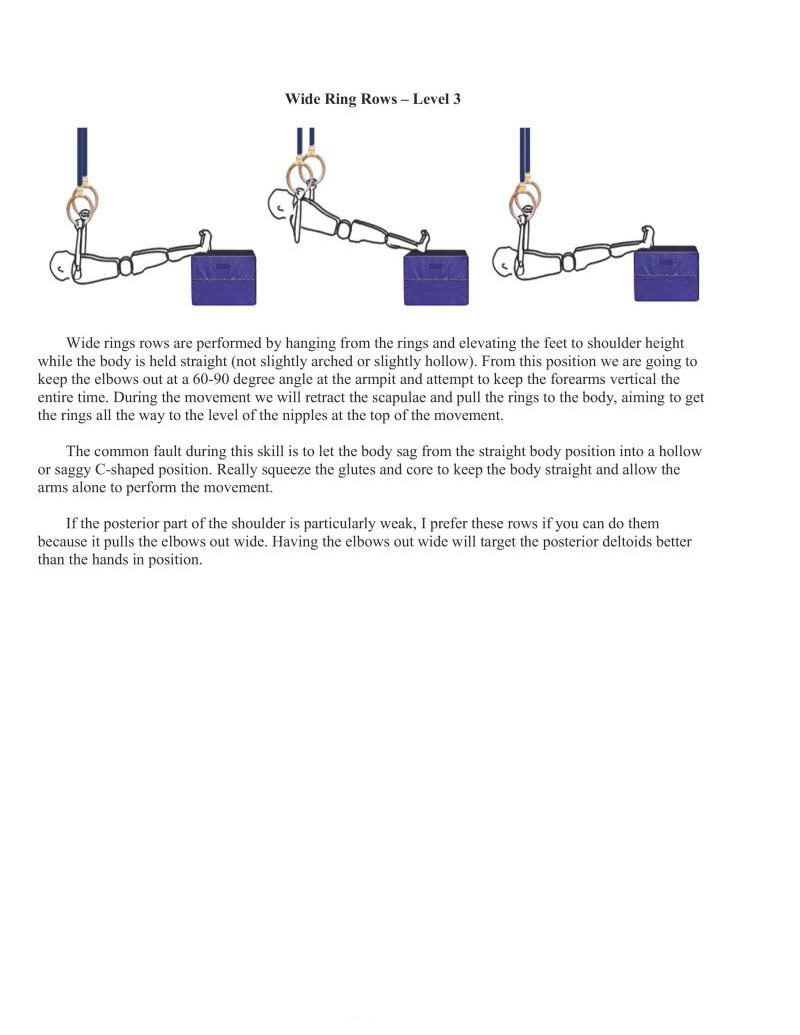
Wide rings rows are performed by hanging from the rings and elevating the feet to shoulder height while the body is held straight (not slightly arched or slightly hollow). From this position we are going to keep the elbows out at a 60-90 degree angle at the armpit and attempt to keep the forearms vertical the entire time. During the movement we will retract the scapulae and pull the rings to the body, aiming to get the rings all the way to the level of the nipples at the top of the movement
The common fault during this skill is to let the body sag from the straight body position into a hollow or saggy C-shaped position. Really squeeze the glutes and core to keep the body straight and allow the arms alone to perform the movement.
If the posterior part of the shoulder is particularly weak, I prefer these rows if you can do them because it pulls the elbows out wide. Having the elbows out wide will target the posterior deltoids better than the hands in position.
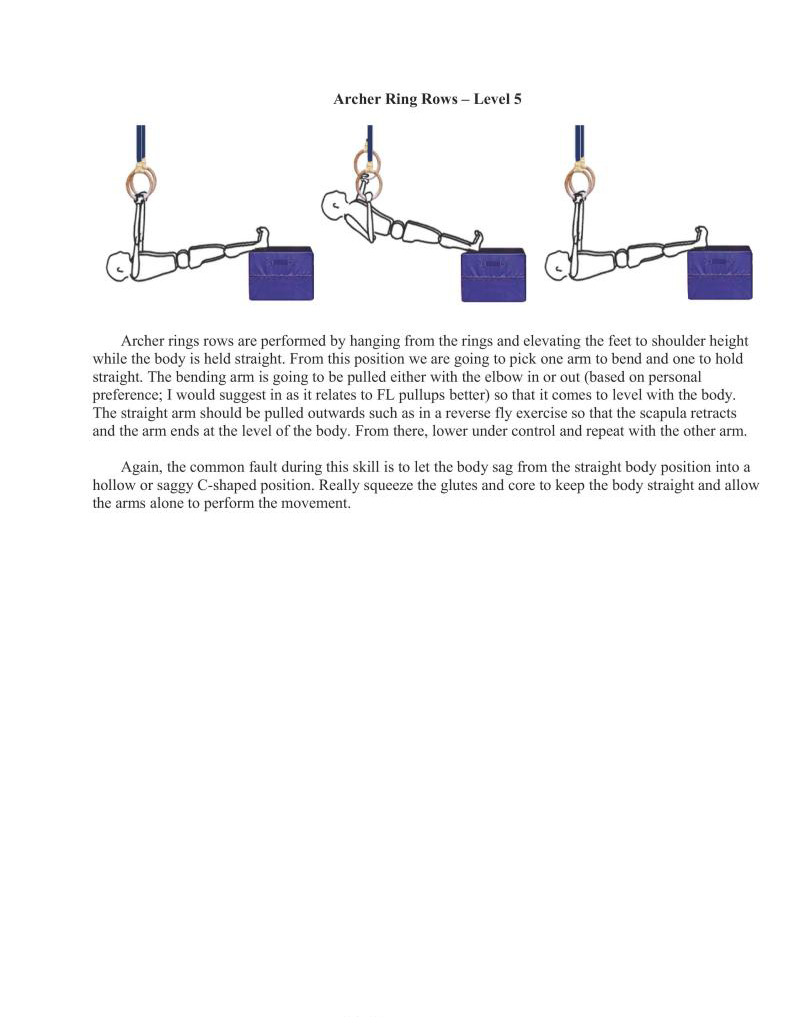
Archer rings rows are performed by hanging from the rings and elevating the feet to shoulder height while the body is held straight. From this position we are going to pick one arm to bend and one to hold straight. The bending arm is going to be pulled either with the elbow in or out (based on personal preference; I would suggest in as it relates to FL pullups better) so that it comes to level with the body. The straight arm should be pulled outwards such as in a reverse fly exercise so that the scapula retracts and the arm ends at the level of the body. From there, lower under control and repeat with the other arm.
Again, the common fault during this skill is to let the body sag from the straight body position into a hollow or saggy C-shaped position. Really squeeze the glutes and core to keep the body straight and allow the arms alone to perform the movement,
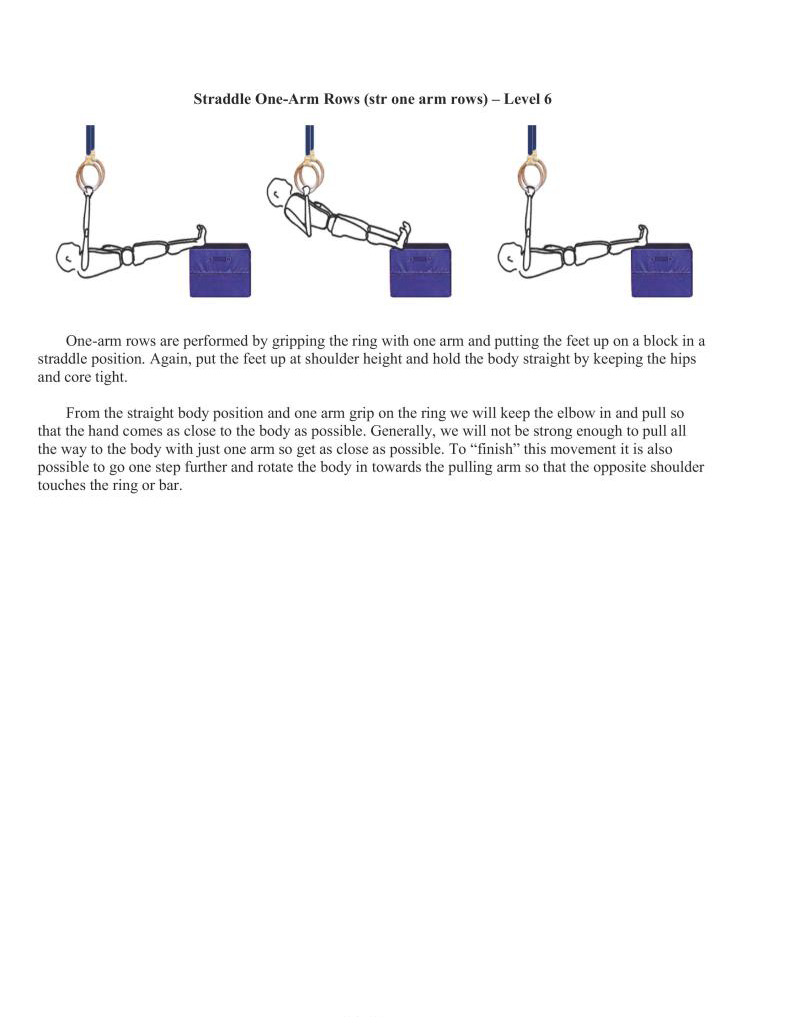
One-arm rows are performed by gripping the ring with one arm and putting the feet up on a block in a straddle position. Again, put the feet up at shoulder height and hold the body straight by keeping the hips and core tight.
From the straight body position and one arm grip on the ring we will keep the elbow in and pull so that the hand comes as close to the body as possible. Generally, we will not be strong enough to pull all the way to the body with just one arm so get as close as possible. To "finish" this movement it is also possible to 2o one step further and rotate the body in towards the pulling arm so that the opposite shoulder touches the ring or bar.

One-arm rows are performed by gripping the ring with one arm and putting the feet up on a block with the legs together. Again, put the feet up at shoulder height and hold the body straight by keeping the hips and core tight
From the straight body position and one arm grip on the ring we will keep the elbow in and pull so that the hand comes as close to the body as possible. Generally, we will not be strong enough to pull all the way to the body with just one arm so get as close as possible. To "finish" this movement it is also possible to go one step further and rotate the body in towards the pulling arm so that the opposite shoulder touches the ring or bar.
This is the final progression in the series. If you are at this level of strength I would suggest moving to the previous progression with the front lever puliups or adding a weight vest to this variation to make it more difficult
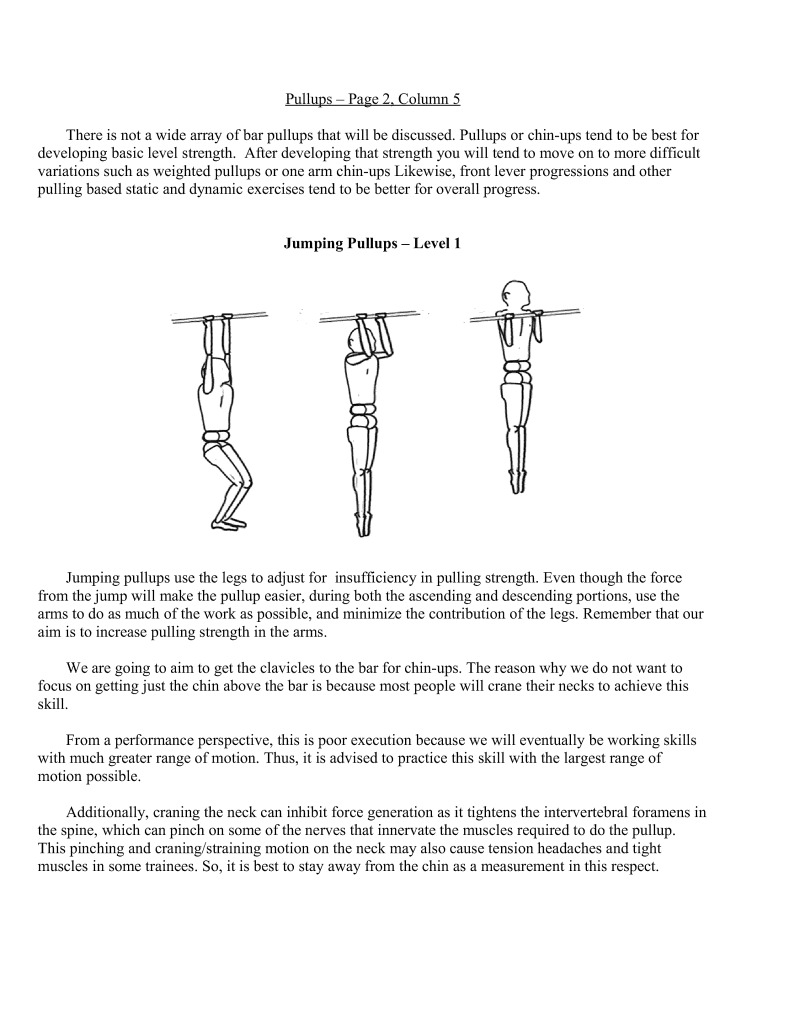
There is not a wide array of bar pullups that will be discussed. Pullups or chin-ups tend to be best for developing basic level strength. after developing that strength you will tend to move on to more difficult variations such as weighted pullups or one arm chin-ups Likewise, front lever progressions and other pulling based static and dynamic exercises tend to be better for overall progress.
Jumping pullups use the legs to adjust for_insufficiency in pulling strength. Even though the force from the jump will make the pullup easier, during both the ascending and descending portions, use the arms to do as much of the work as possible, and minimize the contribution of the legs. Remember that our aim is to increase pulling strength in the arms.
We are going to aim to get the clavicles to the bar for chin-ups. The reason why we do not want to focus on getting just the chin above the bar is because most people will crane their necks to achieve this skill
From a performance perspective, this is poor execution because we will eventually be working skills with much greater range of motion. Thus, it is advised to practice this skill with the largest range of ible.
itionally, craning the neck can inhibit force gencration as it tightens the intervertebral foramens in the spine, which can pinch on some of the nerves that innervate the muscles required to do the pullup.
This pinching and craning/straining motion on the neck may also cause tension headaches and tight muscles in some trainees. So, it is best to stay away from the chin as a measurement in this respect.

Eccentrics are one of the best ways to increase strength for movements that we cannot perform yet, but have enough strength to control the descending portion.
Aim to work up to holding the negative portion of the pullup for 6-8s and do 2-3 repetitions for 2-3 sets. Focus on activating the lats and biceps as much as possible.
Additionally, assistance can be used to gain strength at this level. The Gravitron machine, a spotter assisting us by lifting our hips or legs, using a pulley system, or using a resistance band at the feet can all be used to reduce the load so that the ascending portion can be completed. A combination of unassisted slow negatives and assisted positives are brutally effective at achieving a skill, particularly in attaining a pullup.
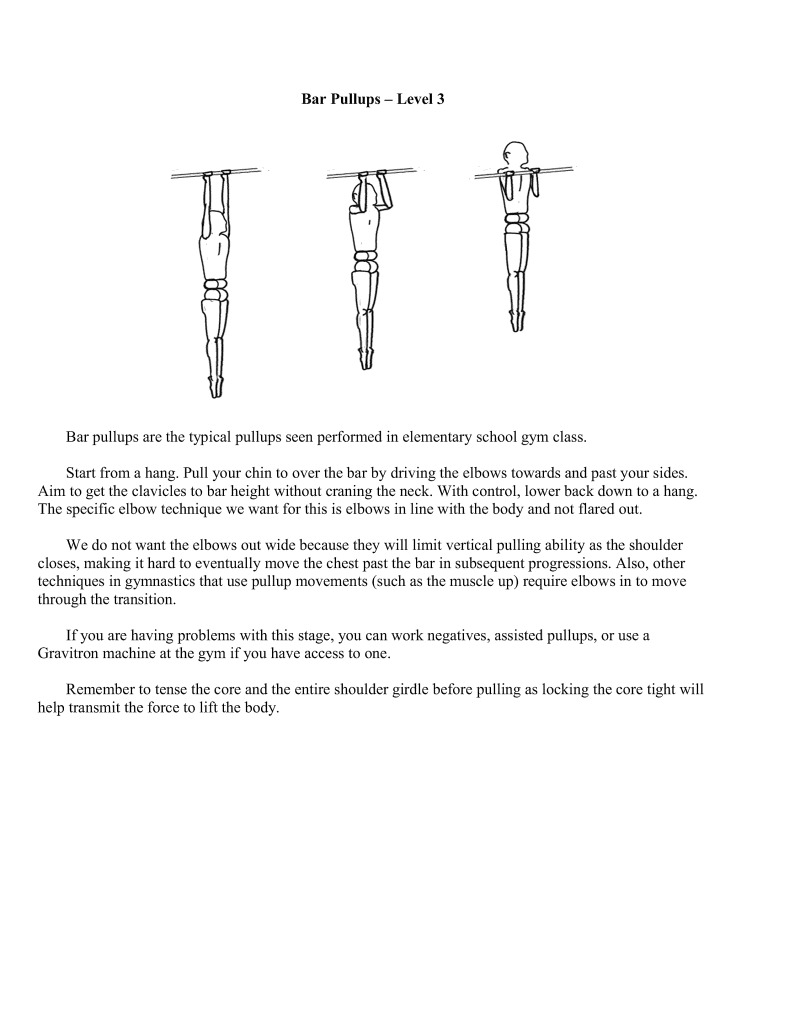
Bar pullups are the typical pullups scen performed in elementary school gym class.
Start from a hang. Pull your chin to over the bar by driving the elbows towards and past your sides. Aim to get the clavicles to bar height without craning the neck. With control, lower back down to a hang. The specific elbow technique we want for this is elbows in line with the body and not flared out.
We do not want the elbows out wide because they will limit vertical pulling ability as the shoulder closes, making it hard to eventually move the chest past the bar in subsequent progressions. Also, other techniques in gymnastics that use pullup movements (such as the muscle up) require elbows in to move through the trans
If you are having problems with this stage, you can work negatives, assisted pullups, or use a Gravitron machine at the gym if you have access to one.
Remember to tense the core and the entire shoulder girdle before pulling as locking the core tight will help transmit the force to lift the body.
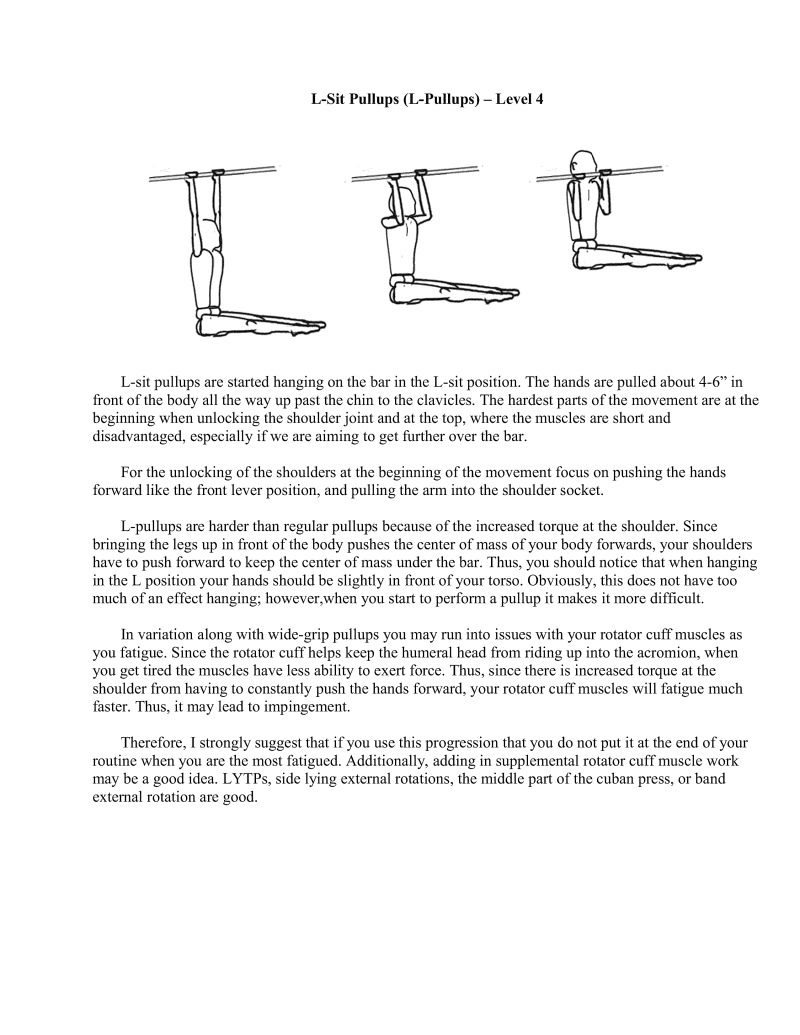
Lesit pullups are started hanging on the bar in the L-sit position. The hands are pulled about 4-6" in front of the body all the way up past the chin to the clavicles. The hardest parts of the movement are at the beginning when unlocking the shoulder joint and at the top, where the muscles are short and disadvantaged, especially if we are aiming to get further over the bar.
For the unlocking of the shoulders at the beginning of the movement focus on pushing the hands forward like the front lever position, and pulling the arm into the shoulder socket.
L-pullups are harder than regular pullups because of the increased torque at the shoulder. Since bringing the legs up in front of the body pushes the center of mass of your body forwards, your shoulders have to push forward to keep the center of mass under the bar. Thus, you should notice that when hanging in the L position your hands should be slightly in front of your torso. Obviously, this does not have too. much of an effect hanging; however.when you start to perform a pullup it makes it more difficult
In variation along with wide-grip pullups you may run into issues with your rotator cuff muscles as you fatigue. Since the rotator cuff helps keep the humeral head from riding up into the acromion, when You get tired the muscles have less ability to exert force. Thus, since there is increased torque at the Shoulder from having to constantly push the hands forward, your rotator cuff muscles will fatigue much faster. Thus, it may lead to impingement.
Therefore, I strongly suggest that if you use this progression that you do not put it at the end of your routine when you are the most fatigued. Additionally, adding in supplemental rotator cuff muscle work may be a good idea. LYTPs, side lying external rotations, the middle part of the cuban press, or band extemal rotation are good.
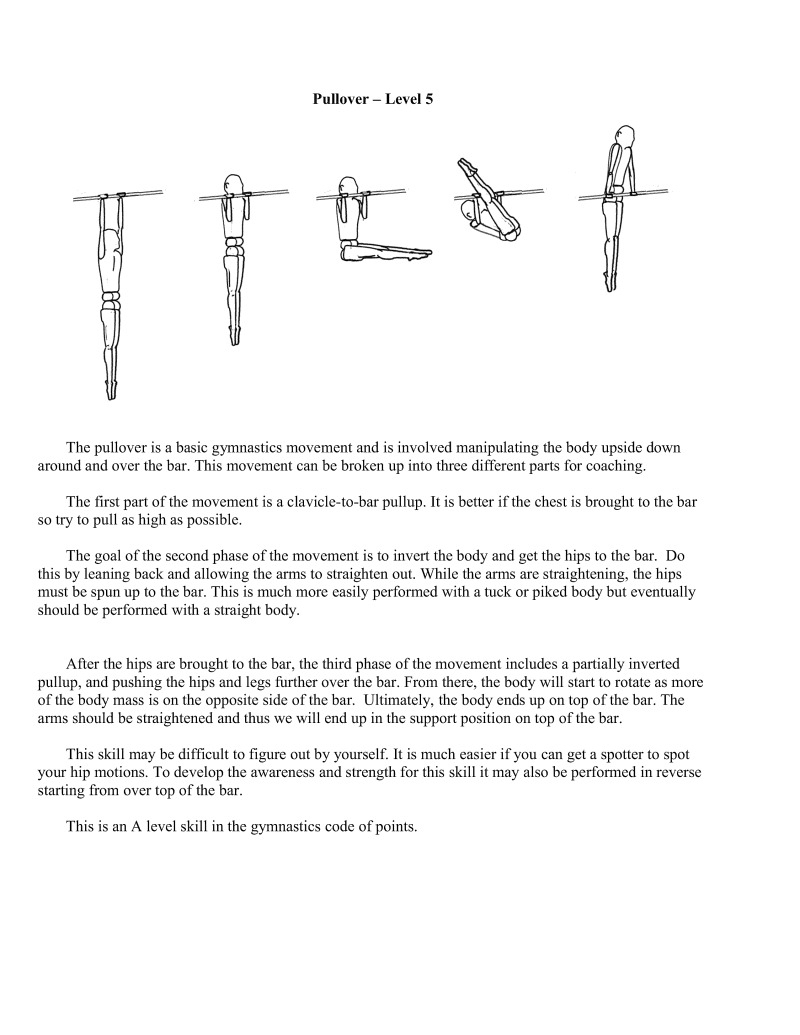
The pullover is a basic gymnastics movement and is involved manipulating the body upside down around and over the bar. This movement can be broken up into three different parts for coaching.
The first part of the movement is a clavicle-to-bar pullup. It is better if the chest is brought to the bar so1try to pull as high as possible.
The goal of the second phase of the movement is to invert the body and get the hips to the bar. Do this by leaning back and allowing the arms to straighten out. While the arms are straightening, the hips must be spun up to the bar. This is much more easily performed with a tuck or piked body but eventually should be performed with a straight body.
After the hips are brought to the bar, the third phase of the movement includes a partially inverted pullup, and pushing the hips and legs further over the bar. From there, the body will start to rotate as more of the body mass is on the opposite side of the bar. Ultimately, the body ends up on top of the bar. The arms should be straightened and thus we will end up in the support position on top of the bar.
This skill may be difficult to figure out by yourself. It is much easier if you can get a spotter to spot your hip motions. To develop the awareness and strength for this skill it may also be performed in reverse Starting from over top of the bar.
This is an A level skill in the gymnastics code of points.
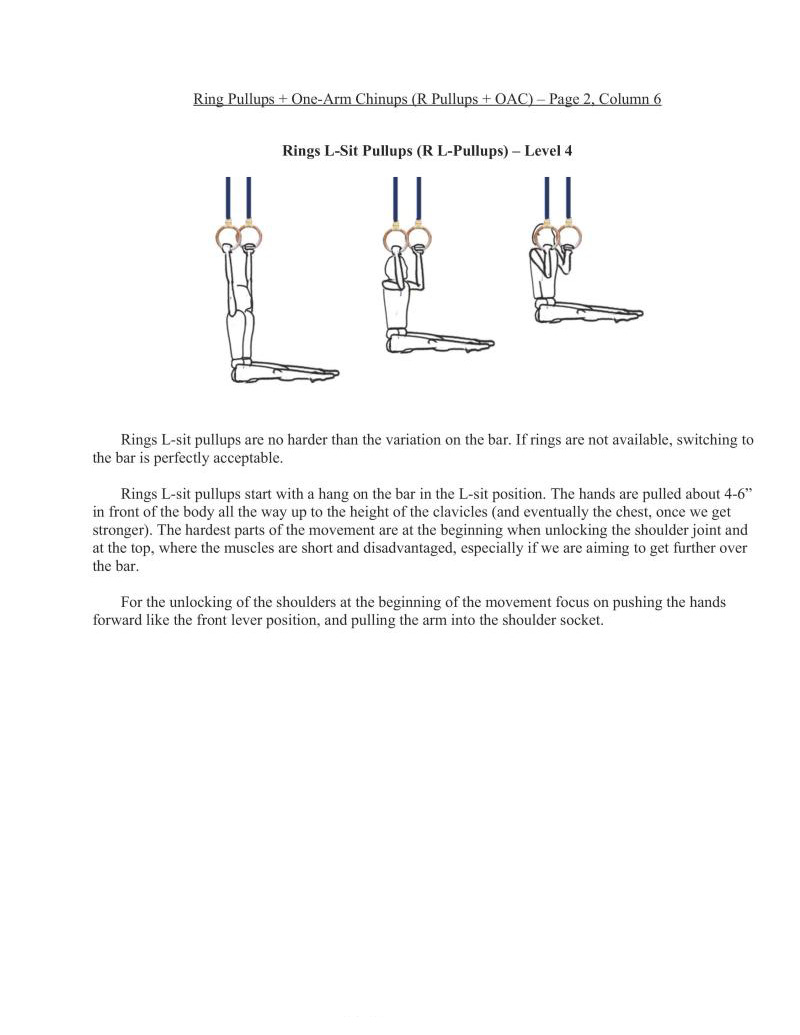
Rings L-sit pullups are no harder than the variation on the bar. If rings are not available, switching to the bar is perfectly acceptable.
Rings L-sit pullups start with a hang on the bar in the L-sit position. The hands are pulled about 4-6" in front of the body all the way up to the height of the clavicles (and eventually the chest, once we get stronger). The hardest parts of the movement are at the beginning when unlocking the shoulder joint and at the top, where the muscles are short and disadvantaged. especially if we are aiming to get further over the bar.
For the unlocking of the shoulders at the beginning of the movement focus on pushing the hands forward like the front lever position, and pulling the arm into the shoulder socket.
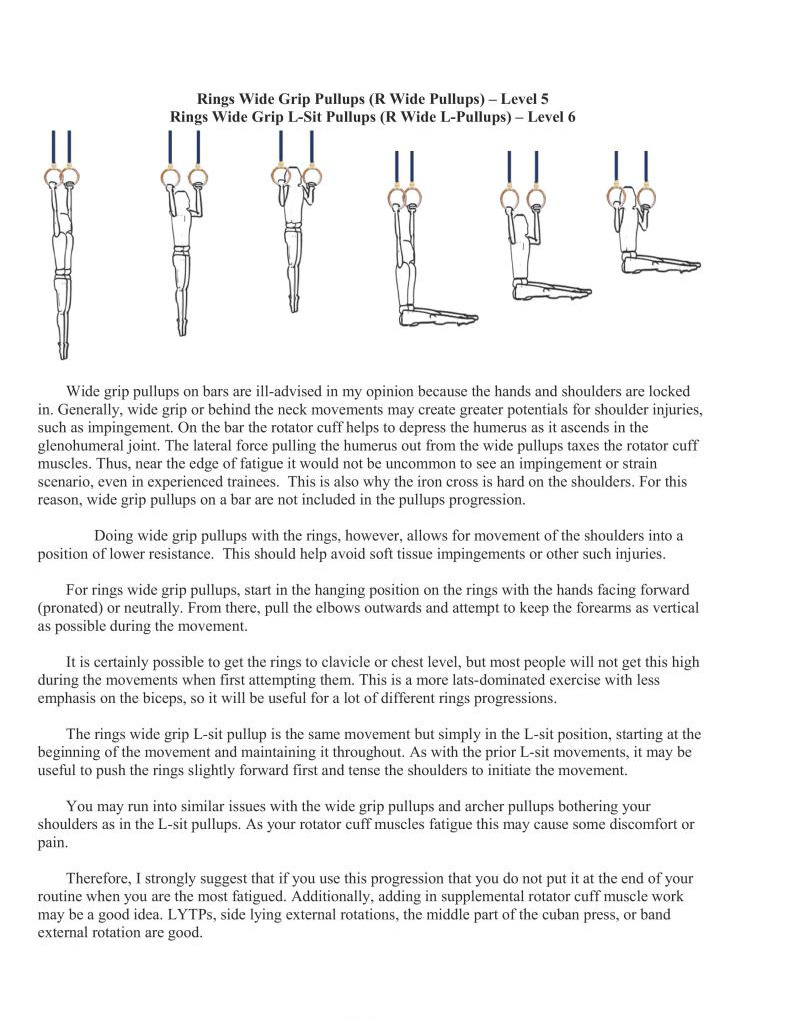
Wide grip pullups on bars are ill-advised in my opinion because the hands and shoulders are locked in. Generally, wide grip or behind the neck movements may create greater potentials for shoulder injuries, such as impingement. On the bar the rotator cuff helps to depress the humerus as it ascends in the glenohumeral joint. The lateral force pulling the humerus out from the wide pullups taxes the rotator cuff muscles. Thus, near the edge of fatigue it would not be uncommon to see an impingement or strain scenario, even in experienced trainees. Thisis also why the iron cross is hard on the shoulders. For this reason, wide grip pullups on a bar are not included in the pullups progression.
Doing wide grip pullups with the rings, however, allows for movement of the shoulders into a position of lower resistance. This should help avoid soft tissue impingements or other such injuries.
For rings wide grip pullups, start in the hanging position on the rings with the hands facing forward (pronated) or neutrally. From there, pull the elbows outwards and attempt to keep the forearms as vertical as possible during the movement.
It is certainly possible to get the rings to clavicle or chest level, but most people will not get this high during the movements when first attempting them. This is a more lats-dominated exercise with less. emphasis on the biceps, so it will be useful for a lot of different rings progressions.
The rings wide grip L-sit pullup is the same movement but simply in the L-sit position, starting at the beginning of the movement and maintaining it throughout. As with the prior L-sit movements, it may be useful to push the rings slightly forward first and tense the shoulders to initiate the movement.
You may run into similar issues with the wide grip pullups and archer pullups bothering your shoulders as in the L-sit pullups. As your rotator cuff muscles fatigue this may cause some discomfort or pain.
Therefore, I strongly suggest that f you use this progression that you do not put it at the end of your routine when you are the most fatigued. Additionally, adding in supplemental rotator cuff muscle work may be a good idea. LYTPs, side lying external rotations, the middle part of the cuban press, or band extemal rotation are good.
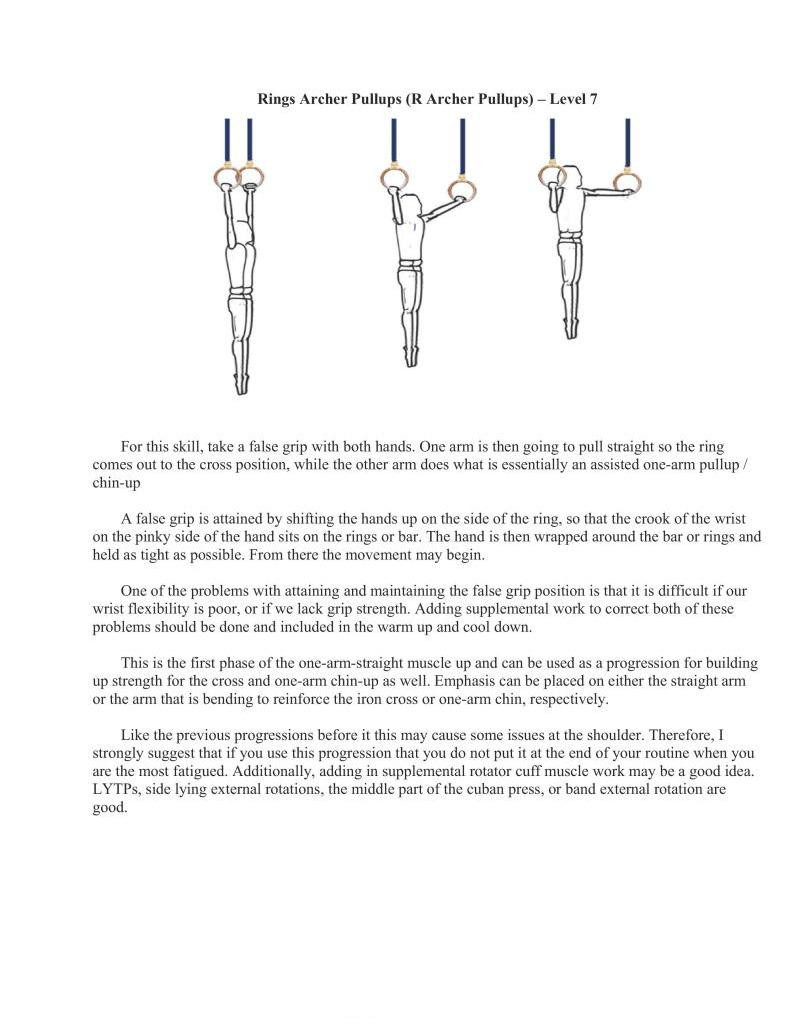
For this skill, take a false grip with both hands. One arm is then going to pull straight so the ring comes out to the cross position, while the other arm does what is essentially an assisted one-arm pullup / chin-up
A false grip is attained by shifting the hands up on the side of the ring, so that the crook of the wrist on the pinky side of the hand sits on the rings or bar. The hand is then wrapped around the bar or rings and held as tight as possible. From there the movement may begin.
One of the problems with attaining and maintaining the false grip position is that it is difficult if our wrist flexibility is poor, or if we lack grip strength. Adding supplemental work to correct both of these: problems should be done and included in the warm up and cool down.
This is the first phase of the one-arm-straight muscle up and can be used as a progression for bu up strength for the cross and one-arm chin-up as well. Emphasis can be placed on either the straight arm or the arm that is bending to reinforce the iron cross or one-arm chin, respectively.
Like the previous progressions before it this may cause some issues at the shoulder. Therefore, I strongly suggest that if you use this progression that you do not put it at the end of your routine when you are the most fatigued. Additionally, adding in supplemental rotator cuff muscle work may be a goo LYTPs, side lying external rotations, the middle part of the cuban press, or band extemal rotation are. good.
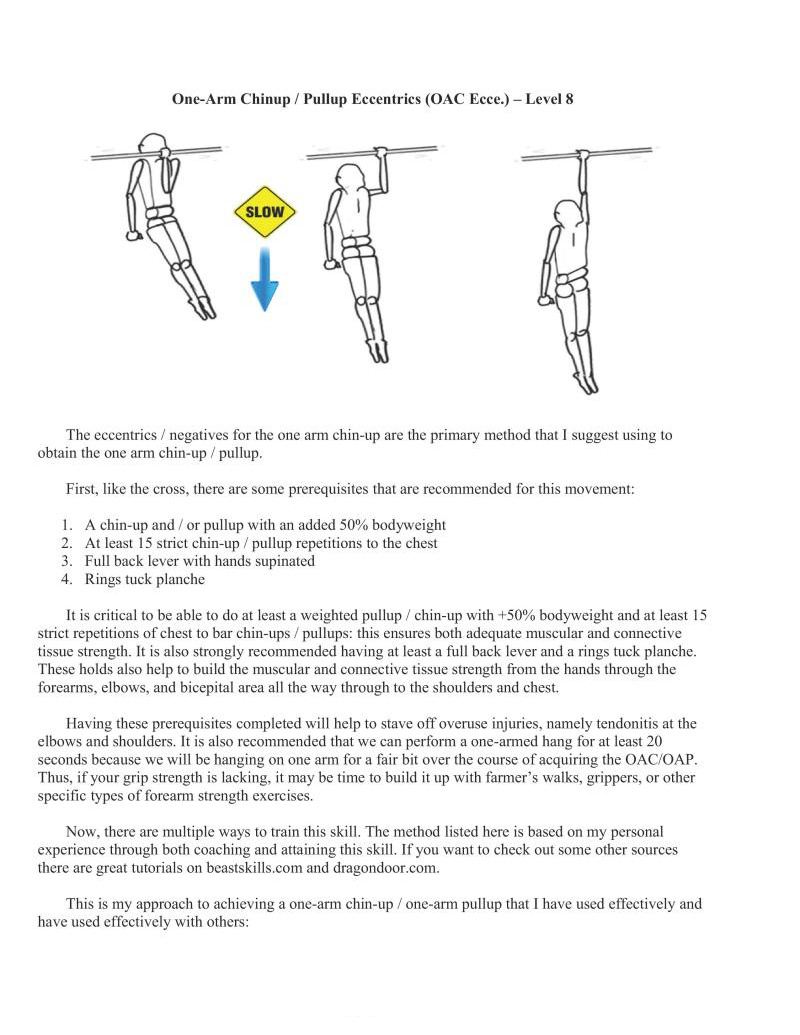
The eccentrics / negatives for the one arm chin-up are the primary method that I suggest using to obtain the one arm chin-up / pullup.
First, like the cross, there are some prerequisites that are recommended for this movement:
It is critical to be able to do at least a weighted pullup / chin-up with +50% bodyweight and at least 15 strict repetitions of chest to bar chin-ups / pullups: this ensures both adequate muscular and connective tissue strength. It is also strongly recommended having at least a full back lever and a rings tuck planche. These holds also help to build the muscular and connective tissue strength from the hands through the forearms, elbows, and bicepital area all the way through to the shoulders and chest.
Having these prerequisites completed will help to stave off overuse injuries, namely tendonitis at the elbows and shoulders. It is also recommended that we can perform a one-armed hang for at least 20 seconds because we will be hanging on one arm for a fair bit over the course of acquiring the OAC/OAP. Thus, if your grip strength is lacking, it may be time to build it up with farmer’s walks, grippers, or other specific types of forcarm strength exercises,
Now, there are multiple ways to train this skill. The method listed here is based on my personal experience through both coaching and attaining this skill. If you want to check out some other sources there are great tutorials on beastskills.com and dragondoor.com.
This is my approach to achieving a one-arm chin-up / one-arm pullup that I have used effectively and have used effectively with others:
If weighted pullups are not an option, the ratio would shift over to 67% on eccentrics vs. 33% on assisted concentrics.
For example, lets examine using a four days per week training schedule over the course of three weeks. With this schedule, there will generally be two days for eccentrics, one day for weighted pullups, and one day for assisted concentrics for vertical pulling movements. The programming for a three days per week schedule is similar. It simply spans the exercises over the course of four weeks, accomplishing what is done in three weeks with the four day per week schedule.
Eccentrics seem to be extremely effective with bodyweight exercises, especially pulling movements. Performing the movement itself with as little outside help as possible is preferred, so nassisted negatives with one arm take precedence over two-arm weighted pullups. Assisted concentrics work the whole of the movement to get in some extra practice, but still rely on outside help to be completed.
At this point in our journey it is likely that we will have been training for at least a year or two. Even So, intense negatives like these are usually limited to two times a week because they are particularly taxing on the CNS,
The OAC seems to best respond to 6-8 second long negatives. Typically, 2-3 repetitions and 2-3 sets of these will be used. Remember that the descent of these movements should be uniform. We want to avoid working the majority of the time at the top of the movement because that will be the strongest part: the muscles are in an advantageous position and we will be the freshest at the beginning. The end of the negative is often the most difficult part. Therefore, do not speed through the eccentric movement before you have reached the fully extended one arm hang position.
As aside note, the weighted pullups and assisted concentrics tend to best respond to 3 sets of 5-8 repetitions. Progress can often be made at about 5 lbs. / 2kg per workout or every other workout.
Approaching the assisted concentrics can be done a few ways. I do not like a spotter for this skill because they tend to help too much and the help is inconsistent. You can use a pulley system and hang weight that you can hold in the other hand or in a belt. Alternatively, we can hang a rope from the bar and progressively grab lower and lower, forcing the opposite hand to assist less and les
Finally, we can use less and less fingers on the opposing hand to assist. First we will eliminate fingers and do different combinations. Generally, the way to work down from the index to pinky fingers on the other hand will go something like this, listed from most assist to least
Oceasionally the last progression will be ring then pinky, but for most people ring finger is slightly weaker than the pinky finger.
Working with OAC eccentrics and assisted concentrics will vary a bit from person to person. From the top we can either face the bar or face it lengthwise. I would say the majority of the people feel more comfortable looking down the bar (lengthwisc) so that the hand is in the "hammer grip" position between pronation and supination. Most people will find themselves naturally gravitate towards this position anyways. It keeps the trainee from having to actively twist to keep the body facing one way or the other. Likewise, it allows for better squeezing of the arm to the chest, which will help generate more tension to perform the movement.
Whatever the preference we should make sure that we practice the chosen technique constantly to achieve the full movement, unless we take the long route and try to become good at many different types simultaneously. Likewise, if we are a rock climber it may be a good idea to practice the OAP (hand facing away from you) instead, because the hands need to be pronated for performing this movement on clim holds or ledges. Specificity is king.
Other exercises such as isometric holds at the top, middle, and bottom may also be of assistance.
These are particularly useful if any of those points are "sticking points" or "rough patches" that need to be strengthened. Otherwise, I would say they are not particularly useful. For instance, "frenchies" can have a solid place in a program to break "sticking points". This is where the negative exercise is performed, but the trainee stops and holds in isometric positions along the way.
Grip strength is also an important factor. The stronger we can hold onto the bar, rings, or other surface, the more innervation we can get to the proximal pulling muscles, resulting in a stronger, more concerted pull. If grip strength is limiting, be sure to add in supplemental work to address the g
Like the previous progressions, the one arm chin-up or one arm pullup creates significant torque at the shoulder. Like the L-pullup, wide pullup, and archer pullup variations this may cause discomfort at the shoulder. Therefore, I strongly suggest that if you use this progression that you do not put it at the end of your routine when you are the most fatigued. Additionally, adding in supplemental rotator cuff muscle work may be a good idea. LYTPs, side lying external rotations, the middle part of the cuban press, or band external rotation are good.
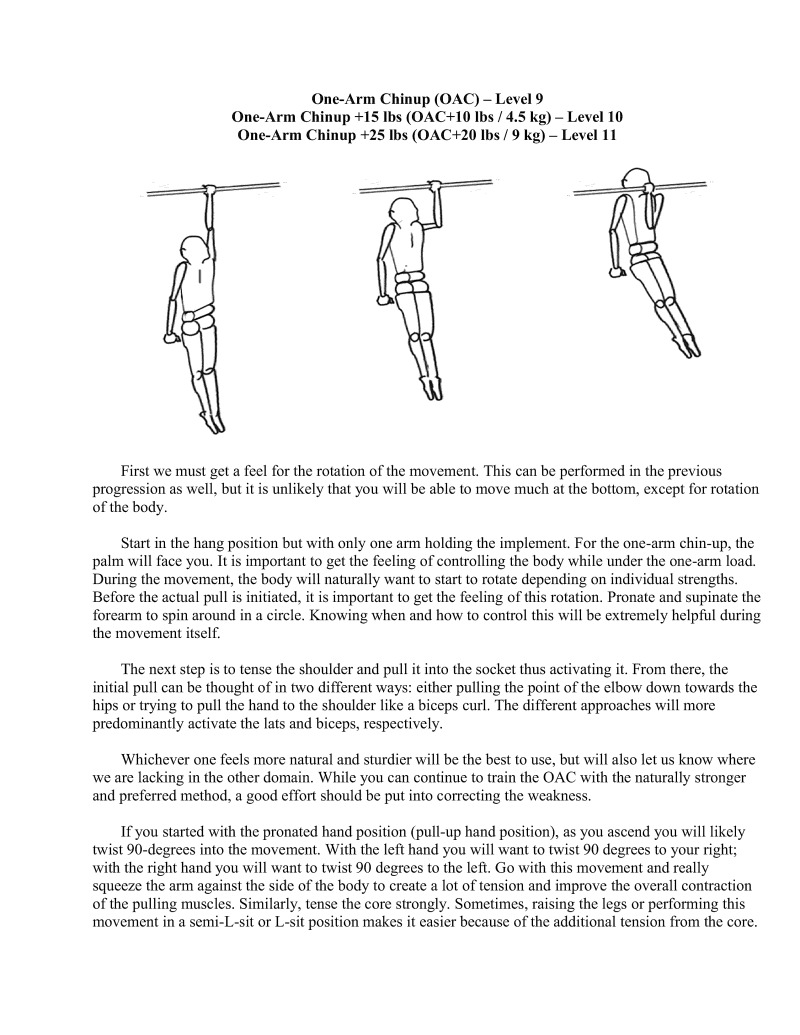
First we must get a feel for the rotation of the movement. This can be performed in the previous progression as well, but it is unlikely that you will be able to move much at the bottom, except for rotation of the body.
Start in the hang position but with only one arm holding the implement. For the one-arm chin-up, the palm will face you. It is important to get the feeling of controlling the body while under the one-arm load. During the movement, the body will naturally want to start to rotate depending on individual strengths. Before the actual pull is initiated, it is important to get the feeling of this rotation. Pronate and supinate the forearm to spin around in a circle. Knowing when and how to control this will be extremely helpful during the movement tself.
The next step is to tense the shoulder and pull it into the socket thus activating it. From there, the initial pull can be thought of in two different ways: either pulling the point of the elbow down towards the hips or trying to pull the hand to the shoulder like a biceps curl. The different approaches will more predominantly activate the lats and biceps, respectively.
Whichever one feels more natural and sturdier will be the best to use, but will also let us know where we are lacking in the other domain. While you can continu to train the OAC with the naturally stronger and preferred method. a good effort should be put into correcting the weakness.
If you started with the pronated hand position (pull-up hand position), as you ascend you will likely twist 90-degrees into the movement. With the left hand you will want to twist 90 degrees to your right; with the right hand you will want to twist 90 degrees to the left. Go with this movement and really squeeze the arm against the side of the body to create a lot of tension and improve the overall contraction of the pulling muscles. Similarly, tense the core strongly. Sometimes, raising the legs or performing this movement in a semi-L-sit or L-sit position makes it easier because of the additional tension from the core.
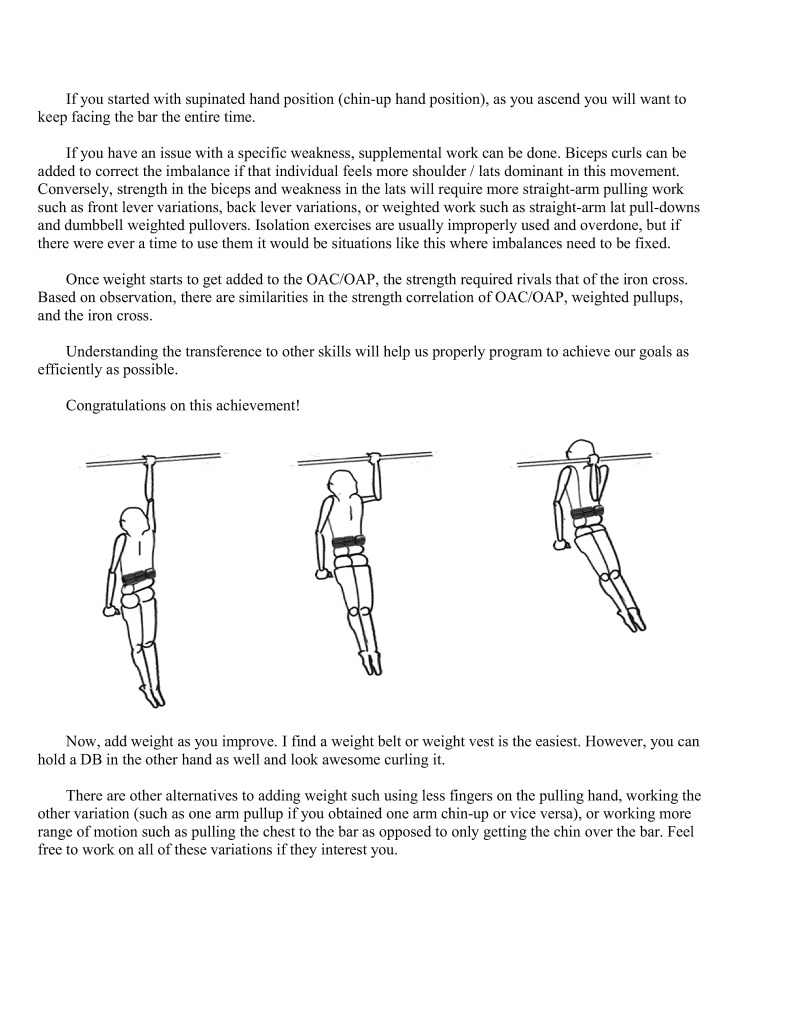
If you started with supinated hand position (chin-up hand position), as you ascend you will want to keep facing the bar the entire time
If you have an issue with a specific weakness, supplemental work can be done. Biceps curls can be added to correct the imbalance if that individual feels more shoulder / lats dominant in this movement. Conversely, strength in the biceps and weakness in the lats will require more straight-arm pulling work such as front lever variations, back lever variations, or weighted work such as straight-arm lat pull-downs and dumbbell weighted pullovers. Isolation exercises are usually improperly used and overdone, but if there were ever a time to use them it would be situations like this where imbalances need to be fixed.
Once weight starts to get added to the OAC/OAP, the strength required rivals that of the iron cross. Based on observation, there are similarities in the strength correlation of OAC/OAP, weighted pullups, and the iron cross.
Understanding the transference to other skills will help us properly program to achieve our goals as efficiently as possible.
Congratulations on t
Now, add weight as you improve. I find a weight belt or weight vest is the easiest. However, you can hold a DB in the other hand as well and look awesome curling it.
There are other alternatives to adding weight such using less fingers on the pulling hand, working the other variation (such as one arm pullup if you obtained one arm chin-up or vice versa), or working more range of motion such as pulling the chest to the bar as opposed to only getting the chin over the bar. Feel free to work on all of these variations if they interest you.
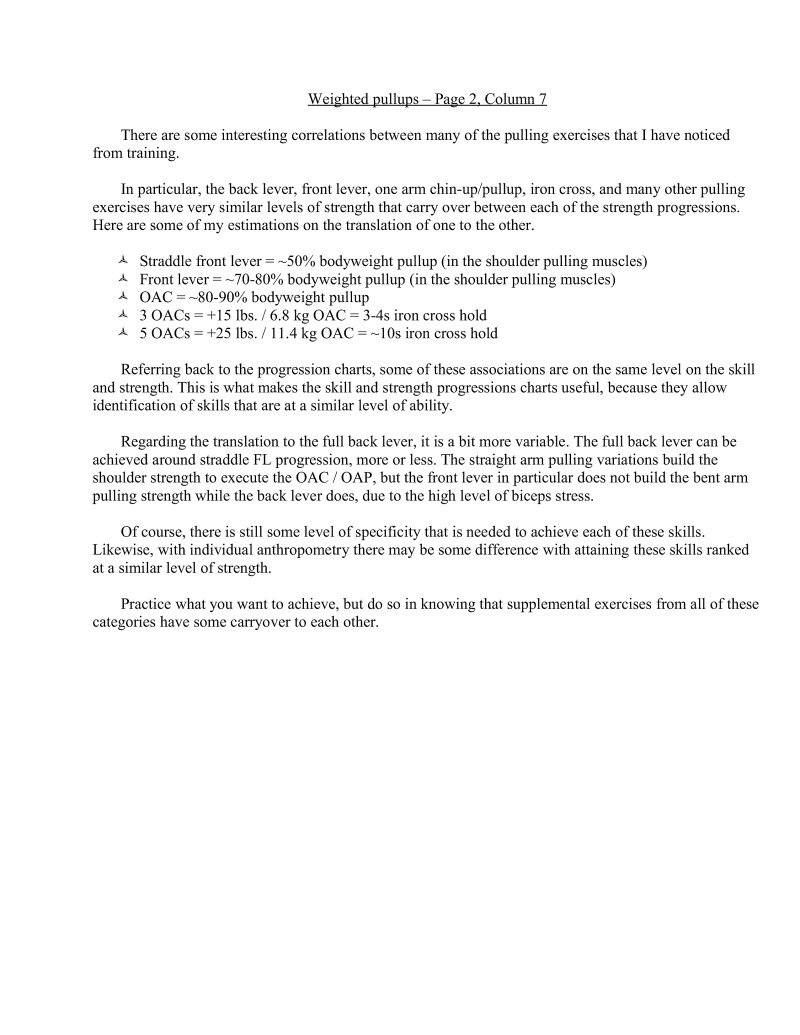
There are some interesting correlations between many of the pulling exercises that I have noticed from training.
In particular, the back lever, front lever, one arm chin-up/pullup, iron cross, and many other pulling exercises have very similar levels of strength that carry over between each of the strength progressions.
Here are some of my estimations on the translation of one to the other.
Referring back to the progression charts, some of these associations are on the same level on the skill and strength. This is what makes the skill and strength progressions charts useful, because they allow identification of skills that are at a similar level of ability.
Regarding the translation to the full back lever, it is a bit more variable. The full back lever can be achieved around straddle FL progression, more or less. The straight arm pulling variations build the shoulder strength to execute the OAC / OAP, but the front lever in particular does not build the bent arm pulling strength while the back lever does, due to the high level of biceps stress.
Of course, there is still some level of specificity that is needed to achieve each of these skills. Likewise, with individual anthropometry there may be some difference with attaining these skills ranked ata similar level of strength.
Practice what you want to achieve, but do so in knowing that supplemental exercises from all of these categories have some carryover to each other.
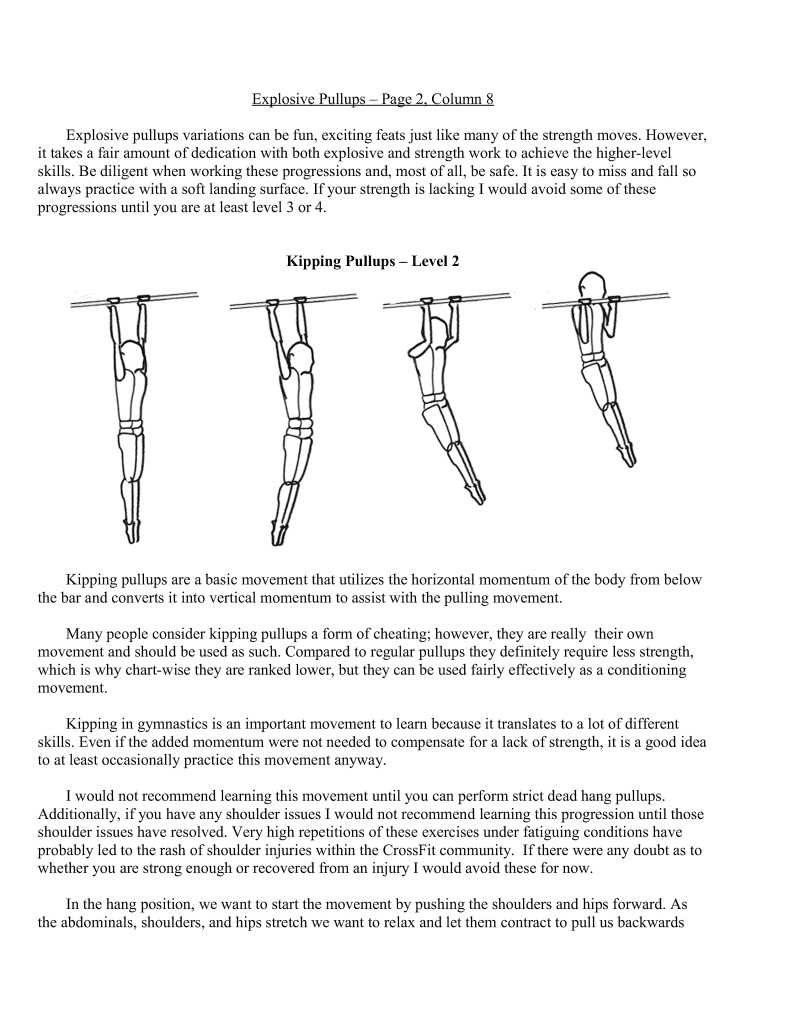
Explosive pullups variations can be fun, exciting feats just like many of the strength moves. However, it takes a fair amount of dedication with both explosive and strength work to achieve the higher-level skills. Be diligent when working these progressions and, most of all, be safe. It is easy to miss and fall so always practice with a soft landing surface. If your strength is lacking I would avoid some of these progressions until you are at least level 3 or 4.
Kipping pullups are a basic movement that utilizes the horizontal momentum of the body from below the bar and converts it into vertical momentum to assist with the pulling movement.
Many people consider kipping pullups a form of cheating; however, they are really their own movement and should be used as such. Compared to regular pullups they definitely require less strength, which is why chart-wise they are ranked lower, but they can be used fairly effectively as a conditioning movement.
Kipping in gymnastics is an important movement to learn because it translates to a lot of different skills. Even if the added momentum were not needed to compensate for a lack of strength, it is a good idea to at least oceasionally practice this movement anyway.
I would not recommend learning this movement until you can perform strict dead hang pullups. Additionally, if you have any shoulder issues I would not recommend learning this progression until those shoulder issues have resolved. Very high repetitions of these exercises under fatiguing conditions have probably led to the rash of shoulder injuries within the CrossFit community. I there were any doubt as to whether you are strong enough or recovered from an injury I would avoid these for now.
In the hang position, we want to start the movement by pushing the shoulders and hips forward. As the abdominals, shoulders, and hips stretch we want to relax and let them contract to pull us backwards
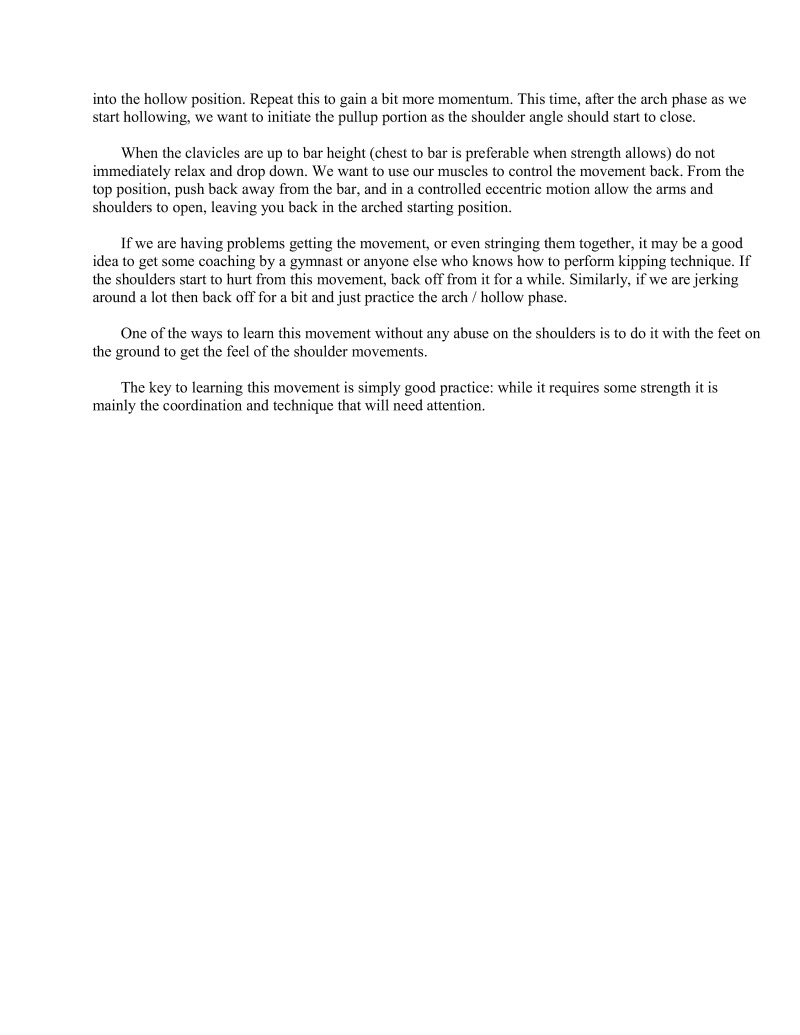
into the hollow position. Repeat this to gain a bit more momentum. This time, after the arch phase as we start hollowing, we want to initiate the pullup portion as the shoulder angle should start to close.
When the clavicles are up to bar height (chest to bar is preferable when strength allows) to not immediately relax and drop down. We want to use our muscles to control the movement back. From the top position, push back away from the bar, and in a controlled eccentric motion allow the arms and shoulders to open, leaving you back in the arched starting position.
If we are having problems getting the movement, or even stringing them together, it may be a good idea to get some coaching by a gymnast or anyone else who knows how to perform kipping technique. 1f the shoulders start to hurt from this movement, back off from it for a while. Similarly, if we are jerking around a lot then back off for a bit and just practice the arch / hollow phase.
One of the ways to learn this movement without any abuse on the shoulders is to do it with the feet on the ground to get the feel of the shoulder movements.
The key to learning this movement is simply good practice: while it requires some strength it is mainly the coordination and technique that will need attention.
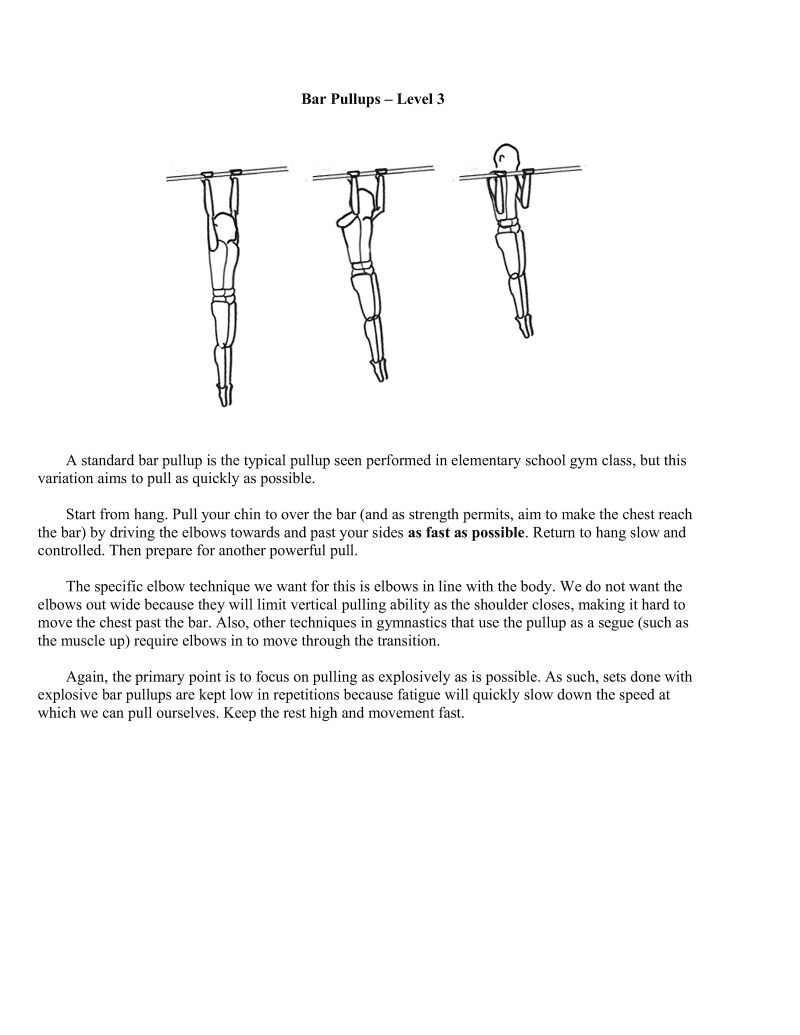
A standard bar pullup is the typical pullup seen performed in clementary school gym class, but this variation aims to pull as quickly as possible.
Start from hang. Pull your chin to over the bar (and as strength permits, aim to make the chest reach the bar) by driving the elbows towards and past your sides as fast as possible. Retun to hang slow and controlled. Then prepare for another powerful pull
The specific elbow technique we want for this is elbows in line with the body. We do not want the elbows out wide because they will limit vertical pulling ability is the shoulder closes, making it hard to move the chest past the bar. Also, other techniques in gymnastics that use the pullup as a segue (such as the muscle up) require elbows in to move through the transition.
Again, the primary point is to focus on pulling as explosively as is possible. As such, sets done with explosive bar pullups are kept low in repetitions because fatigue will quickly slow down the speed at which we can pull ourselves. Keep the rest high and movement fast.
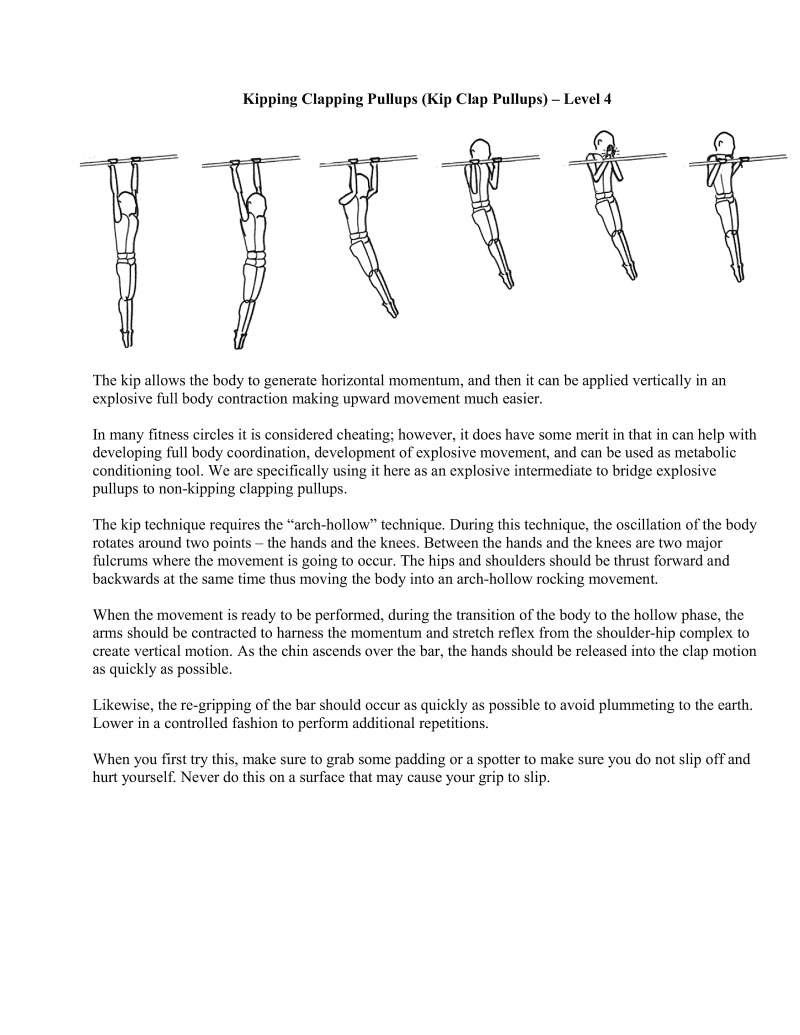
The kip allows the body to generate horizontal momentum, and then it can be applied vertically in an explosive full body contraction making upward movement much easier.
In many fitness circles it is considered cheating; however, it does have some merit in that in can help with developing full body coordination, development of explosive movement, and can be used as metabolic conditioning tool. We are specifically using it here as an explosive intermediate to bridge explosive pullups to non-kipping clapping pullups,
The kip technique requires the "arch-hollow" technique. During this technique, the oscillation of the body rotates around two points — the hands and the knees. Between the hands and the knees are two major fulerums where the movement is going to occur. The hips and shoulders should be thrust forward and backwards at the same time thus moving the body into an arch-hollow rocking movement.
When the movement is ready to be performed, during the transition of the body to the hollow phase, the arms should be contracted to harness the momentum and stretch reflex from the shoulder-hip complex to create vertical motion. As the chin ascends over the bar, the hands should be released into the clap motion as quickly as possible.
Likewise, the re-gripping of the bar should occur as quickly as possible to avoid plummeting to the carth. Lower in a controlled fashion to perform additional repetitions.
When you first try this, make sure to grab some padding or a spotter to make sure you do not slip off and hurt yourself. Never do this on a surface that may cause your grip to slip.
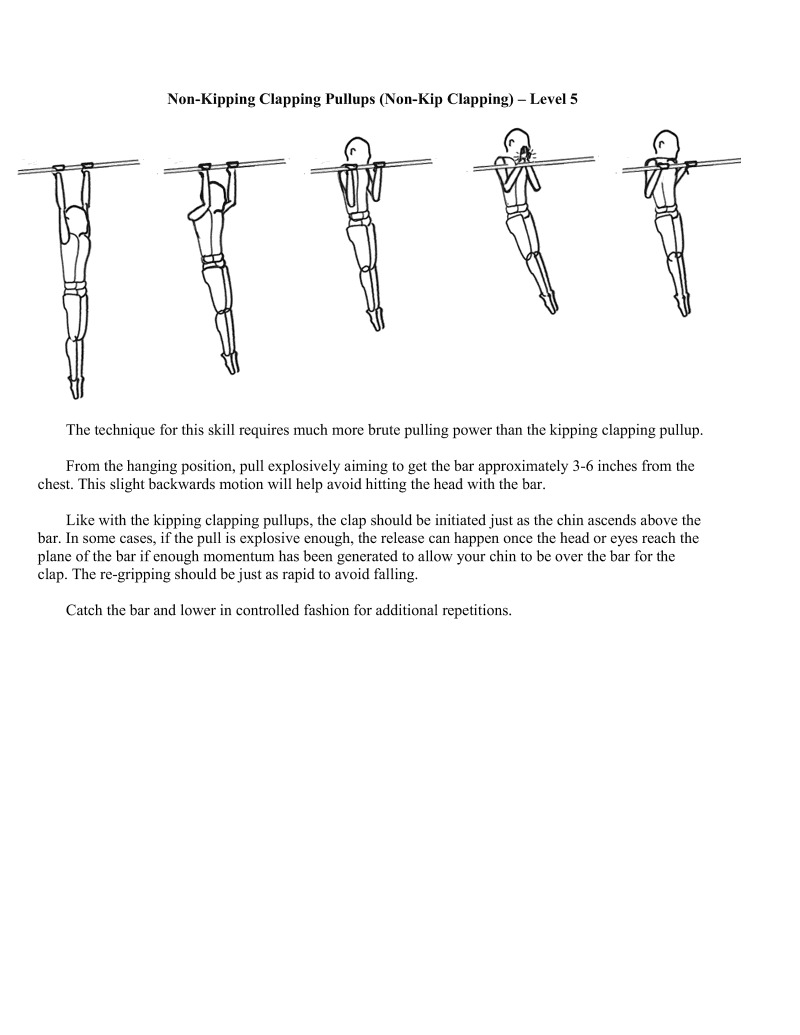
The technique for this skill requires much more brute pulling power than the kipping clapping pullup.
From the hanging position, pull explosively aiming to get the bar approximately 3-6 inches from the chest. This slight backwards motion will help avoid hitting the head with the bar.
Like with the kipping clapping pullups, the clap should be initiated just as the chin ascends above the bar. In some cases, if the pull is explosive enough, the release can happen once the head or eyes reach the plane of the bar if enough momentum has been generated to allow your chin to be over the bar for the clap. The re-gripping should be just as rapid to avoid falling.
Catch the bar and lower in controlled fashion for additional repetitions.

Lsit clapping pullups are the first generation of explosive pullups that add the L-sit to decrease leverage at the shoulder and thus increase difficulty. Since the L-sit forces the center of mass forward, this increases the angle at the shoulder effectively making it require much more force to generate the same vertical momentum used to propel the body upwards.
In this specific technique there is no need to focus on pulling a few inches in front the chest. Rather, since the hands will already be in front of the chest by a couple of inches (which decreases the leverage), the main focus is to keep the toes elevated in the L-sit by keeping the abdominals contracted, and pull the
hands down and the elbows to your sides as quickly as possible. It is a much different movement than the explosive pullups previously described, and will require a bit more practice.
This is the first movement in this progression without a kip besides the standard pullup, and it really requires a strong ability to apply force explosively.
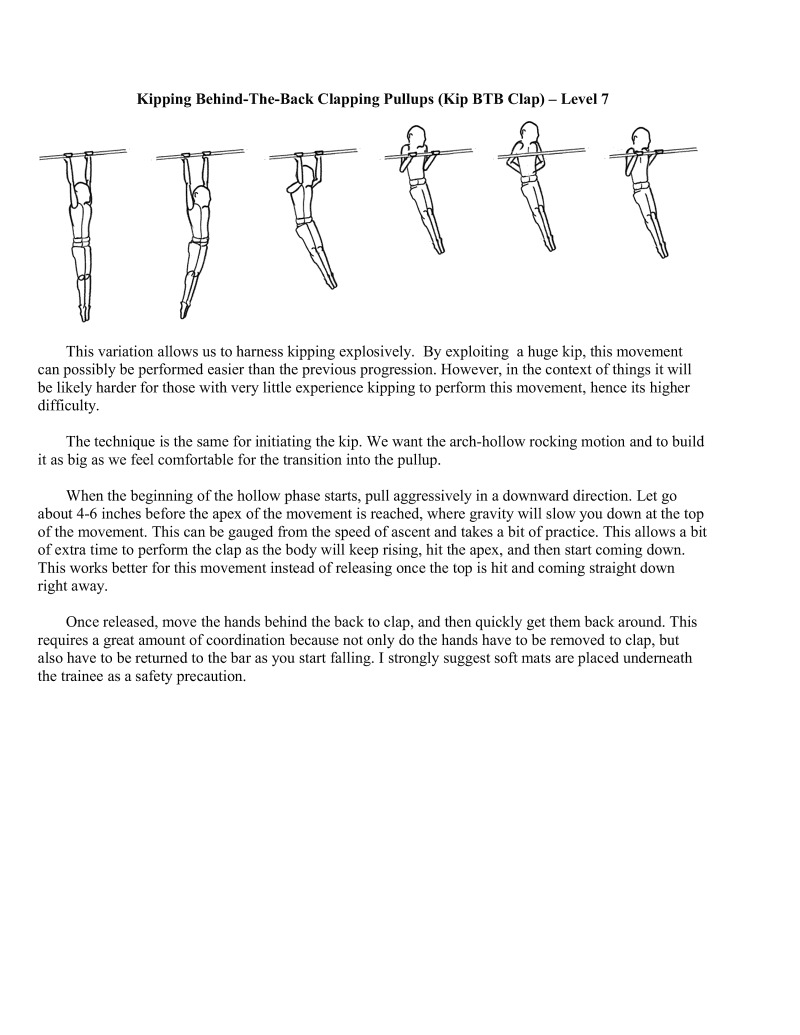
This variation allows us to harness kipping explosively. By exploiting a huge kip, this movement can possibly be performed easier than the previous progression. However, in the context of things it will be likely harder for those with very little experience kipping to perform this movement, hence its higher difficulty.
The technique is the same for initating the kip. We want the arch-hollow rocking motion and to build it as big as we feel comfortable for the transition into the pullup.
When the beginning of the hollow phase starts, pull aggressively in a downward direction. Let go about 4-6 inches before the apex of the movement is reached, where gravity will slow you down at the top of the movement. This can be gauged from the speed of ascent and takes a bit of practice. This allows a bit of extra time to perform the clap as the body will keep rising, hit the apex, and then start coming down. This works better for this movement instead of releasing once the top is hit and coming straight down right away.
Once released, move the hands behind the back to clap, and then quickly get them back around. This requires a great amount of coordination because not only do the hands have to be removed to clap, but also have (o be retumed to the bar as you start falling. I strongly suggest soft mats are placed underneath the trainee as a safety precaution.
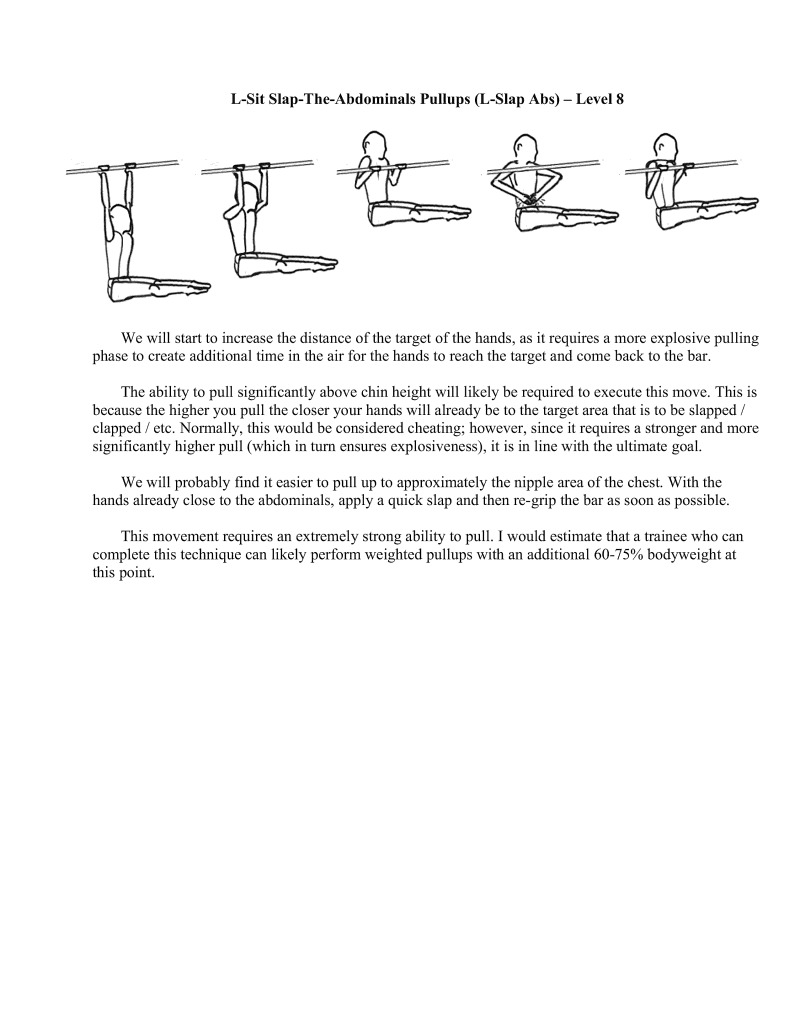
We will start to increase the distance of the target of the hands, as it requires a more explosive pulling phase to create additional time in the air for the hands to reach the target and come back to the bar.
The ability to pull significantly above chin height will likely be required to execute this move. This is because the higher you pull the closer your hands will already be to the target area that is to be slapped / clapped / etc. Normally, this would be considered cheating; however, since it requires a stronger and more significantly higher pull (which in tum ensures explosivenes in line with the ultimate goal
We will probably find it easier to pull up to approximately the nipple area of the chest. With the hands already close (o the abdominals, apply a quick slap and then re-grip the bar as soon as possible.
This movement requires an extremely strong ability to pull. I would estimate that a trainee who can complete this technique can likely perform weighted pullups with an additional 60-75% bodyweight at this point.
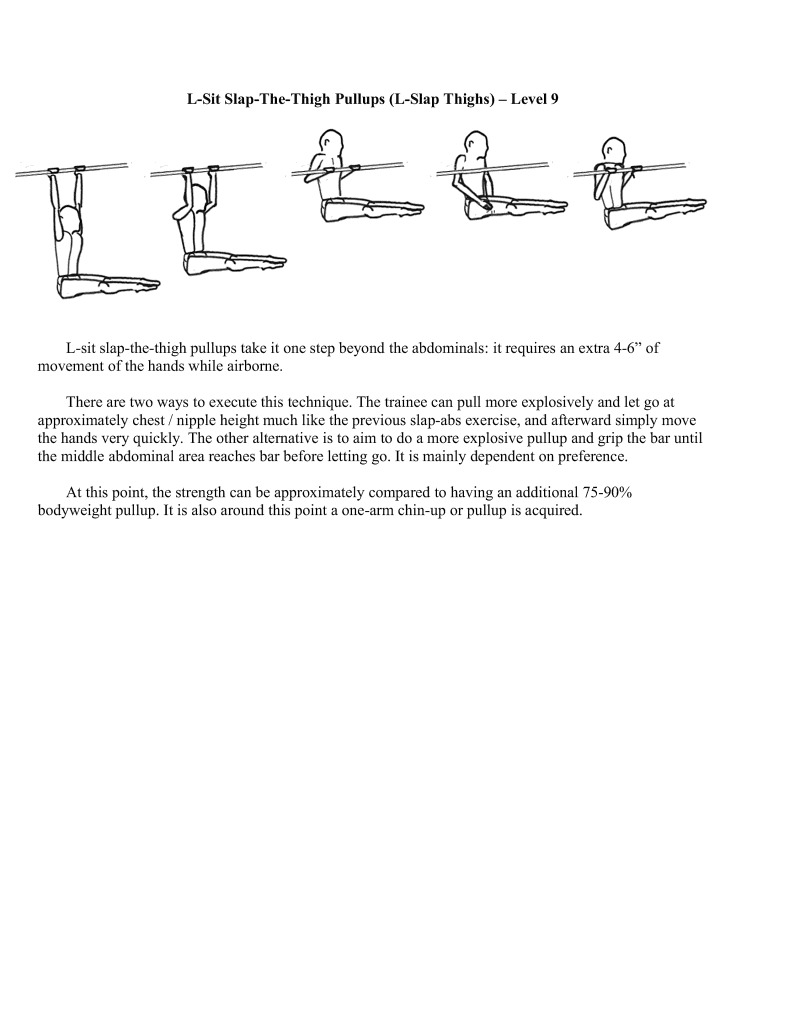
L-sit slap-the-thigh pullups take it one step beyond the abdominals: it requires an extra 4-6" of movement of the hands while airborne.
There are two ways to execute this technique. The trainee can pull more explosively and let go at approximately chest / nipple height much like the previous slap-abs exercise, and afterward simply move the hands very quickly. The other altenative is to aim to do a more explosive pullup and grip the bar until the middle abdominal area reaches bar before letting go. It is mainly dependent on preference.
At this point, the strength can be approximately compared to having an additional 75-90% bodyweight pullup. It is also around this point a one-arm chin-up or pullup is acquired.
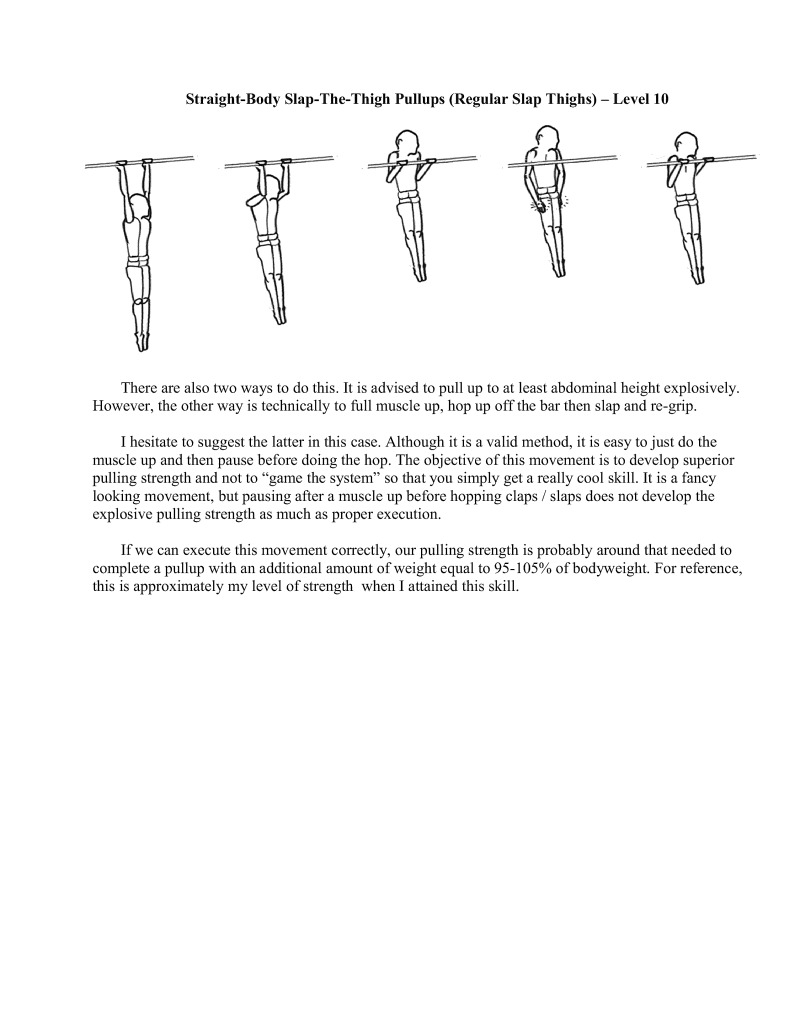
There are also two ways to do this. It is advised to pull up to at least abdominal height explosively. However, the other way is technically to full muscle up, hop up off the bar then slap and re-grip.
I hesitate to suggest the latter in this case. Although it is a valid method, it is easy to just do the muscle up and then pause before doing the hop. The objective of this movement is to develop superior pulling strength and not to "game the system" so that you simply get a really cool skill. It is a fancy looking movement, but pausing after a muscle up before hopping claps / slaps does not develop the explosive pulling strength as much as proper execution.
If we can execute this movement correctly, our pulling strength is probably around that needed to complete a pullup with an additional amount of weight equal to 95-105% of bodyweight. For reference, this is approximately my level of strength when I attained this skill.
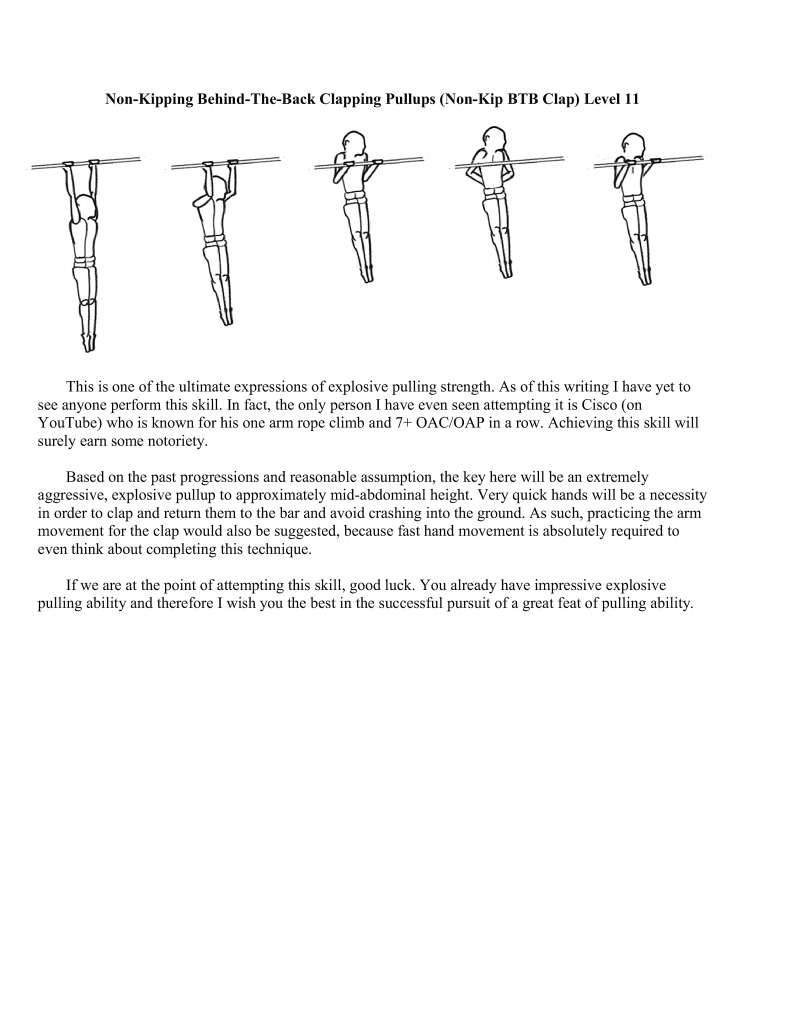
This is one of the ultimate expressions of explosive pulling strength. As of this writing I have yet to see anyone perform this skill. In fact, the only person I have even seen attempting it is Cisco (on YouTube) who is known for his one arm rope climb and 7+ OAC/OAP in a row. Achieving this skill will surely earn some notoriety.
Based on the past progressions and reasonable assumption, the key here will be an extremely aggressive, explosive pullup to approximately mid-abdominal height. Very quick hands will be a necessity in order to clap and return them to the bar and avoid crashing into the ground. As such, practicing the arm movement for the clap would also be suggested, because fast hand movement is absolutely required to even think about completing this technique.
If we are at the point of attempting this skill, good luck. You already have impressive explosive pulling ability and therefore I wish you the best in the successful pursuit of a great feat of pulling ability.
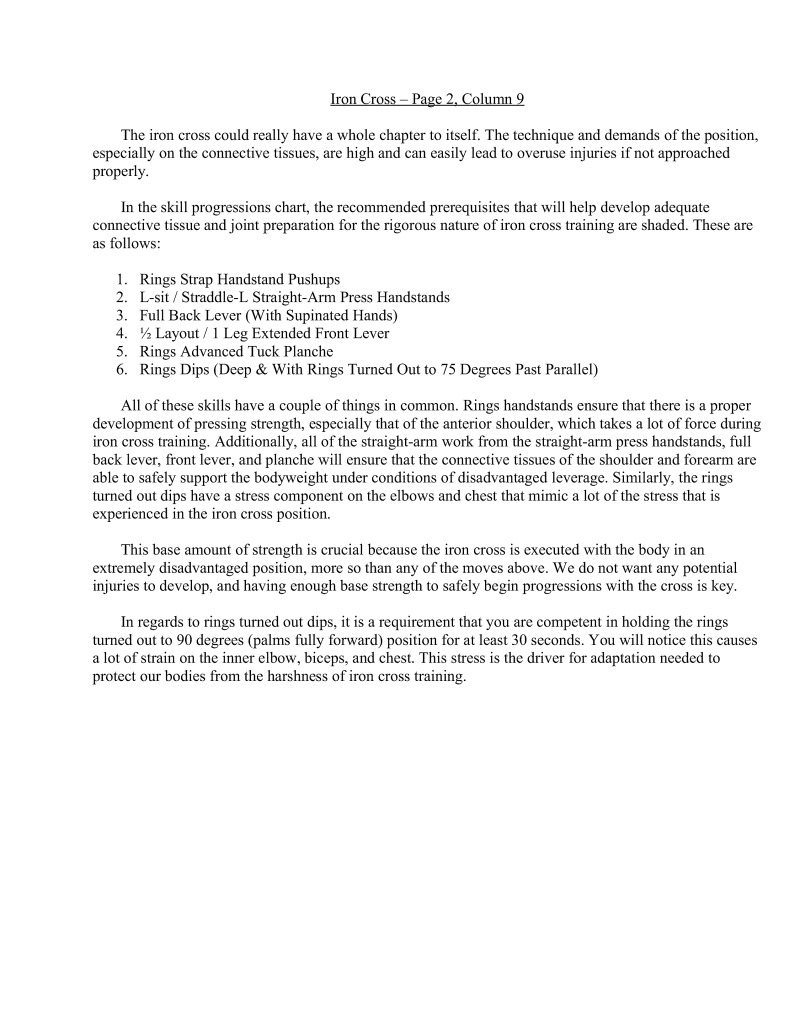
The iron cross could really have a whole chapter to itsel. The technique and demands of the portion, especially on the connective tissues, are high and can easily lead to overuse injuries if not approached properly.
In the skill progressions chart, the recommended prerequisites that will help develop adequate connective tissue and joint preparation for the rigorous nature of iron cross training are shaded. These are as follows:
All of these skills have a couple of things in common. Rings handstands ensure that there is a proper development of pressing strength, especially that of the anterior shoulder, which takes a lot of force during iron cross training. Additionally, all of the straight-arm work from the straight-arm press handstands, full back lever, front lever, and planche will ensure that the connective tissues of the shoulder and forearm are able to safely support the bodyweight under conditions of disadvantaged leverage. Similarly, the rings turned out dips have a stress component on the elbows and chest that mimic a lot of the stress that is experienced in the iron cross position.
This base amount of strength is crucial because the iron cross is executed with the body in an extremely disadvantaged position, more so than any of the moves above. We do not want any potential injuries to develop, and having enough base strength to safely begin progressions with the cross is key.
In regards to rings tured out dips, it is a requirement that you are competent in holding the rings turned out to 90 degrees (palms fully forward) position for at least 30 seconds. You will notice this causes a lot of strain on the inner elbow, biceps, and chest. This stress is the driver for adaptation needed to
protect our bodies from the harshness of iron cross trai

Methods of Training
It preferable to simulate the cross position as best as possible, including keeping the trainee on the rings. Four common methods of training towards the iron cross are listed below and ordered from most to least effective.
From what I have seen and experienced, partner-assisted crosses are the best. They require muscles to be at or near maximum effort the whole time, which is extremely good for developing strength and muscle mass for the cross (provided that you are eating enough). In addition, a training partner typically makes workouts more effective through friendly competition and consistent encouragement.
The second best option would be Theraband cross pullouts with weighted progressions or a dream machine device with pulleys connected to weights (or your bodyweight). It simulates the cross position very well and is scalable with weights to mark continual strength progress. For the weighted progressions, dumbbells, weighted vests, or other implements can be used provided there is a system to consistently add or subtract weight from the body.
Block cross pullouts tend to put a bit more stress on the lats as opposed to the pecs. For this single reason they are rated below the above exercises in which you can achieve the actual iron cross position. On the other hand, block cross pullouts can be effective because progress can be measured either by how much of the legs are on the block or by the height of the block.
Last but not least is the Theraband-assisted cross (with therabands of different colors). It is rated last because the force is less measurable and so progress is less consistent. If using a block feels unnatural, switch to these instead, but do your absolute best to keep everything consistent to ensure steadier progression. If doing these, do your best to pick something that makes you struggle but allows you to eventually push through.
Pressing the rings into the forearms to decrease leverage is a valid method; however, performing iron cross exercises this way seems to not prepare the connective tissues enough. It is often the case that strength training for the iron cross may be limited or partially limited by the ability of the connective tissues to adapt to the stress. In particular, the connective tissues that are most affected are the ones at the elbow (medial epicondyle) and shoulder (otator cuff and surrounding muscular stabilizers). Thus, I would avoid using this as a primary technique.
Another alternative for exercises if you have a dream machine.
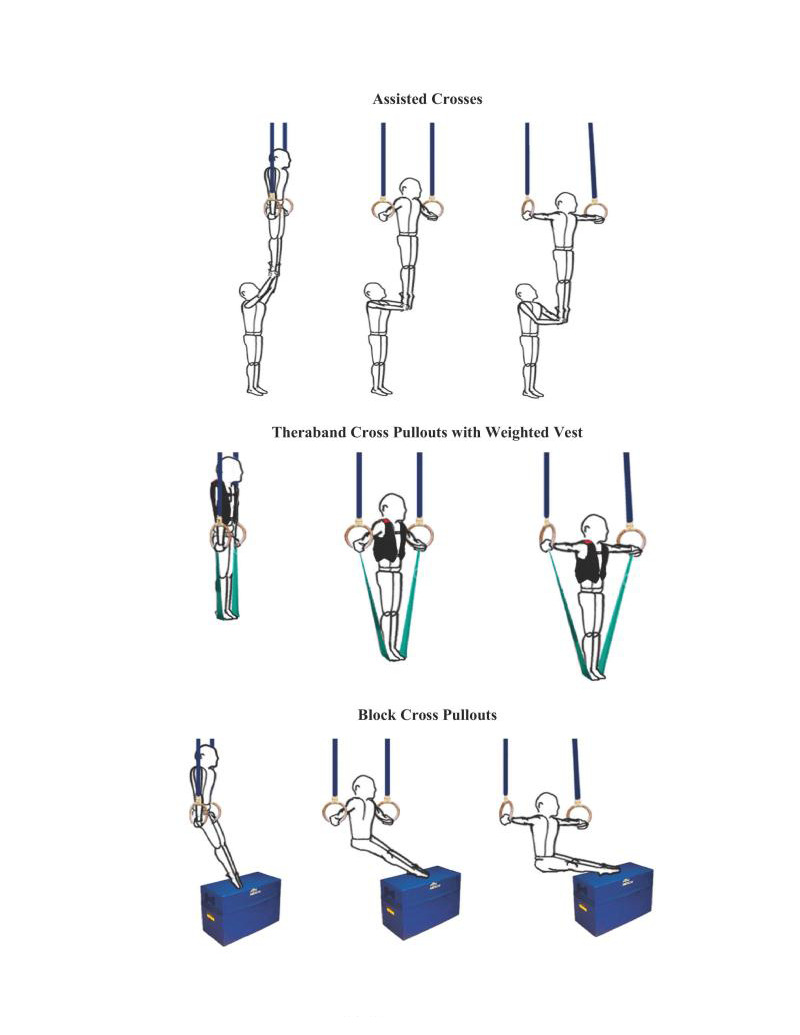
Theraband Cross Pullouts with Weighted Vest
Block Cross Pullouts
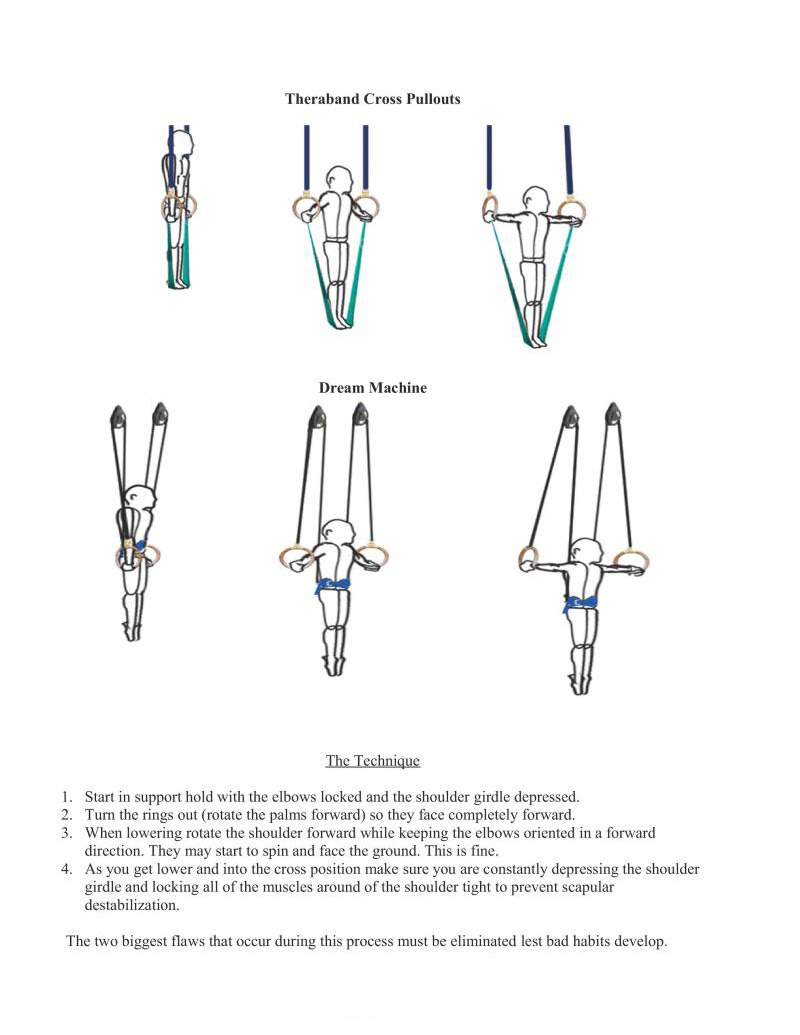
Theraband Cross Pullouts
Dream Machine The Technique
The two biggest flaws that occur during this process must be eliminated lest bad habits develop.
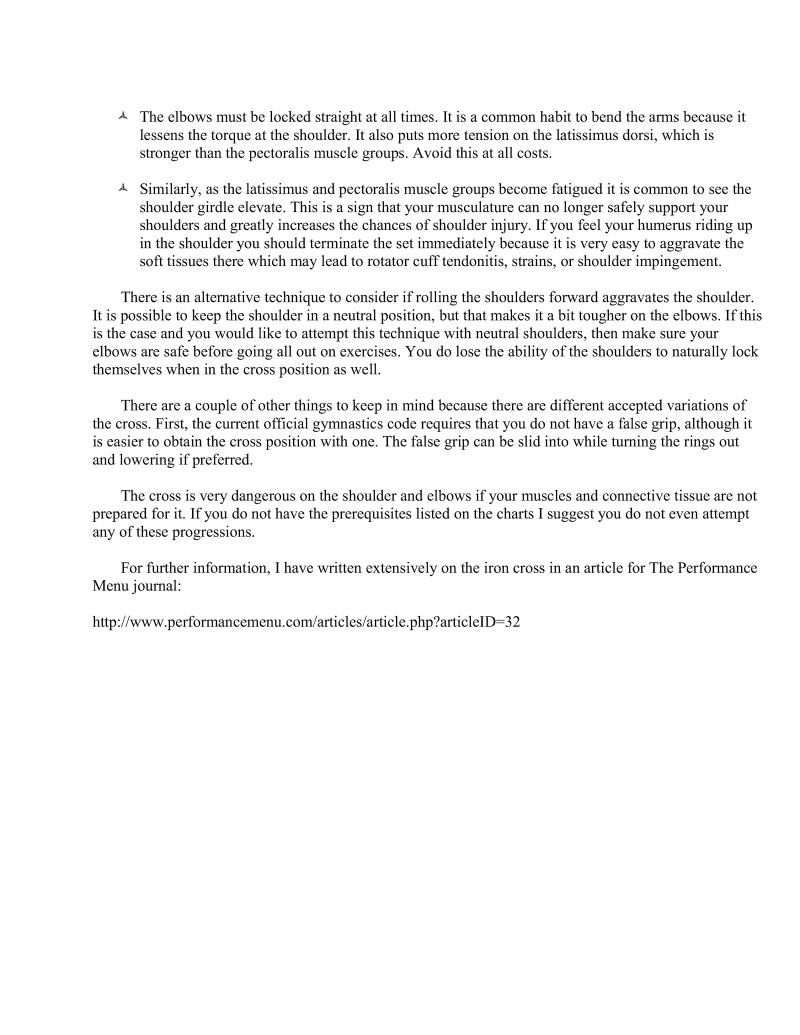
A The elbows must be locked straight at all imes. It is a common habit to bend the arms because it lessens the torque at the shoulder. It also puts more tension on the latissimus dorsi, which is stronger than the pectoralis muscle groups. Avoid this at all costs.
A Similarly, as the latissimus and pectoralis muscle groups become fatigued it is common to see the shoulder girdle elevate. This is a sign that your musculature can no longer safely support your shoulders and greatly increases the chances of shoulder injury. If you feel your humerus riding up in the shoulder you should terminate the set immediately because it is very easy to aggravate the Soft tissues there which may lead to rotator cuff tendos . or shoulder impingement.
There is an alterative technique to consider if rolling the shoulders forward aggravates the shoulder. It i possible to keep the shoulder in a neutral position, but that makes it a bit tougher on the elbows. If this the case and you would like to attempt this technique with neutral shoulders, then make sure your elbows are safe before going all out on exercises. You do lose the ability of the shoulders to naturally lock themselves when in the cross position as well.
There are a couple of other things to keep in mind because there are different accepted variations of the cross. First, the current official gymnastics code requires that you do not have a false grip. although it is easier to obiain the cross position with one. The false grip can be slid into while tuing the rings out and lowering if preferred.
The cross is very dangerous on the shoulder and elbows if your muscles and connective tissue are not prepared for it. I you do not have the prerequisites listed on the charts I suggest you do not even atiempt any of these progressions.
For further information, I have written extensively on the iron cross in an article for The Performance Menu journal
http://www.performancemenu.com/articles/article.php2articlelD=32
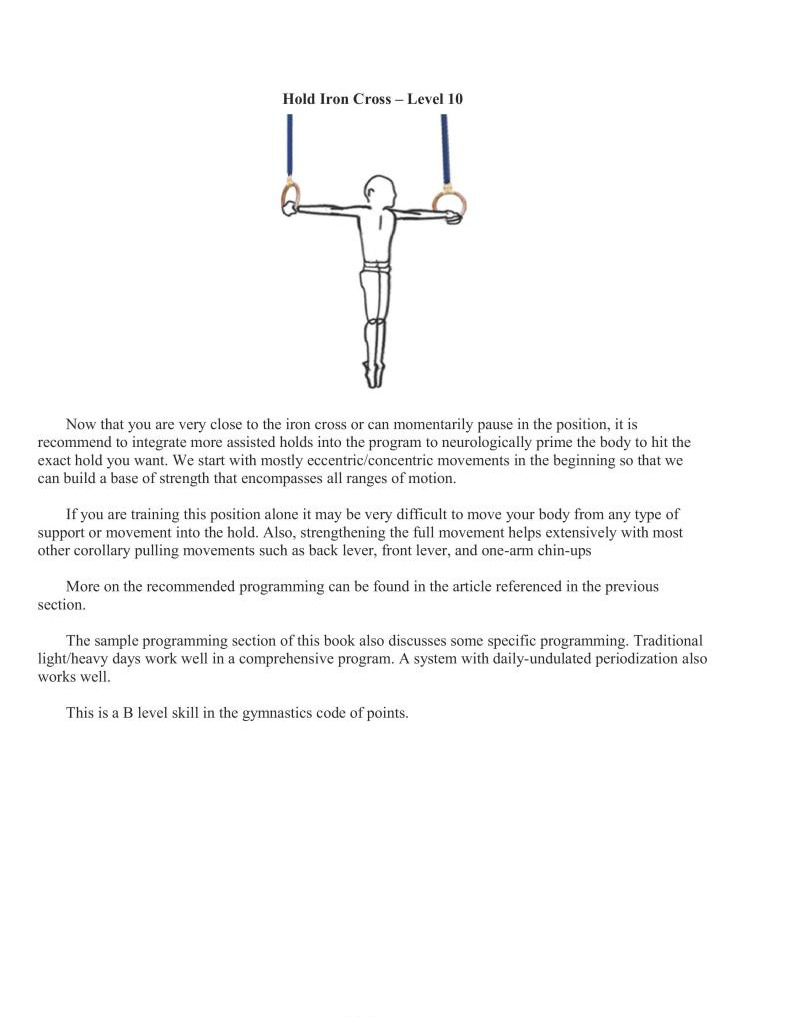
Now that you are very close to the iron cross or can momentarily pause in the position, it is recommend to integrate more assisted holds into the program to neurologically prime the body to hit the exact hold you want. We start with mostly eccentric/concentric movements in the beginning so that we can build a base of strength that encompasses all ranges of motion.
If you are training this position alone it may be very difficult to move your body from any type of support or movement into the hold. Also, strengthening the full movement helps extensively with most other corollary pulling movements such as back lever, front lever, and one-arm chin-ups
More on the recommended programming can be found in the article referenced in the previous section.
The sample programming section of this book also discusses some specific programming. Traditional light/heavy days work well in a comprehensive program. A system with daily-undulated periodization also works weil.
This is a B level skill in the gymnastics code of points.
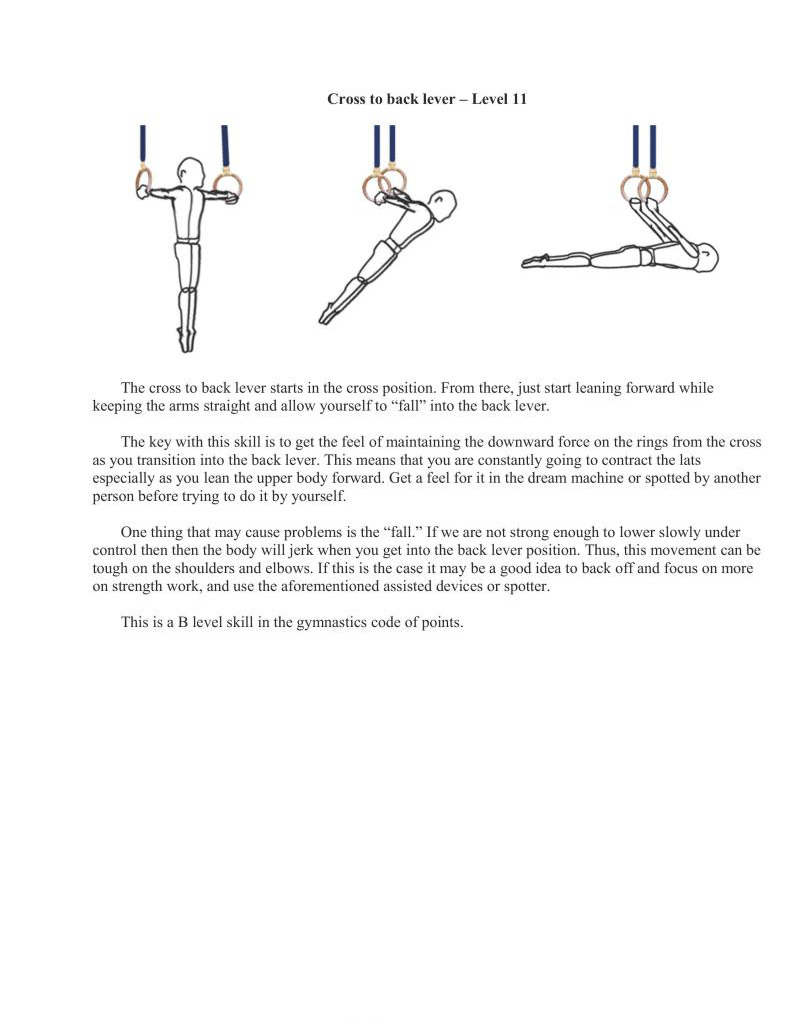
The cross to back lever starts in the cross position. From there, just start leaning forward while keeping the arms straight and allow yourself to "fall" into the back iever.
The key with this skill is to get the feel of maintaining the downward force on the rings from the cross S you transition into the back lever. This means that you are constantly going to contract the lats especially as you lean the upper body forward. Get a feel for it in the dream machine or spotted by another person before trying to do it by yourself.
One thing that may cause problems is the "fall." If we are not strong enough to lower slowly under control then then the body will jerk when you get into the back lever position. Thus, this movement can be tough on the shoulders and elbows. If this is the case it may be a good idea to back off and focus on more on strength work, and use the aforementioned assisted devices or spoter.
This is a B level skill in the gymnastic code of points.
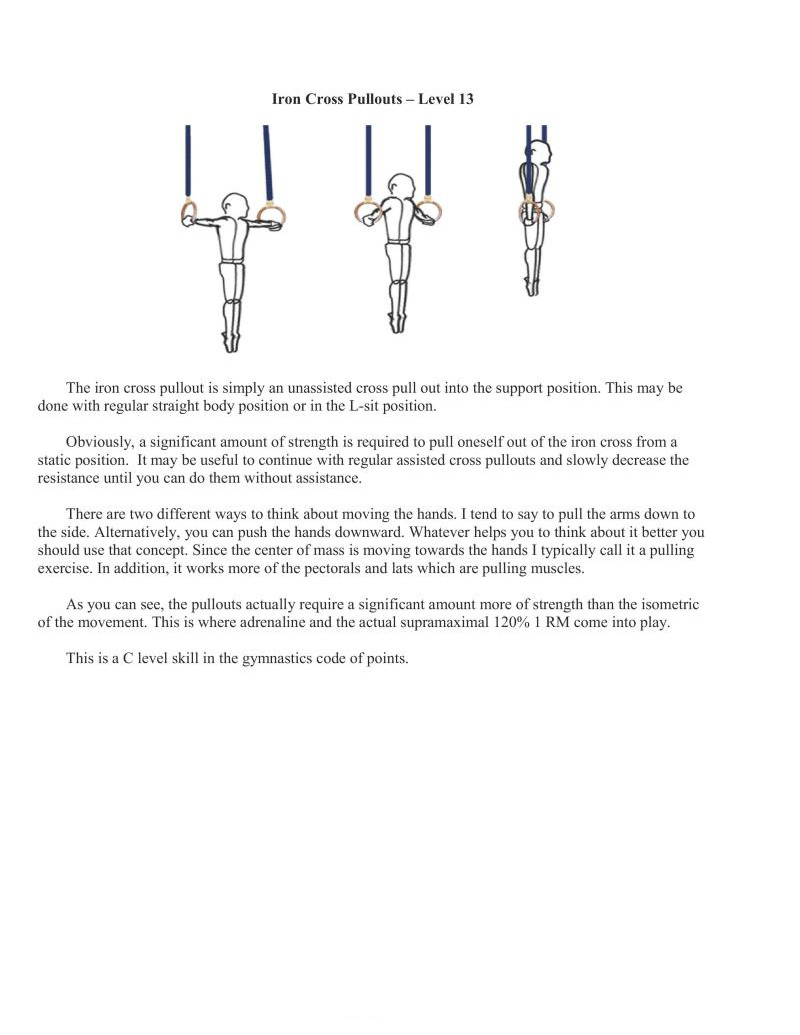
The iron cross pullout is simply an unassisted cross pull out into the support position. This may be done with regular straight body position or in the L-sit position.
Obviously, a significant amount of strength is required to pull oneself out of the iron cross from a static position. It may be useful to continue with regular assisted cross pullouts and slowly decrease the resistance until you can do them without assistance.
There are two different ways to think about moving the hands. I tend to say to pull the arms down to the side. Alternatively, you can push the hands downward. Whatever helps you to think about it better you should use that concept. Since the center of mass is moving towards the hands I typically call it a pulling exercise. In addition, it works more of the pectorals and lats which are pulling muscles.
As you can see, the pullouts actually require a significant amount more of strength than the isometric of the movement. This is where adrenaline and the actual supramaximal 120% 1 RM come into play.
This is a C level skill in the gymnastics code of points.
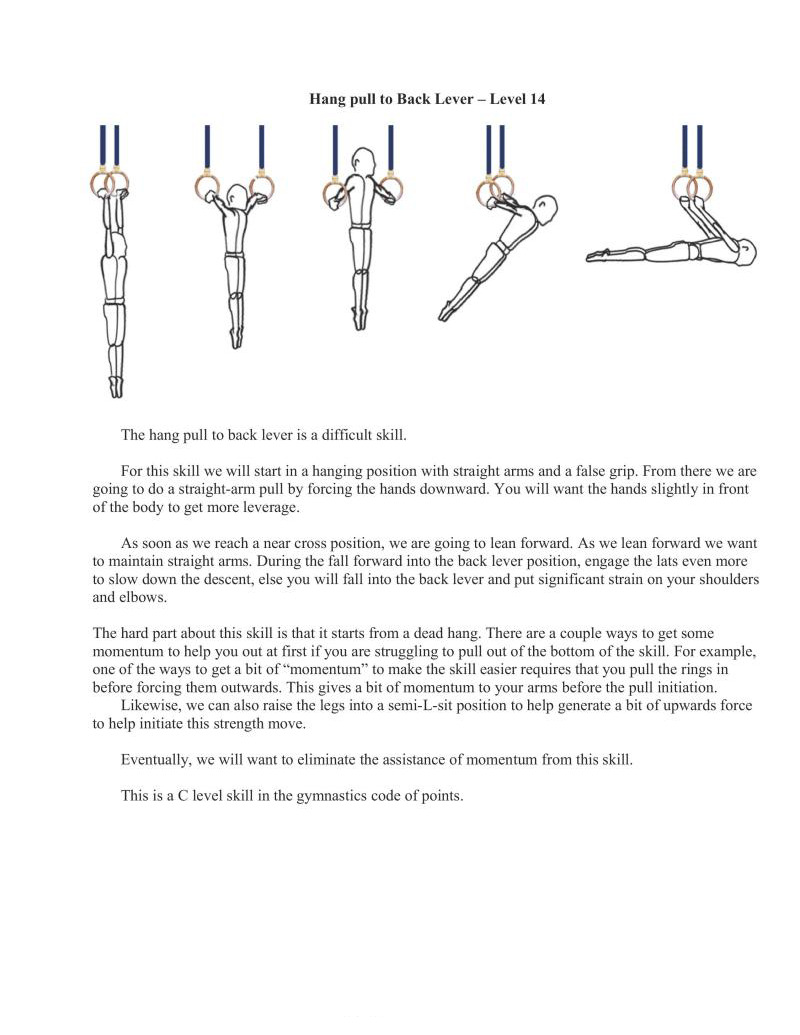
The hang pull to back lever is a difficult skill.
For this skill we will start in a hanging position with straight arms and a false grip. From there we are going to do a straight-arm pull by forcing the hands downward. You will want the hands slightly in front of the body to get more leverage.
As soon as we reach a near cross position, we are going to lean forward. As we lean forward we want to maintain straight arms. During the fall forward into the back lever position, engage the lats even more to slow down the descent, else you will fall into the back lever and put significant strain on your shoulders and elbows.
The hard part about this skillis that it starts from a dead hang. There are a couple ways to get some momentum to help you out at firstif you are struggling to pull out of the bottom of the skill. For example, one of the ways to get a bit of "momentum" to make the skill easier requires that you pull the rings in before forcing them outwards. This gives a bit of momentum to your arms before the pull initiation.
Likewise, we can also raise the legs into a semi-L-sit position to help generate a bit of upwards force o help initiate this strength move.
Eventually, we will want to eliminate the assistance of momentum from this skill.
This is a C level skill in the gymnastics code of points.
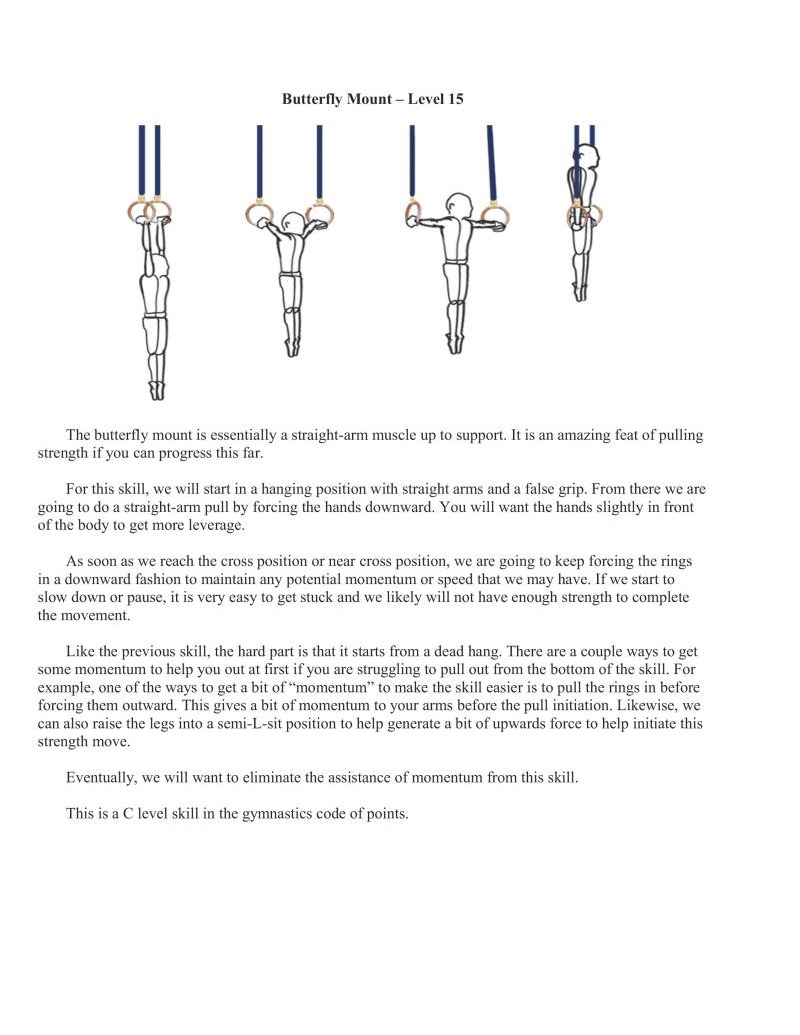
The butterfly mount is essentially a straight-arm muscle up to support. It is an amazing feat of pulling strength if you can progress this far.
For this skill, we will start in a hanging position with straight arms and a false grip. From there we are going to do a straight-arm pull by forcing the hands downward. You will want the hands slightly in front of the body to get more leverage.
As so0n as we reach the cross position or near cross position, we are going to keep forcing the rings in a downward fashion to maintain any potential momentum or speed that we may have. If we start to
slow down or pause, it is very easy to get stuck and we likely will not have enough strength to complete the movement.
In the the previous skill, the hard part is that it starts from a dead hang. There are a couple ways to get some momentum to help you out at first if you are struggling to pull out from the bottom of the skill. For example, one of the ways to get a bit of "momentum" to make the skill easier is to pull the rings in before forcing them outward. This gives a bit of momentum to your arms before the pull initiation. Likewise, we
can also raise the legs into a semi-L-sit position to help generate a bit of upwards force to help initiate this strength move.
Eventually, we will want to eliminate the assistance of momentum from this skill.
This is a C level skill in the gymnastics code of points.
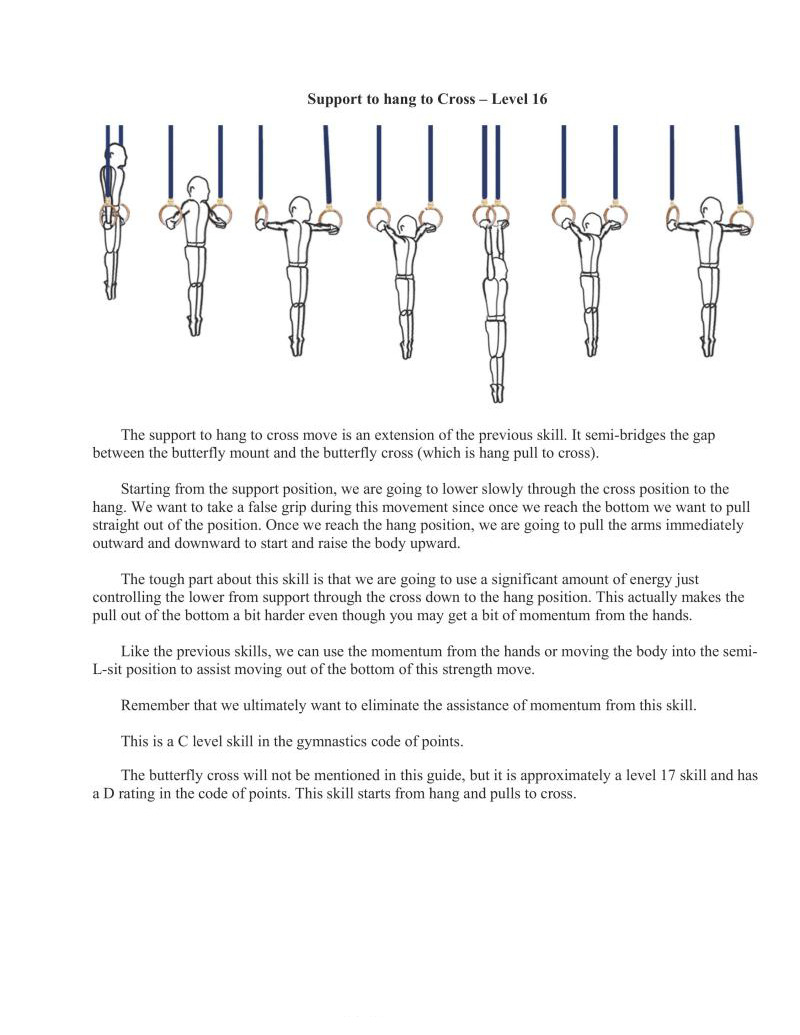
The support to hang to cross move is an extension of the previous skill. It semi-bridges the gap between the butterfly mount and the butterfly cross (which is hang pull to cross).
Starting from the support position, we are going to lower slowly through the eross position to the hang. We want to take a false grip during this movement since once we reach the bottom we want to pull straight out of the position. Once we reach the hang position, we are going to pull the arms immediately outward and downward to start and raise the body upward.
The tough part about this skill is that we are going to use a significant amount of energy just controlling the lower from support through the cross down to the hang position. This actually makes the pull out of the bottom a bit harder even though you may get a bit of momentum from the hands.
Like the previous skills, we can use the momentum from the hands or moving the body into the semi- position to assist moving out of the bottom of this strength move.
Remember that we ultimately want to eliminate the assistance of momentum from this skill.
This is a C level skill in the gymnastics code of points.
The butterfly cross will not be mentioned in this guide, but it is approximately a level 17 skill and has a D rating in the code of points. This skill starts from hang and pulls to cross.

The planche requires an unfathomable amount of straight-arm pushing strength. It seems everyone doing bodyweight training is striving for this skill, yet those who can perform this skill well are few and far between.
Many internet videos now feature this skill and suggest methods on the training towards it. However, in most every case, we see an extremely arched spine and slightly bent arms. These form errors do more than make it look less appealing: they actually make the skill much easier to perform strength-wise and sacrifice over all strength gains. Consequentially, we will hear of people obtaining a "planche" within six months to a year.
If an authentic planche is one of our primary goals, we want to avoid these form errors as much as possible, because we are only cheating ourselves of proper strength development. While the road may be Tonger, we will be rewarded with a cleaner looking body position and much more strength. Indeed the. additional strength will have great transference to the other bodyweight strength skills we are striving towards.
Turning hands to the side for this skill is suggested as it will best translate towards other progressions, such as anything on the parallel bars. The hands forward position does make the skill a bit easier because of the leverage the wrists can provide by moving the base of support forward. This, however, requires tremendous wrist conditioning to avoid wrist pain. And again, while making the skill easier allows you to obtain the full skill sooner, the real pursuit is strength.
Working towards the planche will get frustrating simply because it takes so long to make progress. Remember, we do not know the strength and condition of others who say they were able to achieve these positions in a short amount of time. They could have 5-10+ years of other strength training behind them which speeds up progress. The key to training planche is consistency, even in the supplemental work; do not expect to excel if you keep changing your routine setup.
Shoulders should be tight and active, and the scapulae should be protracted as far as possible. This is done by pressing deep into the ground with your hands, arms, and shoulders as one unit, resisting all of the downward force on your body. This active position is essential to keep the shoulder safe from
impingement, to allow better leverage, and to align body positions correctly. This same position is used in many other movements and holds, such as
Never lose sight of active shoulders no matter how far you progress in the planche.

The frog stand is less of a strength skill and more of a balance skill. That is not to say it does not require any strength, but most of the focus is on getting a feel for the position.
Grip the ground or parallettes firmly and, with bent arms, lean forward. Slowly put one knee at a time on the shelf created by the slightly bent elbows. Onee you can balance like that, lean forward until shoulders and hips are level.
As with all the planche skills from here on out, we should prepare our bodies to feel the "I am going to face plant!" sensation. This is totally normal and a big part of moving up from progression to progression. We should fight this sensation as much as possible with our shoulders. Aside from the Frog Stand, we do not by bend the elbows because (1) we do not want to build the bad habit of bending the elbows when we feel off balance, and (2) we want to build the core of all pressing ability: straight-arm pressing strength through the shoulders.
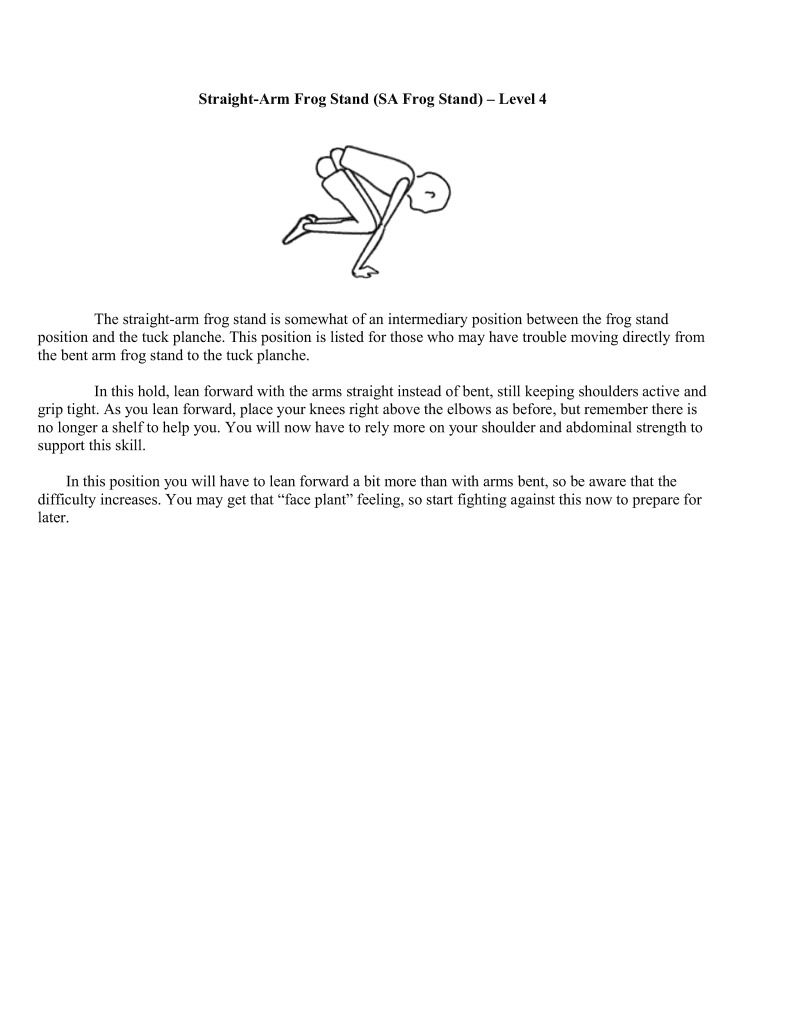
The straight-arm frog stand is somewhat of an intermediary position between the frog stand position and the tuck planche. This position is listed for those who may have trouble moving directly from the bent arm frog stand to the tuck planche.
In this hold, lean forward with the arms straight instead of bent, still keeping shoulders active and grip tight. As you lean forward, place your knees right above the elbows as before, but remember thert 1o longer a shelf to help you. You will now have to rely more on your shoulder and abdominal strength to support this skill
In this position you will have to lean forward a bit more than with arms bent, so be aware that the difficulty increases. You may get that "face plant" feeling, so start fighting against this now to prepare for later.
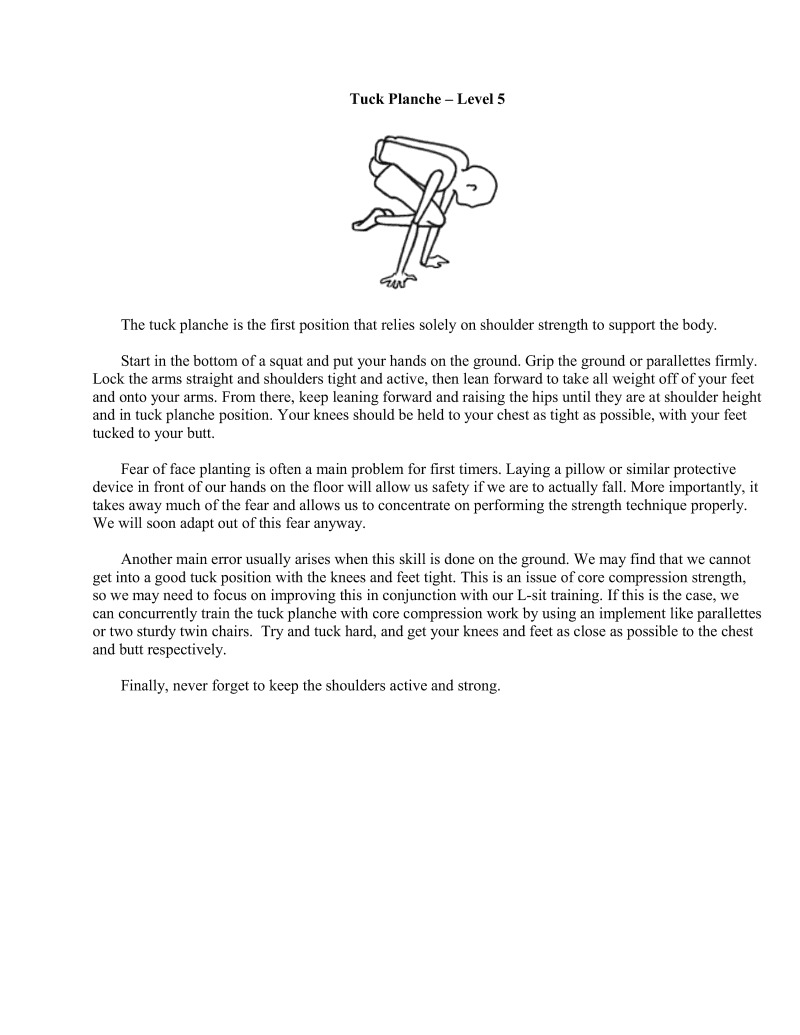
The tuck planche is the first position that relies solely on shoulder strength to support the body.
Start in the bottom of squat and put your hands on the ground. Grip the ground or parallettes firmly. Lock the arms straight and shoulders tight and active, then lean forward to take all weight off of your feet and onto your arms. From there, keep leaning forward and raising the hips until they are at shoulder height and in tuck planche position. Your knees should be held to your chest is tight as possible, with your feet tucked to your butt.
Fear of face planting is often a main problem for first timers. Laying a pillow or similar protective device in front of our hands on the floor will allow us safety if we are to actually fall. More importantly, it takes away much of the fear and allows us to concentrate on performing the strength technique properly. We will soon adapt out of this fear anyway.
Another main error usually arises when this skill is done on the ground. We may find that we cannot getinto a good tuck position with the knces and feet tight. This is an g of core compression strength, so we may need to focus on improving this in conjunction with our L-sit training. If this is the case, we
can concurrently train the tuck planche with core compression work by using an implement like parallettes or two sturdy twin chairs. Try and tuck hard, and get your knees and feet as close as possible to the chest and butt respectively.
Finally, never forget to keep the shoulders active and strong.
The advanced tuck planche takes the tuck planche and flatiens out the back while continuing to keep the hips and shoulders in line and parallel with the ground. At this point we should have fairly good command over our tuck position, so, when training on the floor, dragging feet should not be an issue.
Like the predecessors to this skill, we will lock the arms and shoulders solidly and lean forward, placing the weight on our hands and gripping hard. Start from the tuck planche position and straighten the back until achieving the advanced tuck position.
Atfirst, you may have a hard time even figuring out how to straighten out the back. This lack of back control is usually remedicd by training straight-arm press handstand progressions. Both the planche and straight-arm press handstands are straight-arm pressing skills that work synergistically to increase shoulder strength. Importantly, they also facilitate core strength and awareness that help to fix issues like this one.
Straightening the back will cause us to lean forward more and thus increase the torque at the shoulders. This will increase the difficulty. If our feet start to sag toward the floor as we straighten out, then it is likely one of two problems: either we simply need to lean forward more or our strength is not adequate and we should return to the previous progression until ready.
As fatigue management allows, adding in supplemental work will be extremely useful to help develop the strength needed to attain a planche. Any other shoulder based pressing movements can act as drivers for better shoulder pressing strength, but specificity will also be very helpful here. As such, pseudo planche pushups and planche leans are a great choice; however, they are a bit hard to measure, whi why I did not recommend them as a skill on the progression charts.
Pseudo planche pushups are, in essence, an attempt to best simulate holding the planche position and completing a pushup in that position, but with some assistance. Start yourself in a standard pushup position, but place your feet on an implement instead of the ground. The implement could be a box, mat, chair, or anything that will be high enough to align your feet with your shoulders horizontally. With a straight or slightly hollow body, we arc then going to lean forward as far as possible into the planche position and lower ourselves so that the shoulders get at least as low as the elbows. Then, push back up to the feet-supported planche position. These can help significantly, especially when progress is stalling
Similarly, a planche lean is just like it says. Prop the feet up to shoulder height and lean forwards as far as possible without tipping over and hold the position for a set amount of time.
From this progression onwards, it is common to want to bend the arms slightly or have the hips slightly higher than the shoulders. Remember to avoid these faults. The proper position is going to be difficult to hold, because of both strength and awareness. This is exactly why we want to ensure that we are holding that proper position. We should experience the "face plant" feeling, and the hips will likely feel lower than they truly are when performing this skill. If a camera or spoter is available to check our form, definitely use them.
The straddle planche is the first skill in the planche progression that is actually worth something in the Gymnastics Code of Points with the value of an A on the floor or parallel bars, and the value of a B on the rings. Pat yourself on the back once you have achieved it!
By now our straddle should be proficient because of the practice we have gotten with it in the press handstands, abdominal compression work, and the back and front lever progressions. If this is not the case, then itis
The straddle planche, like all of the other straddle lever skills mentioned before, is executed with the straight-body, legs-apart position. The line from the shoulders to the hips to the knees to the ankles and toes should be straight and parallel to the ground, but with legs spread as far away from each other as possible.
There are a variety of ways to get into this skill on the ground or parallettes. The most common method is just leaning into the skill with the hips slightly bent, and then lifting off the legs once we start to gt the balance with our hands.
The other method is to jump into the straddle planche position then try to balance it from there. While this is more difficult some people prefer this so do what feels more natural. As long as you are hitting good body positions either of these variations are fine.
In most cases, supplemental work is required to attain a straddle planche. From what I have seen in my own training and training others to obtain straddle planche, the most common exercises to get the straddle planche is 3 exercises. One of the exercises is the planche isometric, and the other two are typically two supplemental dynamic pressing movements such as planche progression pushups and/or pseudo planche pushups with a dipping or handstand press variation
Remember, avoid the bent arms and hips-too-high faults! Use a camera or spotter or mirror to correct form.
This is an A level skill in the gymnastics code of points.
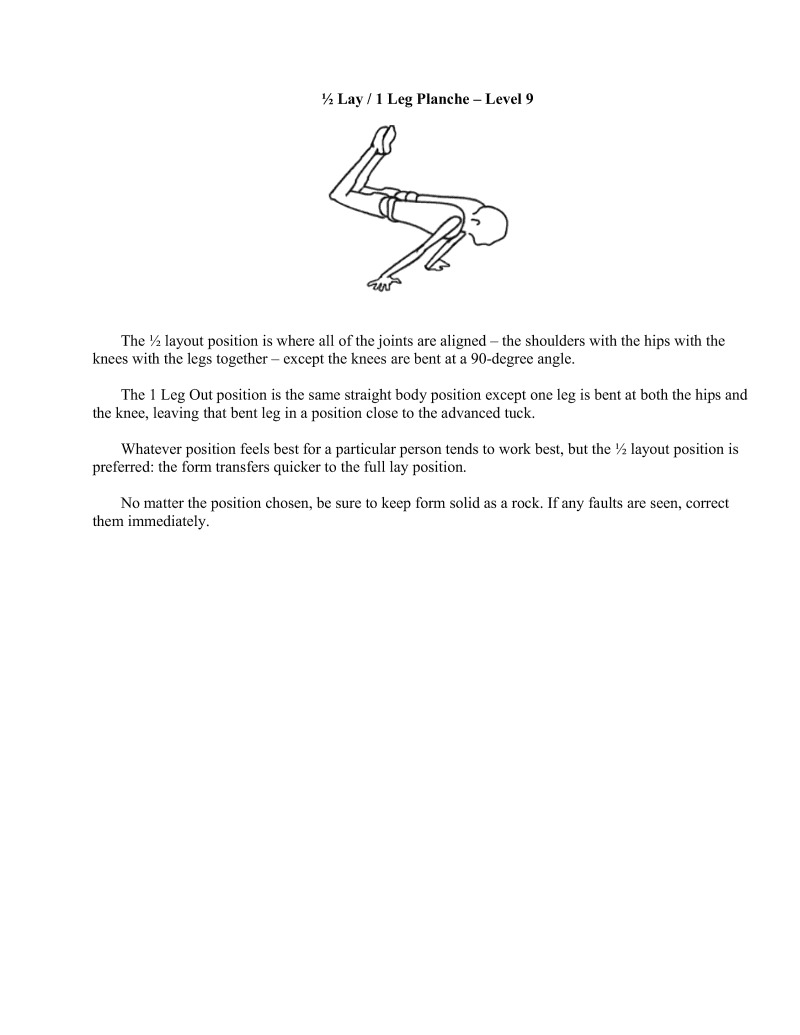
The % layout position is where all of the joints are aligned — the shoulders with the hips with the knees with the legs together — except the knees are bent at a 90-degree angle.
The 1 Leg Out position is the same straight body position except one leg is bent at both the hips and the knee, leaving that bent leg in a position close to the advanced tuck
Whatever position feels best for a particular person tends to work best, but the % layout position is preferred: the form transfers quicker to the full lay position.
No mater the position chosen, be sure to keep form solid as a rock. If any faults are seen, correct mediately.
thes
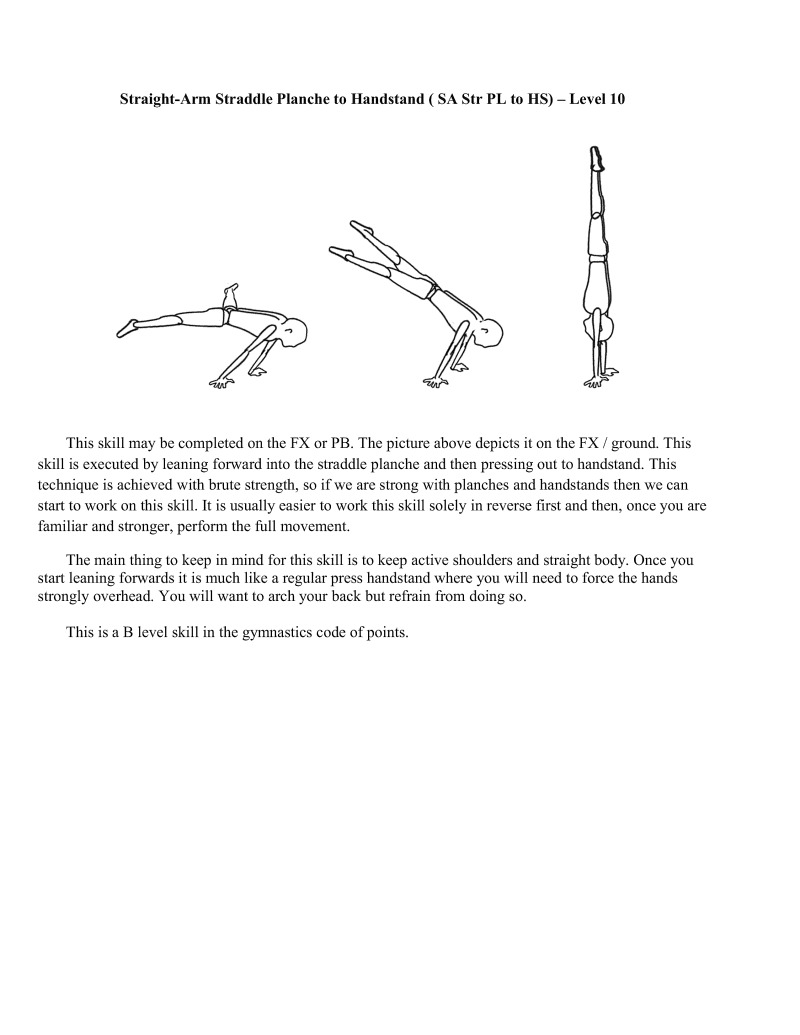
This skill may be completed on the FX or PB. The picture above depicts it on the FX / ground. This skill is executed by leaning forward into the straddle planche and then pressing out to handstand. This technique is achieved with brute strength, so if we are strong with planches and handstands then we can start to work on this skill. It is usually easier to work this skill solely in reverse first and then, once you are familiar and stronger, perform the full movement.
The main thing to keep in mind for this skill is to keep active shoulders and straight body. Once you start leaning forwards it is much like a regular press handstand where you will need to force the hands strongly overhead. You will want to arch your back but refrain from doing so.
This is a B level skil
in the gymnastics code of points.
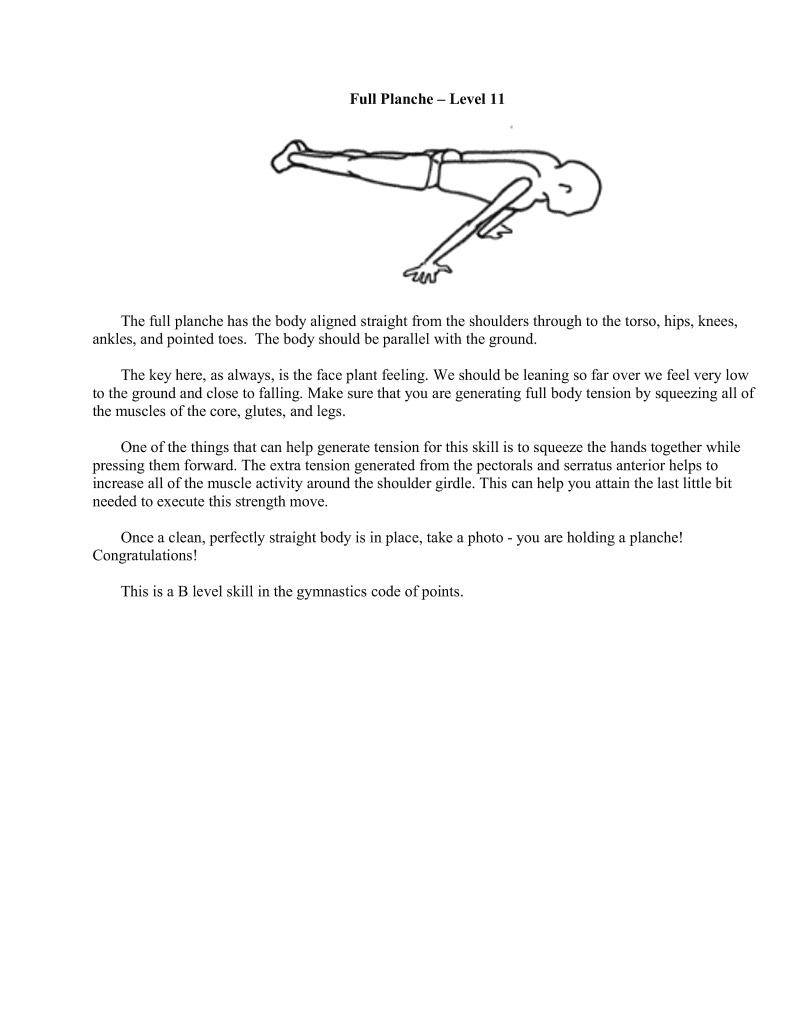
The full planche has the body aligned straight from the shoulders through to the torso, hips, knees, ankles, and pointed toes. The body should be parallel with the ground.
The key here, as always, is the face plant feeling. We should be leaning so far over we feel very low o the ground and close to falling. Make sure that you are generating full body tension by squeczing all of the muscles of the core, glutes, and legs.
One of the things that can help generate tension for this skill i to squeeze the hands together while pressing them forward. The extra tension generated from the pectorals and serratus anerior helps to increase all of the muscle activity around the shoulder girdle. This can help you attain the last little bit needed to execute this strength move.
Once a clean, perfectly straight body is in place, take a photo - you are hol Congratulations!
2 a planche!
This is a B level skill in the gymnastics code of points.
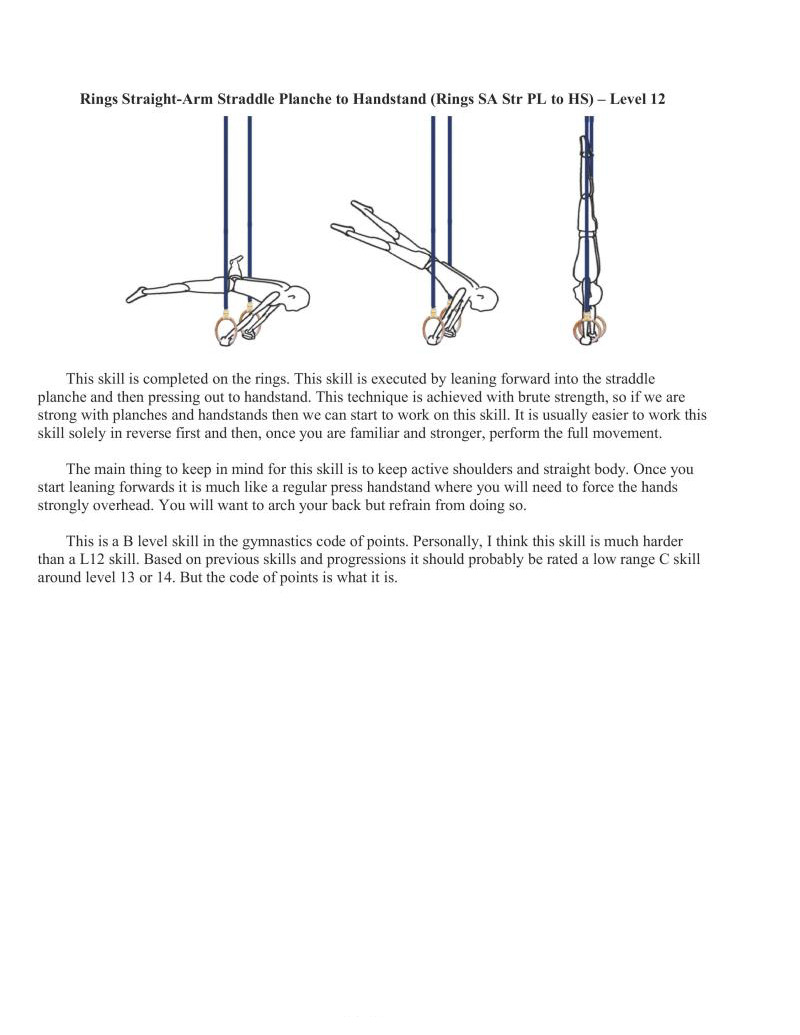
This skill is completed on the rings. This skill is executed by leaning forward into the straddle planche and then pressing out to handstand. This technique is achieved with brute strength, so if we are strong with planches and handstands then we can start to work on this skill. It is usually easier to work this skill solely in reverse first and then, once you are familiar and stronger, perform the full movement
The main thing to keep in mind for this skill is to keep active shoulders and straight body. Once you start leaning forwards it is much like a regular press handstand where you will need to force the hands strongly overhead. You will want to arch your back but refrain from doing so.
This is a B level skill in the gymnastics code of points. Personally, I think this skill is much harder than a L12 skill. Based on previous skills and progressions it should probably be rated a low range C skill around level 13 or 14. But the code of points is what
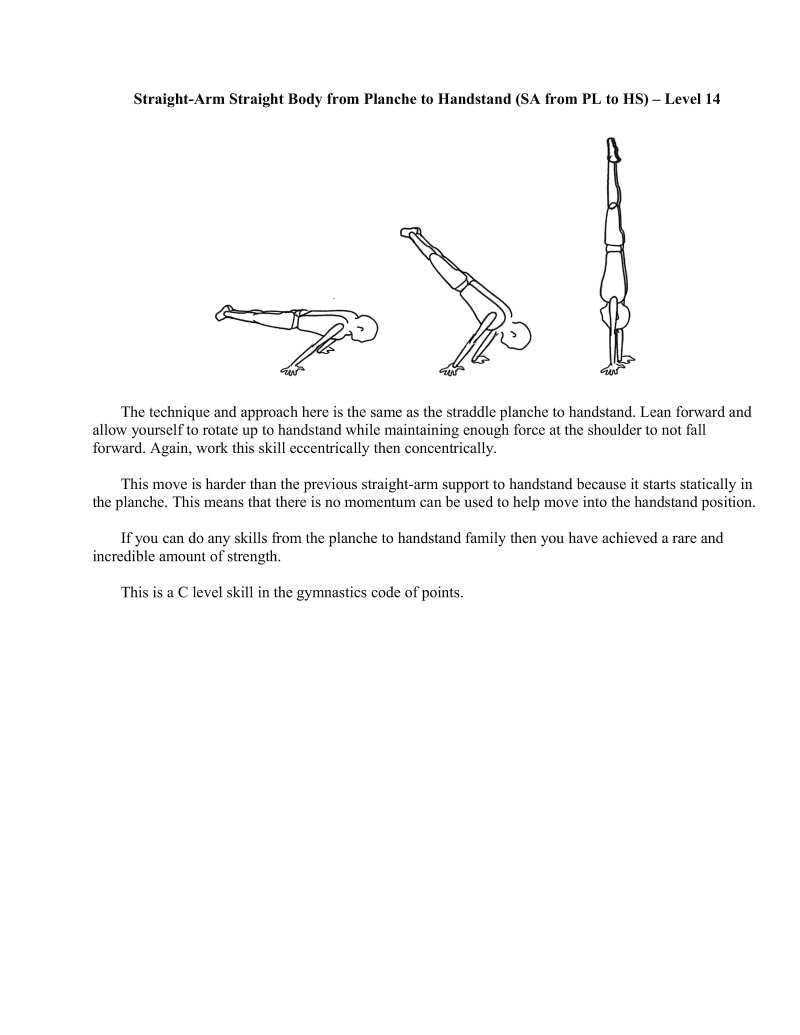
The technique and approach here i the same as the straddle planche to handstand. Lean forward and allow yourself to rotate up to handstand while maintaining enough force at the shoulder to not fall forward. Again, work this skill eccentrically then concentrically.
This move is harder than the previous straight-arm support to handstand because i starts statically in the planche. This means that there is no momentum can be used to help move into the handstand position.
If you can do any skills from the planche to handstand family then you have achieved a rare and incredible amount of strength.
This is a C level skill in the gymnastics code of points.
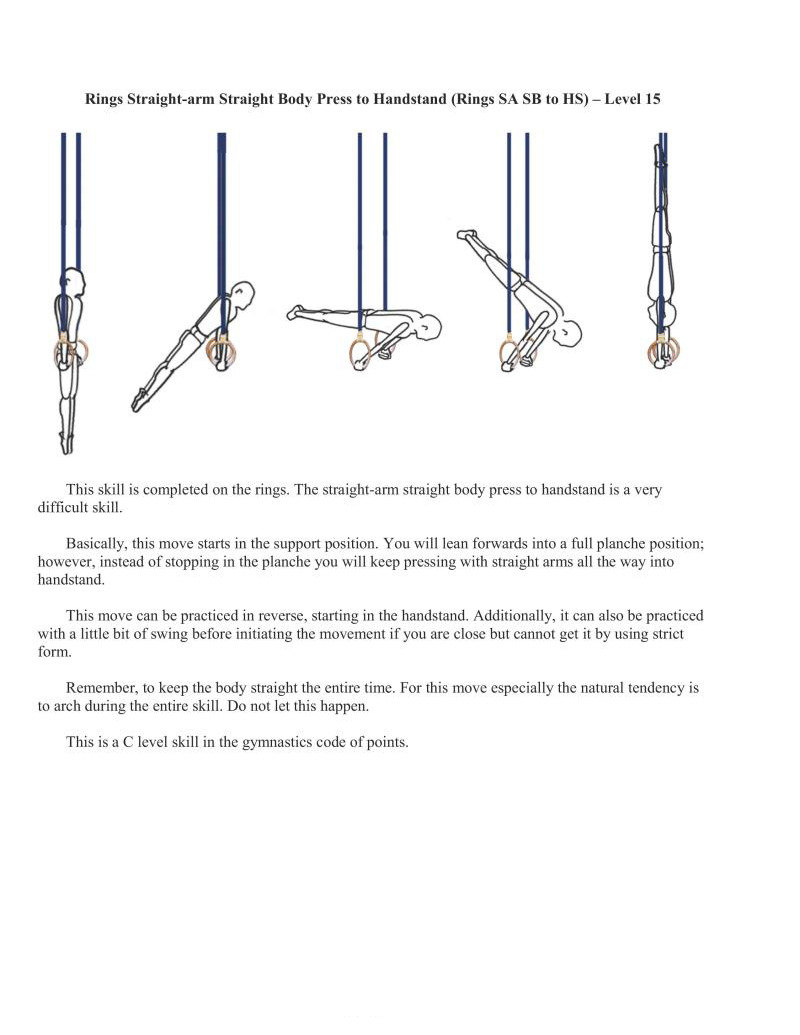
This skill is completed on the rings. The straight-arm straight body press to handstand is a very difficult skill.
Basically, this move starts in the support position. You will lean forwards into a full planche position: however, instead of stopping in the planche you will keep pressing with straight arms all the way into handstand.
This move can be practiced in reverse, starting in the handstand. Additionally, it can also be practiced with a little bit of swing before initiating the movement if you are close but cannot get it by using strict form.
Remember, to keep the body straight the entire time. For this move especially the natural tendency is to arch during the entire skill. Do not let this happen.
This is a C level skill in the gymnastics code of points.
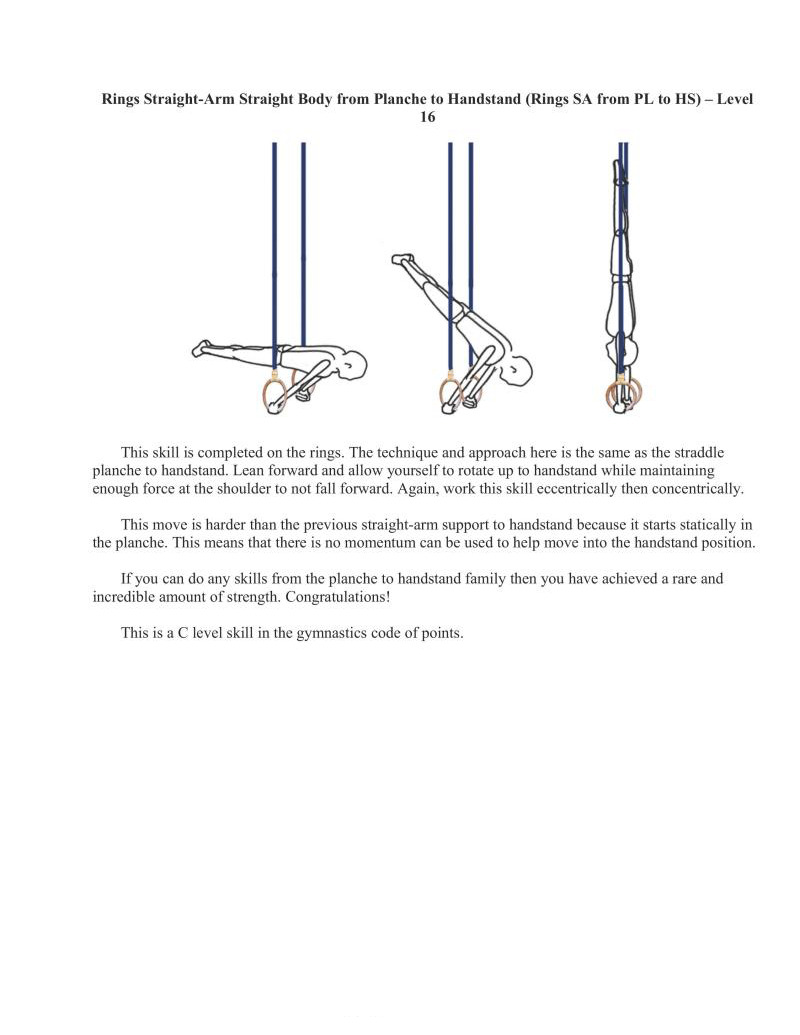
16
This skill is completed on the rings. The technique and approach here is the same as the straddle planche to handstand. Lean forward and allow yourself to rotate up to handstand while maintaining enough force at the shoulder to not fall forward. Again, work this skill eccentrically then concentrically.
This move is harder than the previous straight-arm support to handstand because it starts statically in the planche. This means that there is no momentum can be used to help move into the handstand position.
1f you can do any skills from the planche to handstand family then you have achieved a rare and incredible amount of strength. Congratulations!
This is a C level skill in the gymnastics code of points.
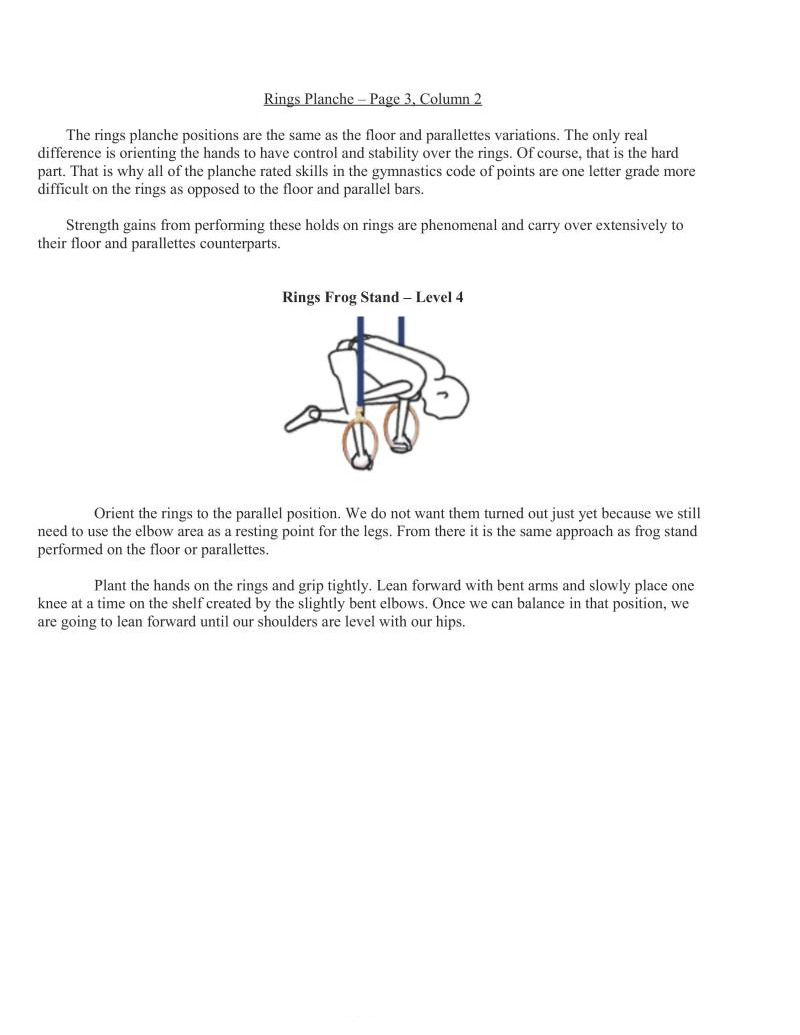
The rings planche positions are the same as the floor and parallettes variations. The only real difference is orienting the hands to have control and stability over the rings. OF course, that is the hard part. That is why all of the planche rated skills in the gymnastics code of points are one letter grade more difficult on the rings as opposed to the floor and parallel bars.
Strength gains from performing these holds on rings are phenomenal and carry over extensively to their floor and parallettes counterparts
Orient the rings to the parallel position. We do not want them turned out just yet because we still need to use the elbow area as a resting point for the legs. From there it is the same approach as frog stand performed on the floor or parallettes.
Plant the hands on the rings and grip tightly. Lean forward with bent arms and slowly place one knee at a time on the shelf created by the slightly bent elbows. Once we can balance in that position, we are going to lean forward until our shoulders are level with our hips.

For the straight-arm frog stand we will orient the rings to the parallel position. We do not want them turned out yet because we still need to use the elbow area as a resting point for the legs. The remaining steps are the same a straight-arm frog stand performed on the floor / parallettes.
Lean forward with the arms straight. As you lean forward, place your knees right above the elbows as before, but remember there is no longer a shelf to help you. Consequentially this will take more shoulder strength to maintain.
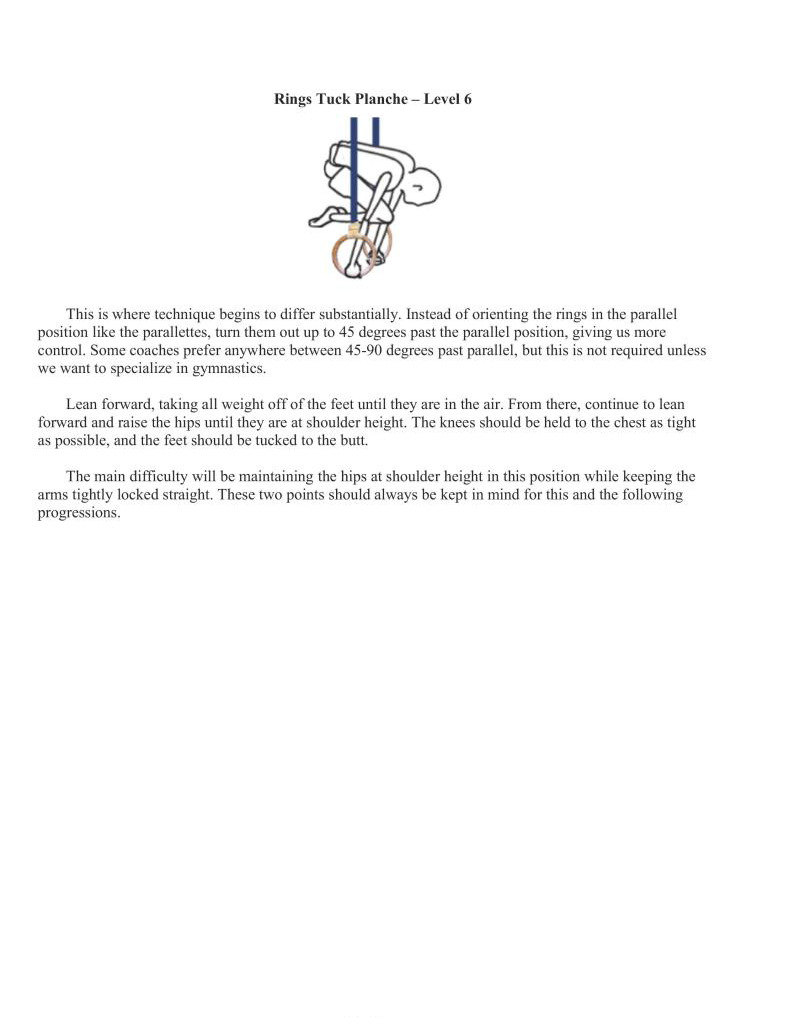
where technique begins to differ substantially. Instead of orienting the rings in the parallel position like the parallettes, turn them out up to 43 degrees past the parallel position, giving us more control. Some coaches prefer anywhere between 45-90 degrees past parallel, but this is not required unless in gymnastics.
Lean forward, taking all weight off of the feet until they are in the air. From there, continue to lean forward and raise the hips until they are at shoulder height. The knees should be held to the chest as tight as possible, and the feet should be tucked to the butt.
The main difficulty will be mai his position while keeping the arms tightly locked straight. These two points should always be kept in mind for this and the following progressions
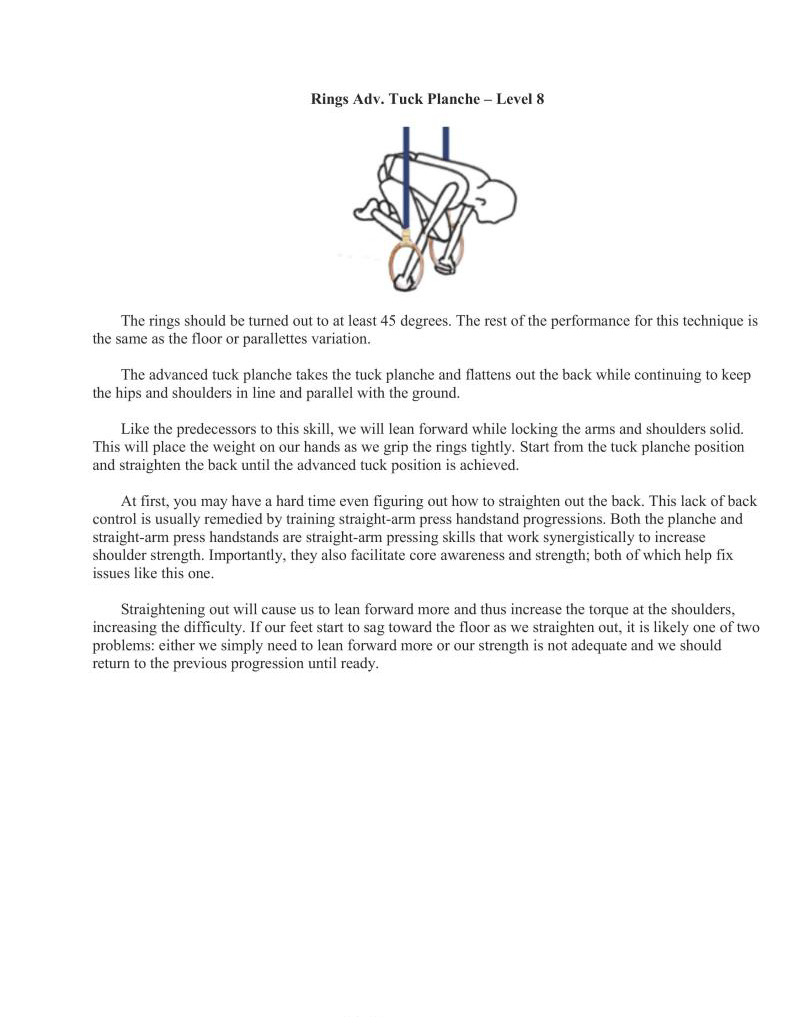
The rings should be turned out to at least 45 degrees. The rest of the performance for this technique is the same as the floor or parallettes variation.
The advanced tuck planche takes the tuck planche and flattens out the back while continuing to keep the hips and shoulders in line and parallel with the ground.
Like the predecessors to this skill, we will lean forward while locking the arms and shoulders solid. This will place the weight on our hands as we grip the rings tightly. Start from the tuck planche position and straighten the back until the advanced tuck position is achieved.
At first, you may have a hard time even figuring out how to straighten out the back. This lack of back control is usually remedied by training straight-arm press handstand progressions. Both the planche and straight-arm press handstands are straight-arm pressing skills that work synergistically to increase
oulder strength. Importantly, they also facilitate core awareness and strength; both of which help fix issues like this one.
Straightening out will cause us to lean forward more and thus increase the torque at the shoulders, increasing the difficulty. If our feet start to sag toward the floor as we straighten out, it is likely one of two. problems: either we simply need to lean forward more or our strength is not adequate and we should return to the previous progression until ready.
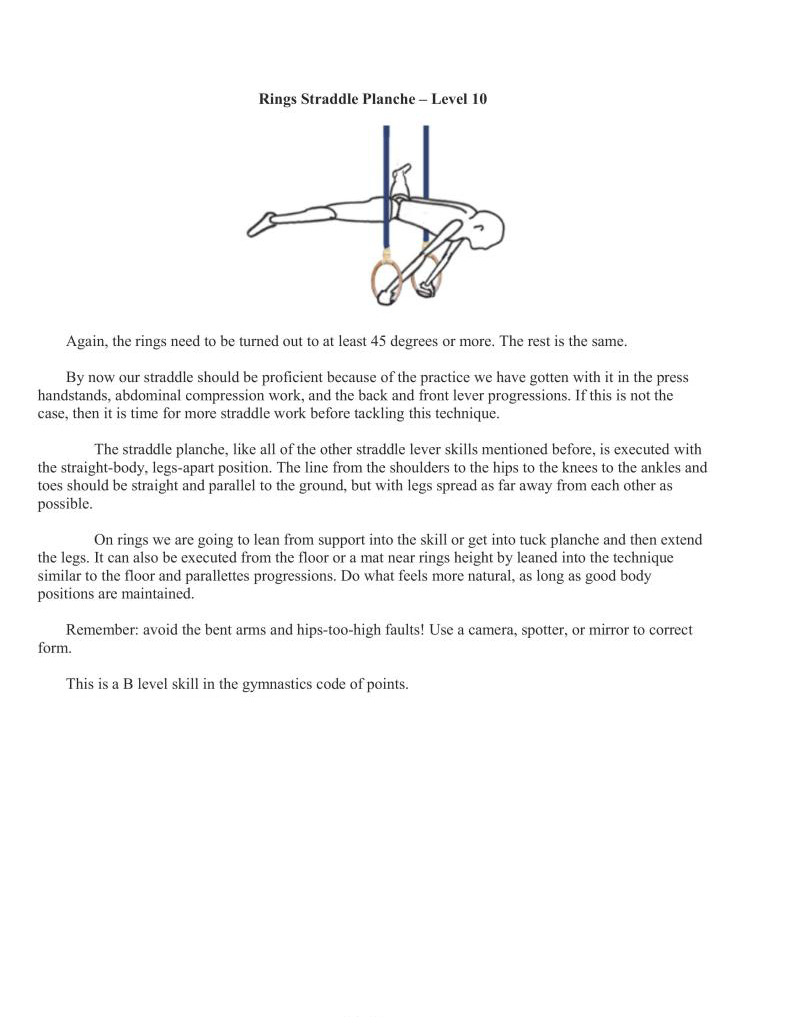
Again, the rings need to be turned out to at least 43 degrees or more. The rest i the same
By now our straddle should be proficient because of the practice we have gotten with it in the press handstands, abdominal compression work, and the back and front lever progressions. If this is not the case, then it is time for more straddle work before tackling this technique.
The straddle planche, like all of the other straddle lever skills mentioned before, is executed with the straight-body, legs-apart position. The line from the shoulders to the hips to the knees to the ankles and toes should be straight and parallel to the ground, but with legs spread as far away from each other as possible.
On rings we are going to lean from support into the skill or get into tuck planche and then extend the legs. It can also be executed from the floor or a mat near rings height by leaned into the technique similar to the floor and parallettes progressions. Do what feels more natural, as long as good body positions are maintained.
Remember: avoid the bent arms and hips-too-high faults! Use a camera, spotter, or mirror to correct form.
This is a B level skill in the gymnastics code of points.
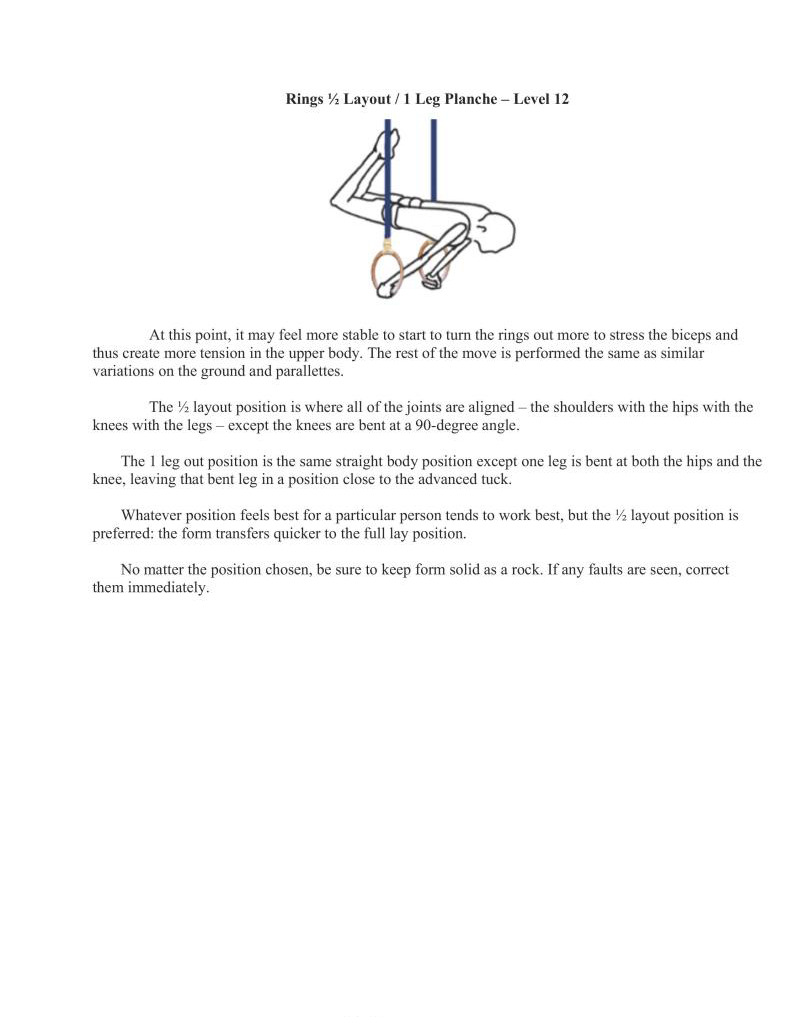
At this point, it may feel more stable to start to turn the rings out more to stress the biceps and ate more tension in the upper body. The rest of the move is performed the same as similar variations on the ground and parallettes.
The % layout position is where all of the joints are aligned the shoulders with the hips with the knees with the legs — except the knees are bent at a 90-degree angle
The 1 leg out position is the same straight body position except one leg is bent at both the hips and the knee, leaving that bent leg in a position close to the advanced tuck.
Whatever position feels best for a particular person tends to work best, but the % layout position is preferred: the form transfers quicker to the full lay position.
No matter the position chosen, be sure to keep form solid as a rock. If any faults are seen, correct them immediately.

On the gymnastics A-G scale (G being the hardest), the full planche on the rings is a C rated skill, though this is actually a point where one has become extremely strong. To put it in perspective, a planche on parallel bars and an iron cross are both only B rated skills.
If we are at this point then we probably do not need any advice from this guide. The similar feelings of wanting to tip over will still be there. It is also likely on rings that we probably will not have the problem of the hips being too high, but we can never be too careful. We should get a spotter or a camera to check our positions when in doubt.
This is a C level skill in the gymnastics code of points.
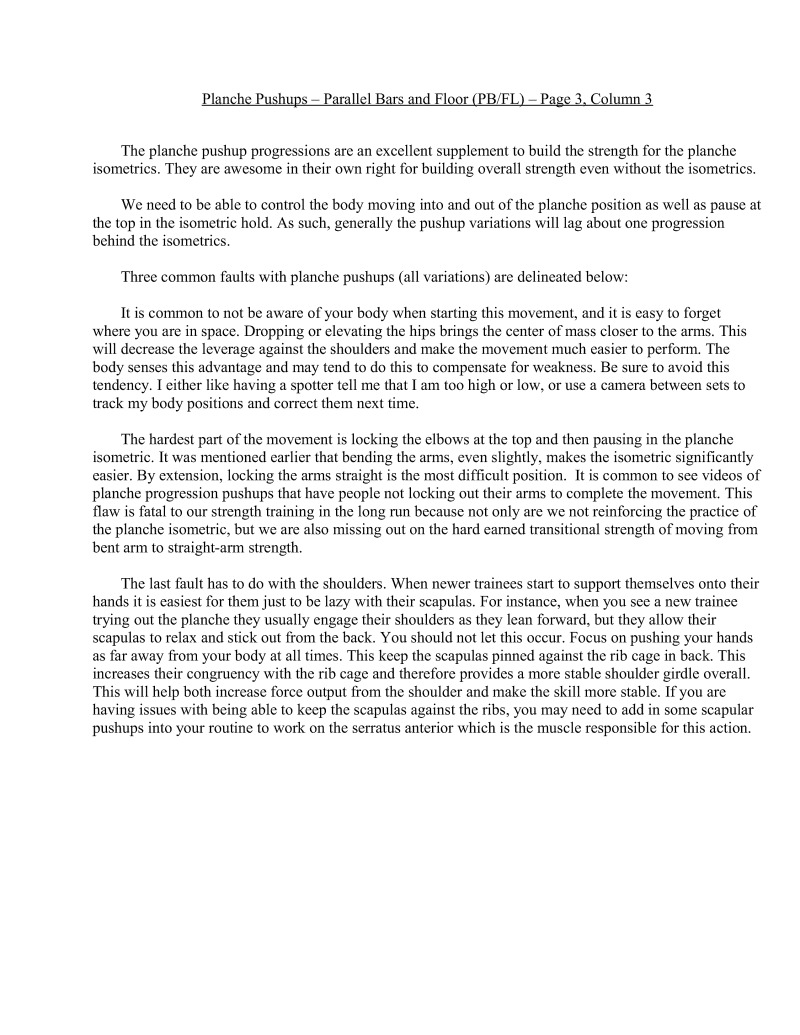
The planche pushup progressions are an excellent supplement to build the strength for the planche isometrics. They are awesome in their own right for building overall strength even without the isometrics.
We need to be able to control the body moving into and out of the planche position as well as pause at the top in the isometric hold. As such, generally the pushup variations will lag about one progression behind the isometrics.
Three common faults with planche pushups (all variations) are delineated below:
It is common to not be aware of your body when starting this movement, and it is easy to forget where you are in space. Dropping or elevating the hips brings the center of mass closer to the arms. This will decrease the leverage against the shoulders and make the movement much easier to perform. The body senses this advantage and may tend to do this to compensate for weakness. Be sure to avoid this tendency. I either like having a spotter tell me that I am too high or low, or use a camera between sets to track my body positions and correct them next time.
The hardest part of the movement is locking the elbows at the top and then pausing in the planche isometric. It was mentioned earlier that bending the arms, even slightly, makes the isometric significantly easier. By extension, locking the arms straight is the most difficult position. It is common to see videos of planche progression pushups that have people not locking out their arms to complete the movement, This flavw is fatal to our strength training in the long run because not only are we not reinforcing the practice of the planche isomeric, but we are also missing out on the hard camed transitional strength of moving from bent arm to straight-arm strength.
The last fault has to do with the shoulders. When newer trainees start to support themselves onto their hands it is easiest for them just to be lazy with their scapulas. For instance, when you see a new trainee trying out the planche they usually engage their shoulders as they lean forward, but they allow their scapulas 10 relax and stick out from the back. You should not let this occur. Focus on pushing your hands as far away from your body at all times. This keep the scapulas pinned against the rib cage in back. This increases their congruency with the rib cage and therefore provides a more stable shoulder girdle overall. This will help both increase force output from the shoulder and make the skill more stable. If you are. having issues with being able to keep the scapulas against the ribs, you may need to add in some scapular pushups into your routine to work on the serratus anterior which is the muscle responsible for this action.
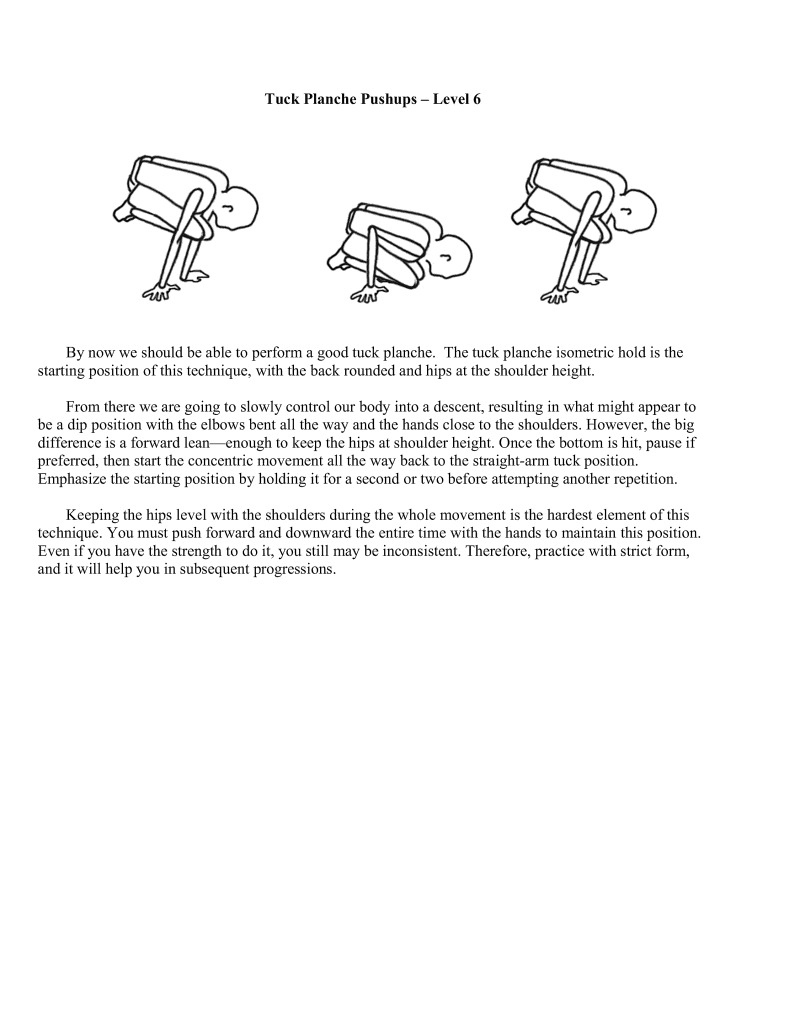
By now we should be able to perform a good tuck planche. The tuck planche isometric hold is the starting position of this technique, with the back rounded and hips at the shoulder height.
From there we are going to slowly control our body into a descent, resulting in what might appear to be adip position with the elbows bent all the way and the hands close to the shoulders. However, the big difference is a forward lean—enough to keep the hips at shoulder height. Once the bottom is hit, pause if preferred, then start the concentric movement all the way back to the straight-arm tuck position. Emphasize the starting position by holding it for a second or two before attempting another repetition.
Keeping the hips level with the shoulders during the whole movement is the hardest clement of this technique. You must push forward and downward the entire time with the hands to maintain this position. Even if you have the strength to do it, you still may be inconsistent. Therefore, practice with strict form, and it will help you in subsequent progressions.
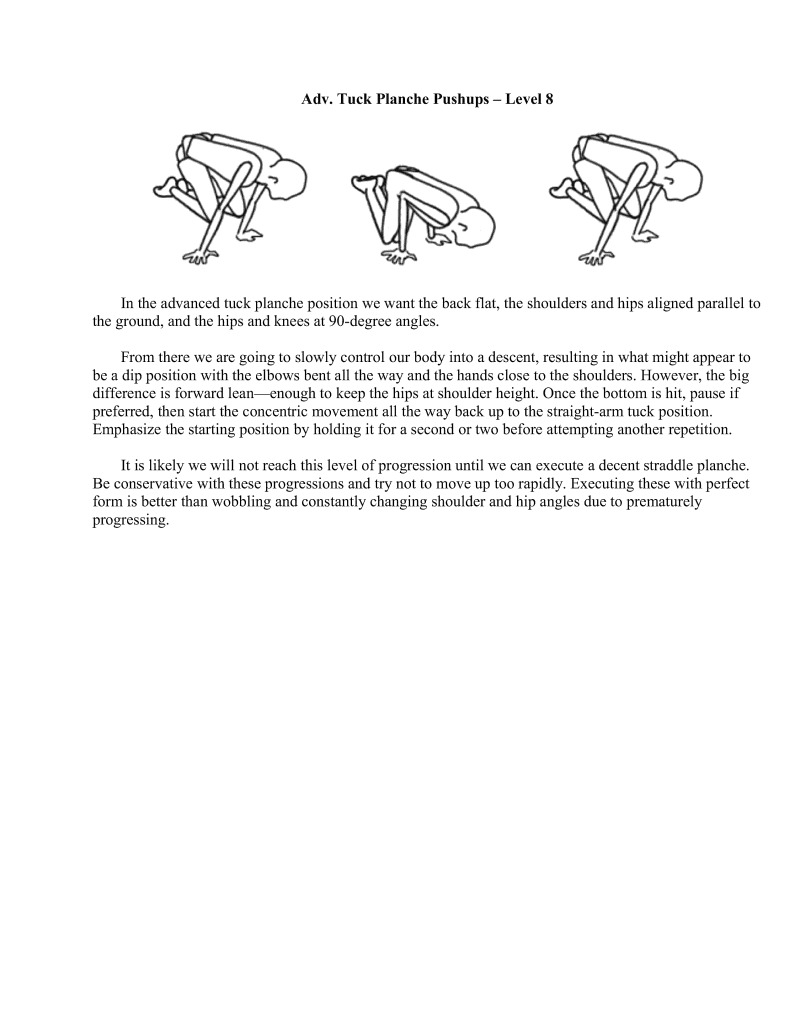
In the advanced tuck planche position we want the back flat, the shoulders and hips aligned parallel to the ground, and the hips and knees at 90-degree angles.
From there we are going to slowly control our body into a descent, resulting in what might appear to be a dip position with the elbows bent all the way and the hands close to the shoulders. However, the big difference is forward lean—enough to keep the hips at shoulder height. Once the bottom is hit, pause if
preferred, then start the concentric movement all the way back up to the straight-arm tuck positi Emphasize the starting position by holding it for a second or two before attempting another reps
It is likely we will not reach this level of progression until we can execute a decent straddle planche. Be conservative with these progressions and try not to move p too rapidly. Executing these with perfect form is better than wobbling and constantly changing shoulder and hip angles due to prematurely progressing.
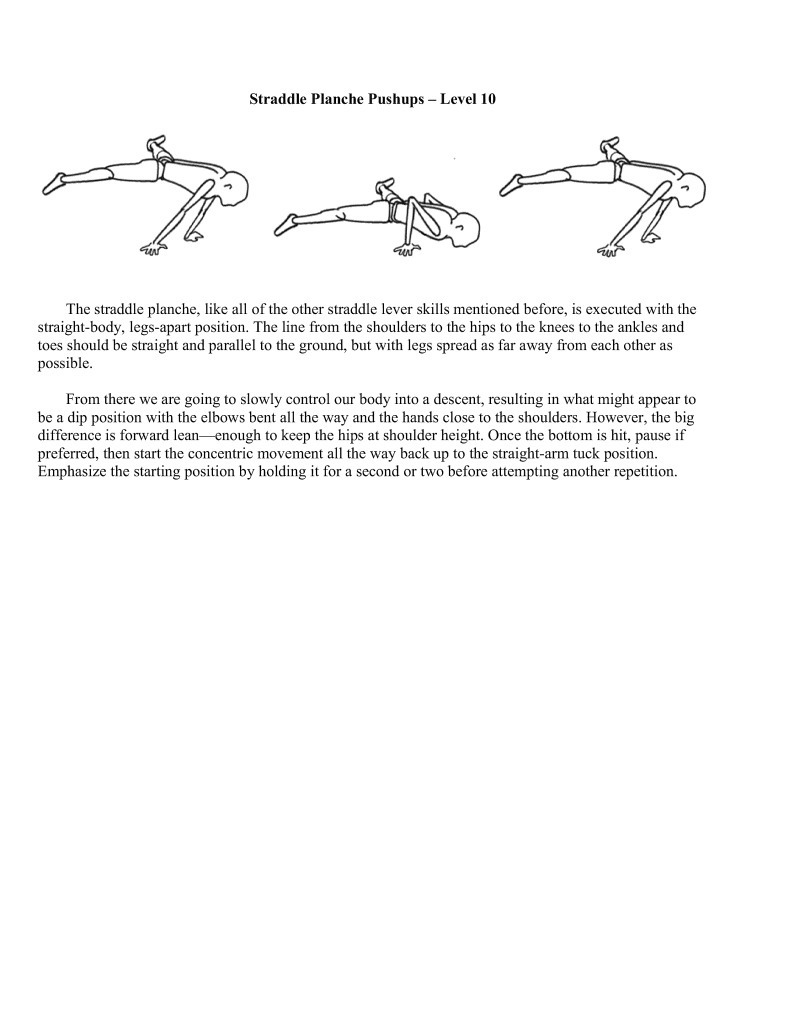
The straddle planche, like all of the other straddle lever skills mentioned before, is executed with the straight-body, legs-apart position. The line from the shoulders to the hips to the knees to the ankles and toes should be straight and parallel to the ground, but with legs spread as far away from each other as possible.
From there we are going to slowly control our body into a descent, resulting in what might appear to be a dip position with the elbows bent all the way and the hands close to the shoulders. However, the big difference is forward lean—enough to keep the hips at shoulder height. Once the bottom is hit, pause if preferred, then start the concentric movement all the way back up to the straight-arm tuck position. Emphasize the starting position by holding it for a second or two before attempting another repetition.
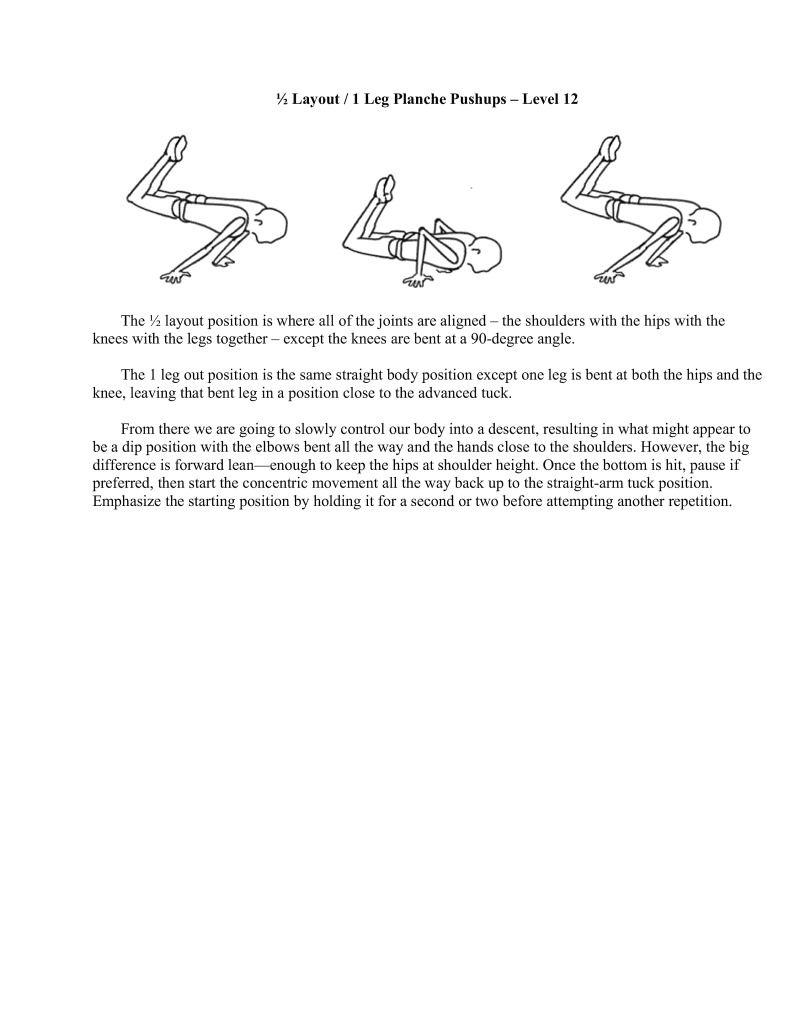
The % layout position is where all of the joints are aligned — the shoulders with the hips with the knees with the legs together — except the knees are bent at a 90-degree angle.
The 1 leg out position is the same straight body position except one leg is bent at both the hips and the knee, leaving that bent leg in a position close to the advanced tuck.
From there we are going to slowly control our body into a descent, resulting in what might appear to be a dip position with the elbows bent all the way and the hands close to the shoulders. However, the big difference is forward lean—enough to keep the hips at shoulder height. Once the bottom is i, pause if preferred, then start the concentric movement all the way back up to the straight-arm tuck position. Emphasize the starting position by holding it for a second or two before attempting another repetition.
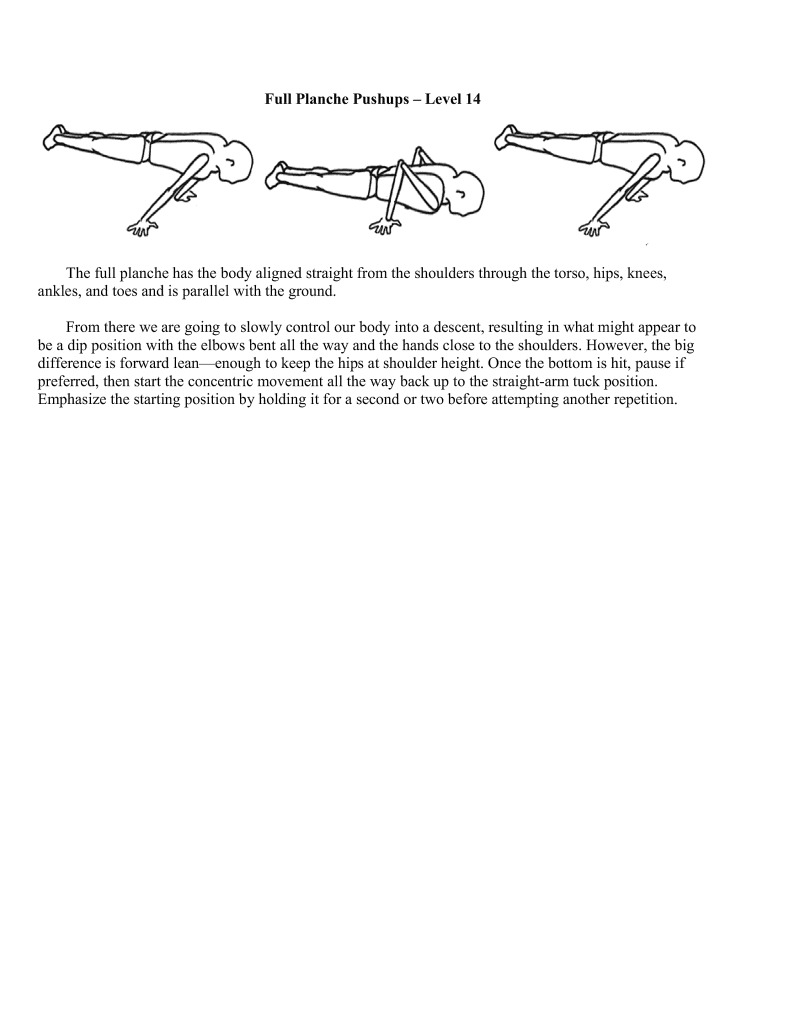
The full planche has the body aligned straight from the shoulders through the torso, hips, knees, ankles, and toes and is parallel with the ground.
From there we are going to slowly control our body into a descent, resulting in what might appear to be adip position with the elbows bent all the way and the hands close to the shoulders. However, the big difference is forward lean—enough to keep the hips at shoulder height. Once the bottom is hit, pause if preferred, then start the concentric movement all the way back up to the straight-arm tuck position. Emphasize the starting position by holding it for a second or two before attempting another repetition.
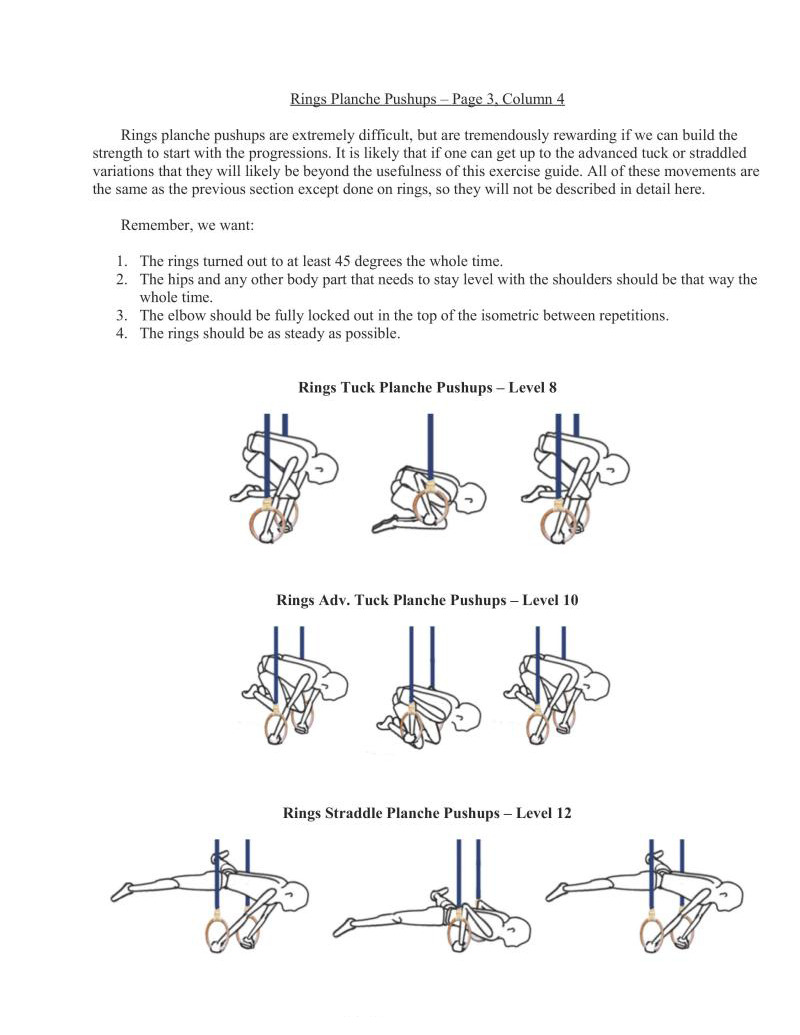
Rings planche pushups are extremely difficult, but are tremendously rewarding if we can build the strength to start with the progressions. It is likely that if one can get up to the advanced tuck or straddled variations that they will likely be beyond the usefulness of this exercise guide. All of these movements are the same as the previous section except done on rings, so they will not be described in detail here.
Remember, we want:
*Rings Tuck Planche Pushups — Level 8 *Rings Adv. Tuck Planche Pushups — Level 10 *Rings Straddle Planche Pushups — Level 12
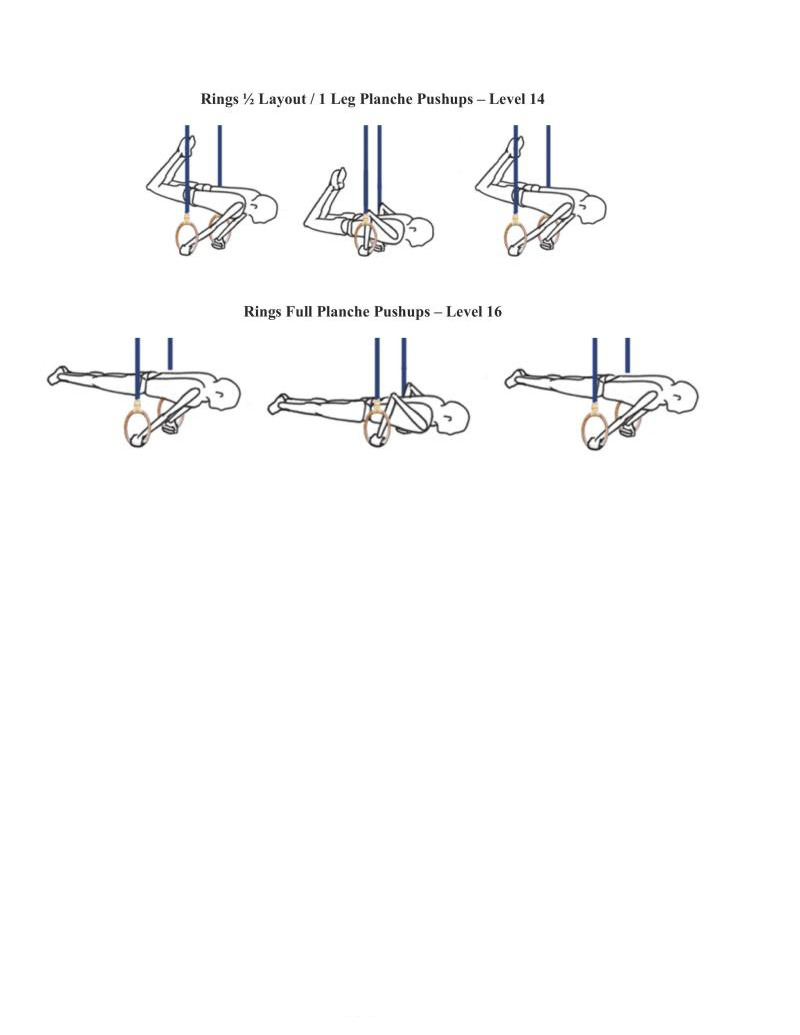
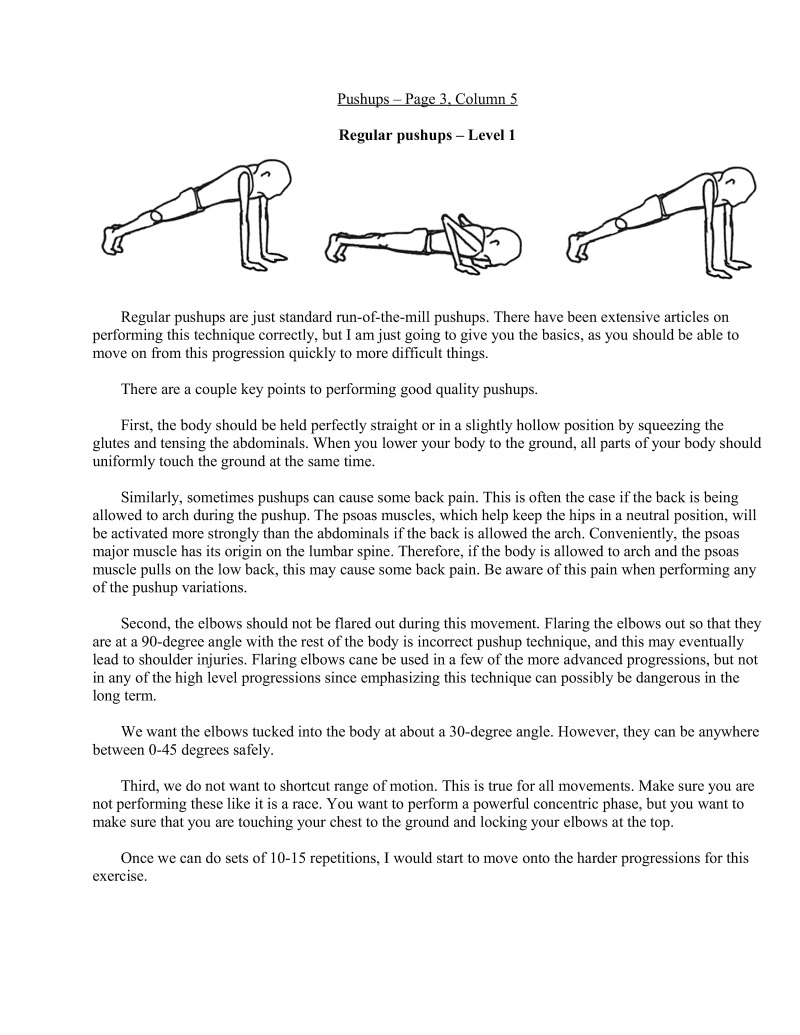
Regular pushups are just standard run-of-the-mill pushups. There have been extensive articles on performing this technique correctly, but I am just going to give you the basics, as you should be able to move on from this progression quickly to more difficult things.
There are a couple key points to performing good quality pushups.
First, the body should be held perfectly straight or in a slightly hollow position by squeezing the glutes and tensing the abdominals. When you lower your body to the ground, all parts of your body should uniformly touch the ground at the same time.
Similarly, sometimes pushups can cause some back pain. This is often the case if the back is being allowed to arch during the pushup. The psoas muscles, which help keep the hips in a neutral position, will be activated more strongly than the abdominals if the back is allowed the arch. Conveniently, the psoas major muscle has its origin on the lumbar spine. Therefore, if the body is allowed to arch and the psoas muscle pulls on the low back, this may cause some back pain. Be aware of this pain when performing any of the pushup variations.
Second, the elbows should not be flared out during this movement. Flaring the elbows out so that they are at a 90-degree angle with the rest of the body is incorrect pushup technique, and this may eventually lead to shoulder injuries. Flaring elbows cane be used in a few of the more advanced progressions, but not in any of the high level progressions since emphasizing this technique can possibly be dangerous in the long term.
We want the elbows tucked into the body at about a 30-degree angle. However, they can be anywhere between 0-45 degrees safely.
Third, we do not want to shortcut range of motion. This is true for all movements. Make sure you are not performing these like it is a race. You want to perform a powerful concentric phase, but you want to make sure that you are touching your chest to the ground and locking your elbows at the top.
Once we can do sets of 10-15 repetitions, I would start to move onto the harder progressions for this exercise.

Diamond pushups take regular pushups a step further. What we want to do is bring the hands closer together to make the pushup harder. Eventually the index fingers and thumbs will meet in the middle to form a diamond shape. This is the position we want to hit in the end.
This technique puts a lot more stress on the triceps and chest due to increasing the torque at the elbows and shoulders. Therefore, be wary of your joints if they start to ache especially in between sessions of exercises. This may signal some overuse, especially if you are a person who is relatively new to exercise attempting to lean these skills
If this is the case, take a break from the offending exercises for a couple of days, if not more, and let your body recover fully before restarting. We do not want to have any nagging injuries, as the progressions get more difficult.
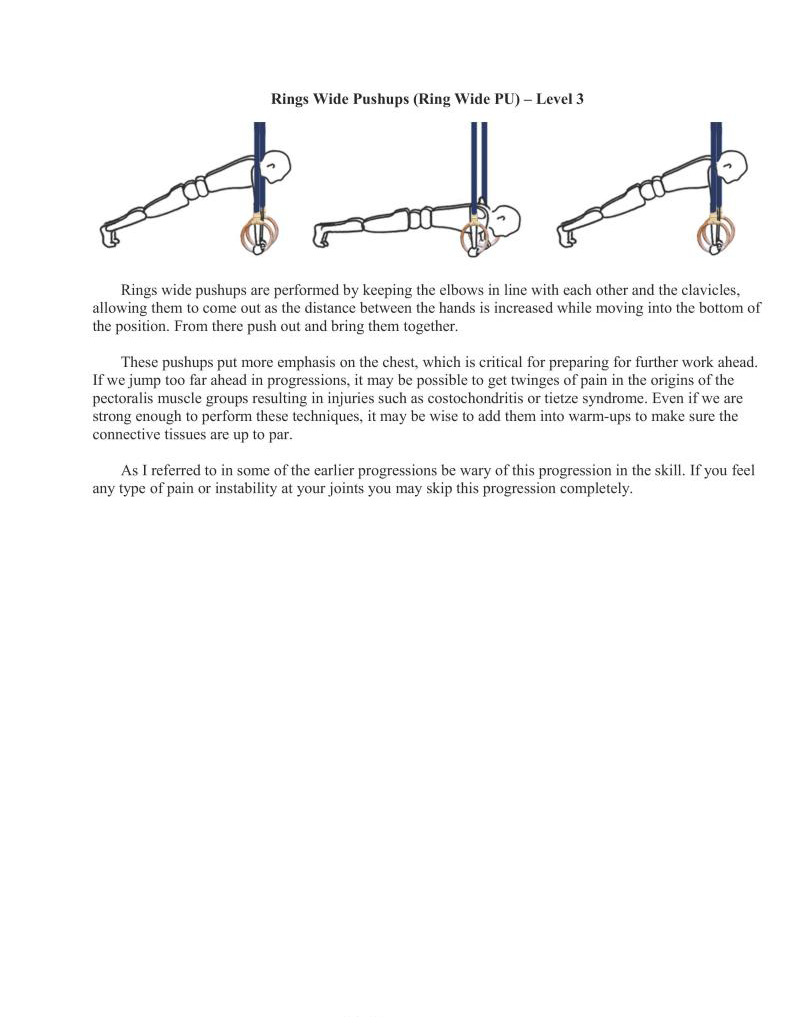
Rings wide pushups are performed by keeping the elbows in line with each other and the clavicles, allowing them to come out as the distance between the hands is increased while moving into the bottom of the position. From there push out and bring them together.
These pushups put more emphasis on the chest, which i critical for preparing for further work ahead. If we jump too far ahead in progressions, it may be possible to get twinges of pain in the origins of the pectoralis muscle groups resulting in injuries such as costochondritis or tietze syndrome. Even if we are strong enough to perform these techniques, it may be wise to add them into warm-ups to make sure the conncetive tissues are up to par.
As I referred to in some of the earlier progressions be wary of this progression in the skill, If you feel any type of pain or instability at your joints you may skip this progression completely.
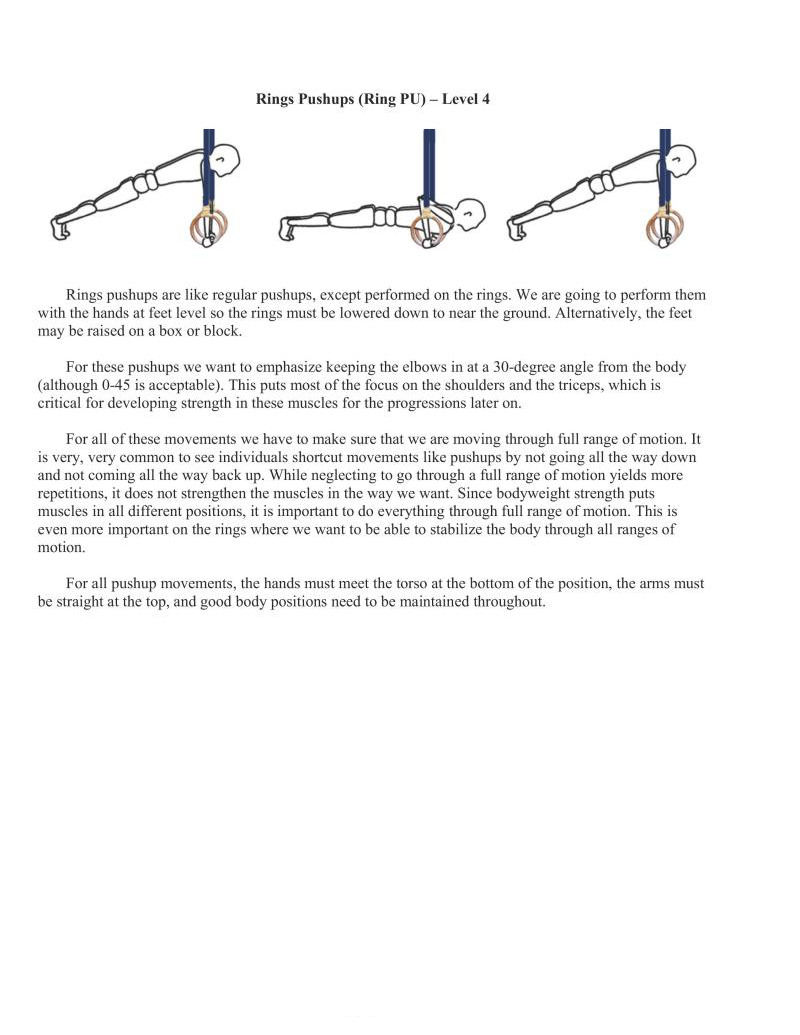
Rings pushups are like regular pushups, except performed on the rings. We are going to perform them with the hands at feet level so the rings must be lowered down to near the ground. Alternatively, the feet may be raised on a box or block
For these pushups we want to emphasize keeping the elbows in at a 30-degree angle from the body (although 0-45 is acceptable). This puts most of the focus on the shoulders and the triceps, which is critical for developing strength in these muscles for the progressions later on.
For all of these movements we have to make sure that we are moving through full range of motion. It
very, very common to see individuals shortcut movements like pushups by not going all the way down and not coming all the way back up. While neglecting to go through a full range of motion yields more repetitions, it does not strengthen the muscles in the way we want. Since bodyweight strength puts muscles in all different positions, it is important to do everything through full range of motion. This is even more important on the rings where we want to be able to stabilize the body through all ranges of motion.
For all pushup movements, the hands must meet the torso at the bottom of the position, the arms must be straight at the top, and good body positions need to be maintained throughout.
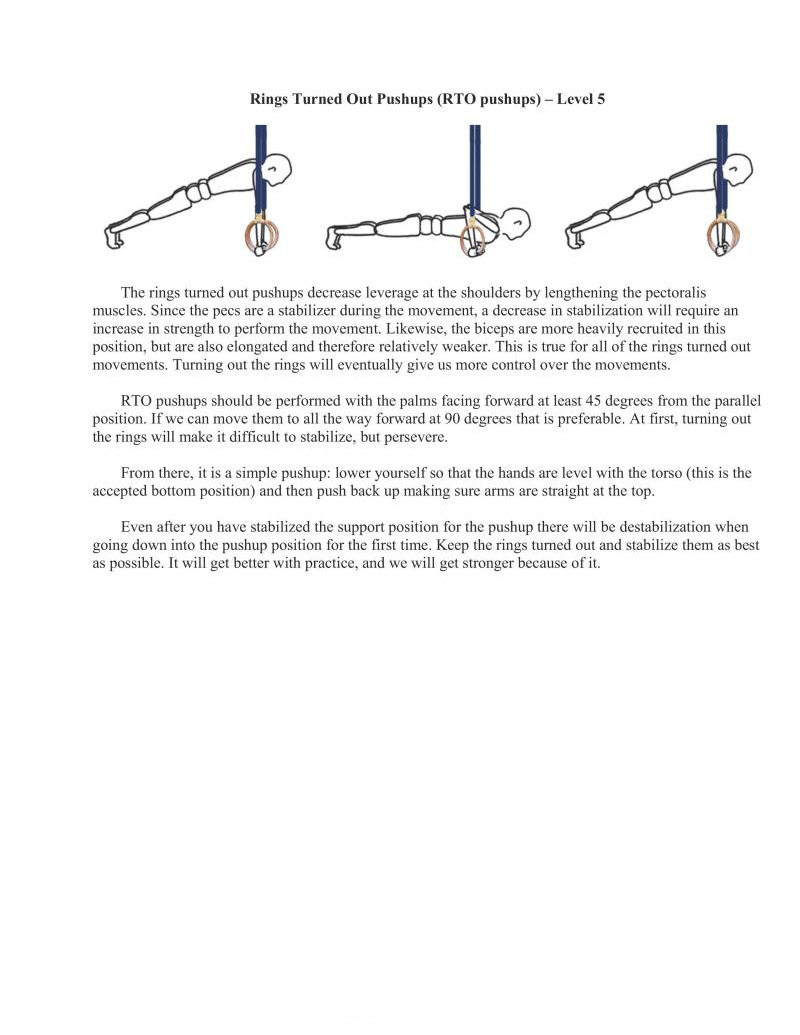
The rings turned out pushups decrease leverage at the shoulders by lengthening the pectoralis muscles. Since the pecs are a stabilizer during the movement, a decrease in stabilization will require an increase in strength to perform the movement. Likewise, the biceps are more heavily recruited in this position, but are also elongated and therefore relatively weaker. This is true for all of the rings turned out movements. Turning out the rings will eventually give us more control over the movements.
RTO pushups should be performed with the palms facing forward at least 45 degrees from the parallel position. If we can move them to all the way forward at 90 degrees that is preferable. At first, turning out the rings will make it difficult to stabilize, but persevere.
From there, it is a simple pushup: lower yourself so that the hands are level with the torso (this is the aceepted bottom position) and then push back up making sure arms are straight at the top.
Even after you have stabilized the support position for the pushup there will be destabilization when going down into the pushup position for the first time. Keep the rings turned out and stabilize them as best as possible. It will get better with practice, and we will get stronger because of t.
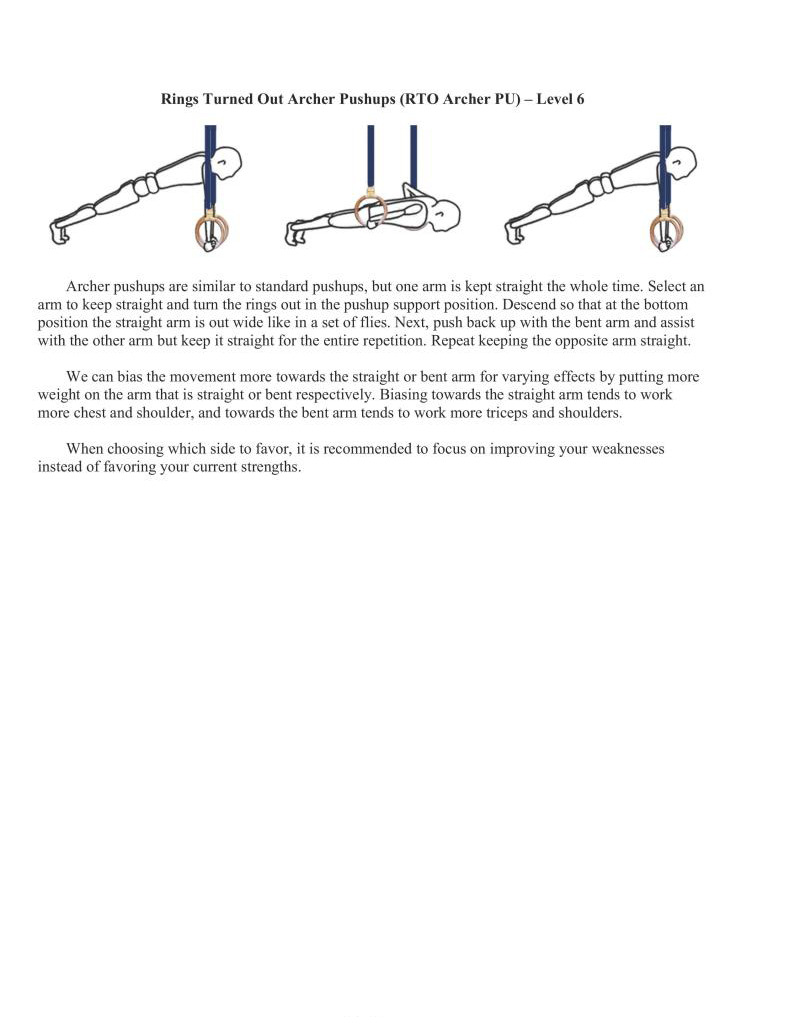
Archer pushups are similar to standard pushups, but one arm is kept straight the whole time. Select an arm to keep straight and tum the rings out in the pushup support position. Descend so that at the bottom position the straight arm is out wide like in a set of flies. Next, push back up with the bent arm and assist with the other arm but keep it straight for the entire repetition. Repeat keeping the opposite arm straight.
We can bias the movement more towards the straight or bent arm for varying effects by putting more weight on the arm that is straight or bent respectively. Biasing towards the straight arm tends to work more chest and shoulder, and towards the bent arm tends to work more triceps and shoulders.
When choosing which side to favor, it is recommended to focus on improving your weaknesses instead of favoring your current strengths.
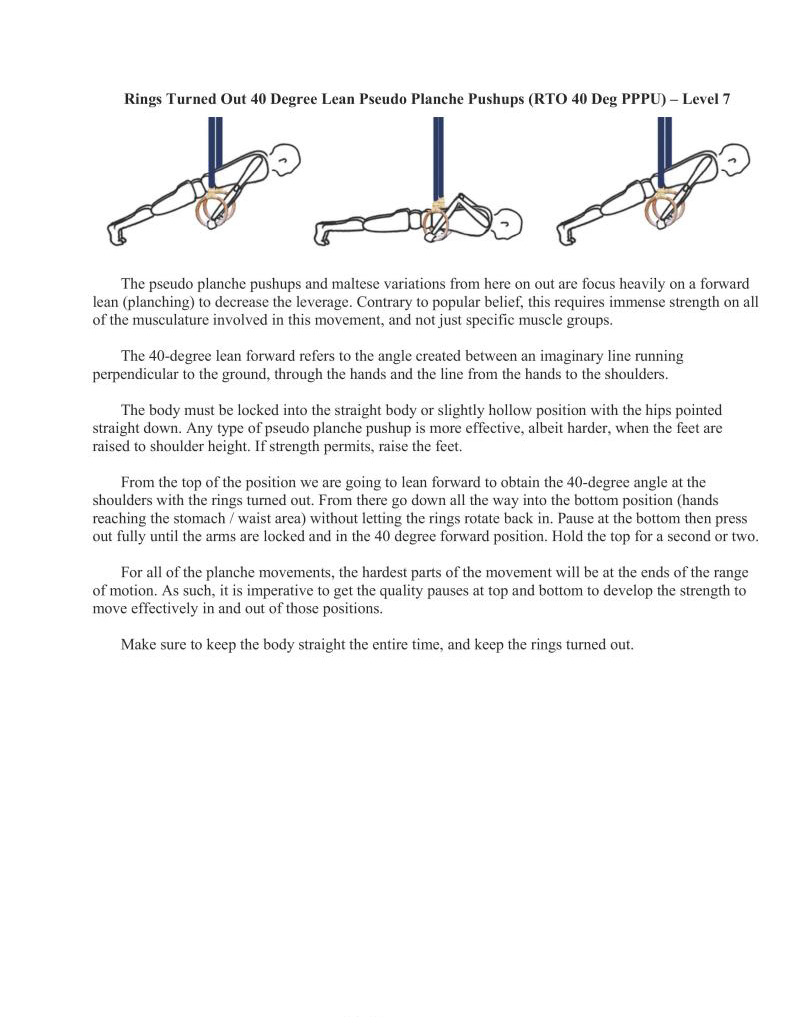
The pseudo planche pushups and maltese variations from here on out are focus heavily on a forward lean (planching) to decrease the leverage. Contrary to popular belief, this requires immense strength on all of the musculature involved in this movement, and not just specific muscle groups.
The 40-degree lean forward refrs to the angle created between an imaginary line running perpendicular to the ground, through the hands and the line from the hands to the shoulders.
The body must be locked into the straight body or slightly hollow position with the hips pointed straight down. Any type of pseudo planche pushup is more effective, albeit harder, when the feet are raised to shoulder height. If strength permits, raise the feet.
From the top of the position we are going to lean forward to obtain the 40-degree angle at the shoulders with the rings turned out. From there go down all the way into the bottom position (hands reaching the stomach / waist area) without letting the rings rotate back in. Pause at the bottom then press out fully until the arms are locked and in the 40 degree forward position. Hold the top for a second or two.
For all of the planche movements, the hardest parts of the movement will be at the ends of the range of motion. As such, it is imperative to get the quality pauses at top and bottom to develop the strength to move effectively in and out of those positions.
Make sure to keep the body straight the entire time, and keep the rings turned out
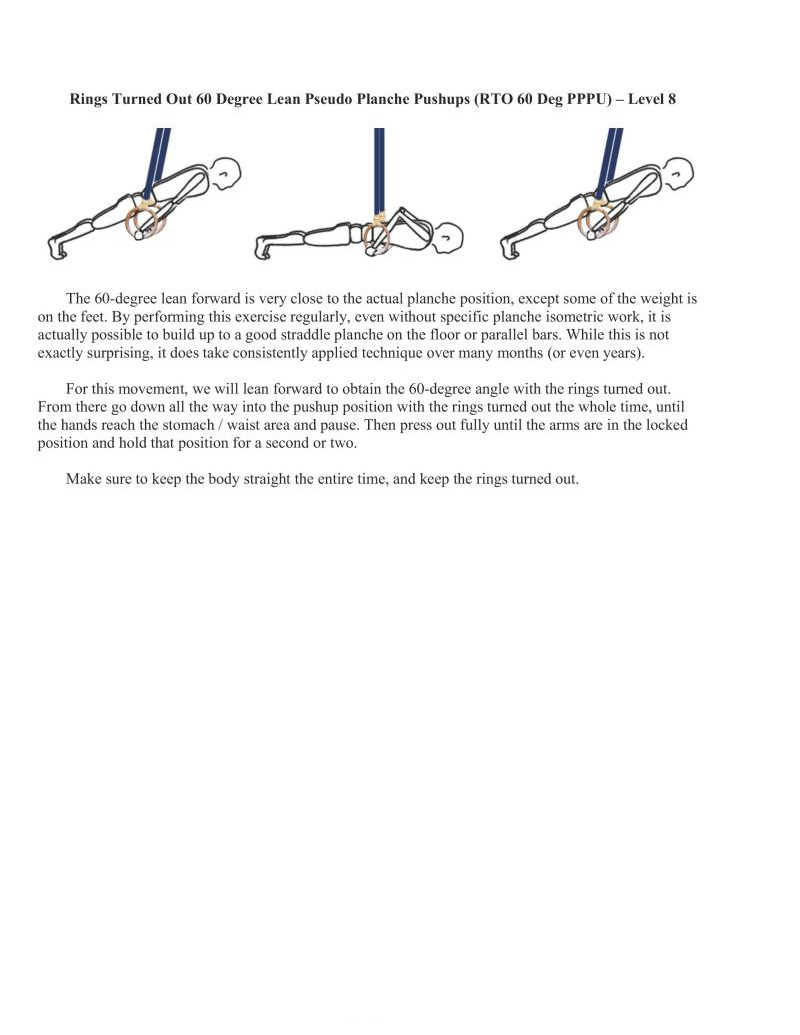
The 60-degree lean forward is very close to the actual planche position, except some of the weight is on the feet. By performing this exercise regularly, even without specific planche isometric work, it is actually possible to build up to a good straddle planche on the floor or parallel bars. While this is not exactly surprising, it does take consistently applicd technique over many months (or even years).
For this movement, we will lean forward to obtain the 60-degree angle with the rings turned out. From there go down all the way into the pushup position with the rings turned out the whole time, until the hands reach the stomach / waist area and pause. Then press out fully until the arms are in the locked position and hold that position for a second or two,
Make sure to keep the body straight the entire time, and keep the rings turned out.
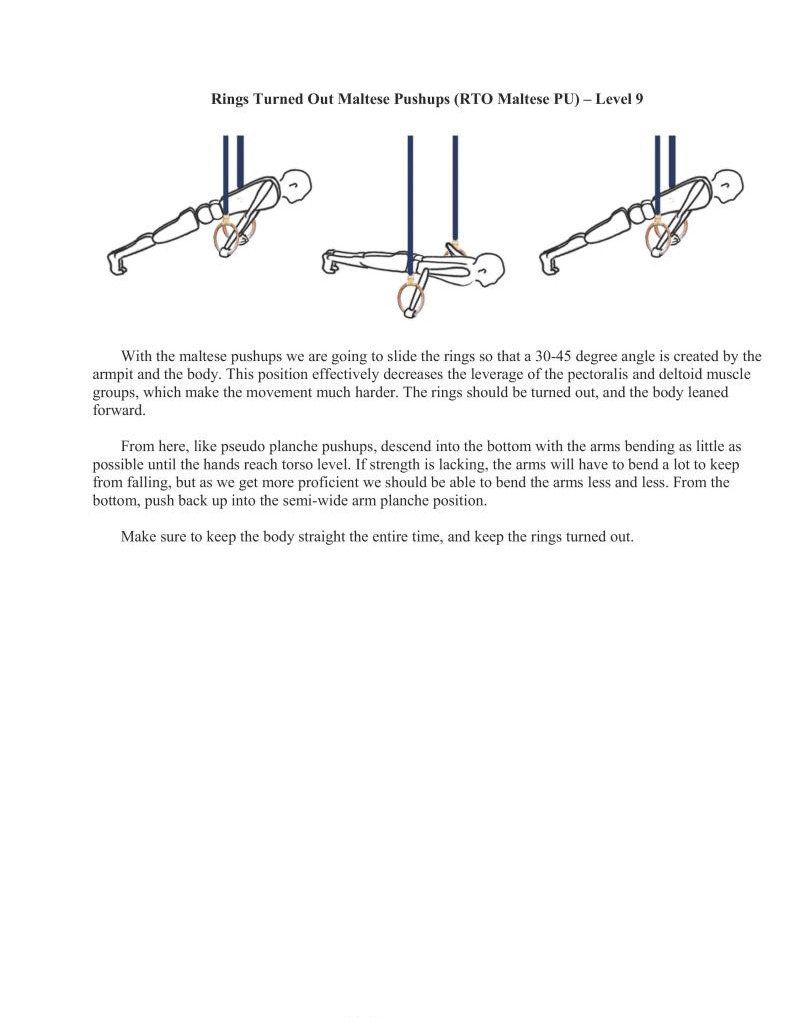
With the maltese pushups we are going to slide the rings so that a 30-45 degree angle is created by the armpit and the body. This position effectively decreases the leverage of the pectoralis and deltoid muscle groups, which make the movement much harder. The rings should be turned out, and the body leaned forward.
From here, like pseudo planche pushups, descend into the bottom with the arms bending as little as possible until the hands reach torso level. If strength is lacking, the arms will have to bend a lot to keep from falling, but as we get more proficient we should be able to bend the arms less and less. From the bottom, push back up into the semi-wide arm planche position.
Make sure to keep the body straight the entire time, and keep the rings turned out.
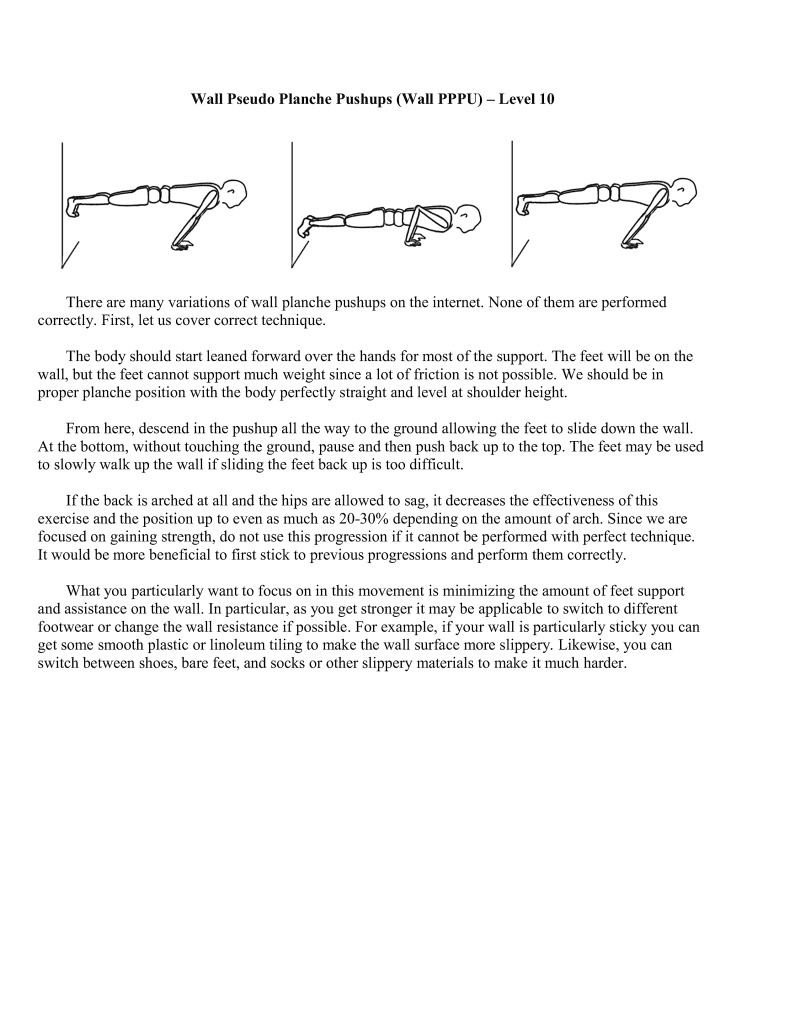
There are many variations of wall planche pushups on the internet. None of them are performed correctly. First, let us cover correct technique.
The body should start leaned forward over the hands for most of the support. The feet will be on the wall, but the feet cannot support much weight since a lot of friction is not possible. We should be in proper planche position with the body perfectly straight and level at shoulder height
From here, descend in the pushup all the way to the ground allowing the feet to slide down the wall. At the bottom, without touching the ground, pause and then push back up to the top. The feet may be used 1o slowly walk up the wall if sliding the feet back up is too difficult
If the back is arched at all and the hips are allowed to sag, it decreases the effectiveness of this exercise and the position up to even as much as 20-30% depending on the amount of arch. Since we are focused on gaining strength, do not use this progression if it cannot be performed with perfect technique. It would be more beneficial to first stick to previous progressions and perform them correctly.
What you particularly want to focus on in this movement is minimizing the amount of feet support and assistance on the wall. In particular, as you get stronger it may be applicable to switch to different footwear or change the wall resistance if possible. For example, if your wall is particularly sticky you can get some smooth plastic or linoleurn tiling to make the wall surface more slippery. Likewise, you can switch between shoes, bare feet, and socks or other slippery materials to make it much harder.
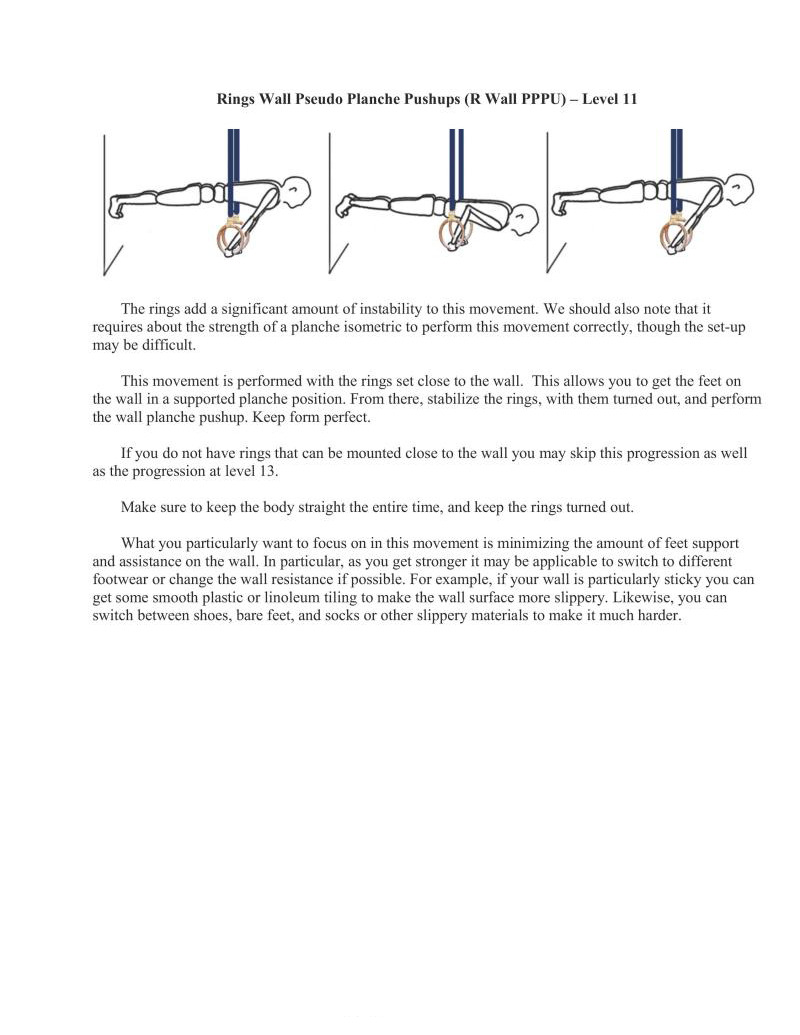
The rings add a significant amount of instability to this movement. We should also note that it requires about the strength of a planche isometric to perform this movement correctly, though the set-up may be difficult.
This movement is performed with the rings set close to the wall. This allows you to get the feet on the wall in a supported planche position. From there, stabilize the rings, with them turned out, and perform the wall planche pushup. Keep form perfect.
If you do not have rings that can be mounted close to the wall you may skip this progression as well as the progression at level 13.
Make sure to keep the body straight the entire time, and keep the rings turned out.
What you particularly want to focus on in this movement is minimizing the amount of feet support and assistance on the wall. In particular, as you get stronger it may be applicable to switch to different footwear or change the wall resistance if possible. For example, if your wall is particularly sticky you can get some smooth plastic or linoleu tiling to make the wall surface more slippery. Likewise, you can switch between shoes, bare feet, and socks or other slippery materials to make it much harder.
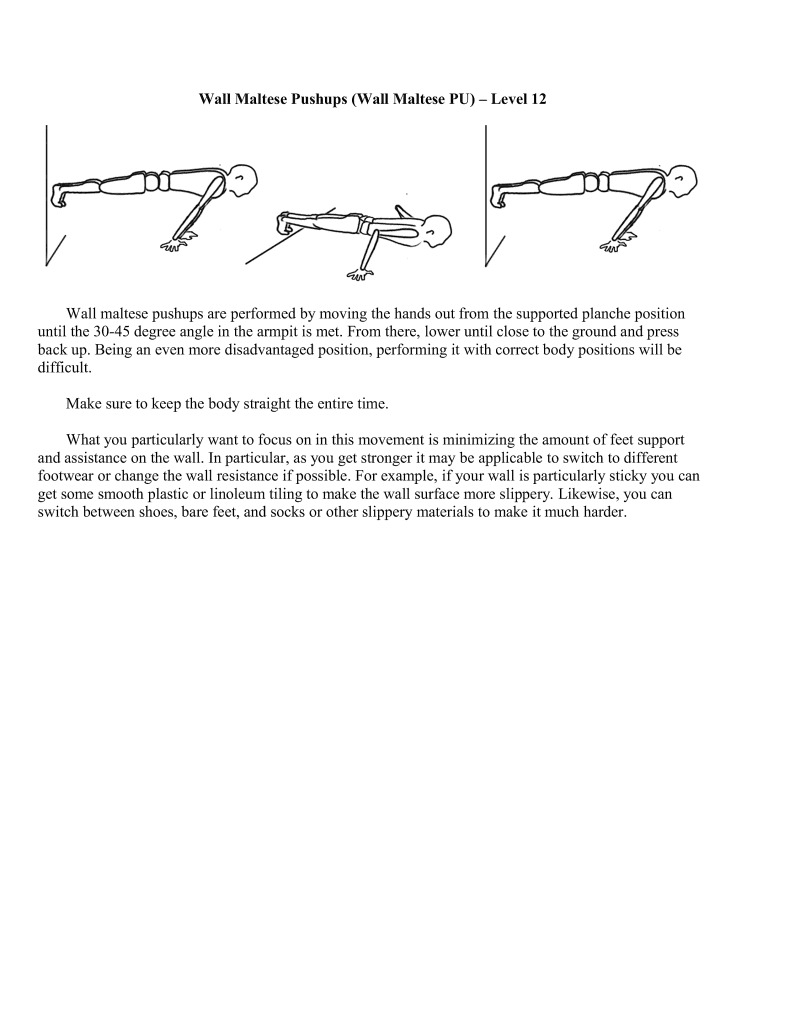
Wall maltese pushups are performed by moving the hands out from the supported planche position until the 30-43 degree angle in the armpit is met. From there, lower until close to the ground and press
back up. Being an even more disadvantaged position, performing it with correct body positions will be difficult.
Make sure to keep the body straight the entire time.
What you particularly want to focus on in this movement is minimizing the amount of feet support and assistance on the wall. In particular, as you get stronger it may be applicable to switch to different footwear or change the wall resistance if possible. For example, if your wall is particularly sticky you can get some smooth plastic or linoleurn tiling to make the wall surface more slippery. Likewise, you can switch between shoes, bare feet, and socks or other slippery materials to make it much harder
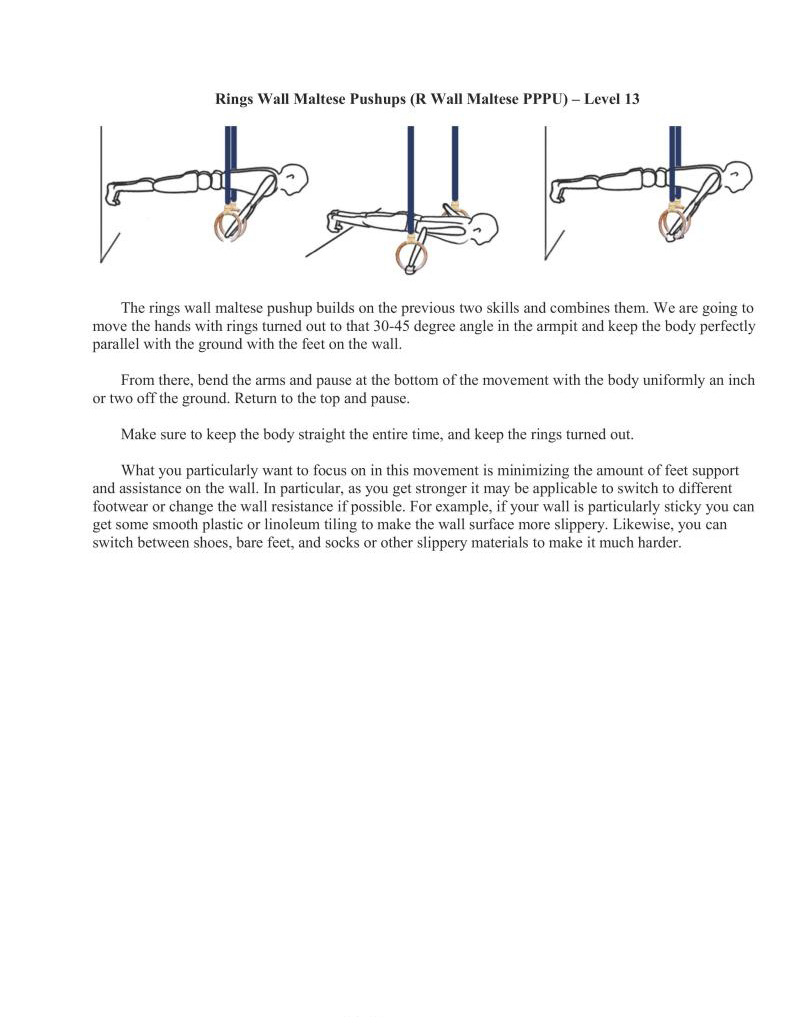
The rings wall maltese pushup builds on the previous two skills and combines them. We are going to move the hands with rings turned out to that 30-45 degree angle in the armpit and keep the body perfectly parallel with the ground with the feet on the wall
From there, bend the arms and pause at the bottom of the movement with the body uniformly an inch or two off the ground. Return to the top and pause.
Make sure to keep the body straight the entire time, and keep the rings turned out.
What you particularly want to focus on in this movement is minimizing the amount of feet support and assistance on the wall. In particular, as you get stronger it may be applicable to switch to different footwear or change the wall resistance if possible. For example, if your wall is particularly sticky you can get some smooth plastic or linoleu tiling to make the wall surface more slippery. Likewise, you can switch between shoes, bare feet, and socks or other slippery materials to make it much harder.
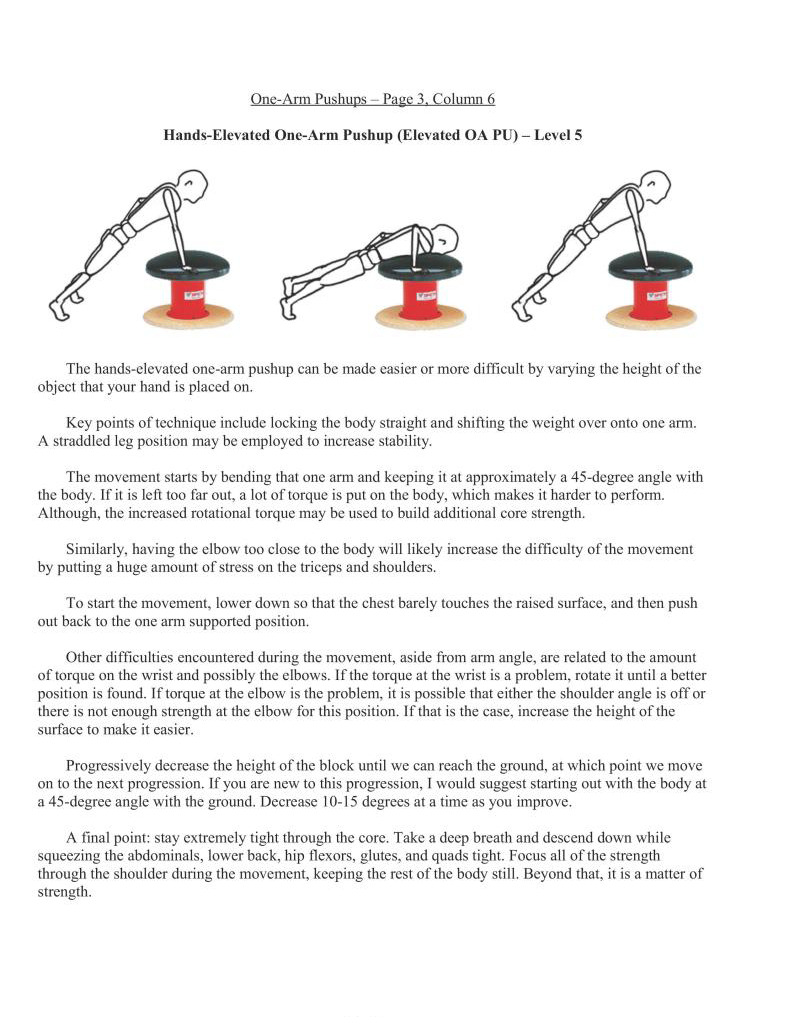
The hands-elevated one-arm pushup can be made easier or more difficult by varying the height of the object that your hand is placed on.
Key points of technique include locking the body straight and shifting the weight over onto one arm. A straddled leg position may be employed to increase stability.
The movement starts by bending that one arm and keeping it at approximately a 43-degree angle with the body. If it is left too far out, a lot of torque is put on the body, which makes it harder to perform. Although, the increased rotational torque may be used to build additional core strength.
Similarly, having the elbow too close to the body will likely increase the difficulty of the movement by putting a huge amount of stress on the triceps and shoulders.
To start the movement, lower down is that the chest barely touches the raised surface, and then push out back to the one arm supported position.
Other difficulties encountered during the movement, aside from arm angle, are related to the amount of torque on the wrist and possibly the elbows. If the torque at the wrist is a problem, rotate it until a better position is found. If torque at the elbow is the problem, it is possible that either the shoulder angle is off or there is not enough strength at the elbow for this position. If that is the case, increase the height of the surface to make it easier.
Progressively decrease the height of the block until we can reach the ground, at which point we move on to the next progression. If you are new to this progression, I would suggest starting out with the body at a45-degree angle with the ground. Decrease 10-15 degrees at a time as you improve.
A final point: stay extremely tight through the core. Take a deep breath and descend down while squeezing the abdominals, lower back, hip flexors, glutes, and quads tight. Focus all of the strength through the shoulder during the movement, keeping the rest of the body still. Beyond that, it is a matter of strength.
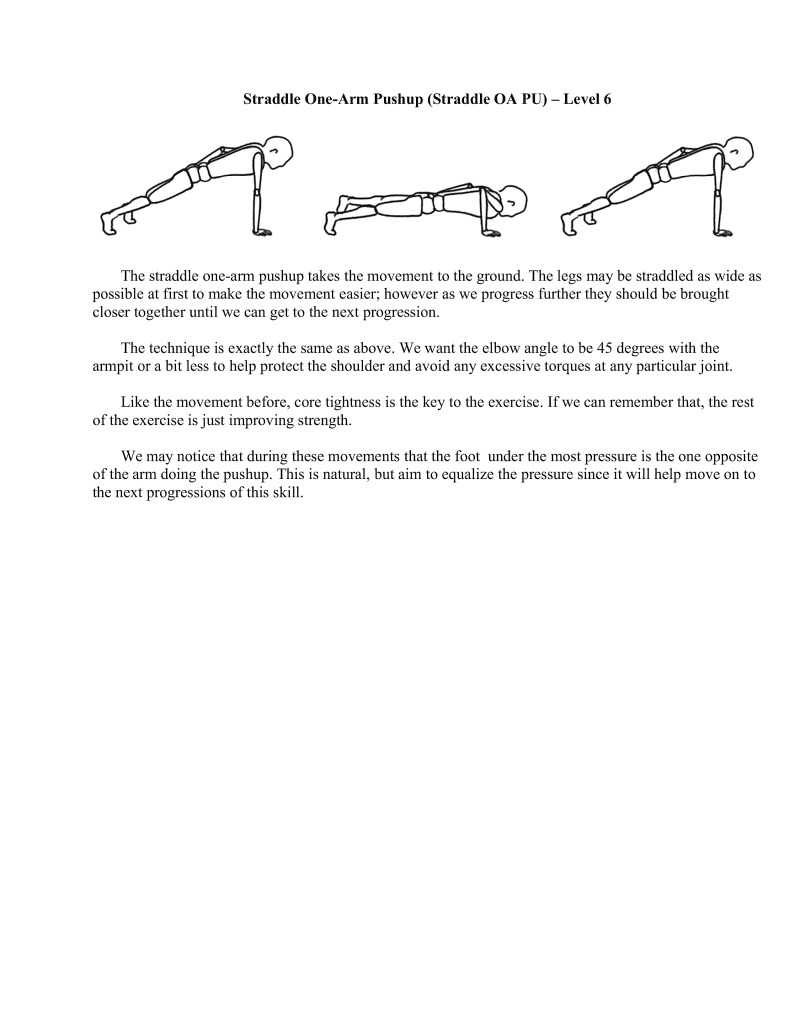
The straddle one-arm pushup takes the movement to the ground. The legs may be straddled as wide as possible at first to make the movement easier; however as we progress further they should be brought closer together until we can get to the next progression.
The technique is exactly the same as above. We want the elbow angle to be 45 degrees with the armpit or a bit less to help protect the shoulder and avoid any excessive torques at any particular joint.
Like the movement before, core tightness is the key to the exercise. If we can remember that, the rest
We may notice that during these movements that the foot under the most pressure is the one opposite of the arm doing the pushup. This is natural, but aim to equalize the pressure since it will help move on to the next progressions of this skill
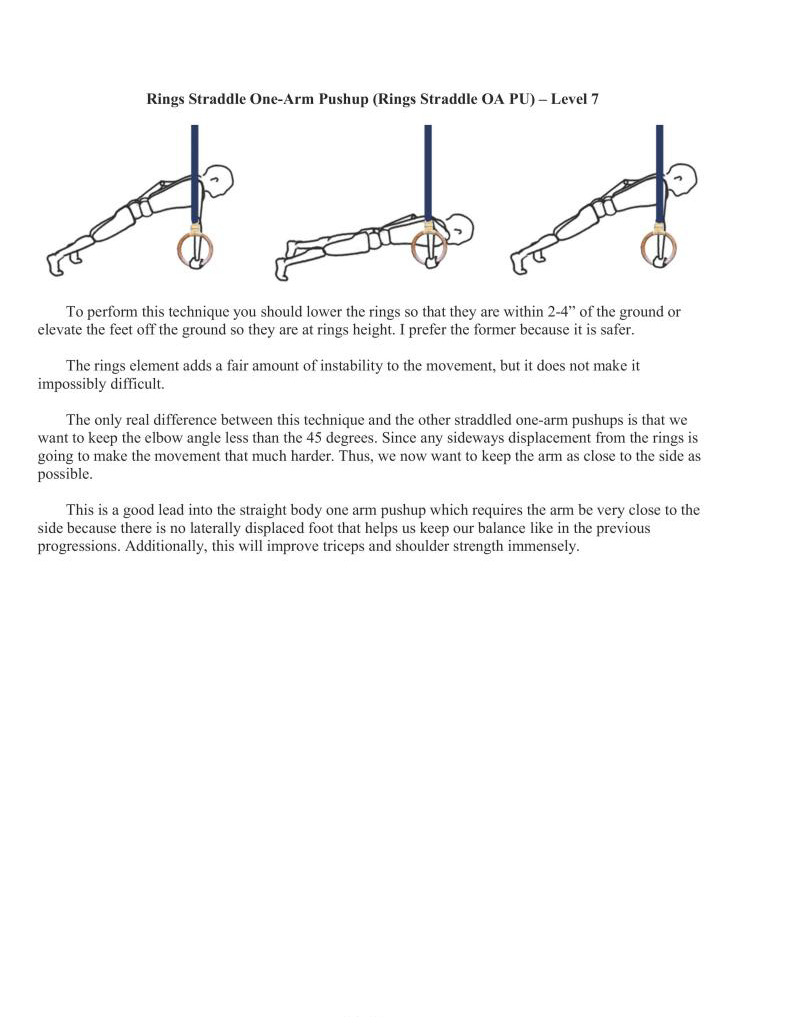
To perform this technique you should lower the rings so that they are within 2-4 of the ground or elevate the feet off the ground so they are at rings height. I prefer the former because it is safer.
The rings element adds a fair amount of instability to the movement, but it does not make it impossibly difficult.
The only real difference between this technique and the other straddled one-arm pushups is that we want to keep the elbow angle less than the 45 degrees. Since any sideways displacement from the rings is going to make the movement that much harder. Thus, we now want to keep the arm as close to the side as possible.
This is a good lead into the straight body one arm pushup which requires the arm be very close to the side because there is no laterally displaced foot that helps us keep our balance like in the previous progressions. Additionally, this will improve triceps and shoulder strength immensely.
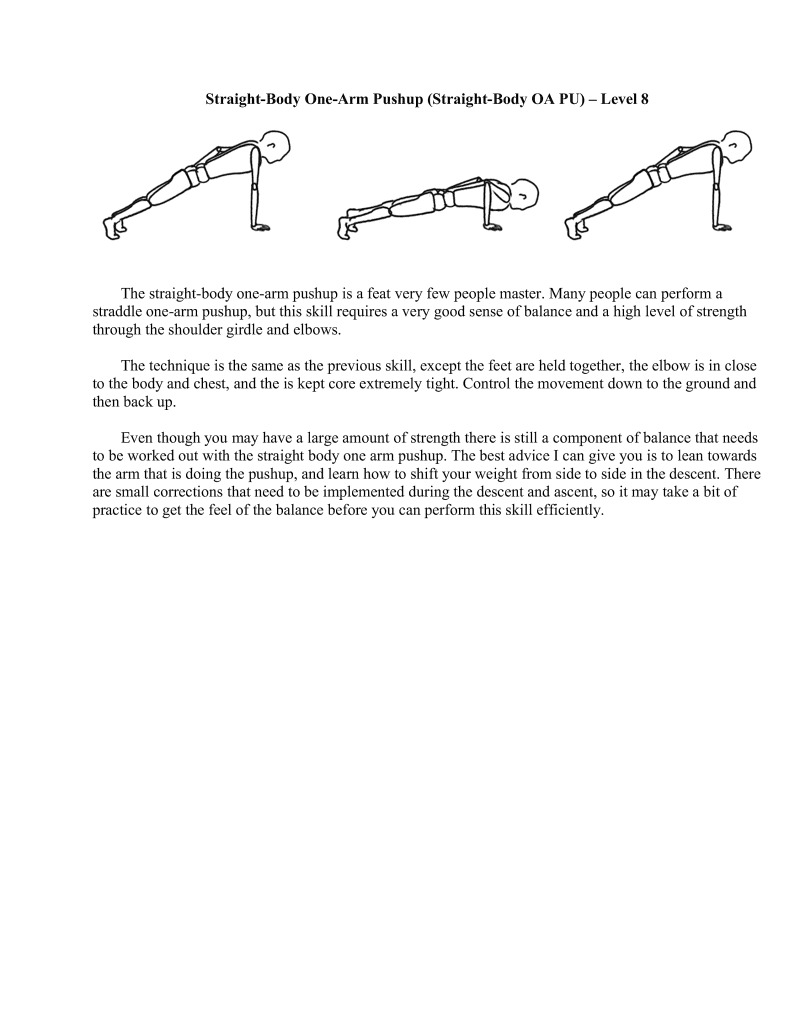
The straight-body one-arm pushup is a feat very few people master. Many people can perform a
straddle one-arm pushup, but this skill requires a very good sense of balance and a high level of strength through the shoulder girdle and elbows
The technique is the same as the previous skill, except the feet are held together, the elbow is in close o the body and chest, and the is kept core extremely tight. Control the movement down to the ground and then back up.
Even though you may have a large amount of strength there is still a component of balance that needs to be worked out with the straight body one arm pushup. The best advice I can give you is to lean towards the arm that is doing the pushup, and learn how to shift your weight from side to side in the descent. There are small corrections that need to be implemented during the descent and ascent, so it may take a bit of practice to get the feel of the balance before you can perform this skill efficiently.
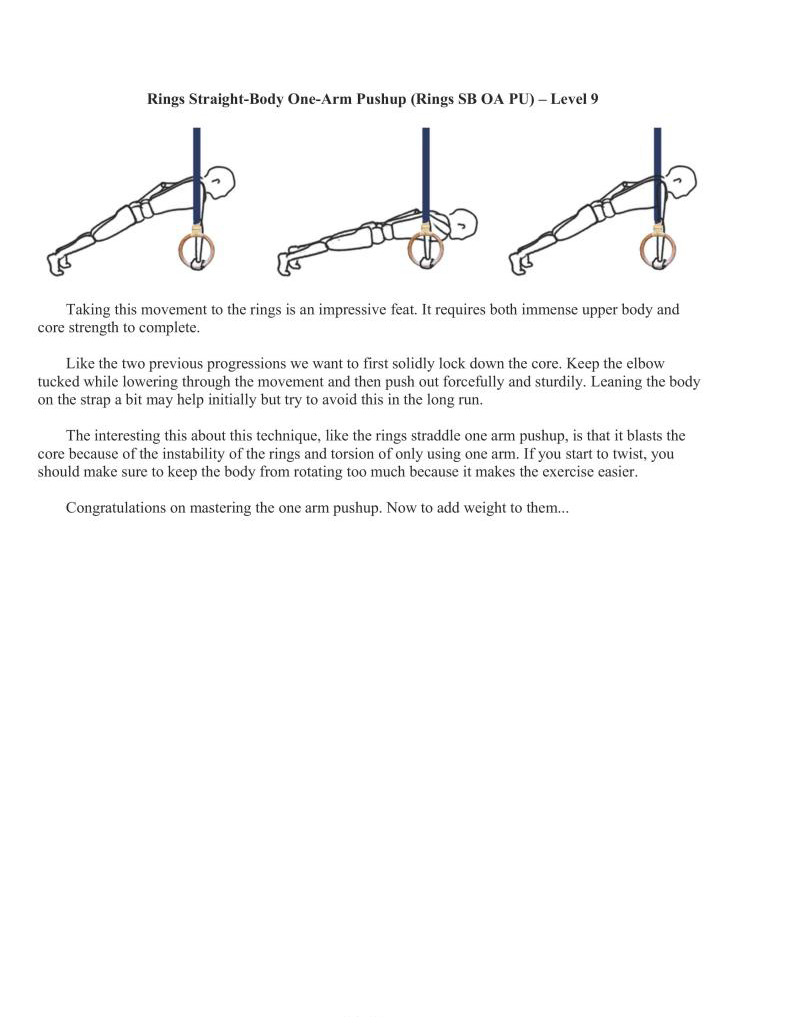
Taking this movement to the rings is an impressive feat. It requires both immense upper body and core strength to complete.
Like the two previous progressions we want to first solidly lock down the core. Keep the elbow tucked while lowering through the movement and then push out forcefully and sturdily. Leaning the body on the strap a bit may help initially but ry to avoid this in the long run.
The interesting this about this technique, like the rings straddle one arm pushup, is that it blasts the core because of the instability of the rings and torsion of only using one arm. If you start to twist, you should make sure to keep the body from rotating too much because it makes the exercise easier.
Congratulations on mastering the one arm pushup. Now to add weight to them...
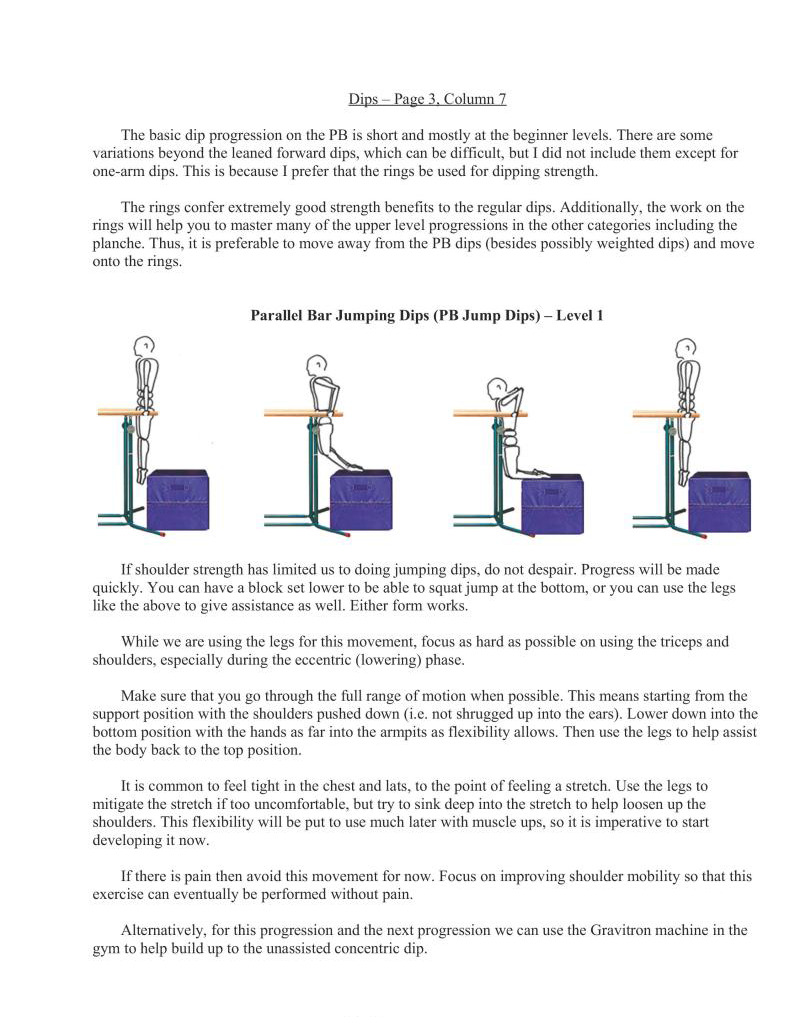
dip progression on the PB is short and mostly at the beginner levels. There are some variations beyond the leaned forward dips, which can be difficult, but did not include them except for one-arm dips. This is because I prefer that the rings be used for dipping strength.
The rings confer extremely good strength benefits to the regular dips. Additionally, the work on the rings will help you to master many of the upper level progressions in the other categories including the planche. Thus, it is preferable to move away from the PB dips (besides possibly weighted dips) and move onto the rings,
I shoulder strength has limited us to doing jumping dips. do not despair. Progress will be made quickly. You can have a block set lower to be able to squat jump at the boitom, or you can use the legs like the above to give assistance as well. Either form works.
While we are using the legs for this movement, focus as hard as possible on using the triceps and shoulders, especially during the eccentric (lowering) phase.
Make sure that you go through the full range of motion when possible. This means starting from the support position with the shoulders pushed down (i.¢. not shrugged up into the cars). Lower down into the bottom position with the hands as far into the armpits as flexibility allows. Then use the legs to help assist the body back to the top position.
It is common to feel tight in the chest and lats, to the point of feeling a streteh. Use the legs to mitigate the stretch if too uncomfortable, but try to sink deep into the stretch to help loosen up the shoulders. This flexibility will be put to use much later with muscle ups, so it is imperative to start developing it now.
If there is pain then avoid this movement for now. Focus on improving shoulder mobility so that this exercise can eventually be performed without pain.
Alternatively, for this progression and the next progression we can use the Gravitron machine in the gym to help build up to the unassisted concentric dip.
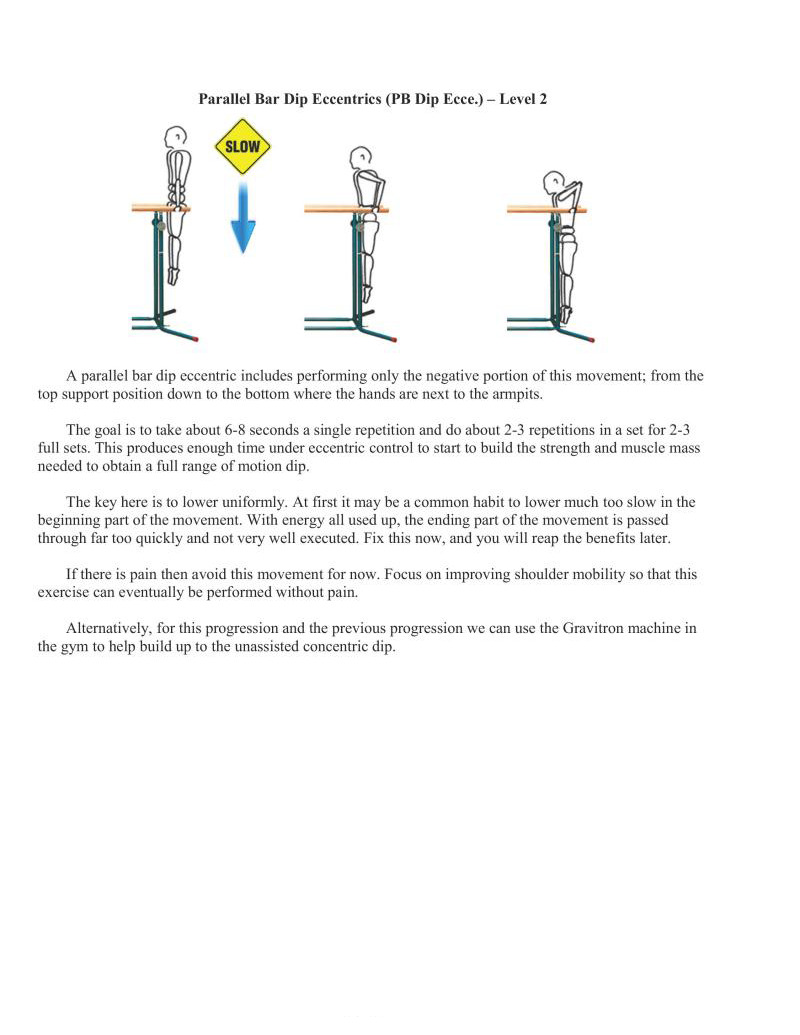
A parallel bar dip eccentric includes performing only the negative portion of this movement; from the top support position down to the bottom where the hands are next to the armpits.
The goal i to take about 6-8 seconds a single repetition and do about 2-3 repetitions in a set for 2-3 full sets. This produces enough time under eccentric control to start to build the strength and muscle mass needed to obtain a full range of motion dip.
The key here is to lower uniformly. At first it may be a common habit to lower much too slow in the beginning part of the movement. With energy all used up, the ending part of the movement is passed through far too quickly and not very well executed. Fix this now, and you will reap the benefits later.
If there is pain then avoid this movement for now. Focus on improving shoulder mobility so that this exercise can eventually be performed without pain.
Alternatively, for this progression and the previous progression we can use the Gravitron machine in the gym to help build up to the unassisted concentric dip.
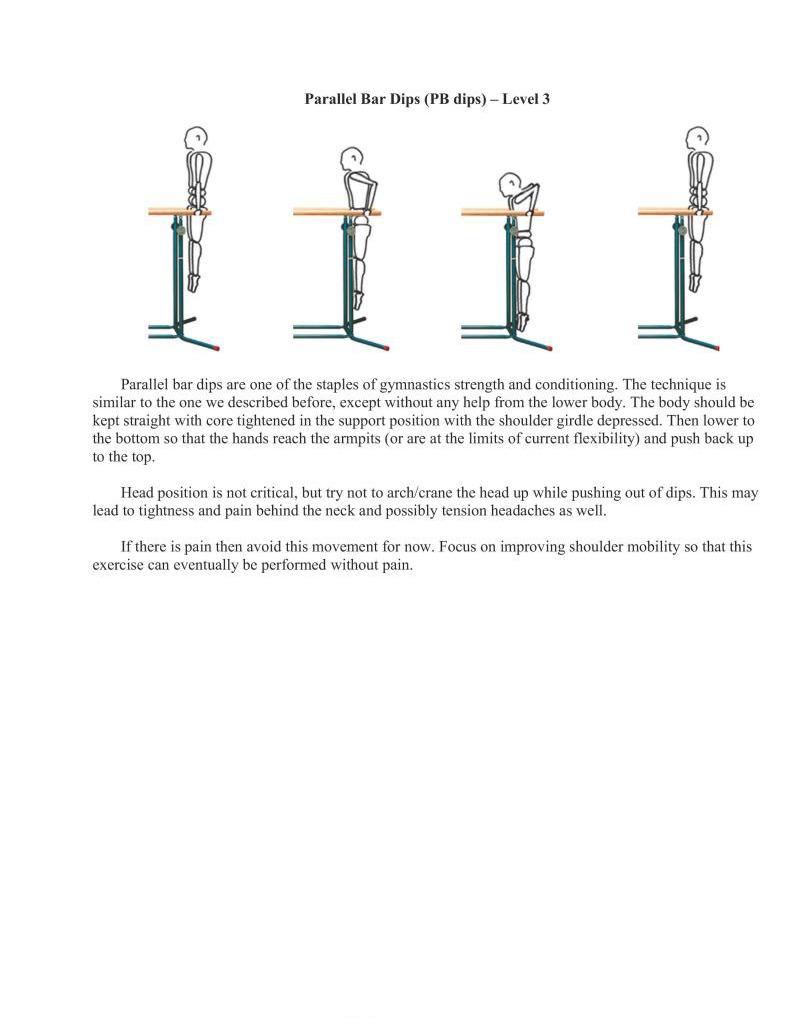
Parallel bar dips are one of the staples of gymnastics strength and conditioning. The technique is similar to the one we described before, except without any help from the lower body. The body should be kept straight with core tightened in the support position with the shoulder girdle depressed. Then lower to the bottom so that the hands reach the armpits (o are at the limits of current flexibility) and push back up 1o the top.
Head position is not critical, but try not to arch/crane the head up while pushing out of dips. This may lead to tightness and pain behind the neck and possibly tension headaches as well.
If there is pain then avoid this movement for now. Focus on improving shoulder mobility so that this exercise can eventually be performed without pain.
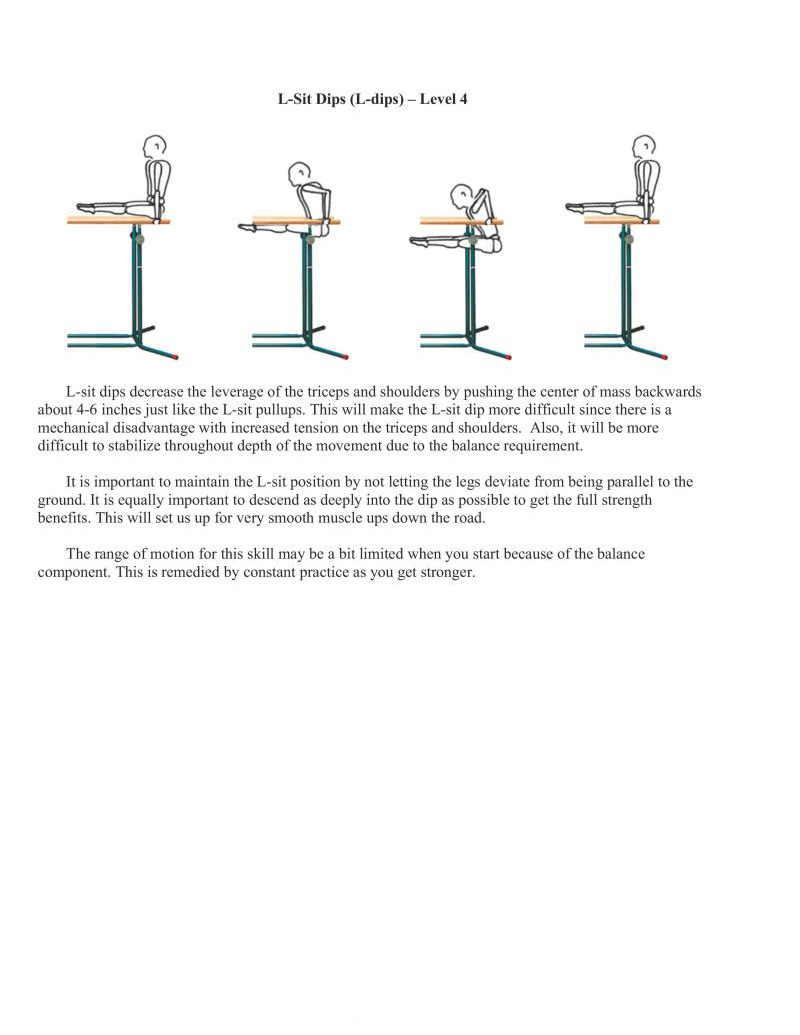
L-sit dips decrease the leverage of the triceps and shoulders by pushing the center of mass backwards about 4-6 inches just like the L-sit pullups. This will make the L-sit dip more difficult since there is a
mechanical disadvantage with increased tension on the triceps and shoulders. Also, it will be more difficult to stabilize throughout depth of the movement due to the balance requirement.
It is important to maintain the L-sit position by not letting the legs deviate from being parallel to the ground. It is equally important to descend as decply into the dip as possible to get the full strength benefits. This will set us up for very smooth muscle ups down the road.
The range of motion for this skill may be a bit limited when you start because of the balance component. This is remedied by constant practice as you get stronger.
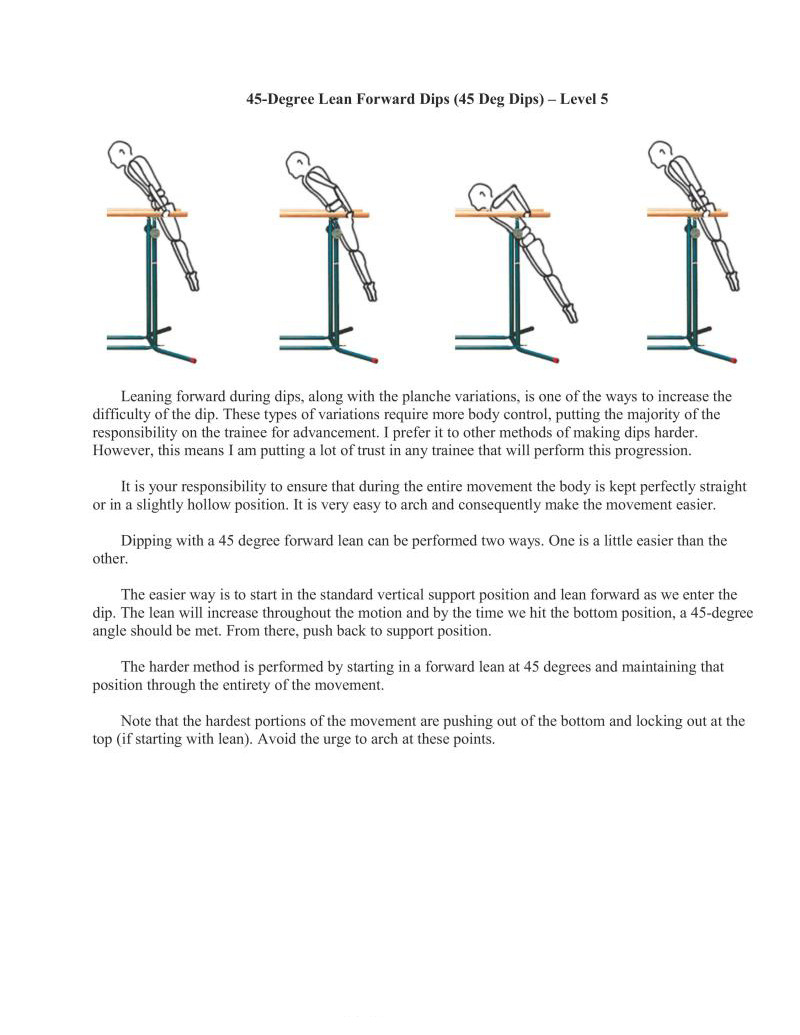
Leaning forward during dips, along with the planche variations, is one of the ways to increase the difficulty of the dip. These types of variations require more body control, putting the majority of the responsibility on the trainee for advancement. I prefer it to other methods of making dips harder. However, this means | am putting a lot of trust in any trainee that will perform this progression.
It is your responsibility to ensure that during the entire movement the body is kept perfectly straight orin a slightly hollow position. It is very easy to arch and consequently make the movement easier.
Dipping with a 45 degree forward lean can be performed two ways. One is a littl easier than the other.
The easier way is to start in the standard vertical support position and lean forward as we enter the dip. The lean will increase throughout the motion and by the time we hit the bottom position, a 45-degree angle should be met. From there, push back to support position.
The harder method is performed by starting in a forward lean at 45 degrees and maintaining that position through the entirety of the movement
Note that the hardest portions of the movement are pushing out of the bottom and locking out at the top (if starting with lean). Avoid the urge to arch at these points,

It is a novel exercise that very few people even know about or want to learn. I decided on including it because, like the one arm chinup or one arm pushup, using this progression can be good for assessing unilateral strength balance. It also requires good use of the core stabilizers. Plus, it is fun to see if you can perform this type of skill
There are two different variations of the one arm dip, and one way to make each more difficult. These progressions will likely be used solely on a wall because the wall can brace the legs to help provide balance. It is possible to do it on a single rail, but this will make the exercise significantly more difficult.
The first variation of the one arm dip is with the body facing the wall. Usually the hand will be placed with the fingers pointing forward. The hand will be placed more towards the middle of the body.
The second variation is to face parallel along the wall with the side of the body facing the wall. In this position, the hand is placed in line with the dircction the body is facing. There will be some lean over the arm to keep balance.
Descending and ascending is just like in the straight body one-arm pushup progressions. Keep the amm tucked in close to the body to n torque at the joints and rotational forces. The core must be squeezed tight along with the legs
This exercise can be made easier by just bending the torso down and up. This decreases any movement of the legs, which takes weight off of the pushing arm. Additionally, the legs can be used to push minimally because of a bit of fiction from the wall. Ultimately. you will want to eliminate any of these assistance measures and perform this technique by keeping a straight body and pressing through a single arm.
Do note that if you bend and/or twist your your torso, it can make the movement much easier such that it may fall under level 6 or 7 type of strength. This is one way to build up to the movement. It is also an alternative movement you can use to work on strength in the absence of a weighted vest, weight belt, parallettes, or other equipment. It is useful outside as well and can be performed on a bar with some balance effort.
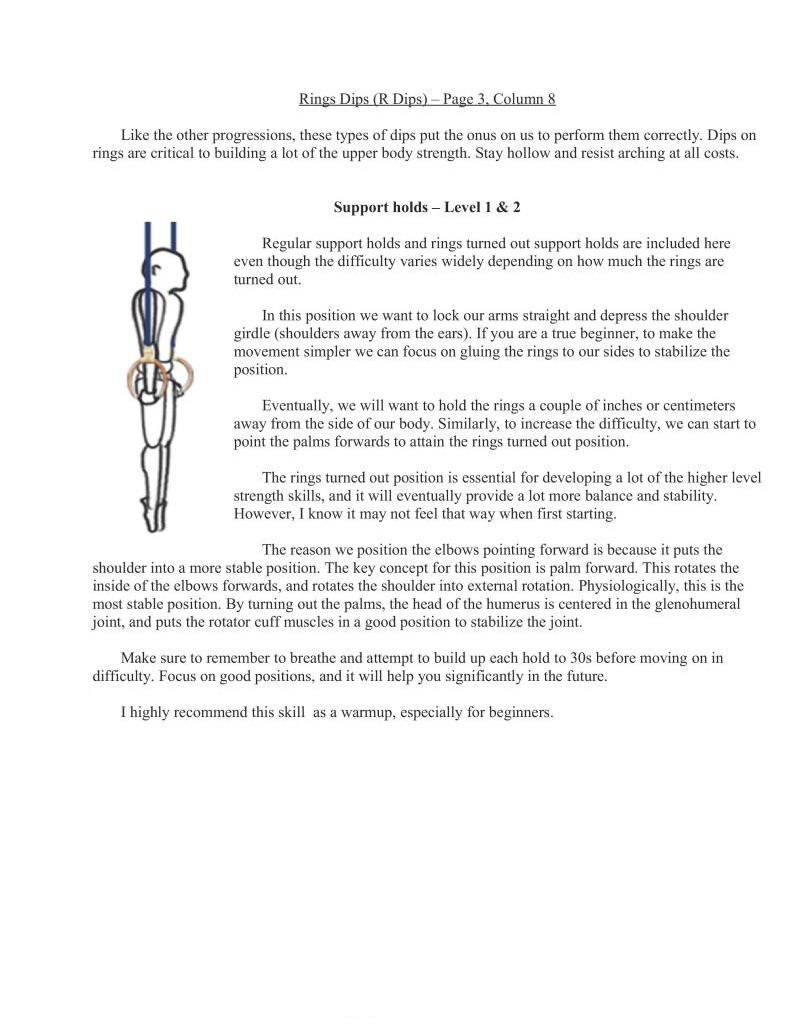
Like the other progressions, these types of dips put the onus on us to perform them correctly. Dips on rings are critical to building a lot of the upper body strength. Stay hollow and resist arching at ail costs.
Regular support holds and rings turned out support holds are included here even though the difficulty varies widely depending on how much the rings are turned out.
In this position we want to lock our arms straight and depress the shoulder girdle (shoulders away from the ears). If you are a true beginner, to make the movement simpler we can focus on gluing the rings to our sides to stabilize the position.
Eventually, we will want to hold the rings a couple of inches or centimeters away from the side of our body. Similarly, to increase the difficulty, we can sart to point the palms forwards to attain the rings turned out position
The rings turned out position is essential for developing a lot of the higher level strength skills, and it will eventually provide a lot more balance and stability. However, I know it may not feel that way when first starting.
The reason we position the elbows pointing forward is because it puts the shoulder into a more stable position. The key concept for this position is palm forward. This rotates the inside of the elbows forwards, and rotates the shoulder into external rotation. Physiologically, this is the most stable position. By turning out the palms, the head of the humerus is centered in the glenohumeral joint, and puts the rotator cuff muscles in a good position to stabilize the joint.
Make sure to remember to breathe and attempt to build up each hold to 30s before moving on in difficulty. Focus on good positions, and it will help you significantly in the future.
I highly recommend this skill as a warmup, especially for beginners
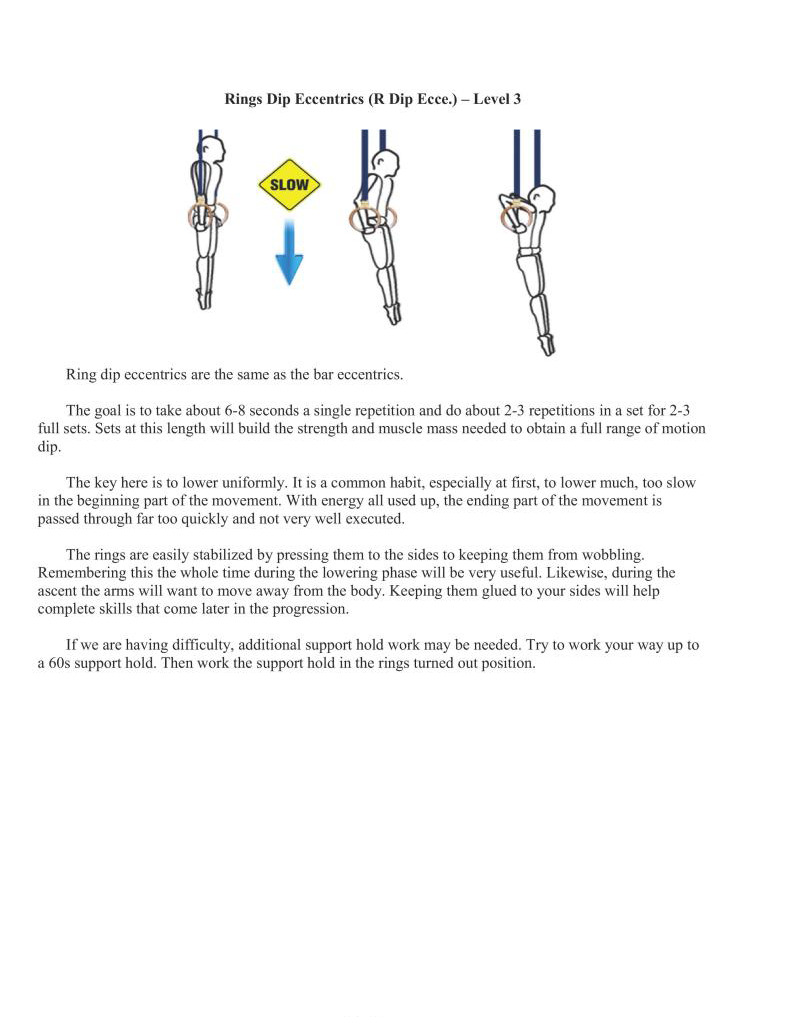
Ring dip eccentrics are the same as the bar eccentrics.
The goal is to take about 6-8 seconds a single repetition and do about 2-3 repetitions in a set for 2-3 full sets. Sets at this length will build the strength and muscle mass needed to obtain a full range of motion dip.
The key here is to lower uniformly. It is a common habit, especially at first, to lower much, too slow in the beginning part of the movement. With energy all used up, the ending part of the movement is passed through far too quickly and not very well executed.
The rings are easily stabilized by pressing them to the sides to keeping them from wobbling. Remembering this the whole time during the lowering phase will be very useful. Likewise, during the ascent the arms will want to move away from the body. Keeping them glued to your sides will help complete skills that come later in the progression.
If we are having difficulty, additional support hold work may be needed. Try to work your way up to a 60s support hold. Then work the support hold in the rings turned out position.
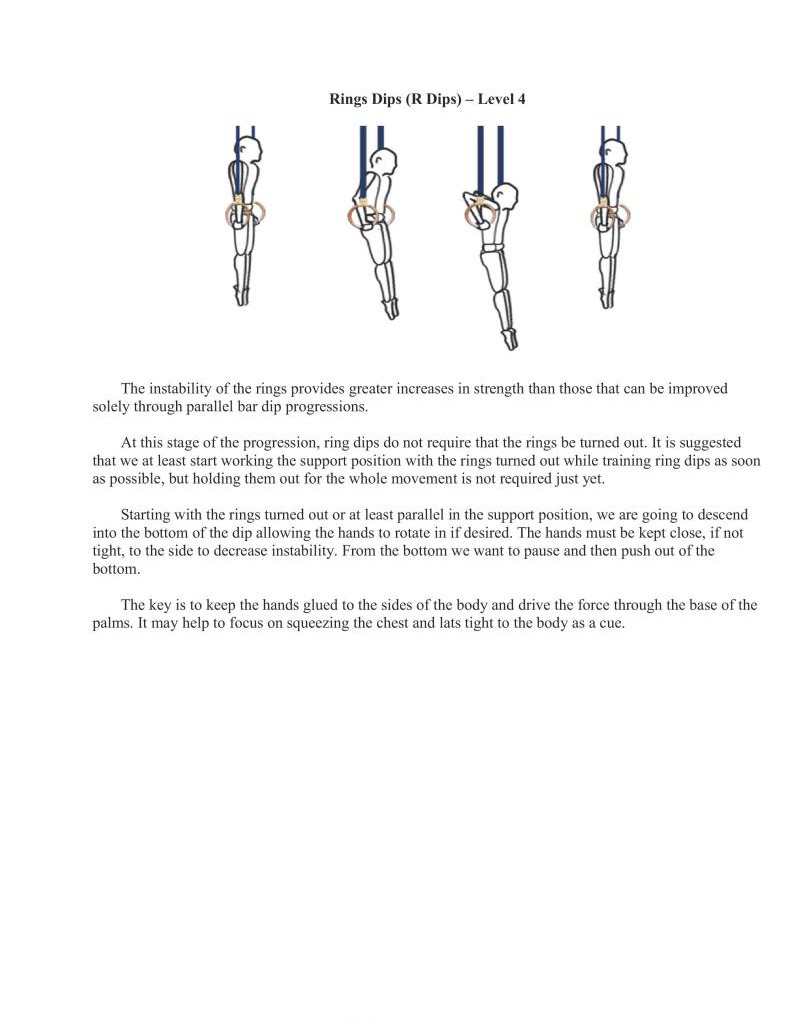
The instability of the rings provides greater increases in strength than those that can be improved solely through parallel bar dip progressions.
At this stage of the progression, ring dips do not require that the rings be turned out. It is suggested that we at least start working the support position with the rings turned out while training ring dips as soon as possible, but holding them out for the whole movement is not required just yet.
Starting with the rings turned out or at least parallel in the support position, we are going to descend into the bottom of the dip allowing the hands to rotate in if desired. The hands must be kept close, if not tight, to the side to decrease instability. From the bottom we want to pause and then push out of the bottom.
The key is to keep the hands glued to the sides of the body and drive the force through the base of the palms. It may help to focus on squeczing the chest and lats tight to the body as a cue.
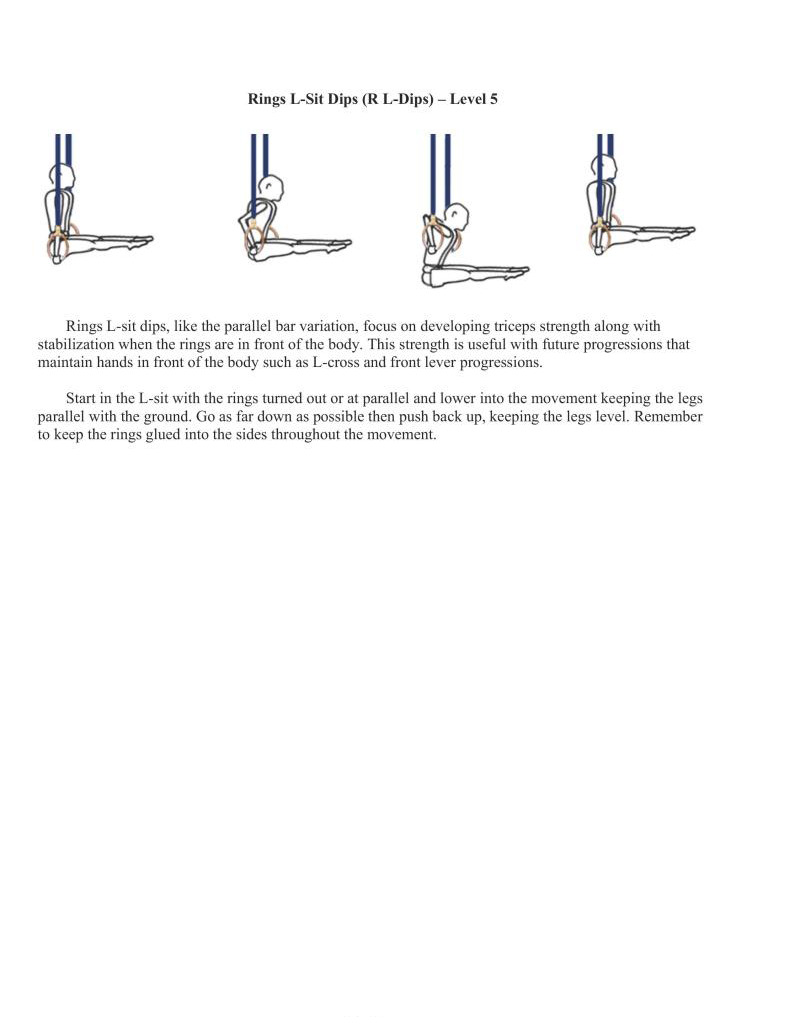
Rings L-sit dips, like the parallel bar variation, focus on developing triceps strength along with
stabilization when the rings are in front of the body. This strength is useful with future progressions that maintain hands in front of the body such as L-cross and front lever progressions.
Start in the L-sit with the rings turned out or at parallel and lower into the movement keeping the legs parallel with the ground. Go as far down as possible then push back up, keeping the legs level. Remember to keep the rings glued into the sides throughout the movement.
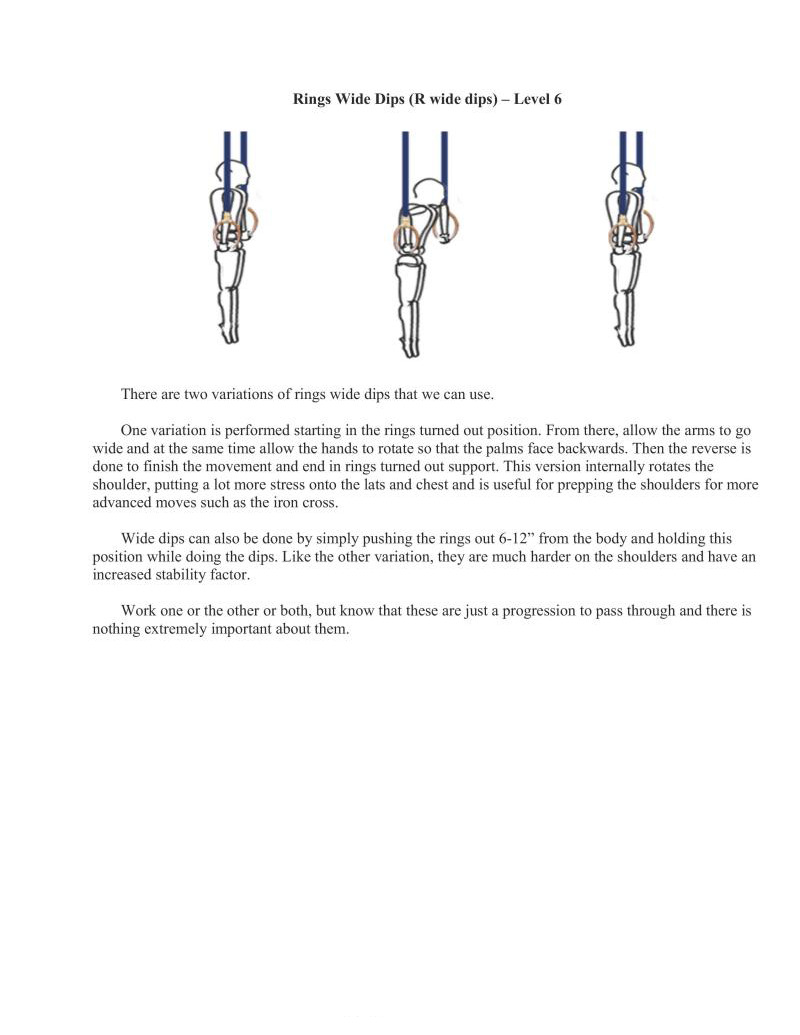
There are two variations of rings wide dips that we can use.
One variation is performed starting in the rings turned out position. From there, allow the arms to go wide and at the same time allow the hands to rotate so that the palms face backwards. Then the reverse is done to finish the movement and end in rings turned out support. This version internally rotates the shoulder, putting a lot more stress onto the lats and chest and is useful for prepping the shoulders for more advanced moves such as the iron cross.
Wide dips can also be done by simply pushing the rings out 6-12" from the body and holding this position while doing the dips. Like the other variation, they are much harder on the shoulders and have an increased stability factor.
Work one or the other or both, but know that these are just a progression to pass through and there is nothing extremely important about them.
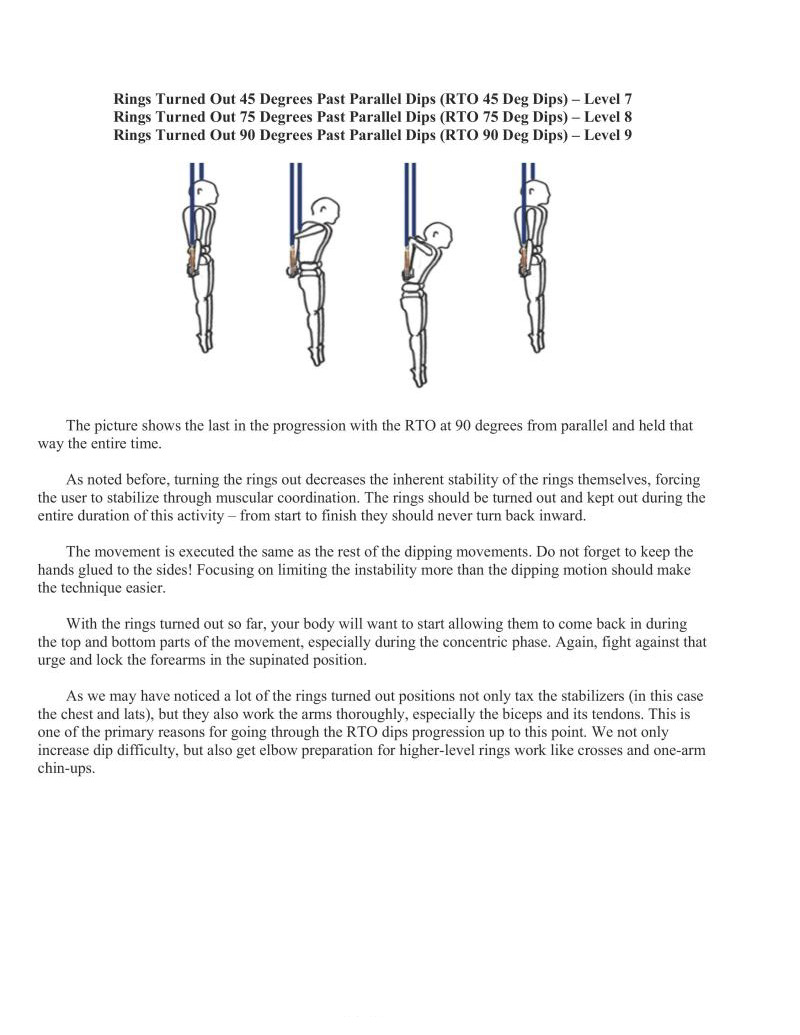
The picture shows the last in the progression with the RTO at 90 degrees from parallel and held that way the entire time.
As noted before, turning the rings out decreases the inherent stability of the rings themselves, forcing the user to stabilize through muscular coordination. The rings should be turned out and kept out during the entire duration of this activity — from start to finish they should never turn back inward.
The movement is executed the same as the rest of the dipping movements. Do not forget to keep the hands glued to the sides! Focusing on limiting the instability more than the dipping motion should make the technique casicr.
With the rings turned out so far, your body will want to start allowing them to come back in during the top and bottom parts of the movement, especially during the concentric phase. Again, fight against that urge and lock the forearms in the supinated position.
As we may have noticed a lot of the rings turned out positions not only tax the stabilizers (in this case the chest and lats), but they also work the arms thoroughly, especially the biceps and its tendons. This is one of the primary reasons for going through the RTO dips progression up to this point. We not only increase dip difficulty, but also get elbow preparation for higher-level rings work like crosses and one-arm chin-ups.
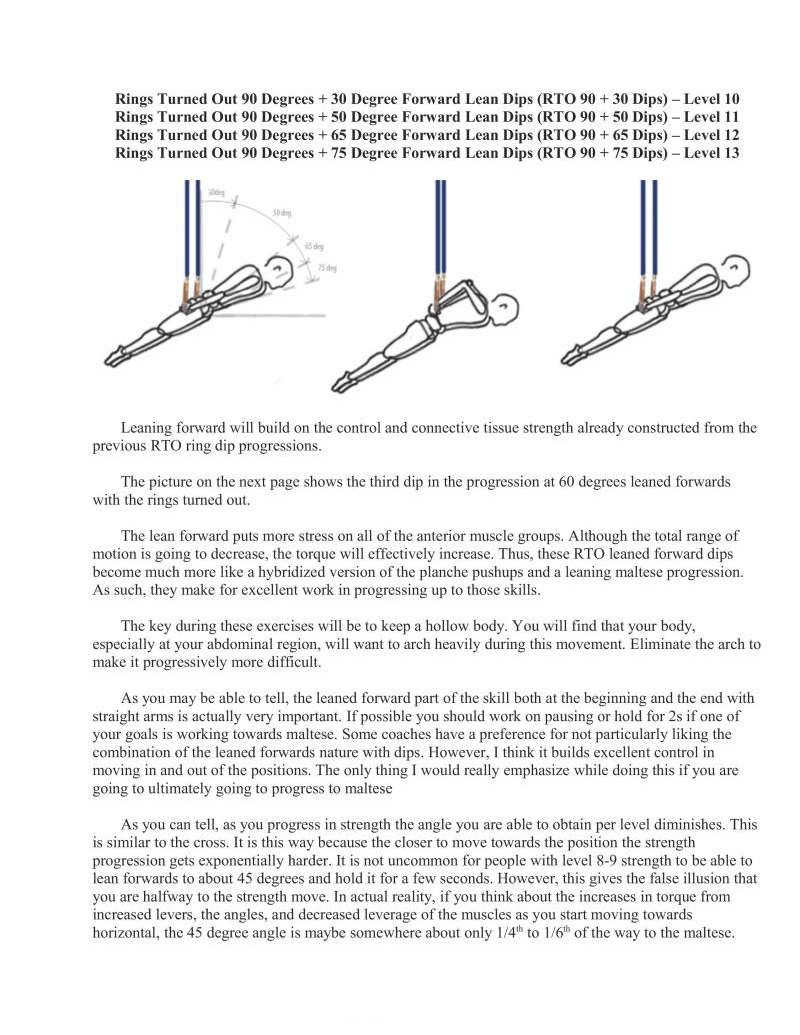
Leaning forward will build on the control and connective tissue strength already constructed from the previous RTO ring dip progressions.
The picture on the next page shows the third dip in the progression at 60 degrees leaned forwards with the rings turned out
The lean forward puts more stress on all of the anterior muscle groups. Although the total range of motion is going to decrease, the torque will effectively increase. Thus, these RTO leaned forward dips become much more like a hybridized version of the planche pushups and a leaning maltese progression. As such, they make for excellent work in progressing up to those skills.
The key during these exercises will be to keep a hollow body. You will find that your body, especially at your abdominal region, will want to arch heavily during this movement. Eliminate the arch to make it progressively more difficult.
As you may be able to tell, the leaned forward part of the skill both at the beginning and the end with straight arms is actually very important. If possible you should work on pausing or hold for 2s if one of your goals is working towards maltese. Some coaches have a preference for not particularly liking the combination of the leaned forwards nature with dips. However, I think it builds excellent control in moving in and out of the positions. The only thing I would really emphasize while doing this if you are going to ultimately going to progress to maltese
As you can tell, as you progress in strength the angle you are able to obtain per level diminishes. This is similar to the cross. It is this way because the closer to move towards the position the strength progression gets exponentially harder. It is not uncommon for people with level 8-9 strength to be able to lean forwards to about 45 degrees and hold it for a few seconds. However, this gives the false illusion that you are halfway to the strength move. In actual reality, if you think about the increases in torque from increased levers, the angles, and decreased leverage of the muscles as you start moving towards horizontal, the 45 degree angle is maybe somewhere about only 1/4" to 1/6" of the way to the maltese.

Since I am not covering the maltese specifically, I did want to finish out the start with approximate angles of lean as you get closer to the maltese. These are as below and filled out in the chart as well (though the maltése is in the column to the left since I did not have enough room).
Weighted dips are often called the squat of the upper body for the amount of musculature they use. I would agree with this assessment,
Weighed dips can be done on either parallel bars or rings. Obviously, rings weighted dips are a bit more difficult than those done on parallel bars at lower levels. However, once you start to move towards full 2x bodyweight dips, they actually start to get easier on the rings.
This is because the rings splay outwards normally, but when you add significant amounts of weight to your body, physics dictates that the rings tend to stay put. When the rings move outwards they also move upwards. Hence, gravity, your weight, and the additional weight counteract the outward force applied to the rings from your hands, which help to stabilize the rings more.
Regardless, the weighted dip progression is very easy to measure, which is why I have used them extensively in my training. Weighted dips have very good transference to planche skills, but they do not benefit handstand pushups as much. We should expect this because weighted dips work more in the extension range of motion of the shoulder, conferring some benefit to the flexion of the planche. However, itis unlikely to confer benefits to fully flexed shoulder positions such as handstands and handstand pushups
Weighted dips will typically outpace weighted pullups by a progression or two due to additional involved musculature. Additionally, the triceps are larger and stronger than the biceps.
You should be able to perform a 2x bodyweight dip at roughly level 9 ability. This is about consistent with all of the other skills developed around that level. For reference, straddle planche is at level 8, and the 1/2 layout and 1 leg out planche is a level 9 ability.
The muscle up is a fundamental movement that outlives its usefulness as we get to higher intermediate strength and beyond. However, for beginners they are a vastly important skill. The muscle up not only gets one above the rings, but also develops strength in the full range of motion through the pullup and dip positions.
Once we get to a certain point, we are going to transition from the strict pullup / dip muscle up to harder pulling skills, pushing skills, and isometrics in succession with the muscle up transition. This will help build strength moving from position to position which lets us build routines and sequences that can be utilized for strength and conditioning.
The false grip will be the primary grip when training muscle ups. It will be dropped later on, but it is critical to the learning process in the beginning. By putting the wrists on top we arc in a more advantageous position, offering more leverage during the transitional phase. It should be used in all progressions unless otherwise stated.
A false grip is attained by shifting the hands up on the side of the ring, so that the crook of the wrist on the pinky side of the hand sits on the rings or bar. The hand is then wrapped around the bar or rings and held as tight as possible. From there the movement may begin.
One of the problems when learning the false rip position is the difficulty created by poor wrist flexibility or grip strength. If this is a problem, then add additional work to correct both of these problems in the warm up and cool down.
If the wrists themselves are being torn p during training, you have a few options. The firstis decreasing the frequency. Decreasing the frequency will allow the skin to heal and toughen up into calluses much like the hands will toughen up given enough training time. The second is to get wrist bands. or use athletic tape to help blunt the friction. However, the issue with this is that it generally makes it harder to hold the false grip. Alternatively, gloves can be used in conjunction with this, but I do not recommend them because it takes away from grip strength.
Finally, the last and my favorite alternative is to train a different skill or similar progression while the wrists are healing and come back as needed. There is no reason to destroy the skin on your wrists or even on your hands. You can consider it an injury that takes away from your training. As you may know now that if you work through injuries you may have issues with them for a long while. It is best to treat these types of things as an injury condition — avoid the painful and offending stimulus while decreasing frequency just enough to toughen up the skin. Then come back and work them much more when you are healed up.
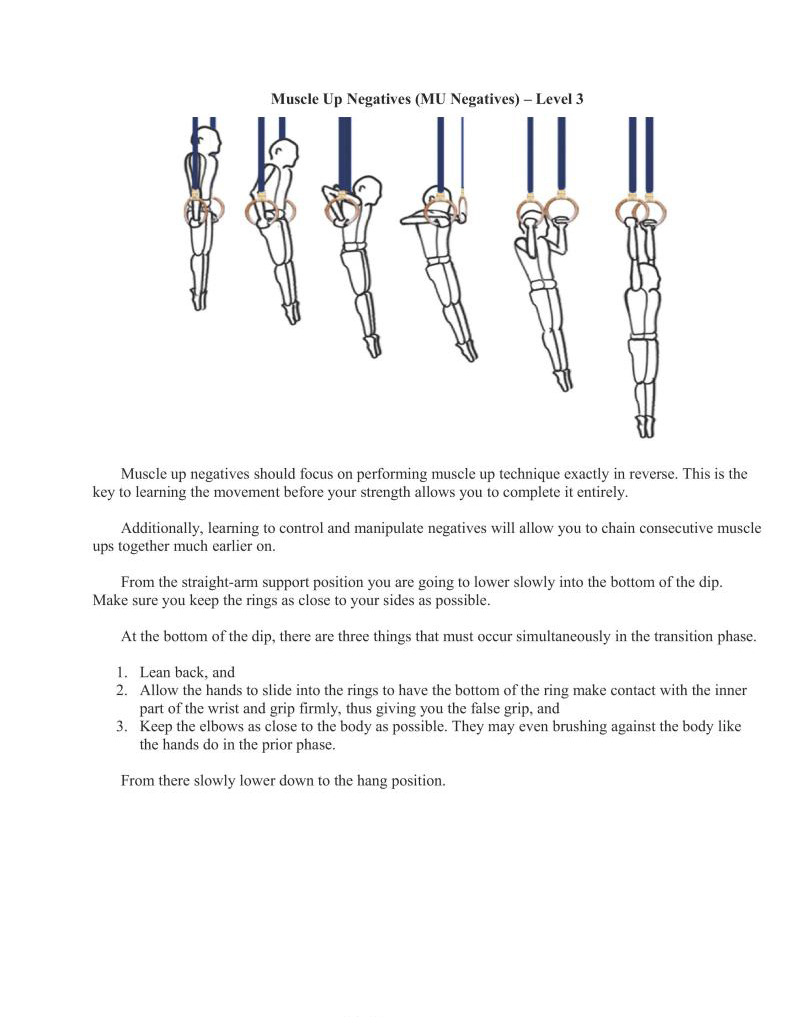
Muscle up negatives should focus on performing muscle up technique exactly in reverse. This is the key to learning the movement before your strength allows you to complete it entirely.
Additionally, leaning to control and manipulate negatives will allow you to chain consecutive muscle ups together much earlier on.
From the straight-arm support position you are going to lower slowly into the bottom of the dip. Make sure you keep the rings as close to your sides as possible.
At the bottom of the dip, there are three things that must occur simultaneously in the transition phase.
From there slowly lower down to the hang position.
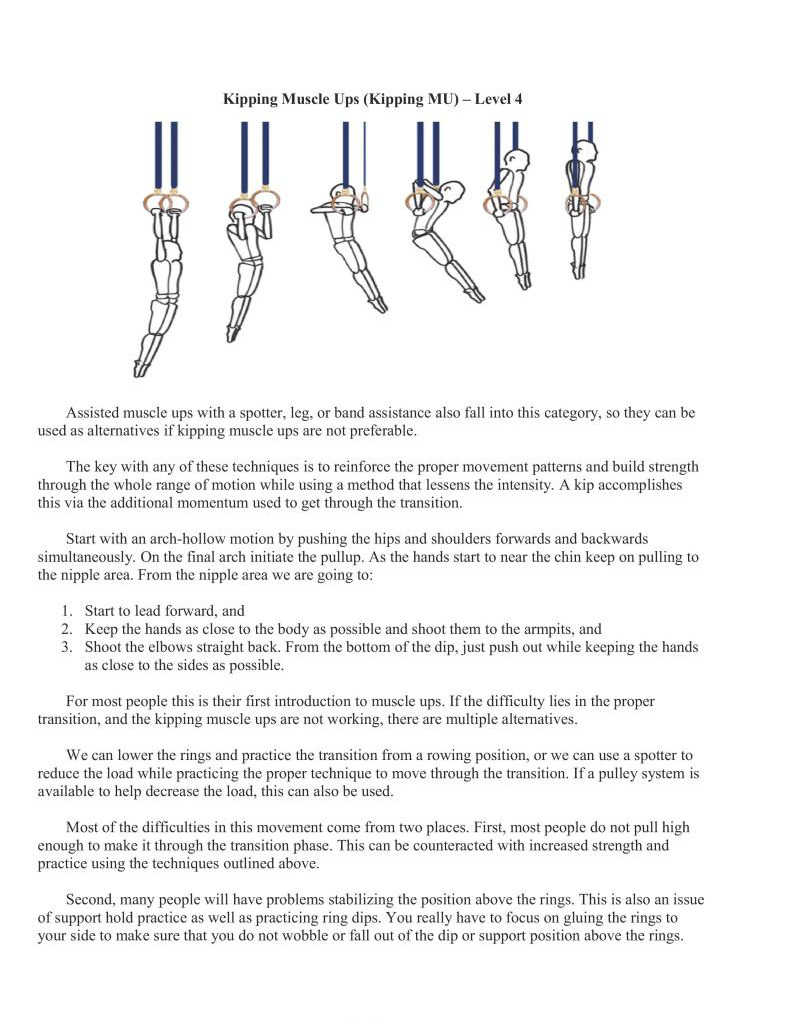
Assisted muscle ups with a spotter, leg, or band assistance also fall into this category, so they can be used as altenatives if kipping muscle ups are not preferable.
The key with any of these techniques is to reinforce the proper movement patterns and build strength through the whole range of motion while using a method that lessens the intensity. A kip accomplishes this via the additional momentum used to get through the transition.
Start with an arch-hollow motion by pushing the hips and shoulders forwards and backwards simultaneously. On the final arch initiate the pullup. As the hands start to near the chin keep on pulling to the nipple area. From the nipple area we are going to:
For most people this is their first introduction to muscle ups. If the difficulty lies in the proper transition, and the kipping muscle ups are not working, there are multiple alternatives.
We can lower the rings and practice the transition from a rowing position, or we can use a spotter to reduce the load while practicing the proper technique to move through the transition. If a pulley system is available to help decrease the load, this can also be used.
Most of the difficulties in this movement come from two places. First, most people do not pull high enough to make it through the transition phase. This can be counteracted with increased strength and practice using the techniques outlined above.
Second, many people will have problems stabilizing the position above the rings. This is also an issue of support hold practice as well as practicing ring dips. You really have to focus on gluing the rings to your side to make sure that you do not wobble or fall out of the dip or support position above the rings.
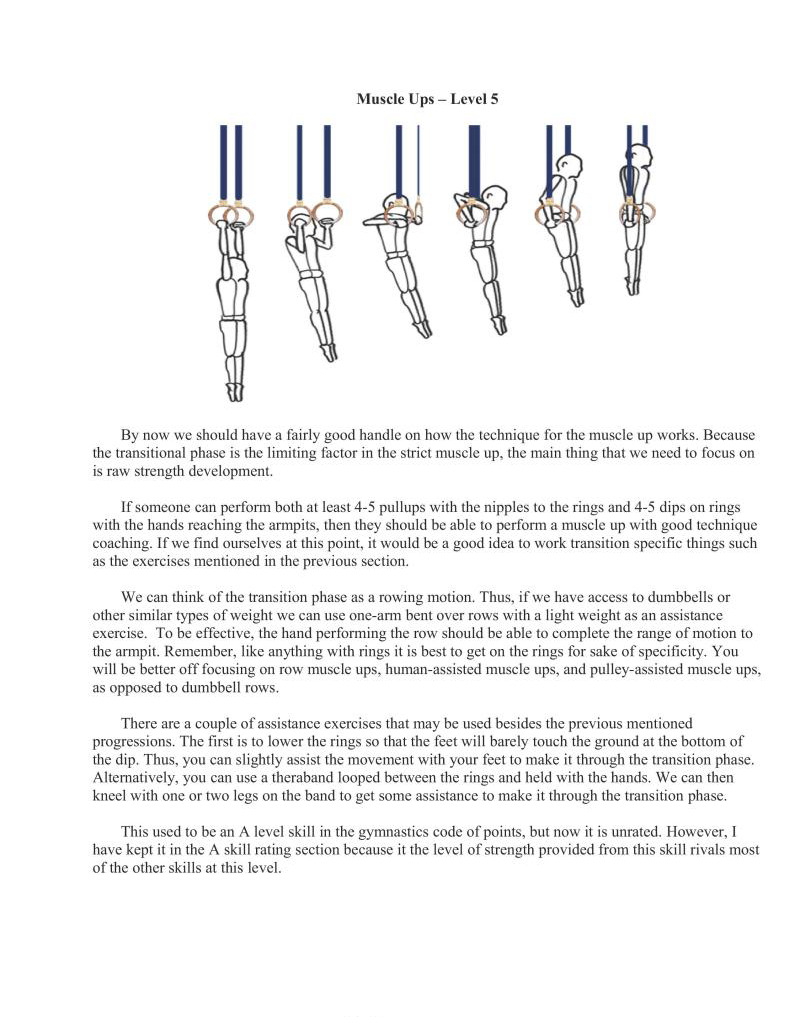
By now we should have a fairly good handle on how the technique for the muscle up works. Because the transitional phase is the limiting factor in the strict muscle up, the main thing that we need to focus on is raw strength development.
If someone can perform both at least 4-5 pullups with the nipples to the rings and 4-5 dips on rings with the hands reaching the armpits, then they should be able to perform a muscle up with good technique coaching. If we find ourselves at this point, it would be a good idea to work transition specific things such as the exercises mentioned in the previous section.
We can think of the transition phase as a rowing motion. Thus, if we have access to dumbbells or other similar types of weight we can use one-arm bent over rows with a light weight as an assistance excreise. To be effective, the hand performing the row should be able to complete the range of motion to the armpit, Remember, like anything with rings it is best to get on the rings for sake of specificity. You will be better off focusing on row muscle ups, human-assisted muscle ups, and pulley-assisted muscle ups, as opposed to dumbbell rows.
There are a couple of assistance exercises that may be used besides the previous mentioned progressions. The first is to lower the rings so that the feet will barely touch the ground at the bottom of the dip. Thus, you can slightly assist the movement with your feet to make it through the transition phase. Aliernatively, you can use a theraband looped between the rings and held with the hands. We can then kneel with one or two legs on the band to get some assistance to make it through the transition phase.
This used to be an A level skill in the gymnastics code of points, but now it is unrated. However, I have kept it in the A skill rating section because it the level of strength provided from this skill rivals most of the other skills at this level.
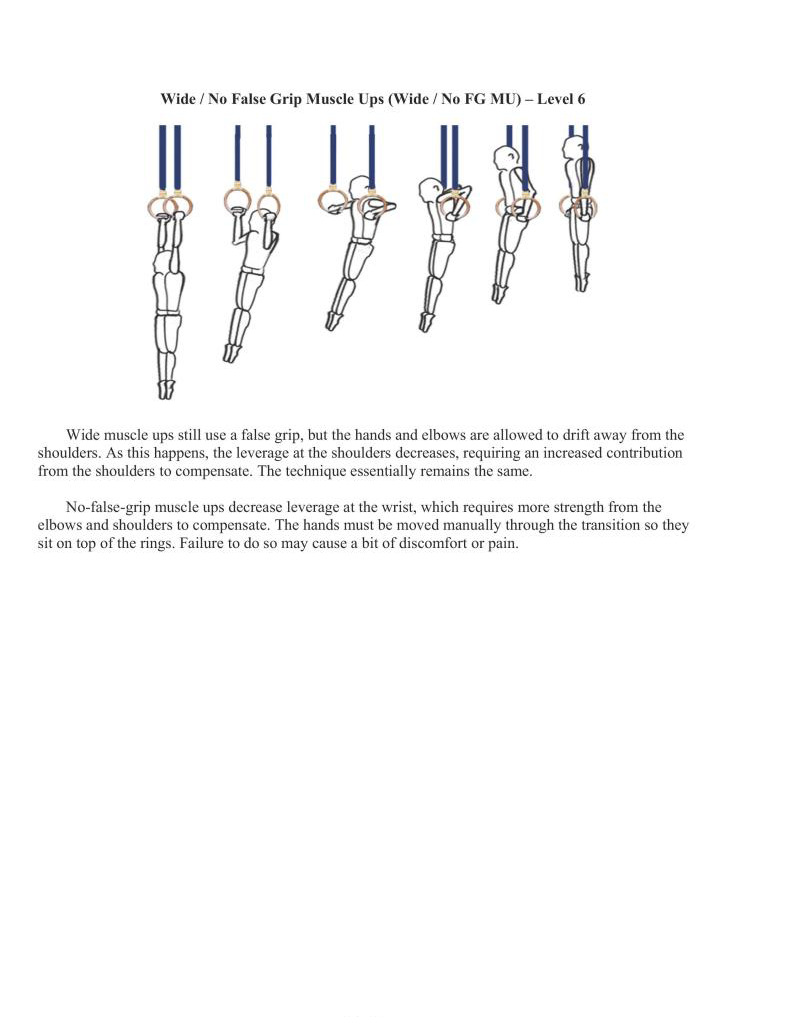
Wide muscle ups still use a false grip, but the hands and elbows are allowed to drift away from the shoulders. As this happens, the leverage at the shoulders decreases, requiring an increased contribution from the shoulders to compensate. The technique essentially remains the same.
No-false-grip muscle ups decrease leverage at the wrist, which requires more strength from the elbows and shoulders to compensate. The hands must be moved manually through the transition so they sit on top of the rings. Failure to do so may cause a bit of discomfort or pain.
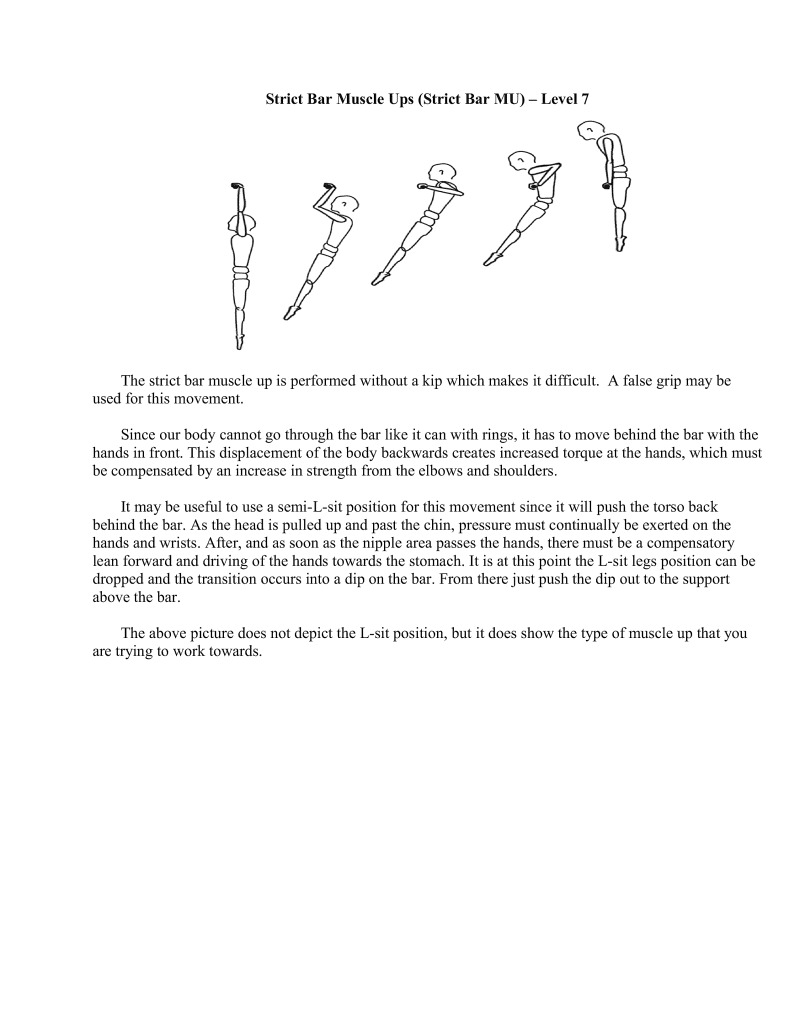
The strict bar muscle up is performed without a kip which makes it difficult. A false grip may be used for this movement.
Since our body cannot go through the bar like it can with rings, it has to move behind the bar with the hands in front, This displacement of the body backwards creates increased torque at the hands, which must be compensated by an increase in strength from the elbows and shoulders.
1t may be useful to use a semi-L-sit position for this movement since it will push the torso back behind the bar. As the head is pulled up and past the chin, pressure must continually be exerted on the hands and wrists. after, and as soon as the nipple area passes the hands, there must be a compensatory lean forward and driving of the hands towards the stomach. It is at this point the Lt legs position can be dropped and the transition occurs into a dip on the bar. From there just push the dip out to the support above the bar.
The above picture does not depict the L position, but it does show the type of muscle up that you are trying to work towards.
The addition of skills to the muscle up, such as front levers and planches, increases the difficulty of the pullup and dip portion of the muscle up. While they do not affeet the transition directly, moving into the transition from a decreased leverage position does tax the body and build strength.
In the lower portion of the movement we will move from the front lever into the transition. This requires more strength to reach the point where the transition starts, making the transition itself seem more difficult. Similarly, the dip into planche makes the transition feel more difficult as well.
A false grip for this movement may be used if desired because it will make the transition easier, but at this level of strength it should not be necessary. Start in that nice straddle front lever position and as you move out of it and let the torso and legs drop, initiate the pullup and transition. From there, push the hips up through the dip and all the way up to planche level, as the arms lock out. Hold each of the static positions for at least a second or two.
This progression is not listed on the skill and strength progression charts, but this is the approximate difficulty of its location in the muscle up progressions. It is included here because it is the impressive looking muscle up variation that has been shown in the popular YouTube video of the gymnast Andreas Aguilar where he performs an exhibition routine.
In this progression, we will start with an L-sit and a false grip under the rings. From there we will perform a muscle up while keeping the legs in the L-sit position the entire time through the movement
The reason why this skill requires such immense strength is because, like all of the other L-sit variations of skills, the hands must be displaced in front of the body about 4-6" the entire time. Failure to do so, especially through the transition, will lead to the legs dropping from the L-sit position.
As the hands need to be in front of the body the whole time, this increases the torque at the shoulders, This makes it similar to what might be called an upright front lever position. Indeed, the difficulty actual rivals being able to perform a full front lever.
The one-am-straight muscle up eliminates the leverage of the wrist and elbow from one-arm completely and relies completely on the straight-arm shoulder strength and the pull from the other arm.
Variations of this skill, with the pullup and dip separately, are sometimes sed in strengthening the iron cross position. Similarly, these variations and can be used as a progress desired. It can also be used to train the on-arm chinup / one-arm pullup, as well. Working towards this skill overall is a good hybrid combination of many skills that are highly desired, including the one-arm chinup and iron cross. If you are interested in progressing to either of these skills, then it is strongly recommended you train the one-arm-straight muscle up.
For this skill, take a false grip with both hands. One arm will pull straight, so the ring comes out to the cross position, while the other arm does an assisted one-arm pullup / chinup. As the one-arm pullup / chinup arm passes the chin we need to initiate the transition phase by keeping the hand very close as we lean forward.
It is at this point most people want to put increased weight on the straight arm to help shift the other arm in transition. This is expected and acceptable, given the helping arm stays straight. From there, it is a combination of the one-arm dip with the assistance of the one-arm cross puliout.
Note that using the straight arm puts a lot more stress on the shoulder joint. During this exercise, the shoulders may fatigue such that it may start to strain the muscles of the rotator cuff. Be careful trying to push through any discomfort.
This is the first skill in the inverted muscle up progress
This skill requires much more strength since the only momentum we can gain from this is from the initial falling down phase, and manipulating the bend of the arms. Eventually, we will want to eliminate this momentum. Since the hips are all the way extended, there is no way to use the hips to assist with this skill.
We will start in support and control the roll backwards. Use only as much momentum as needed, then phase it out later as you become more proficient in this technique. We need to bend the arms as we rise through the second phase, allowing the legs to rotate the upper body back above the rings. We should pin the rings to the hips, and push the hands forwards as hard as possible. This allows the body to rotate around the hands and back to support.
Ideally, we want to eliminate the use of any momentum altogether, which is why this is ranked at level 10. A quickly executed backward roll to support with good technique is much easier than a level 10 skill. I would say that this skill is easily learnable with momentum at level 6-7 ability, if you haress enough momentum and execute the technique perfeetly. However, performing this technique without momentum requires much control and strength.
The most difficult part of this progression is the inverted muscle up portion, which is the second phase of this skill. Typically, working negatives of the inverted muscle up will help your progress. For example, we can get into the shoulder stand position and slowly lower down to the inverted hang position.
This is a B level skill in the gymnastics code of points;
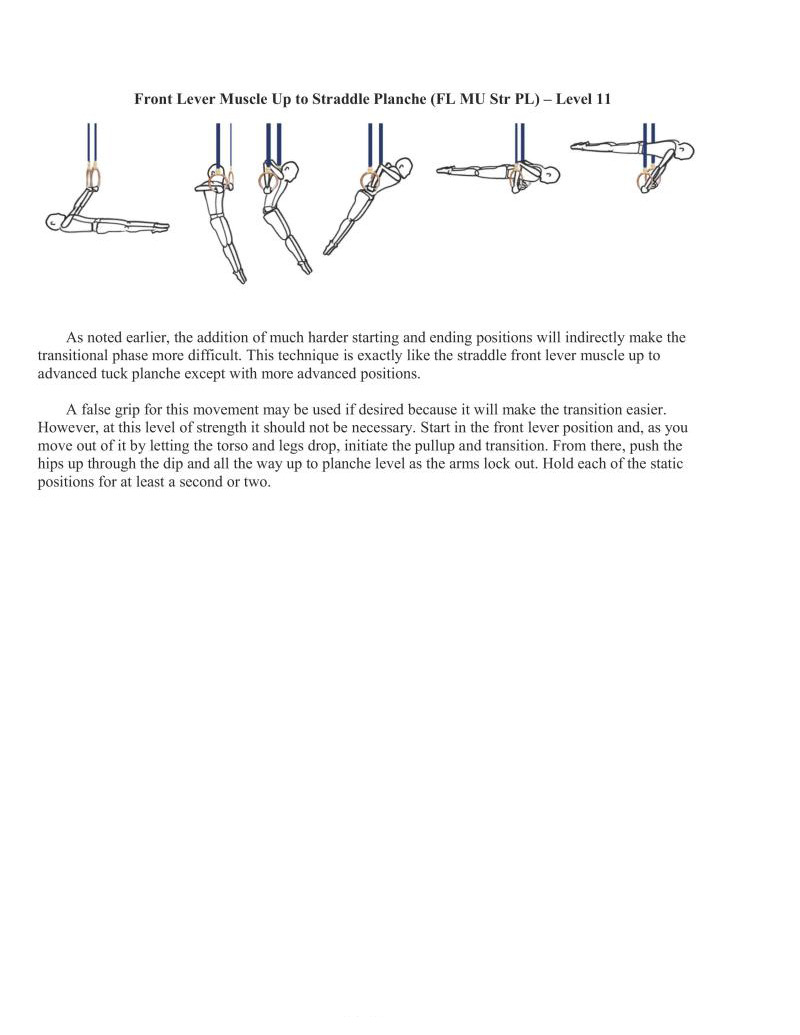
As noted earlier, the addition of much harder starting and ending positions will indirectly make the transitional phase more difficult. This technique is exactly like the straddle front lever muscle up to advanced tuck planche except with more advanced positions.
A false grip for this movement may be used if desired because it will make the transition easier. However, at this level of strength it should not be necessary. Start in the front lever position and, as you move out of it by letting the forso and legs drop, initiate the pullup and transition. From there, push the hips up through the dip and all the way up to planche level as the arms lock out. Hold each of the static positions for at least a second or two.
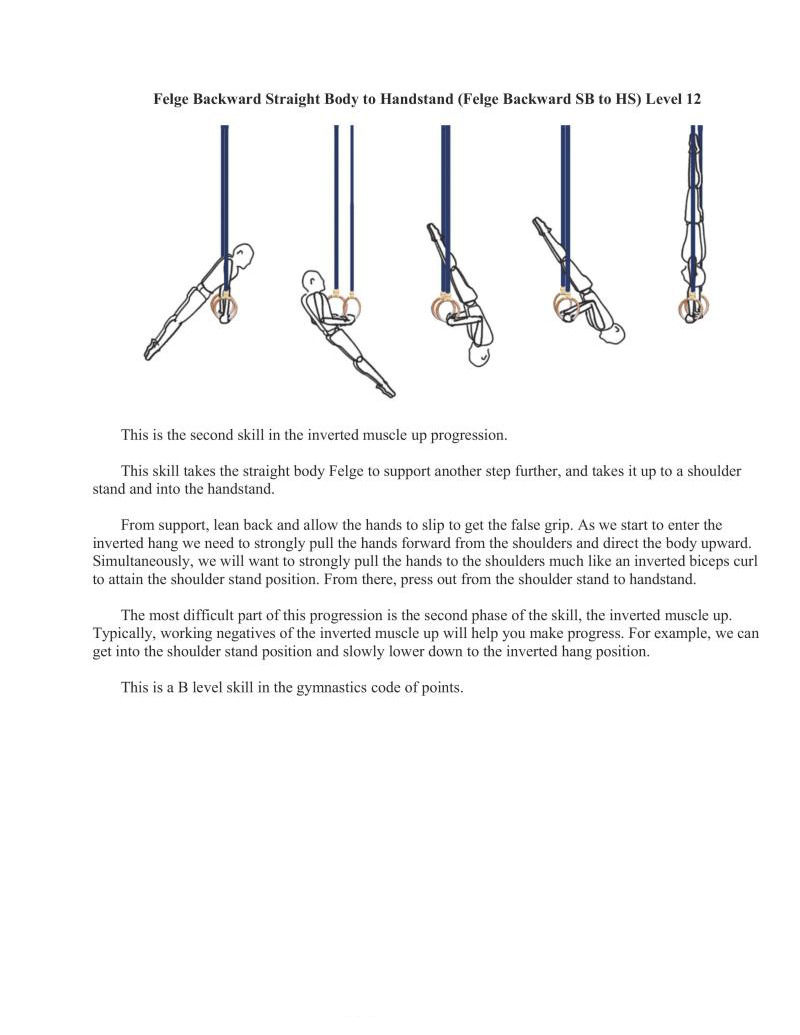
This is the second skill in the inverted muscle up progression.
This skill takes the straight body Felge to support another step further, and takes it up to a shoulder stand and into the handstand.
From support, lean back and allow the hands to slip to gt the false grip. As we start to enter the inverted hang we need to strongly pull the hands forward from the shoulders and dircct the body upward. simultaneously, we will want to strongly pull the hands to the shoulders much like an inverted biceps curl to attain the shoulder stand position. From there, press out from the shoulder stand to handstand.
The most difficult part of this progre: the second phase of the skill, the inverted muscle up. Typically, working negatives of the inverted muscle up will help you make progress. For example, we can get into the shoulder stand position and slowly lower down to the inverted hang position.
This is a B level skill in the gymnastics code of points.
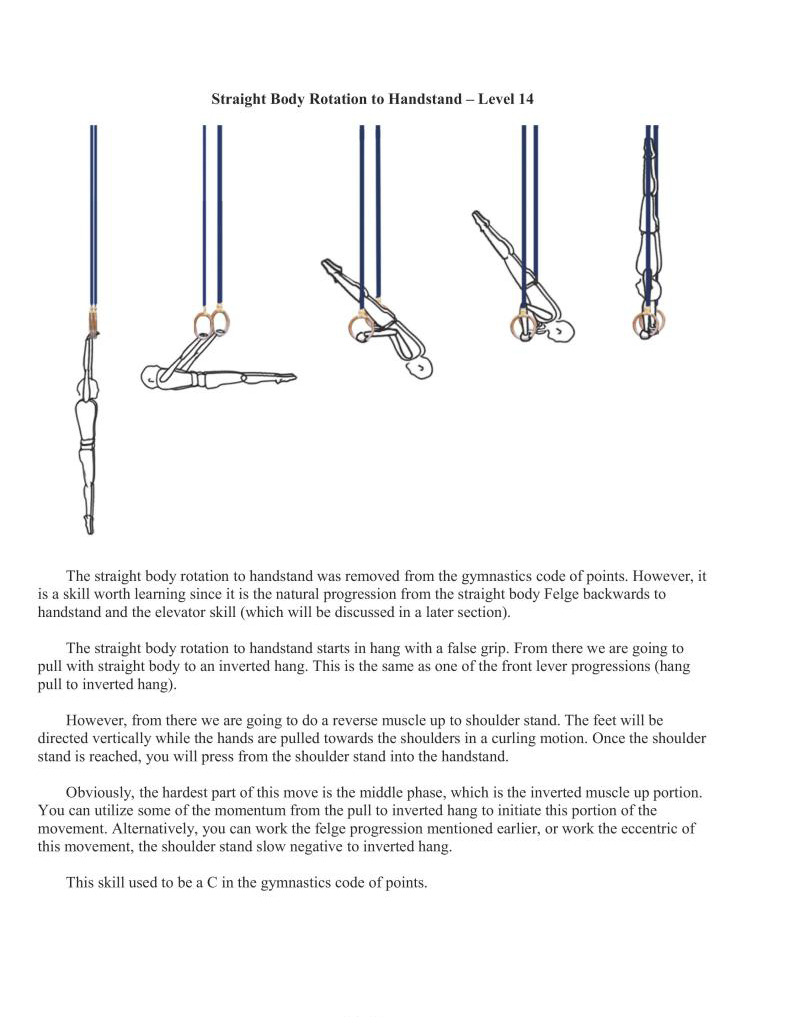
The straight body rotation to handstand was removed from the gymnastics code of points. However, it is a skill worth learning since it is the natural progression from the straight body Felge backwards to handstand and the elevator skill (which will be discussed in a later section).
The straight body rotation to handstand starts in hang with a false grip. From there we are going to pull with straight body to an inverted hang. This is the same as one of the front lever progressions (hang pull to inverted hang).
However, from there we are going to do a reverse muscle up to shoulder stand. The feet will be directed vertically while the hands are pulled towards the shoulders in a curling motion. Once the shoulder stand is reached, you will press from the shoulder stand into the handstand.
Obviously, the hardest part of this move is the middle phase, which i the inverted muscle up portion.
You can utilize some of the momentum from the pull to inverted hang to e this portion of the movement. Alternatively, you can work the felge progression mentioned earlier, or work the eccentric of movement, the shoulder stand slow negative to inverted hang.
This skill used to be a C in the gymnastics code of points.
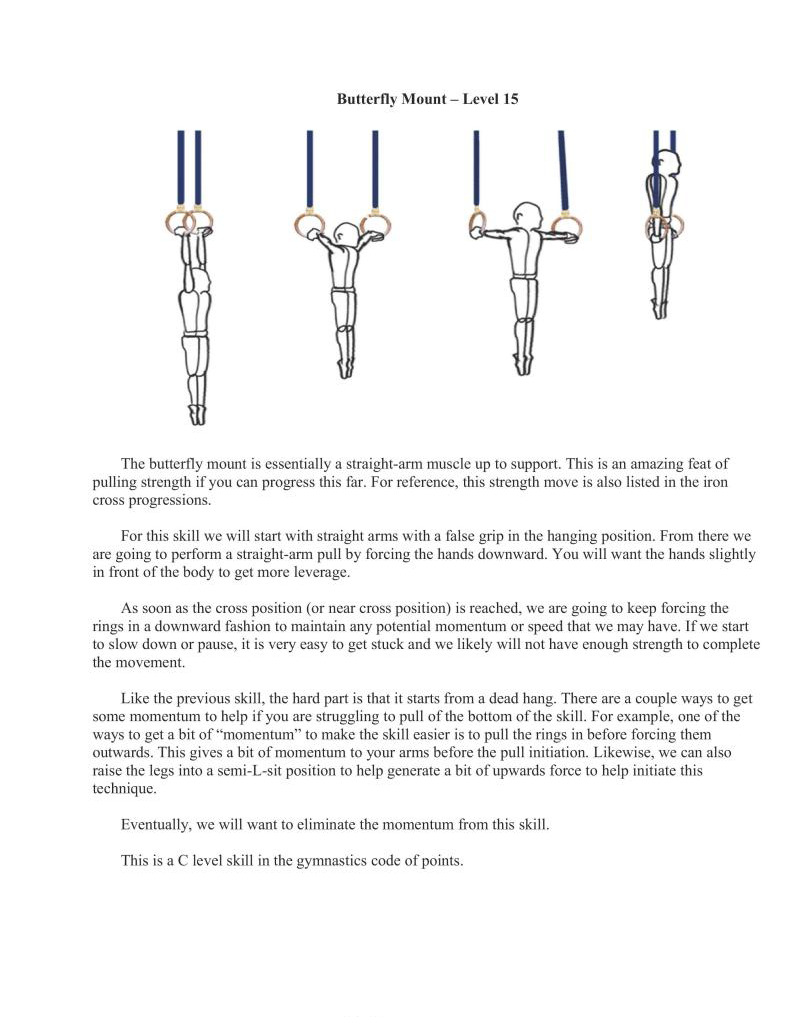
The butterfly mount is essentially a straight-arm muscle up to support. This is an amazing feat of pulling strength if you can progress this far. For reference, this strength move is also listed in the iron cross progressions.
For this skill we will start with straight arms with a false grip in the hanging position. From there we are going to perform a straight-arm pull by forcing the hands downward. You will want the hands slightly in front of the body to get more leverage.
As soon as the cross position (or near cross position) is reached, we are going to keep forcing the rings in a downward fashion to maintain any potential momentum or speed that we may have. If we start to slow down or pause, it is very easy to get stuck and we likely will not have enough strength to complete the movement.
Like the previous skill, the hard part is that it starts from a dead hang. There are a couple ways to get Some momentum to help if you are struggling to pull of the bottom of the skill. For example, one of the ways to get a bit of "momentum" to make the skill easier is to pull the rings in before forcing them outwards. This gives a bit of momentum to your arms before the pull initiation. Likewise, we can also raise the legs into a semi-L-sit position to help generate a bit of upwards force to help initiate this technique.
Eventually, we will want to eliminate the momentum from this skill.
This is a C level skill i the gymnastics code of points.
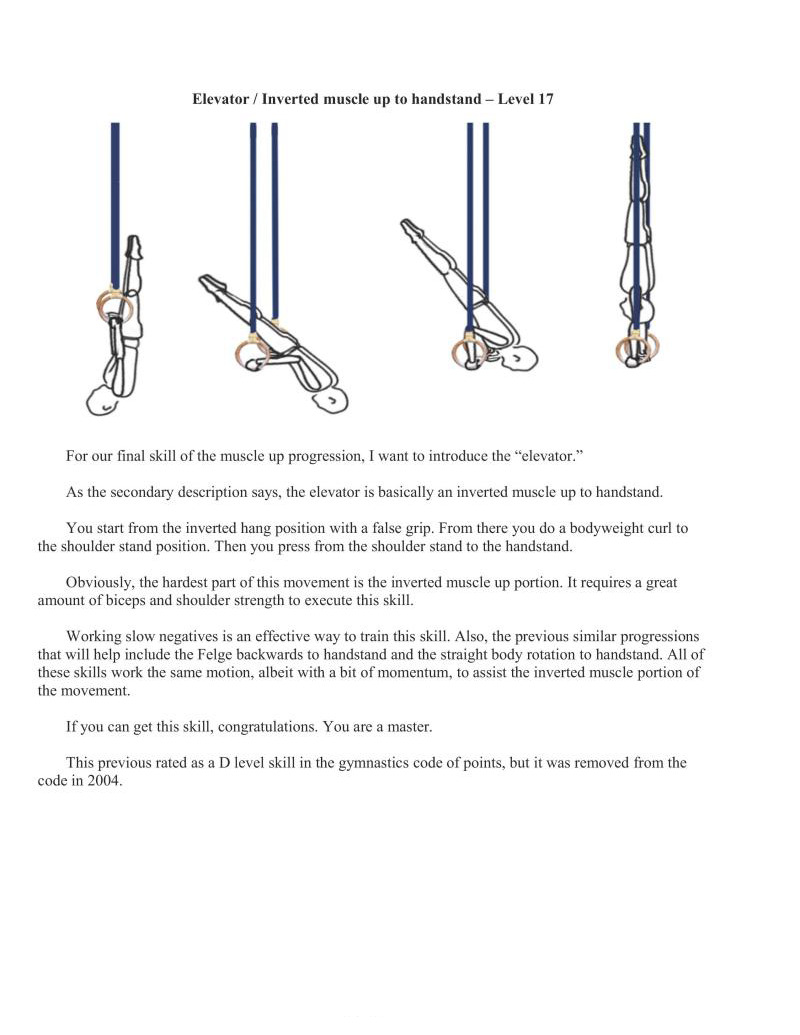
For our final skill of the muscle up progression, I want to introduce the "elevator." As the secondary description says, the elevator is basically an inverted muscle up to handstand.
You start from the inverted hang position with a false grip. From there you do a bodyweight curl to the shoulder stand position. Then you press from the shoulder stand to the handstand.
Obviously, the hardest part of this movement is the inverted muscle up portion. It requires a great amount of biceps and shoulder strength to execute this skill
Working slow negatives is an effective way to train this skill. Also, the previous similar progressions that will help include the Felge backwards to handstand and the straight body rotation to handstand. Al of these skills work the same motion, albeit with a bit of momentum, to assist the inverted muscle portion of the movement.
If you can get this skill, congratulations. You are a master.
This previous rated as a D level skill in the gymnastics code of points, but it was removed from the code in 2004.
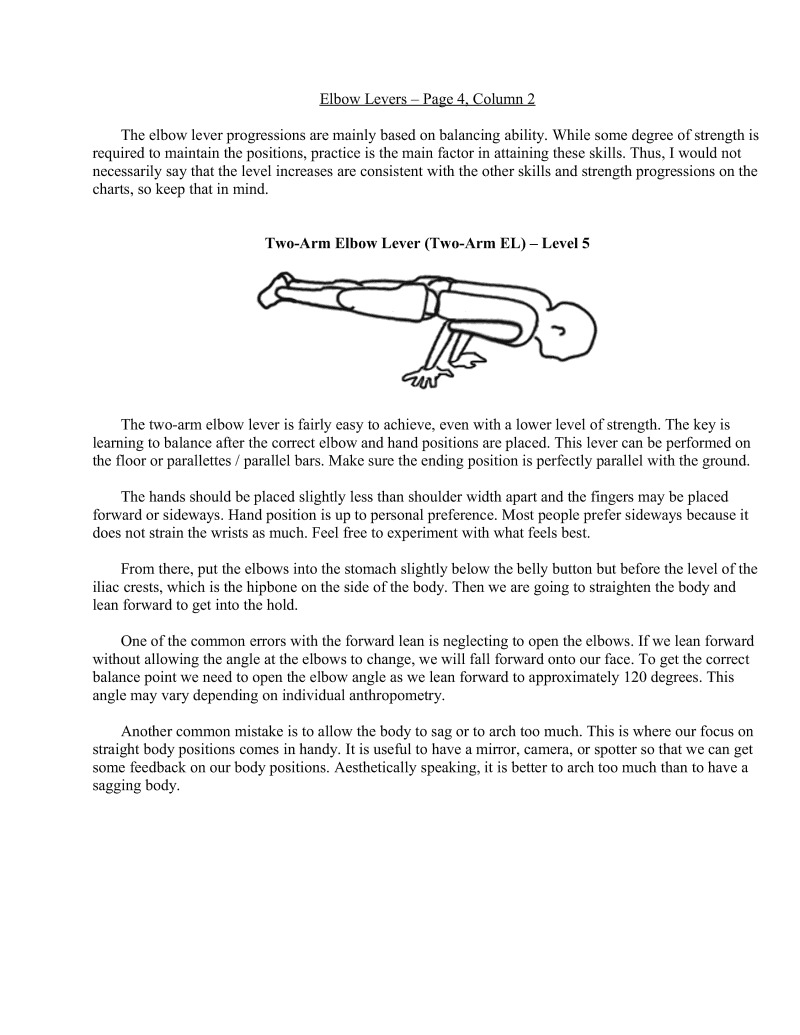
The elbow lever progressions are mainly based on balancing ability. While some degree of strength is required to maintain the positions, practice is the main factor in attaining these skills. Thus, I would not necessarily say that the level increases are consistent with the other skills and strength progressions on the charts, so keep that in mind.
The two-arm elbow lever is fairly easy to achieve, even with a lower level of strength. The key is learning to balance after the correct elbow and hand positions are placed. This lever can be performed on the floor or parallettes / parallel bars. Make sure the ending position is perfectly parallel with the ground.
The hands should be placed slightly less than shoulder width apart and the fingers may be placed forward or sideways. Hand position is up to personal preference. Most people prefer sideways because it does not strain the wrists as much. Feel free to experiment with what feels best
From there, put the elbows into the stomach slightly below the belly button but before the level of the iliac crests, which is the hipbone on the side of the body. Then we are going to straighten the body and lean forward (o get into the hold.
One of the common errors with the forward lean is neglecting to open the elbows. If we lean forward without allowing the angle at the elbows to change, we will fall forward onto our face. To get the correct balance point we need to open the elbow angle as we lean forward to approximately 120 degrees. This angle may vary depending on individual anthropometry.
Another common mistake is to allow the body to sag or to arch too much. This is where our focus on straight body positions comes in handy. It is useful to have a mirror, camera, or spotter so that we can get some feedback on our body positions. Aesthetically speaking, it is better to arch too much than to have a sagging body.
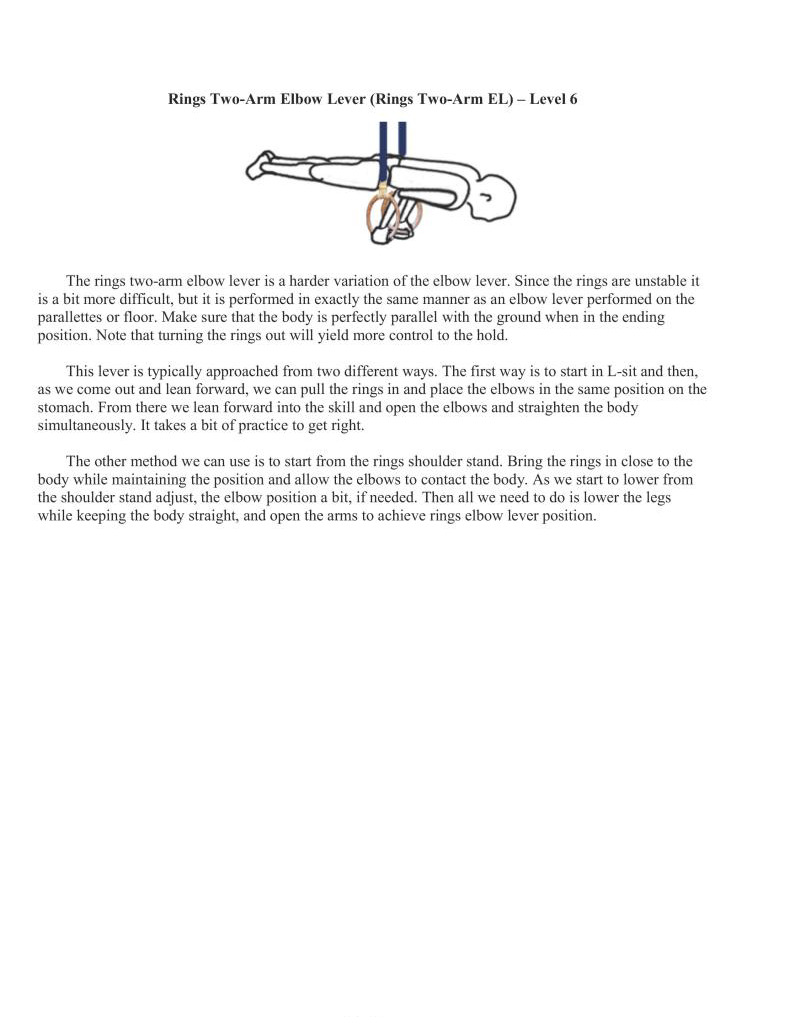
The rings two-arm elbow lever is a harder variation of the elbow lever. Since the rings are unstable it is a bit more difficult, but it is performed in exactly the same manner as an elbow lever performed on the parallettes or floor. Make sure that the body is perfectly parallel with the ground when in the ending position. Note that turning the rings out will yield more control to the hold.
This lever is typically approached from two different ways. The first way is to start in L-sit and then, as we come out and lean forward, we can pull the rings in and place the elbows in the same position on the stomach. From there we lean forward into the skill and open the elbows and straighten the body simultaneously. It takes a bit of practice to get right.
The other method we can use is to start from the rings shoulder stand. Bring the rings in close to the body while maintaining the position and allow the elbows to contact the body. As we start to lower from the shoulder stand adjust, the elbow position a bit, if needed. Then all we need to do is lower the legs. while keeping the body straight, and open the arms to achieve rings elbow lever position.

The one-arm straddle elbow lever requires a decent amount of strength to perform correctly, because it is a balance skill as much as it is a strength skill for the balancing arm. The stronger we are both in pushing and pulling, the easier it is to control the skill. From there, it just takes a litte bit of practice. Thus, if we are having trouble performing this skill, it may be a good idea to focus on strength training, because it will help significantly.
Like the two-arm elbow levers, the elbow will be placed in the same position: slightly inside shoulder width, a bit below the navel but slightly above the iliac crest.
The hand placement for this skill is also variable. It is possible to do it with hands forwards, sideways or backwards. The hand position that works best, from a balancing perspective, is to align the body with the thumb. This is essentially the hands sideways position. Feel free to experiment with hand to find your preference.
Because there is only one point of balance, this skill is inherently unstable. We have to compensate for this instability through other means. Curving the body toward the hand that is balancing is one way to help balance correctly.
Exclusively with the straddle variation, we can manipulate the legs more towards the arm to help with balance. The straight body version, however, does not allow this, so it is not recommended to rely on this method for your balance in the long term. To focus on moving towards the straight body version, slightly rotate the side away from the hand, up towards the ceiling. While this is initially more challenging, it is ultimately more effective,
When starting to move into this hold remember the balance techniques mentioned above. Remember, we need to extend the elbows so that we get the elbow angle to about 120 degrees, just like two armed elbow levers. From there it is just manipulating the forearm muscles and possibly the lbows slightly to balance the body. We want to avoid moving the body as much as possible, because that makes the skill unstable overall. Remember, the forearms should provide the primary means for balance.
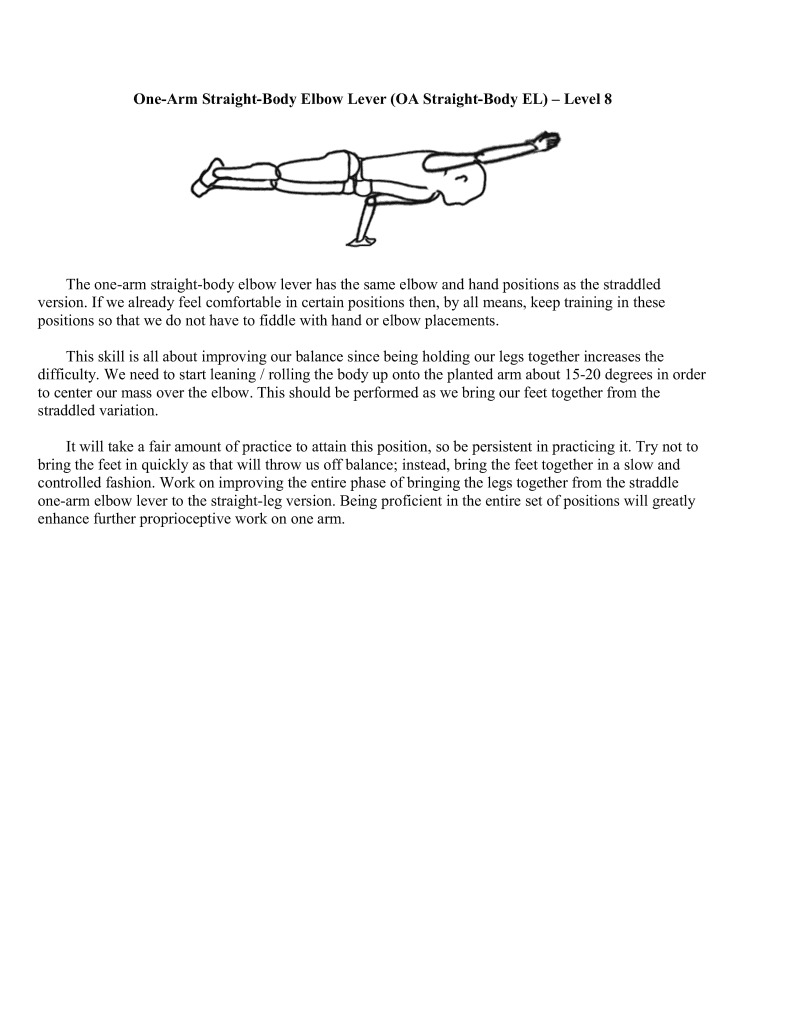
The one-arm straight-body elbow lever has the same elbow and hand positions as the straddled version. If we already feel comfortable in certain positions then, by all means, keep training in these positions so that we do not have to fiddle with hand or elbow placements.
This skill is all about improving our balance since being holding our legs together increases the difficulty. We need to start leaning / rolling the body up onto the planted arm about 15-20 degrees in order 1o center our mass over the elbow. This should be performed as we bring our feet together from the straddled variation.
It will take a fair amount of practice to attain this position, so be persistent in practicing it. Try not to bring the feet in quickly as that will throw us off balance; instead, bring the feet together in a slow and controlled fashion. Work on improving the entire phase of bringing the legs together from the straddle one-arm elbow lever to the straight-leg version. Being proficient in the entire set of positions will greatly enhance further proprioceptive work on one arm.
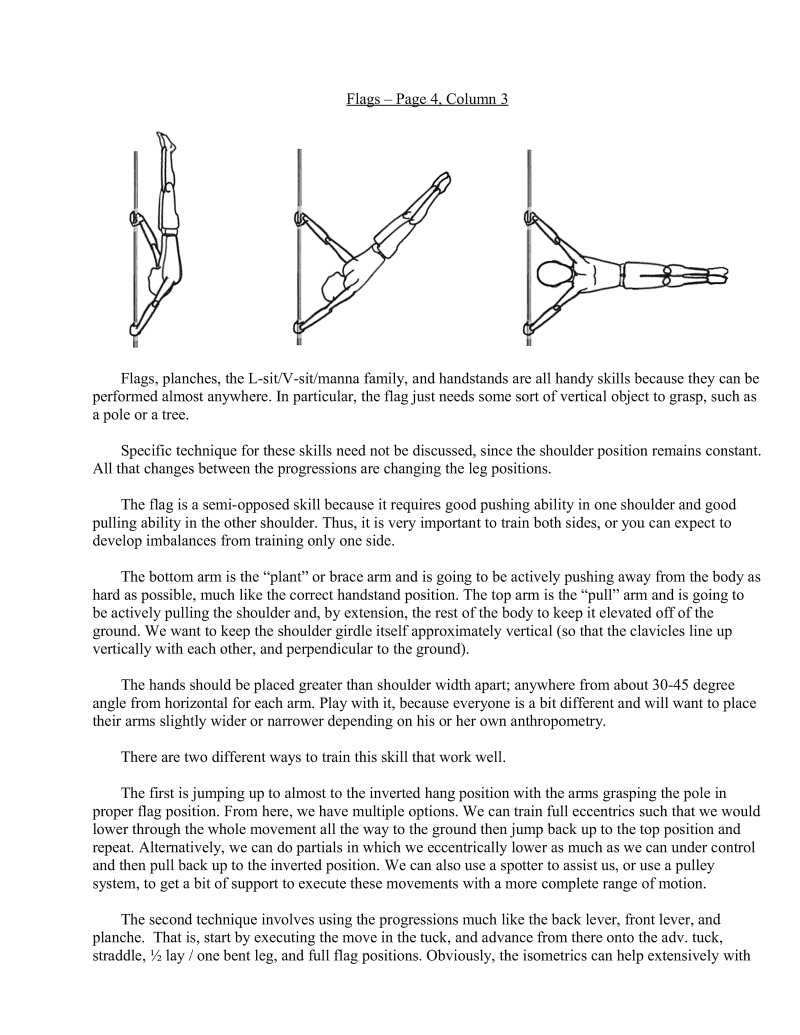
Flags, planches, the L-sit/V-sit/manna family, and handstands are all handy skills because they can be performed almost anywhere. In particular, the flag just needs some sort of vertical object to grasp, such as a pole or a tree.
Specific technique for these skills need not be discussed, since the shoulder position remains constant. All that changes between the progressions are changing the leg positions.
The flag is a semi-opposed skill because it requires good pushing ability in one shoulder and good pulling ability in the other shoulder. Thus, it is very important to train both sides, or you can expect to develop imbalances from training only one side.
The bottom arm is the "plant" or brace arm and is going to be actively pushing away from the body as hard as possible, much like the correct handstand position. The top arm is the "pull" arm and is going to
be actively pulling the shoulder and, by extension, the rest of the body to keep it elevated off of the ground. We want to keep the shoulder girdle itself approximately vertical (so that the clavicles line up vertically with each other, and perpendicular to the ground)
The hands should be placed greater than shoulder width apart; anywhere from about 3045 degree angle from horizontal for each arm. Play with it, because everyone is a bit different and will want to place
their arms slightly wider or narrower depending on his or her own anthropometry.
There are two different ways to train this skill that work well.
The firstis jumping up to almost to the inverted hang position with the arms grasping the pole in proper flag position. From here, we have multiple options. We can train full eccentrics such that we would lower through the whole movement all the way to the ground then jump back up to the top position and repeat. Alternatively, we can do partials in which we eccentrically lower as much as we can under control and then pull back up to the inverted position. We can also use a spotter to assist us, or use a pulley system, to get a bit of support to execute these movements with a more complete range of motion.
The second technique involves using the progressions much like the back lever, front lever, and planche. That i, start by exceuting the move in the tuck, and advance from there onto the adv. fuck, straddle, Y lay / one bent leg, and full flag positions. Obviously, the isometrics can help extensively with
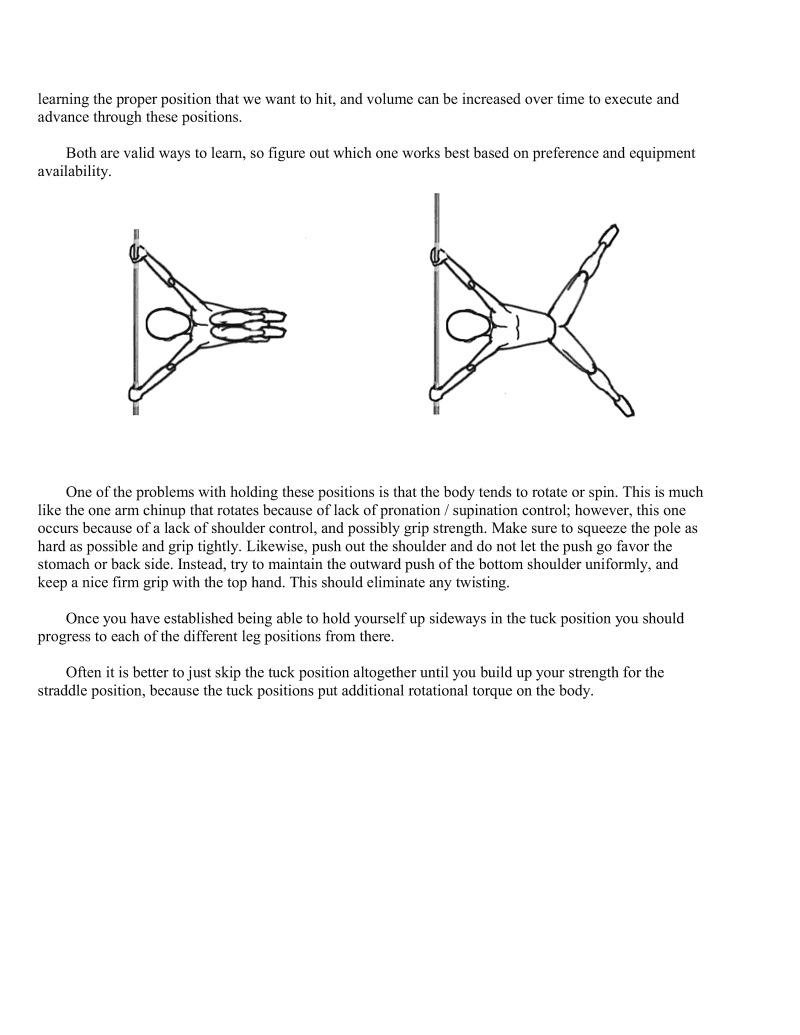
learning the proper position that we want to hit, and volume can be increased over time to execute and advance through these positions
Both are valid ways to learn, so figure out which one works best based on preference and equipment availability.
One of the problems with holding these positions is that the body tends to rotate or spin. This is much like the one arm chinup that rotates because of lack of pronation / supination control; however, this one occurs because of a lack of shoulder control, and possibly grip strength. Make sure to squecze the pole as hard as possible and grip tightly. Likewise, push out the shoulder and do not let the push go favor the stomach or back side. Instead, iry to maintain the outward push of the bottom shoulder uniformly, and keep a nice firm grip with the top hand. This should eliminate any twisting.
Once you have established being able to hold yourself up sideways in the tuck position you should progress to each of the different leg positions from there.
often it is beer to just skip the tuck position altogether until you build up your strength for the straddle position, because the tuck positions put additional rotational torque on the body.
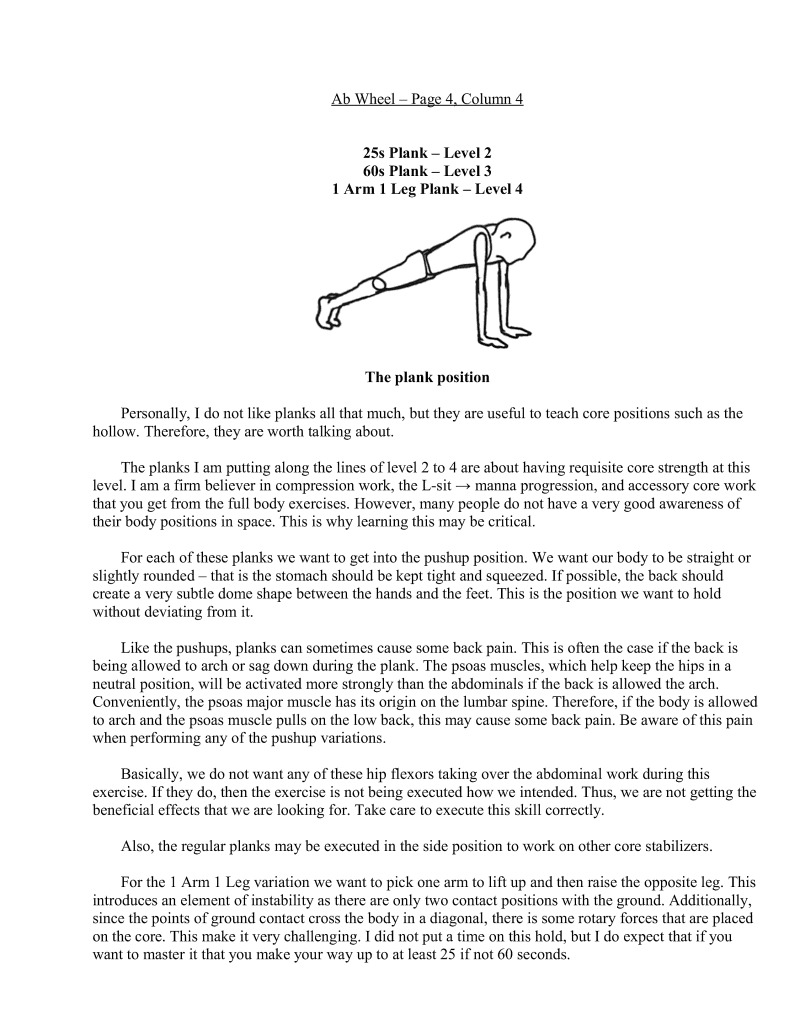
25s Plank — Level 2 60s Plank — Level 3 1 Arm 1 Leg Plank — Level 4
Personally, I do not like planks all that much, but they are useful to teach core positions such as the hollow. Therefore, they are worth talking about.
The planks I am putting along the lines of level 2 to 4 are about having requisite core strength at this level. I am a firm believer in compression work, the L-sit — manna progression, and accessory core work that you get from the full body exercises. However, many people do not have a very good awareness of their body positions in space. This is why learning this may be critical.
For each of these planks we want to get into the pushup position. We want our body to be straight or slightly rounded — that is the stomach should be kept tight and squeezed. If possible, the back should create a very subtle dome shape between the hands and the feet. This is the position we want to hold without deviating from it
Like the pushups, planks can sometimes cause some back pain. This is often the case if the back is being allowed to arch or sag down during the plank. The psoas muscles, which help keep the hips in a neutral position, will be activated more strongly than the abdominals if the back is allowed the arch. Conveniently, the psoas major muscle has its origin on the lumbar spine. Therefore, if the body is allowed to arch and the psoas muscle pulls on the low back, this may cause some back pain. Be aware of this pain when performing any of the pushup variations.
Basically, we do not want any of these hip flexars taking over the abdominal work during this exercise. If they do, then the exercise is not being executed how we intended. Thus, we are not getting the beneficial effects that we are looking for. Take care to execute this skill correctly.
Also, the regular planks may be executed in the side position to work on other core stabilizers.
For the 1 Arm 1 Leg variation we want to pick one arm to lift up and then raise the opposite leg. This introduces an element of instability as there are only two contact positions with the ground. Additionally, since the points of ground contact cross the body in a diagonal, there is some rotary forces that are placed on the core. This make it very challenging. I did not put a time on this hold, but I do expect that if you want to maser it that you make your way up to at least 25 if not 60 scconds.
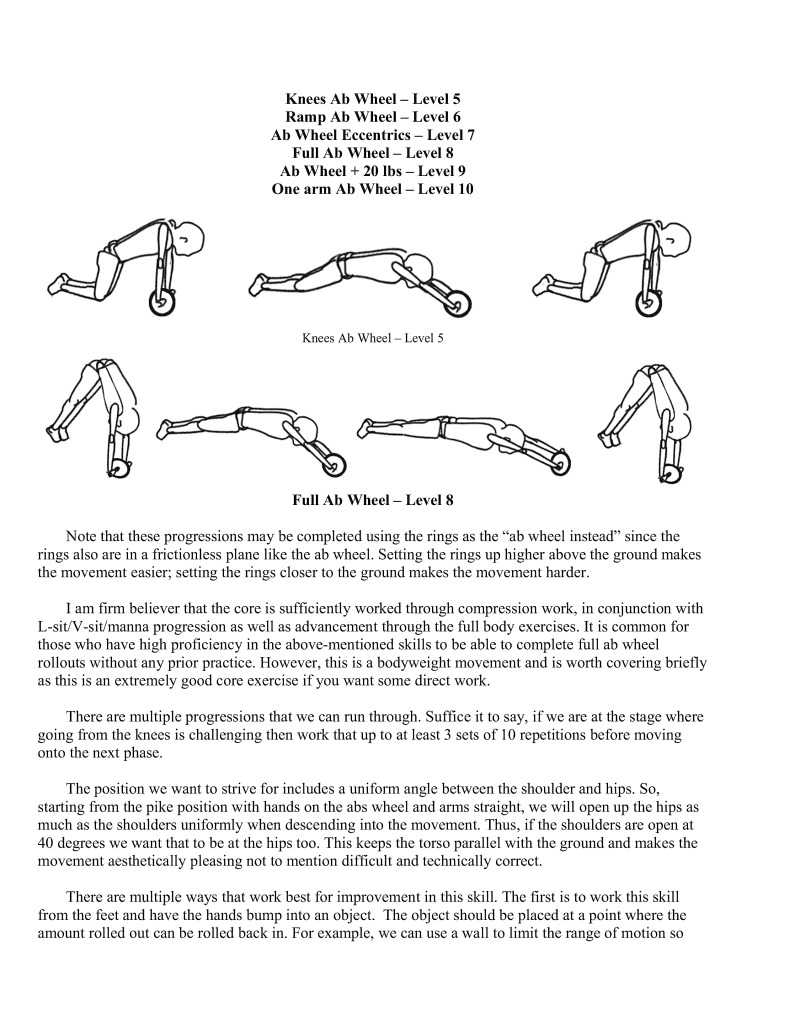
Note that these progressions may be completed using the rings as the "ab wheel instead" since the rings also are in a frictionless plane like the ab wheel. Setting the rings up higher above the ground makes the movement easier; seting the rings closer to the ground makes the movement harder.
I am firm believer that the core is sufficiently worked through compression work, in conjunction with L-sit/V-sit/manna progression as well as advancement through the full body exercises. It is common for those who have high proficiency in the above-mentioned skills to be able to complete full ab wheel rollouts without any prior practice. However, this is a bodyweight movement and is worth covering briefly as this is an extremely good core exercise if you want some direct work
There are multiple progressions that we can run through. Suffice it to say, if we are at the stage where going from the knees is challenging then work that up to at least 3 sets of 10 repetitions before moving onto the next phase.
The position we want to strive for includes a uniform angle between the shoulder and hips. So, starting from the pike position with hands on the abs wheel and arms straight, we will open up the hips as much as the shoulders uniformly when descending into the movement. Thus, if the shoulders are open at 40 degrees we want that to be at the hips too. This keeps the torso parallel with the ground and makes the movement aesthetically pleasing not to mention difficult and technically correct,
There are multiple ways that work best for improvement in this skill. The first is to work this skill from the feet and have the hands bump into an object. The object should be placed at a point where the amount rolled out can be rolled back in. For example, we can use a wall to limit the range of motion so that we go down to a range of motion just before we would collapse. This allows us to progressively back up the feet further and further away from the wall as we progress.
As a second option, and the one I noted on the chart for level 6, you can start to work the ab wheel on an upwards sloping ramp. This will provide some resistance towards moving outwards as you go out further. Obviously, the slope of the ramp makes a huge difference in how hard the movement is. Therefore, if you are having a lot of trouble with the movement a higher slope will be needed to work your way down.
As a third option, we can utilize slow eccentric movements to build up towards the concentric movement. This is the level 7 variation on the chart. We can start the movement on flat ground and extend outas slowly and controlled as possible. As we reach the point where we collapse, go to the knees and finish going to the ground. Then, as we pull back in from being fully extended, once we are at the position where we can support all the way from feet again, we should pop up from the knees back onto the feet and finish. This method ensures that we do the whole movement.
Al of these approaches have worked, 5o the best method for an individual will be based mainly on preference.
There is one injury aspect I would like to talk about. The ab wheel is not a lower back exercise. This means that you should not be feeling it in your back. If you feel this movement in your back this means that your hip flexors, particular your psoas major, is firing too much. While the psoas major is part of the chain that connect the core, it has origins on the lumbar spine. Therefore, if you feel any undue discomfort o pain in the low back that means that psoas major muscle is way too overactive at this point in time. Therefore, back off on the progression until you can get a nice solid rollout without having any discomfort in the low back. The last thing you want to do is strain your back and have to take time off from training.
There are multiple ways to make the ab wheel harder that vary by difficulty. I am going to include a couple of these variations on the chart, but I am not going to provide pictures for them.
For example, one of the way is to make these significantly harder is to start adding a weighted vest to them. Obviously, since the weighted vest is at the core, it will exert downward force in the middle of the movement. Thus, it will make the core on the opposite side work sufficiently harder. I have included a level 9 skill as adding a 20 lbs weighted vest.
Likewise, to tax the rotary and stability of both the core and shoulder more you can remove limbs from the equation. For example, the level 10 ab wheel variation is to only use one arm. You will need an ab wheel with two wheels on the outside of the handles to do this variation. Since you are only using one am, like the one arm pushup, there will be a rotation torque along the body as you go further down. Also, instead of the weight on both shoulders, there will only be weight on the single shoulder which makes it much harder. Clearly, you can build up to the one arm rollout by utilizing the same techniques as to build up to the two arm rollout: using a wall, using a ramp, and using eccentrics.
Additionally, to make even the one arm rollout harder you can start adding a weight vest or remove another component such as one of the legs while you are performing the skill. The possibilities are limitless.
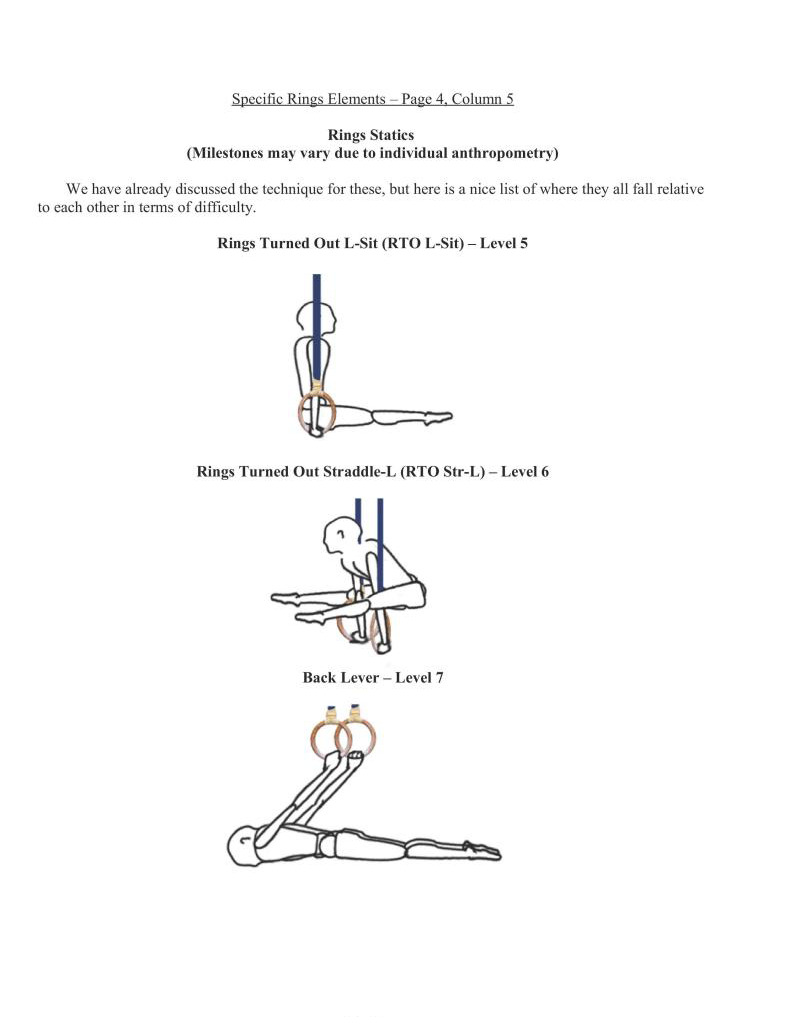
(Milestones may vary due to individual anthropometry)
We have already discussed the technique for these, but here is a nice list of where they all fall relative to each other in terms of difficulty.
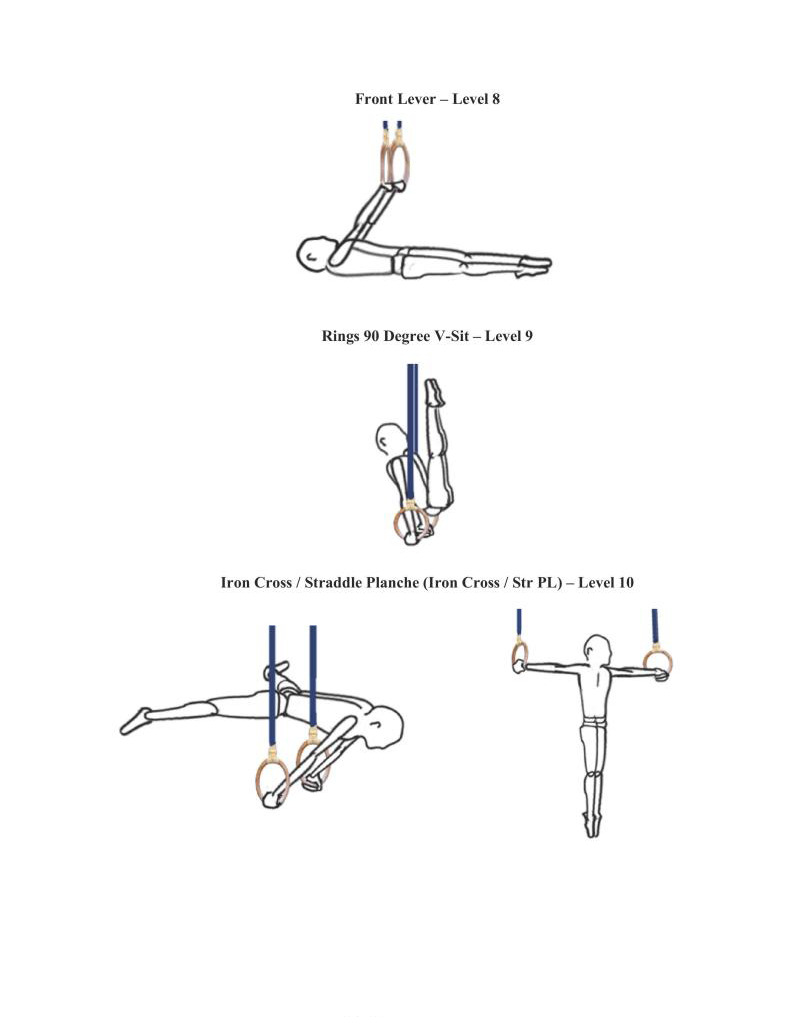
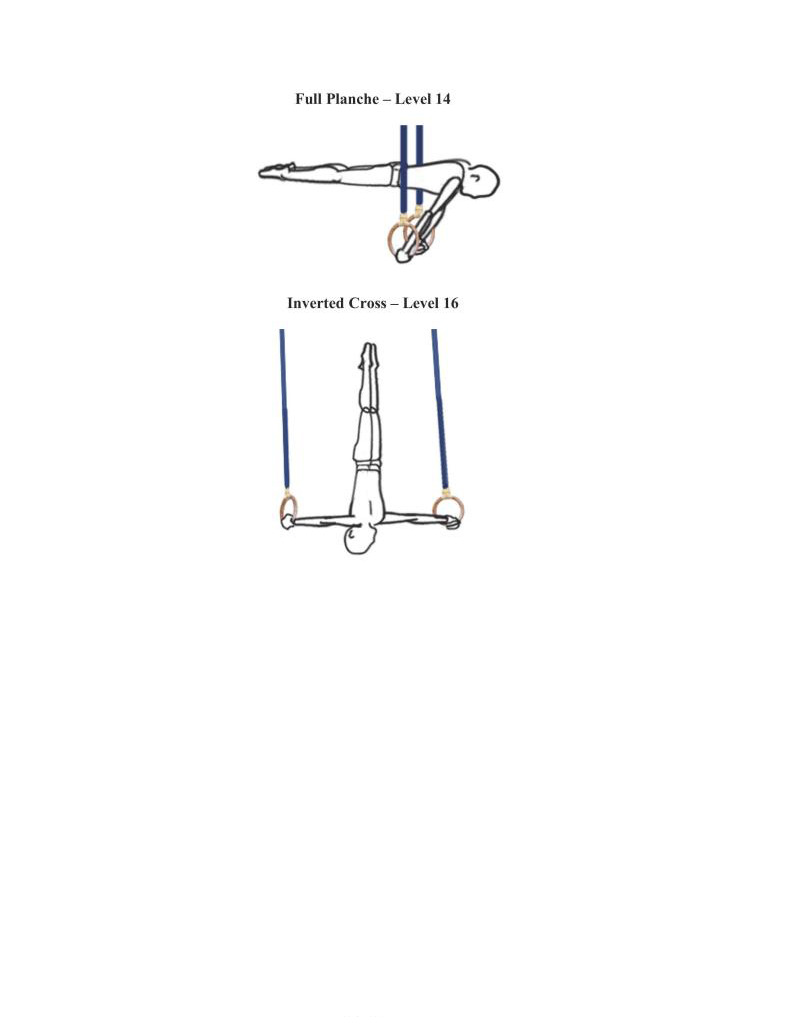
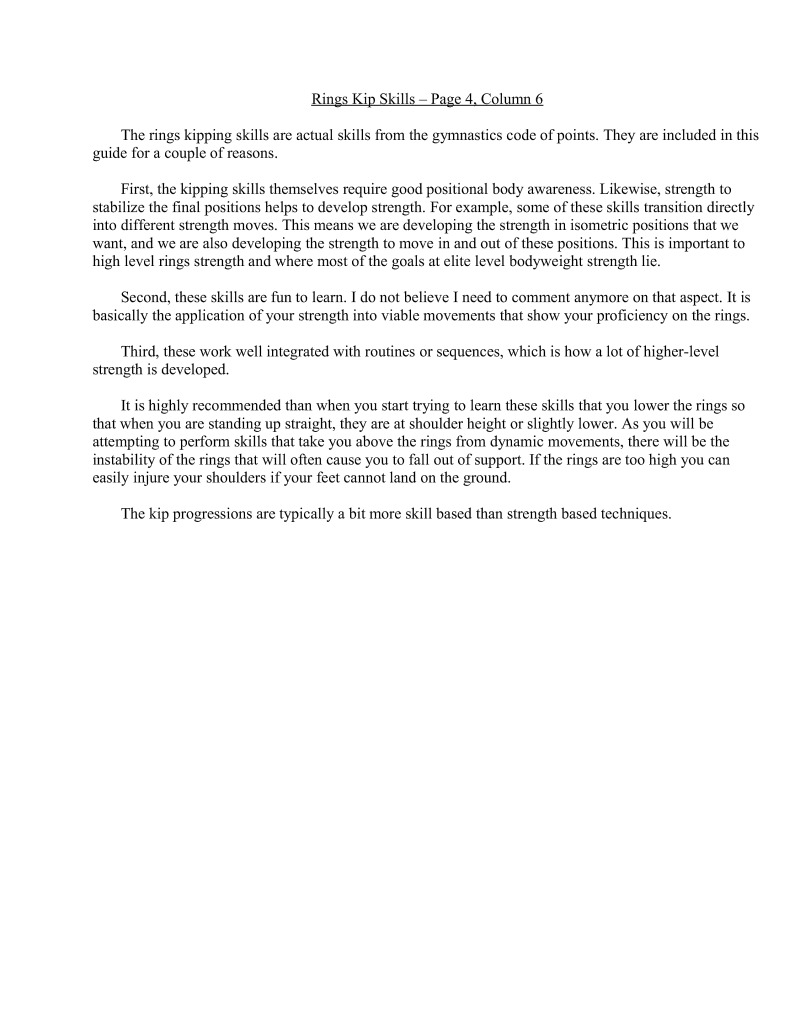
The rings kipping skills are actual skills from the gymnastics code of points. They are included in this. guide for a couple of reasons.
First, the kipping skills themselves require good positional body awareness. Likewise, strength to stabilize the final positions helps to develop strength. For example, some of these skills transition directly into different strength moves. This means we are developing the strength in isometric positions that we want, and we are also developing the strength to move in and out of these positions. This is important to high level rings strength and where most of the goals at elite level bodyweight strength lc.
Second, these skills are fun to learn. I do not believe I need to comment anymore on that aspect. It is basically the application of your strength into viable movements that show your proficiency on the rings.
Third, these work well integrated with routines or sequences, which is how a lot of higher-level strength is developed.
It is highly recommended than when you start rying to learn these skills that you lower the rings so that when you are standing up straight, they are at shoulder height or slightly lower. As you will be attempting to perform skills that take you above the rings from dynamic movements, there will be the instability of the rings that will often cause you to fall out of support, If the rings are too high you can easily injure your shoulders if your feet cannot land on the ground.
The kip progressions are typically a bit more skill based than strength based techniques.
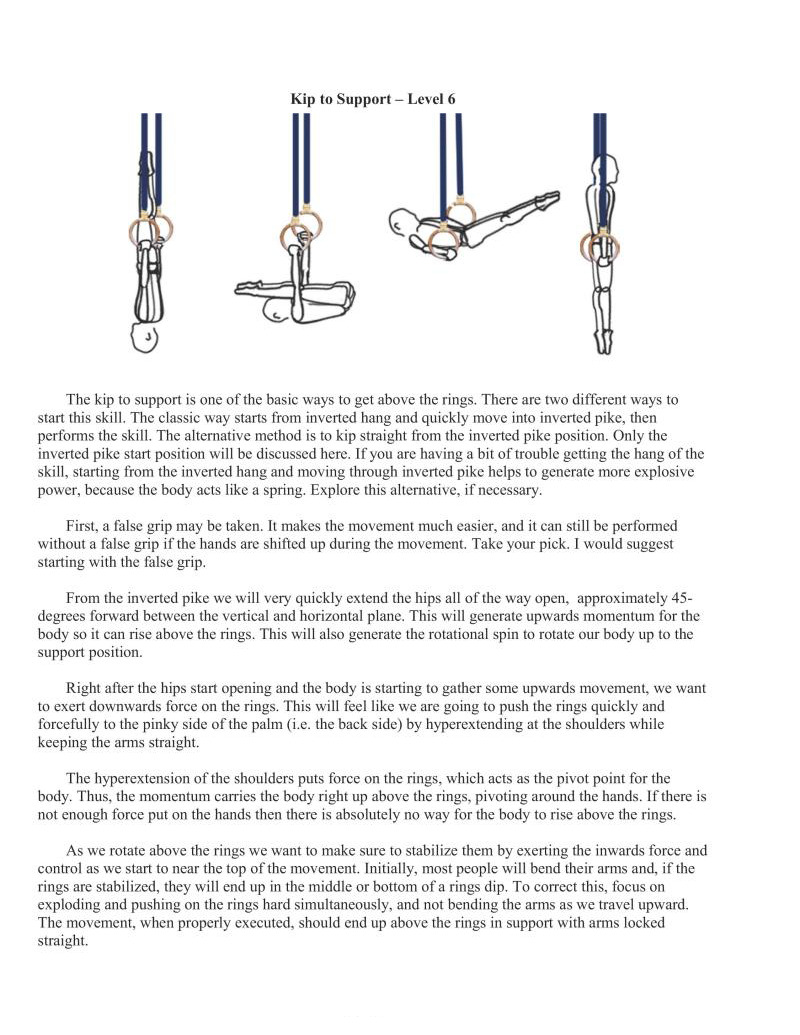
The kip to support is one of the basic ways to get above the rings. There are two different ways to start this skill. The classic way starts from inverted hang and quickly move into inverted pike, then performs the skill. The alternative method is to kip straight from the inverted pike position. Only the inverted pike start position will be discussed here. If you are having a bit of trouble getting the hang of the skill, starting from the inverted hang and moving through inverted pike helps to generate more explosive power, because the body acts like a spring. Explore this alternative, if necessary.
First, a false grip may be taken. It makes the movement much easier, and it can still be performed without a false grip if the hands are shified up during the movement. Take your pick. I would suggest starting with the false grip.
From the inverted pike we will very quickly extend the hips all of the way open, approximately 45- degrees forward between the vertical and horizontal plane. This will generate upwards momentum for the body so it can rise above the rings. This will also generate the rotational spin to rotate our body up to the support position.
Right after the hips start opening and the body is starting to gather some upwards movement, we want to exert downwards force on the rings. This will feel like we are going to push the rings quickly and forcefully to the pinky side of the palm (ic. the back side) by hyperextending at the shoulders while keeping the arms straight
The hyperextension of the shoulders puts force on the rings, which acts as the pivot point for the body. Thus, the momentum carries the body right up above the rings, pivoting around the hands. If there is not enough force put on the hands then there is absolutely no way for the body to rise above the rings.
As we rotate above the rings we want to make sure to stabilize them by exerting the inwards force and control as we start to near the top of the movement. Iniially, most people will bend their arms and, if the rings are stabilized, they will end up in the middle or bottom of a rings dip. To correct this, focus on exploding and pushing on the rings hard simultaneously, and not bending the arms as we travel upward. The movement, when properly excuted, should end up above the rings in support with arms locked straight.
Once you start getting the hang of the skill, typically you will end up in the transition phase of the muscle up or in the decp part of the dip. This usually implied at least
one of a few possible problems. First, as mentioned, you may not be exerting enough force through the rings. Second, it is possible that your explosiveness out of the inverted pike position is lacking. Third, it could be a combination of the coordination between the first and second elements involved in the movement.
Keep practicing. If you are still having serious issues, then attempt to get advice from people who know how to execute the skill well or have coaching experience. It will come with practice though.
This is an A level skill i the gymnastics code of points.
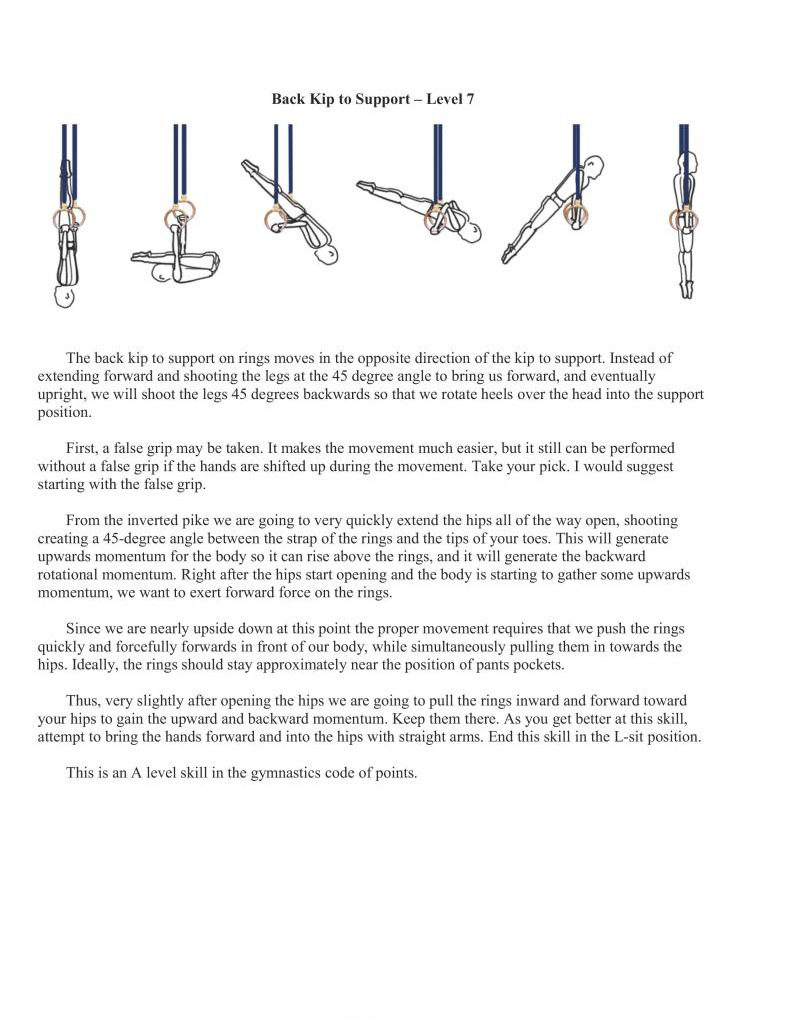
The back kip to support on rings moves in the opposite dircction of the kip to support. Instead of extending forward and shooting the legs at the 45 degree angle to bring us forward, and eventually upright, we will shoot the legs 45 degrees backwards so that we rotate heels over the head into the support position.
First, a false grip may be taken. It makes the movement much easier, but it still can be performed without a false grip if the hands are shified up during the movement. Take your pick. I would suggest starting with the false grip.
From the inverted pike we are going to very quickly extend the hips all of the way open, shooting creating a 45-degree angle between the strap of the rings and the tips of your toes. This will generate upwards momentum for the body so it can rise above the rings, and it will generate the backward rotational momentum. Right after the hips start opening and the body is starting to gather some upwards momentum, we want to exert forward force on the rings.
ce we are nearly upside down at this point the proper movement requires that we push the rings quickly and forcefully forwards in front of our body, while simultaneously pulling them in towards the hips. Ideally, the rings should stay approximately near the position of pants pockets.
Thus, very slightly after opening the hips we are going to pull the rings inward and forward toward your hips to gain the upward and backward momentum. Keep them there. As you get better at this skill, attempt to bring the hands forward and into the hips with straight arms. End this skill in the L-sit position.
This is an A level skill in the gymnastics code of points.
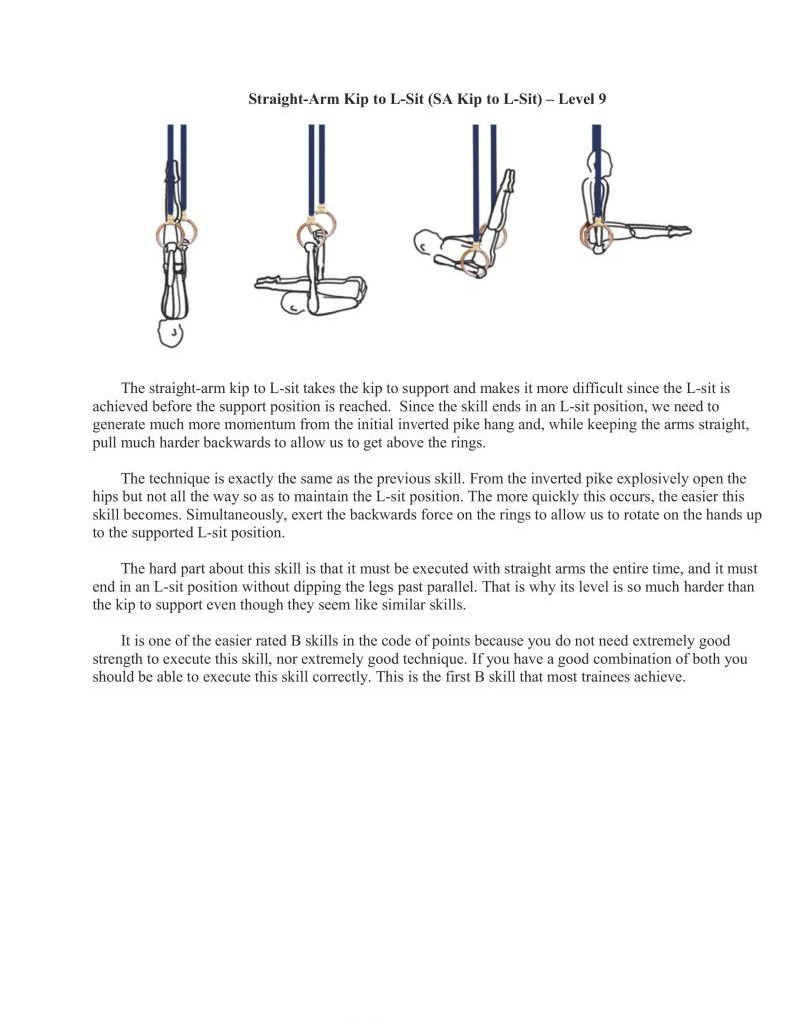
The straight-arm kip to L-sit takes the kip to support and makes it more difficult since the L-sit is achieved before the support position is reached. Since the skill ends in an L-sit position, we need to generate much more momentum from the initial inverted pike hang and, while keeping the arms straight, pull much harder backwards to allow us to get above the rings.
The technique is exactly the same as the previous skill. From the inverted pike explosively open the hips but not all the way so as to maintain the L-sit position. The more quickly this occurs, the easier this skill becomes. Simultaneously, exert the backwards force on the rings to allow us to rotate on the hands up. o the supported L-sit position.
The hard part about this skill is that it must be executed with straight arms the entire time, and it must end in an L-sit position without dipping the legs past parallel. That is why its level is so much harder than the kip to support even though they seem like similar skills.
It is one of the easier rated B skills in the code of points because you do not need extremely good strength to execute this skill, nor extremely good technique. If you have a good combination of both you should be able to execute this skill correctly. This is the first B skill that most trainees achieve.
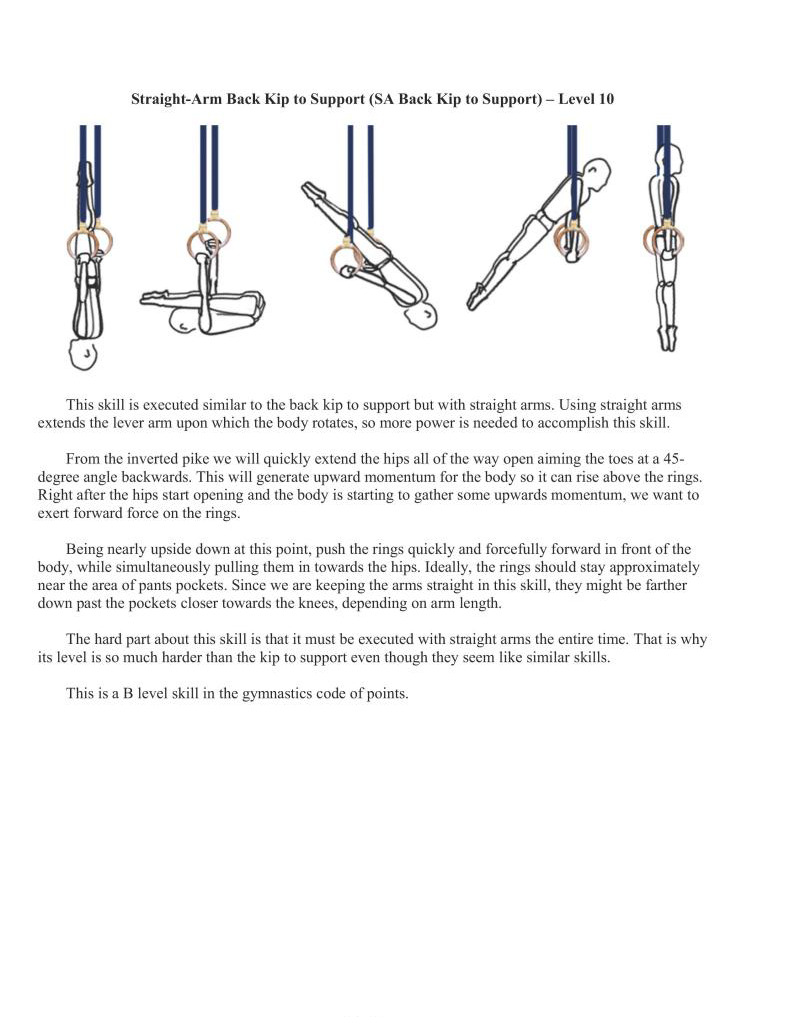
This skill is executed similar to the back kip to support but with straight arms. Using straight arms extends the lever arm upon which the body rotates, so more power is needed to accomplish this skill
From the inverted pike we will quickly extend the hips all of the way open aiming the toes at a 45- degree angle backwards. This will generate upward momentum for the body so it can rise above the rings. Right after the hips start opening and the body is starting to gather some upwards momentum, we want o exert forward force on the rings.
Being nearly upside down at this point, push the rings quickly and forcefully forward in front of the body, while simultaneously pulling them in towards the hips. Ideally, the rings should stay approximately near the area of pants pockets. Since we are keeping the arms straight in this skill, they might be farther down past the pockets closer towards the knees, depending on arm length.
The hard part about this skill is that it must be executed with straight arms the entire time. That is why its level is so much harder than the kip to support even though they seem like similar skills.
This is a B level skill in the gymnastics code of points.
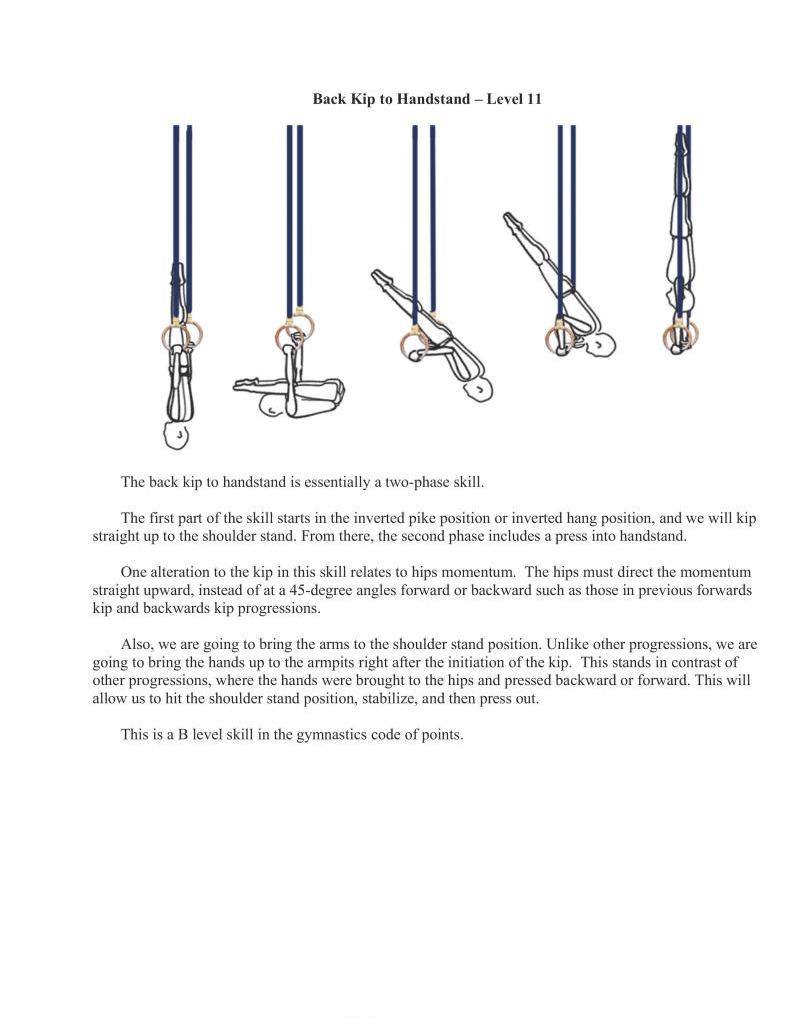
The back kip to handstand is essentially a two-phase skill
The first part of the skill starts in the inverted pike position or inverted hang position, and we will kip straight up to the shoulder stand. From there, the second phase includes a press into handstand.
One alteration to the kip in this skill relates to hips momentum. The hips must dircet the momentum raight upward, instead of at a 45-degree angles forward or backward such as those in previous forwards kip and backwards kip progressions.
Also, we are going to bring the arms to the shoulder stand position. Unlike other progressions, we are going to bring the hands up to the armpits right after the initiation of the kip. This stands in contrast of other progressions, where the hands were brought to the hips and pressed backward or forward. This will allow us to hit the shoulder stand position, stabilize, and then press out.
This is a B level skill in the gymnastics code of points
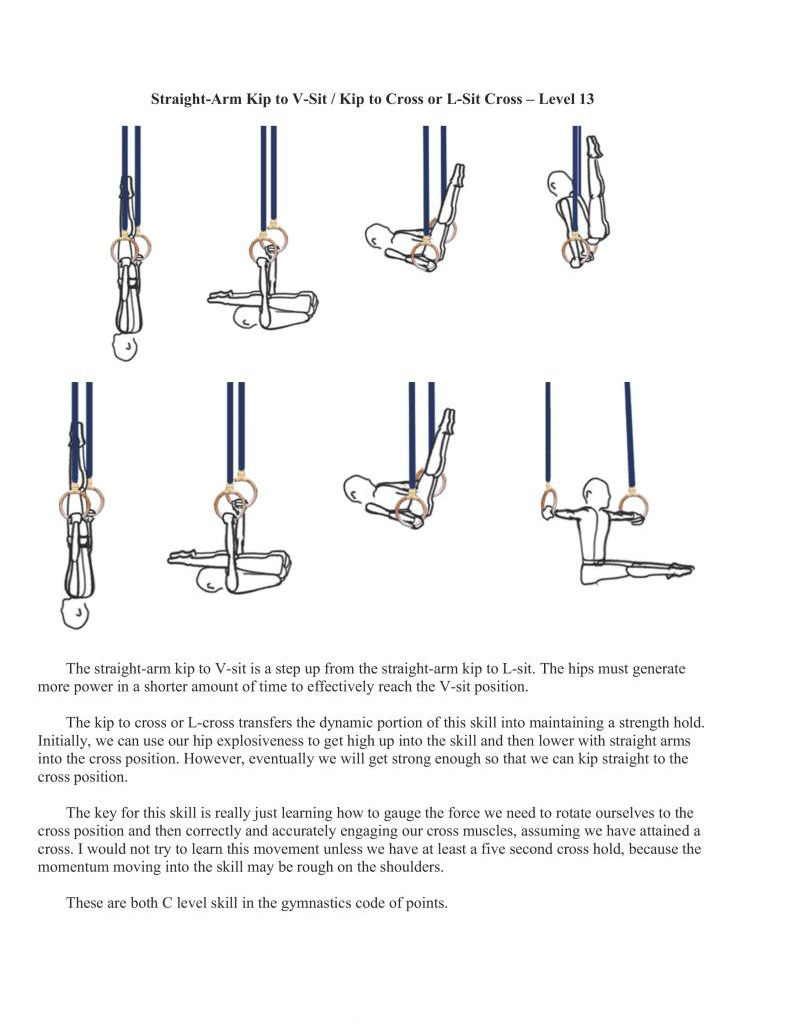
The straight-arm kip to V-sit is a step up from the straight-arm kip to L-sit. The hips must generate more power in a shorter amount of time to ceffectively reach the V-sit position.
The kip to cross or L-cross transfers the dynamic portion of this skill into maintaining a strength hold. Initially, we can use our hip explosiveness to get high up into the skill and then lower with straight arms into the cross position. However, eventually we will get strong enough so that we can kip straight to the cross position.
The key for this skillis really just learning how to gauge the force we need to rotate ourselves to the cross position and then correctly and accurately engaging our cross muscles, assuming we have attained a cross. I would not try to learn this movement unless we have at least a five second cross hold, because the momentum moving into the skill may be rough on the shoulders.
These are both C level skill in the gymnastics code of poins.
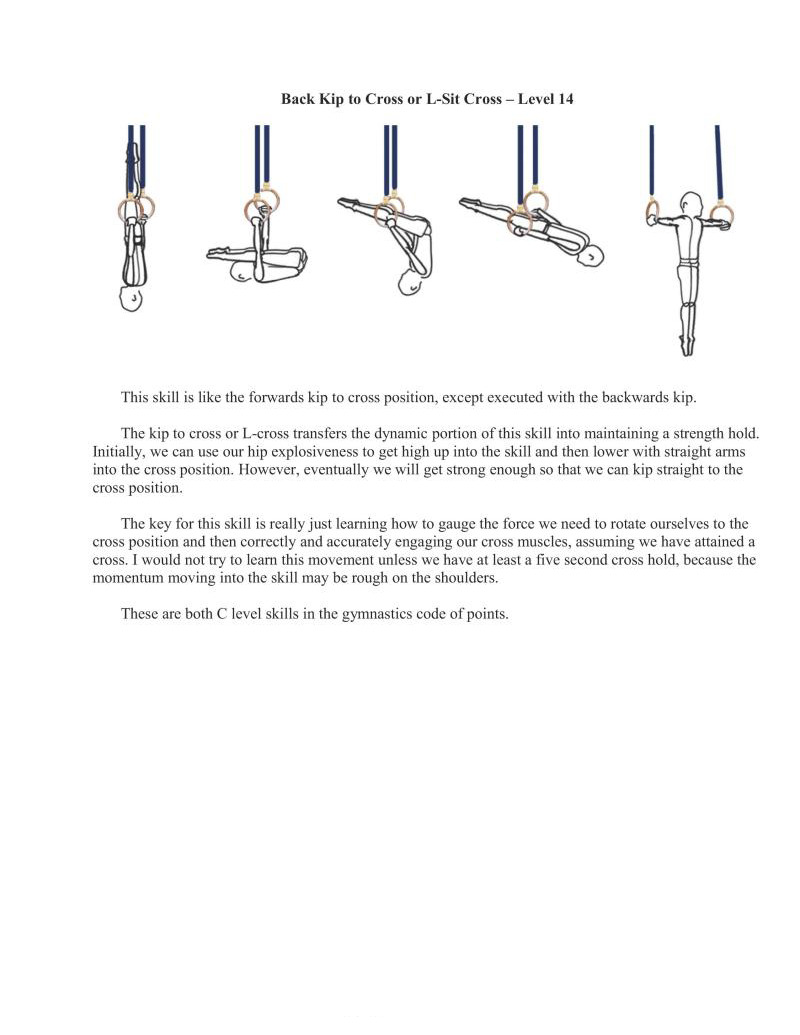
This skill is like the forwards kip to cross position, except executed with the backwards kip.
The kip to cross or L-cross transfers the dynamic portion of this skill into maintaining a strength hold. Initially, we can use our hip explosiveness to get high up into the skill and then lower with straight arms into the cross position. However, eventually we will get strong enough so that we can kip straight to the cross position.
The key for this skill is really just learning how to gauge the force we need to rotate ourselves to the cross position and then correctly and accurately engaging our cross muscles, assuming we have attained a cross. I would not try to learn this movement unless we have at least a five second cross hold, because the momentum moving into the skill may be rough on the shoulders.
These are both C level skills in the gymnastics code of points.
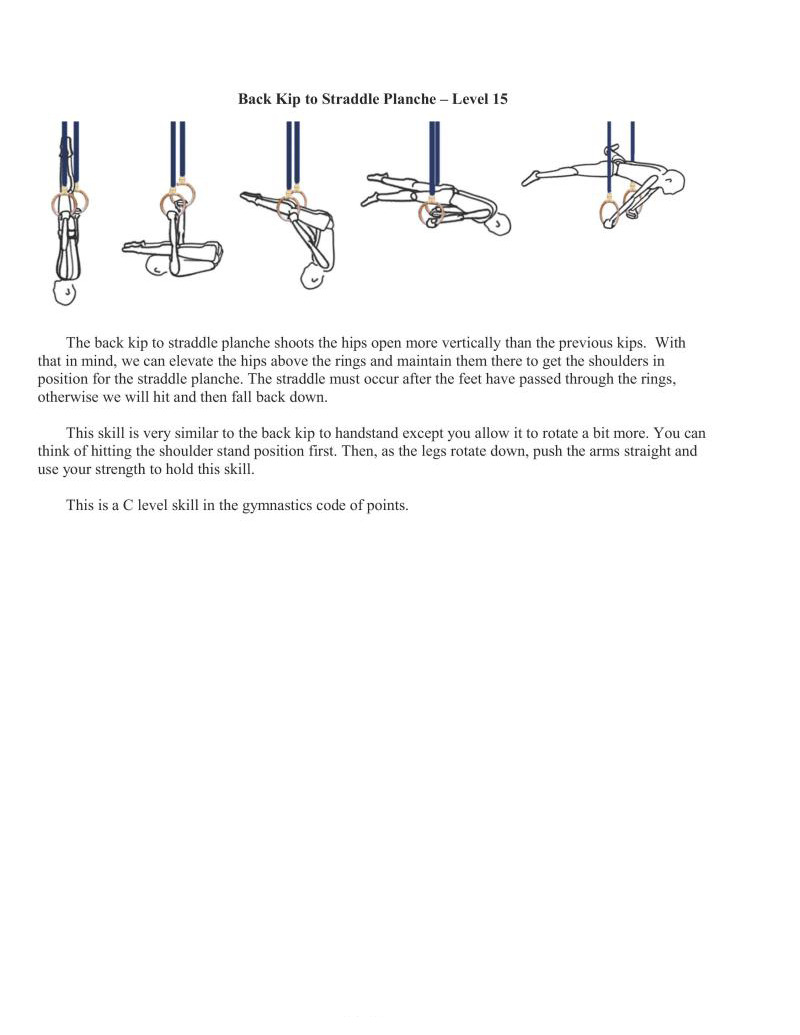
The back kip to straddle planche shoots the hips open more vertically than the previous kips. With that in mind, we can elevate the hips above the rings and maintain them there to get the shoulders in position for the straddle planche. The straddle must occur after the feet have passed through the rings, otherwise we will hit and then fall back down.
This skill is very similar to the back kip to handstand except you allow it to rotate a bit more. You can think of hitting the shoulder stand position first. Then, as the legs rotate down, push the arms straight and use your strength to hold this skill
This is a C level skill in the gymnastics code of points.
The felges are the series of forwards and backwards rolls on rings, to either support or various strength skills. When integrated into routines, they are a lot of fun to perform and show off.
There are no variations of these skills in the tuck position, because the difficulty is too easy, or they are not aesthetically pleasing. However, they can be learned this way before progressing to the pike variations of these skills. Keep this in mind if the pike or straight body variations are too hard at the start.
When you start trying to learn these skills, it is highly recommended that you lower the rings so that they hang at your standing shoulder height. Duc to the nature of these movements, the instability of the rings will often cause you to fall out of suppor. If the rings are too high you can easily injure your shoulders if your feet cannot land on the ground.
The felge progressions are typically more strength based than kipping techniques.
I did not include the tucked versions of the felge forward and felge backward to support. However, they are about 1 progression level easier than their piked counterparts.
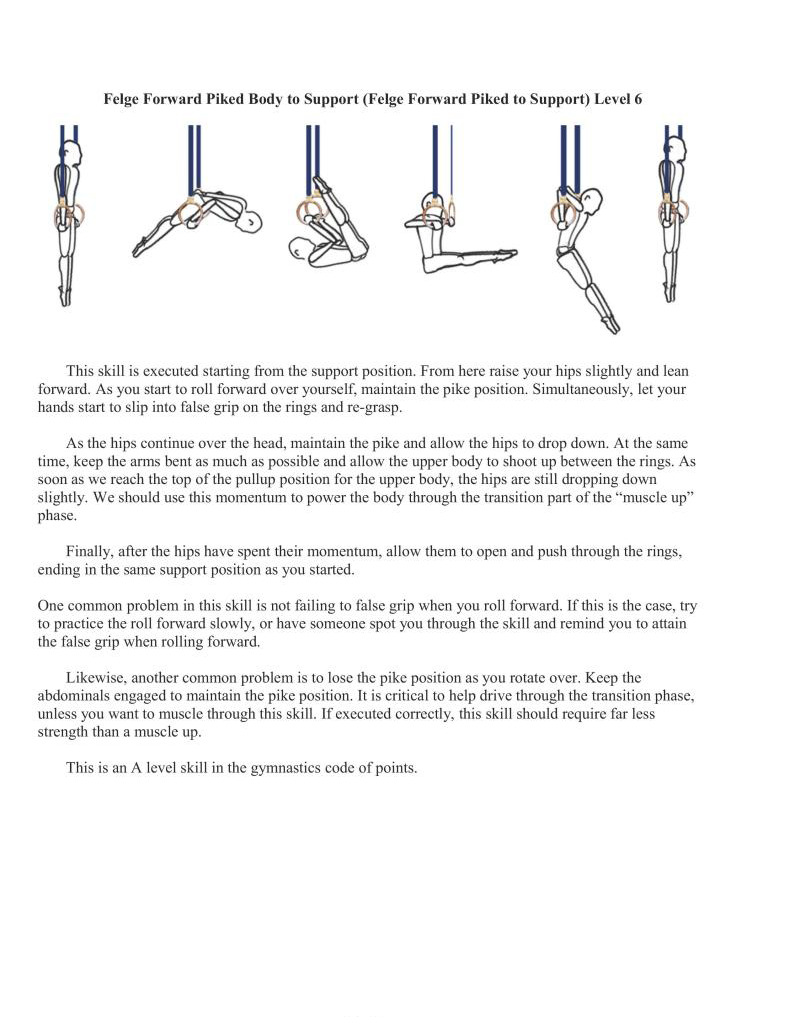
This skill is executed starting from the support position. From here raise your hips slightly and lean forward. As you start to roll forward over yourself, maintain the pike position. simultaneously. let your hands start to slip into false grip on the rings and re-grasp.
As the hips continue over the head, maintain the pike and allow the hips to drop down. At the same time, keep the arms bent as much as possible and allow the upper body to shoot up between the rings. As soon as we reach the top of the pullup position for the upper body, the hips are still dropping down slightly. We should use this momentum to power the body through the transition part of the "muscle up" phase.
Finally, after the hips have spent their momentum, allow them to open and push through the rings, ending in the same support position as you started.
One common problem in this skill is not failing to false grip when you roll forward. If ths is the case, try to practice the roll forward slowly. or have someone spot you through the skill and remind you to attain the false grip when rolling forward,
Likewise, another common problem is to lose the pike position as you rotate over. Keep the abdominals engaged to maintain the pike position. It is critical to help drive through the transition phase, unless you want to muscle through this skill. If executed correctly, this skill should require far less strength than a muscle up.
This is an A level skill in the gymnastics code of points.
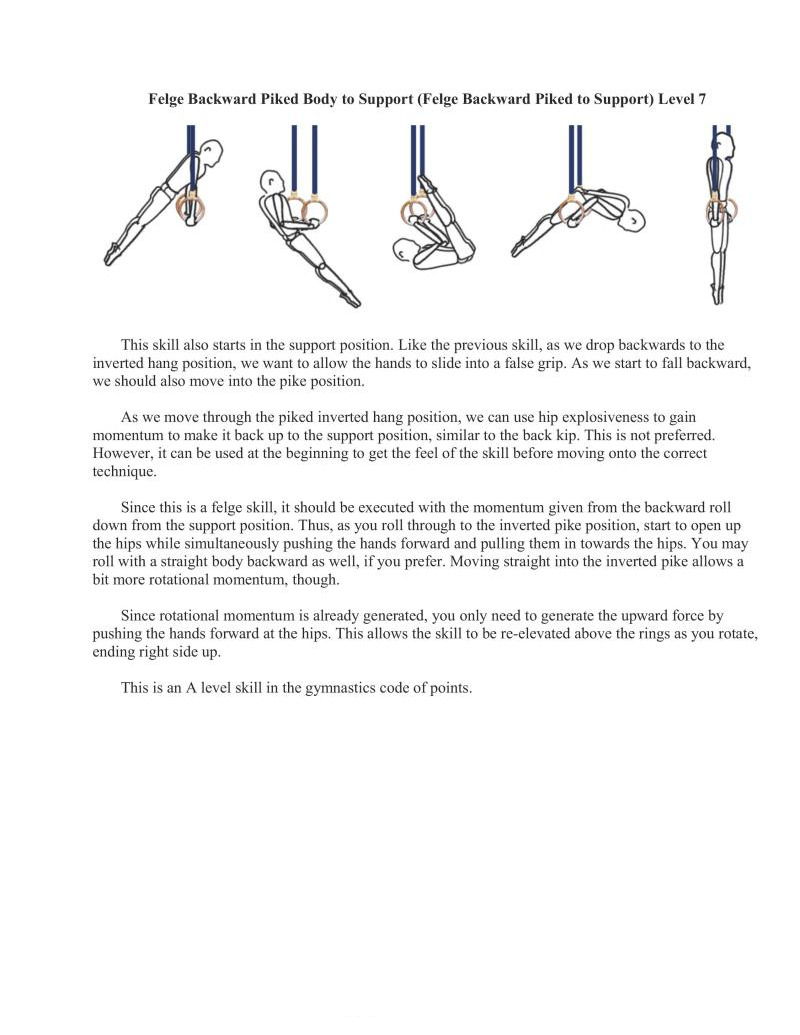
This skill also starts in the support position. Like the previous skill, as we drop backwards to the inverted hang position, we want to allow the hands to slide into a false grip. As we start to fall backward, we should also move into the pike position.
As we move through the piked inverted hang position, we can use hip explosiveness to gain momentum to make it back up to the support position, similar to the back kip. This is not preferred. However, it can be used at the beginning to gt the feel of the skill before moving onto the correct technique.
Since this is a felge skill, it should be executed with the momentum given from the backward roll down from the support position. Thus, as you roll through to the inverted pike position, start to open up
the hips while simultaneously pushing the hands forward and pulling them in towards the hips. You may roll with a straight body backward as well, if you prefer. Moving straight into the inverted pike allows a bit more rotational momentum, though.
Since rotational momentum is already generated, you only need to generate the upward force by pushing the hands forward at the hips. This allows the skill to be re-elevated above the rings as you rotate, ending right side up.
This is an A level skill in the gymnastics code of points.

We can make the felge forward to support skill much harder by doing it with a straight body. The straight body does not allow us to use counter momentum from dropping the hips to help drive through the transition. This makes the transition much more difficult, because we naturally want to pike through the skill to counterbalance the upper body through the transition.
Controlling this skill with a straight body will get much harder, mandating proficiency with the pike before attempting this skill.
For this skill we are going to roll forward with a straight body. Make sure that you start to drop the shoulders before you hit a shoulder stand position. If you roll directly out of the shoulder stand position with a straight body, then you will likely fall out of control. Slip into the false grip as your body passes through the rings.
As your feet start to descend past the rings height you will have to use your upper body strength to actually slow down the skill and control it. You will find that you will almost move through a semi-front lever position underneath the rings
As the legs drop further, you will shoot into the pullup position, and then use your strength to execute the transition phase of the muscle up. From there, just press out of the dip to complete the skill.
Ideally, this skill should be completed slowly and controlled with little to no momentum. You may aim to use momentum at first to get the hang of it, but eliminate the momentum as you get stronger.
This is a B level skill in the gymnastics code of points.
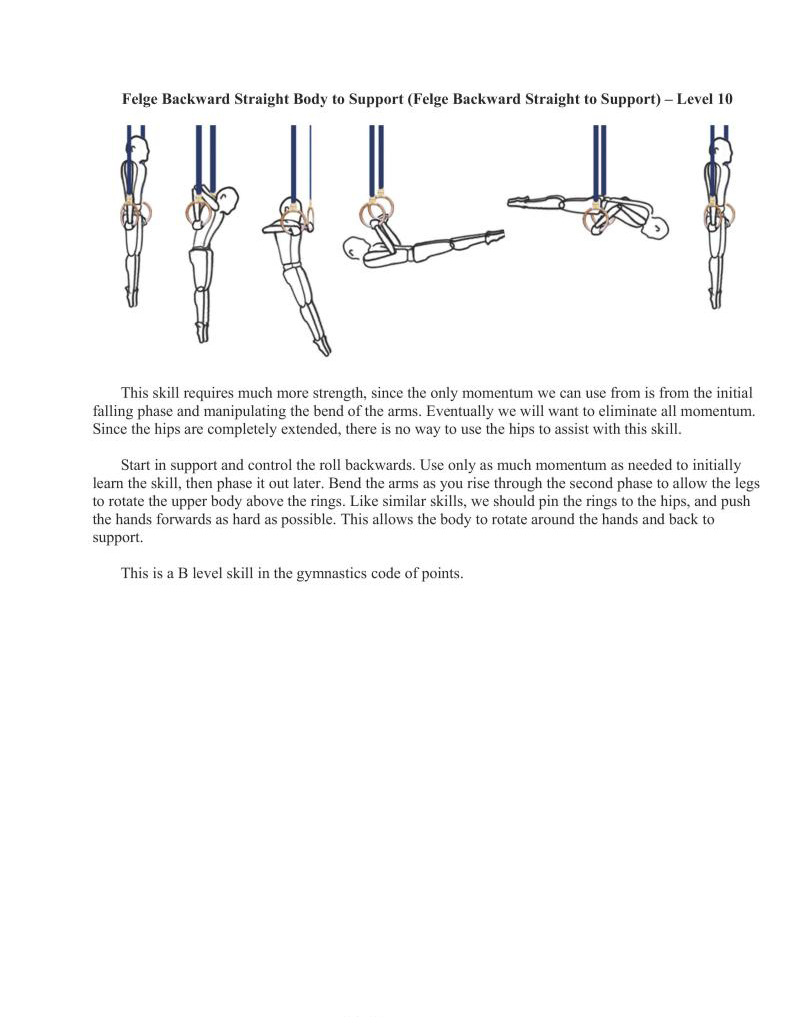
This skill requires much more strength, since the only momentum we can use from is from the initial falling phase and manipulating the bend of the arms. Eventually we will want to eliminate all momentum. Since the hips are completely extended, there is no way to use the hips to assist with this skill.
Start in support and control the roll backwards. Use only as much momentum as needed to initially learn the skill, then phase it out later. Bend the arms as you risc through the second phase to allow the legs o rotate the upper body above the rings. Like similar skills, we should pin the rings to the hips, and push the hands forwards as hard as possible. This allows the body to rotate around the hands and back to support.
This is a B level skill in the gymnastics code of points.
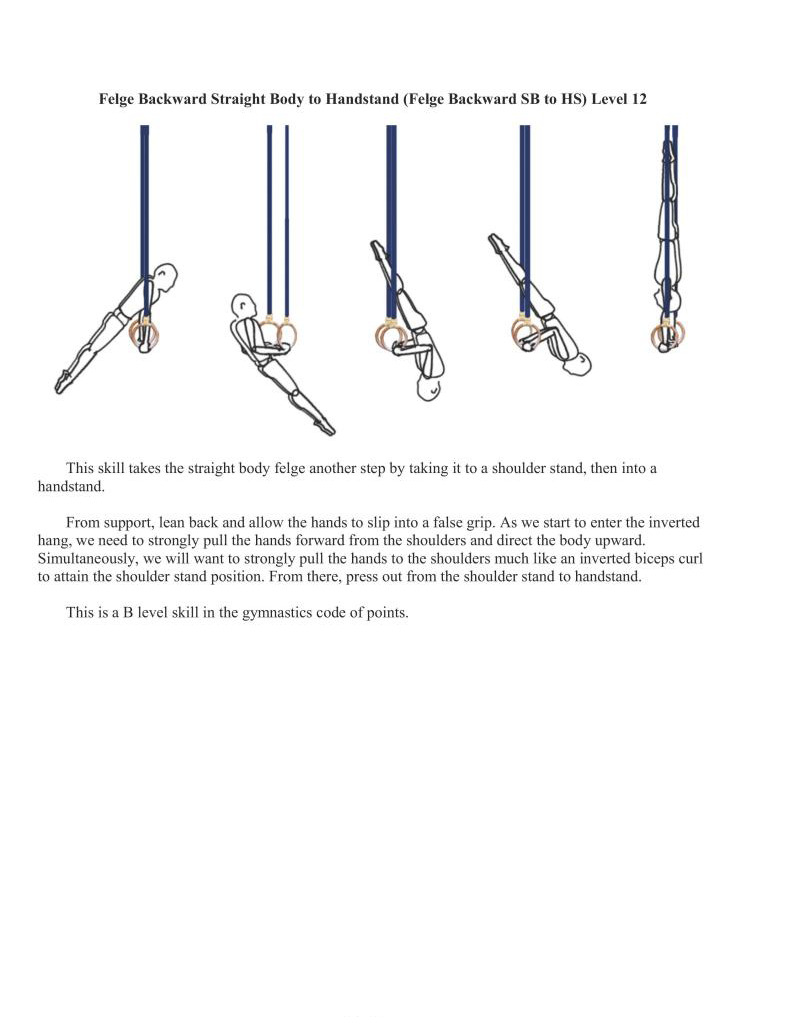
This skill takes the straight body felge another step by taking it to a shoulder stand, then into a handstand.
From support, lean back and allow the hands to slip into a false grip. As we start to enter the inverted hang, we need to strongly pull the hands forward from the shoulders and direct the body upward. Simultaneously, we will want to strongly pull the hands to the shoulders much like an inverted biceps curl o attain the shoulder stand position. From there, press out from the shoulder stand to handstand.
This is a B level skill in the gymnastics code of points.
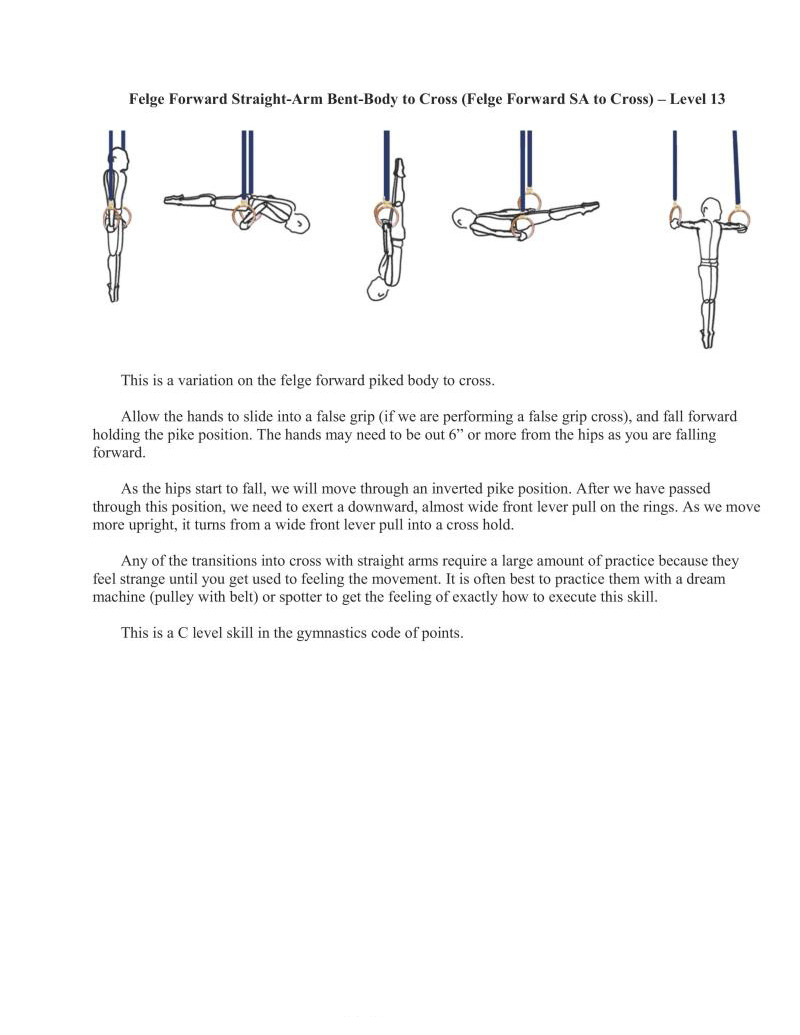
This is a variation on the felge forward piked body to cross.
Allow the hands to slide into a false grip (if we are performing a false grip cross), and fall forward holding the pike position. The hands may need to be out 6 or more from the hips as you are falling forward.
As the hips start to fall, we will move through an inverted pike position. After we have passed through this position, we need to exert a downward, almost wide front lever pull on the rings. As we move more upright, it tums from a wide front lever pull into a cross hold.
Any of the transitions into cross with straight arms require a large amount of practice because they flel strange until you get used to feeling the movement. It is often best to practice them with a dream machine (pulley with belt) or spotter to get the feeling of exactly how to execute this skill.
This is a C level skill in the gymnastics code of points.
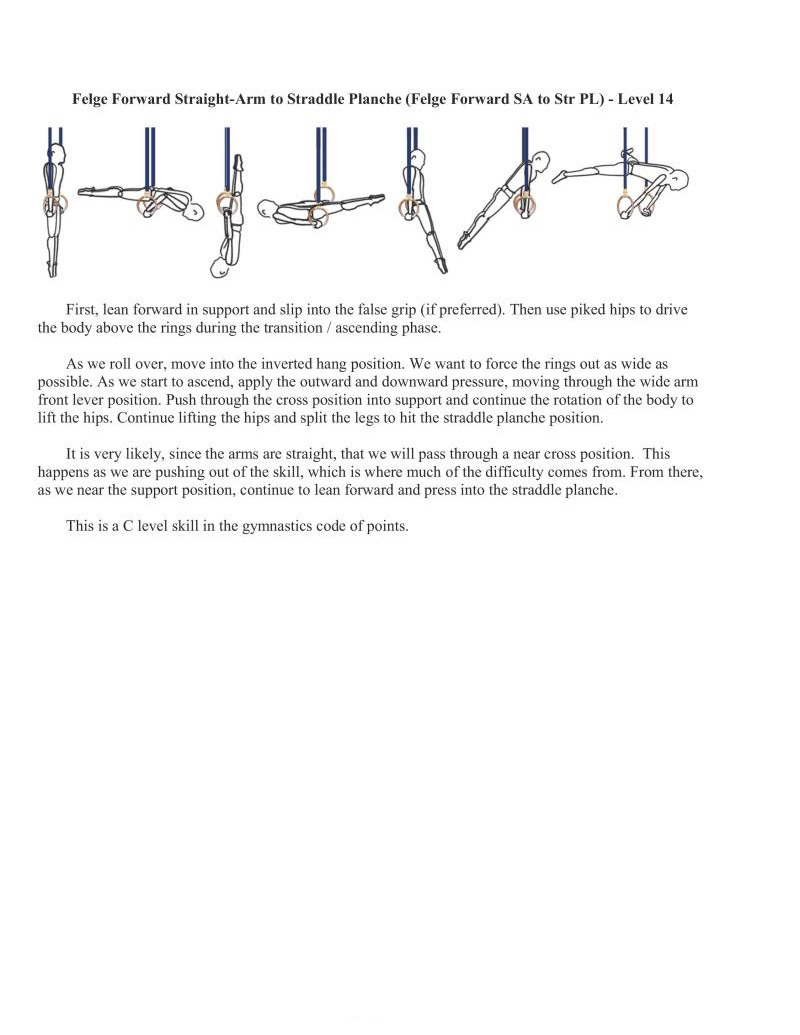
First, lean forward in support and slip into the false grip (if preferred). Then use piked hips to drive the body above the rings during the transition / ascending phase.
As we roll over, move into the inverted hang position. We want to force the rings out as wide as possible. As we start to ascend, apply the outward and downward pressure, moving through the wide arm front lever position. Push through the cross position into support and continue the rotation of the body to Tift the hips. Continue lifting the hips and split the legs to hit the straddle planche position.
It is very likely, since the arms are straight, that we will pass through a near cross position. This happens as we are pushing out of the skill, which is where much of the difficulty comes from. From there, as we near the support position, continue to lean forward and press into the straddle planche.
This is a C level skill in the gymnastics code of points.
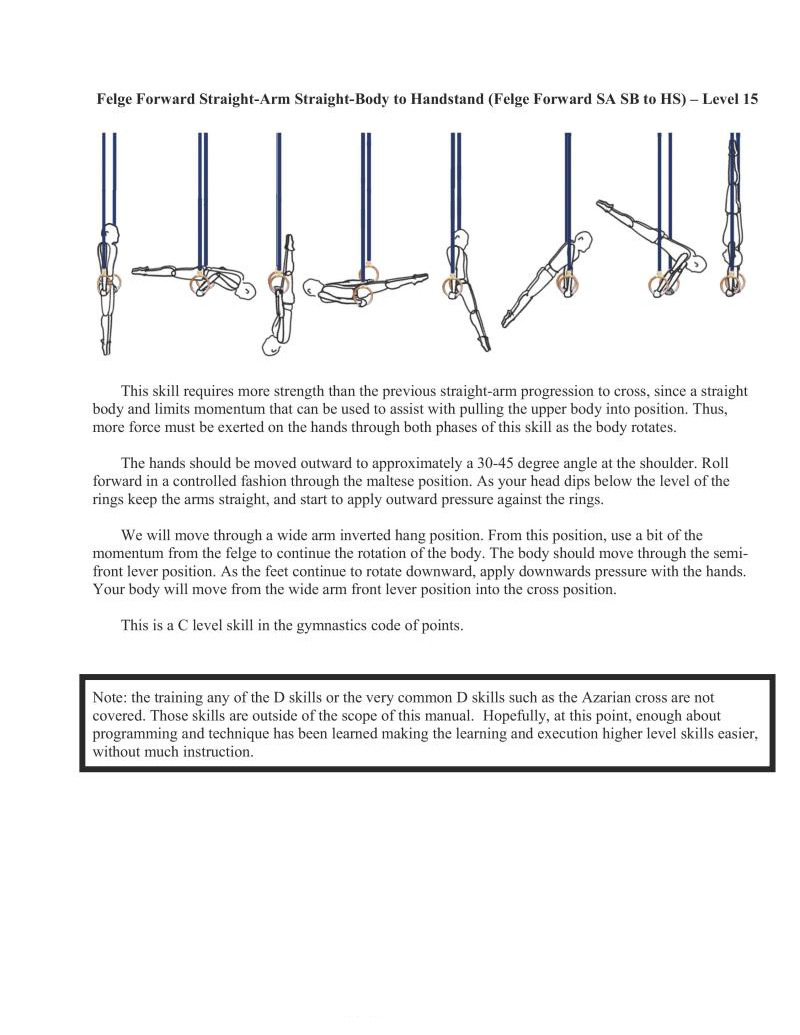
This skill requires more strength than the previous straight-arm progression to cross, since a straight body and limits momentum that can be used to assist with pulling the upper body into position. Thus, more force must be exerted on the hands through both phases of this skill as the body rotates.
The hands should be moved outward to approximately a 30-43 degree angle at the shoulder. Roll forward in a controlled fashion through the maltese position. As your head dips below the level of the rings keep the arms straight, and start to apply outward pressure against the rings.
We will move through a wide amm inverted hang position. From this position, use a bit of the momentum from the felge to continue the rotation of the body. The body should move through the sem front lever position. As the feet continue to rotate downward, apply downwards pressure with the hands Your body will move from the wide arm front lever position into the cross position.
This is a C level skill in the gymnastics code of points.
Note: the training any of the D skills or the very common D skills such as the Azarian cross are not covered. Those skills are outside of the scope of this manual. Hopefully, at this point, enough about programming and technique has been learned making the learning and execution higher level skills easier, without much instruction.
You may noticed that I did not cover all types of bodyweight exercises that can be used. I wanted to make sure to include most of the important exercises to strength development. As this book is already over 500 pages, I am unable to include them all even if there are some that are useful. There may even be creative exercises that are effective that I am not even aware of at the moment.
For example, I did not include any variations of regular rope climbs, banging leg raises, rings flys, ete. This is not because they are not important. I feel that other variations of exercises are as effective or more effective than these exercises in certain goal scenarios.
This is not to say they are not that useful though. While I typically recommend active compression work, L-sit/V-sit/manna progressions, and the other core work that comes from many of the levers over hanging leg raises, the hanging leg raises and their progressions can be effective for building good core strength as well. If you prefer this progression of exercises there is nothing wrong with continuing to perform them,
The same is true with an exercise like rings flys. They are useful for specifically helping with elbow conditioning and assisting with pectoral hypertrophy. If these relate to your goals or you think are a better exercise fit than other exercises on the chart then you should use them for sure.
Therefore, if you are interested in helping to enhance the charts by adding exercise progressions to various levels feel free. It is always good to improve a useful resource to make a better one. If you believe you have some useful ideas, make sure to help spread the word on the Internet or in your community. Bring them to my attention. New ideas are always welcome.
These extra charts at the end of the book are for you to rip out or mark with a pencil or pen if you do not have access to a photo copier. There are two extra copies of each.
Also in this index is the modified Prilepin's charts for regular concentrics, isometrics, and eccentrics. Use them to help program your specific repetitions and sets for exercises.
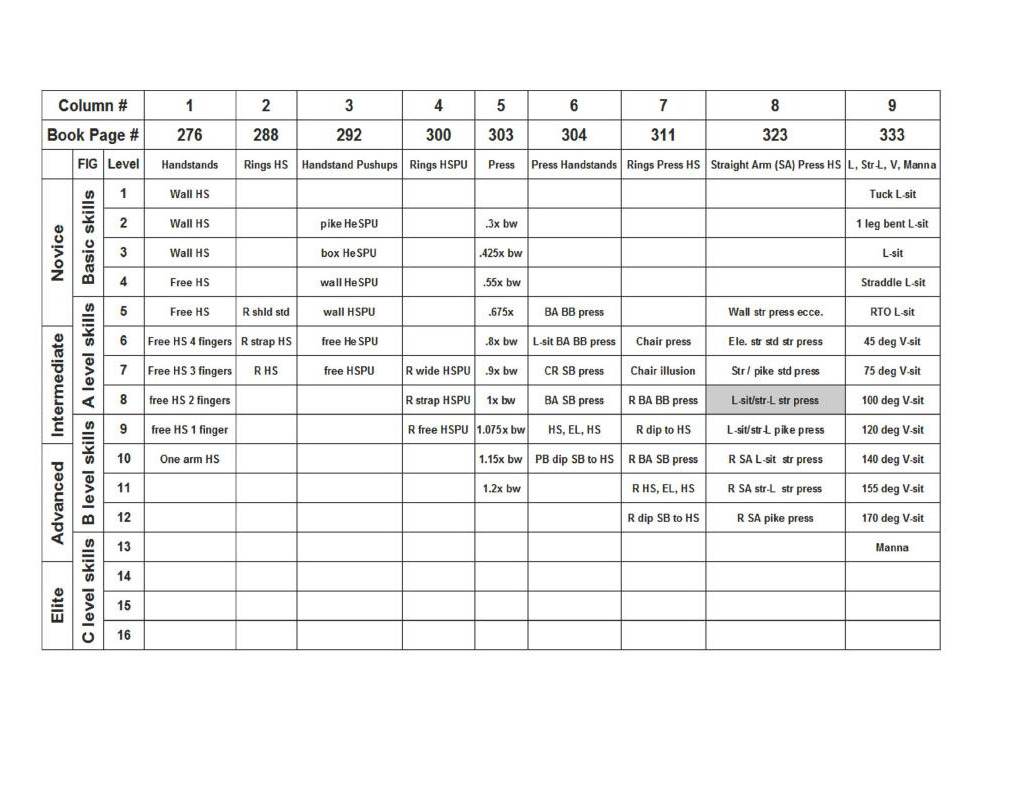
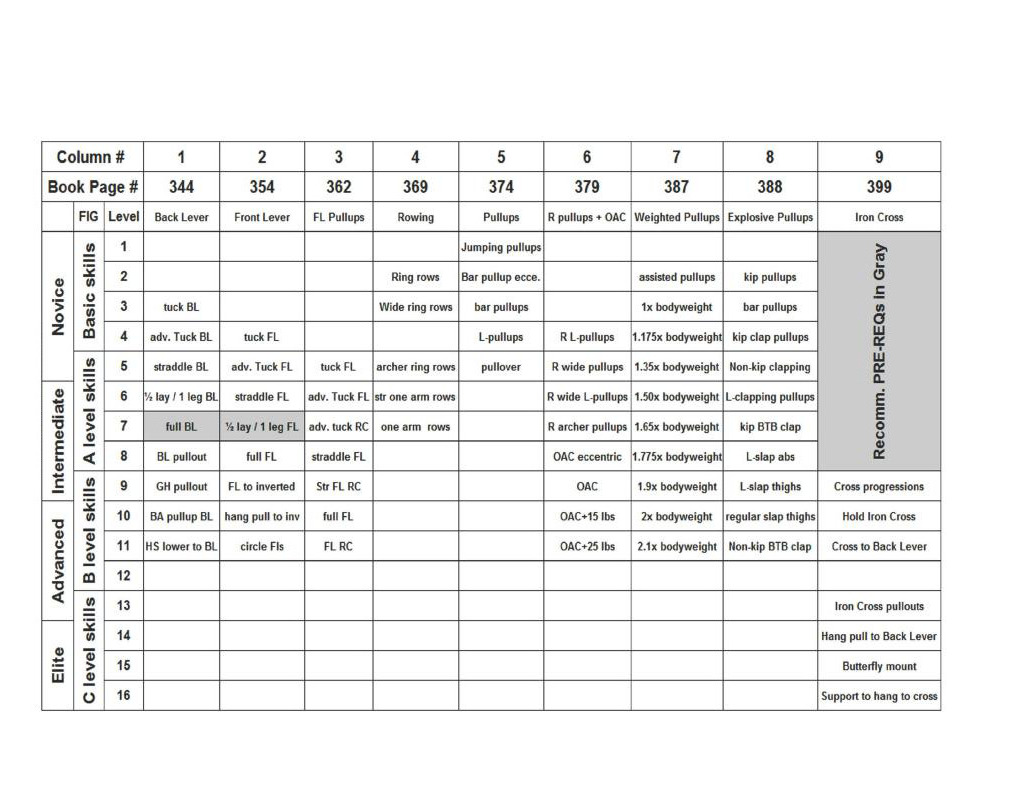
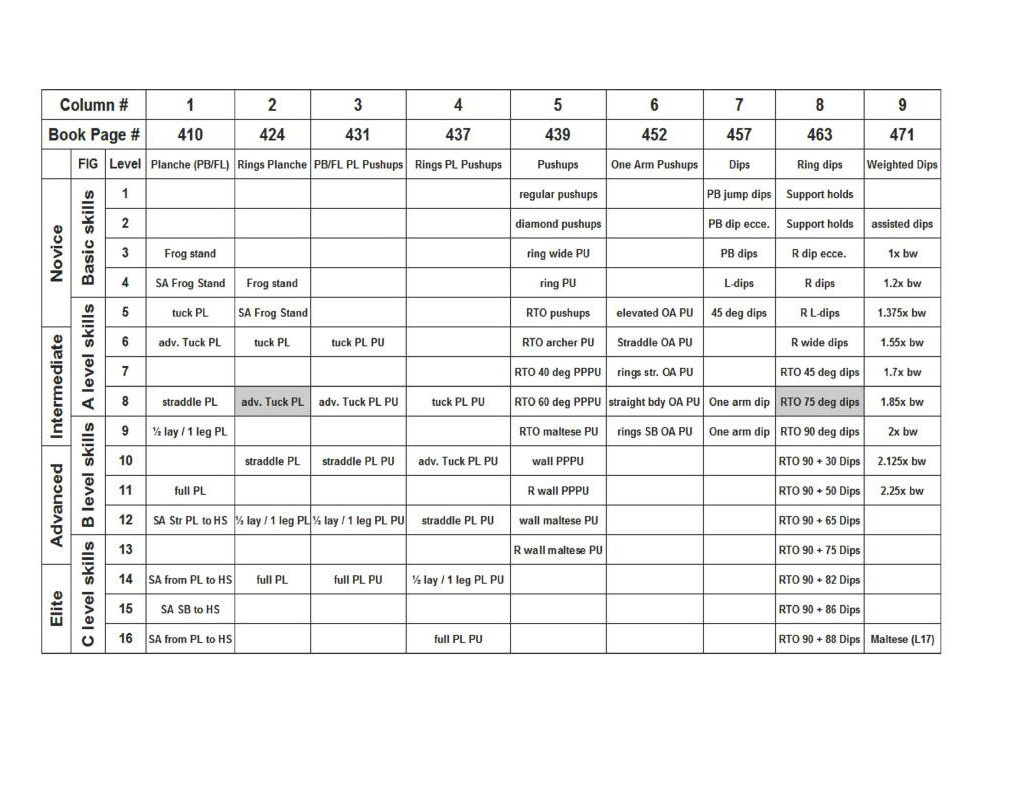
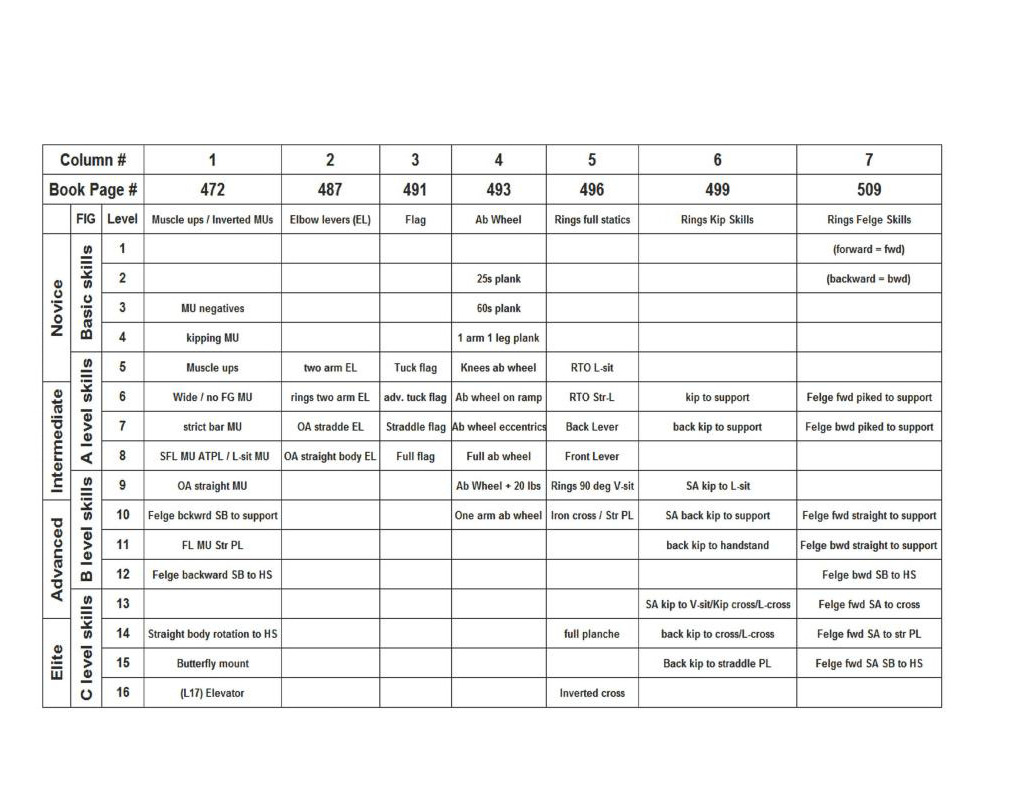


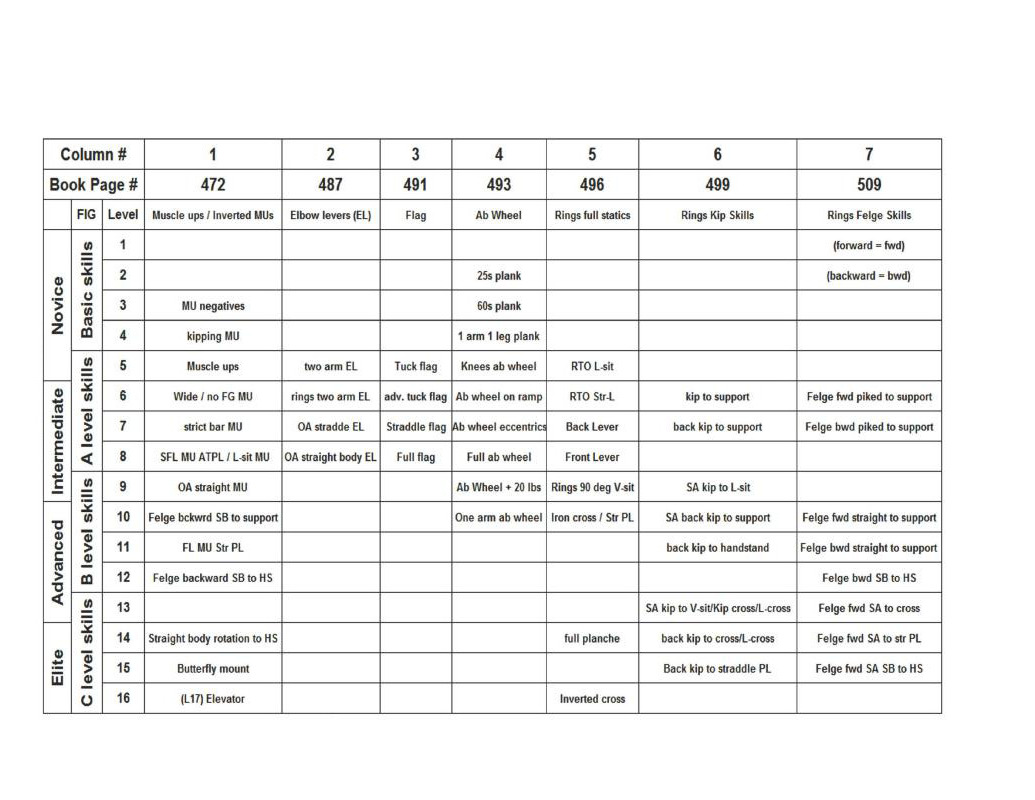
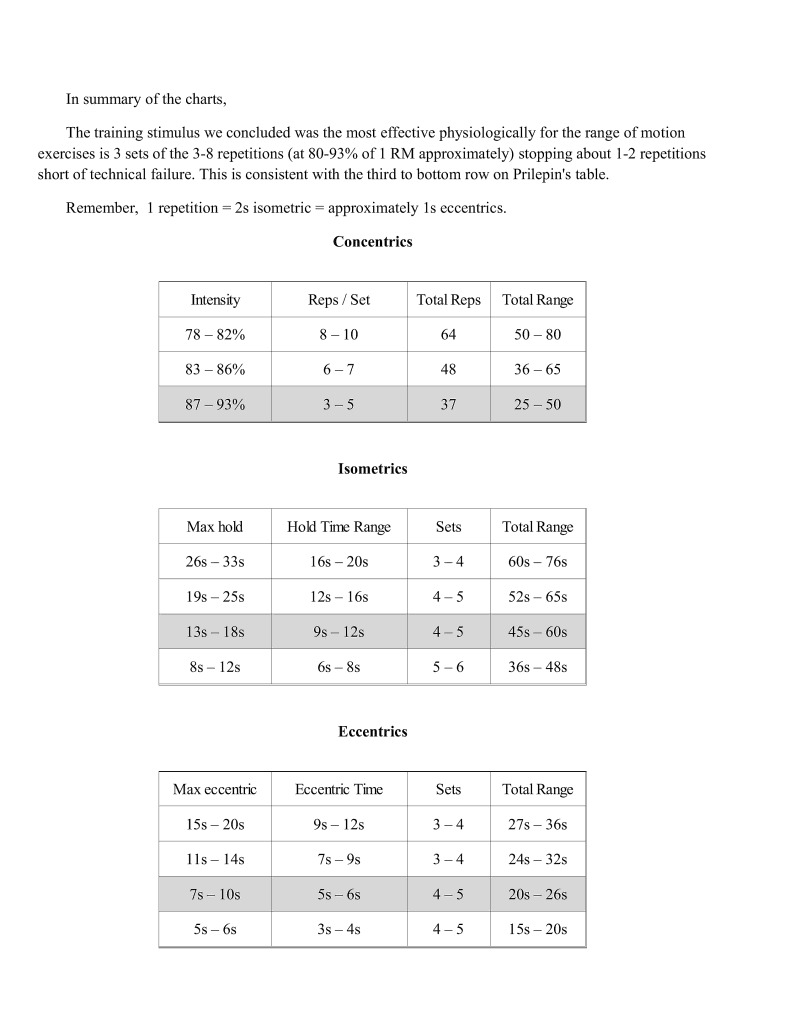
The training stimulus we concluded was the most effective physiologically for the range of motion exercises is 3 sets of the 3-8 repetitions (at 80-93% of 1 RM approximately) stopping about 1-2 repetitions short of technical failure. This is consistent with the third to bottom row on Prilepin's table.
Remember, 1 repetition = 2s isometric = approximately 1s eccentrics.
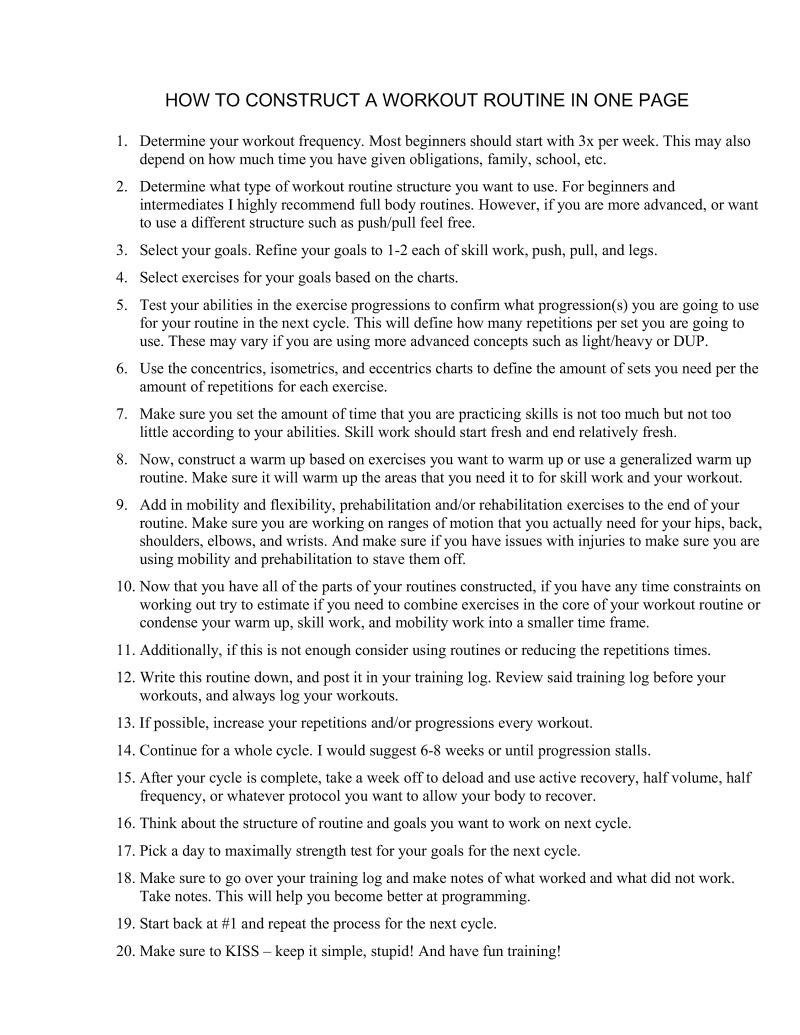
Determine your workout frequency. Most beginners should start with 3x per week. This may also depend on how much time you have given obligations, family, school, etc.
Determine what type of workout routine structure you want to use. For beginners and intermediates I highly recommend full body routines. However, if you are more advanced, or want to use a different structure such as push/pull feel free.
Select your goals. Refine your goals to 1-2 each of skill work, push, pull, and legs.
Select exercises for your goals based on the charts.
Test your abilities in the exercise progressions to confirm what progression(s) you are going to use for your routine in the next cycle. This will define how many repetitions per set you are going to use. These may vary if you are using more advanced concepts such as light/heavy or DUP.
Use the concentrics, isometrics, and eccentrics charts to define the amount of sets you need per the amount of repetitions for each exercise.
Make sure you set the amount of time that you are practicing skills is not too much but not too little according to your abilities. Skill work should start fresh and end relatively fresh.
Now, construct a warm up based on exercises you want to warm up or use a generalized warm up routine. Make sure it will warm up the areas that you need it to for skill work and your workout.
Add in mobility and flexibility, prehabilitation and/or rehabilitation exercises to the end of your routine. Make sure you are working on ranges of motion that you actually need for your hips, back, shoulders, elbows, and wrists. And make sure if you have issues with injuries to make sure you are using mobility and prehabilitation to stave them off.
Now that you have all of the parts of your routines constructed, if you have any time constraints on working out try to estimate if you need to combine exercises in the core of your workout routine or condense your warm up, skill work, and mobility work into a smaller time frame.
Additionally, if this is not enough consider using routines or reducing the repetions times.
Write this routine down, and post it in your training log. Review said training log before your workouts, and always log your workouts.
If possible, increase your repetitions and/or progressions every workout.
Continue for a whole cycle. I would suggest 6-8 weeks or until progression stals.
After your cycle is complete, take a week off to deload and use active recovery, half volume, half frequency, or whatever protocol you want to allow your body to recover.
Think about the structure of routine and goals you want to work on next cycle.
Pick a day to maximally strength test for your goals for the next cycle.
Make sure to go over your training log and make notes of what worked and what did not work.
Take notes. This will help you become better at programming.
Start back at #1 and repeat the process for the next cycle.
Make sure to KISS — keep it simple, stupid! And have fun training!

Steven is a former competitive gymnast who, in recent years, has been heavily involved in the gymnastics performance troupe, Gymkana. He has coached Gymkana Summer Camp for 4 years, and has served as an assistant coach of the Gymkana Troupe for 3 years. With his degree from the University of Maryland College Park in Biochemistry, Steven has spent thousands of hours independently researching the scientific foundations of health, fitness and nutrition. Currently Steven is pursuing a doctorate of Physical Therapy from the University of Maryland Baltimore which provides him with insights into practical care for common injuries. His training is varied and intense with a focus on gymnastics, parkour, and sprinting. He currently resides in his home state of Maryland.
Overcoming Gravity takes the reader on a journey trough logically and systematically constructing a strength oriented bodyweight workout routine. Additionally, the book delves into how to adequately prepare the body for the rigors of bodyweight training and specifies avenues to pursue concerning health and injury management. Finally, it provides information about the proper execution of the exercises and techniques along with sample programming to assist with designing well-bal- anced routines.
Lack of activity destroys the good condition of every human being, while movement and methodical physical exercise save it and preserve it. Plato (427-347 BC)